
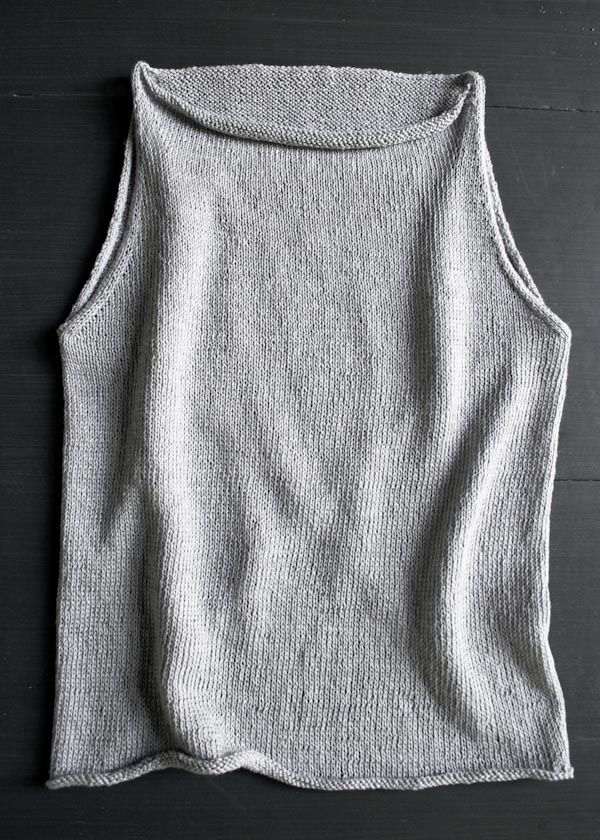
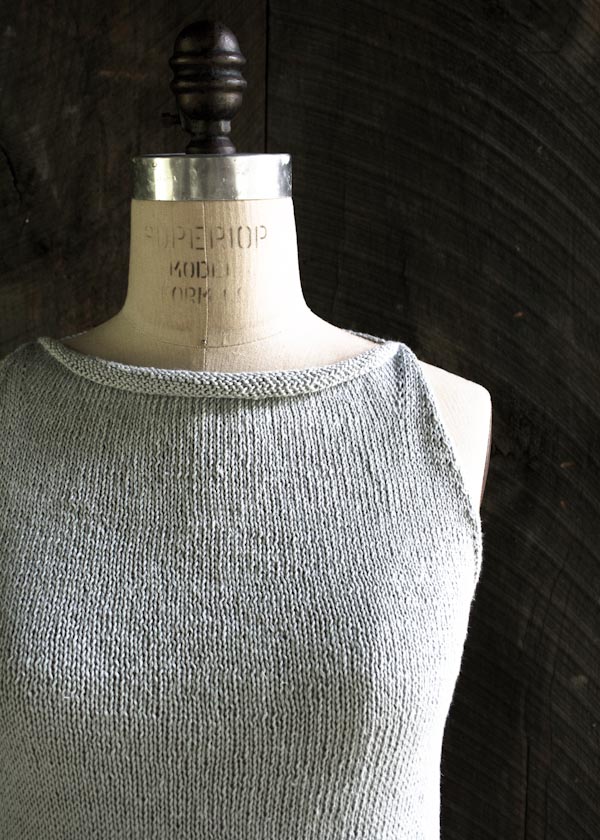
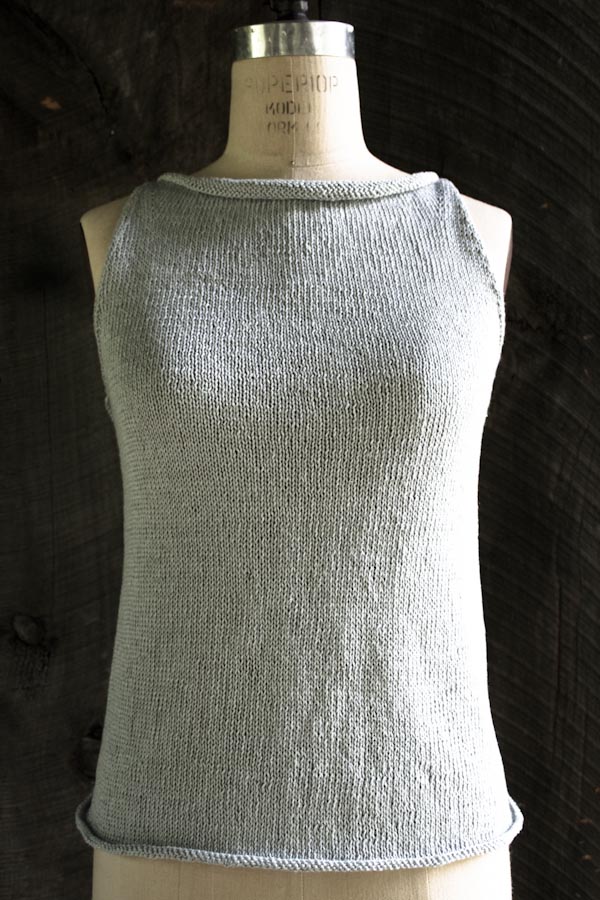
Tulip Tank Top
At first bud a tulip’s elongated petals are packed tightly, protectively hugging its center, but it doesn’t take long for the stance of the petals to soften. Those lovely ovals separate slightly and open finally, giving a glimpse of what’s inside. Even as the petals flounce, they remain in an embrace, now catching the sunlight, as well as the attention of admirers.

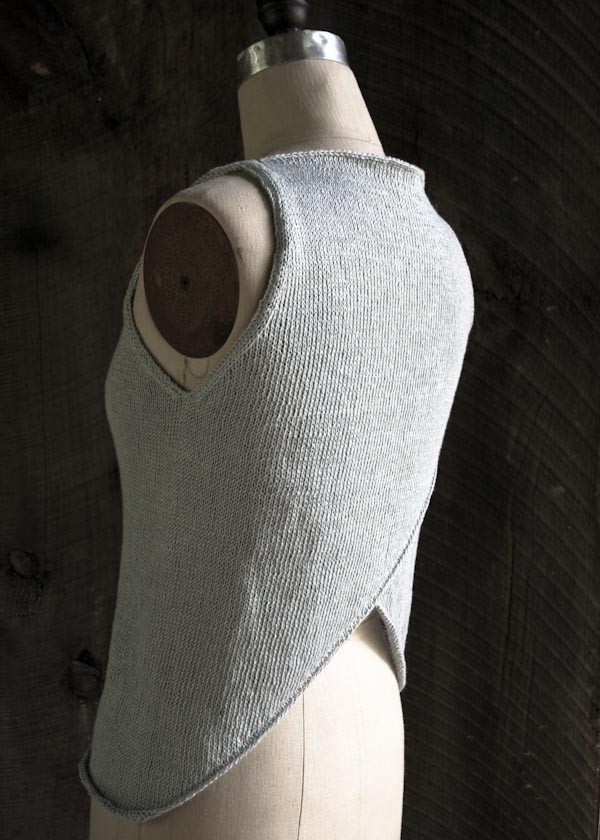
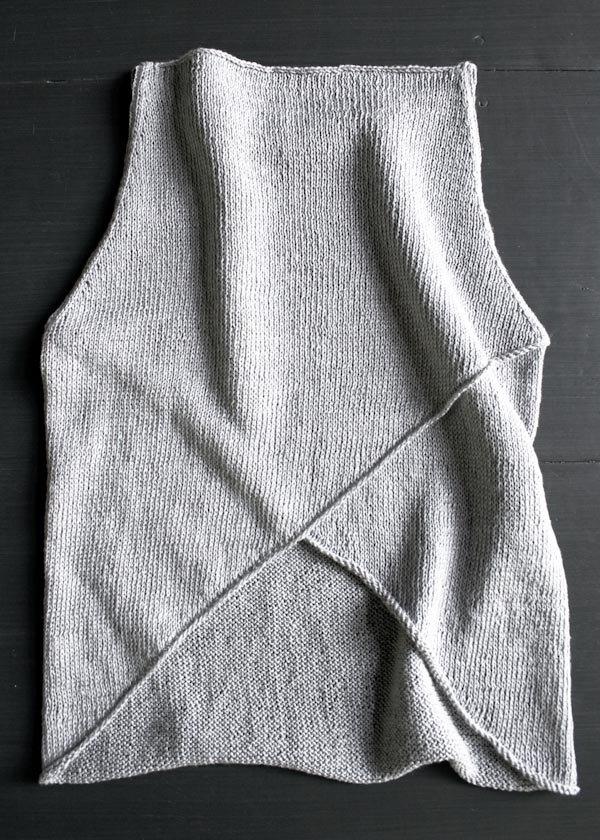
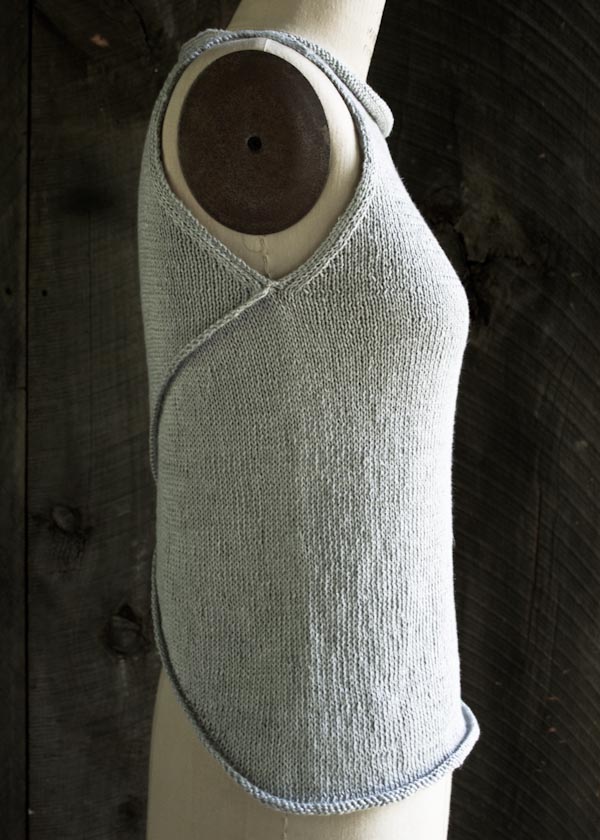
Wanting to experience the beauty and femininity of a tulip’s structure, I designed this Tulip Tank Top to wrap and overlap, to gently hug my center… maybe even to attract some admirers!
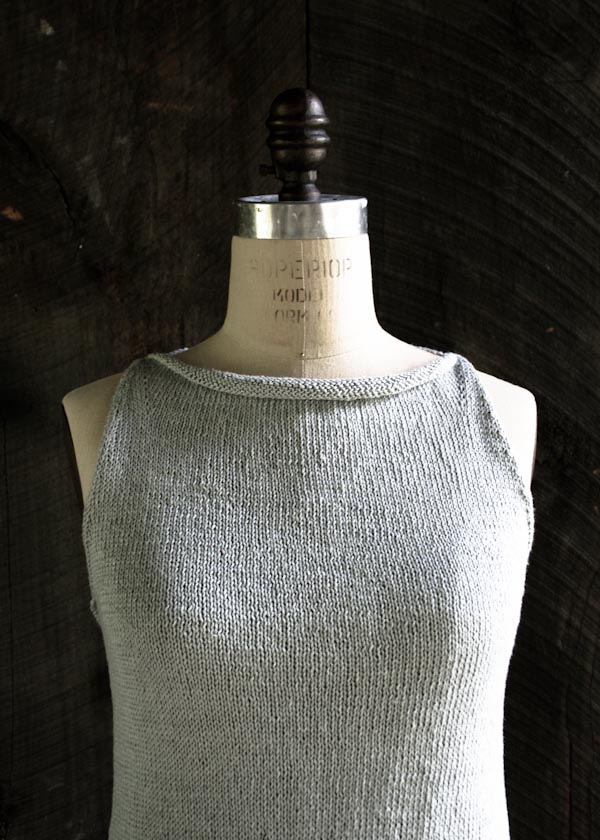
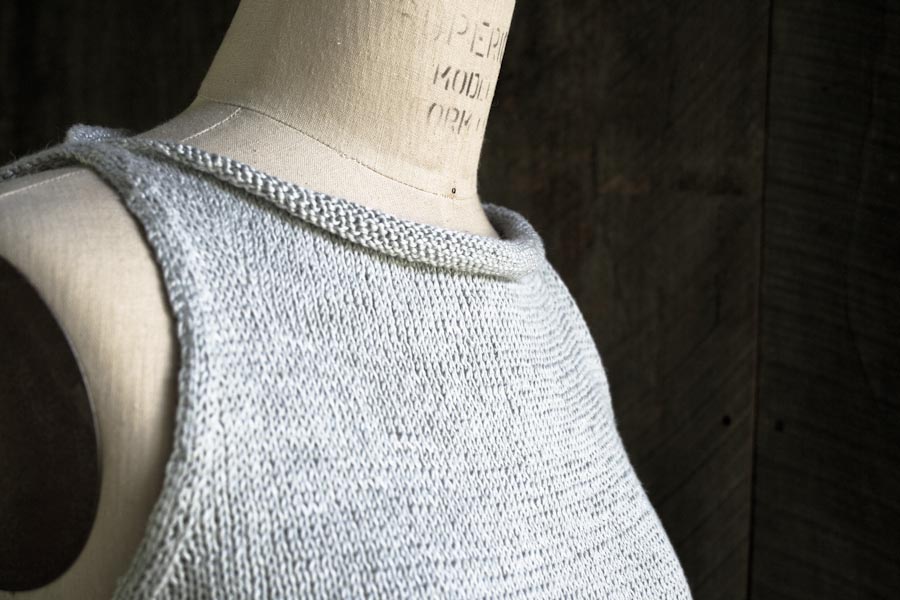
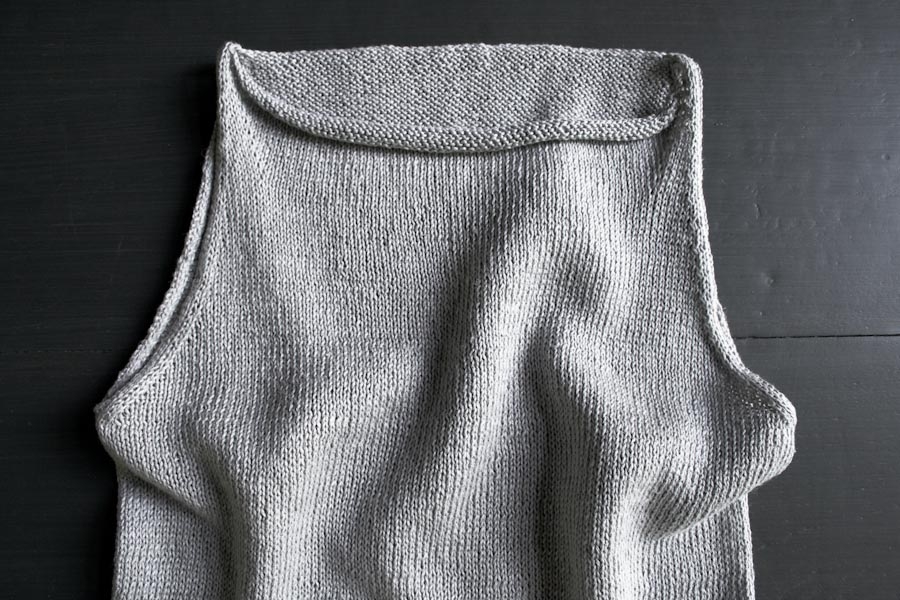
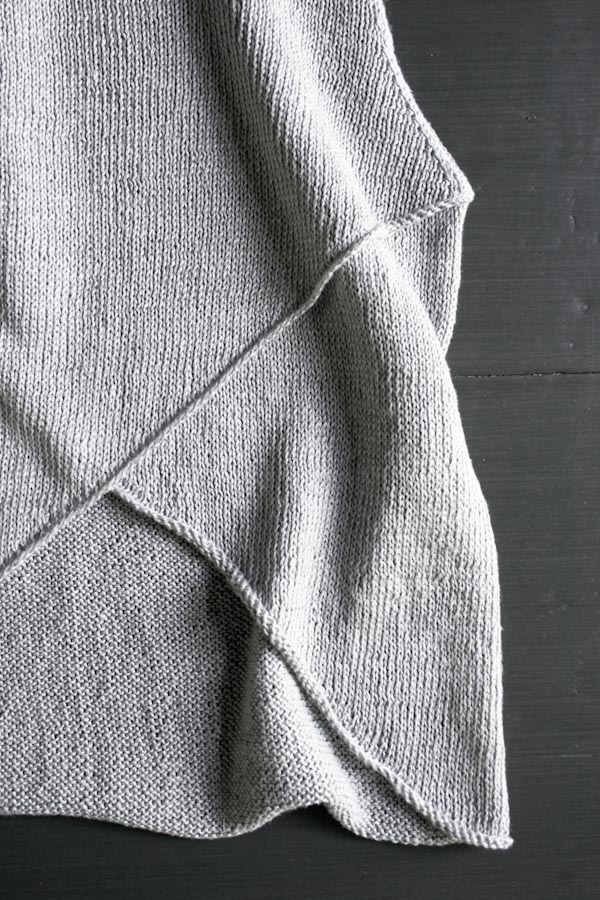
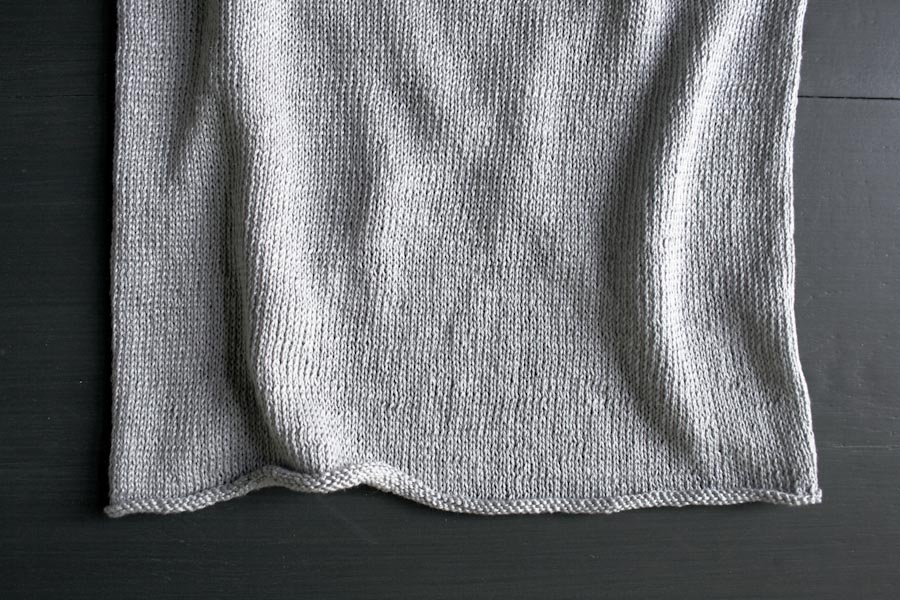
I took advantage of the beauty and drape of Louet’s 100% linen Euroflax, knowing it would fall gracefully and catch the light with movement. I knit this piece primarily in stockinette stitch for a smooth finish and a pretty, little curl along the short-row-shaped edges. And over time, you can expect the linen to soften and relax, becoming better with each wear.
I may not be frolicking amidst the actual tulips this year, but my new Tulip Tank has me feeling as fancy-free as if I were! -Laura
Designed by Purl Soho designer, Laura Ferguson.
Share your progress and connect with the community by tagging your pics with #PurlSoho, #PurlSohoBusyHands, and #PurlSohoTulipTankTop. We can’t wait to see what you make!
Materials
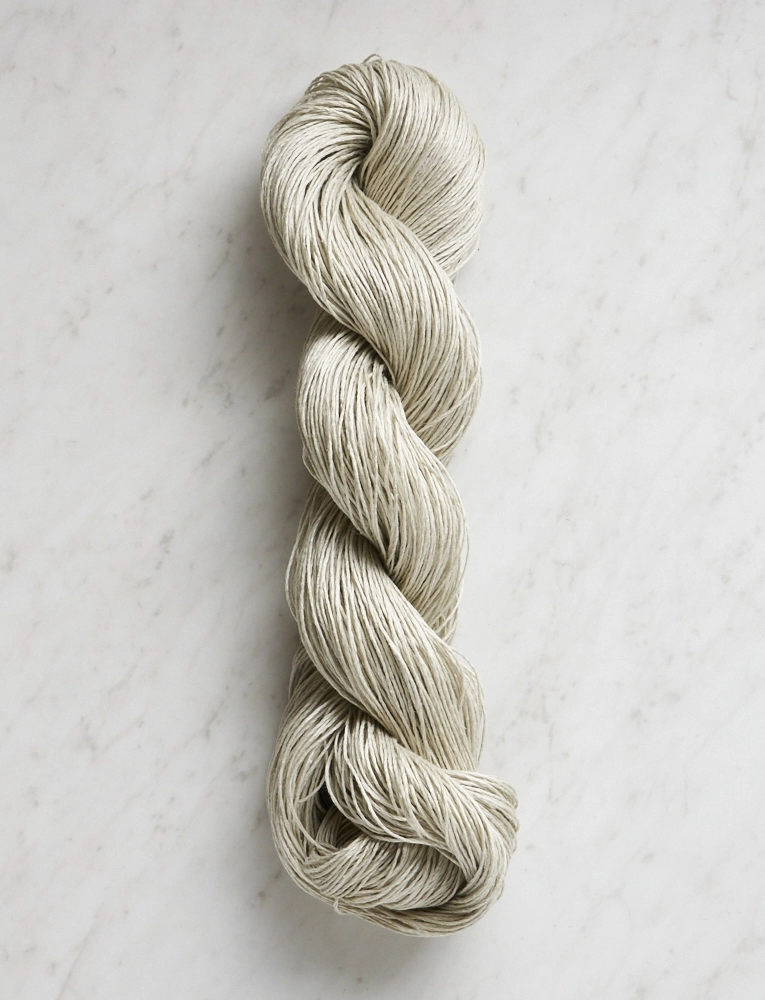
- 3 (3, 3, 4, 4) (4, 4, 5, 5) skeins of Purl Soho’s Field Linen, 100% linen. Each skein is 295 yards/ 100 grams; approximately 665 (740, 820, 925, 1015) (1095, 1180, 1305, 1395) yards required. We like the color Silver Thistle.
OR
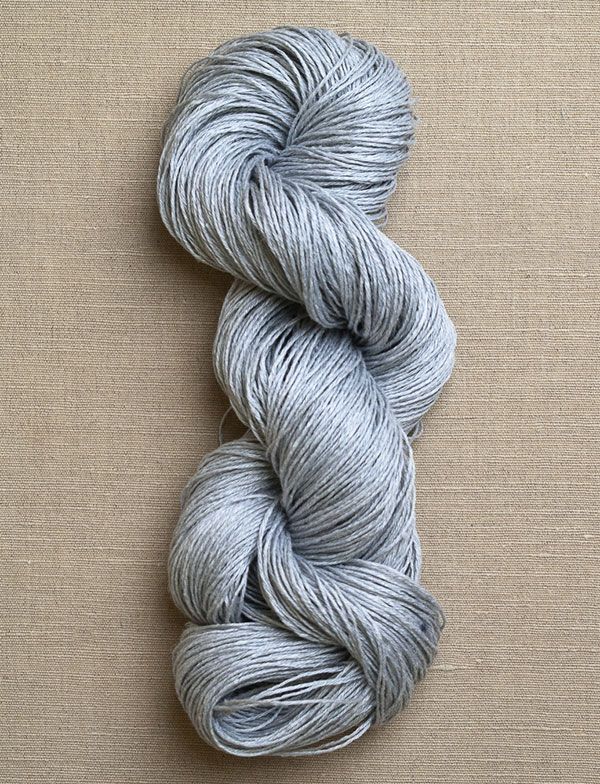
- 3 (3, 4, 4, 5) (5, 5, 6, 6) skeins of Louet’s Euroflax, 100% linen. Each skein is 270 yards/ 100 grams; approximately 730 (810, 905, 1020, 1120) (1205, 1315, 1440, 1540) yards required. This is the color Cloud Grey. (Please note, we no longer carry Louet’s Euroflax.)
You will also need…
- US 5 (3.75 mm), 32-inch or longer circular needles
- US 3 (3.25 mm), 32-inch or longer circular needles
- US 3, 16- or 24-inch circular needles
- 2 stitch markers
Gauge
24 stitches and 28 rows = 4 inches in stockinette stitch on smaller needles
Sizes
NOTE For help picking a size, please check out our Understanding Ease + Selecting Size Tutorial!
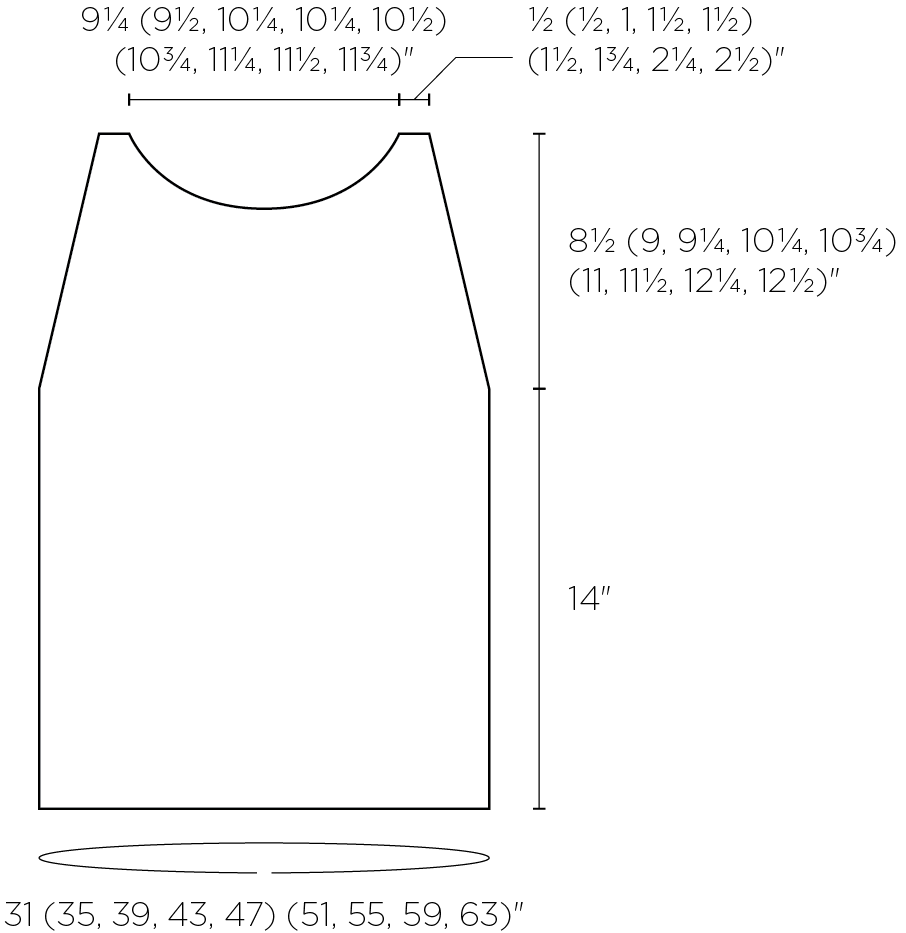
31 (35, 39, 43, 47) (51, 55, 59, 63)
To fit chest circumference of 26-29 (30-33, 34-37, 38-41, 42-45) (46-49, 50-53, 54-57, 58-61) inches with 2 to 5 inches of positive ease
- Finished Chest Circumference: 31 (35, 39, 43, 47) (51, 55, 59, 63) inches
- Length from Shoulder to Bottom Edge: 22½ (23, 23¼, 24¼, 24¾) (25, 25½, 26¼, 26½) inches
- Length from Underarm to Bottom Edge: 14 inches
NOTES
SPECIAL INSTRUCTIONS
SHORT ROW SHAPING: WRP-T (wrap and turn)
NOTE: For more information about this technique, please visit our Short Rows tutorial.
On the right side: Keeping yarn in back, slip next stitch purlwise from left needle to right needle. Bring yarn to front. Return slipped stitch to left needle. Bring yarn to back. Turn work so wrong side is facing you.
On the wrong side: Keeping yarn in front, slip next stitch purlwise from left needle to right needle. Bring yarn to back. Return slipped stitch to left needle. Bring yarn to front. Turn work so right side is facing you.
SSSK (SLIP, SLIP, SLIP, KNIT)
Slip three stitches knitwise, one at a time. Insert left needle into front of slipped stitches and knit together. [2 stitches decreased]
PATTERN
BEGIN AT HEM
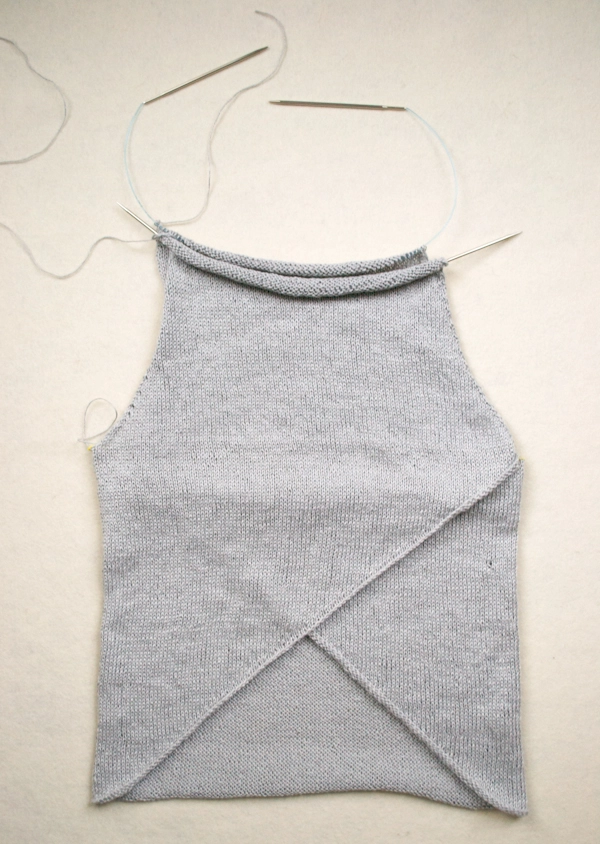
Using a Long Tail Cast On and larger circular needles, cast on 98 stitches, place marker (pm), cast on 83 (119, 155, 191, 227) (263, 299, 335, 371) stitches, pm, cast on 98 stitches. [279 (315, 351, 387, 423) (459, 495, 531, 567) total stitches]
Row 1 (wrong side): Purl to end of row.
Row 2 (right side): Knit to end of row.
START SHORT ROW SHAPING
NOTES: In this section, you will be working back and forth in short rows, turning the work partway through each row. The markers indicate where the short row shaping begins. With each consecutive row you will work one stitch past the previously wrapped stitch, away from the markers and closer to the end of the row. For extra help, see Special Instructions.
Change to smaller 32-inch circular needles.
Row 1 (wrong side): Purl to second marker, slip marker (sm), wrp-t (see Special Instructions).
Row 2 (right side): Knit to second marker, sm, wrp-t.
Row 3: Purl to wrapped stitch, slipping markers as you come to them, purl wrapped stitch with its wrap, p1, wrp-t.
Row 4: Knit to wrapped stitch, slipping markers as you come to them, knit wrapped stitch with its wrap, k1, wrp-t.
Repeat Rows 3 and 4 forty-eight more times (at which point just one stitch remains after the wrp-t on each side).
Next Row (wrong side): Removing markers as you come to them, purl to wrapped stitch, purl wrapped stitch with its wrap, p1 to end of row.
DIVIDE FRONT + BACKS
Division Row (right side): K93 (105, 117, 129, 141) (153, 165, 177, 189), place these stitches onto stitch holders or scrap yarn for Back Left; k93 (105, 117, 129, 141) (153, 165, 177, 189), place these stitches onto stitch holders or scrap yarn for Front; knit to wrapped stitch, knit wrapped stitch with its wrap, k1 to end of row. [93 (105, 117, 129, 141) (153, 165, 177, 189) stitches remain for Back Right]
Backs
Shape Back Right
SIZES 51, 55, 59, AND 63 ONLY
Row 1 (wrong side): Purl to end of row.
Row 2: K2, slip slip slip knit (sssk, see Special Instructions), knit to last 5 stitches, knit 3 together (k3tog), k2. [4 stitches decreased]
Repeat Rows 1 and 2 – (–, –, –, –) (3, 4, 5, 7) more times. [– (–, –, –, –) (137, 145, 153, 157) stitches remain]
ALL SIZES
Row 1 (wrong side): Purl to end of row.
Row 2: K2, slip slip knit (ssk), knit to last 4 stitches, knit 2 together (k2tog), k2. [2 stitches decreased]
Repeat Rows 1 and 2 two (10, 11, 14, 22) (19, 20, 21, 20) more times. [87 (83, 93, 99, 95) (97, 103, 109, 115) stitches remain]
CONTINUE SHAPING BACK RIGHT
Row 1 (wrong side): Purl to end of row.
Row 2: Knit to end of row.
Row 3: Repeat Row 1.
Row 4: K2, ssk, knit to last 4 stitches, k2tog, k2. [2 stitches decreased]
Repeat Rows 1-4 twelve (9, 9, 9, 6) (6, 6, 6, 6) more times. [61 (63, 73, 79, 81) (83, 89, 95, 101) stitches remain]
Cut yarn and leave stitches on smaller 32-inch circular needles.
Shape Back Left
With smaller 16- or 24-inch circular needles, join yarn to wrong side.
Work as for SHAPE BACK RIGHT.
Do not cut yarn.
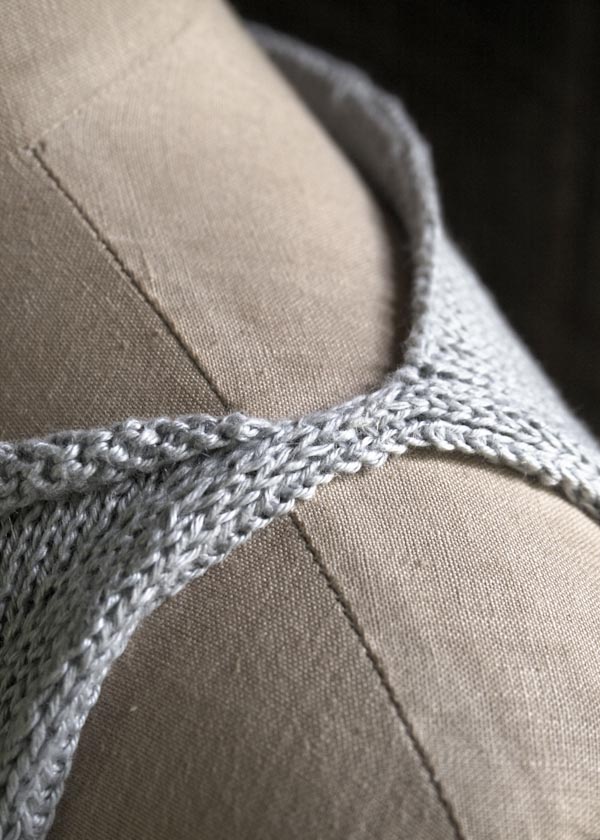
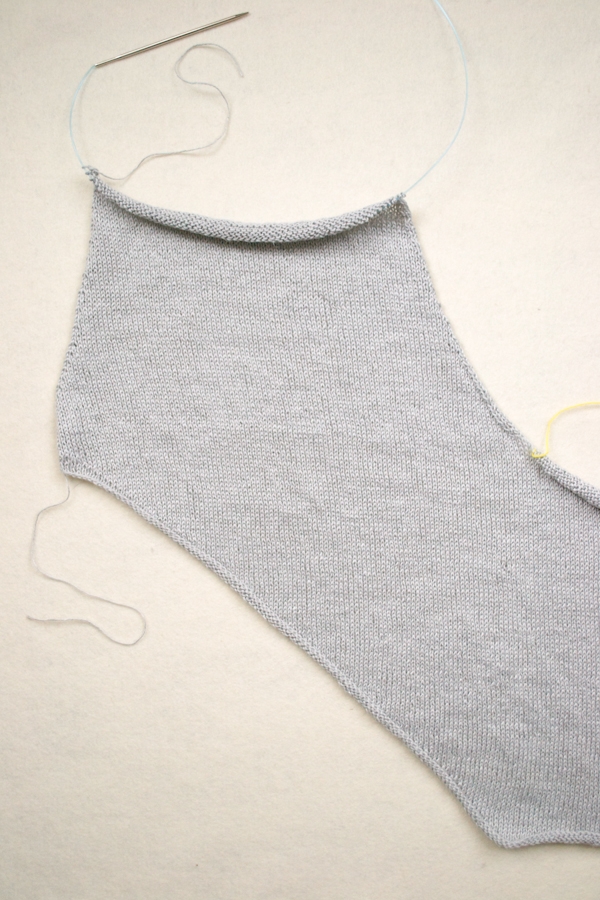
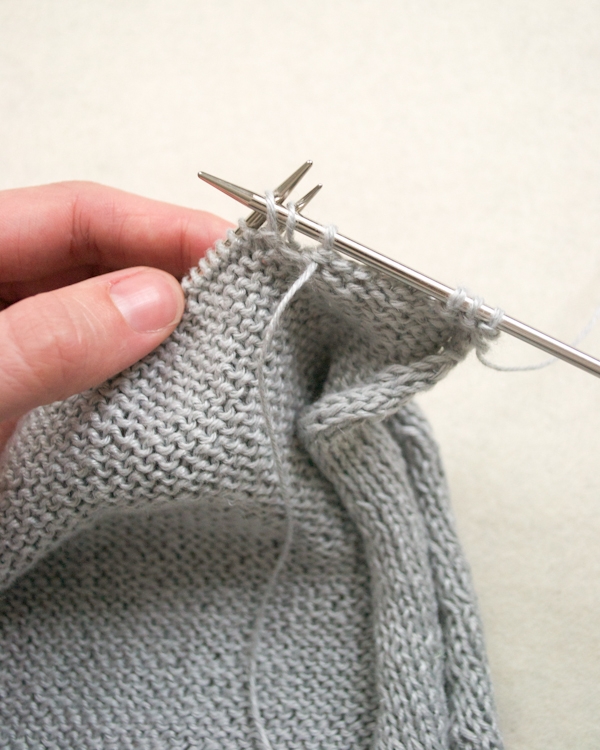
Overlap Backs
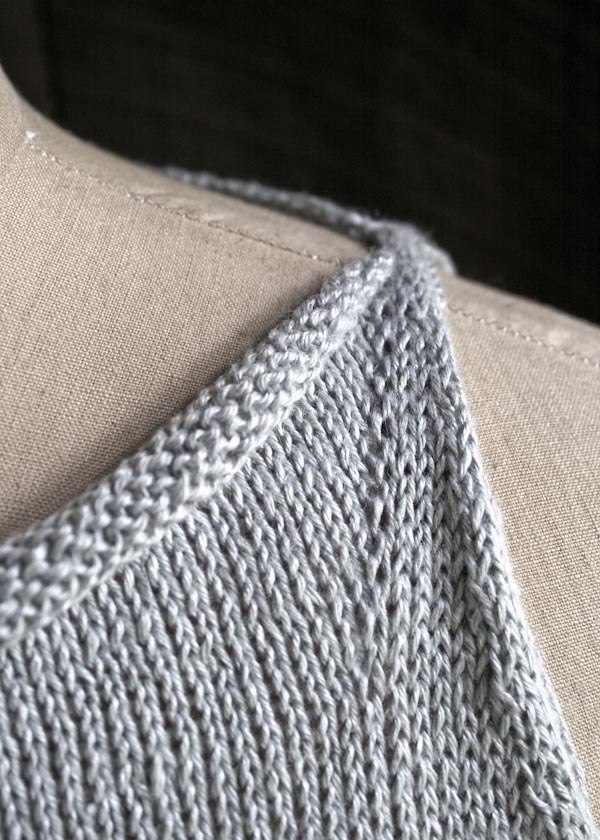
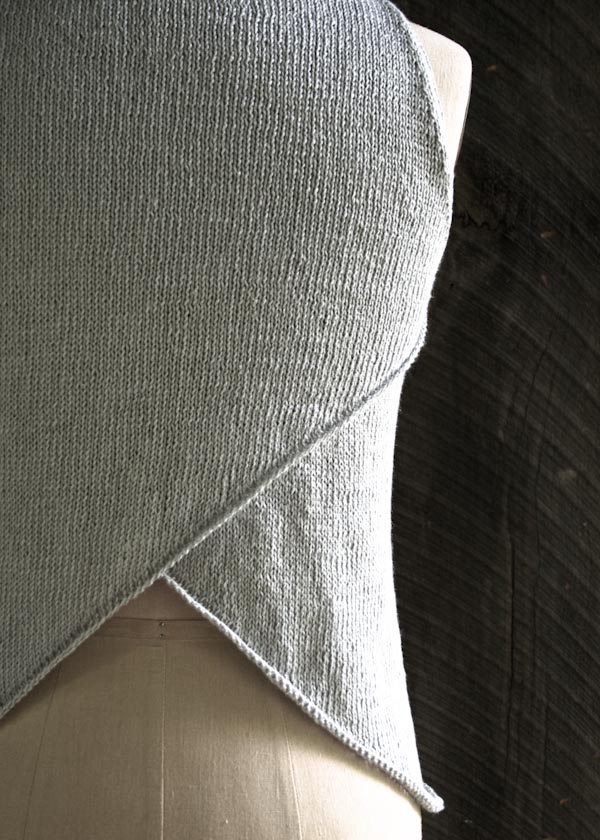
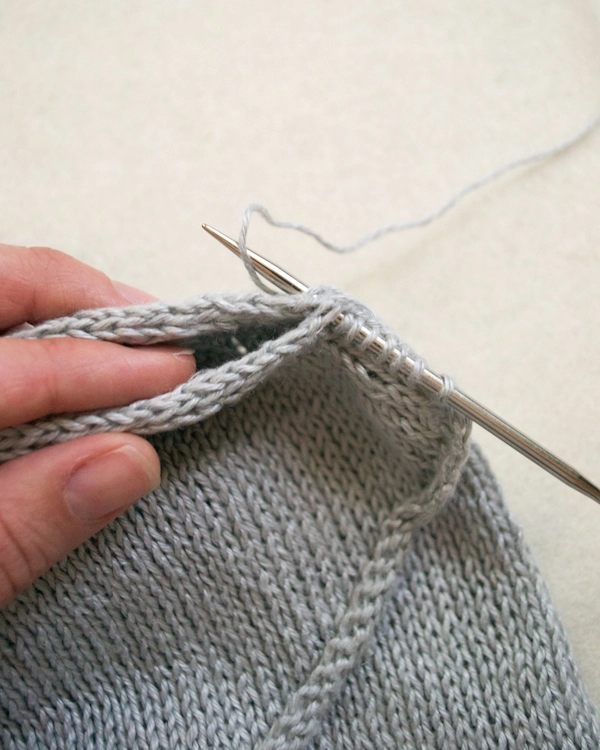
Lay piece on flat surface with wrong side facing up. Fold Back Right so that its cast-on corner meets the left underarm at the point where you divided Front and Backs. Fold Back Left so that its cast-on corner meets the right underarm (see above photo). Carefully flip the piece over so the right side of Front is facing you.
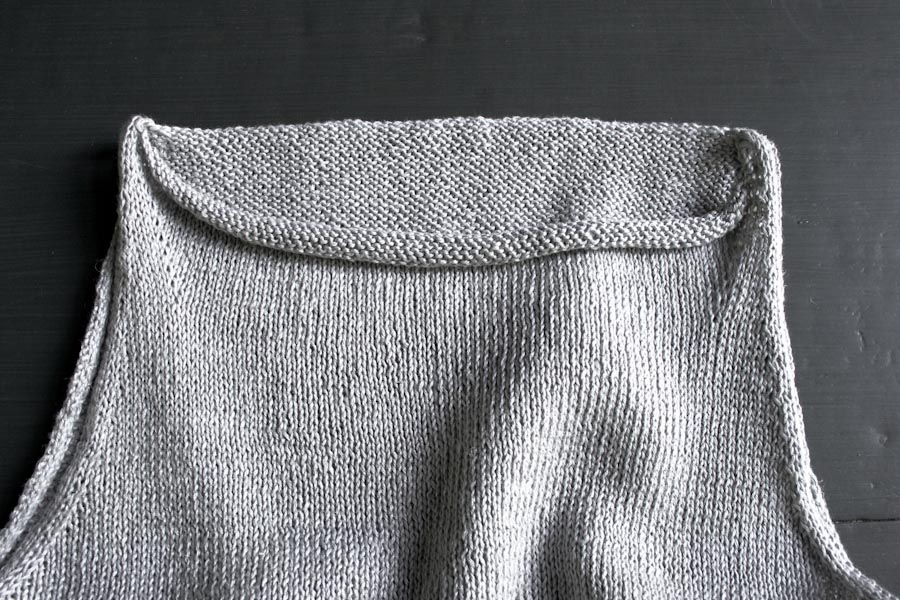
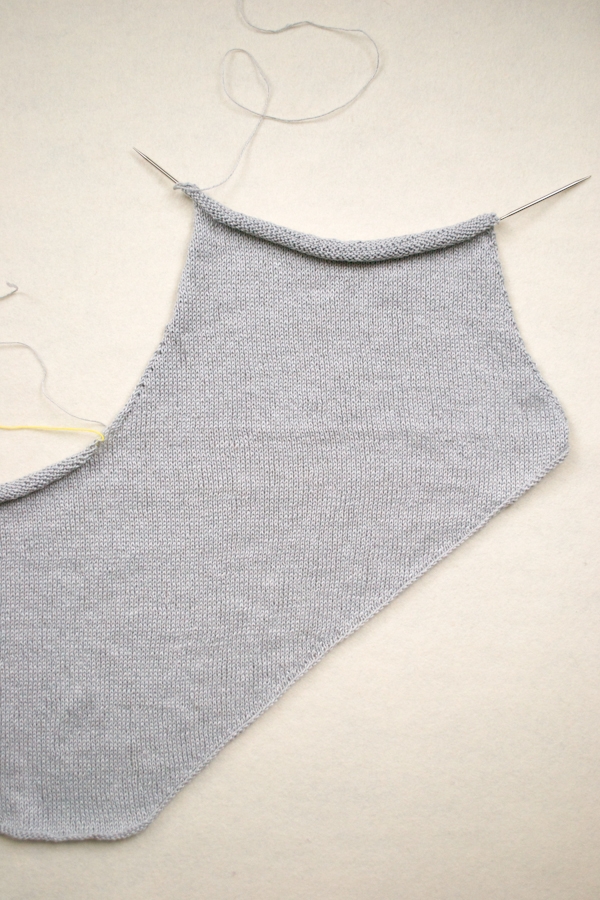
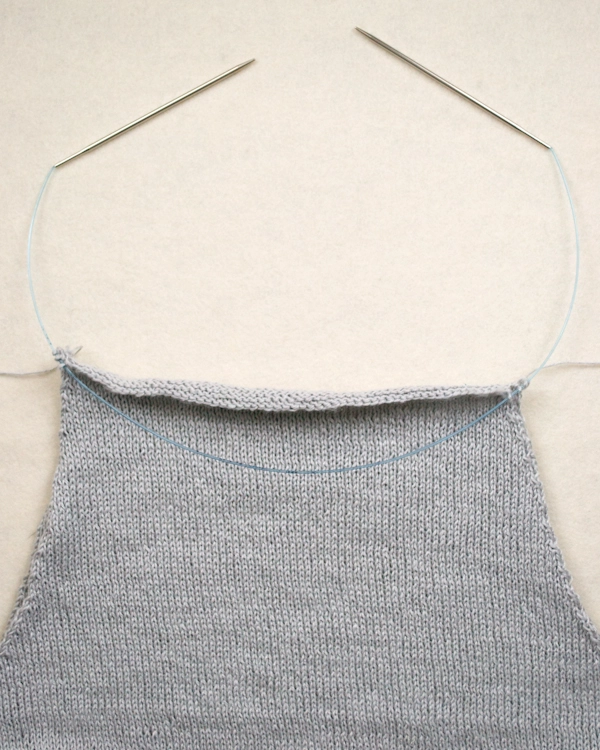
GRAFT BACKS + BIND OFF FOR NECK
Hold two circular needles with Back Left and Back Right stitches parallel with wrong sides of Backs facing you and working yarn coming from right end of back needles.
Working through stitches on both the back and front needles simultaneously, use left end of longer needles to…
Next Row (wrong side): P3 (3, 6, 9, 9) (9, 11, 13, 15), bind off following 55 (57, 61, 61, 63) (65, 67, 69, 71) stitches purlwise for Back Neck, purl to end of row. [6 (6, 12, 18, 18) (18, 22, 26, 30) total stitches remain: 3 (3, 6, 9, 9) (9, 11, 13, 15) stitches for each Shoulder]
Cut yarn.
FRONT
With smaller 16-inch needles, join yarn to wrong side.
SHAPE FRONT
SIZES 51, 55, 59, AND 63 ONLY
Row 1 (wrong side): Purl to end of row.
Row 2: K2, sssk, knit to last 5 stitches, k3tog, k2. [4 stitches decreased]
Repeat Rows 1 and 2 – (–, –, –, –) (3, 4, 5, 7) more times. [– (–, –, –, –) (137, 145, 153, 157) stitches remain]
ALL SIZES
Row 1 (wrong side): Purl to end of row.
Row 2 (right side): K2, ssk, knit to last 4 stitches, k2tog, k2. [2 stitches decreased]
Repeat Rows 1 and 2 two (10, 11, 14, 22) (19, 20, 21, 20) more times. [87 (83, 93, 99, 95) (97, 103, 109, 115) stitches remain]
CONTINUE SHAPING FRONT
Row 1 (wrong side): Purl to end of row.
Row 2 (right side): Knit to end of row.
Row 3: Repeat Row 1.
Row 4: K2, ssk, knit to last 4 stitches, k2tog, k2. [2 stitches decreased]
Repeat Rows 1-4 seven (4, 5, 6, 3) (2, 2, 2, 2) more times. [71 (73, 81, 85, 87) (91, 97, 103, 109) stitches remain]
SHAPE FRONT NECKLINE
Set-Up Row (wrong side): P8 (8, 10, 12, 12) (13, 15, 17, 19), pm, p55 (57, 61, 61, 63) (65, 67, 69, 71), pm, purl to end of row.
Row 1 (right side): Knit to next marker, sm, make 1 right (m1R), knit to next marker, make 1 left (m1L), sm, knit to end of row. [2 stitches increased]
Row 2 (wrong side): Purl to end of row.
Row 3: K2, ssk, knit to next marker, sm, m1R, knit to next marker, m1L, sm, knit to last 4 stitches, k2tog, knit to end of row. [2 stitches increased and 2 stitches decreased]
Row 4: Purl to end of row.
Repeat Rows 1-4 four (4, 3, 2, 2) (3, 3, 3, 3) more times [81 (83, 89, 91, 93) (99, 105, 111, 117) stitches]
Next Row (right side): Removing stitch markers as you come to them, k3 (3, 6, 9, 9) (9, 11, 13, 15), bind off following 75 (77, 77, 73, 75) (81, 83, 85, 87) stitches, knit to end of row. [6 (6, 12, 18, 18) (18, 22, 26, 30) total stitches remain: 3 (3, 6, 9, 9) (9, 11, 13, 15) stitches for each Shoulder]
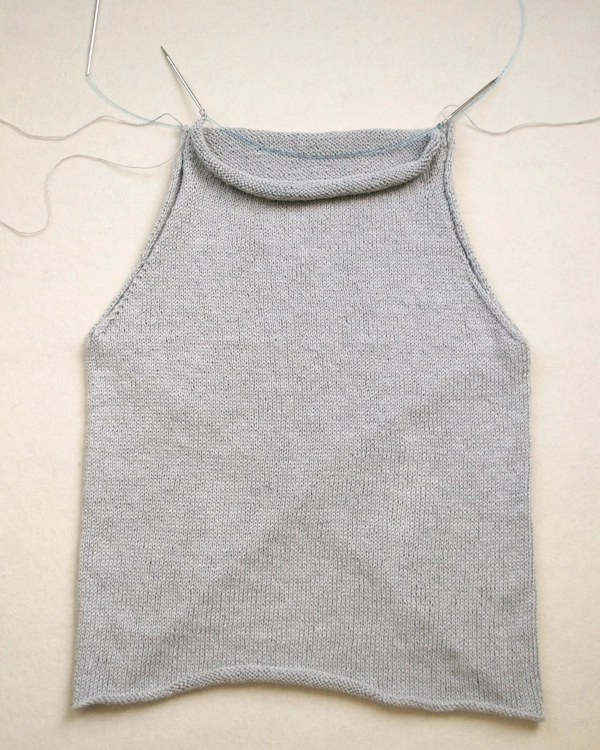
FINISHING
SHOULDERS
NOTE: For help with Kitchener Stitch, visit our tutorial.
Use Kitchener Stitch to graft together Front and Back Shoulder stitches for both Left and Right Shoulders.
ARMHOLES
With right side of Back facing you and beginning at center of underarm, use smaller 16-inch circular needles to pick up and knit 1 stitch from each stitch around entire Armhole edge, inserting needle through both Backs on back side and through just the Front on front side.
Join for working in the round and bind off loosely knitwise.
Repeat for other Armhole.
WEAVE IN ENDS + BLOCK
Weave in the ends and gently wet block.


Excited to start my first garment project! I was curious what cast on method was used. That part will make up the back right?
Hi Mayumi,
Thanks for reaching out, we’re thrilled that you’re getting ready to start your first garment! For the Tulip Tank, we’d recommend using a long-tail cast-on (we have a great tutorial here, if you’re unfamiliar with it!). The cast on for this lovely top will seem quite a bit bigger than normal. This is because you will be working short rows to create more fabric in the middle (front) of the piece. The cast on edge will draw up and create the diagonals across the back. Thus the measurement will be from the back under one arm, down and around the front, back up the other side of the back and to the other under arm. Therefore, for the smallest size, the cast on should measure 46 1/2 inches, far larger than you would expect for a 31 inch bust! If you run into any questions about the construction as you work, remember that you can always reach out to us at customerservice@purlsoho.com for additional assistance!
Warmly,
Kelsey
Hi there!
I need some help, I can’t seem to understand how to do the armhole parts. For either armholes, of course haha Do you have a photo of the armholes ? Or any other way of explaining? I just don’t know what to do and it’s the last thing!
Please, help! 🙁
Hi Gabriela,
Thank you for your questions! The armholes are constructed by picking up all armhole edge stitches and then immediately binding them off knitwise in the round. The armhole edge stitches you are picking up consist of the armhole ends of the two back pieces. So, for each new armhole stitch, you pick up one stitch from the two back stitch panels held together, therefore “sewing” together the back panels while also finishing the armholes in a polished bind off edge.
I hope this helps! Please don’t hesitate to reach out if this is still unclear. You can always send in photos of your work to customerservice@purlsoho.com so we can get a better feel for how things look on your end!
Best,
Margaret
Hello! I am a little confused about this pattern, rows 1 to 4 say:
Row 1 (wrong side): Purl to second marker, slip marker (sm), wrp-t (see Special Instructions).
Row 2 (right side): Knit to second marker, sm, wrp-t.
Row 3: Purl to wrapped stitch, slipping markers as you come to them, purl wrapped stitch with its wrap, p1, wrp-t.
Row 4: Knit to wrapped stitch, slipping markers as you come to them, knit wrapped stitch with its wrap, k1, wrp-t.
Repeat Rows 3 and 4 forty-eight more times (at which point just one stitch remains after the wrp-t on each side).
~~
First question- when I wrap and turn, do I head back the way I came? If so, then how would the last 1/3 of the row be knit?
Second question- when I wrap and turn, do I knit on the way back or purl? In other words, Do I knit to the beginning of the row, or do I start row 2 right there and the second marker becomes the first one?
I guess my understanding is that you are knitting the middle first and then moving to the sides, but that seems incorrect based on the photos!
Hi Timma,
Thanks for reaching out. It sounds like our Short Rows: Wrap + Turn tutorial might be very helpful! I’d recommend giving that a look over, and I think it will clear up all of your questions. I can also answer them here: First, because these are “short” rows, you only knit part of the row and not the final portion after the wrp-t. This creates the shaping of the garment. Second, because this is still in stockinette stitch, you will always knit when the right side is facing you and always purl when the wrong side is facing you. You will count the markers as you pass them, regardless of which side of the fabric you’re on. Hope this helps!
All the best,
Lili
Unlike other purlsohos, this pattern is very difficult to follow. Please send diagrams of how the Overlap Backs is done.
E.g., the “cast-on corner”? What is that?
-“meets the left underarm at the point where you divided Front and Backs”? Are they physically separate in order to do this?
I am so frustrated I will have to return all materials for a refund, if you cannot provide direction for this. I’m a 92 yr old, experienced knitter who has found other Purlsoho patterns easy to interpret. Sorry to say, the multitude of somewhat repetitious photos are not that helpful.
I look forward to your help.
Hi Evelyn,
I’m so sorry to hear that you have been struggling with your project! I’m here to help!
It looks like you are at the point where you are folding your shirt up to graft everything into place. In the directions for the Overlap Backs section, it says to align your back right “cast-on corner” with the left underarm. It would be easier to visualize this part of the directions as making an “X” at the back of your tank top with the back left and back right panels. Your goal is to line up the top corners of the “X” with the armpits and the bottom corners of the “X” with either side of the cast-on row. You will know that everything is lined up if the top of your “X” is perfectly squared with the bottom corners!
I can definitely understand how having a labeled drawing can help make this process more clear, so if you’re still having trouble visualizing how to align everything, I would encourage you to email us at customerservice@purlsoho.com. From there, we would be happy to send you a diagram of the back right and back left folding over the center front.
I hope that this explanation helps in the meantime, but we’ll keep an eye out for any other questions!
All the best,
Carly
I am looking forward to casting on this project. I’m curious as to why it is cast on to larger needles and then almost immediately moved to smaller ones.
Hi Karrie,
Thanks for reaching out! The larger needles are needed for the first few rows of the Tulip Top to ensure that the cast-on edge is loose and stretchy enough. Linen doesn’t tend to be a very stretchy fiber, so a loose cast-on is important for a finished garment that fits well.
I hope this helps and please let us know if you have any questions!
All the best,
Carly
Many thanks!
Sadly, after doing swatches, I am not getting anything close to the gauge. Given the lack of flexibility in the pattern for this, Im not sure what to do. On 3.5mm needles, I am getting 27×37, and on 4mm needles 26x 30. Im leaning toward knitting on 4mm needles, but have seen some comments about challenges putting it all together if the gauge is not right. So two questions:
a) do you think this will work? Do you think I need to go up a size?
b) if I knit it on 4mm needles, I should presumably cast on 4.5?
Hi Karrie,
I’m sorry to hear that it’s been difficult meeting gauge for this pattern! I’d actually recommend swatching again with larger needles (4.5mm needles would be the next ones to try!) to see if you can get 24 stitches and 28 rows. If you haven’t already, you can also try blocking your swatches! You may be able to gently pull the edges of the swatch on the 4mm needles so that the gauge reaches the gauge of the pattern.
All the best,
Lili
Hi, is the graphing backs+ bind off of the neckline a 3 needle bind off? It doesn’t say specifically but I was reading it as such. I was just kind of confused which 3 needles specifically it is asking for. I wish there was a full picture not just a close up of that section. 😕
Hi Jen,
Thank you for your question, though we’re so sorry there isn’t a more helpful photo of this step. Grafting the backs together is very similar to a three needle bind off, however in this pattern, it is just done purlwise instead of knitwise! The “third” needle in this place is the opposite end of the longer pair of circular needles (currently holding one of the BACKS).
I hope this helps clarify things!
All the best,
Lili
I have made a mistake on the beginnings of this top. All has been going well until this and I have googled everything trying to give me a solution. I need to send you a photo, is that possible? I’m at a standstill for the time hoping for a cure but also know that I may have to just start over. I will be adding safety lines in the future 🙂
Thank you
Hi Deb,
Thank you for reaching out. We’re so sorry to hear that you’ve run into roadblocks with your project and are eager to help however we can! Please feel free to send us a photo of your work at customerservice@purlsoho.com and we’re more than happy to assist you further there. Also, we offer free 1-On-1 Project Help Zoom sessions as well in case you’re interested in meeting with a member of our team regarding your questions! You can sign up for a session here (https://www.purlsoho.com/1-on-1-project-help.html)!
I hope this helps!
All the best,
Cat
Thank you so much!! I was able to figure this out on my on.. yay!! Took me all day looking at it and then walking away but it finally clicked and I’m back to knitting. Good to know you’re available if I hit another roadblock.
Thanks again, Deb
Hi Deb,
You’re very welcome! I’m so happy to hear your project is back on track! Thank you again for your comment and hope you have a great rest of your day!
All the best,
Cat
If I understand this correctly, I will K-P w/wrap all remaining stitches except for the last at the end.
(Repeat Rows 3 and 4 forty-eight more times (at which point just one stitch remains after the wrp-t on each side).
Next Row (wrong side): Removing markers as you come to them, purl to wrapped stitch, purl wrapped stitch with its wrap, p1 to end of row.)
Please correct me if I’m wrong
Thank you, Deb
Hi Deb,
Thanks for reaching out. On Next Row (wrong side), there will only be one wrapped stitch! That’s because you’re been working the previously wrapped stitch on each repeat of Rows 3 and 4. So on Next Row, you can purl normally until the wrapped stitch, purl that wrapped stitch with its wrap, and then purl normally to the end of the row. Hope this helps clarify things!
All the best,
Lili
Hi there. I’m confused by a certain point in the pattern. After casting on and then working rows 1 and 2, there’s a change to the smaller circular needle, but because after this you work short rows, are both needles still in use? Or do you transfer all stitches to the smaller needle before starting the short rows?
Thank you!
Hi Sally,
That’s a great question! Because of the short rows, I would recommend completely transferring your stitches to the smaller needles before starting them. Hope this helps!
All the best,
Lili
Sure does help, I thank you.
Hello again. Help! I’m at the grafting of backs + bind off for neck, but I’m sure I’ve made a mistake. I’m doing the third size, and on the longer needle I’ve got 6 purls on each end with 61 bound off in the middle, but I failed to do the same with the stitches on the other needle. Can you help me understand how to fix this? Would I undo the 6 purls, unbind off the 61, undo the other 6 purls, then correctly do the graphing with both needles? Thank you.
Hi Sally,
Thanks for writing in, although I’m sorry to hear that you’ve reached a stopping point in this pattern! I’m a little confused about what’s causing the problem though. Would you be able to send a photo of your work to customerservice@purlsoho.com? That way, we can visualize exactly what’s going on!
All the best,
Lili
Thank you, Lili. Yes, I will send a photo later today, and I might also schedule a 1:1 — so grateful for that resource.
Hi again. I’m almost finished! But I’m confused at the point of armholes. I still have stitches on a needle for, I think, what looks like what I’m calling the “front back” because the back seems to have two sections. After picking up stitches at armhole, is this where I bind off the many stitches I still have on a needle? And can you define “the center” of underarm? Is that at the bottom, below the shoulder? Thank you!
Hi Sally,
Very exciting! When you pick up the stitches for the armhole, you should be picking up each stitch from both the “front back” and the “back back” in order to join the together (and then on the front, there’s only one layer, so you can pick up these stitches as normal). Once you have new live stitches all the way along the backs and the front, then you can bind off all of these stitches! And the “center” of the underarm is the bottom.
All the best,
Lili
Gah! What a horrible pattern. Gone wrong at the first step. An awful lot of cast on stitches. Also, would like to print this out for ease of following but no pdf without images. Does such a thing exist? Thanks.
Hi Sally,
We’re so sorry to hear that this pattern has been frustrating so far, and we’re eager to help! Since you mentioned that one issue is the large cast-on, I wanted to pass along a handy tip to make those long cast-ons less stressful. When casting on, place a stitch marker every 10 or 20 stitches. That way, you only have to count up to a smaller number each time, and this also makes it easier to re-count your stitches before beginning to knit. Just make sure to remove the stitch markers on the first row!
And here’s how to get a printer-friendly version of any of our free patterns: If you’re on your computer, you’ll find a “print” icon in the right column just below the “Save To Favorites” button. If you’re on a mobile version of the site, you will find the “print” icon below the pattern and above the comments.
Click on this button, and a window will pop up where you can delete whichever parts of the pattern you don’t want to print. When you hover over any image or a text block, it will be highlighted in yellow and a “trash” icon will appear. Just click on this icon to delete anything that’s not necessary to the pattern! For example, you may decide to shorten the pattern by omitting certain images or the list of materials. Then, just click on the “Print” button in the upper left-hand corner of the pop-up window!
I hope this helps, and please don’t hesitate to let us know if you have any other questions or concerns.
All the best,
Lili
Hi,
I am about to start this top but have a question about sizing.
I have quite a long torso and wanted to know if it’s possible to adjust the pattern to make the body of the top longer?
Thanks!
Hi Eleri,
That’s a great question, and there is a way to make the torso longer! If you look at the short rows, you’ll notice that on each one you’ll work the wrapped stitch with its wrap, work a normal stitch, and then work a wrap + turn. These short rows extend all the way through the body, up until you divide for the front and back, but you can add more rows by omitting the normal stitch you work in between each wrap! So instead of working this stitch and then working the wrap + turn, just work the next wrap + turn immediately after working the previous wrapped stitch with its wrap.
Because this modification changes the slope that the short rows create, I’d recommend saving it until you near the end of the short rows! That will create a more gentle and consistent slope to the sides of the body. Once you’re on the final few repeats of the short rows, you can start omitting the normal stitch between wraps on each row. This will allow you to fit more rows (and therefore add more height) before dividing the front and back.
I hope this helps, and please let me know if you have any other questions!
All the best,
Lili
Can u recommend a super wash yarn that might work for this project? Thanks!
Hi Evan,
Thank you for writing in! While our Field Linen is machine washable, Cattail Silk and Santolina could also make great alternatives for this pattern! I hope this helps but please let me know if you have any other questions!
Happy knitting,
Gavriella
I’ve just started on the Body section of the pattern, working on the short rows using the 35” chest circumference number of stitches. Counting ahead, I don’t understand how I’ll end up with only one stitch remaining on each side as it looks more like I’ll have at least 50+ left on each side!Please explain.
Hi Ann,
Thanks for writing in! Can you let me know if you’re making sure to work an additional stitch right after working the previous row’s wrapped stitch with its wrap and before working the wrap + turn? There should be one plain stitch in between these things! Omitting this stitch will lead to a lot of extra stitches on each end, so I want to make sure you’re taking it into account. Let me know, and then we can go from there!
All the best,
Lili