

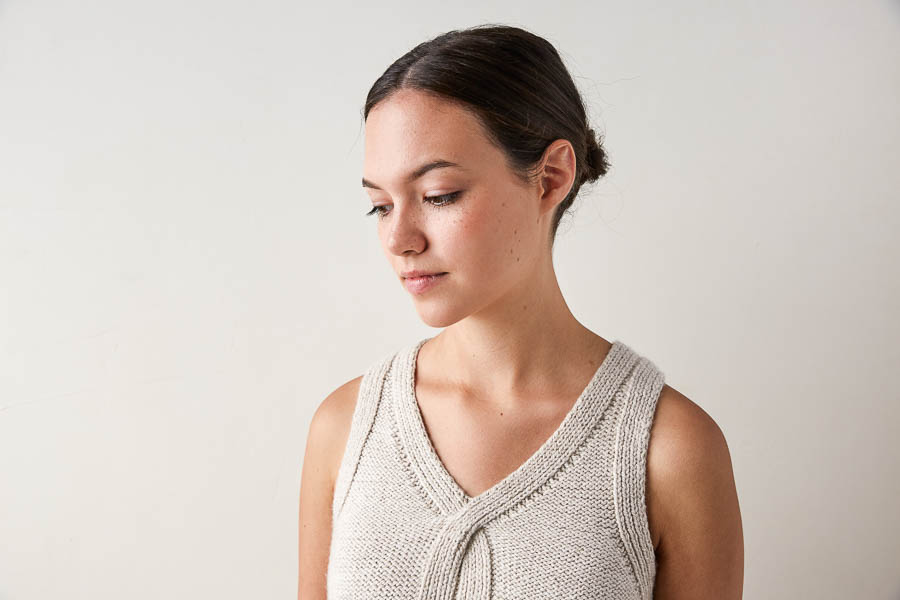
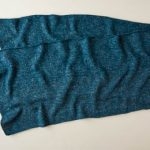
Criss Cross Top
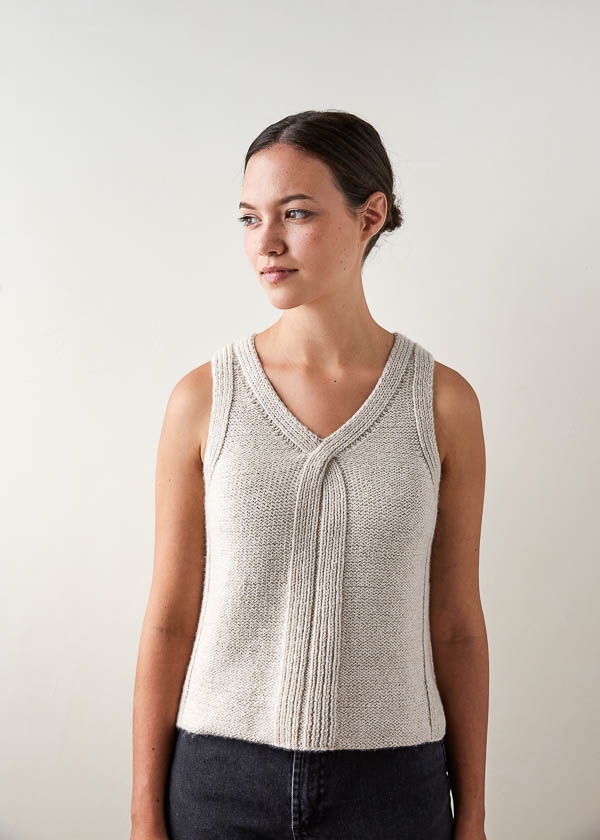
Beginning with a thoughtful design and ending with a flattering fit, there’s a lot to love about our Criss Cross Top!
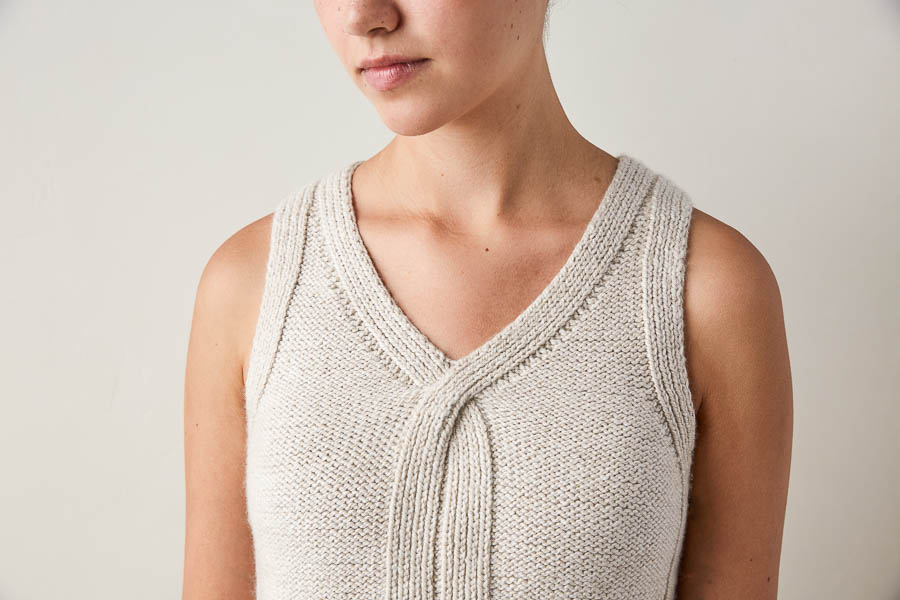
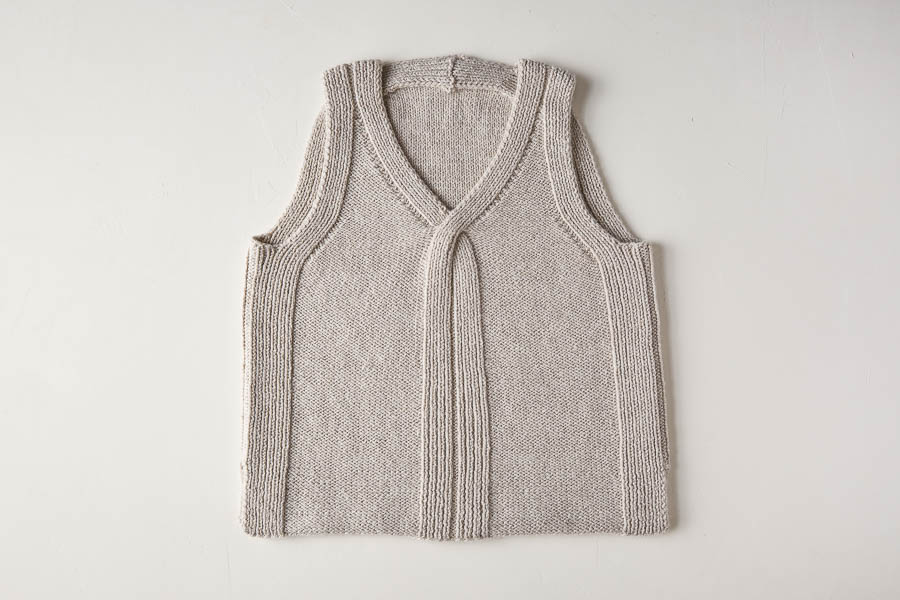
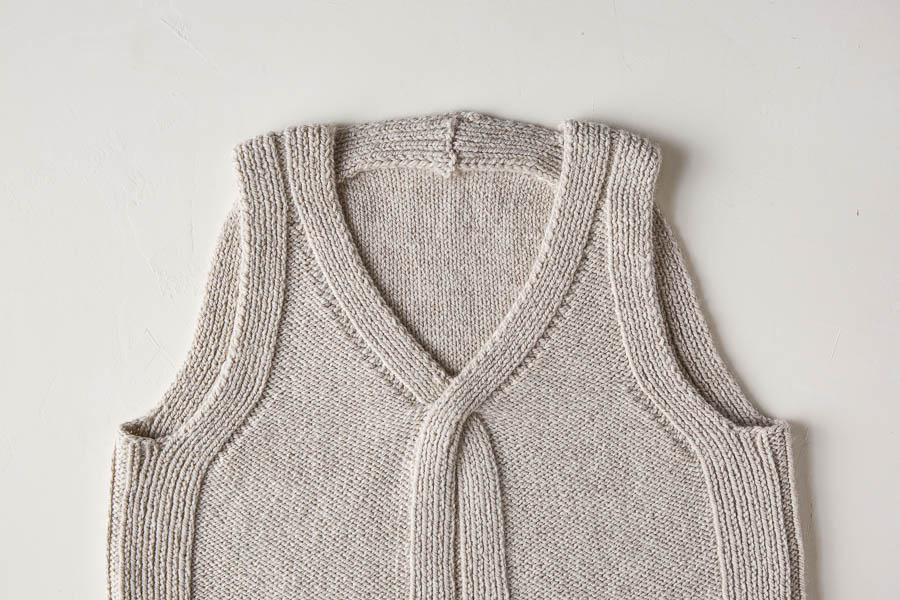
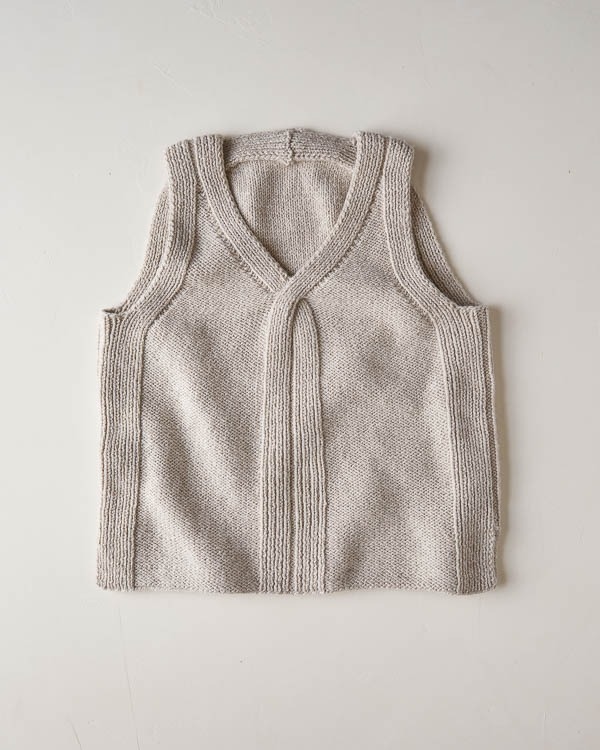
Form follows function, here, with easy stitch patterns that each do their job. Reverse stockinette serves as a beautiful all-over ground, while 1 x 1 ribbing gives structure and definition to edges. One simple cable at the front neckline provides all the drama.
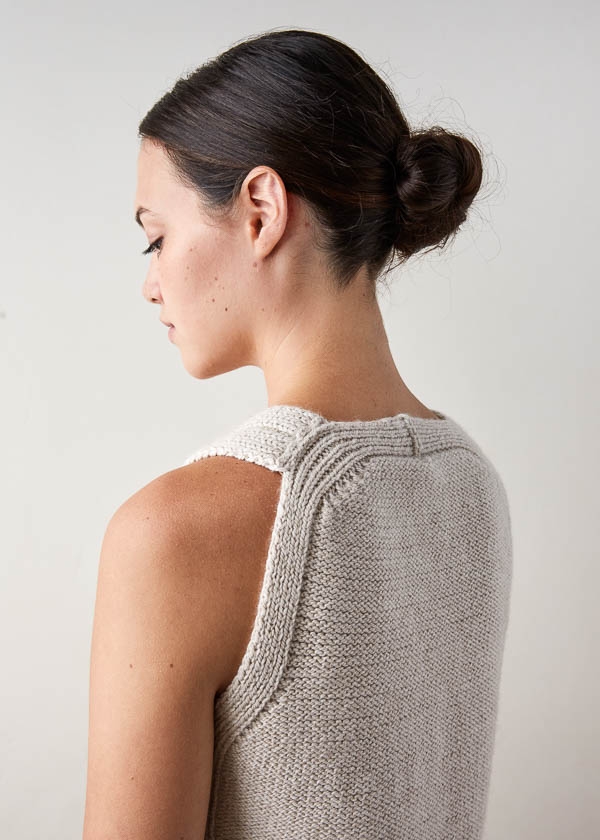
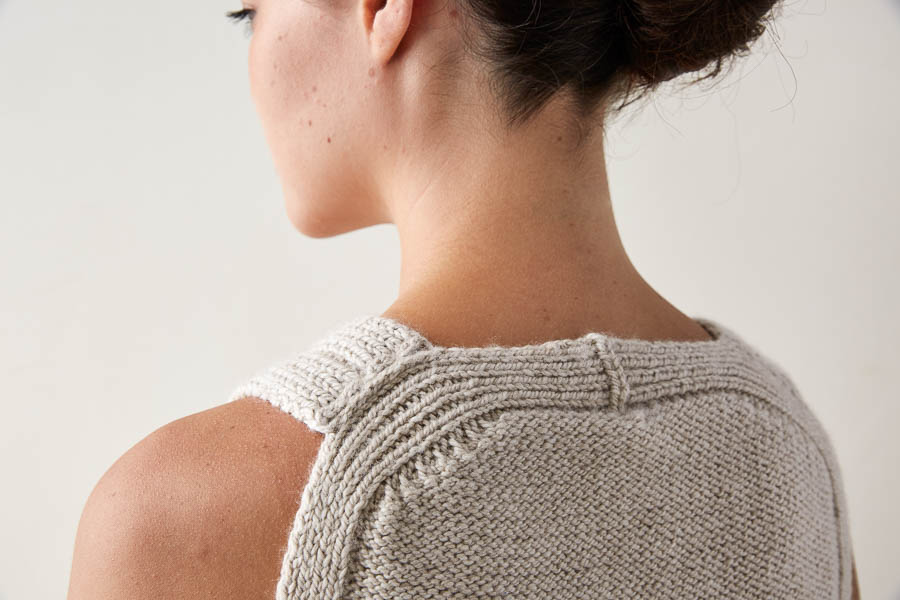
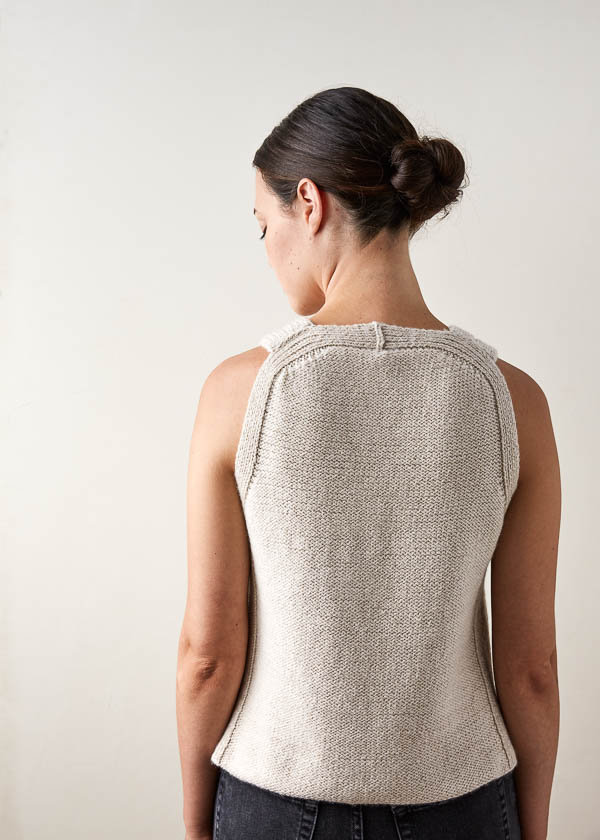
Knit from the bottom up, you start with the front hem, then knit the back hem, then join in the round, and separate again to work the front and back. A back neckband anchors the front shoulders, and before you know it, it’s time to slip on your own gorgeous Criss Cross Top!
We knit up ours in our 100% merino wool Worsted Twist. It has an incredibly soft and cozy touch, works up as a fairly quick knit, and comes in a beautiful palette of gentle colors. Pick your favorite and cast on for this free pattern… Free? Yes!

Designed by Purl Soho designer, Adam Aronowitz.
Share your progress and connect with the community by tagging your pics with #PurlSoho, #PurlSohoBusyHands, #PurlSohoCrissCrossTop, and #PurlSohoWorstedTwist. We can’t wait to see what you make!
MATERIALS

- 4 (4, 5, 5, 6, 7) skeins of Purl Soho’s Worsted Twist, 100% merino wool. Each skein is 164 yards/ 100 grams; approximately 565 (655, 710, 820, 905, 1035) yards required. We used the color Wheat Flour. (NOTE: We no longer offer Worsted Twist, but choose from one of our other worsted/aran weight yarns.)
- US 6 (4 mm), 24-inch circular needles
- US 6, 32-inch or 40-inch circular needles (depending on sweater size)
- Two US 6 double pointed needles
- Stitch markers, including 4 removable
- A cable stitch holder
- Stitch holders or scrap yarn
GAUGE
20 stitches and 31 rows = 4 inches in reverse stockinette stitch
SIZES
NOTE For help picking a size, please check out our Understanding Ease + Selecting Size Tutorial!
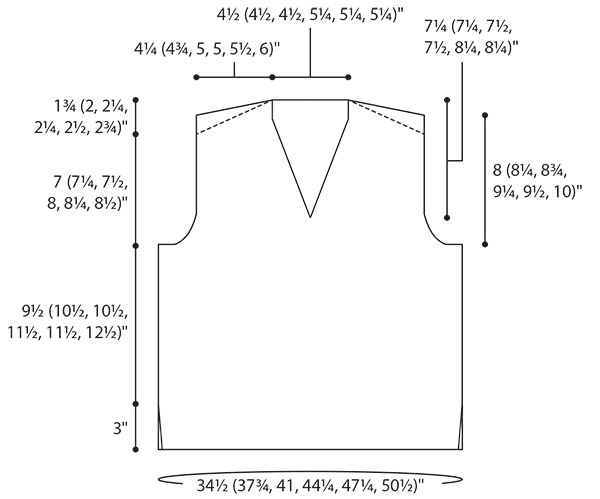
34½ (37¾, 41, 44¼, 47¼, 50½)
To fit actual chest circumference 31–33 (34–36, 37–39, 40–42, 43–45, 47–49) inches, with approximately 2–4 inches of ease
- Finished Chest Circumference: 34½ (37¾, 41, 44¼, 47¼, 50½) inches
- Finished Length From Top Of Shoulder: 21¼ (22¾, 23¼, 24¾, 25¼, 26¾) inches
SAMPLE: The top pictured here is size 34½ inches modeled with 2½ inches of ease.
NOTES
SLIP STITCHES
Slip stitches purlwise unless directed otherwise.
Ssp (SLIP SLIP PURL)
Slip 2 stitches knitwise, one at a time, return them to left-hand needle in new orientation, purl them together through back loops. [1 stitch decreased]
For our photo tutorial, please visit our Purl 2 Together Through Back Loop Tutorial.
Sssp (SLIP SLIP SLIP PURL)
Slip 3 stitches knitwise, one at a time, return them to left-hand needle in new orientation, purl them together through back loops. [2 stitches decreased]
P3tog (PURL 3 TOGETHER)
Insert right-hand needle into next 3 stitches purlwise and purl them together. [2 stitches decreased]
PATTERN
FRONT HEM
Cast 92 (100, 108, 116, 124, 132) stitches onto 24-inch circular needles. We used a basic Long Tail Cast On. Do not join for working in the round.
Row 1 (wrong side): Slip 1 (see Notes) with yarn in front (wyif), [p1, k1] 6 times, place marker (pm), k24 (28, 32, 36, 40, 44), pm, [k1, p1] 4 times, k2, [p1, k1] 4 times, pm, k24 (28, 32, 36, 40, 44), pm, [k1, p1] 6 times, k1.
Row 2 (right side): Slip 1 wyif, [k1, p1] 6 times, slip marker (sm), purl to next marker, sm, [p1, k1] 4 times, p2, [k1, p1] 4 times, sm, purl to next marker, sm, [p1, k1] 6 times, k1.
Row 3: Slip 1 wyif, [p1, k1] 6 times, sm, knit to next marker, sm, [k1, p1] 4 times, k2, [p1, k1] 4 times, sm, knit to next marker, sm, [k1, p1] 6 times, k1.
Repeat Rows 2 and 3 until Front Hem measures 3 inches from cast-on edge, ending with a wrong-side row. Cut yarn and set aside.
BACK HEM
Cast 92 (100, 108, 116, 124, 132) stitches onto 32- or 40-inch circular needles. Do not join for working in the round.
Row 1 (wrong side): Slip 1 wyif, [p1, k1] 6 times, pm, k66 (74, 82, 90, 98, 106), pm, [k1, p1] 6 times, k1.
Row 2 (right side): Slip 1 wyif, [k1, p1] 6 times, sm, purl to next marker, sm, [p1, k1] 6 times, k1.
Row 3: Slip1 wyif, [p1, k1] 6 times, sm, knit to next marker, sm, [k1, p1] 6 times, k1.
Repeat Rows 2 and 3 until Back Hem measures 3 inches from cast-on edge, ending with a wrong-side row.
JOIN HEMS IN THE ROUND
NOTE: In the following section you will join Front and Back Hems for working Body in the round.
Joining Round (right side): Working across Back Hem stitches, slip 1 wyif, [k1, p1] 6 times, sm, purl to next marker, sm, [p1, k1] 6 times, slip last stitch of Back Hem onto a cable stitch holder; pick up Front Hem with right side facing you, and holding cable stitch holder in front of work, use Back Hem needle to p1 from Front Hem, place marker on right-hand needle for Left Side, p1 from cable stitch holder; working across Front Hem stitches, [k1, p1] 6 times, sm, purl to next marker, sm, [p1, k1] 4 times, p2, [k1, p1] 4 times, sm, purl to next marker, sm, [p1, k1] 6 times, slip the last stitch of Front Hem onto cable stitch holder; pick up Back Hem with right side facing you, being careful to not twist the stitches and holding cable stitch holder in back of work, p1 from Back Hem, place unique marker on right-hand needle for end of round, slip stitch from cable stitch holder to left-hand needle. [184 (200, 216, 232, 248, 264) stitches total: 92 (100, 108, 116, 124, 132) stitches each for Front and Back]
BODY
CONTINUE BODY IN THE ROUND
Round 1: [P1, k1] 6 times, p1, sm, purl to next marker, sm, [(p1, k1) 6 times, p1, sm] 2 times, purl to next marker, sm, [p1, k1] 4 times, p2, [k1, p1] 4 times, sm, purl to next marker, sm, [p1, k1] 6 times, p1.
Repeat Round 1 until Body measures 9½ (10½, 10½, 11½, 11½, 12½) inches from Joining Round.
DIVIDE BODY
Division Round: [P1, k1] 6 times, p1, sm, purl to next marker, sm, [p1, k1] 4 times, p1, bind off 8 stitches in pattern for Left Underarm (removing Left Side marker), [k1, p1] 4 times, sm, purl to next marker, sm, [p1, k1] 4 times, p2, [k1, p1] 4 times, sm, purl to next marker, sm, [p1, k1] 4 times, p1, bind off 8 stitches in pattern for Right Underarm (removing end-of-round marker). [168 (184, 200, 216, 232, 248) stitches remain: 84 (92, 100, 108, 116, 124) stitches each for Front and Back]
Place 84 (92, 100, 108, 116, 124) Front stitches on stitch holders or scrap yarn.
BACK
NOTE: In this section of the pattern you will be working back and forth over only the Back stitches.
WORK ARMHOLES
FOR SIZES 44¼, 47¼, AND 50½ INCHES ONLY
Row 1 (right side): Slip 1 wyif, [k1, p1] 4 times, sm, purl 2 together (p2tog), purl to 2 stitches before next marker, ssp (see Notes), sm, [p1, k1] 4 times, k1. [2 stitches decreased]
Row 2 (wrong side): Slip 1 wyif, [p1, k1] 4 times, sm, slip slip knit (ssk), knit to 2 stitches before next marker, k2tog, sm, [k1, p1] 4 times, k1. [2 stitches decreased]
Repeat Rows 1 and 2 – (–, –, 1, 3, 4) more time(s). [– (–, –, 100, 100, 104) stitches remain]
FOR ALL SIZES
Row 1 (right side): Slip 1 wyif, [k1, p1] 4 times, sm, purl 2 together (p2tog), purl to 2 stitches before next marker, ssp (see Notes), sm, [p1, k1] 4 times, k1. [2 stitches decreased]
Row 2 (wrong side): Slip 1 wyif, [p1, k1] 4 times, sm, knit to next marker, sm, [k1, p1] 4 times, k1.
Repeat Rows 1 and 2 seven (9, 11, 9, 7, 7) more times. [68 (72, 76, 80, 84, 88) stitches remain]
Next Row (right side): Slip 1 wyif, [k1, p1] 4 times, sm, purl to next marker, sm, [p1, k1] 4 times, k1.
Next Row (wrong side): Slip 1 wyif, [p1, k1] 4 times, sm, knit to next marker, sm, [k1, p1] 4 times, k1.
Repeat last two rows until Armhole measures 5½ (5¾, 6, 6½, 6¾, 7) inches, ending with a wrong-side row.
SHOULDERS
Row 1 (right side): Slip 1 wyif, [k1, p1] 4 times, sm, p3tog (see Notes), purl to 3 stitches before next marker, sssp (see Notes), sm, [p1, k1] 4 times, k1. [4 stitches decreased]
NOTE: With right side facing, place a removable marker around first and last stitches of previous row to indicate where to attach Front Shoulders.
Row 2 (wrong side): Slip 1 wyif, [p1, k1] 4 times, sm, knit to next marker, sm, [k1, p1] 4 times, k1.
Repeat Rows 1 and 2 six (7, 8, 8, 9, 10) more times. [40 (40, 40, 44, 44, 44) stitches remain]
BACK NECK
NOTE: For the following section you will be working the ribbed section back and forth in short rows while eliminating Back Neck stitches to form Neckband.
RIGHT BACK NECK
Row 1 (right side): Slip 1 wyif, [k1, p1] 4 times, sm, p2tog, turn. [1 stitch decreased]
Row 2 (wrong side): Slip 1 with yarn in back (wyib), sm, [k1, p1] 4 times, k1.
NOTE: With right side facing, place a removable marker around stitch below first stitch on left-hand needle to indicate where to attach Front Shoulder.
Repeat Rows 1 and 2 eight (8, 8, 10, 10, 10) more times, then repeat Row 1 once more. [30 (30, 30, 32, 32, 32) stitches remain]
Cut yarn. Place last 10 stitches on right-hand needle onto stitch holder or scrap yarn for Right Back Neck edge. [20 (20, 20, 22, 22, 22) stitches remain]
LEFT BACK NECK
Row 1 (wrong side): With wrong side facing, slip 1 to right-hand needle, join new yarn and [p1, k1] 4 times, sm, ssk, turn. [1 stitch decreased]
Row 2 (right side): Slip 1 wyif, sm, [p1, k1] 4 times, k1.
NOTE: With wrong side facing, place a removable marker around stitch below first stitch on left-hand needle to indicate where to attach Front Shoulder.
Repeat Rows 2 and 3 eight (8, 8, 10, 10, 10) more times. [10 stitches remain]
Cut yarn, leaving a 36-inch tail. Place remaining 10 stitches onto stitch holder or scrap yarn for Left Back Neck edge.
FRONT
NOTE: In this section of the pattern you will be working back and forth over only the Front stitches.
Return 84 (92, 100, 108, 116, 124) on-hold Front stitches to 24-inch circular needles.
SHAPE ARMHOLES
FOR SIZES 44¼, 47¼ AND 50½ INCHES ONLY
Row 1 (right side): Slip 1 to right-hand needle, join new yarn and [k1, p1] 4 times, sm, p2tog, purl to next marker, sm, [p1, k1] 4 times, p2, [k1, p1] 4 times, sm, purl to 2 stitches before next marker, ssp, sm, [p1, k1] 4 times, k1. [- (-, -, 106, 114, 122) stitches]
Row 2 (wrong side): Slip 1 wyif, [p1, k1] 4 times, sm, ssk, knit to next marker, sm, [k1, p1] 4 times, k2, [p1, k1] 4 times, sm, knit to 2 stitches before next marker, k2tog, sm, [k1, p1] 4 times, k1. [2 stitches decreased]
Row 3: Slip 1 wyif, [k1, p1] 4 times, sm, p2tog, purl to next marker, sm, [p1, k1] 4 times, p2, [k1, p1] 4 times, sm, purl to 2 stitches before next marker, ssp, sm, [p1, k1] 4 times, k1. [2 stitches decreased]
Repeat Rows 2 and 3 – (–, –, 0, 2, 3) more times, then repeat Row 2 once more. [– (–, –, 100, 100, 104) stitches remain]
FOR ALL SIZES
Row 1 (right side): Slip 1 to right-hand needle (wyif for Sizes 44¼, 47¼ and 50½), join new yarn (for Sizes 34½, 37¾, and 41) and [k1, p1] 4 times, sm, p2tog, purl to next marker, sm, [p1, k1] 4 times, p2, [k1, p1] 4 times, sm, purl to 2 stitches before next marker, ssp, sm, [p1, k1] 4 times, k1. [2 stitches decreased]
Row 2 (wrong side): Slip 1 wyif, [p1, k1] 4 times, sm, knit to next marker, sm, [k1, p1] 4 times, k2, [p1, k1] 4 times, sm, knit to next marker, sm, [k1, p1] 4 times, k1.
Row 3: Slip 1 wyif, [k1, p1] 4 times, sm, p2tog, purl to next marker, sm, [p1, k1] 4 times, p2, [k1, p1] 4 times, sm, purl to 2 stitches before next marker, ssp, sm, [p1, k1] 4 times, k1. [2 stitches decreased]
Repeat Rows 2 and 3 two (4, 4, 4, 2, 3) more times. [76 (80, 88, 88, 92, 94) stitches remain]
Work 1 wrong-side row even.
WORK CABLE CROSS + DIVIDE FRONTS
NOTE: In the following section you will work the cable cross at center front and then divide for Left and Right Fronts. At the same time, you will shape Armholes and Front Neckline.
Row 1 (right side): Slip 1 wyif, [k1, p1] 4 times, sm, p2tog, purl to next marker, sm, slip 9 stitches onto cable stitch holder and hold in back of work, from left-hand needle [p1, k1] 4 times, p1, from cable stitch holder [p1, k1] 4 times, p1, sm, purl to 2 stitches before next marker, ssp, sm, [p1, k1] 4 times, k1. [74 (78, 86, 86, 90, 92) stitches remain]
Row 2 (wrong side): Slip 1 wyif, [p1, k1] 4 times, sm, knit to next marker, sm, [k1, p1] 4 times, k2, [p1, k1] 4 times, sm, knit to next marker, sm, [k1, p1] 4 times, k1.
Row 3: Slip 1 wyif, [k1, p1] 4 times, sm, p2tog, purl to next marker, sm, [p1, k1] 4 times, p2, [k1, p1] 4 times, sm, purl to 2 stitches before next marker, ssp, sm, [p1, k1] 4 times, k1. [72 (76, 84, 84, 88, 90) stitches remain]
Row 4: Slip 1 wyif, [p1, k1] 4 times, sm, knit to next marker, sm, [k1, p1] 4 times, k1, place last 36 (38, 42, 42, 44, 45) stitches worked onto stitch holder or scrap yarn for Right Front, [k1, p1] 4 times, k1, sm, knit to next marker, sm, [k1, p1] 4 times, k1. [36 (38, 42, 42, 44, 45) stitches remain for Left Front]
LEFT FRONT
SHAPE ARMHOLES + NECKLINE
Row 1 (right side): Slip 1 wyif, [k1, p1] 4 times, sm, p2tog, purl to 2 stitches before next marker, ssp, sm, [p1, k1] 4 times, k1. [2 stitches decreased]
Row 2 (wrong side): Slip 1 wyif, [p1, k1] 4 times, sm, knit to next marker, sm, [k1, p1] 4 times, k1.
Repeat Rows 1 and 2 one (1, 3, 1, 1, 0) more time(s). [32 (34, 34, 38, 40, 43) stitches remain]
SHAPE NECKLINE
Decrease Row (right side): Slip 1 wyif, [k1, p1] 4 times, sm, purl to 2 stitches before next marker, ssp, sm, [p1, k1] 4 times, k1. [1 stitch decreased]
Next Row (wrong side): Slip 1 wyif, [p1, k1] 4 times, sm, knit to next marker, sm, [k1, p1] 4 times, k1.
Working in established pattern, repeat Decrease Row every right-side row 8 (12, 9, 15, 17, 19) more times, then every 4th row 3 (1, 4, 2, 2, 1) time(s), ending with a wrong-side row. [20 (20, 20, 20, 20, 22) stitches remain]
FOR SIZES 34½, 37¾, 41, AND 44¼ INCHES ONLY
Decrease Row (right side): Slip 1 wyif, [k1, p1] 4 times, remove marker, ssp, remove marker, [p1, k1] 4 times, k1. [19 stitches remain]
Next Row (wrong side): Slip 1 wyif, [p1, k1] 3 times, p1, k3, p1, [k1, p1] 3 times, k1.
Next Row (right side): Slip 1 wyif, [k1, p1] 3 times, k1, p3, k1, [p1, k1] 3 times, k1.
Next Row: Slip 1 wyif, [p1, k1] 3 times, p1, k3, p1, [k1, p1] 3 times, k1.
Decrease Row (right side): Slip 1 wyif, [k1, p1] 3 times, k1, p1, ssp, k1, [p1, k1] 3 times, k1. [18 stitches remain]
Next Row (wrong side): Slip 1 wyif, [p1, k1] 3 times, p1, k2, p1, [k1, p1] 3 times, k1.
ALL SIZES
Work even until Armhole measures 8¾ (9¼, 9¾, 10¼, 10¾, 11¼) inches, ending with a wrong-side row.
Place Left Front stitches onto stitch holder or scrap yarn.
RIGHT FRONT
SHAPE ARMHOLES + NECKLINE
Return on-hold 36 (38, 42, 42, 44, 45) Right Front stitches to 24-inch circular needles.
Row 1 (right side): With right side facing you, slip 1 stitch to right-hand needle, join new yarn and [k1, p1] 4 times, sm, p2tog, purl to 2 stitches before next marker, ssp, sm, [p1, k1] 4 times, k1. [34 (36, 40, 40, 42, 43) stitches remain]
Row 2 (wrong side): Slip 1 wyif, [p1, k1] 4 times, sm, knit to next marker, sm, [k1, p1] 4 times, k1.
FOR SIZES 34½, 37¾, 41, 44¼, AND 47¼ INCHES ONLY
Row 1 (right side): Slip 1 wyif, [k1, p1] 4 times, sm, p2tog, purl to 2 stitches before next marker, ssp, sm, [p1, k1] 4 times, k1. [2 stitches decreased]
Row 2 (wrong side): Slip 1 wyif, [p1, k1] 4 times, sm, knit to next marker, sm, [k1, p1] 4 times, k1.
Repeat Rows 1 and 2 zero (0, 2, 0, 0, –) more times [32 (34, 34, 38, 40, –) stitches remain]
SHAPE NECKLINE: ALL SIZES
Decrease Row (right side): Slip 1 wyif, [k1, p1] 4 times, sm, p2tog, purl to next marker, sm, [p1, k1] 4 times, k1. [1 stitch decreased]
Next Row (wrong side): Slip 1 wyif, [p1, k1] 4 times, sm, knit to next marker, sm, [k1, p1] 4 times, k1.
Working in established pattern, repeat Decrease Row every right-side row 8 (12, 9, 15, 17, 19) more times, then every 4th row 3 (1, 4, 2, 2, 1) time(s). [20 (20, 20, 20, 20, 22) stitches remain]
FOR SIZES 34½, 37¾, 41, AND 44¼ INCHES ONLY
Decrease Row (right side): Slip 1 wyif, [k1, p1] 4 times, remove marker, p2tog, remove marker, [p1, k1] 4 times, k1. [19 stitches remain]
Next Row (wrong side): Slip 1 wyif, [p1, k1] 3 times, p1, k3, p1, [k1, p1] 3 times, k1.
Next Row (right side): Slip 1 wyif, [k1, p1] 3 times, k1, p3, k1, [p1, k1] 3 times, k1.
Next Row: Slip 1 wyif, [p1, k1] 3 times, p1, k3, p1, [k1, p1] 3 times, k1.
Decrease Row: Slip 1 wyif, [k1, p1] 3 times, k1, p2tog, p1, k1, [p1, k1] 3 times, k1. [18 stitches remain]
Next Row: Slip 1 wyif, [p1, k1] 3 times, p1, k2, p1, [k1, p1] 3 times, k1.
ALL SIZES
Work even until Armhole measures 8¾ (9¼, 9¾, 10¼, 10¾, 11¼) inches, ending with a wrong-side row.
Do not cut yarn.
FINISH
ATTACH FRONTS TO BACK SHOULDERS
With wrong sides of Right Front and Right Back Shoulder facing each other, align live stitches of Right Front between markers on Right Back Shoulder. There are 7 (8, 9, 9, 10, 11) selvedge stitches (columns of slipped edge stitches) between markers on Back Shoulder, which will be joined to the 18 (18, 18, 18, 20, 22) Right Front stitches. Here’s how…
Insert right-hand needle into first stitch of Front, then into first selvedge stitch of Shoulder, use working yarn to wrap yarn around needle as if to knit and draw stitch through both the selvedge and live stitch, dropping live stitch off left-hand needle.
Insert needle into next stitch of Front, then into same selvedge stitch just worked, wrap working yarn around needle as if to knit and draw stitch through both selvedge and live stitch. Pass first stitch over second stitch. [1 stitch bound off: 17 (17, 17, 17, 19, 21) Right Front stitches remain]
FOR SIZES 34½ AND 37¾ INCHES ONLY
*Insert right-hand needle into next stitch of Front, then into next selvedge stitch of Shoulder, wrap working yarn around needle as if to knit and draw stitch through both the selvedge and live stitch, dropping live stitch off left-hand needle. Pass first stitch over second stitch. [1 stitch bound off]
[Insert needle into next stitch of Front, then into same selvedge stitch just worked, wrap working yarn around needle as if to knit and draw stitch through both the selvedge and live stitch. Pass first stitch over second stitch.] 2 times. [2 stitches bound off]
Repeat from * 3 (1, –, –, –, –) more time(s). [5, 11, –, –, –, –) Right Front stitches remain]
FOR ALL SIZES
**Insert right-hand needle into next stitch of Front, then into next selvedge stitch of Shoulder, wrap working yarn around needle as if to knit and draw stitch through both the selvedge and live stitch, dropping live stitch off left-hand needle. Pass first stitch over second stitch. [1 stitch bound off]
Insert needle into next stitch of Front, then into same selvedge stitch just worked, wrap working yarn around needle as if to knit and draw stitch through both the selvedge and live stitch. Pass first stitch over second stitch. [1 stitch bound off]
Repeat from ** until all Front Shoulder stitches have been bound off and attached to Back Shoulder.
Cut yarn and pull through last stitch.
Repeat for Left Shoulder, joining new yarn at beginning of sequence.
CONNECT BACK NECK STITCHES
Place each set of 10 Back Neck stitches onto a double pointed needle. Holding the needles parallel with wrong sides facing each other, work a Modified 3-Needle Bind Off over the Back Neck stitches.
Cut yarn and pull through last stitch.
WEAVE ENDS + BLOCK
Weave in all ends and block as desired.


Could this be made with one of the silk containing yarns? Thinking about the Cattail Silk knowing another top uses two together.
Is it possible to see the 87 comments provided earlier? I might be asking the same question as someone else.
Hi Leslie,
Thanks for reaching out! I apologize that our comments are not currently available, but our web team is hard at work to get them back! It sounds like you are thinking of our Sayer top, which uses Cattail Silk held double. However, even held double, Cattail Silk will be a little thin for the Criss Cross Top. For Sayer, on a US 7, our gauge was 20 stitches to 4 inches, but this top calls for 18 stitches to 4 inches, so the fabric would probably be a little sheer or loosely knit if you sized up the needles to obtain the correct gauge. Instead, I would recommend trying our Spectrum Silk held double! It is a gorgeous mostly matte 100% silk, and it is slightly thicker than Cattail Silk, so I think you will have an easier time getting to the right gauge! Another option would be Burnish, which feels and drapes very much like silk, but is a rayon from bamboo. You would also need to use this yarn held double.
I hope that helps, and happy knitting!
Julianna
I love this pattern but don’t know how to knit in the round. Do you have pattern instructions for straight needles?
Hi Mary,
Thanks for reaching out! At this time we only offer instructions for working the pattern in the round, but thank you for expressing your interest! I will be sure to pass this along to the rest of the team!
Warmly,
Gianna
Looks beautiful, what is the difficulty level of this top?
Hi Kit,
Thanks for reaching out! I would say this is an intermediate pattern!
Warmly,
Gianna
Hi are you able to knit this with straight needles?
Hi Lesley,
Thanks for reaching out! I wouldn’t recommend using straight needles for this pattern, since you work the body in the round (and we only offer instructions for working this in the round), I think it would be a bit too complicated to try to re-work the pattern to knit this flat on straight needles!
I hope this helps!
Gianna
Salve, i vostri modelli sembrano interessanti ma sarebbe opportuno che venissero integrati con le trasformazioni da pollici in centimetri e con le tg. europee. Grazie e complimenti
Hi Grazia,
Thanks for reaching out! Thanks for reaching out! We totally hear you regarding metric sizes and measurements. This is something that is currently under consideration, so we really appreciate your input!
Warmly,
Gianna
Left front – have completed the Decrease Row every right side row 9 more times [ right and wrong side rows] and am ready to do the every 4th row 4 times. Have I done one too many wrong side rows? Every 4th row now will take me to a wrong side row to decrease.
Also, is there any reason why I can’t join the back neck borders together before finishing the rest of the front? The extra 36 inches is a nuisance.
Am really liking this top so far.
Many thanks,
Wendy
Sorry to bother you again, but no sooner hit the send button than it occurred to me that row number 9 of the wrong side was actually row number 1 of the “every 4th row decrease 4 times ending on a wrong side row with 20 stitches. [ Left Front.]
Tried that and after only 10 rows am down to 20 stitches.Now I am not too sure where I should start counting the “every 4th row” from.
Should mention that I am doing size 37 – 39. For my bamboo/silk yarn I went up a size and down a needle to get the gauge I wanted.
Feel a bit foolish, this is such a well written pattern. Very clear and easy to follow. Maybe I need more chocolate??? to wake up my brain?
Many thanks once again.
Wendy
Hi Wendy,
Thanks for reaching out! I think there is a bit of confusion about the rows, and unfortunately, I think you may need to take your work back to the beginning of the decrease rows. Basically you will repeat the Decrease Row every right-side row, 9 more times, not row 9, and not decreasing every, only right sides. Once you do that, you will then repeat the Decrease Row every 4th row, 4 more times, ending on a wrong-side row with 20 stitches remaining. You should start counting every 4 rows once you finish the decreases 9 times. Also, please keep in mind you only work the decreases on the right-side rows, never the wrong side. I think this is why you are down to 20 stitches after only 10 rows.
I hope this clears things up and please let me know if you have any more questions!
Gianna
It seem to me I should continue to decrease at armhole as well as neckline as there doesn’t seem to be enough decreases to get the correct stitch count. What am I missing here?
Hi Kim,
Thanks for writing in! Could you please let me know which part of the pattern exactly you are running into trouble along with the size you are making? This could help us better understand where we can help you out.
All the best,
Gavriella
I love this pattern and am in the process of attaching the front and back shoulders. I’ve tried to do this multiple times, trying to figure out how to knit the live stitch, then the selvedge stitch, drop the live stitch and go into the second live stitch and the same selvedge stitch. I end up catching up other stitches, three stitches instead of two on the right needle. I’m finding this the most difficult part of the whole pattern. Could I go into the first two live stitches and into the selvedge as a way to match two live stitches to the one selvedge stitch? Or am I missing something? Why am I finding this so difficult? Thanks!!!!!
Hi Nancy!
Thank you so much for your question! We went ahead and looked at the part of the pattern you are working on and decided that we could better help you out over email. This is a very size-specific pattern, so if you could send us the size you are working on, and some photos of your work to customerservice@purlsoho.com, we would be more than happy to help you proceed from there!
Best,
Margaret
Possible error. DIVIDE BODY
Division Round: [P1, k1] 6 times, p1, sm, purl to next marker, sm, [p1, k1] 4 times, p1, bind off 8 stitches in pattern for Left Underarm (removing Left Side marker), [k1, p1] 4 times, sm
After (removing left side marker), P1, {K1,P1} 4 times, sm
Hi Patty!
Thank you for your post. We’re not sure if you’re proposing an edit or inquiring about a typo or an extra stitch on your needles, and wanted to double check!
The division round should end with 84 (92, 100, 108, 116, 124) stitches left on your needles each for Front and Back. In addition, there is one purled stitch before binding off the 8 stitches in pattern for Left Underarm, so perhaps this is where the purl stitch you pointed out is located!
I hope this helps in the meantime, and please feel free to let us know if you have any other questions about this pattern!
All the best,
Margaret
I just finished this top and it is perfect! What a lovely design and well written pattern. It fits perfectly. This will be a long time favorite, I can tell. Thank you for this pattern.
I love the look of this pattern, understated and classic yet sleeveless. I would like to make this top for my daughter as a gift, but in a yarn more suitable for the hot LA climate than a merino wool. Can you recommend a cool cotton or linen yarn that would meet the gauge requirements of this pattern?
Hi Victoria!
Thank you for your question. I would recommend Tulip Cotton or Sunshower Cotton for a cotton alternative at this gauge! Tulip Cotton is a wonderful worsted weight cotton that would be lovely for a cool version of this top, while Sunshower Cotton is a smidge more fluffy and would provide a unique look with its stippled coloring. You really can’t go wrong with either of these two yarns!
All the best,
Margaret
Hi! Any tips or tricks for making gauge? I’m using the worsted twist and I’ve knit swatches using size 6 and size 5 needles. Still not making gauge and think size 4 needles would be very tight. Would you recommend a lighter weight yarn?
Hi Carlye,
Thanks for reaching out! I actually would recommend giving the size 4s a try. If your gauge is still too loose on size 5s, then it likely will be much closer on the 4s! Let me know how it goes!
All the best,
Lili
Could this pattern be knitted up in a fingering weight yarn?
Hi Terry,
Because this pattern I designed for a much thicker yarn, I wouldn’t recommend knitting it in a fingering weight yarn! If you have a fingering weight on hand though, I’d recommend testing it out by knitting up a swatch. If you’re able to achieve the gauge (20 stitches and 31 rows = 4 inches in reverse stockinette stitch) and are satisfied with the texture and density of the knit fabric, then I’d say go for it! But the stitches will feel very loose and airy since the yarn is thinner.
All the best,
Lili
Please help,
I am stuck at the Right Front : Shape armholes + Neckline
1)
For size 34 1/2, …
It seems like the left front is decreased 2 stitches in row 1, but the Right front is decreased only 1 stitch.
For left front repeat row 1 (size 34 1/2) 1 more time but the right front Zero decreased
Thank you
Hi Nga,
Thanks for reaching out! The RIGHT FRONT is also decreased by 2 stitches in Row 1; there is a p2tog near the beginning of the row and an ssp near the end. I’ve bolded these stitches in the instructions below so you’re sure to catch them both:
Row 1 (right side): With right side facing you, slip 1 stitch to right-hand needle, join new yarn and [k1, p1] 4 times, sm, p2tog, purl to 2 stitches before next marker, ssp, sm, [p1, k1] 4 times, k1. [34 (36, 40, 40, 42, 43) stitches remain]
In answer to your other question, the RIGHT and LEFT FRONT sections are written a bit differently to account for different factors, but they do amount to the same number of rows in the end! Hope this helps!
All the best,
Lili
I bought from you last year widgeon fine Falkland merino. Do you think it is suitable for this pattern? Could you recommend a vest pattern that would work with this yarn?
Hi Joan,
This pattern is designed for a worsted weight yarn, so unfortunately, Wigeon will be too thin, since it’s sportweight. We do have a vest pattern written for a sportweight yarn though, and you can find it right here!
All the best,
Lili