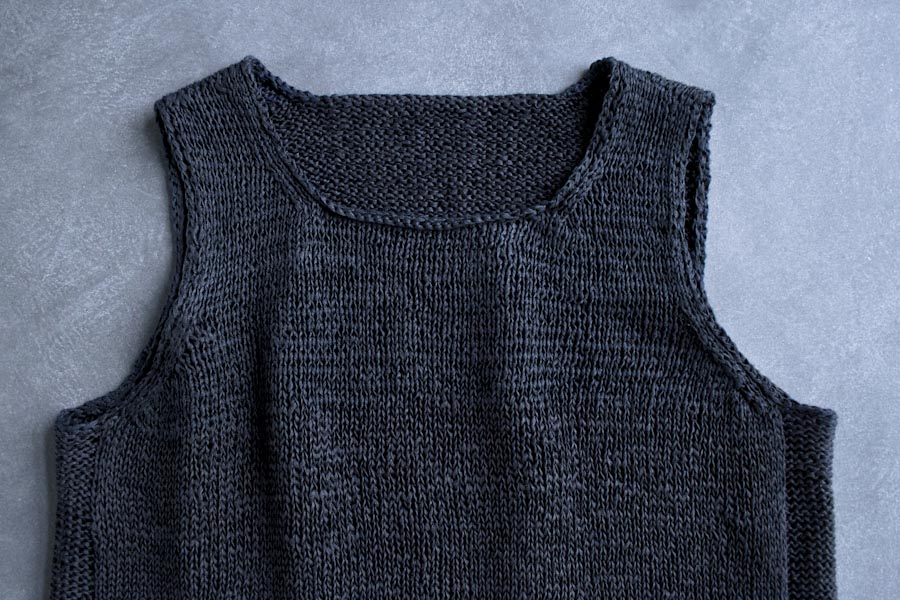

Notched Hem Tank Top
It seems like indigo dye is everywhere right now, from bright blue shower curtains to saturated shirts and pillows to deep dark denim bedding. I’m so smitten with the color I’ve contemplated setting up an indigo vat in my itty-bitty Brooklyn apartment!

But since I can’t imagine my landlord or my roommates being too happy with a dye kitchen in the house, I did a little dance of joy when I saw that Habu Textiles had done the work for me. Knitted Linen in Dark Indigo glows with intensity. Finally, the rich indigo I crave, without the stained hands and sink!

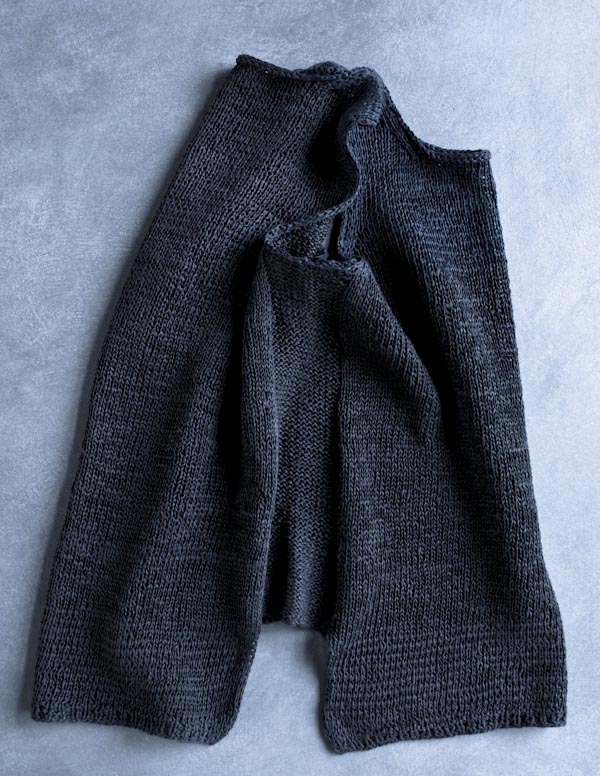
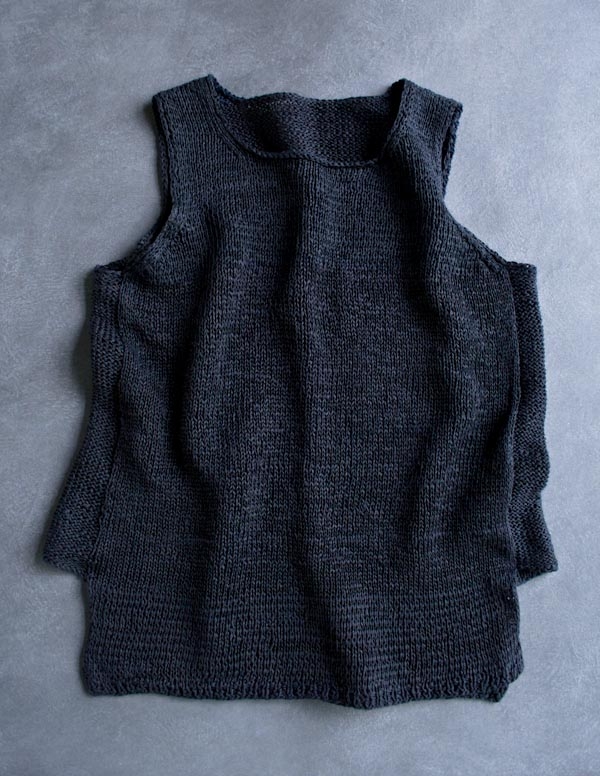
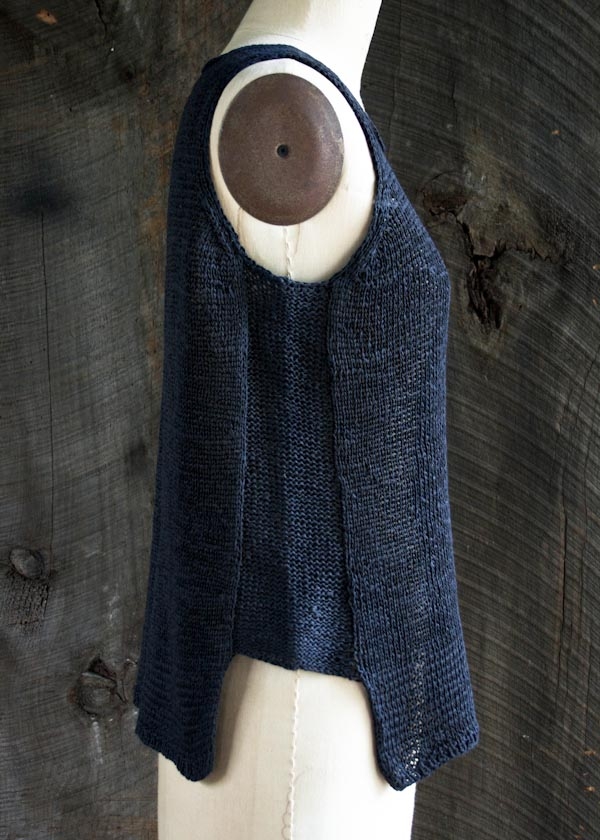
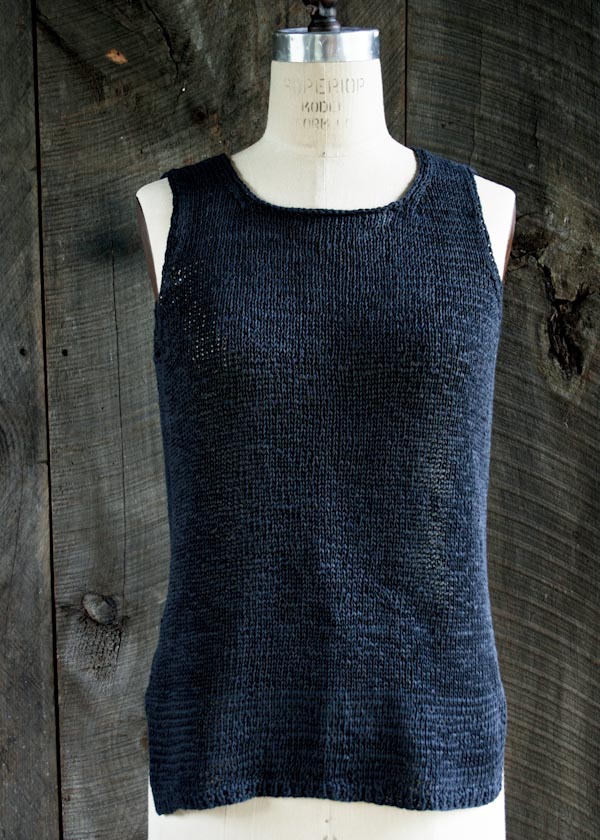
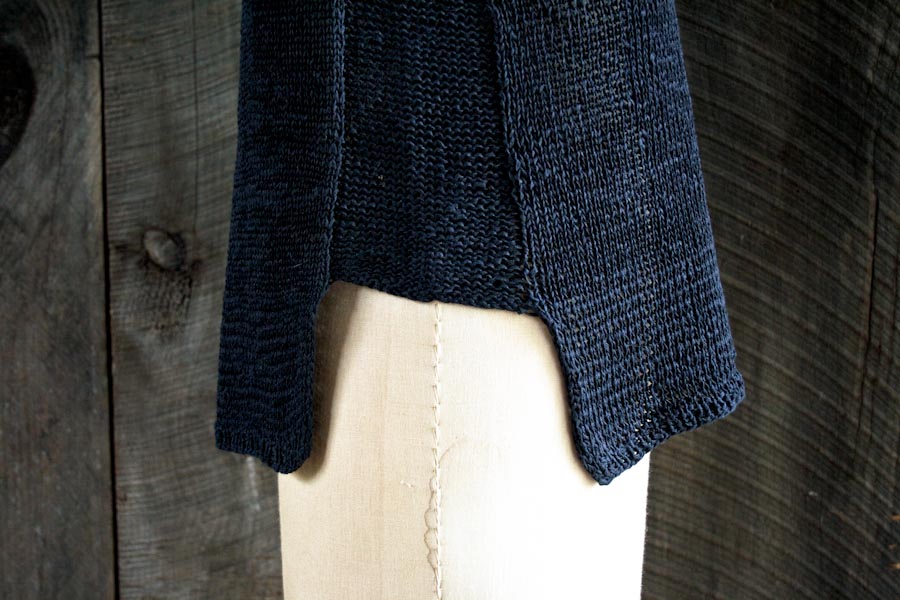
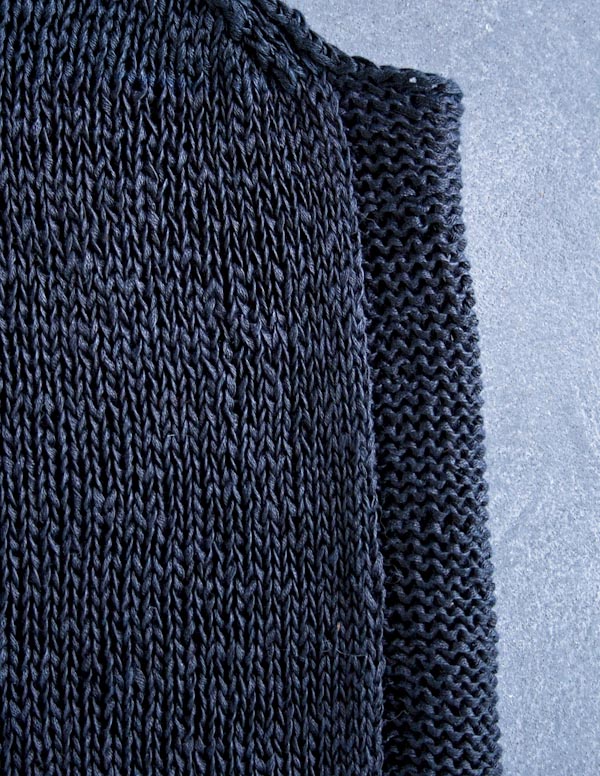
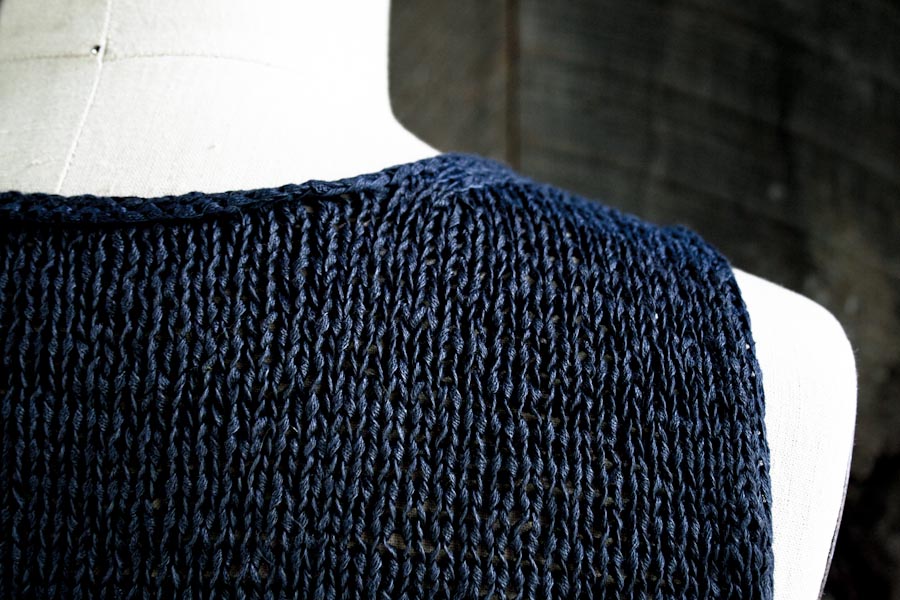
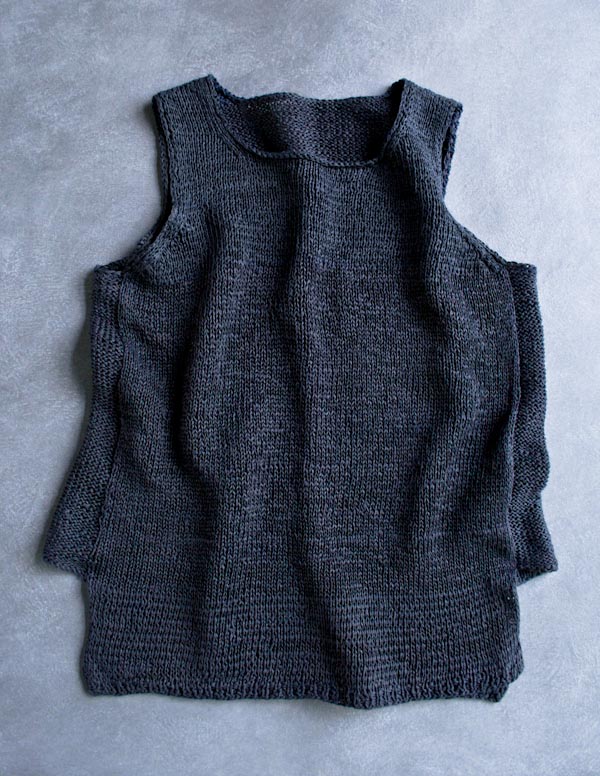
I used Knitted Linen to whip up this easy-fitting Notched Hem Tank Top. The front and back panels are in stockinette stitch, and the flattering side panels are in reverse stockinette. The notched hem, slightly longer in the back than the front, gives this tank an airy feel, just right for layering over shorts and skirts. Summertime, easy breezy knitting and beautiful indigo… Now we’re talking! -Gina
Designed by Purl Soho designer, Gina Rockenwagner. Click here to see even more of Gina’s designs!
Share your progress and connect with the community by tagging your pics with #PurlSoho, #PurlSohoBusyHands, and #PurlSohoNotchedHemTankTop. We can’t wait to see what you make!
Materials
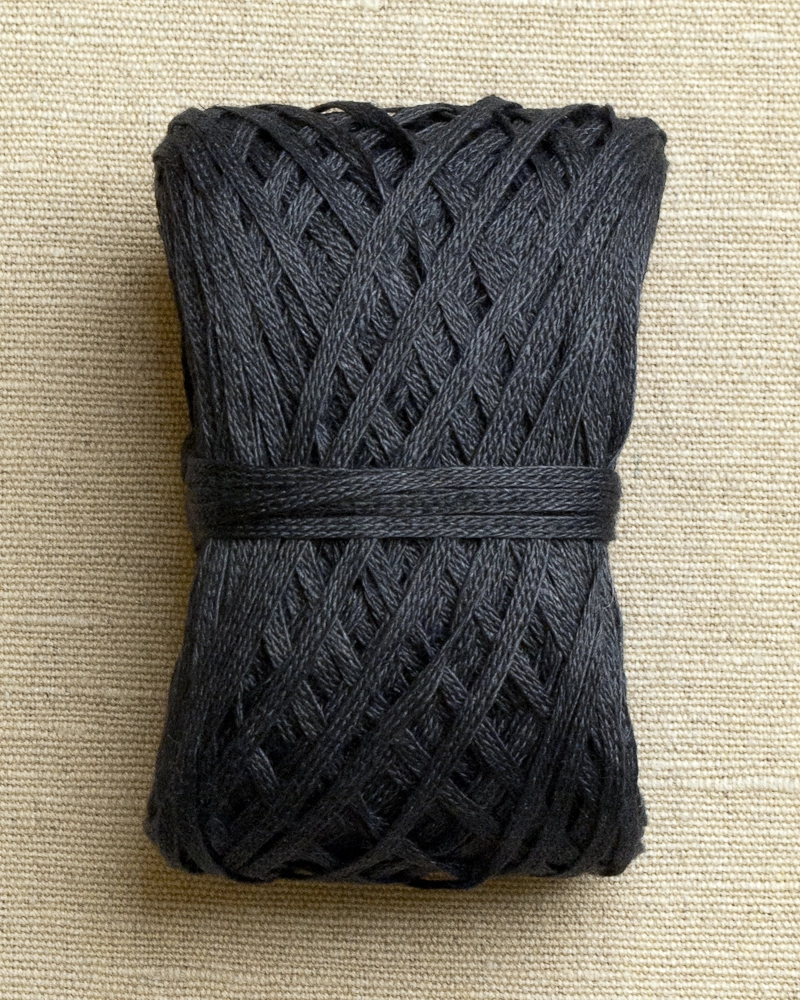
- 11 (12, 14, 15, 16) skeins of Habu Textiles’ Knitted Linen Tape, 100% linen; approximately 506 (552, 644, 690, 735) yards of a fingering weight yarn required. We used the color Dark Indigo.
- US 4 (3.5 mm) circular or straight needles
- US 7 (4.5 mm), 32-inch circular needle
- Stitch holders or scrap yarn
- A stitch marker
NOTE: Just like your favorite dark jeans, the indigo used to dye this yarn can transfer to light colored fabrics. Please wash the tank top separately from other items for the first couple of washes to prevent staining any light colored clothing.
Gauge
21 stitches and 28 rows = 4 inches in stockinette stitch, using the larger needle.
Sizes
NOTE For help picking a size, please check out our Understanding Ease + Selecting Size Tutorial!
34 (37, 40, 43, 46)
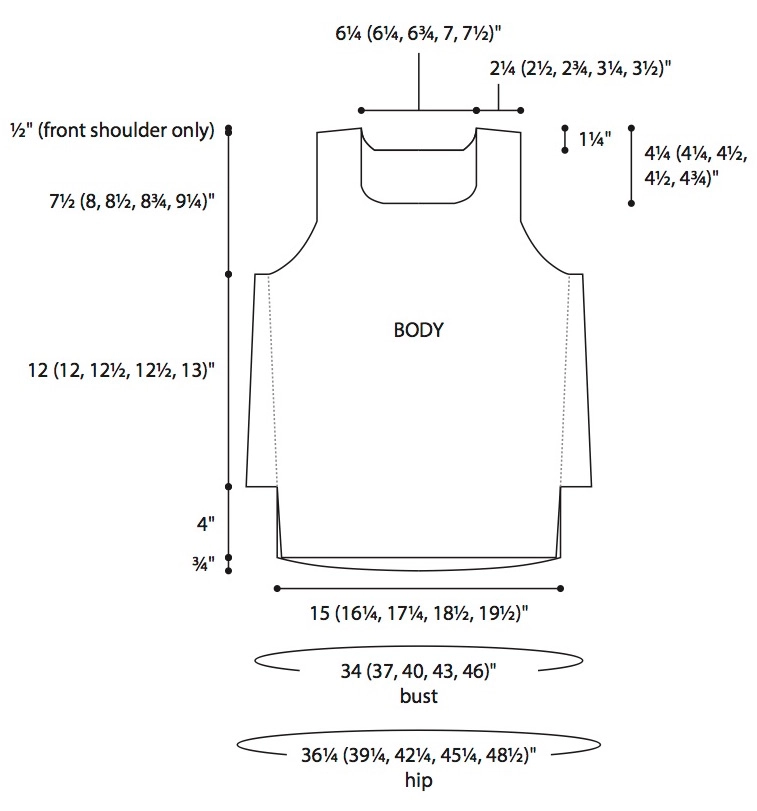
- Finished Chest Circumference: 34 (37, 40, 43, 46) inches
- Finished Length from Shoulder to Bottom Edge (Back): 24 ¼ (24 ¾, 25 ¾, 26, 27) inches
- Finished Length from Underarm to Bottom Edge (Front): 16 (16, 16 ½, 16 ½, 17) inches
Sample: Size 37 is pictured here, shown with 2 inches of positive ease.
NOTES
SHORT-ROW SHAPING: WRP-T (WRAP AND TURN)
NOTE: For more information about this technique, please visit our Short Rows tutorial.
On the right side: Keeping yarn in back, slip next stitch purlwise from left needle to right needle. Bring yarn to front. Return slipped stitch to left needle. Bring yarn to back. Turn work so wrong side is facing you.
On the wrong side: Keeping yarn in front, slip next stitch purlwise from left needle to right needle. Bring yarn to back. Return slipped stitch to left needle. Bring yarn to front. Turn work so right side is facing you.
PICKING UP PURL WRAP ON KNIT SIDE
NOTE: See this situation in action at minute 4:33 of our Short Rows tutorial.
Use tip of right needle to pick up wrap, inserting needle from front to back. Place wrap onto left needle, nudging wrap, if necessary, so it is after next stitch on needle. Slip first stitch knitwise, then slip wrap purlwise. Insert tip of left needle into front legs of two slipped stitches. Wrap working yarn around right needle to knit two together.
Pattern
Begin Back
*With the smaller needle(s), cast on 79 (85, 91, 97, 103) stitches. We used a basic Long Tail Cast On.
Ribbing Row 1 (wrong side): Slip 1 with yarn in front (wyif), *k1, p1, repeat from * to end of row.
Ribbing Row 2 (right side): Slip 1 with yarn in back (wyib), *p1, k1, repeat from * to end of row.
Repeat Ribbing Rows 1 and 2 until piece measures 1 inch from the cast-on edge, ending with a Row 1.
Change to larger needle and still working back and forth in rows…
Next Row (right side): Slip 1 wyib, knit to end of row.
Next Row (wrong side): Slip 1 wyif, purl to end of row.
Repeat the last two rows until piece measures 4 inches from the cast-on edge, ending with a wrong side row.**
Cut the yarn and place the stitches on a stitch holder or scrap yarn.
Begin Front
Work as for the “Begin Back” section from * to **.
Do not cut the yarn.
Join to Work in the Round
Knit across the 79 (85, 91, 97, 103) stitches of the Front; turn so the wrong side is facing you and cable cast on 16 (18, 20, 22, 24) stitches; turn so the right side is facing you, knit across the 79 (85, 91, 97, 103) stitches of the Back; turn so the wrong side is facing you and cable cast on 8 (9, 10, 11, 12) stitches, place a marker, cable cast on 8 (9, 10, 11, 12) stitches; turn so the right side is facing you.
Carefully checking to make sure the stitches are not twisted around the needle, join to work in the round. [190 (206, 222, 238, 254) stitches]
Continue in the Round
Note: Round 1 is a partial round to bring you back to the stitch marker, which now marks the beginning of the round.
Round 1: K79 (85, 91, 97, 103), p16 (18, 20, 22, 24), k79 (85, 91, 97, 103), p8 (9, 10, 11, 12).
Round 2: P8 (9, 10, 11, 12), k79 (85, 91, 97, 103), p16 (18, 20, 22, 24), k79 (85, 91, 97, 103), p8 (9, 10, 11, 12).
Repeat Round 2 until piece measures 7 inches from the cast-on edges of the Front and Back hems.
Shape Back and Body
Note: The Back is shaped with short rows, and the Body is shaped with decreases at the sides. If you need some short row pointers, please visit our Short Rows Tutorial.
Short Row 1 (right side): P8 (9, 10, 11, 12), k79 (85, 91, 97, 103), p16 (18, 20, 22, 24), k77 (83, 89, 95, 101), wrap and turn.
Short Row 2 (wrong side): P75 (81, 87, 93, 99), wrap and turn.
Short Row 3: K77 (83, 89, 95, 101), working wrapped stitch with its wrap as you come to it, p8 (9, 10, 11, 12).
Decrease Round 1: P7 (8, 9, 10, 11), k2tog, k77 (83, 89, 95, 101), ssk, p14 (16, 18, 20, 22), k2tog, k77 (83, 89, 95, 101), working wrapped stitch with its wrap as you come to it, ssk, p7 (8, 9, 10, 11). [186 (202, 218, 234, 250) stitches]
Next round: P7 (8, 9, 10, 11), k79 (85, 91, 97, 103), p14 (16, 18, 20, 22), k79 (85, 91, 97, 103), p7 (8, 9, 10, 11).
Repeat the last round until piece measures 10 inches from the cast-on edge of the Front hem.
Short Row 4 (right side): P7 (8, 9, 10, 11), k79 (85, 91, 97, 103), p14 (16, 18, 20, 22), k77 (83, 89, 95, 101), wrap and turn.
Short Row 5 (wrong side): P75 (81, 87, 93, 99), wrap and turn.
Short Row 6: K77 (83, 89, 95, 101), working wrapped stitch with its wrap as you come to it, p7 (8, 9, 10, 11).
Decrease Round 2: P6 (7, 8, 9, 10), k2tog, k77 (83, 89, 95, 101), ssk, p12 (14, 16, 18, 20), k2tog, k77 (83, 89, 95, 101), working wrapped stitch with its wrap as you come to it, ssk, p6 (7, 8, 9, 10). [182 (198, 214, 230, 246) stitches]
Next Round: P6 (7, 8, 9, 10), k79 (85, 91, 97, 103), p12 (14, 16, 18, 20), k79 (85, 91, 97, 103), p6 (7, 8, 9, 10).
Repeat the last round until piece measures 13 inches from the cast-on edge of the Front hem.
Short Row 7 (right side): P6 (7, 8, 9, 10), k79 (85, 91, 97, 103), p12 (14, 16, 18, 20), k77 (83, 89, 95, 101), wrap and turn.
Short Row 8 (wrong side): P75 (81, 87, 93, 99), wrap and turn.
Short Row 9: K77 (83, 89, 95, 101), working wrapped stitch with its wrap as you come to it, p6 (7, 8, 9, 10).
Decrease Round 3: P5 (6, 7, 8, 9), k2tog, k77 (83, 89, 95, 101), ssk, p10 (12, 14, 16, 18), k2tog, k77 (83, 89, 95, 101), working wrapped stitch with its wrap as you come to it, ssk, p5 (6, 7, 8, 9). [178 (194, 210, 226, 242) stitches]
Next Round: P5 (6, 7, 8, 9), k79 (85, 91, 97, 103), p10 (12, 14, 16, 18), k79 (85, 91, 97, 103), p5 (6, 7, 8, 9).
Repeat the last round until work measures 16 (16, 16 ½, 16 ½, 17) inches from the cast-on edge of the Front hem, ending 3 (4, 5, 6, 7) stitches before marker on final round.
Divide Work for Top Front and Back
Dividing Round: Bind off the next 6 (8, 10, 12, 14) stitches (removing marker), p2 (including the last stitch from bind off), k79 (85, 91, 97, 103) across the Front, p2, bind off the next 6 (8, 10, 12, 14) stitches, p2 (including the last stitch from bind off), k79 (85, 91, 97, 103) across the Back, p2.
Place the 83 (89, 95, 101, 107) stitches of the Front on a stitch holder or scrap yarn.
Top Back
Note: For the Top Back and Top Front, you will not be working in the round; you will work back and forth in rows.
Row 1 (wrong side): Slip 1 wyib, k1, purl to last 2 stitches, k2.
Decrease Row 1 (right side): Slip 1 wyif, k2tog, k77 (83, 89, 95, 101), ssk, p1. [81 (87, 93, 99, 105) stitches]
Decrease Row 2 (wrong side): P2tog tbl (through the back loop), p77 (83, 89, 95, 101), p2tog. [79 (85, 91, 97, 103) stitches]
Decrease Row 3: Slip 1 wyib, k1, ssk, knit to last 4 stitches, k2tog, k2. [2 stitches decreased]
Decrease Row 4: Slip 1 wyif, p1, p2tog, purl to last 4 stitches, p2tog tbl, p2. [2 stitches decreased]
Repeat Decrease Rows 3 and 4 four (five, five, five, five) more times, then repeat Decrease Row 3 once more. [57 (59, 65, 71, 77) stitches]
Next Row (wrong side): Slip 1 wyif, purl to end of row.
Next Row (right side): Slip 1 wyib, knit to end of row.
Repeat the last two rows until armhole measures 6 ¼ (7 ½, 8, 8 ¼, 8 ¾) inches, ending with a wrong side row.
Bind Off for Back Neckline
Bind Off Row (right side): Slip 1 wyib, k16 (17, 19, 21, 23), bind off 23 (23, 25, 27, 29) stitches, knit to end.
Place the first set of 17 (18, 20, 22, 24) stitches you worked on a stitch holder or scrap yarn. These stitches are for the Back Right Shoulder. You will work the Back Left Shoulder first.
Back Left Shoulder
Note: Continue working on the second set of 17 (18, 20, 22, 24) stitches.
Decrease Row 1 (wrong side): Slip 1 wyif, purl to last 4 stitches, p2tog tbl, p2. [1 stitch decreased]
Decrease Row 2 (right side): Slip 1 wyib, k1, ssk, knit to end of row. [1 stitch decreased]
Repeat Decrease Rows 1 and 2 once more, then repeat Decrease Row 1 once again. [12 (13, 15, 17, 19) stitches]
Next Row (right side): Slip 1 wyib, knit to end of row.
Next Row (wrong side): Slip 1 wyif, purl to end of row.
Armhole measures approximately 7 ½ (8, 8 ½, 8 ¾, 9 ¼) inches.
Cut the yarn and place the 12 (13, 15, 17, 19) stitches of the Back Left Shoulder onto a stitch holder or scrap yarn.
Back Right Shoulder
Slip the 17 (18, 20, 22, 24) stitches of the Back Right Shoulder to the larger needle. With the right side facing you, join a new ball of yarn to the Back Right Shoulder stitches, ready to work a right side row.
Decrease Row 1 (right side): Slip 1 wyib, knit to last 4 stitches, k2tog, k2. [1 stitch decreased]
Decrease Row 2 (wrong side): Slip 1 wyif, p1, p2tog, purl to end of row. [1 stitch decreased]
Repeat Decrease Rows 1 and 2 once more, then repeat Decrease Row 1 once again. [12 (13, 15, 17, 19) stitches]
Next Row (wrong side): Slip 1 wyif, purl to end of row.
Next Row (right side): Slip 1 wyib, knit to end of row.
Armhole measures approximately 7 ½ (8, 8 ½, 8 ¾, 9 ¼) inches.
Cut the yarn and place the 12 (13, 15, 17, 19) stitches of the Back Right Shoulder onto a stitch holder or scrap yarn.
Top Front
Slip the 83 (89, 95, 101, 107) stitches of the Top Front onto the larger needle. With the wrong side facing you, join a new ball of yarn to the Top Front, ready to work a wrong side row.
Row 1 (wrong side): Slip 1 wyib, k1, purl to last 2 stitches, k2.
Decrease Row 1 (right side): Slip 1 wyif, k2tog, k77 (83, 89, 95, 101), ssk, p1. [81 (87, 93, 99, 105) stitches]
Decrease Row 2 (wrong side): P2tog tbl, p77 (83, 89, 95, 101), p2tog. [79 (85, 91, 97, 103) stitches]
Decrease Row 3: Slip 1 wyib, k1, ssk, knit to last 4 stitches, k2tog, k2. [2 stitches decreased]
Decrease Row 4: Slip 1 wyif, p1, p2tog, purl to last 4 stitches, p2tog tbl, p2. [2 stitches decreased]
Repeat Decrease Rows 3 and 4 three (four, four, three, three) more times, then repeat Decrease Row 3 once more. [61 (63, 69, 79, 85) stitches]
Next Row (wrong side): Slip 1 wyif, purl to end of row.
Decrease Row 5 (right side): Slip 1 wyib, k1, ssk, knit to last 4 stitches, k2tog, k2. [2 stitches decreased]
Repeat the last two rows one (one, one, three, three) more time(s). [57 (59, 65, 71, 77) stitches]
Next Row (wrong side): Slip 1 wyif, purl to end of row.
Next Row (right side): Slip 1 wyib, knit to end of row.
Repeat the last two rows until armhole measures 3 ¾ (4 ¼, 4 ½, 4 ¾, 5) inches, ending with a wrong side row.
Bind Off for Front Neckline
Bind Off Row (right side): Slip 1 wyib, k16 (17, 19, 21, 23), bind off 23 (23, 25, 27, 29) stitches, knit to end.
Place the first set of 17 (18, 20, 22, 24) stitches you worked on a stitch holder or scrap yarn. These stitches are for the Front Left Shoulder. You will work the Front Right Shoulder first.
Front Right Shoulder
Note: Continue working on the second set of 17 (18, 20, 22, 24) stitches.
Decrease Row 1 (wrong side): Slip 1 wyif, purl to last 4 stitches, p2tog tbl, p2. [16 (17, 19, 21, 23) stitches]
Decrease Row 2 (right side): Slip 1 wyib, k1, ssk, knit to end of row. [15 (16, 18, 20, 22) stitches]
Next Row (wrong side): Slip 1 wyif, purl to end of row.
Decrease Row 3 (right side): Slip 1 wyib, k1, ssk, knit to end of row. [1 stitch decreased]
Repeat the last 2 rows two more times. [12 (13, 15, 17, 19) stitches]
Next Row (wrong side): Slip 1 wyif, purl until end of row.
Next Row (right side): Slip 1 wyib, knit until end of row.
Repeat the last two rows until armhole measures 7 ½ (8, 8 ½, 8 ¾, 9 ¼) inches, ending with a wrong side row.
Short Row 1 (right side): Slip 1 wyib, k7 (8, 10, 12, 14), wrap and turn.
Short Row 2 (wrong side): Purl to end of row.
Short Row 3: Slip 1 wyif, k2 (3, 5, 7, 9), wrap and turn.
Short Row 4: Purl to end of row.
Next Row (right side): Slip 1 wyif, knit to end, picking up the wraps as you come to them and knitting them together with the stitch they wrap.
Do not cut the yarn.
Turn the garment inside out. Place the stitches of the Back Right Shoulder onto a spare needle in a similar size. Hold the two needles parallel, with the right sides of the pieces together and so that the wrong side of the Back Right Shoulder is facing you. With a third needle in a similar size, work a 3 needle bind off across all stitches, using the ball of yarn attached to the Front Right Shoulder. Cut the yarn and thread the tail through the last remaining stitch. Pull gently to secure. Turn the garment right side out.
Front Left Shoulder
Slip the 17 (18, 20, 22, 24) stitches of the Front Left Shoulder to the larger needle. With the wrong side facing you, join a new ball of yarn to the Front Left Shoulder, ready to work a wrong side row.
Decrease Row 1 (wrong side): Slip 1 wyif, p1, p2tog, purl to end of row. [16 (17, 19, 21, 23) stitches]
Decrease Row 2 (right side): Slip 1 wyib, knit to last 4 stitches, k2tog, k2. [15 (16, 18, 20, 22) stitches]
Next Row (wrong side): Slip 1 wyif, purl to end of row.
Decrease Row 3 (right side): Slip 1 wyib, knit to last 4 stitches, k2tog, k2. [1 stitch decreased]
Repeat the last two rows two more times. [12 (13, 15, 17, 19) stitches]
Next Row (wrong side): Slip 1 wyif, purl to end of row.
Next Row (right side): Slip 1 wyib, knit to end of row.
Repeat the last two rows until armhole measures 7 ½ (8, 8 ½, 8 ¾, 9 ¼) inches, ending with a right side row.
Short Row 1 (wrong side): Slip 1 wyif, p7 (8, 10, 12, 14), wrap and turn.
Short Row 2 (right side): Knit to end of row.
Short Row 3: Slip 1 wyib, p2 (3, 5, 7, 9), wrap and turn.
Short Row 4: Knit to end of row.
Next Row (wrong side): Slip 1 wyif, purl to end, picking up the wraps as you come to them and purling them together with the stitch they wrap, Do not cut the yarn.
Turn the garment inside out. Place the stitches of the Back Left Shoulder onto a spare needle in a similar size. Hold the two needles parallel, with the right sides of the pieces together and the wrong side of the Front Right Shoulder facing you. With a third needle in a similar size, work a 3 needle bind off across all stitches, using the ball of yarn attached to the Front Left Shoulder. Cut the yarn, thread the tail through the last stitch. Pull gently to secure. Turn the garment right side out.
Finish Armholes
With the larger needle and the right side facing you, beginning at the center of the underarm, pick up and knit 72 (80, 86, 90, 94) stitches evenly around the armhole edge. Loosely bind off all stitches.
Repeat for other armhole.
Finish Neckline
With the larger needle and the right side facing you, beginning at the left shoulder seam, pick up and knit 63 (63, 67, 69, 73) stitches along the Front Neck and 43 (43, 45, 47, 49) stitches along the Back Neck. [106 (106, 112, 116, 122) stitches total]. Loosely bind off all stitches.
Weave in the ends.
Block the tank top by hand washing it separately from other items in cold water with a mild detergent. Rinse until the water runs clear. Some indigo will wash out, but don’t worry; the tank top will come out the same beautiful, dark indigo color!


wondered if anyone has made this with sleeves?
Hi Anita,
Thank you for the comment! We have had a few requests for how to go about adding sleeves to this project. You could add sleeves to this, it wouldn’t be a beginner modification but it’s definitely do-able. Follow the directions for finishing the armholes, but instead of binding off, you can join to work in the round. Throw a decrease in the underarm every couple of rounds until the sleeve is the width you want. Then continue straight and bind off when the sleeve is the length you want.
I hope this helps and feel free to respond if you have anymore questions!
Happy Knitting!
Jake
Hi. I’m confused about the yardage needed. I’ve read the above about the mislabeled labels. The area where you buy the yarn says number of skeins does not change with the correction for the mislabeled labels. Could u please verify. Maybe change the pattern to reflect yardage for each size? Thank you!
Hi Daniele,
Thank you for the comment! Yes the yardage was mislabeled but the number of skeins is correct. The total yardage needed to make the smallest size is 616 yards and each skein has 56 yards on it. I hope this clarifies and feel free to respond if you have anymore questions!
Good Luck!
Jake
I’m still a bit confused about the sizing. If I have a 36″ bust and want the garnet to fit with the 2″ easing, would I want to knit the 37″ size or the 40″ size?
Thanks
Hi Robin,
Thanks for the question! Based on my experience with this yarn I suggest you knit the 40″ size. There isn’t a lot of stretch in the knitted linen yarn, so if the garment is too tight, you’ll be really uncomfortable. The 40″ chest should work out just fine!
-Adam
I love your simple beautiful patterns. I want to start this tank top but am wondering if I should choose the size closest to my true bust measurement or the next largest? Is the ease built into the pattern? Thank you!
Hi Debbie,
Thank you for the comment! This piece is designed to fit with a 2-inch ease so if you want it to be a fitted tank top then I would go with the closest size. The tank also has a good amount of stretch so I think it should fit appropriately. The design does work well as a slightly oversized piece so I think either will work nicely depending how you would like it to fit.
Good Luck and feel free to write back if you have anymore questions!
Jake
Visited habu this weekend in NY. They didn’t have the linen tape. I chose A-174 cotton gima in coral instead. Also a tape but only 1mm wide. Is that similar to the linen tape?
Thanks
Esta
Hi Esta,
Thank you for the comment! The Cotton Gima is a beautiful yarn substitute! This yarn is a finer gauge than the linen tape we used in the pattern. The cotton gima knits up to about 6.5 stitches per inch while the gauge with the original yarn is about 5 stitches per inch. You can absolutely use it but I would make at least one size larger than you intend to wear to accommodate the necessary additional stitches.
I hope this helps and feel free to write back if you have anymore questions!
Happy Knitting!
Jake
My gauge is usually spot on, but with this linen tape I got 17 sts per 4″ rather than 21 sts on size 7 metal lace needles knitted in the round. I’ll try going down to a size 6 needle, but am worried I still won’t get close because the yarn is so stiff. I am wondering, considering how it is bundled, if I can’t soak the whole skein in water first to soften it. When I soaked the swatch in cold water and a mild detergent, it did not “run.” It is somewhat softer but not what I expected. Should I try “warm” water? Thank you!
Hi Carol,
Thank you for the comment! The linen will become much softer and easier to work with after it’s been soaked, and warm water will relax it more than cold. You can try to soak the yarn if you would like but be sure to take out the tissue paper in the center of the ball. I would also try going down a needle size if you can still knit it comfortably. If you like the fabric you are getting on the US 7 needles then I would go with that and you could just alter the pattern slightly to accommodate the gauge if you are comfortable doing that!
I hope this helps and feel free to write back if you have anymore questions!
Good Luck!
Jake
Thank you for your reply, Jake. I have tried the size 6 needle, and it is just too small for the linen tape, so I’ll have to stick with the size 7 and reduce the number of total stitches. I need to make the smallest size tank, so I can’t go down a pattern size. At my guage of 17 stitches per 4 inches, and 182 stitches in the round for a size 34, I figure I need to reduce the number of stitches 20%!! Is this even possible? Maybe you could recommend another linen yarn that would give the same affect but would knit up in a smaller gauge. Thank you.
Hi Carol,
Thanks for responding! We do carry another beautiful linen yarn by Euroflax that would be a nice substitute for the project. It is a sport weight and knits nicely on a size 4-6 needle so you should be able to achieve the gauge with one of those needle sizes. You can browse our color selection of that yarn here; https://www.purlsoho.com/purl/products/item/380-Louet-Euroflax-Originals
You could also reduce your number of stitches by working off a cast on of 53 (calculated from your gauge) but you will have to go through and make sure that all your shaping works out. If you choose to alter the pattern just take out the number of stitches from the center of the short rows and you can keep the other decreases the same for the most part. You may also need to reconfigure the neckline but all are do-able alterations.
I hope this works out and let me know if there’s anything else I can help you with!
Good Luck!
Jake
Thanks for the lower cost options. How is the drape on the Bockens Tow Linen? Could you use Shibui Linen for this pattern? The indigo color is so fabulous it’s part of what I want to recreate.
Hi MJ,
Thanks for the comment! The Bockens Tow Linen yarn has more of a raw linen quality. It is also finer gauge than the Knitted Linen Tape that we used so if you use the same needle size to achieve gauge I think it will drape nicely but will be a very open knit. The Shibui Linen is also a finer gauge but due to the construction of that yarn it will drape very beautifully so for that one I would go down in needle size and make one size larger than you intend to wear to accommodate the finer yarn. I think one of these options should work beautifully, I would also take a look at the Euroflax linen which I have suggested people use as a substitute. You can browse the color selection for that yarn here; https://www.purlsoho.com/purl/products/item/380-Louet-Euroflax-Originals
I hope this helps you with choosing a yarn and feel free to write back if you’d like anymore suggestions!
Happy Knitting!
Jake
I’ve started knitting the Notched Hem Tank with N-98B as suggested by pattern. It is very stiff and I’m wondering if I should FROG it and soak all the skeins in warm water before knitting. Will it change the yarn too much to soak it, knit project, and then block it?
Hi Susan,
Thank you for the comment! Linen yarns by nature are stiffer to work with. You can soak the skeins in warm water to soften it slightly although it is not ideal to soak yarns while they are in ball form. I also find that soaking linen breaks down the fiber slightly (which makes it softer) but with the knitted construction of this yarn I think it will be a very minor effect.
I hope this helps and feel free to write back if you have anymore questions!
Good Luck!
Jake
I love your beautiful patterns! I purchased Cascade Yarn Ultra Pima to make this beautiful tank. Do you recommend a particular cast on method?
Thank you
Hi Vicki,
Thank you for the comment! I would do a regular long tail cast on for this project! I’m very curious how it will knit up the Ultra Pima Cotton let me know how it works out!
Happy Knitting!
Jake
Hi,
I’ve started working on this, but am wondering about the length. I have a longer-than-average torso (for the over-the-top top, my back section was 22 inches instead of the 18 1/2 for an XS). I’m wondering if I should still start the short rows 7″ from the bottom, or if I should knit a few inches more before starting them.
thanks!!
Hi Jessica,
Thank you for the comment! This top is already about 6 inches longer than the Over-the-top Top so I think it should not be necessary to add length. Though if you would like it to be more like a tank dress you could add a couple inches!
I hope this helps clarify and feel free to write back if you have anymore questions!
Happy Knitting!
Jake
Is there any hope for a top-down version? :0)
Hi Brenda-
We don’t have plans to do a top down version but thanks for the suggestion!
Molly
Just finished knitting the middle size. Used recommended needles as my tension is very average (30 years a knitter) fitted my size 12 australian, self very generously with nearly 4 skeins left over!! That was an expensive error in materials needed!!
Hi Sara-
I am so sorry to hear you had this problem! Which size did you knit? And were you getting the proper gauge? Needle size is always just a recommendation because everyone knits differently. Please let me know, I’d love to get to the bottom of this!
Molly
How would I adjust the pattern for a size 32?
Hi Linda! In general, we don’t resize our patterns, I’m sorry about that, but thanks a lot for writing in. Best to you.
Just finished…. thank you, it’s really wonderful! It’s the first item that I knit for myself and not for someone’s gift, I’m so proud of myself
Hi Debora, that’s really great to hear! Congratulations! Thanks for writing!
When you begin the short rows in shaping back and body, it does not say to pick them up as it does later on when working front right & left shoulder. I assume we should always pick up the wraps even when it does not say to? Is that correct?
Hi Laura!
You’re absolutely correct! When working short rows for the the back and body, you will pick up the wraps and work them as you come to them in the following rows, just as you will when working the front right and left shoulder. Thanks for letting us know and good luck with your tank!
Kristy
Hi there
I am a beginner knitter and I love this garment but I am worried about knitting a tape….is it especially tricky? I have never used a yarn like this before.
Thanks!
Rebecca
Hi Rebecca,
Try not to let the word “tape” put you off! Although it may be a bit flatter than yarns you have worked with so far, there’s nothing at all tricky about working with it! Thanks a lot for writing and good luck!
Kristy
Hi there!
I really love this pattern, thank you for creating such inspiring knits! But I am in the UK so can’t get hold of the Habu. Can I use Quince and Co Sparrow for this? Love the idea of linen! I know its a thinner yarn but a really don’t want an open knit. So, if I used a smaller needle, say US4, how many sizes up would you recommend knitting?Thanks in advance!
Francesca
Hello Francesca!
Quince and Co. Sparrow looks like a fingering weight yarn that could definitely yield 7 stitches per inch. However, you’re correct in assuming it would come out much more open that the pattern initially intended.
Knitting a larger size would of course change the proportions of the item quite easily, but it will be very difficult to accurately estimate without doing a gauge swatch. I would knit a bit of the Sparrow to figure out the density of fabric you’re looking for, and then multiply the gauge you come up with by the number of inches you want the final chest circumference to be.
The size with the closest number of cast on stitches should be the best choice for this route of sizing up the pattern. Keep in mind that its all an estimation, and that changing the yarn this drastically usually would call for a complete re-work of the pattern. You seem to have an excellent sense of sizing and gauge, so take a whack at it!
Happy knitting! -Alyson
If it does not say to pick up wrapped stitches in this pattern do I need to pick them up? Thanks!
Hello Lisa!
You’re totally right! Our pattern doesn’t specify to pick up the wraps with the stitches, but you should definitely pick them up to avoid any holes in the stockinette portion of the top. For future reference with short rows, always pick up the wraps unless specifically instructed not to!
Thanks for your question! -Alyson
no videos. sad. why?
Hi Angelina-
We have many video tutorials on our site that you can see here: https://www.purlsoho.com/create/tag/video-tutorials/
This particular project doesn’t have any videos attached to it but we are always looking out for techniques and projects that would be best explained via video. Is there a particular part of this project that you would like to see a video for? Please let us know, and thanks for getting in touch!
Molly
I would love to knit this is a wool (or wool blend) for winter. Any suggestions on yarn? I don’t want the stitches to be too open.
Thanks!
Hello, Jessie!
Thank you so much for writing in! Sorry about the very delayed response! I think knitting this in a wool/wool blend for the winter would be beautiful! The knitted linen that we used is considered to be a sport or DK weight so I recommend trying Tosh Merino DK (https://www.purlsoho.com/yarn/knitting-crochet/tosh-merino-dk.html) or this Suri Merino (https://www.purlsoho.com/yarn/knitting-crochet/suri-merino.html). The Suri will bloom a bit more than the Tosh, which is nice if you’re worried about open stitches.
As always, I recommend doing a gauge swatch with any of the yarns that you choose just to make sure you’re getting the correct gauge and to make sure that you like the look and feel of the yarn once it’s been knit.
If you have further questions, please let us know!
Best wishes,
Kumeko
I am looking to purchase material to make the Notched Hem Tank Top, but I am confused about which Habu Knitted Linen Tape to buy. Should I purchase the N-20 or the N-98B?
Thanks for your assistance!
Taylor
Hi Taylor,
Thank you for your question! For this project we used N-98B which is wider than N-20.
Happy knitting!
-Cassy
I don’t understand how to knit across the back hem that was placed on scrap yarn. I just finished doing the cable cast on 16 stitches, and have no idea how to put the other panel into the work. Please help!
Hi Andrea,
Thank you for writing in and our apologies for the greatly delayed response. I totally understand your confusion. I would suggest moving the stitches for the back onto a second circular needle and then knitting off of that. If you do not have a needle of the same size that you are using, you can use a smaller needle size so long as the cord is long enough to hold all of the held stitches. When you reach the back stitches, you will knit off of this second needle onto your first needle.
I hope that this helps!
Cassy
Hi there,
Love this pattern. I’m a newish knitter and had the same question as Andrea. I have moved the stitches from scrap yarn to a different circular needle. My question is what yarn do I use to knit across the back? The same yarn I just used to knit across the front and cast on 16? Or a new ball of yarn and then cut it again? Or the cut yarn? Sorry, I’m confused! Thanks so much.
Hi Rachel,
Thanks for writing in! You are correct! You will knit with the yarn that you used to knit the front!
I hope that this helps!
Cassy
In order to join the yarn from the stitches you moved onto a scrap needle/yarn for the back with the live stitches for the front and side, do you have to join to work in the round? I normally knit on an extra stitch and then drop it off once I join in the round. Do I need to do that here?
Hi Shayna,
Thanks for writing back! Once you have knit across the stitches that you have moved onto scrap yarn and then cable cast on the noted stitches, you will then join in the round. You will not need to knit an extra stitch and then drop it off. Simply join in the round as noted and be sure to hold the yarn tight when doing so, so as not to create a gap!
I hope that this helps!
Cassy
is the 4 inches above the 1 inch knit purl edge in garter stitch? it looks very different than the rest of the sweater above that area and I could not see that you changed needle size there either…
Hi Barbara,
Thanks for writing in! The bottom pieces for the back and front measure 4 inches total; the 1 inch of ribbing and then 3 additional inches of stockinette. After the ribbing, you change to larger needles that you continue to use for the remainder of the garment. The texture of these bottom pieces may appear slightly different due to the construction of the Habu yarn used or due to a slight difference in flat versus in the round gauge. In person, the difference is very slight!
I hope that this helps and happy knitting!
Cassy
I wanted to use a contrasting color for the side panels. Is there a version or notes/suggestions on knitting it flat to allow for this design element?
Hello Phyllis,
Thanks for writing in and being so creative! This top would look great with contrasting side panels, but yes, you will have to knit it flat. We have never knit this flat before, but you could simply knit the panels flat in your colors of choice by adding 1 stitch to each side for seaming. Be aware that there is body shaping, but that none of that shaping is done in the purled side sections. In fact, the only place you’ll have to change for the purled section is at the bind off for the armhole where you’ll have to omit the P2 at the beginning of the first divide and knit row for the back and front underarms. I hope this helps and good luck!
Best,
Adam
This is a gorgeous tank. I’m visiting your store in July from Australia so will definitely purchase the yarn then. I was wondering if it is possible to make the scoop neck at the front slightly deeper and if so, how I could do that.
Thank you 🙂
Hi Alex,
Thanks for the nice comment! The neck is easy to lower in this pattern. All you need to do is bind off for the neck earlier and space out your decreases for each shoulder more. I’d start with a row gauge to estimate how low your neckline will hit and bind off the amount at center front as the pattern says. A good place to start is where the armhole is bound off. If this hits you in a suitable area on your chest, then I would simultaneously bind off the underarm and the neckline to kill two birds with one stone. I hope this helps you!
-Adam
Thank you for the gorgeous pattern!
I’m knitting this in Patins Silk Bamboo. I’ve switched and I’m dead on for stitches per inc but my # of rows are fewer in 4 inches. I’ll keep an eye on length because of this.
I am a little confused on the sizing before I even start. I see there is 2” negative ease in the pattern but it also says, for example size 37 is 37” circumference when finished.
If I want it to fit size 37 do I knit this size or the smaller size so that the ease is built in?
I want it ti fit a US Women’s size 12 (L) so I’m leaning toward the size 40 but do g want it to be too baggy. Any suggestions?
Thanks for your advise.
Hi Sharon,
Thanks for the kind comment! Also, thanks for catching this. It is confusing, but after doing the gauge math I figured out that the finished chest circumference is the actual size of the garment. So a size 37 does have a 37″ chest. If I were you, I’d choose the chest circumference that you feel is best for the way you want it to fit and go with that one. In regard to the difference in row gauge, I would add a bit of length to the body for sure. However, because silk is so stretchy and slinky and the Habu Linen tape is so rigid and structural, I wouldn’t worry about adding too many rows to the chest or strap area, as they will probably grow. Also, try blocking your swatch to the row gauge! It might work! I hope this makes sense. Good luck on the project and let me know if you have any other issues!
Best,
Adam
Thank you Adam,
I’ve been reading the pattern, several times and yes have decided to go with the measured chest size. Just casting on.
I had another question regarding the shaping after dividing for front and back.
For example
Top back
Decrease Row 2 (wrong side): P2tog tbl (through the back loop), p77 (83, 89, 95, 101), p2tog. [79 (85, 91, 97, 103) stitches]
ONLY the first P2tog is through the back of the loop. The other is a normal purl two together? This occurs a couple of times in the pattern so I just want to make sure that I knit as written? Not all the purl 2 tog are through the back of the loop?
I’ll google the difference the stitch makes as I can’t picture it.
Again, thank you for the pattern, the wonderful pictures! And the help answering my question.
I love the store and all your designs!
Hi Sharon,
You have a very good eye for knitting! This is actually intentional because p2tog tbl is a right slanting decrease, whereas p2tog is a left slanting decrease. Thanks again for the kind words! If you should have anymore questions, feel free to ask!
-Adam
Thank you!
Can you tell me the name of the stitch being used for the hem? Is that linen stitch?
Hello Sarah,
The bottom hem is a simple 1×1 rib but you are slipping the first stitch of every row to create a nice knitted selvedge. Make sure you are only repeating the stitch pattern from the asterisk on. Hope this helps!
-Adam
I have trouble determining what size to make. How should I think about “finished chest circumference” and “designed to fit with a 2-inch ease”?
My actual bust is 38.5″ and hip is 41″.
Do I knit size 37 because its designed to fit with a 2-inch ease which means actual circumference is 39″? If I were to take a tape measure around my bust and hold it at 42″ circumference that would be size 40, right? That seems too big. Should I knit size 37 or size 40?
Hi Petra,
Great question! This pattern is designed to be knit with 2″ of positive ease and the finished measurements are for the bust. The best way to decide what size to knit is to take your bust measurement, add 2 inches and choose the closest size. In you case, 38.5″ plus 2″ would equal 40.5″. I would select the 40″ size for your bust. The top is wider at the bottom than at the bust and as such the 40″ size should sit nicely both at your bust and hip measurement.
I hope that this helps and happy knitting!
Cassy
Hi Cassy,
Thank you for your reply. I will go with Size 40 per your recommendation.
I am having trouble getting gauge with this wide linen tape. On US 7, knitting my normal tension, I am getting 22 sts/4 inches.
How much is that 1 stitch going to impact my overall project?
What do you recommend I do?
Thanks in advance.
Petra
Hi Petra,
Thanks for writing in again! With your gauge of 22 sts/4″ you will probably end up with a 38″ chest. Have you tried blocking the swatch? This might loosen up the fiber and stretch it out a bit. Otherwise, you could also swatch on a US8 needle. Let us know how it goes!
-Adam
Thanks Adam. I’ve decided to knit on US 8.
One final question, for this tape, what is the best method for attaching the next skein? A knot or weaving in ends?
Thanks again,
Petra
Hey Petra!
I would say the best method for joining a new skein is a knot because the yarn doesn’t really stick to itself or anything for that matter. Best of luck knitting the project! I hope you enjoy it!
-Adam
I am on the “TOP BACK” and have finished the decrease rows and starting on increasing the armhole. The pattern says “repeat last 2 rows until armhole measures 6/14 inches” but I’m not sure where to measure from.
Does the armhole start from first row of the top back section (i.e. Row 1 (wrong side): Slip 1 wyib, k1, purl to last 2 stitches, k2) or does is start after the decrease rows?
I hope my question makes sense.
Thanks
Lizzie
Hi Lizzie,
Thanks for your question! If you look at the computer drawn sketch at the top of the pattern, you’ll see that the armhole is measured straight up from the underarm point. To do this you will create a cross section with two rulers: one going straight up from the armhole and one going straight across along your live stitches. Voila! True armhole height. Hope this helps!
Adam
Thanks so much for this pattern, I’ve been looking for a track top pattern and here the model and the color are just right 🙂 I’m a beginner though and got confused here: Knit across the 79 stitches of the Front (done that); turn so the wrong side is facing you (done that) and cable cast on 16 (done that) stitches; turn so the right side is facing you (done that), knit across the 79 stitches of the Back. When I turn so that right side is facing me, the work is on the right side instead of on the left like it’s supposed to be so that I can start knitting. And what to do with the added 16 stitches? Thanks
Hi Anastasia,
Thank you for your kind comment! When you turn your work after the cable cast on you will have your cable cast on stitches in your right hand and your back body stitches in your left. you’ll join the cable cast on to the back body and continue on in pattern. Just make sure you don’t twist your cable cast on around the needle when joining! You’ll continue by knitting in the round after both cable cast ons are completed. The cable cast ons are your “notches” in the tank since the front and back are longer. I hope this helps you out! Best of luck and happy knitting!
-Adam
Hi, I have started working this project but am having trouble with the first row of pull stitches in the notch (this corresponds to the first stitch of your cable cast on). As I work the piece I am noticing the first purl stitch on each side is very loose and nothing I am doing seems to be helping. Do you have any advice? I am working this piece in a slightly thinner yarn with smaller needles to meet gauge.
Hi Julia,
Thanks for writing us! It could be that your first cable cast on was not close enough to your front body, creating a gap. This will eventually tighten up as you purl normally, but if it does bother you, then I would rip out and redo the cable cast ons. If you do restart, then I would make sure that you are manipulating your first cable cast on to have as little space between the cast on stitch and the knit stitch as possible. I hope this makes sense and helps a bit!
Best of luck and happy knitting!
-Adam
I saw your comment to add sleeves and I am going to attempt that – would you suggest omitting the shoulder decreases as well?
Thanks!
Hi Jessica,
I think it would be a great idea to add sleeves to this top! The shoulder decreases are necessary as the shoulder slopes downward from the neck to the actual shoulder bone. This makes the fit better. If you do decide to do sleeves, I suggest short rowing the cap in because the armholes are deep, meaning that they curve inward. If you want to avoid short rows, you can eliminate the armhole shaping by omitting the decreases in the “Top Back” portion of the pattern. Essentially you will bind off for the armholes and knit straight up until you reach the right armhole length. This will make a drop shoulder, which requires only picking up and knitting down. Hope this helps and gives you some options!
Best,
Adam
I absolutely love this style and design of vest top. It’s very modern and hip. Thank you, for sharing it with us . I find it easier to follow that most patterns.
I am a beginner and my skills are basic. My question is about suggestions for making an xxl size or a European 52?
Thank you.
Hi Pam,
Thank you for writing in and I’m so glad you like the pattern! According to my research, a EU 52 is a 37-41″ chest in US sizes. Let me know if I’m wrong! However, I think that you’ll be able to knit the largest size and have enough ease if my research is right. Best of luck!
-Adam
Is there a way to get a PDF of this pattern for download? Thank you…it is lovely and I want to make it, but need to be able to download the pattern! ❤
Hi Rawna,
Thanks for writing in! You certainly can download a PDF of each of our patterns! If you’re on a desktop version of the site, you will find a “print” icon in the right column just below the date and tags. If you’re on a mobile version of the site, you will find a “print” icon below the pattern and above the comments.
Follow the easy on-screen instructions to delete whichever parts of the pattern you don’t want to print or save. For example, you may decide to shorten the pattern by omitting certain images or the list of materials.
I hope that this helps!
Cassy
I have some Louet Euroflax that I’d love to use, for this top. Has anyone subbed in other yarns, with good result?
HI Joyce,
Thanks for writing in! You certainly can. I did this myself. I would suggest using smaller needles to correspond to the yarn. Be sure to knit a gauge swatch. You may need to knit a size up from what you would normally to compensate for the smaller gauge of your yarn.
I hope that this helps!
Cassy
I just started making this lovely top and have a question. After knitting the bottom ribbing and changing to the larger needle size, it seems there is a curve developing in the bottom edge. Is this supposed to look like this? It doesn’t seem that noticeable in your photos.
Thank you.
Hi Nancy,
Thanks for the question. It might be that the yarn is stiff and can’t flatten out. This might work itself out in blocking. Best of luck!
-Adam
Hello…… you have this pattern in french ???
Thanks ?
Hi Brigitte,
Thanks for writing us! Unfortunately we don’t have this pattern translated into French. Thank you for contacting us though!
-Adam
Hi Fabulous People:
I adore this pattern and I’m reading it closely before I start knitting. I compared the pattern to the picture and the schematic. It all makes sense but the front and back sections directly above the 1×1 rib appear to have a different texture in the picture than the body section above (circular knitting section). The pattern seems to be “generally” stockinette stitch in both the long front/back sections and the body in size 7 (or gauge size). Is this true?So, I’m confused as to why it looks different. (Maybe just knitting back and forth gave the different appearance? Or was it a different size needle? Different variegation?)
Thank you!
Hi Shannon,
Thanks for writing in! The texture of these bottom pieces may appear slightly different due to the construction of the Habu yarn used or due to a slight difference in flat versus in the round gauge. In person, the difference is very slight!
I hope that this helps and happy knitting!
Cassy
Question about the measurements for the armholes under “Top Back.” “Repeat the last two rows until armhole measures 6 ¼ (7 ½, 8, 8 ¼, 8 ¾) inches, ending with a wrong side row.”
Where do I measure this from? I saw another Q&A in this forum and it says to take two measurements, but I am still confused. Do I average the measurements or should they be the same?
Hi Sara,
Thanks for writing in! I find it helpful to look at the schematic above when measuring this section. You will lay the top flat and measure straight up from the bottom of the armhole up to the measurement appropriate for your size. This measurement will be as if the top continued in a straight line up instead of curving for the armhole.
I hope that this helps!
Cassy
Yes, but where does the bottom of the armhole start? Is the last purl row in the “notched hem” section? The schematic is only slightly helpful when it comes to this question.
Thanks!
Hello Candi,
Thank you for clarifying your question! The bottom of the armhole starts when you divide for your front and back, so when you cast off your stitches for your armhole that is the bottom of your armhole.
I hope this clarifies things for you and happy knitting!
-Marilla
There is a typo in this pattern: under “Back Left Shoulder” Decrease Row 1 should say “purl to last 4 stitches, p2tog tbl, p2”
This is because all the other shoulder decreases (the ssk, k2tog, and p2tog) are decreasing the FOURTH stitch from the neck edge, not the third stitch from the neck edge. I just tinked back and re-knit my left shoulder with this correction and it looks much better. Thx.
Hi Sarina,
Thanks for writing in and for your eagle eyes! I have knit this lovely top a few times and must have corrected the error on the go without noticing! We have fixed the issue and thank you again for letting us know!
Best,
Cassy
I’m a machine knitter so working in the round doesn’t work, any suggestions? I would love to make this
Hello Lisa,
Thank you for reaching out! If you would like to knit this flat, I would recommend knitting each section separately and then seaming them together when the time comes. This means you would have a front, back, and two side panels. You might need to add a stitch to each side to account for seaming, but other than that adapting it should be relatively simple.
I hope this helps and let us know how it goes!
-Marilla
love your patterns, I like the look of this one because the diagrams suggest it has some shape in the torso (sadly don’t have a slender NY figure!!). Anyway am wondering if this would work ok in Cattail Silk??
Hello Karen,
Thank you for reaching out! Unfortunately Cattail Silk knits up at a much smaller gauge than Habu’s Wide Knitted Linen. You could try knitting with two strands of Cattail silk at once, this should get you very close to the needed gauge of 21 stitches to 4 inches.
I hope this helps and happy spring knitting!
-Marilla
Is it possible to use Cascade yarns ultra prima instead?
Hello Jacqui,
Thank you for reaching out! Cascade’s Ultra Pima will work beautifully with this pattern. I would, as always, knit up a gauge swatch before jumping in to avoid any surprises along the way.
Happy knitting!
-Marilla
I am kinda confused
The item is so beautifully and finely knitted…how can that be using ‘linen tape’ ?
Hello Rose,
Thank you for writing! Habu’s Knitted Linenyarn knits up beautifully and once you block your linen it becomes even softer with more drape.
Happy knitting!
-Marilla
Has any errata been published for this pattern. It is a lovely design, but I seem to be finding errors in the directions. It does not mention when to pick up the wraps and the decreases are confusing. I can’t quite figure out exactly where they go because the count doesn’t seem right, though I have the right number of stitches in each section. Help, please.
Hi Barbara,
Thanks for reaching out! When working short rows for the the back and body, you will pick up the wraps and work them as you come to them in the following rows, just as you will when working the front right and left shoulder. Although quite a few knitters have taken on our Notched Hem Tank Top, we haven’t had any reports of errors in the decrease section. Can you let me know what size you are making and what row you are having trouble with?
I hope to hear from you soon!
Julianna
Hello there! I’m loving this pattern so far. I’m knitting it in silk, and it’s going great, but I’ve hit a snag! I looked at comments but couldn’t find anything , so I hope I’m not repeating a question! Here it is: when dividing work for top front and back, and after binding off the next X stitches, you say “p2 (including the last stitch from bind off)” – what does the last stitch bit mean? I’d love some help. Thanks and greetings from London!
Hello Leonor,
Thank you for writing, this is a great question! When we say “p2 (including the last stitch from bind off)” It is referring to the stitch that you that you just knit and is left on your needle from binding off “Bind off the next 6 (8, 10, 12, 14) stitches”. You will work that stitch again as a purl.
I hope this clears things up and let us know if you have any further questions!
-Marilla
Hi.
I had no clue I had to pick up the wraps…will this mess up the sizing?? I really don’t want to unravel 6 plus inches if I don’t need to.
Hello Ashley,
Thank you for reaching out! If you don’t pick up your wraps small holes will appear where you wrap and turned, but it shouldn’t change the sizing.
I hope this helps and happy knitting!
-Marilla
Hi! I would like to knit with neddle size US 4. Which pattern size instructions do I follow? How many sizes up?
Thank you
Maria
Hi Maria,
Thanks for writing in! Unfortunately drastically changing the needle size would require extensive pattern alteration which we are unable to do in the comments, and without first knitting a gauge swatch and doing quite a few calculations it would be very difficult to say exactly how the final size of the top would be affected. If you are looking for a top in the fingering to sport weight range, you may be interested in our Cable Back Shell or Knit T-Shirt!
Best,
Julianna
Hello, I’m just getting started on this cool looking pattern, but as I’m short waisted, I don’t need so much length from underarm to hem(17″ for size 46). I believe I need to keep the 4.75″ for the hem ribbing, but plan to reduce the body length to 8.5″ for a total length from underarm to hem of 13.25″. Do you see any issues with this modification? I’ve never knitted anything like this or made changes to a pattern, so I’d appreciate your experienced insight!
Hello Carole,
Thank you for reaching out- this sounds like a great plan!
Let us know how it goes and happy knitting!
-Marilla
I am having issues with the shaping of the back and short rows. I’m reading the instructions literally and the # of stitches I am told to work and turn leaves 1 knit stitch left after the wrap and turn. After knitting the wrap stitch, it instructs me to purl 8 (10 in my case) but does not instruct me on what to do with this last knit stitch before my purl section. Please clarify this for me. 2nd time working this and get same result. Thank you!
Hi Rebecca,
Thanks for reaching out! Since each short row is a few stitches shorter than the previous row, when you work the final short row on the right side, you should end up knitting all of the back stitches, and will treat this stitch that was left after the wrap and turn as a normal stitch. If you find that your purl columns up the sides of the garment are not lining up after the short rows, you may have gotten off on your stitch count at some point.
I hope that clears things up!
Julianna
Hello, I tried to look through the comments first and did not notice an answer to my question. I am on the “finish armholes” section. I’m assuming you pick up all the way around the armhole (including the outside edge of the strap)? I’m also not quite sure where to pick up the stitches, since my current edge is kind of rolling in a bit, or how to space the stitches out. Any help would be great!
Hi Kelly,
Thanks for reaching out! Yes, you will space these stitches evenly all the way around the armhole. You will have to unroll the edge of the armhole as you go to make sure you are consistently picking up one stitch or row in from the edge of the fabric, but if the rolling edges are making it too difficult, it will help to lightly steam or spray block the armholes before picking up stitches. To evenly space out the stitches on an edge like this, I like to divide up the edge into quarters using removable stitch markers so you only have to worry about spreading out a quarter of the stitches at a time. For an armhole, I would place a marker at the shoulder seam and the center of the underarm, then fold the armhole so the two markers touch and mark the halfway point on both the front and back. You will then divide how many stitches you need to pick up by four (for instance, for the smallest size of this top, 72 stitches divided by 4 is 18) and pick up that many evenly spaced in each section.
Best of luck and I hope that helps!
Julianna
Hi there, I need help with picking up the second wrap. This is the wrap which is performed on the purl side and later picked up on the knit side in the decrease row. Every time I attempt it it doesn’t close correctly and I am left with a hole. Thanks!
Hello Michelle,
Thank you for reaching out! I would reccomend watching our video tutorial for wrap and turns. You could be twisting your wrap when picking it up, which could create a hole.
I hope this helps, but if you still need help please let us know!
Good luck and happy knitting!
-Marilla
Thank you, Marilla! I did re-watch the video and it didn’t totally address my specific problem but I ended up using your video for converting wrap and turns to German Short Rows. Now I have no holes! Thanks again.