
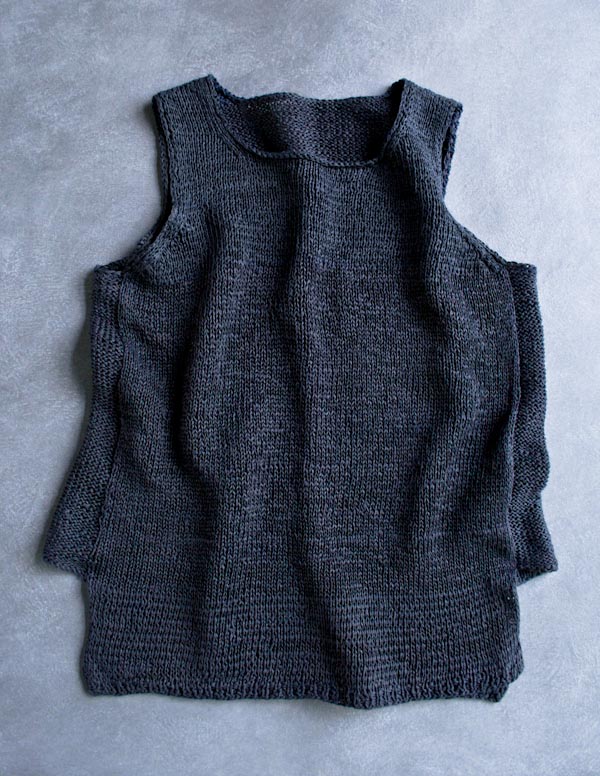
Notched Hem Tank Top
It seems like indigo dye is everywhere right now, from bright blue shower curtains to saturated shirts and pillows to deep dark denim bedding. I’m so smitten with the color I’ve contemplated setting up an indigo vat in my itty-bitty Brooklyn apartment!

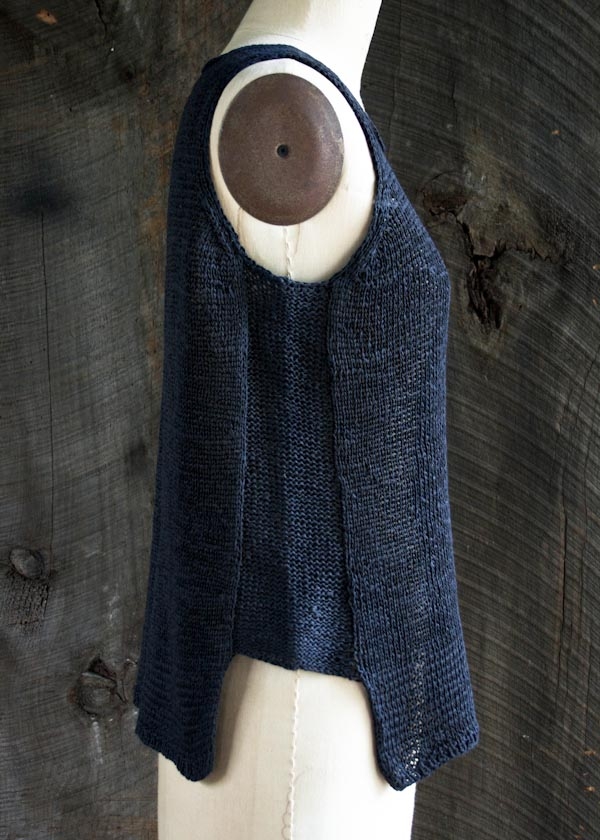
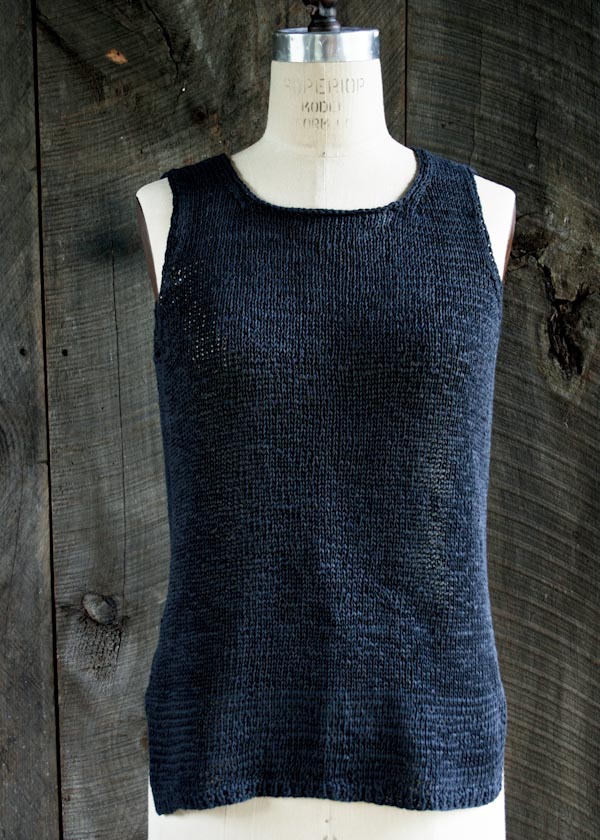
But since I can’t imagine my landlord or my roommates being too happy with a dye kitchen in the house, I did a little dance of joy when I saw that Habu Textiles had done the work for me. Knitted Linen in Dark Indigo glows with intensity. Finally, the rich indigo I crave, without the stained hands and sink!

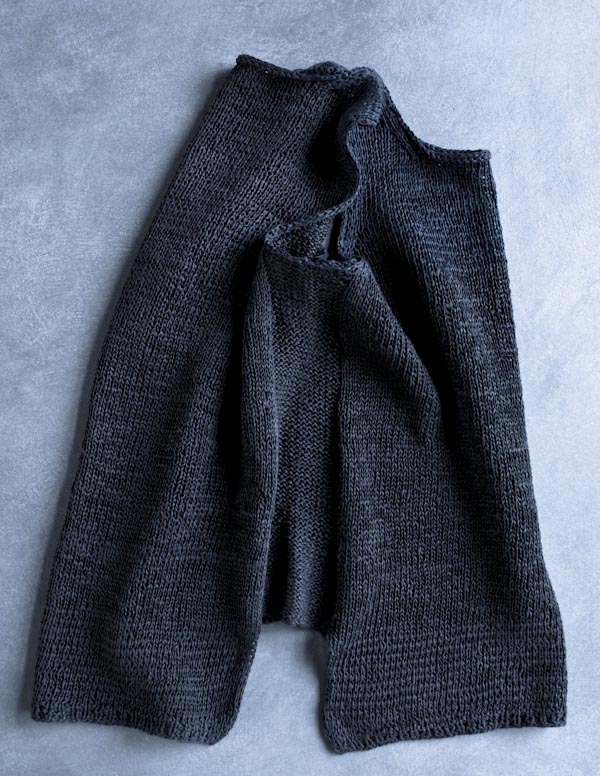
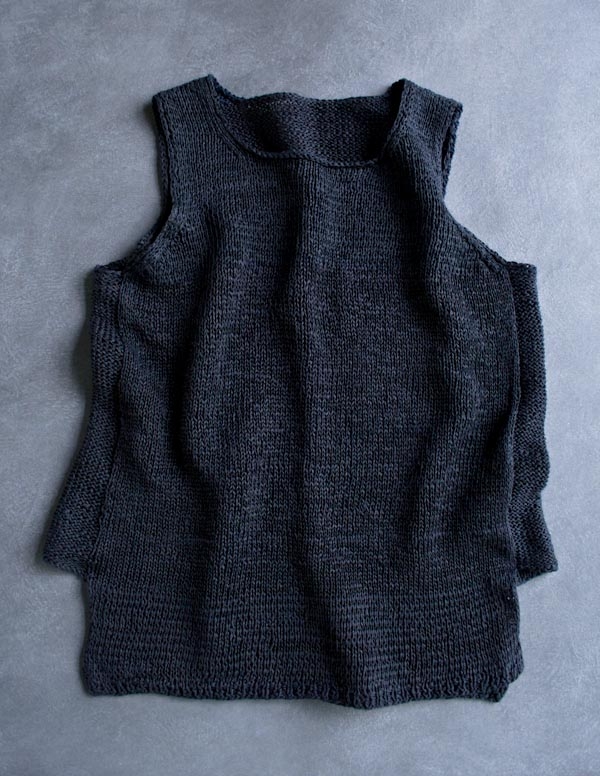
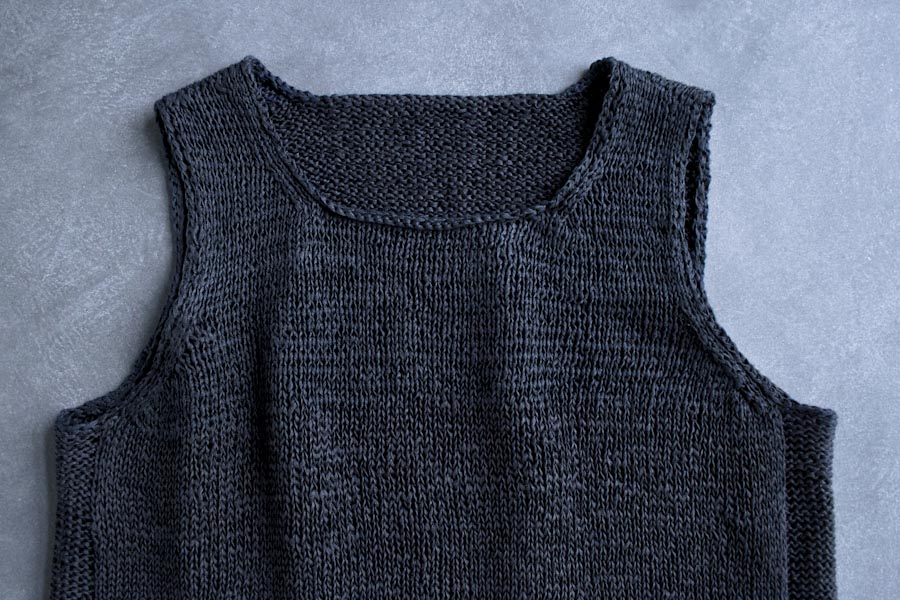
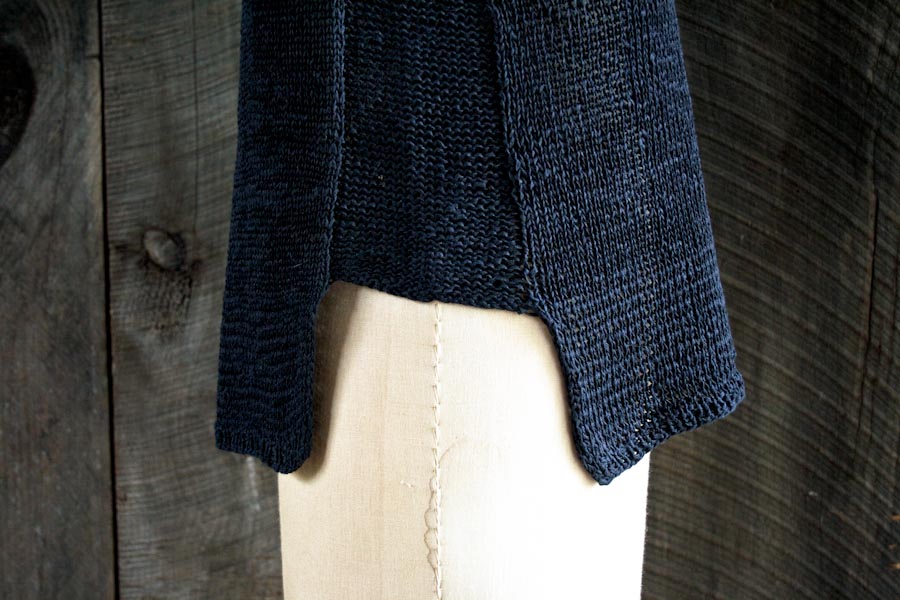
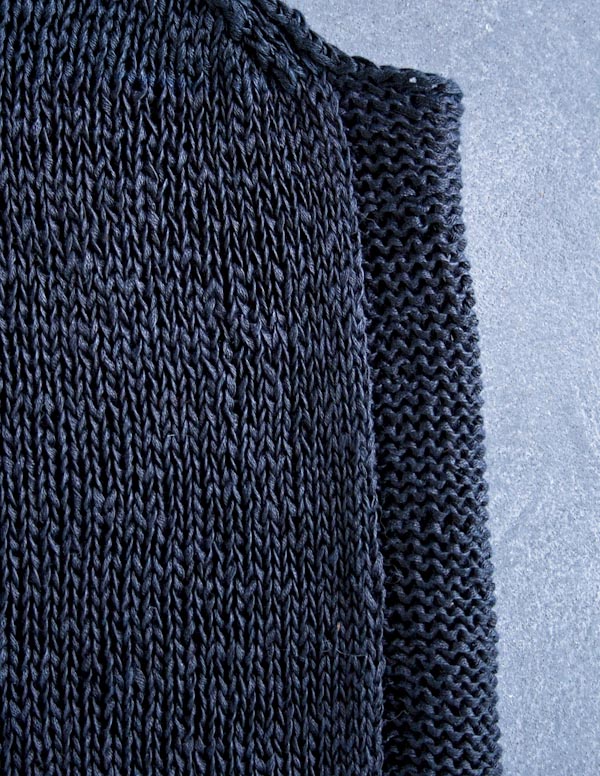
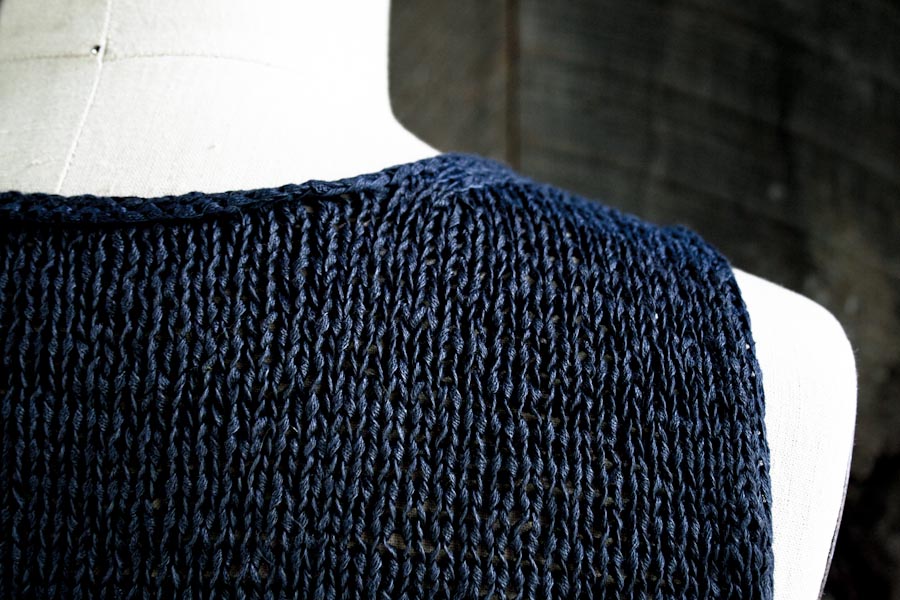
I used Knitted Linen to whip up this easy-fitting Notched Hem Tank Top. The front and back panels are in stockinette stitch, and the flattering side panels are in reverse stockinette. The notched hem, slightly longer in the back than the front, gives this tank an airy feel, just right for layering over shorts and skirts. Summertime, easy breezy knitting and beautiful indigo… Now we’re talking! -Gina
Designed by Purl Soho designer, Gina Rockenwagner. Click here to see even more of Gina’s designs!
Share your progress and connect with the community by tagging your pics with #PurlSoho, #PurlSohoBusyHands, and #PurlSohoNotchedHemTankTop. We can’t wait to see what you make!
Materials
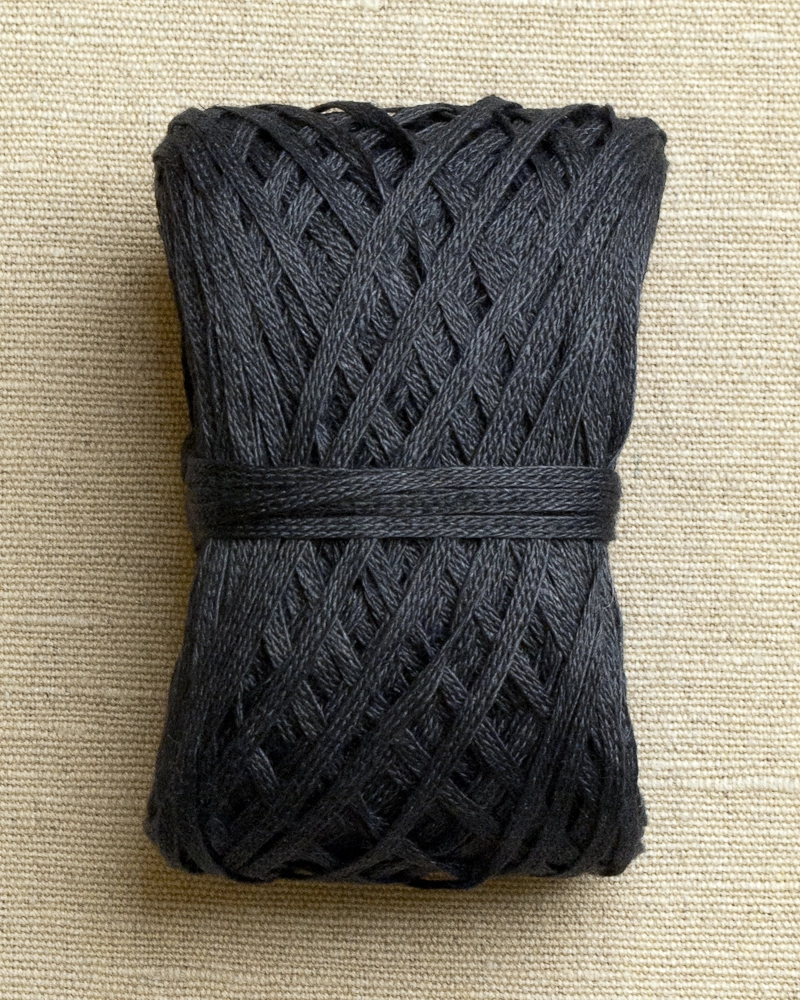
- 11 (12, 14, 15, 16) skeins of Habu Textiles’ Knitted Linen Tape, 100% linen; approximately 506 (552, 644, 690, 735) yards of a fingering weight yarn required. We used the color Dark Indigo.
- US 4 (3.5 mm) circular or straight needles
- US 7 (4.5 mm), 32-inch circular needle
- Stitch holders or scrap yarn
- A stitch marker
NOTE: Just like your favorite dark jeans, the indigo used to dye this yarn can transfer to light colored fabrics. Please wash the tank top separately from other items for the first couple of washes to prevent staining any light colored clothing.
Gauge
21 stitches and 28 rows = 4 inches in stockinette stitch, using the larger needle.
Sizes
NOTE For help picking a size, please check out our Understanding Ease + Selecting Size Tutorial!
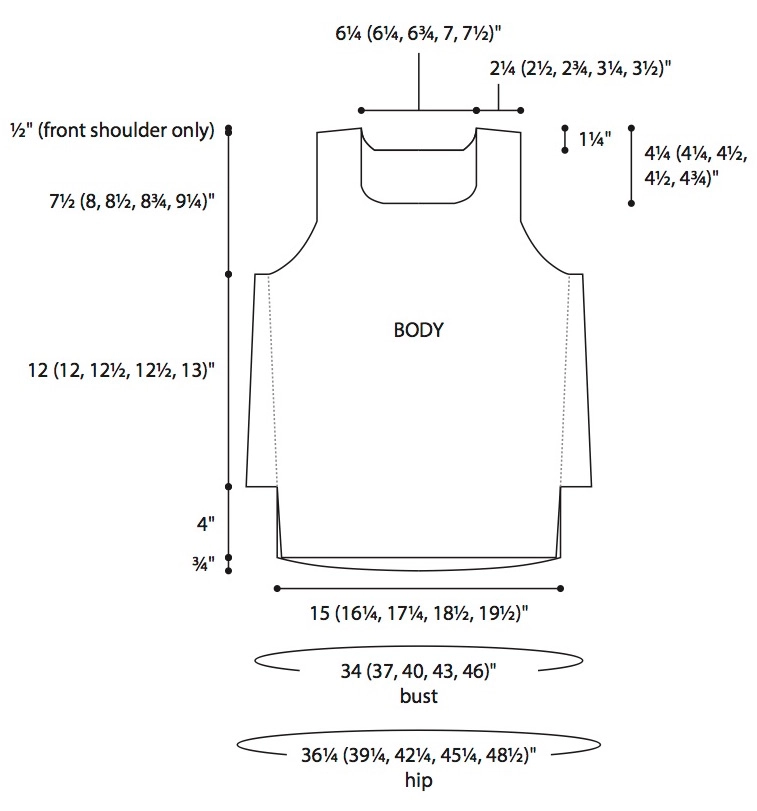
34 (37, 40, 43, 46)
- Finished Chest Circumference: 34 (37, 40, 43, 46) inches
- Finished Length from Shoulder to Bottom Edge (Back): 24 ¼ (24 ¾, 25 ¾, 26, 27) inches
- Finished Length from Underarm to Bottom Edge (Front): 16 (16, 16 ½, 16 ½, 17) inches
Sample: Size 37 is pictured here, shown with 2 inches of positive ease.
NOTES
SHORT-ROW SHAPING: WRP-T (WRAP AND TURN)
NOTE: For more information about this technique, please visit our Short Rows tutorial.
On the right side: Keeping yarn in back, slip next stitch purlwise from left needle to right needle. Bring yarn to front. Return slipped stitch to left needle. Bring yarn to back. Turn work so wrong side is facing you.
On the wrong side: Keeping yarn in front, slip next stitch purlwise from left needle to right needle. Bring yarn to back. Return slipped stitch to left needle. Bring yarn to front. Turn work so right side is facing you.
PICKING UP PURL WRAP ON KNIT SIDE
NOTE: See this situation in action at minute 4:33 of our Short Rows tutorial.
Use tip of right needle to pick up wrap, inserting needle from front to back. Place wrap onto left needle, nudging wrap, if necessary, so it is after next stitch on needle. Slip first stitch knitwise, then slip wrap purlwise. Insert tip of left needle into front legs of two slipped stitches. Wrap working yarn around right needle to knit two together.
Pattern
Begin Back
*With the smaller needle(s), cast on 79 (85, 91, 97, 103) stitches. We used a basic Long Tail Cast On.
Ribbing Row 1 (wrong side): Slip 1 with yarn in front (wyif), *k1, p1, repeat from * to end of row.
Ribbing Row 2 (right side): Slip 1 with yarn in back (wyib), *p1, k1, repeat from * to end of row.
Repeat Ribbing Rows 1 and 2 until piece measures 1 inch from the cast-on edge, ending with a Row 1.
Change to larger needle and still working back and forth in rows…
Next Row (right side): Slip 1 wyib, knit to end of row.
Next Row (wrong side): Slip 1 wyif, purl to end of row.
Repeat the last two rows until piece measures 4 inches from the cast-on edge, ending with a wrong side row.**
Cut the yarn and place the stitches on a stitch holder or scrap yarn.
Begin Front
Work as for the “Begin Back” section from * to **.
Do not cut the yarn.
Join to Work in the Round
Knit across the 79 (85, 91, 97, 103) stitches of the Front; turn so the wrong side is facing you and cable cast on 16 (18, 20, 22, 24) stitches; turn so the right side is facing you, knit across the 79 (85, 91, 97, 103) stitches of the Back; turn so the wrong side is facing you and cable cast on 8 (9, 10, 11, 12) stitches, place a marker, cable cast on 8 (9, 10, 11, 12) stitches; turn so the right side is facing you.
Carefully checking to make sure the stitches are not twisted around the needle, join to work in the round. [190 (206, 222, 238, 254) stitches]
Continue in the Round
Note: Round 1 is a partial round to bring you back to the stitch marker, which now marks the beginning of the round.
Round 1: K79 (85, 91, 97, 103), p16 (18, 20, 22, 24), k79 (85, 91, 97, 103), p8 (9, 10, 11, 12).
Round 2: P8 (9, 10, 11, 12), k79 (85, 91, 97, 103), p16 (18, 20, 22, 24), k79 (85, 91, 97, 103), p8 (9, 10, 11, 12).
Repeat Round 2 until piece measures 7 inches from the cast-on edges of the Front and Back hems.
Shape Back and Body
Note: The Back is shaped with short rows, and the Body is shaped with decreases at the sides. If you need some short row pointers, please visit our Short Rows Tutorial.
Short Row 1 (right side): P8 (9, 10, 11, 12), k79 (85, 91, 97, 103), p16 (18, 20, 22, 24), k77 (83, 89, 95, 101), wrap and turn.
Short Row 2 (wrong side): P75 (81, 87, 93, 99), wrap and turn.
Short Row 3: K77 (83, 89, 95, 101), working wrapped stitch with its wrap as you come to it, p8 (9, 10, 11, 12).
Decrease Round 1: P7 (8, 9, 10, 11), k2tog, k77 (83, 89, 95, 101), ssk, p14 (16, 18, 20, 22), k2tog, k77 (83, 89, 95, 101), working wrapped stitch with its wrap as you come to it, ssk, p7 (8, 9, 10, 11). [186 (202, 218, 234, 250) stitches]
Next round: P7 (8, 9, 10, 11), k79 (85, 91, 97, 103), p14 (16, 18, 20, 22), k79 (85, 91, 97, 103), p7 (8, 9, 10, 11).
Repeat the last round until piece measures 10 inches from the cast-on edge of the Front hem.
Short Row 4 (right side): P7 (8, 9, 10, 11), k79 (85, 91, 97, 103), p14 (16, 18, 20, 22), k77 (83, 89, 95, 101), wrap and turn.
Short Row 5 (wrong side): P75 (81, 87, 93, 99), wrap and turn.
Short Row 6: K77 (83, 89, 95, 101), working wrapped stitch with its wrap as you come to it, p7 (8, 9, 10, 11).
Decrease Round 2: P6 (7, 8, 9, 10), k2tog, k77 (83, 89, 95, 101), ssk, p12 (14, 16, 18, 20), k2tog, k77 (83, 89, 95, 101), working wrapped stitch with its wrap as you come to it, ssk, p6 (7, 8, 9, 10). [182 (198, 214, 230, 246) stitches]
Next Round: P6 (7, 8, 9, 10), k79 (85, 91, 97, 103), p12 (14, 16, 18, 20), k79 (85, 91, 97, 103), p6 (7, 8, 9, 10).
Repeat the last round until piece measures 13 inches from the cast-on edge of the Front hem.
Short Row 7 (right side): P6 (7, 8, 9, 10), k79 (85, 91, 97, 103), p12 (14, 16, 18, 20), k77 (83, 89, 95, 101), wrap and turn.
Short Row 8 (wrong side): P75 (81, 87, 93, 99), wrap and turn.
Short Row 9: K77 (83, 89, 95, 101), working wrapped stitch with its wrap as you come to it, p6 (7, 8, 9, 10).
Decrease Round 3: P5 (6, 7, 8, 9), k2tog, k77 (83, 89, 95, 101), ssk, p10 (12, 14, 16, 18), k2tog, k77 (83, 89, 95, 101), working wrapped stitch with its wrap as you come to it, ssk, p5 (6, 7, 8, 9). [178 (194, 210, 226, 242) stitches]
Next Round: P5 (6, 7, 8, 9), k79 (85, 91, 97, 103), p10 (12, 14, 16, 18), k79 (85, 91, 97, 103), p5 (6, 7, 8, 9).
Repeat the last round until work measures 16 (16, 16 ½, 16 ½, 17) inches from the cast-on edge of the Front hem, ending 3 (4, 5, 6, 7) stitches before marker on final round.
Divide Work for Top Front and Back
Dividing Round: Bind off the next 6 (8, 10, 12, 14) stitches (removing marker), p2 (including the last stitch from bind off), k79 (85, 91, 97, 103) across the Front, p2, bind off the next 6 (8, 10, 12, 14) stitches, p2 (including the last stitch from bind off), k79 (85, 91, 97, 103) across the Back, p2.
Place the 83 (89, 95, 101, 107) stitches of the Front on a stitch holder or scrap yarn.
Top Back
Note: For the Top Back and Top Front, you will not be working in the round; you will work back and forth in rows.
Row 1 (wrong side): Slip 1 wyib, k1, purl to last 2 stitches, k2.
Decrease Row 1 (right side): Slip 1 wyif, k2tog, k77 (83, 89, 95, 101), ssk, p1. [81 (87, 93, 99, 105) stitches]
Decrease Row 2 (wrong side): P2tog tbl (through the back loop), p77 (83, 89, 95, 101), p2tog. [79 (85, 91, 97, 103) stitches]
Decrease Row 3: Slip 1 wyib, k1, ssk, knit to last 4 stitches, k2tog, k2. [2 stitches decreased]
Decrease Row 4: Slip 1 wyif, p1, p2tog, purl to last 4 stitches, p2tog tbl, p2. [2 stitches decreased]
Repeat Decrease Rows 3 and 4 four (five, five, five, five) more times, then repeat Decrease Row 3 once more. [57 (59, 65, 71, 77) stitches]
Next Row (wrong side): Slip 1 wyif, purl to end of row.
Next Row (right side): Slip 1 wyib, knit to end of row.
Repeat the last two rows until armhole measures 6 ¼ (7 ½, 8, 8 ¼, 8 ¾) inches, ending with a wrong side row.
Bind Off for Back Neckline
Bind Off Row (right side): Slip 1 wyib, k16 (17, 19, 21, 23), bind off 23 (23, 25, 27, 29) stitches, knit to end.
Place the first set of 17 (18, 20, 22, 24) stitches you worked on a stitch holder or scrap yarn. These stitches are for the Back Right Shoulder. You will work the Back Left Shoulder first.
Back Left Shoulder
Note: Continue working on the second set of 17 (18, 20, 22, 24) stitches.
Decrease Row 1 (wrong side): Slip 1 wyif, purl to last 4 stitches, p2tog tbl, p2. [1 stitch decreased]
Decrease Row 2 (right side): Slip 1 wyib, k1, ssk, knit to end of row. [1 stitch decreased]
Repeat Decrease Rows 1 and 2 once more, then repeat Decrease Row 1 once again. [12 (13, 15, 17, 19) stitches]
Next Row (right side): Slip 1 wyib, knit to end of row.
Next Row (wrong side): Slip 1 wyif, purl to end of row.
Armhole measures approximately 7 ½ (8, 8 ½, 8 ¾, 9 ¼) inches.
Cut the yarn and place the 12 (13, 15, 17, 19) stitches of the Back Left Shoulder onto a stitch holder or scrap yarn.
Back Right Shoulder
Slip the 17 (18, 20, 22, 24) stitches of the Back Right Shoulder to the larger needle. With the right side facing you, join a new ball of yarn to the Back Right Shoulder stitches, ready to work a right side row.
Decrease Row 1 (right side): Slip 1 wyib, knit to last 4 stitches, k2tog, k2. [1 stitch decreased]
Decrease Row 2 (wrong side): Slip 1 wyif, p1, p2tog, purl to end of row. [1 stitch decreased]
Repeat Decrease Rows 1 and 2 once more, then repeat Decrease Row 1 once again. [12 (13, 15, 17, 19) stitches]
Next Row (wrong side): Slip 1 wyif, purl to end of row.
Next Row (right side): Slip 1 wyib, knit to end of row.
Armhole measures approximately 7 ½ (8, 8 ½, 8 ¾, 9 ¼) inches.
Cut the yarn and place the 12 (13, 15, 17, 19) stitches of the Back Right Shoulder onto a stitch holder or scrap yarn.
Top Front
Slip the 83 (89, 95, 101, 107) stitches of the Top Front onto the larger needle. With the wrong side facing you, join a new ball of yarn to the Top Front, ready to work a wrong side row.
Row 1 (wrong side): Slip 1 wyib, k1, purl to last 2 stitches, k2.
Decrease Row 1 (right side): Slip 1 wyif, k2tog, k77 (83, 89, 95, 101), ssk, p1. [81 (87, 93, 99, 105) stitches]
Decrease Row 2 (wrong side): P2tog tbl, p77 (83, 89, 95, 101), p2tog. [79 (85, 91, 97, 103) stitches]
Decrease Row 3: Slip 1 wyib, k1, ssk, knit to last 4 stitches, k2tog, k2. [2 stitches decreased]
Decrease Row 4: Slip 1 wyif, p1, p2tog, purl to last 4 stitches, p2tog tbl, p2. [2 stitches decreased]
Repeat Decrease Rows 3 and 4 three (four, four, three, three) more times, then repeat Decrease Row 3 once more. [61 (63, 69, 79, 85) stitches]
Next Row (wrong side): Slip 1 wyif, purl to end of row.
Decrease Row 5 (right side): Slip 1 wyib, k1, ssk, knit to last 4 stitches, k2tog, k2. [2 stitches decreased]
Repeat the last two rows one (one, one, three, three) more time(s). [57 (59, 65, 71, 77) stitches]
Next Row (wrong side): Slip 1 wyif, purl to end of row.
Next Row (right side): Slip 1 wyib, knit to end of row.
Repeat the last two rows until armhole measures 3 ¾ (4 ¼, 4 ½, 4 ¾, 5) inches, ending with a wrong side row.
Bind Off for Front Neckline
Bind Off Row (right side): Slip 1 wyib, k16 (17, 19, 21, 23), bind off 23 (23, 25, 27, 29) stitches, knit to end.
Place the first set of 17 (18, 20, 22, 24) stitches you worked on a stitch holder or scrap yarn. These stitches are for the Front Left Shoulder. You will work the Front Right Shoulder first.
Front Right Shoulder
Note: Continue working on the second set of 17 (18, 20, 22, 24) stitches.
Decrease Row 1 (wrong side): Slip 1 wyif, purl to last 4 stitches, p2tog tbl, p2. [16 (17, 19, 21, 23) stitches]
Decrease Row 2 (right side): Slip 1 wyib, k1, ssk, knit to end of row. [15 (16, 18, 20, 22) stitches]
Next Row (wrong side): Slip 1 wyif, purl to end of row.
Decrease Row 3 (right side): Slip 1 wyib, k1, ssk, knit to end of row. [1 stitch decreased]
Repeat the last 2 rows two more times. [12 (13, 15, 17, 19) stitches]
Next Row (wrong side): Slip 1 wyif, purl until end of row.
Next Row (right side): Slip 1 wyib, knit until end of row.
Repeat the last two rows until armhole measures 7 ½ (8, 8 ½, 8 ¾, 9 ¼) inches, ending with a wrong side row.
Short Row 1 (right side): Slip 1 wyib, k7 (8, 10, 12, 14), wrap and turn.
Short Row 2 (wrong side): Purl to end of row.
Short Row 3: Slip 1 wyif, k2 (3, 5, 7, 9), wrap and turn.
Short Row 4: Purl to end of row.
Next Row (right side): Slip 1 wyif, knit to end, picking up the wraps as you come to them and knitting them together with the stitch they wrap.
Do not cut the yarn.
Turn the garment inside out. Place the stitches of the Back Right Shoulder onto a spare needle in a similar size. Hold the two needles parallel, with the right sides of the pieces together and so that the wrong side of the Back Right Shoulder is facing you. With a third needle in a similar size, work a 3 needle bind off across all stitches, using the ball of yarn attached to the Front Right Shoulder. Cut the yarn and thread the tail through the last remaining stitch. Pull gently to secure. Turn the garment right side out.
Front Left Shoulder
Slip the 17 (18, 20, 22, 24) stitches of the Front Left Shoulder to the larger needle. With the wrong side facing you, join a new ball of yarn to the Front Left Shoulder, ready to work a wrong side row.
Decrease Row 1 (wrong side): Slip 1 wyif, p1, p2tog, purl to end of row. [16 (17, 19, 21, 23) stitches]
Decrease Row 2 (right side): Slip 1 wyib, knit to last 4 stitches, k2tog, k2. [15 (16, 18, 20, 22) stitches]
Next Row (wrong side): Slip 1 wyif, purl to end of row.
Decrease Row 3 (right side): Slip 1 wyib, knit to last 4 stitches, k2tog, k2. [1 stitch decreased]
Repeat the last two rows two more times. [12 (13, 15, 17, 19) stitches]
Next Row (wrong side): Slip 1 wyif, purl to end of row.
Next Row (right side): Slip 1 wyib, knit to end of row.
Repeat the last two rows until armhole measures 7 ½ (8, 8 ½, 8 ¾, 9 ¼) inches, ending with a right side row.
Short Row 1 (wrong side): Slip 1 wyif, p7 (8, 10, 12, 14), wrap and turn.
Short Row 2 (right side): Knit to end of row.
Short Row 3: Slip 1 wyib, p2 (3, 5, 7, 9), wrap and turn.
Short Row 4: Knit to end of row.
Next Row (wrong side): Slip 1 wyif, purl to end, picking up the wraps as you come to them and purling them together with the stitch they wrap, Do not cut the yarn.
Turn the garment inside out. Place the stitches of the Back Left Shoulder onto a spare needle in a similar size. Hold the two needles parallel, with the right sides of the pieces together and the wrong side of the Front Right Shoulder facing you. With a third needle in a similar size, work a 3 needle bind off across all stitches, using the ball of yarn attached to the Front Left Shoulder. Cut the yarn, thread the tail through the last stitch. Pull gently to secure. Turn the garment right side out.
Finish Armholes
With the larger needle and the right side facing you, beginning at the center of the underarm, pick up and knit 72 (80, 86, 90, 94) stitches evenly around the armhole edge. Loosely bind off all stitches.
Repeat for other armhole.
Finish Neckline
With the larger needle and the right side facing you, beginning at the left shoulder seam, pick up and knit 63 (63, 67, 69, 73) stitches along the Front Neck and 43 (43, 45, 47, 49) stitches along the Back Neck. [106 (106, 112, 116, 122) stitches total]. Loosely bind off all stitches.
Weave in the ends.
Block the tank top by hand washing it separately from other items in cold water with a mild detergent. Rinse until the water runs clear. Some indigo will wash out, but don’t worry; the tank top will come out the same beautiful, dark indigo color!


I m writting from Türkiye. My English isnt
enough. I drew a pattern about my problem. İt s in the excel. But I need a mail adress.
Thank you…
Hi and thanks for writing in! Please feel free to reach out to us at customerservice@purlsoho.com!
Best,
Julianna
Do you have a variation worked flat? I only have 1 hand and can’t knit in the round. I use a knitting aid to clamp 1 needle.
Hi Margo,
Thanks for reaching out! We currently only offer this pattern for working in the round, but thank you so much for expressing your interest! I will be sure to pass this along to the rest of the team!
Warmly,
Gianna
Hi there,
So I’ve fallen in love with the shape and drape of this top.
Can you recommend another yarn for it?
Or even just a yarn weight?
(I can’t seem to find this linen tape yarn anywhere! Which is probably not a shocker, as the post is 5 years old already.)
Thanks so kindly,
Sarah
Hi Sarah
Thanks so much for writing in! This top is knit out of a fingering weight yarn, and a good substitute would be the Field Linen I hope this helps!
Happy knitting
Jessica
That helps immensely. Thanks very much, Jessica!!!
(and for the speedy reply!)
Hello, love this. How many skeins of the field linen will I need?
Hi Brigitte,
Thanks for reaching out! You will need 2 (2, 3, 3, 3) skeins of Field Linen for this top. Although they are both fingering weight yarns, the texture of Field Linen is quite different from Linen Tape, so I would definitely recommend knitting a gauge swatch before you cast on!
Best,
Julianna
Thank you for your reply
Hi,
This is a beautiful top and thank you for sharing it. I’m about to start it in a Pima cotton that gets about 3.5 st/in. I‘ve read through the pattern and am just clarifying that this is straight stockinette and reverse stockinette so it should be just a matter of converting the desired measurements to conform with my gauge. The only real question I have is whether my stitch count needs to be a particular multiple of a number. It didn’t appear to be but I would like to make sure. Thank you in advance for your help.
Hi Gina,
Thanks for reaching out! If you are comfortable with converting a pattern to a new gauge, yes, you can go ahead and follow along with the schematic! Since the top only uses stockinette and reverse stockinette, you do not have to cast on any particular multiple of stitches.
Happy knitting!
Julianna
I love this tank! 🙂
I have 10 balls of a lovely pale green cotton/silk yarn that I think would be beautiful, but it is a worsted weight. Do you think this pattern could be adjusted for that yarn? I’m kind of a newbie so not sure how that works. Thanks
Hi Ande,
Thanks for reaching out! It is possible to convert a pattern to a different gauge, but it requires quite a bit of math and swatching. If you’re new to knitting, I don’t think I would recommend jumping into that right away, especially on a garment! You might want to consider our Pebble Tank or Cap Sleeve Pullover instead, as both of those tops are written for worsted weight yarns.
Best,
Julianna
Hello! Beautiful pattern! Would cattail silk work and if so, how many yards would I need? Thank you!
Hi April,
Thanks for writing in! I think Cattail Silk held double would work great for this pattern! Although the original yarn, Habu N98-b Knitted Linen Tape, is listed as a fingering weight yarn, it often behaved more like a Dk or light worsted weight. For this tank, we used it on a US 8 and got 21 stitches to 4 inches, which would result in an extremely lacy and loopy fabric in a single strand of Cattail Silk. It should work well held double, however, and you will need 1012 (1104, 1288, 1380, 1470) yards, or 2 (2, 3, 3, 3) skeins.
Happy knitting!
Julianna
I have some Savanna Queensland Collection yarn. It is a Silk and Linen blend. Would this yarn work for this top? I have 750 yards. Thanks!
Hi Beth,
Thanks for reaching out! I think that should work! Just be sure to work a swatch and check your gauge prior to beginning to insure you are consistent with the pattern!
Warmly,
Gianna
i have Patons Pearl twist.. ithink it is a DK weight.. would this work for this pattern
Hi Marie,
Thanks for reaching out! I think that should be fine to use! Just be sure to work a gauge swatch prior to beginning to insure your gauge is 21 stitches and 28 rows = 4 inches in stockinette stitch, using the larger needle!
Happy knitting!
Gianna
Hi! I have a question about this wonderful pattern. In the Continue in the Round section, it says, “Repeat Round 2 until piece measures 7 inches from the cast-on edges of the Front and Back hems.” What would be considered the hems … the k1/p1 section at the very bottom or where the two pieces are joined with cable cast on stitches? Thank you so much!
Hi Crys,
Thanks for writing in! The hem is considered the cast on edge where you began the ribbing section!
I hope this helps, happy knitting!
Gianna
Hi! I’m writing from Italy and I have a question about this lovely top: can you help me with corresponding sizes (like S – M – L -XL etc) for 34 -36 – etc as written in the pattern, please? I couldn’t figure It out properly.
Thanks a lot in advance
Hi Ludovica,
Thanks for writing in! Our sizes are based on the actual measurements of the finished garment and your measurements! So the best way to select the correct size is to base it off of your own measurements. For example, if you have a chest measurement of 36″ then I would suggest making the 2nd size: size 37! I would recommend checking out our Understanding Ease + Selecting Your Size tutorial, it is an excellent resource to use and will walk you through the process of selecting the correct size!
I hope this helps!
Gianna
Thanks Gianna! I’ll surely have a look at the tutorial
I would like to knit this tank in “Spectrum Silk”. Will this yarn have the same drape? Do you think I should hold it double as it was suggested for the Cattail Silk?
Thanks, Jo
Hi Jo,
Thanks for writing in! I think this tank would look so lovely in Spectrum Silk! The drape should be very similar and I recommend holding the yarn doubled to achieve the correct gauge. I also recommend working a gauge swatch prior to beginning to ensure you are consistent with the pattern!
Happy knitting!
Gianna
How many yards are needed ?
Hi Vedder,
Thanks for reaching out! For this top, you will need 506 (552, 644, 690, 735) yards depending on the size you are making!
I hope this helps and please let me know if you have any more questions!
Gianna
Happy moms day!
What type of ease are you suggesting for this pattern. negative? Positive? Ild like to get it off my to do list and on my needles.
Thanks
Beth
Hi Beth,
Thanks for reaching out. The sample we knit is shown worn with 2 inches of positive ease, so positive ease is definitely a good option! But you can absolutely change that up for your own project–it all depends on how you want it to fit. If you’re not sure what fit you like best, I’d recommend measuring a favorite garment of yours and determining if it has positive, negative, or zero ease. Hope this helps!
All the best,
Lili
You say the top is shown with 2” ease, but the pattern for size 37 says that is actual 37” bust… no ease? So if I have 37” bust should I make the next larger size if I want 2” ease. (I’ve read your post on size and ease, but you’re wording on this pattern confuses me.)
Hi Christina,
Thanks for reaching out. The 37″ measurement for size 37 is the finished chest circumference of the top itself! In order to pick a size that fits with positive ease, you should pick a size that has a finished chest circumference that’s larger than your own chest circumference. For example, since the model is wearing the top with 2″ of positive ease, then their chest circumference is 35″. And if your own chest circumference is 37″, then you would need to choose the size 40 to get some positive ease (which would end up being 3″). Hope this helps clarify things!
All the best,
Lili
Hi, I’m enjoying knitting this, but the three-needle bind off instructions seem wrong, since the ball of yarn is at the wrong end if you follow the instructions to have the back right shoulder facing you. I just turned it around and cast off from the opposite side, but I did spend ten minutes puzzling about it before doing so…
Hi AB,
Thanks so much for reaching out about this! You’re absolutely correct, and we’ll update the pattern instructions as soon as we can. The instructions should now read:
Turn the garment inside out. Place the stitches of the Back Right Shoulder onto a spare needle in a similar size. Hold the two needles parallel, with the right sides of the pieces together and so that the wrong side of the Front Right Shoulder is facing you. With a third needle in a similar size, work a 3 needle bind off across all stitches, using the ball of yarn attached to the Front Right Shoulder. Cut the yarn and thread the tail through the last remaining stitch. Pull gently to secure. Turn the garment right side out.
Thanks again for bringing this to our attention!
All the best,
Lili