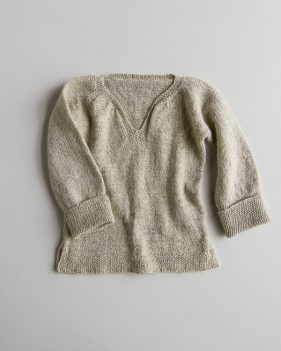
Easy Pullover for Babies, Toddlers and Kids

The Easy Baby Cardigan from Joelle’s More Last-Minute Kitted Gifts has become a Purl Soho classic… but it wasn’t the original! Before she knit up that worsted weight cardigan, Joelle first conceived of a lightweight, all-season pullover. At 7 stitches to the inch, it wasn’t exactly a “last minute knitted gift” and so it evolved; but Joelle never forgot the adorable prototype she had decided to shelve!
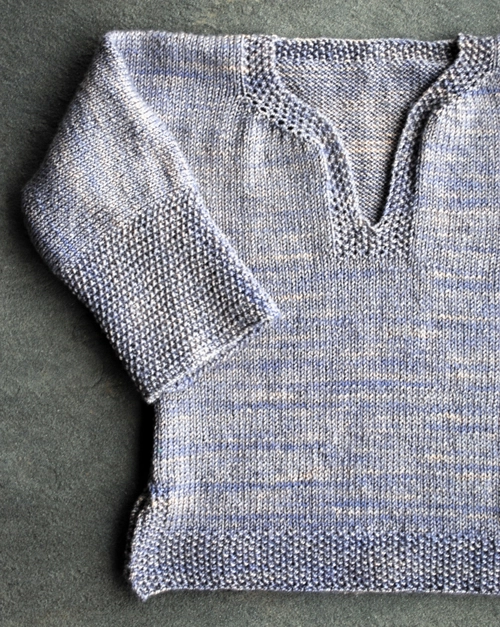
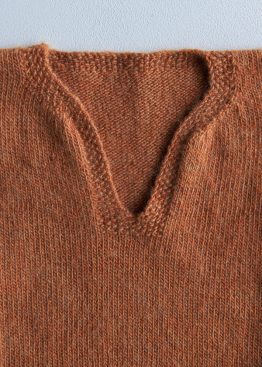
The inspiration behind both sweaters was always Joelle’s intrigue with an over-the-top construction. Starting at the bottom back, knitting up and over the shoulders and sleeves, then down the front, this sweater is a one-piece engineering wonder! The Easy Baby Pullover may not be as quick as its cardigan cousin, but it’s just as easy! And just as beautiful, with the gorgeous hand dyed subtlety of Koigu Premium Merino. Wonderfully soft, machine washable and as gorgeous as yarn comes, KPM is one of our all time favorites!
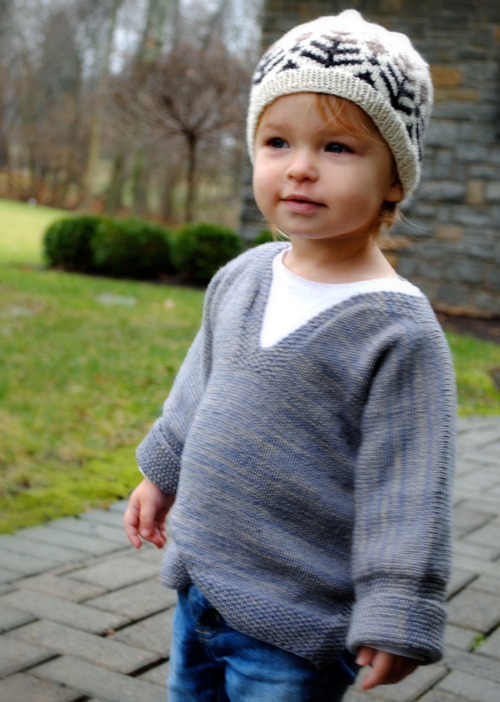
This timeless design is filled with design details that make it cozy for tots and easy for parents: a roomy neck opening for quick on and off, cuffs designed for rolling, and a loose, casual style for busy little bodies! A new classic? We think so!
P.S. Curious about the cute hat too? It’s our Little Fair Isle Hat and you can find out all about it right here!
Update: Additional Sizes
January 2014

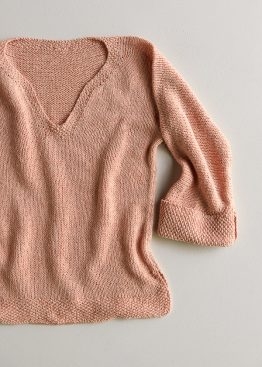
When we added three new sizes to the Easy Pullover pattern, we thought we’d knit up a new version in a new color! This sweet peach of a color is Koigu Premium Merino #1111.5. You can see more pictures of this version here!
Update: New Yarns!
July 2017
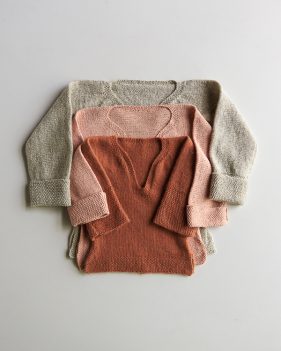
Our Easy Pullover for Babies, Toddlers + Kids is such a classic, we rely on it over and over, like an old friend. This year we’ve knit it up in, not one, not two, but three different Purl Soho yarns, each one with its own unique beauty! For more information on these yarns and for additional pictures, be sure to visit our new post here!
Share your progress and connect with the community by tagging your pics with #PurlSoho, #PurlSohoBusyHands, and #PurlSohoEasyPulloverForBabiesToddlersAndKids. We can’t wait to see what you make!
Materials
- 4 (5, 6, 7, 8, 9, 10) skeins of Koigu’s Koigu Premium Merino (KPM), 100% merino. Each skein is 175 yards/ 50 grams; approximately 700–1750 yards required. The denim blue is color #1010.5 and the peach is color #1111.5.
- US 4 (3.5 mm), 32-inch circular needle
- 4 stitch markers
- Stitch holder or scrap yarn
Gauge
28 stitches = 4 inches in stockinette stitch
Sizes
12-24 months (2 years, 4 years, 6 years, 8 years, 10 years, 12 years)
- Chest Circumference: 20½ (23, 26, 30, 32½, 34½, 36½) inches
- Length from Shoulder to Bottom Edge: 14 (16, 17, 19½, 20½, 22½, 24) inches
- Length from Cast-On to Underarm: 9 (10½, 11½, 13½, 14½, 16, 17) inches
- Armhole Depth: 5 (5½, 5½, 6, 6, 6½, 7) inches
- Sleeve Length from Underarm to Cuff, unfolded: 8¾ (11, 12¾, 15, 15½, 15½, 16¼) inches

Notes
This pullover is worked flat. It is worked in one piece from the bottom edge of the Back, over the shoulders and sleeves, then down to the bottom edge of the Front.
Seed Stitch: (multiple of 2 stitches + 1) All Rows: K1, *p1, k1, repeat from *.
Stockinette stitch: Knit on right-side rows and purl on wrong-side rows.
Errata
This pattern was updated on January 2, 2014 to include 3 additional sizes. The update also includes revisions to the original sizes, adjusting fit to better align with standard sizing. The original January 12, 2012 pattern is now only available on Ravelry as a free downloadable pattern (click here to go to Ravelry). And for the most up-to-date version, just read on right here!
Pattern
Back
Cast on 71 (81, 91, 105, 113, 121, 127) stitches. We used a basic Long Tail Cast On.
Work in Seed Stitch for 1½ (1½, 1½, 1½, 2, 2, 2) inches, ending with a wrong-side row.
Next Row (right side): Work in Seed Stitch for 5 stitches, work in stockinette stitch to last 5 stitches, work inSeed Stitch to end.
Work as set by last row until piece measures 2½ (2½, 2½, 2½, 3, 3, 3) inches from cast-on edge, ending with a wrong-side row.
Change to all stockinette stitch. Work even until piece measures 9 (10½, 11½, 13½, 14½, 16, 17) inches from cast-on edge, ending with a wrong-side row.
Cast on for Sleeves
Row 1 (right side): With right side facing, use a Cable Cast-On to cast on 60 (74, 88, 102, 106, 106, 110) stitches. Work across cast-on stitches in Seed Stitch for 25 (29, 33, 37, 37, 37, 37) stitches, place a marker (pm), knit to end. [131 (155, 179, 207, 219, 227, 237) stitches]
Row 2: With wrong side facing, use a Cable Cast-On to cast on 60 (74, 88, 102, 106, 106, 110) stitches. Work across cast-on stitches in Seed Stitch for 25 (29, 33, 37, 37, 37, 37) stitches, pm, purl to next marker, work in Seed Stitch to end [191 (229, 267, 309, 325, 333, 347) stitches]
Row 3: Work in Seed Stitch to first marker, work in stockinette stitch to next marker, work in Seed Stitch to end.
Repeat Row 3 until piece measures 4½ (5, 5, 5½, 5¼, 5¾, 6¼) inches from beginning of Sleeve, ending with a wrong-side row.
Shape Back Neck
Row 1 (right side): Work in Seed Stitch to first marker, k51 (64, 76, 93, 99, 103, 110), pm, work in Seed Stitch over next 39 (43, 49, 49, 53, 53, 53) stitches, pm, knit to next marker, work in Seed Stitch to end.
Row 2: Work in Seed Stitch to first marker, work in stockinette stitch to next marker, work in Seed Stitch to following marker, work in stockinette stitch to last marker, work in Seed Stitch to end.
Repeat Row 2 until the back neck Seed Stitch measures ½ (½, ½, ½, ¾, ¾, ¾) inch, ending with a wrong-side row.
Next Row (right side): Work in pattern to second marker, work 5 stitches in Seed Stitch, bind off 29 (33, 39, 39, 43, 43, 43) stitches in pattern, work in pattern to end. [81 (98, 114, 135, 141, 145, 152) stitches remaining for each side]
Left Front
Now working only the Left Front and Sleeve stitches (leaving the remaining stitches on needle), work even in patterns as established for 1 (1, 1, 1¼, 1¼, 1½, 1½) inch(es), ending with a wrong-side row.
Shape Front Left Neck
Row 1 (right side): Work in pattern to first marker, slip marker (sm), knit into front and back of next stitch (kfb), work in patterns to end. [82 (99, 115, 136, 142, 146, 153) stitches]
Row 2: Work in patterns to 1 stitch before second marker, kfb, sm, work in pattern to end. [83 (100, 116, 137, 143, 147, 154 stitches]
Repeat Rows 1 and 2 six (seven, eight, eight, nine, nine, nine) more times, working increased stitches in stockinette stitch. [95 (114, 132, 153, 161, 165, 172) stitches]
SIZES – ( – , 4 YEARS 6 YEARS, 8 YEARS, 10 YEARS, 12 YEARS) ONLY
Work Row 1 again. [- (-, 133 154, 162, 166, 173) stitches]
ALL SIZES
Work even until piece measures 10 (11, 11, 12, 12, 13, 14) inches from beginning of Sleeve, ending with a right- side row.
Left Sleeve
Next Row (wrong side): Bind off 60 (74, 88, 102, 106, 106, 110) stitches in pattern (removing marker), work in patterns to end. [35 (40, 45, 52, 56, 60, 63) stitches remain]
Cut yarn and place stitches on stitch holder or scrap yarn.
Right Front
With wrong side facing, rejoin yarn to stitches on needle. Work even in patterns as established for 1 (1, 1, 1¼, 1¼, 1½, 1½) inch(es), ending with a wrong-side row.
Shape Front Right Neck
Row 1 (right side): Work in patterns to 1 stitch before second marker, kfb, work in pattern to end. [82 (99, 115, 136, 142, 146, 153) stitches]
Row 2: Work in pattern to first marker, sm, kfb, sm, work in patterns to end. [83 (100, 116, 137, 143, 147, 154) stitches]
Repeat Rows 1 and 2 six (seven, eight, eight, nine, nine, nine) more times, working increased stitches in stockinette stitch. [95 (114, 132, 153, 161, 165, 172) stitches]
SIZES – ( – , 4 YEARS 6 YEARS, 8 YEARS, 10 YEARS, 12 YEARS) ONLY
Work Row 1 again. [- , ( – , 133 (154, 162, 166, 173) stitches]
ALL SIZES
Work even until piece measures 10 (11, 11, 12, 12, 13, 14) inches from beginning of Sleeve, ending with a wrong-side row.
Right Sleeve
Row 1 (right side): Bind off 60 (74, 88, 102, 106, 106, 110) stitches in pattern (removing marker), work in patterns to end, Cable Cast-On 1 stitch for center neck, work this stitch in Seed Stitch, then work the 35 (40, 44, 52, 56, 60, 63) stitches of Left Side in patterns as established. [71 (81, 91, 105, 113, 121, 127) stitches]
Front
Row 1 (wrong side): Work in stockinette stitch to first marker, work in Seed Stitch to next marker, work in stockinette stitch to end.
Work as set by last row for 3/4 inch total, ending with a wrong-side row.
Next Row (right side): Work entire row in stockinette stitch, removing markers.
Work even until Front measures 6½ (8, 9, 11, 11½, 13, 14) inches from end of Sleeve, or until Front is same length as Back to beginning of Seed Stitch trim above side slit, ending with a wrong-side row.
Next Row (right side): Work in Seed Stitch for 5 stitches, work in stockinette stitch to last 5 stitches, work in Seed Stitch to end.
Work as set by last row for 1 inch total.
Next Row: Work entire row in Seed Stitch.
Repeat last row for 1½ (1½, 1½, 1½, 2, 2, 2) inches total, ending with a wrong-side row.
Bind off in Seed Stitch.
Finish
Block if desired. Using mattress stitch, sew side seams, starting above the Seed Stitch edging, and leaving 2½ (2½, 2½, 2½, 3, 3, 3) inches unsewn for side slits. Also sew the Sleeve seams.
Weave in your ends and block as desired.


I made this sweater in size 4. Ordered my yarn from you and just followed the pattern to the letter, not giving much thought to the sleeve length. The directions were very clear and I blocked the sweater before seaming. The sleeves are way too long. Too late to do anything about that now. Who came up with the sleeve length? Even rolling up the cuff will not shorten the sleeves enough. Could there be a mistake in number of stitches?
Hello Kaye,
I’m so sorry the sleeves came out too long! If your sweater’s arm length is 12 3/4″, then you have hit gauge and made the sleeve to spec. The sleeves on this sweater are meant to be rolled up and if that is not staying, I suggest adding a button up the forearm and an i-cord loop at the sleeve edge to secure the cuff in place. Let us know if you have any other questions!
-Adam
Any chance this pattern was adapted for adult sizes? I thought it had at one time, but I can’t seem to find it. Thanks in advance.
Sara
Hi Sara,
Thanks for your interest in this pattern! This pattern has never been adapted for adults, but I’m sure there are similar patterns on Ravelry that you could refer to. Thanks for writing in!
Happy knitting!
Adam
I for one would love to have this pattern graded for adult sizes. I’d be happy to pay for it. I haven’t found anything on Ravelry that comes close. I’ve made this for my baby grandson and I’m now knitting it again for another baby in the family. It’s a fabulous sweater.
Hi Paula,
Thanks for reaching out! Unfortunately, we don’t currently have the resources to re-write this pattern for adult sizes but thank you so much for expressing your interest! I will be sure to pass this along to the design team!
All the best,
Gianna
Hi there, my daughter loves this pattern and I’d like to knit it for her impending new baby 🙂 Is there a size for newborn or 3-6 months? Otherwise could I successfully scale it down, do you think?
Thanks
Hi Chrissie,
Thank you for your question! Unfortunately, the smallest size for this sweater is 12-24 months. We appreciate your request for a smaller size but at the moment we do not have the resources to size it down but will pass on your request to our designers.
Perhaps the Little Baby Sweater would work better or you could knit this sweater for winter after the baby is born. I know that new mom’s love to have some items that will work for a little further on than the first year!
I hope that this helps and happy knitting!
-Cassy
I’m enjoying knitting this for my expected grandchild. The yarn is beautiful and soft, and I know he or she will love wearing this garment! I’m a relatively new knitter and am a bit stumped by part of the instructions in the Shape Back Neck section:
Next Row (right side): Work in pattern to second marker, work 5 stitches in Seed Stitch…..
Work in pattern means what, here? Just continuing in stockinette stitch?
Hello Paula,
I’m so happy you’re loving this pattern! It’s going to be a great gift! When you “knit in pattern” you are essentially doing seed stitch for the seed stitch portions and stockinette for the stockinette portions. Basically, it means to knit the different stitch variations as they come in the row. Let me know if you have any other questions! Best of luck!
-Adam
OK, Adam, that’s what I thought but wanted to make sure. I appreciate the help!
I would second (fifth?) the motion to have this pattern reworked for adult sizes. And perhaps a chunk/bulky yarn weight?
Hi Paula,
Thanks for the suggestion! We’ll keep it in mind for future projects! Stay tuned!
Best,
Adam
Hi, I clicked the link for Cable Cast On referenced in this pattern and it appears to be a broken link. I also used your search bar and came up short. Can you update the link for that tutorial? Many thanks 🙂
Hi Susan,
Thank you so much for letting us know! I have fixed the link in the pattern and am including the link here for your convenience (https://www.purlsoho.com/create/2008/07/07/cable-cast-on/). We really appreciate the heads up!
Happy knitting!
Cassy
In shaping the neck, row one says to kfb, and row 2 also says kfb. Just making sure row 2 isn’t supposed to be pfb since that’s the purl row?
Hi Paula,
Thank you for writing in! The increases at the neckline are supposed to continue the seed stitch texture, so this is why you kfb on both the right and wrong sides. Good catch though! Let me know how the rest of the pattern goes and feel free to write back in if you have any other questions!
Best,
Adam
I am at this point in the pattern too. For row 2, it seems the increase should be a PFB instead of a KFB. Otherwise the seed stitch pattern would be extending past the existing neckline stitches. And for the following 12 rows, the pattern says to do all increases in stockinette stitch. Am I missing something?
Hello Julie,
Thanks for reaching out! When you turn your work to begin your next row all of your knits become purls and all your purls become knits. This means that you are ending with a knit stitch, but when you turn your work to start knitting back across the wrong side row, the stitch you just knit will be a purl.
I hope this all makes sense, but let us know if you have any further questions!
Best,
Marilla
very easy to fallow and nice pattern have agood day
Hi I am knew to knitting and was wondering if there was any way you could add pictures to the steps or a video I struggle when it gets to the sleeves and I really want to make this sweater for each of my boys please and thank you
Hi Roxie,
Thanks for writing in! Unfortunately we don’t have the resources at this moment to add more content to the pattern but we will keep this in mind for future patterns!
-Adam
So you have any suggestions for yarn substitutions? This yarn looks lovely but it’s so expensive; especially for a child’s garment!
Hi Diana,
Thanks for writing us! We understand that sometimes our yarn choices are more than you may want to spend. The Koigu that we used for this pattern is a fingering weight yarn. Madelinetosh Tosh Merino Light would make a nice substitute. You will need half as many skeins as the yardage is quite a bit higher and the price is a bit lower.
I hope that this helps and happy knitting!
Cassy
Hi there! I need some help!
I was doing really well (i think) until I got to the section titled “Left Front”…. so, if I understand the pattern correctly this section should start be WS since the row before it was RS, correct? If that’s the case I don’t understand how to get my yarn to left front because it is at the end of the needle on the right front.
Maybe I’m looking at my work the wrong way? If I’m holding my work in front of me, the purl side is facing me with the yarn on the far right(making the next row I would work on WS)…but if I flip the sweater and look at the knit side aka the back that I just finished then the yarn is on the “left side”.
I don’t know… I’m just confused! haha
Thanks,
Alexa
Hi Alexa,
Thanks for writing us. Hopefully I can clarify this! The left front actually starts on a right side row and ends on a wrong side row before increasing for the left front neck. After you bind off the back neck you should have your left front and left sleeve in your left hand. Continuing directly after your bind off you’ll start the left front section. I hope this clears things up!
-Adam
Writing in for a little more clarity, as I’ve reread this response several times and think I must still be misinterpreting it. As Alexa says, after the bindoff of the back collar and finishing the right side of the Left Sleeve, we turn our work to begin the Left Front, correct? So then we’re on the wrong side, working with the same yarn on the Left Front.
That area begins with Seed Stitch, then we get to stockinette. What do we do now—knit (as we have been for previous right-side rows) or purl (which would technically be “in pattern” since we seem to now be on the wrong side)?
Sorry—I would really appreciate a tiny bit more clarity! When I did what I think Adam instructed, I ended up reversing the stockinette. Do we actually have a new definition of “right side”?
Hi Shannon,
Thanks for reaching out! I believe you are at a different step than what Adam is describing – he is referring to the section where you begin increases to shape the front neck, which starts with a right side row. The section before that, titled “Left Front,” does begin with a wrong side row. Either way, in the stockinette portions of this sweater, you should always be knitting on the right side and purling on the wrong side, and the right and wrong sides will not be switching.
I hope that clarifies everything!
Julianna
Hi there,
I’m a little confused about Row 2 in the sleeves section. I’ve cast on and successfully done the row 1 section but am I now to just cast on the next 60 stitches in what would appear to create one very long sleeve for now? I currently have the row 1 stitches on my right needle and the rest of the project on my left. SO, if I were to cast on the 60 additional I just don’t see how it would continue to be the correct shape for the sweater. Thanks!
I think I figured it out, I didn’t understand initially that in row one you need to continue knitting back through the back of the sweater, not just the newly cast on stiches!
Hello 🙂
What a beautiful pattern this is! I’m using a hand dyed ombre yarn for this, which I think is going to look lovely. I’m just wondering if there are any instructions available for knitting this in the round, and using a steek for the neck opening?
I’m in no way an expert knitter, so perhaps this isn’t even feasible?!
Thanks so much for your inspiring patterns and your user friendly site! It’s my ‘go-to’ site for that instant feel good factor, when you can grab a few moments between the daily chaos and dream of future projects!!
Mary
Mi Mary,
Thanks for writing in and for your kind words! Altering this pattern to knitting in the round with a steak would be quite a lot of work. I would recommend knitting it as written or if you are interested in trying a steak, try our Tiny Stripes Cardigan and Vest pattern!
Happy knitting!
Cassy
Hi there,
I’m at “shape front left neck” and I seem to have lost a stitch marker somewhere. I only have a marker now separating the seed stitch portion on the end of the sleeve.
To stop at the first marker, how many stitches in/ or left, should I be at at this point?
Thanks!
Hi Kassandra,
Thanks for writing in! We would be to try to help you out figuring out where your markers should be. Can you please tell me what size you are knitting?
Best,
Cassy
I love this little pattern,
I am a small trim petite lady and after all considerations I feel confident that I can knit this adorable v-neck top up for myself. I’m anxious to gibe it a ‘go’. Thank you.
I love this sweater! I will be making this for my boy/girl twins very soon! I would love to have an adult version of this sweater!! *hint hint* in womens medium!
I made this. It was an easy pattern to follow. Folded the sleeves up and put a stitch in to hold them up. Found they kept unrolling. Used Loops and Threads woolike yarn. I also would like to put a wood button or toggle at the neck. I found it flaps open too much. I followed the size 4 pattern and my 3.5 yr old is wearing it. Is there a way to add a picture?
Hi Amanda,
Thanks for writing in! We are so glad that this pattern worked out well for you and we were so happy to receive the photo! It is always such a joy to see our patterns worked up and on happy recipients!
Best,
Cassy
I’m stuck on the sleeve cast on… the link you have for the cable cast on says have the wrong side of your work face you but the pattern says have the right side face you. Should I be starting the sleeve cast on where I would normally start the next knit row? Can I follow the cable knit cast on instructions from your link the same way even if it’s done on the opposite side?
Hello Analyn,
Thank you for reaching out! To cast on for the sleeve with the right side facing you, you’ll use the working yarn which is coming from the first stitch and you will use a cable cast on technique to cast on the instructed number of stitches, just as you would following the tutorial. Once you have completed the cable casted on, the right side will still be facing you and the working yarn will be coming from the stitch you’ve just cast on which is now the first stitch of the row. Work across those newly casted on stitches and the to the end of the row as instructed (seed stitch first and then knitting to the end). Next you’ll do the same thing for the other sleeve, but this time with the wrong side facing and once you’ve worked in seed stitch, you’ll purl and then finish the row in seed stitch.
I hope this is helpful and happy knitting!
-Marilla
Hi – question about gauge. 28 stitches = 4 inches. Is this the gauge swatch? Meaning, 28 stitches across and 28 up equals 4 inches square? Trying to make sure I adjust my gauge correctly before I start. Also, any recommended website to adjust gauge? Thank you!
Hi Sara,
Thanks for reaching out! For this lovely sweater we are giving just the stitch gauge and not the row gauge. Knit stitches are wider than they are tall so when you see a gauge that gives both, it will generally have more stitches vertically than horizontally. Here, stitch gauge is the more critical measure!
As to adjusting gauge, if you are getting more stitches per inch than notes, you will want to go up in needle size and if you are getting fewer stitches per inch, you will want to go down in needle size!
I hope that this helps!
Cassy
Thanks Cassy! As I read through the pattern, I realize it gives a lot of ‘knit until this big’ instructions, rather than amount of rows, so that helps. I am getting 30 stitches for 4 inches. Do you think that would be ok, and the sweater would just be slightly smaller (doing the smallest size). Or do you think I should convert all the instructions slightly to adjust to my gauge? Don’t want the proportions to be off. Thanks!
Sara
Hello Sara,
Thank you for your reply! 30 stitches vs 28 stitches can add up over a sweater to be significant. What I would recommend doing is going up one needle size and seeing if that will get you to the correct gauge. That being said if can be flexible with size you could always stick with your gauge and go up one sweater size. Sometimes with kids sweaters size is slightly less crucial. I hope this answers your questions and let us know if you have any further questions!
-Marilla
I am confused about the Seed Knit stitch. In the directions, it states: Seed Stitch: (multiple of 2 stitches + 1) All Rows: K1, *p1, k1, repeat from *.
However, if I cast on 71 stitches and do K1, p1, k1, I end on a knit one. In my mind, that means that when I start the WS row, I should P1 first. Am I missing something?
Hello Sara,
Thank you for reaching out! When you turn your work to begin your next row all of your knits become purls and all your purls become knits. This means that you are ending with a knit stitch, but when you turn your work to start knitting back across the wrong side row, the stitch you just knit will be a purl.
I hope this all makes sense! It becomes much clearer as you start to knit, I promise. If you have any more questions- just let us know!
Happy knitting!
-Marilla
Question about cable cast on – in this pattern, says with right side facing you. On the Cable Cast on tutorial page, it says with wrong side facing you. Will it be the same steps with the right side facing me, as the pattern states? Never done this before, feeling anxious! Thanks!
Hello Sara,
Thank you for reaching out! In this case you will follow what the pattern tells you to do. You can do a cable cast on either the right or wrong side, depending on what your pattern tells you to do. If you come across any other questions don’t hesitate to ask – we are here for you!
Happy knitting,
Marilla
Oh this is beautiful!! Any chance you’ve adapted the pattern for adults yet as I’ve been reading that there is quite a bit of request for adult size and chunky yarn? Thank you 🙂
Hi Sabine,
Thanks for reaching out and for the very kind words! Although we still only have children’s sizes, I will pass along your request to the design team!
Best,
Julianna
I think you should adapt this here pattern for adults too. This is a beaut.
Hi,
I’m finally getting close to completing this beautiful project but I’ve hit a snag at the Right Sleeve section. The left side is tucked away on a piece of yearn. I did the bind off of the right sleeve and I’m trying to understand this part: “Cable cast on 1 stitch for center neck, work this stitch in Seed stitch, then work the xx stitches of Left side in patterns”.
You didn’t say anything about putting the left side stitches back on the needle, where/when do you do that?
Should cable cast on 1, then add the left side on the left needle (facing right side), then turn turn facing wrong side, do 1 seed with the cast on, turn again and continue working on right side the cast on stitch again and the left side?
Sorry, I’m kind of an old beginner and I can’t find a video online to explain this step.
Hello Olivia,
Thank you for reaching out. I know this part is confusing, but you are on the right track! You are going to be on the right side throughout this Row. You will Cable Cast-On 1 stitch for center neck with the right side facing you and then, still with the right side facing you, work this stitch in Seed Stitch, then work the 35 (40, 44, 52, 56, 60, 63) stitches of Left Side in patterns as established. Ending with 71 (81, 91, 105, 113, 121, 127) stitches.
I hope this makes sense and let me know if I can clarify anything for you!
Warmly,
Marilla
I had the same question and the explanation unfortunately doesn’t clarify for me. I just finished the right front bind off of 60 stitches and then worked the remaining 35 stitches.
1. Do I pick-up a stitch from the middle of the neck and then do the cable cast on?
2. Do I just add a stitch using the cable cast-on right next to the 35 I just completed on the right side?
3. How do you work one stitch in seed stitch?
4. Once I cast on the one stitch do I work I put the stitches on the left front from the stitch holder on my other needle and work them in pattern?
Thanks,
Hillary
Hi Hillary,
Thanks for reaching out. Let me see if I can answer the specific questions you’re wondering about! First, you’ll work the cable cast on right after the 35 stitches you just completed. You don’t need to pick up any extra stitches to do this–just insert your needle between the previous two stitches on your needles and cast on the extra stitch. To work this stitch in seed stitch, you’ll work the next stitch in pattern. So for example, if your 35th stitch was a knit stitch, then you’ll purl the stitch you just cast on, but if the 35th stitch was a purl stitch, then you’ll knit the extra stitch instead. And finally, yes, you’ll put the stitches on hold for the left front back on your needles to finish this row! I hope this clarifies things more for you.
All the best,
Lili
hi i was wondering why you would need to use a circular needle on this jumper? thanks
Hi Donna,
Thanks for reaching out! Although this pullover is knitted flat, since it is all in one piece, you will have quite a few stitches on your needles at once during the sleeves – up to 347 depending on which size you are making. We find it much easier to fit that many stitches on a circular needle, but if you have long straight needles that could accommodate that many stitches you could certainly use them instead.
Happy knitting!
Julianna
Hello,
Thanks for publishing this beautiful pattern. I’m not a very experienced knitter and I’m wondering if there would be a simple enough way to alter the neckline so that it is a loose crew neck instead of the V-neck, but keeping the seed-stitch.
Thanks for any advice!
Hello Hellen,
Thanks for reaching out! There are a couple of ways you could try this out. The simplest way would be to omit the “Work even until piece measures 10 (11, 11, 12, 12, 13, 14) inches from beginning of Sleeve, ending with a right- side row.” portion for the Front Left and Front Right. This is the section that is giving you the v shape.
This would mean two very important things.
Firstly, because this is taking space away from the neck opening, your neck might end up two small for a head. I would suggest adding an inch or so to the Left Front and Right Front before beginning your increases. Secondly, you are going to still need that length in your sleeves that you would have been working simultaneously with the neck shaping. This means that you would need to continue to knit your sleeves during the “Front” portion of the pattern until they reach the length of knitting you omitted “10 (11, 11, 12, 12, 13, 14) inches from beginning of Sleeve”.
This all might take a bit of experimenting, but you can definitely do it!
Let us know how it goes an happy knitting!
-Marilla
Thank you so much for the extra directions, I’m really happy with how it turned out! Haven’t been able to try it on the recipient baby yet to see if it fits over her head but looks like it should!
I’M QUITE SURE I NEED THIS IN ADULT SIZES, PLEASE.
Hi Janne,
Thanks for writing in! At present we do not have an adult version of this sweater, but I’ll be sure to pass your request along to the design team!
Best,
Julianna
Thank you for sizing this up for kids. It’s ambitious for me, but I may just try to make one for my eight year old. (The last sweater I started for him has yet to be finished though!) I don’t know my yarn terminology well. I did look at the link for the type of yarn used (Koigu) and I saw a tag of “fingerling” but I saw earlier in the description that maybe the yarn used for the sweater is worsted? I know gauge is the most important part of this but I’ll need somewhere to start. So, worsted or fingerling? What should I start with?
Thank you!
HI Emily,
Thanks for reaching out! I am happy to help! The yarn used for this sweater is a fingering weight yarn! The version of this sweater that appears in Joelle’s lovely book uses worsted weight but this version above uses fingering weight yarn which is great for its light weight nature!
I hope that this helps!
Cassy
Hello, beautiful pattern and so far very easy to follow. Just a quick question…I’m knitting the 12-24 month size and working on the sleeves. Have gotten to the point where my sleeves measure 4.5 inches from the beginning of the sleeve. Well 4.5 inches of the stockinette stitch, my seed stitch is slightly smaller so it’s more like 4.25 inches. Should I continue until my seed stitch cuffs reach 4.5 inches or is this measurement ok for the stockinette?
Hope that makes sense.
Many thanks
Charlotte
Hi Charlotte,
Thanks for writing in! I suspect that your seed stitch will block out a bit wider, so I would go with your stockinette measurement – otherwise the sleeve may end up too baggy at the upper arm and shoulder. If it doesn’t block out wider, it will be just fine for the cuff to be a little tighter than the rest of the sleeve!
Happy knitting!
Julianna
That’s very helpful, thank you for replying Julianna!
Hi,
This is the 2nd sweater I have knit and it has been super easy to understand up until now. I have the left side on a stitch holder and am starting the right side. How am I supposed to rejoin the yarn onto my stitches? Right now it’s just a section with no tail to be able to knit.
Thanks,
Steph
Hello Stephanie,
Thanks for reaching out! For this section you will need to join another ball of yarn, or cut your working yarn to rejoin to knit the right side.
I hope this makes sense, let us know if you have any clarifying questions!
-Marilla
I’m about to start Left Front. I have been knitting on straight needles. How do I just knit the left front and what do I do with the Right Front stitches while I’m not working on them? Is it essential to switch to circular needles now, or put those stitches somewhere in a ‘holding zone’? This is my first time only knitting part of the whole number of stitches at once and I’m a little confused. Is there a video that might be illuminating? Hard to envision and I don’t want to just jump in and start and end up with a jumble. Thanks!
Hi Sara,
Thanks for reaching out! It is possible to do this step as written on straight needles, but it’s a bit tricky to visualize! You will essentially ignore the Right Front stitches, and every time you knit across the Left Front stitches and get to the bound off neck stitches, turn and work back across the Left Front stitches for the next row. It will look odd, but it works! If it makes it easier, you can certainly place the Right Front stitches on a holder while you work the Left Front!
I hope that clears things up!
Julianna
I just finished the end of Shape Front Left Neck and instead of 95 stitches I just counted and have 98. Do I need to do something to fix this (knit two together in three random spots?) or will I just bind off more (63?) when I get to that step? Not sure how I ended up with the extra 3 stitches, but hoping I can just recover somehow.
Hi Sara,
Thanks for reaching out! Since the Left and Right Front pieces have to match, and casting off extra stitches would make one side of the sleeve longer than the other, I would unfortunately recommend going back to your increases in this side. It sounds like you probably worked too many increase rows, so you should be able to take out three increases rows to get to 95 stitches, and then knit the plain rows to get back to 10 inches.
I hope that helps!
Julianna
Hi there,
I am currently knitting this sweater and have a technical question regarding the neck shaping.
I am at this point in the pattern:
SHAPE FRONT LEFT NECK
Row 1 (right side): Work in pattern to first marker, slip marker (sm), knit into front and back of next stitch (kfb), work in patterns to end. [82 (99, 115, 136, 142, 146, 153) stitches]
Row 2: Work in patterns to 1 stitch before second marker, kfb, sm, work in pattern to end. [83 (100, 116, 137, 143, 147, 154 stitches]
**My question is for when I start Row 2. Would Row 2 be the wrong side? Therefore is the second marker the one right before the neck trim? If so my question is since I am knitting on the purl side when I do the stitch increase do I switch so that increase using kfb? Or am I supposed to increase using pfb.
Hope my question makes sense.
Thank you!
Zahra
Hi Zahra,
Thanks for reaching out! Yes, Row 2 is a wrong side row, and you will still be increasing at the neck edge. Although it seems like it would, the wrong side of a pfb does not look like the right side of a kfb, but both stitches will blend nicely into the edge of the seed stitch border, so a kfb is correct!
Best,
Julianna
Hi Julianna,
great, thank you!
I’m just casting on the 12-24 and this sweater looks huge for a 2 year old. My daughter is quite slim, but the front could almost wrap around her body. Is this meant to have a lot of ease width wise?
Hi Emily,
Thanks for writing to us! Most children’s garment patterns are written to have more ease than adult patterns, but if it’s really looking too big you might want to try changing your needle size to something smaller. Is your gauge 28 stitches over 4 inches, or close to that? Let me know if you have any other questions!
Best,
Cassandra
I am confused about shaping the left front:
Row 1 (right side): Work in pattern to first marker, slip marker (sm), knit into front and back of next stitch (kfb), work in patterns to end. [82 (99, 115, 136, 142, 146, 153) stitches]
Row 2: Work in patterns to 1 stitch before second marker, kfb, sm, work in pattern to end. [83 (100, 116, 137, 143, 147, 154 stitches]
Does this mean Row 2 is a “purl front to back” pfb?
I have just been doing kfp on the right side row only increasing every right side row.
thanks for helping!
Hi Naomi
That’s a great question! Although it seems like it would, the wrong side of a pfb does not look like the right side of a kfb, but both stitches will blend nicely into the edge of the seed stitch border, so a kfb is correct on Row 2. If you only increased on the RS rows, your neckline will be longer than the original pattern when you get to the correct number. I hope this helps!
Happy knitting
Jessica
Hi, I’m knitting this and at the sleeves– the pattern says to measure from the “beginning of Sleeve,” but I am getting pretty different measurements depending on whether I measure from the edge of the stockinette portion of the sleeve (measured a little longer) vs. the seed stitch version of the sleeve (measures a little shorter.) Any advice for me? Thank you!
Hi Audra,
Thanks for reaching out! For this part of the pattern, you measure from the cast on edge of the sleeve!
I hope this helps!
Gianna
The binding off for the back of the neck is done on the right side. The work should now continue on the left front only for one inch (for the smallest size). Is this done from the end of the sleeve towards the neckline? If the left front refers to the side as the child wears it, I will need to restart the yarn on the other side from where I finished the neck binding off row. Is this correct? Thanks so much. It’s coming along nicely so far.
Hi Andrea,
Thanks for reaching out! Yes, that is correct! Once you bind off the stitches you will continue with the left side sleeve!
Happy knitting!
Gianna