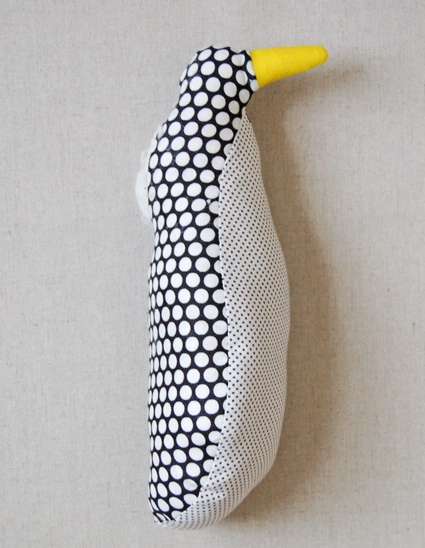
The Purl Bee Penguin
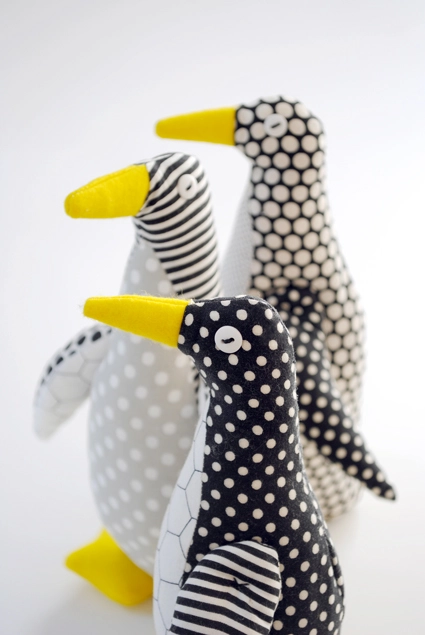
Winter in New York City can be hard to love with its frozen sidewalks, dirty snowbanks, and bare trees. But this winter I’m counting on my new cold weather friend, the Purl Bee Penguin, to help me through! Its happy ovoid shape and graphic palette are sure to remind me that joy really does exist in January. Just ask an Emperor Penguin!
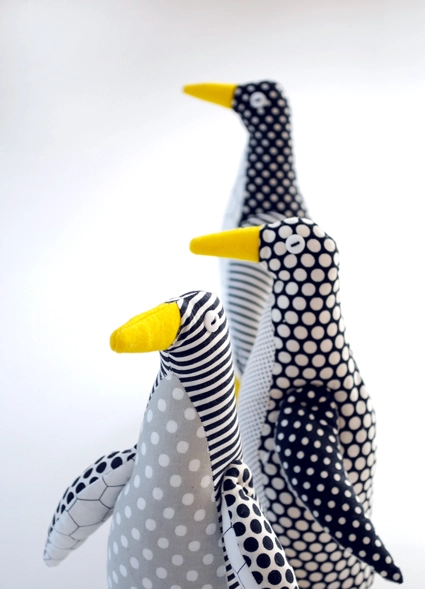
I used our new Penguin Fat Quarter Bundle, a lively mix of black and white dots, stripes, and prints, to sew up this quirky little trio of penguins. I loved seeing how each one developed its own personality as I sewed, becoming more and more alive with each stitch! They are also real crowd pleasers. Even my non-sewing thirty-something friends all oohed and aahed when they saw my penguins lined up on my ironing board.
The Purl Bee Penguins are pretty addictive to make, and I don’t think that I’ll be able to stop with just these three. Check back in a few weeks; I may have amassed a penguin colony!
Materials

To make three penguins:
- 1/4 yard each of seven dots, stripes, and chicken wire in black and white.
- A piece of bright yellow felt. I used Sunshine (01) but Sun (03) and yellow (02) would look great too.
- 100% cotton sewing thread in color 1040 (ecru) and color 1001 (black)
- DMC embroidery floss in color 310 (black)
- Six small white buttons in white
- A Purl Bee Penguin Pattern Template, available for free download here, printed and cut out.
It will also be helpful to have a size 3- 7 straight knitting needle or a similar pointy object for stuffing.
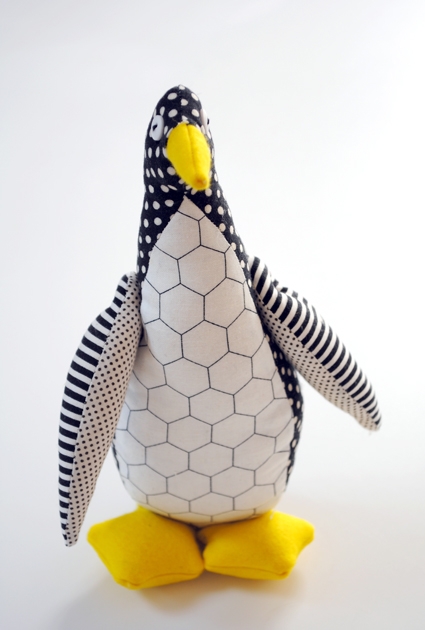
Size
9-inches tall
Pattern
Cutting
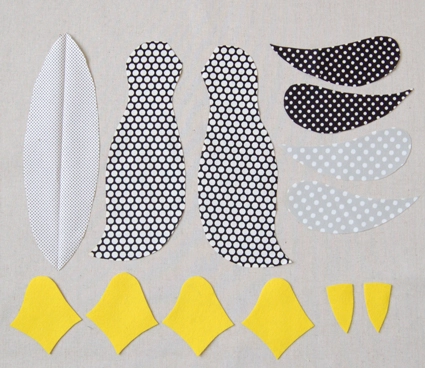
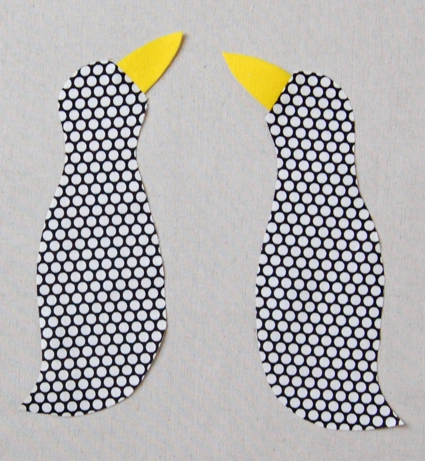
Cut out the fabric according to the directions on the template. You can mix and match the patterns however you like. When cutting the side body and wing pieces make sure that you are cutting two opposite facing pieces. Do this by cutting one piece with the right side of fabric facing and the next one with the wrong side of the fabric facing. Make all of the marks with an erasable marker or a pencil on the wrong side of the fabric.
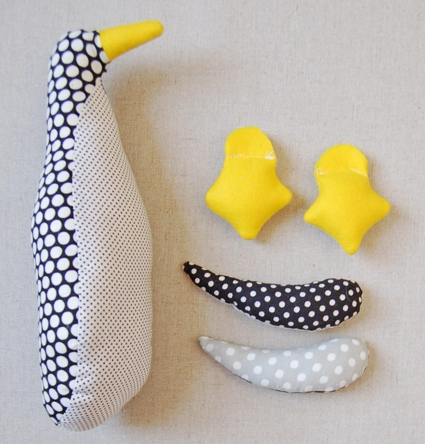
You will have:
- 2 side body pieces
- 1 front body piece
- 2 light colored wing pieces
- 2 dark colored wing pieces
- 4 felt feet piece
- 2 felt beak pieces
Sewing

With the right sides of both the body pieces facing up pin the beak pieces to the flat area directly above mark A so that the point of the beak is facing inward as shown above.
Note: For all of the sewing in this section you will be using the ecru colored thread and your machine.
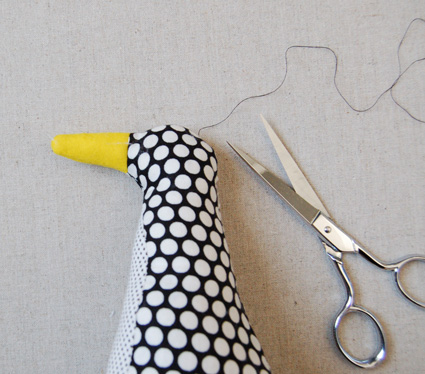
Sew the beak along the pinned area with an 1/8-inch seam allowance. Press it flat with the seam allowance facing towards the side body piece and the point of the beak facing out as shown above.

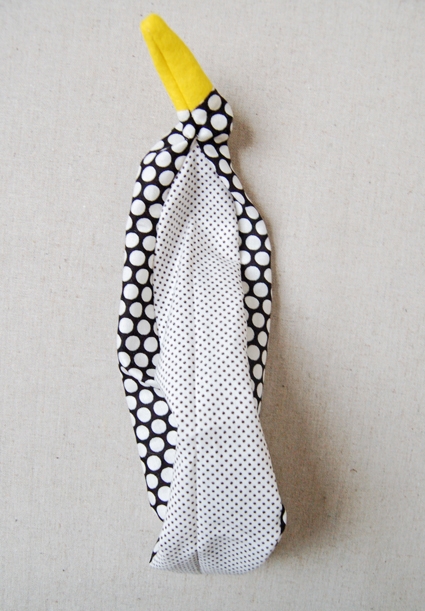
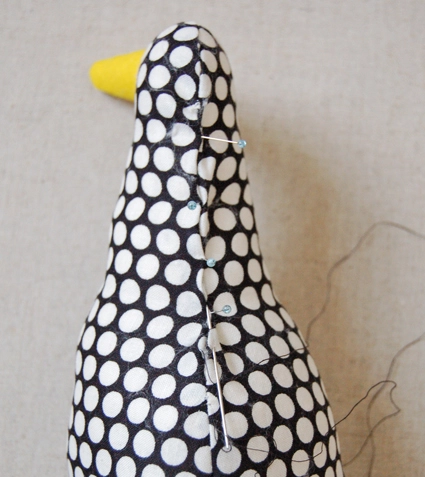
Pin the two side body pieces right sides together just from mark A to mark B. Sew them together with a scant 1/4-inch seam allowance. Start at mark A an sew up along the outside of the beak to its point, then down the opposite side of the beak and along the top of the head to mark B. Back stitch at the beginning and end of the seam. Trim the seam allowance around the beak so that it’s very close to the seam.

Turn the sewn portion right sides out and push the beak out. This is the most tricky part of the whole sewing process. The beak is very thin so it takes a bit of patience to get it totally turned right sides out. Use a knitting needle and or tweezers to help with this step.

Turn both pieces so that their wrongs sides are facing out but keep the beak portion inside with its right sides out. The beak will not be visible as in the picture above.
Pin the two pieces together from mark C to mark D. Sew along this edge with a scant 1/4-inch seam allowance and backstitching at each end. This sewn side is the back of the penguin. There should be an unsewn gap between mark B and mark C.

Open the front, unsewn side of the penguin side pieces as shown above. You will be pinning the front body piece (which is shaped like a surfboard) along both sides of this opening right sides together.

Pin either side of the front body piece to either side of the side body pieces right sides together as shown above. Start pinning at mark A and pin all the way down the curve of each side until you reach mark D. If the front body shape is a bit longer than the sides you can trim it once it’s been pinned onto both sides. Since you’re pinning along a curve it’s a good idea to use a lot of pins and go carefully and slowly.
Sew both pinned sides with a scant 1/4-inch seam allowance backstitching at the beginning and end of each seam. Pay special attention to not sew into the opposite side where the two seams will meet at mark A.

Turn the body right side out through the gap between mark B and C. It’s beginning to look like a penguin!
Pay special attention to the area under the chin where the front body piece starts. It should look like a neat upside-down “V” shape. If you accidentally sewed over into the opposite side on this section do not despair. You can just rip out the offending section of the seam and re-sew that section making sure to back stitch at both ends of the new seam.
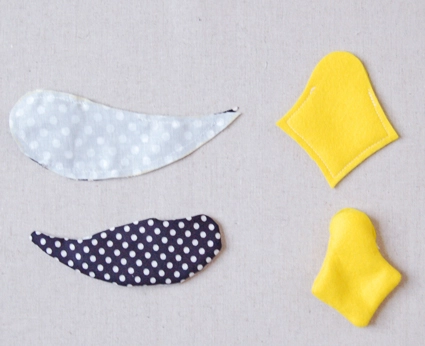
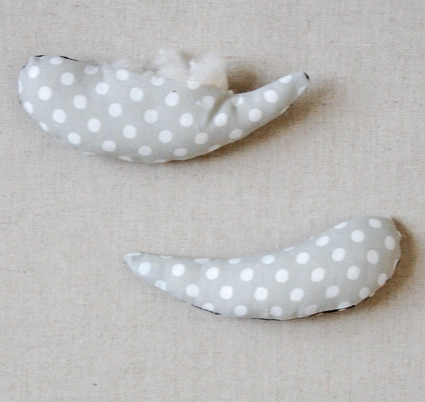
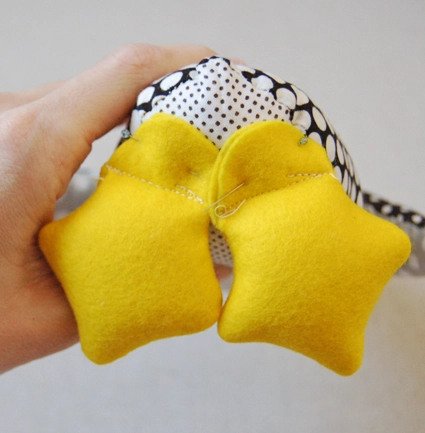
Sew each dark wing piece to a light wing piece right sides together with a scant 1/4-inch seam allowance leaving an unsewn gap in-between the two marks. Turn the wings right sides out through the gap.
Sew two of the foot pieces together with an 1/8-inch seam allowance just along the webbed foot shape, leaving the top curve, in-between the two marks, unsewn. Turn the foot right sides out through the unsewn section. Press the points of the foot out with your knitting needle. Repeat this for the second foot.
Stuffing

Stuff the feet tightly so they are puffy. Push all of the stuffing towards the sewn part of the foot and away from the open curved area.
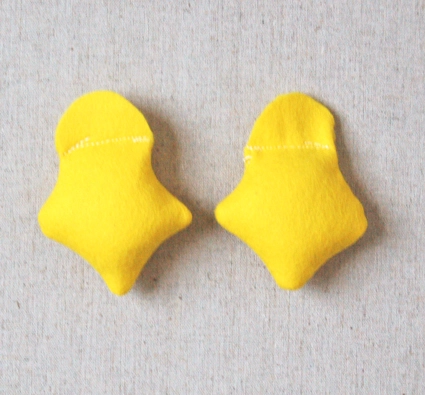
To close the feet sew a line across the bottom of the open curved section from one mark to the opposite one, backstitching at each end and thus encasing the stuffing. Use your sewing machine and the ecru thread for this seam.
Stuff the body of the penguin tightly. Use your knitting needle to get the stuffing into the smaller areas like the beak and the point of the tail. One of the tricks to making a nice stuffed animal is to stuff it really tightly, just keep on adding stuffing until you can’t anymore.
Pin the back gap closed with the raw seams tucked to the inside. Using the black sewing thread stitch up the gap using a slip stitch. Tie a small knot at the end of the seam.
Then pass your needle through a section of the stuffed body and pull it out. Cut the thread just at the exit point thus hiding it.
Stuff the wings tightly and hand sew the gaps shut with the black sewing thread using a slip stitch in the same manner as you did for the body.
Sewing Together
You will now have the following pieces:
- 2 opposite facing wings. The penguin’s right wing is pictured on the top and the left wing is pictured at the bottom.
- 2 feet
- 1 body

Note: You will be using with the black embroidery floss in this section. This type of embroidery floss is six strands thick. You will only be using three strands for the sewing in this pattern so separate each length of thread into two three-stranded lengths before you begin sewing.
Pin the left and right wings to the opposite sides of the body about 2 1/2-inches below the top of the front body panel just behind where the front panel and the side panels meet. They should be parallel to one another and be curving towards the back of the bird.
Using a length of the black embroidery floss sew them on at the same time by passing the needle through the middle of the body to the opposite wing. Use a long needle and squish the penguin as much as you have to to get the needle to come through to the opposite side. You can always re-fluff the body later, stuffing is pretty forgiving. Keep going back and forth through the body like this and attach the wings with a doubled cross stitch. Tie a knot on the inside of one of the wing joints and hide the thread end by passing it through the stuffing as illustrated in the stuffing section.
Pin the feet onto the flat section of the bottom of the body so they are a bit splayed.

Stand the penguin up. If it doesn’t stay standing on its own re-pin the feet in different positions until it does.

Using the black embroidery thread whip stitch the curves of the feet onto the bottom on the body.

Arrange two of the buttons on the opposite sides of the penguin’s head. Using the black embroidery thread stitch them on at the same time passing through the center of the head with your needle.
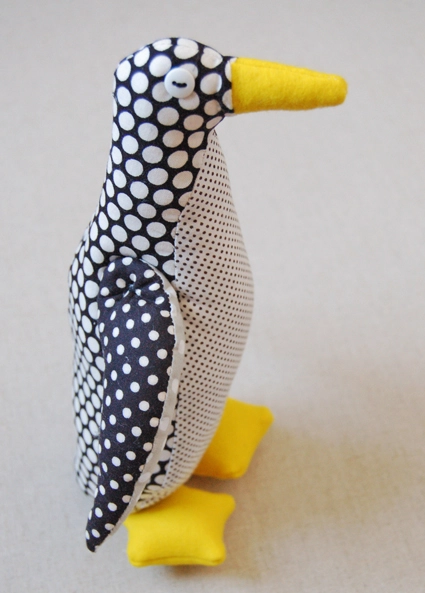
Your first penguin is all done… repeat all these steps to make him some friends!


Lindos!!!
Vou tentar faze-los.
O padro escolhido lindo. Parabns!!!
Obrigado por partilhar!
IT’S CLEAR PATTERN THANK YOU VERY MUCH
Can you make this with fabric glue? I really want to make it but I can’t hand sew and don’t have a sewing machine.
Hi Katherine-
Unfortunately you can’t, sorry! You might want to check out some of our felt craft projects. They would be more glue friendly.
https://www.purlsoho.com/create/category/craft/projects-craft/
Thanks for getting in touch!
Molly
Great pattern! Stitched two penquins – more than twice the size of the pattern – turned out great!
Thank you – now to make a couple smaller ones for little people…
edl
How can l get the pattern, please?
Hi Lizz-
The full pattern is here in the blog post. We are working on making our site easier to print from but if you like to print it in the meantime we recommend that you use printfriendly.com
Thanks so much for getting in touch and good luck with the project.
Best-
Molly
Love it – just finishing – but regarding the dmc thread for the arms and whipstitching the feet – do you use all the strands of the thread (I think there are six or 8) or do you pull one thread out of the strand to use? Thanks. For the almost 1 yr. old.
Hi Dee-
Great question! You should use 3 strands of the DMC. The pattern has been updated to explain this.
Thanks so much for getting in touch and please let us know if you have any more questions!
Molly
I did not feel confident about making soft toys but this penguin is so cute and the instructions so clear and comprehensive so I thought I’d give him a go. Made my first penguin today and he is adorable, and yes, even does stand up! I will be making a penguin family next weekend. Thank you for such a delightful and manageable project.
Sharon
Hi, my kids have been searching penguins since they have watched Madagascar, they really love them and now i can make.
Thank you
Love your penguins!
I thought I’d give him a go. Made my first penguin today and he is adorable, and yes, even does stand up! I will be making a penguin family next weekend. Thank you for such a delightful and manageable project
Such a lovely pattern ! Made one just for the fun of it. She is not standing yet. (yes, she is a she) I wasnt to happy with the result of her feet since I used a fabric. Found felt in my stash though….
I could not get the photos to open for this pattern.
Hi Judy-
I’m so sorry to hear you’re having technical problems with this pattern. I’m not sure what you mean by getting the pictures to open? Are you not seeing the pictures at all? Are you getting an error message? Are you having an issue with the template? If you’d like to send me a screenshot of what’s going on you can send it to purlbee@purlsoho.com
Thanks for getting in touch!
Molly
Love this pattern, I’ve made 3 since monday!! I’m struggling with getting the neck right, but I’m going to persevere! Thanks!
Wow! Keep up the great work!
What’s going on with your penguins’ necks exactly? Can we help in any way? Please don’t hesitate to write in again! Thanks! -Alyson
Yes, very cute, but I cannot locate the template!
Hi Veronica-
The template is linked in the materials section. Or just click on this link: https://www.purlsoho.com/create/wp-content/uploads/2012/01/penguin_costume_templateREV.pdf
Thank you-
Molly
How do I secure the stitch when doing the wings? As I can’t have the knot on the outside?
Hi Chelsea,
Thanks for writing in! For this fun little penguin we use a visible knot on the outside of the wings. If you really so not like the look, you may be able to hide the knot, under the wing close to the body.
I hope that this helps and happy sewing!
Cassy
Hi,
I love this project but I don’t own a sewing machine. I’m not the best sewer but am more than willing if not able.
My question is, is it okay to hand sew and if so, what stitching would be the strongest?
Regards, Cy.
Hello Cy!
Thank you for your question! You can hand sew the Purl Bee Penguin. I recommend stitching the Penguin with a Back Stitch then using a Blind/Slip Stitch to close up the gaps after you’ve added stuffing.
Please let us know if you have any more questions! Thank you for writing in!
Best wishes,
Kumeko
Hello! I just wanted to thank you for your very kind generosity in sharing your sweet penguin pattern with us all. Your penguins are so cute and so very appealing! I love them! I love the mix of fabric designs. It is very striking and works well for the sweeties. God bless you for your kindness!
That penguin pattern is so very familiar
How much of each fabric is needed for just one penguin?
Hi Ash,
Thanks for writing in! For the main outer fabric you will need 1/4 yard. For all of the remaining pieces, you will need pieces smaller than 1/4 yard; with the largest pieces being 8 inches by 11 inches. If you have scraps available, it might be helpful to print up the template above and cut out the pieces. You can then check to see if the pieces of fabric you have will work for this lovely penguin!
Best,
Cassy
I am having trouble getting my penguin to stand up. No matter how I pin the feet, he is top/front heavy and takes a nose dive. Any suggestions? I wish I would have realized the difficulty I would have getting him to stand–I would have weighted his tail down a bit.
Hi Alexandra!
I’m wondering if adding a weight to his bottom will help to make him stand up? I would recommend stuffing the bottom of your penguin with rice or lentils to make it a bit heavier.
I hope this helps!
Carly
Cute penguins! Does the white belly need to be handsewn? Otherwise I don’t know how to set up the penguin in the sewing machine for that part without also sewing the other side. Did I mess up a step? Thanks!
Hi Stephanie,
Thanks for writing in! It is possible to attach the belly section with a sewing machine, though it can be tricky. Each long side of the belly should be pinned to either side of the back pieces so that the opposite side can be held out of the way while stitching along each seam. I would recommend going slowly and checking frequently to make sure you aren’t catching the opposite side of the body, but if you prefer you can hand sew this with a back stitch.
I hope that helps!
Julianna
I love these little guys!!! I have a pot luck dinner at my house each year and ask everyone to bring something for us and something for the local food pantry. I usually have a little take away for my guests and this year I am busy making these penguins for them. So far I have about 50 done……I must really love them because I still enjoy making each one. Thanks for such a cute project.
I made about a dozen of these guys for Christmas gifts for the kids. Good thing I made extras cause the adults wanted them too.
Trop beau ce modele de pingouin il est adorable, bravo
Merci pour le partage
This pattern is so cute! I want to try it sometime! Thanks for sharing it on your website!
Thank you so much for this. I was looking for a pattern to make with some of my mum’s clothes (she passed away in July) and these are just perfect – she LOVED penguins. Thank you for all the comments above I’ll try weighting the tail down. I haven’t made anything like this before so fingers crossed!
I love this adorable pattern and I thank you so very much as I want to make this as asap, just too sweet! However, after reviewing the instructions…I can’t seem to find where it states on “page 4″… Cut out the fabric according to the directions on the “template.”
Unfortunately…there was “no template” included on the print-out?” Could you please help? Thank you for your reply 🙂
Hi Irene,
Thanks for reaching out! You can find the download link for the pattern template in the materials list above, or by clicking right here!
Best,
Julianna
I made my first one this weekend and will make many more! I usually make sock monkeys as a new baby gift, but I think this penguin may steal the show, atleast temporarily. Thanks for sharing this pattern and tutorial. Perfect instructions!
I love these penguins but despite it saying a free pattern I can not find the templates for the pieces. Where should I be clicking to arrive at it.
Regards
Annie
Hi Ann,
Thanks for writing in! You can find the template for the penguin pattern here: Hope this helps – happy crafting!
Best,
Cassandra
I came across your name and Blog through the Moda Blockheads 3 and decided to check it out. You have so many beautiful articles and free patterns. This morning I stopped in my tracks when I saw this really great Penguin Pattern. Since I am strictly a quilter (I have never even hemmed a pair of pants!) I slowly read every word of the instructions along with all of the comments and replies. I feel pretty confident that I can make these cuties due to the great instructions & details in your pattern, and the great questions that were asked in the comments section. Wish me luck!
Hi Jackson,
Thanks for writing in! I’m so glad you like the pattern and are going to give it a try! The Penguin is really just like a 3-dimensional quilt (I’m a quilter too!), and I’m sure your giving it a go will be a success. Good luck and happy crafting!
Best,
Cassandra
i have downloaded the penguin pattern and information how to but were it says cut out using the instructions on the ten plate
were is the tenplate I can see how to lay it out but not the actual size
Sorry for being so dim
Sonya
Hi Sonya,
Thanks for reaching out! You can print out the pattern template using this direct link: Purl Bee Penguin Pattern Template
Happy Crafting!
Cassandra
These are so cute! I’m wondering if you have a suggestion for child safe eyes? Maybe black felt sewn on? Oh, maybe small black yo-yo’s?
Hi Patti,
Thanks for reaching out! Yes, I think either black felt or tiny yo-yo’s that are securely attached would be excellent options if you are giving the penguin to a child! You could also embroider the eyes using satin stitch, which you can read about in our Embroidery Basics tutorial.
Best,
Julianna
I have just found out I am to be a first time nana so want to explore possible baby toys. I was taken with your penguin ? Soo cute!
Do I cut out the fabric exactly around the template or add a seam allowance when cutting?
Many thanks for the inspiration.
Hi Angela,
Thanks for writing in, and what exciting news! All of our sewing patterns include a seam allowance – no need to add one!
I hope that helps, and congratulations!
Julianna
Love this pattern and am just about to start making one for my granddaughter. I’m new to sewing so have a question.
Should I cut out pattern adding the seam width, or cut out as per the pattern and add seam width as I sew (making it slightly smaller than template?
Hi Teresa,
Thanks for reaching out! We include the seam allowance in all of our patterns, so there’s no need to add one when you are cutting!
Best,
Julianna
Thank you so much for this template! I just finished him and he is so adorable!!
Can the hand sewing be done a machine? Like if pull out where attaching to?
New to sewing and feel confident enough with my machine but hand sewing… I have no idea.
Great pattern and instructions. Thank you.
Hi Luke!
Thank you for your question. We recommend hand sewing these steps because you will be passing your needle through the entire penguin for some of these hand sewing steps, which if you were to do this with a machine, it would flatten the penguin! To help you feel more confident with your hand sewing, we have a collection of sewing tutorials that may be helpful to reference on our Sewing Tutorials Page.
I hope this helps, and thank you again for writing in!
All the best,
Margaret
Love this..and getting stuff together to make one. The template has rather thick lines. Do I cut on the inside of the line, or on the outside of the line?
Hi Donna!
We’re so glad to hear this pattern caught your eye! I suggest cutting on the outside edge of these lines, so that the lines are still intact after cutting out the template. This way, you can use these lines as a guide for where to sew, with a little extra wiggle room if needed!
All the best,
Margaret
Genial!!! Muchas gracias por toda la información gratuita 🙂
Good morning from Greece,
I love these pretty penguins so much!!!
I am preparing the christening of my son and the theme is penguin.
But as much as I try I cannot make them. Could anyone help me out and make them for me??
Hi Eftihia,
Thanks for reaching out! While we don’t offer this service ourselves, I’d recommend asking family and friends! Chances are someone will know (or know someone who knows!) how to sew and would be happy to help out.
If you have any questions about the pattern itself though, please don’t hesitate to reach out to us either here or by sending an email to customerservice@purlsoho.com! We’re happy to give you advice on the sewing process.
All the best,
Lili
My granddaughter has loved penguins since she was 18 months old so when her dad ( my youngest son) passed away in early December ‘22 my DIL & I talked about having a Memory Penguin made with a couple of his shirts that his daughter loved. Early on, I found a photo of one we really liked but without finding its pattern! Today I found your pattern —— I think it will be our go to!!!! Before using his shirts, I’m going to use some of my scrap fabric so when I make hers—- it will be ‘perfect’! Thanks so much!