Little Fair Isle Hat
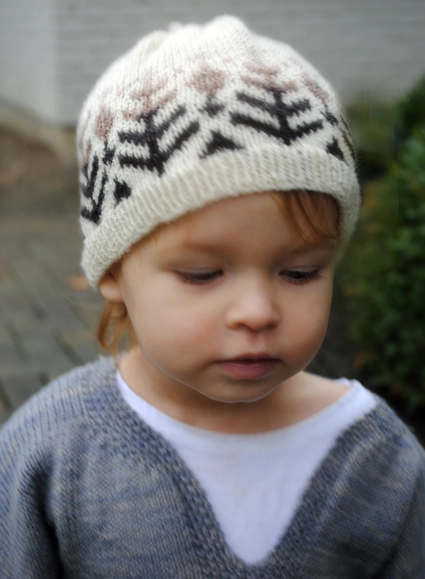
Before learning how to knit, I loved and admired Fair Isle knitting but always assumed that it was reserved for an elite few gold medal knitters, the kind who apprenticed on their grandmothers’ knees before they could even walk. Now, of course, I know that I should never have been so intimidated!

What looks so intricate is actually just a matter of knitting first with one color and then with a second, switching between the two as the pattern slowly emerges and blossoms into a fascinating and surprising design. Fair Isle is really one of the most fun things you can do in knitting!
If you’ve never done it, this Little Fair Isle Hat is a great place to start, small and manageable. And if you’re a veteran of the craft, then you’ll appreciate the speed of this sweet knit. Either way, some baby, toddler or child somewhere is going to be sporting a very pretty hat, made by you!

It’s true that an intrinsic economic difficulty of Fair Isle knitting is the necessity for small amounts of many colors. I was so happy to sidestep this problem with Koigu’s little 11 yard skeins of KPM Needlepoint Yarn. They’re wonderfully soft, beautiful and affordable. And with over 150 hand dyed colors to choose from, the fancy knitting may end up being the easiest part! -Whitney
P.S. We also have a pattern for the adorable sweater! Just visit our Easy Baby Pullover project journal right here!
Designed by Purl Soho designer, Whitney Van Nes.
Share your progress and connect with the community by tagging your pics with #PurlSoho, #PurlSohoBusyHands, and #PurlSohoLittleFairIsleHat. We can’t wait to see what you make!
Materials

- Main Color: 1 skein of Koigu Premium Merino, 100% merino wool. Each skein is 175 yards/ 50 grams; approximately 75 (87, 100) yards required. We used the color #0000.
- Contrast Colors: 5 skeins of Koigu Premium Merino Needlepoint Yarn, 100% merino wool. Each skein is 11 yards; approximately 5 yards required. We used the color #2420, #2425, #1305, #1303, and #2360.
- US 4 (3.5 mm), 16 inch circular needles
- A set of US 4 double pointed needles
Gauge
28 stitches = 4 inches in stockinette stitch
Finished Sizes
Baby (Toddler, Kid)
- Circumference: 14 (16, 18) inches
Sample: The hat pictured here is Toddler size.
Pattern
With the circular needles and the Main Color (MC), cast on 98 (112, 126) stitches. We used a basic Long Tail Cast On.
Place a marker and join for working in the round, being careful to not twist the stitches.
Round 1: *P1, k1, repeat from * to end of round.
Repeat Round 1 six more times.
Now follow this chart, starting in the lower right corner and reading from right to left. Repeat each line to the end of the round (7, [8, 9] times), then move up the chart, always starting from the right. Remember to change colors as the chart’s colors change!

With the MC, knit until piece measures 4¼ (5, 5¾) inches from the cast on edge.
The Crown
Kid Size, Start Here:
Round 1: *K7, k2tog, repeat from * to end of round. 112 stitches
Rounds 2 and 3: Knit.
Continue on to Round 1 of the Toddler Size.
Toddler Size, Start Here:
Round 1: *K6, k2tog, repeat from * to end of round. 98 (98) stitches
Rounds 2 and 3: Knit.
Continue on to Round 1 of the Baby Size.
Baby Size, Start Here:
Round 1: *K5, k2tog, repeat from * to end of round. 84 stitches, all sizes
Rounds 2 and 3: Knit.
Round 4: *K4, k2tog, repeat from * to end of round. 70 stitches
Rounds 5: Knit.
Round 6: *K3, k2tog, repeat from * to end of round. 56 stitches
Round 7: Knit.
Round 8: *K2, k2tog, repeat from * to end of round. 42 stitches
Round 9: *K1, k2tog, repeat from * to end of round. 28 stitches
Round 10: *K2tog, repeat from * to end of round. 14 stitches
Round 11: Repeat last round. 7 stitches
Round 12: [K2tog] 3 times, k1. 4 stitches
The Top Loop
Slip all 4 stitches onto one double pointed needle so that the last stitch you knit is at the left end of the needle.
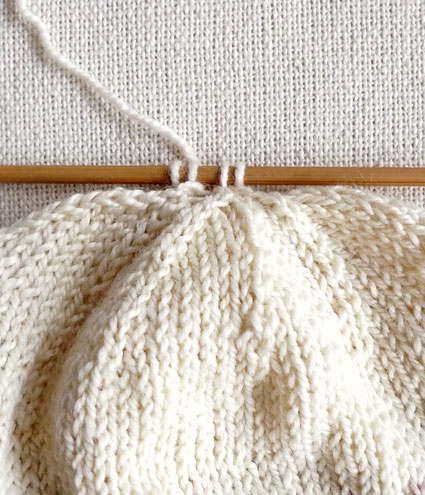
Knit a 2 1/2 inch I-cord. Bind off, cut the yarn, and pull the tail through the remaining stitch.

To form the top loop, bring the tail to the inside of the hat, pulling the very tip of the I-cord along with it. As you weave in the tail, sew the I-cord tip to the inside of the hat.
Weave in all the ends and gently block your pretty new hat!


I have completed Row 9 of the decreases and believe I cannot continue on 16″ circular needles. The stitches are already stretched. Should I change to perhaps 3 double-pointed needles for the rest? I don’t see how it is possible to wait until the very end.
If I should change, does it matter how long they are? I have a pair of double-pointed size 4 and another pair of single-point size 3 that are each 12″ long.
Hi Judy,
Thanks for writing in! You should switch to double pointed needles whenever you feel that there are too few stitches to stretch around the 16″ needle – no need to wait until the very end! You will need to use double pointed needles, not straight needles, but any length should work.
Best,
Julianna
As I am making an adult hat, would a tassel or pom pom suit it better than a loop? For the former, I have leftover contrast yarns. For the latter, a whole skein of main color.
It’s looking lovely, by the way, although I had to correct several mistakes.
I will have to ask how to weave in the CC ends, so might as well ask now. I left really long tails.
Thanks for such an imaginative pattern. Each pattern row was different from every other, so never dull.
Hi Judy,
I’m so glad you enjoyed knitting the hat! The finish on top is really up to you – I think all the options work well, even for an adult hat, so you can choose whichever one you prefer! When you are weaving in the ends, you just need to try to weave each end in on top of the rows that are the same color as best you can. It can be tricky when the stripes are so narrow, so it’s okay if you overlap a different color a bit, but do try to keep them out of the portion of the hat that is just the main color!
I hope that helps!
Julianna
I am redoing from knit two, knit two together, as that is where I could pick everything up. The top had inverted due to tightness.
I used two double-pointed needles plus the circular, amounting to three double needles. I don’t see how knitting with two is possible. Or is it, if you carry the needles parallel with each other?
Hello Judy,
Thank you for your question! For the crown of the hat you will need at least 4 double pointed needles to knit with, but you will only need two to knit the i-cord loop at the top of the hat.
I hope this makes sense and happy knitting!
-Marilla
Hello!
I have a quick question about something I don’t quite understand regarding the chart:
“Repeat each line to the end of the round (7, [8, 9] times), then move up the chart, always starting from the right. Remember to change colors as the chart’s colors change!”
Do I repeat every line of the chart 7,[8,9] times?
Many thanks for claryfiying!
Best,
Merima
Hi Merima,
Thanks for writing in! This means that you will be repeating the 14 stitches of the chart 7 (8, 9) times around the hat in each row – for instance, the smallest size of the hat has 98 stitches, which divides by 14 7 times, so you will work 7 repeats of the chart. You will, however, only work each row of the chart once.
I hope that clears things up!
Julianna
This is such a cute hat that it has become my go-to for baby gifts! My favorites are a light varigated background with all-black “trees” so that it looks like either dawn or use bright oranges varigated for a sunset! I’m on my third (fourth?) printout of this pattern because I use it so much! I have also found a knitted baby sock pattern (lionbrand) to use to make matching socks to go with! Well, printing the pattern yet again so I can continue making many many more hats!
Just printed out Little Fair Isle Hat and can hardly wait to start it! The first color change is a little hard to see on my graph. Do you change to the 2nd contrasting color on Row 9?
Hi Diane,
Thanks for reaching out! That is indeed a little difficult to see since the colors are so similar. It looks like it actually switches to the 2nd contrasting color on Row 8, not 9.
I hope that helps!
All the best,
Zha Zha
Oh wow! Thanks for asking this question as I didn’t even notice that colour change. It’s just all black on my iPad!
Hi! I’m just going to start on the colors. Is it necessary to catch the floats on the wrong side? After how many stitches would you do this, if it is necessary?
Hi Diane,
Thanks for writing in! I don’t believe it is necessary to catch the floats with this pattern unless you would like to!
All the best,
Gianna
Thank you for this sharing !
Hello,
I just love this pattern and so do many of my friends and family. I sell finished products on Etsy and was wondering if I could sell this beautiful finished product on my Etsy page? I would obviously give credit to the pattern designer and add a note the wool used is by Purl Soho. Thank you for your consideration.
D Smith
Hi D,
Thank you for your interest in our patterns! While we’re happy you like our Little Fair Isle Hat, our patterns and designs are copyrighted and are for home use only. This means that you can’t use our patterns to make things for sale. We hope you understand!
All the best,
Lili
I just made this for my almost four year old. The toddler size with size 5 needles came out perfect for her (slightly large head). Added some cute ear flaps to keep it steady.
Would this pattern work with your Line Weight yarn? I have several leftover colors and I’d like to try this pattern to make a baby hat. Thanks!
Hi Dakota,
Thanks for your question! We are so happy you are thinking of using those leftover bits of yarn. Baby hats are such great stash-busters!
Line weight is a little more on the lighter end of fingering weight yarns but we think holding it double could be a great idea to knit this hat. Just to be sure, we recommend swatching first to make sure you are happy with the fabric and to see if it meets the gauge for the pattern of 28 stitches = 4 inches in stockinette stitch. Let us know if you need any help along the way!
Happy knitting,
Gavriella