Easy Pullover for Babies, Toddlers and Kids

The Easy Baby Cardigan from Joelle’s More Last-Minute Kitted Gifts has become a Purl Soho classic… but it wasn’t the original! Before she knit up that worsted weight cardigan, Joelle first conceived of a lightweight, all-season pullover. At 7 stitches to the inch, it wasn’t exactly a “last minute knitted gift” and so it evolved; but Joelle never forgot the adorable prototype she had decided to shelve!
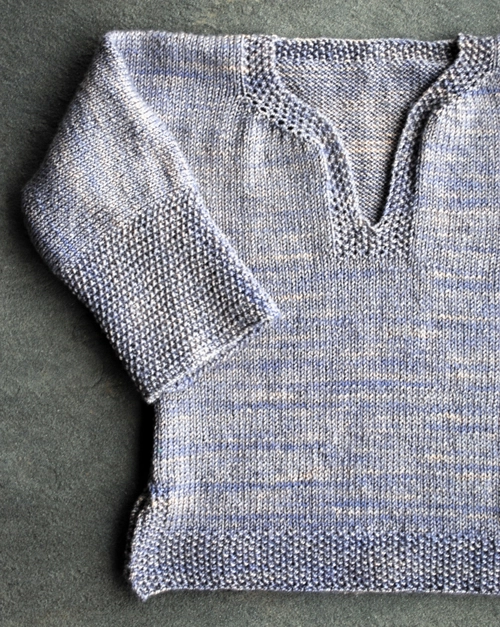
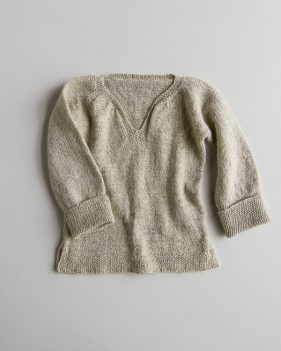
The inspiration behind both sweaters was always Joelle’s intrigue with an over-the-top construction. Starting at the bottom back, knitting up and over the shoulders and sleeves, then down the front, this sweater is a one-piece engineering wonder! The Easy Baby Pullover may not be as quick as its cardigan cousin, but it’s just as easy! And just as beautiful, with the gorgeous hand dyed subtlety of Koigu Premium Merino. Wonderfully soft, machine washable and as gorgeous as yarn comes, KPM is one of our all time favorites!
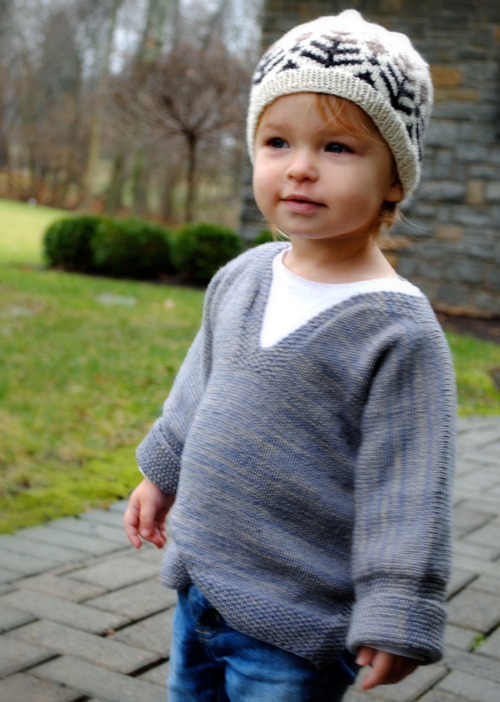
This timeless design is filled with design details that make it cozy for tots and easy for parents: a roomy neck opening for quick on and off, cuffs designed for rolling, and a loose, casual style for busy little bodies! A new classic? We think so!
P.S. Curious about the cute hat too? It’s our Little Fair Isle Hat and you can find out all about it right here!
Update: Additional Sizes
January 2014

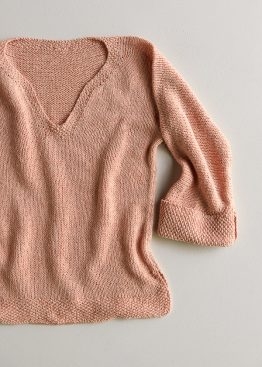
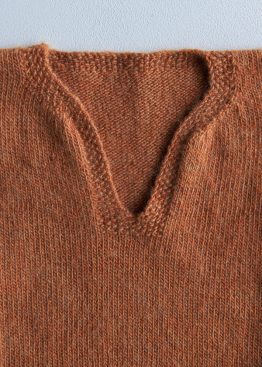
When we added three new sizes to the Easy Pullover pattern, we thought we’d knit up a new version in a new color! This sweet peach of a color is Koigu Premium Merino #1111.5. You can see more pictures of this version here!
Update: New Yarns!
July 2017
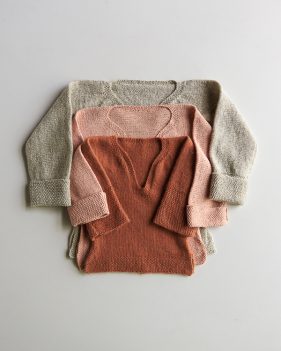
Our Easy Pullover for Babies, Toddlers + Kids is such a classic, we rely on it over and over, like an old friend. This year we’ve knit it up in, not one, not two, but three different Purl Soho yarns, each one with its own unique beauty! For more information on these yarns and for additional pictures, be sure to visit our new post here!
Share your progress and connect with the community by tagging your pics with #PurlSoho, #PurlSohoBusyHands, and #PurlSohoEasyPulloverForBabiesToddlersAndKids. We can’t wait to see what you make!
Materials
- 4 (5, 6, 7, 8, 9, 10) skeins of Koigu’s Koigu Premium Merino (KPM), 100% merino. Each skein is 175 yards/ 50 grams; approximately 700–1750 yards required. The denim blue is color #1010.5 and the peach is color #1111.5.
- US 4 (3.5 mm), 32-inch circular needle
- 4 stitch markers
- Stitch holder or scrap yarn
Gauge
28 stitches = 4 inches in stockinette stitch
Sizes
12-24 months (2 years, 4 years, 6 years, 8 years, 10 years, 12 years)
- Chest Circumference: 20½ (23, 26, 30, 32½, 34½, 36½) inches
- Length from Shoulder to Bottom Edge: 14 (16, 17, 19½, 20½, 22½, 24) inches
- Length from Cast-On to Underarm: 9 (10½, 11½, 13½, 14½, 16, 17) inches
- Armhole Depth: 5 (5½, 5½, 6, 6, 6½, 7) inches
- Sleeve Length from Underarm to Cuff, unfolded: 8¾ (11, 12¾, 15, 15½, 15½, 16¼) inches

Notes
This pullover is worked flat. It is worked in one piece from the bottom edge of the Back, over the shoulders and sleeves, then down to the bottom edge of the Front.
Seed Stitch: (multiple of 2 stitches + 1) All Rows: K1, *p1, k1, repeat from *.
Stockinette stitch: Knit on right-side rows and purl on wrong-side rows.
Errata
This pattern was updated on January 2, 2014 to include 3 additional sizes. The update also includes revisions to the original sizes, adjusting fit to better align with standard sizing. The original January 12, 2012 pattern is now only available on Ravelry as a free downloadable pattern (click here to go to Ravelry). And for the most up-to-date version, just read on right here!
Pattern
Back
Cast on 71 (81, 91, 105, 113, 121, 127) stitches. We used a basic Long Tail Cast On.
Work in Seed Stitch for 1½ (1½, 1½, 1½, 2, 2, 2) inches, ending with a wrong-side row.
Next Row (right side): Work in Seed Stitch for 5 stitches, work in stockinette stitch to last 5 stitches, work inSeed Stitch to end.
Work as set by last row until piece measures 2½ (2½, 2½, 2½, 3, 3, 3) inches from cast-on edge, ending with a wrong-side row.
Change to all stockinette stitch. Work even until piece measures 9 (10½, 11½, 13½, 14½, 16, 17) inches from cast-on edge, ending with a wrong-side row.
Cast on for Sleeves
Row 1 (right side): With right side facing, use a Cable Cast-On to cast on 60 (74, 88, 102, 106, 106, 110) stitches. Work across cast-on stitches in Seed Stitch for 25 (29, 33, 37, 37, 37, 37) stitches, place a marker (pm), knit to end. [131 (155, 179, 207, 219, 227, 237) stitches]
Row 2: With wrong side facing, use a Cable Cast-On to cast on 60 (74, 88, 102, 106, 106, 110) stitches. Work across cast-on stitches in Seed Stitch for 25 (29, 33, 37, 37, 37, 37) stitches, pm, purl to next marker, work in Seed Stitch to end [191 (229, 267, 309, 325, 333, 347) stitches]
Row 3: Work in Seed Stitch to first marker, work in stockinette stitch to next marker, work in Seed Stitch to end.
Repeat Row 3 until piece measures 4½ (5, 5, 5½, 5¼, 5¾, 6¼) inches from beginning of Sleeve, ending with a wrong-side row.
Shape Back Neck
Row 1 (right side): Work in Seed Stitch to first marker, k51 (64, 76, 93, 99, 103, 110), pm, work in Seed Stitch over next 39 (43, 49, 49, 53, 53, 53) stitches, pm, knit to next marker, work in Seed Stitch to end.
Row 2: Work in Seed Stitch to first marker, work in stockinette stitch to next marker, work in Seed Stitch to following marker, work in stockinette stitch to last marker, work in Seed Stitch to end.
Repeat Row 2 until the back neck Seed Stitch measures ½ (½, ½, ½, ¾, ¾, ¾) inch, ending with a wrong-side row.
Next Row (right side): Work in pattern to second marker, work 5 stitches in Seed Stitch, bind off 29 (33, 39, 39, 43, 43, 43) stitches in pattern, work in pattern to end. [81 (98, 114, 135, 141, 145, 152) stitches remaining for each side]
Left Front
Now working only the Left Front and Sleeve stitches (leaving the remaining stitches on needle), work even in patterns as established for 1 (1, 1, 1¼, 1¼, 1½, 1½) inch(es), ending with a wrong-side row.
Shape Front Left Neck
Row 1 (right side): Work in pattern to first marker, slip marker (sm), knit into front and back of next stitch (kfb), work in patterns to end. [82 (99, 115, 136, 142, 146, 153) stitches]
Row 2: Work in patterns to 1 stitch before second marker, kfb, sm, work in pattern to end. [83 (100, 116, 137, 143, 147, 154 stitches]
Repeat Rows 1 and 2 six (seven, eight, eight, nine, nine, nine) more times, working increased stitches in stockinette stitch. [95 (114, 132, 153, 161, 165, 172) stitches]
SIZES – ( – , 4 YEARS 6 YEARS, 8 YEARS, 10 YEARS, 12 YEARS) ONLY
Work Row 1 again. [- (-, 133 154, 162, 166, 173) stitches]
ALL SIZES
Work even until piece measures 10 (11, 11, 12, 12, 13, 14) inches from beginning of Sleeve, ending with a right- side row.
Left Sleeve
Next Row (wrong side): Bind off 60 (74, 88, 102, 106, 106, 110) stitches in pattern (removing marker), work in patterns to end. [35 (40, 45, 52, 56, 60, 63) stitches remain]
Cut yarn and place stitches on stitch holder or scrap yarn.
Right Front
With wrong side facing, rejoin yarn to stitches on needle. Work even in patterns as established for 1 (1, 1, 1¼, 1¼, 1½, 1½) inch(es), ending with a wrong-side row.
Shape Front Right Neck
Row 1 (right side): Work in patterns to 1 stitch before second marker, kfb, work in pattern to end. [82 (99, 115, 136, 142, 146, 153) stitches]
Row 2: Work in pattern to first marker, sm, kfb, sm, work in patterns to end. [83 (100, 116, 137, 143, 147, 154) stitches]
Repeat Rows 1 and 2 six (seven, eight, eight, nine, nine, nine) more times, working increased stitches in stockinette stitch. [95 (114, 132, 153, 161, 165, 172) stitches]
SIZES – ( – , 4 YEARS 6 YEARS, 8 YEARS, 10 YEARS, 12 YEARS) ONLY
Work Row 1 again. [- , ( – , 133 (154, 162, 166, 173) stitches]
ALL SIZES
Work even until piece measures 10 (11, 11, 12, 12, 13, 14) inches from beginning of Sleeve, ending with a wrong-side row.
Right Sleeve
Row 1 (right side): Bind off 60 (74, 88, 102, 106, 106, 110) stitches in pattern (removing marker), work in patterns to end, Cable Cast-On 1 stitch for center neck, work this stitch in Seed Stitch, then work the 35 (40, 44, 52, 56, 60, 63) stitches of Left Side in patterns as established. [71 (81, 91, 105, 113, 121, 127) stitches]
Front
Row 1 (wrong side): Work in stockinette stitch to first marker, work in Seed Stitch to next marker, work in stockinette stitch to end.
Work as set by last row for 3/4 inch total, ending with a wrong-side row.
Next Row (right side): Work entire row in stockinette stitch, removing markers.
Work even until Front measures 6½ (8, 9, 11, 11½, 13, 14) inches from end of Sleeve, or until Front is same length as Back to beginning of Seed Stitch trim above side slit, ending with a wrong-side row.
Next Row (right side): Work in Seed Stitch for 5 stitches, work in stockinette stitch to last 5 stitches, work in Seed Stitch to end.
Work as set by last row for 1 inch total.
Next Row: Work entire row in Seed Stitch.
Repeat last row for 1½ (1½, 1½, 1½, 2, 2, 2) inches total, ending with a wrong-side row.
Bind off in Seed Stitch.
Finish
Block if desired. Using mattress stitch, sew side seams, starting above the Seed Stitch edging, and leaving 2½ (2½, 2½, 2½, 3, 3, 3) inches unsewn for side slits. Also sew the Sleeve seams.
Weave in your ends and block as desired.


Hi Ashleigh-
We don't have a version of this pattern for men. We actually don't have any sweater patterns for men on The Purl Bee but hopefully we will in the near future. You might want to look through the Mens sweater patterns we sell on our website here: https://www.purlsoho.com/purl/products/5-knitting-crochet-patterns?filters%5B%5D=978&filters%5B%5D=975
The "Brooklyn Tweed Guston Pullover" seems like it might have a similar feeling?
Thank you for your question!
Molly
I LOVE this sweater, but want to knit it for my own little bundle due in January (maybe a 'coming home from hospital sweater'). Any suggestions for making this a 0-3 month size?
Hi Michelle.
Unfortunately we do not have the resources at this time to re-size this pattern for you. What I can suggest is changing the gauge. This will adjust the circumference of the sweater without having to do any math. The vertical elements of the sweater (how far to knit to the underarms and for the sleeves, etc) will have to be adjusted. For these adjustments I would use a sweater you already own as a guide.
As for adjusting the gauge. If you follow the smallest size pattern at a gauge of 7 3/4 stitches to the inch, you will end up with an 18 1/4 inch circumference chest.
For yarns to accomplish a 7 3/4-inch gauge, please click here:
https://www.purlsoho.com/purl/products/3-knitting-crochet-yarn?filters%5B%5D=3
Anzula's Squishy would be my top choice!
Hope this helps.
Laura
This is the perfect weight pullover for my granddaughters who live in Arizona as their winters are so mild. Hopefully, if I make it a little longer, they will get more than one year of wear from it.
First of all I must say that you have so much beautiful knits on your page. I get so inspired! I am a norwegian who has my own knittingblog. Right now i am knitting this super cool sweater to my child to be. I had some challenges translating the american knittinglanguage to understandable norwegian:) My question is; When I have finished the sweater I am going to put it out in my knittingblog. Will I have your permission to publish your reciepe for this sweater in norwegian, or will you prefer that I rather put a link toward your webpage?
Anyway, you have so many goreous items I would like to knit for the future- so thank you so much for this super webpage:)
Sincerely Cathrine Lund, Harstad, Norway
I'm midway through this awesome sweater and want to make the version with the longer neck . In the comments above you said that you can make the neck longer by increasing every other row instead of every row. So does that mean that in the "Shape Front Left/Right Neck" section would repeat the increase in Row 1, but always have the following (WS) row in pattern? Also, would the increase always be on the stitch after the first marker (stitch 6 on RS)?
Thanks!
Kira
Hi Kira,
The neck can be easily lengthened. You can increase every other row rather than every row. Just be sure to account for the extra distance you are creating here and compensate for it in the body of the sweater.
SHAPE FRONT LEFT NECK
Row 1 (RS): Work in pattern to first marker, slip marker (sm), knit into front and back of next stitch (kfb), work in pattern to end. (1 stitch increased)
Row 2: Work in pattern.
SHAPE FRONT RIGHT NECK
Row 1 (RS): Work in pattern to 1 stitch before second marker, kfb, work in pattern to end. (1 stitch increased)
Row 2: Work in pattern.
Let me know if you have any other questions.
-Laura
Hello! I am only a novice knitter – this is only the third item I have knitted – but I love this jumper so much! I am knitting it as per your revised instructions above for shape front left neck, but am wondering if I repeat the two rows 8 more times (I'm making the 4 yr old version) or 16 times, because I am not increasing on every row. I have repeated it 8 more times and have not reached the 132 stitches. If it is 16 times more, this would take me well over the 11inch mark from the start of the sleeve. If it is only the 8 times, do i still bind off the same number of stitches?
Finally, I am not yet knowledgeable enough to "compensate for the extra distance in the body of the sweater". What do I need to do here?
Apologies for all the questions – I am sure these are self-evident to a more experienced knitted!
Hi Tara.
No need for apologies! We're happy to help. Thanks for writing in.
If you are working the revised version above, you will have to repeat 16 times in order to get to 132 stitches because you are increasing every other row rather than every row.
And yes, that makes sense that doing this took you past the 11 inches from the start of the sleeve which means you'll have to follow the following portions of the pattern (FINISH RIGHT SLEEVE and FINISH LEFT SLEEVE) simultaneously while shaping the neck. I have to admit, it' is kind of a tough modification for a novice knitter. Unfortunately we don't have the resources to re-work the pattern for you at this time.
You want to be sure you are working along with the correct stitch count, so once you are at 132 (however you choose to do it, increasing every row or every other row) you will bind off as instructed above.
As for compensating for the distance in the body of the sweater… essentially you just want the front body to be the same dimensions as the back body, so if your neck shaping goes past the underarms or sleeves into the body, be sure to compensate for that when working even.
I do hope this helps.
Please write in again if you have more questions.
Laura
Was wondering if this would work in stripes? I would love to do multiple colors or maybe an ombre and just change colors when the skein runs out for a mis-matched sock look? Either way – I love this pattern!
You guys on the Purl Bee are so amazing. All your patterns are beautiful! I am always looking forward to going on your page every day and seeing any new projects it patterns! This is also a beautiful sweater! I am a knitter, sewer, and I crochet! Never stop doing what your doing because it is amazing! Just wanted to give you guys a thumbs up and wish u a happy and crafty new year!!!!!!!
Hi Adrienne-
Sure! This would look great in stripes!
Thanks for getting in touch!
Molly
Thank you for including the pattern for this adorable top!
I've just re-entered the knitting circle after almost 3 decades of absence and this jumper looks just the thing to start with.
Would you have any suggestions for a different yarn? Although I love the Koigu yarn and colour choices I am knitting this for my 1 year old great-niece and am thinking it might be better to make it in a washable yarn. Is there anything that would come close to the same feel and have good colour options, as well? Thank you so much!
HI Lynn-
We actually do wash Koigu in the machine, on a gentle cycle and dry it with great results!
You could also use Anzula Squishy, which is also washable: https://www.purlsoho.com/purl/products/item/7124-Anzula-Squishy
Thank you!
Molly
Thanks for the extended sizes, I had never knitted before and this was the first pattern I decided to do for my second son! It turned out really nicely and so I'm happy I can now make it for his big brother due to the larger sizes.
Thank you again for all your help back in early December. I finished the jumper and it looks absolutely gorgeous!
I'd kill for an adult size in this style…… 🙂
And I can't wait to try some more of your patterns.
Tara
Would it look ok to substitute garter stitch for stockinette? I don't like doing the all purl rows and would prefer to mostly knit…
I am about halfway through this pattern and really enjoying it. This is the most complicated project I've ever attempted, and the pattern is so clearly written that its been fun so far. One question: after I bind off the first (left) sleeve, do I HAVE to transfer the left front stiches onto scrap yarn? Could I just leave them on the needle, the way you leave the right stitches in the needle when you knit the left side? Or does it just get too cumbersome with the long sleeve in this case? Asking mostly out of curiosity. Thanks!
Hi Jehane,
That'd be interesting. I think if you were to do the stockinette potions in garter, you might want to do the whole thing in garter due to the typical difference in row between seed stitch and garter stitch. I would perhaps make a swatch working garter next to seed stitch and see how the fabric lies.
All that said… I LOVE garter stitch and I think this piece would be quite handsome with that ridge texture.
Let us know how it goes!
Laura
Hi Emily P,
If leaving those stitches on the needle doesn't bother you, leave them on there! It might get a little cumbersome by the time you finish the right side, but there is no reason you HAVE to put the stitches on a hold.
Laura
Any plans to make this in a 0 to 3 month size?
Hi Shannon-
We don't have plans to make this in smaller sizes. But the original patter that this was inspired by, the Easy Baby Cardigan in Joelle's book "More Last Minute Knitted Gifts" comes in a 0-3 size so that might be a nice alternative.
Thanks for getting in touch!
Molly
Hi there,
Thanks for this pattern and all the other great stuff on this site. I love your site (and your store!)
I am a beginning knitter and am nearly done with this sweater but I have run into an issue. I just joined the two front sides and finished the 3/4 inch seed stitch section at the bottom of the neck. I measured the width of the front to make sure it's even with the back of the sweater, and for some reason, the front of my sweater is about an inch wider than the back of the sweater, even though my stitch count is correct.
Any suggestions on what I should do about this? Maybe it doesn't matter too much? Or should I drop some stitches, and if so, where should I do the decreasing? I wanted to ask before I knit too many more rows down the front…
Thank you so much in advance for your help!
Marianne
Hello Marianne.
My fist thought is that perhaps your tension changed resulting in a different gauge. This happens, to a lot of us! I have a question. Is your gauge correct on the BACK or on the FRONT?
If it is correct on the FRONT, that means your BACK is probably a little narrow. In order to keep the whole garment from being too tight, I would leave the FRONT alone and carry on with the pattern.
If your gauge is correct on the BACK, that means your FRONT is too wide. In which case, yes, you can do some decreasing. You'll want to figure out how many stitches you'd like to eliminate in order to get the same width as you have across the BACK. Measure the BACK. Multiple that measurement by the gauge you are getting in the front (let's call this number Y). Take the number of stitches you currently have and from that number subtract that number Y. This is how many stitches you'll want to eliminate.
I would decrease one on each side every other or every third row until you've eliminated as many stitches as you desire.
I do hope this is clear and helps. Please write us back with any questions!
Laura
Love this sweater. I am not clear on the Sleeve instruction. If I cast on row 1 then how do I work across the cast on stitches? Will I do it on the wrong side since my working yarn will be at the end?
Hi Jodi.
To cast on for the sleeve… With the right side facing you, you'll use the working yarn which is coming from the first stitch and you will use a cable cast on technique to cast on the instructed number of stitches (here is a link to our cable cast on tutorial https://www.purlsoho.com/create/knitting-tutorials-cast-ons/2008/7/7/cable-cast-on.html). Once you have completed the cable casted on, the right side will still be facing you and the working yarn will be coming from the stitch you've just cast on which is now the first stitch of the row. Work across those newly casted on stitches and the to the end of the row as instructed (seed stitch first and then knitting to the end). Next you'll do the same thing for the other sleeve, but this time with the wrong side facing and once you've worked in seed stitch, you'll purl and then finish the row in seed stitch.
Jodi, does this help? Please let me know if you have any questions.
Laura
I truly love this sweater.. so simple and sweet. But I would also love to knit the Fair Isle hat however the link to Whit's Little Fair Isle isn't working. Can you please help? Thanks billions!!
Hi Kristin-
The link is fixed now! https://www.purlsoho.com/create/the-purl-bee/2012/1/12/easy-pullover-for-babies-toddlers-and-kids.html
Thanks for pointing that out!
Best-
Molly
Does anyone ever make a picture tutorial for those who do not have a clue as to how to knit clothing? we live in an area where there are no knitting shops and it is sometimes very difficult to figure it out in a book.
I too would like an adult version of this sweater– perfect sleeves and neckline for adult also. thanks marywallis
Hi Linda-
We have photo and video tutorials for many of the techniques needed here. You might want to check out our terms and tutorials page here: https://www.purlsoho.com/create/knitting-terms-tutorials/
Our You Tube page also contains some great info: https://www.youtube.com/user/PurlSoho
Additionally, if you have any specific questions about this project we'd be happy to answer them here in the comments section.
Thanks and good luck!
Molly
Hi Marywallis-
We don't have plans to make this in an adult size at the moment. You might try looking on Ravelry for a "tunic" style sweater.
Thanks for getting in touch!
Molly
Bonjour
Est il possible d’avoir les explications pour la taille 6 mois?, Merci
Hi Irene-
We don’t have plans to make this in a smaller size at the moment but thanks for getting in touch!
Molly
I am knitting this sweater for my grandson. I am right at the point where you begin the sleeves. I am having trouble visualizing what I am doing. I ended, as it said, and then cast on stitches, adding to the stitches that were already on the needle. Is that right? I can’t see on the photos what part of the sleeve this is. I’m wondering if I was supposed to have put the stitches on a stitch holder and then started the sleeves as separate pieces.
Thanks, Rosie
Hi Rose Ann-
Thanks for getting in touch about this, you should leave stitches on the needle and use a separate needle for the sleeve.
Best-
Molly
Hello,
Beautiful pattern, I must say but I am having the same problem as above. How do I start the sleeves? Your answer to the above question is still not clear to me 🙁 could you please explain some more?
Hi Molly,
Beautiful pattern. I am having the same problem, how do i begin the sleeves? I still dont understand 🙁
Hi Aisha-
I’d be happy to try to help, What part of the sleeve instructions don’t you understand?
Best-
Molly
Hi Molly,
Thank you but I somehow managed to get it right.
Now I am on the increase portion of the left side. From what I understand, the increases are only happening on the side of the neckline, right?
Aisha
Hi Aisha-
Yes that’s correct.
Let us know if you have any more question!
Molly
This is such a beautiful pattern. I have some wonderful yarn that knits up with a gauge of 3.5 stitches to the inch. Would I be able to half all of the directions and measure length often in order to make the sweater with the thicker yarn or is there another way of going about it?
Any advice would be helpful. Thank you.
Hi Kelli-
Unfortunately converting a pattern like this that needs to fit a body isn’t as simple as dividing all the directions in half. 3 1/2 stitches per inch is quite a lot chunkier than this original yarn so in this case we wouldn’t recommend trying to use this pattern. We don’t have any kids patterns here on the Purl Bee that come in that chunky of a gauge but you might have some lucky if you search “chunky weight, kids sweater pattern” on Ravelry.
Thanks so much!
Molly
Hi there, very keen to try this pattern – question (and I’m sorry if its obvious somewhere and Ive missed it!) can I do this on straight needles? Me and circular aren’t very good friends yet 🙂 Thanks 🙂
Hi Jen-
Yes, you can make this on straight needles, just make sure to get long ones! (I’d use ones that are at least 14-inches long.) But, just FYI, while this pattern calls for circular needles it is not knit in the round- you just go back and forth like you would on straight needles, switching the needles in your hands at the end of each row, so there isn’t any special skill involved! We just recommend the circular needles because they are less bulky and hold the width of the sweater better.
Hope this helps, and good luck with the pattern!
Best-
Molly
I made this in the smallest size for a baby. It was my first attempt at a sweater and I’m so pleased with the results. Thanks for posting this awesome pattern. I also wanted to throw in another vote to develop this in adult sizes, as my husband fell in love with the pattern and is begging for one that he could wear! Thank you!
Thank you for this lovely pattern! I am stuck on one part of it and am wondering if you might be able to help me. I am at the part where I need to rejoin the yarn to the stitches on the needle in order to finish the right front. When I went to do this, there was no tail to do so. The tail I cut was on the left front sleeve. There is no tail on the right front. Where do I go from here? Did I make a mistake?
Everything looks beautiful right now and I fear having to rip everything out. Please help!
Hi Kayla!
You’ll join a new ball entirely to the right front. You don’t need a tail already attached to do so. Just join new yarn to the stitches on hold, and start knitting!
Happy Knitting!
Thomas
Can you help me convert this to a bigger weight yarn in order to decrease the number of stitches per inch and allow it to be knit more quickly?
Thanks,
Cherrie
Hi Cherrie-
I’m so sorry but we don’t have this particular pattern available for thicker yarn and unfortunately it’s not a simple conversion. We would recommend that you check out some of our other kids sweater patterns to see if something else catches your eye.
Here is a link to all of our babies and kids sweater patterns: https://www.purlsoho.com/create/category/knit/projects-knit/garments-projects-knit/babies-kids-garments-projects-knit/
In particular the Purl Soho Pullover in Alpaca Pure might be a good option: https://www.purlsoho.com/create/2014/03/09/the-purl-soho-pullover-in-alpaca-pure/
As would the Friendly Fair Isle Sweater for Toddlers and Kids: https://www.purlsoho.com/create/2015/01/02/friendly-fair-isle-sweater-now-sized-for-toddlers-kids-too/
Thanks for getting in touch!
Molly
I love this sweater! All I have left to do is seam the sleeve cuff. Any tutorials for seaming the seed stitch portion of the cuff?
Hi Michelle,
We seamed the entire sleeve with the mattress stitch method.
Our tutorial is here: https://www.purlsoho.com/create/2013/09/27/mattress-stitch/
Happy Knitting!
Sophia
I have enjoyed creating this sweater. I am on my third one for my grandsons, the first ones I followed the pattern the sleeves ended up really long so I took 20 stitches off the sleeve, hope to know soon if it is good or too much. I have the material to create a grey one for him for his birthday that is coming right up. I would love one of these for myself. They look like they would fit comfortably and I am going to try and create one for myself.
I do like the way it fits the boys. They have matching sweaters that their grandmother made for them and are able to wrap in her love and warmth.
Hello! I had a quick question. I’m at the point in the pattern titled “Left Front”.
Where it instructs “Now working only the Left Front and Sleeve stitches …”, does this mean to work the Left Front and only the Left Sleeve, or the Left Front and *both* Sleeves? If it means only the Left sleeve, when in the pattern do I add bulk to the Right Sleeve?
Thank you so much for your help!
Hey Stephanie,
Thank you for the comment! You will be working the Left Front and Left Sleeve together. You want to work each sleeve and front shoulder sections separately so that you can create the neck opening.
I hope that clarifies things for you and feel free to write us back if you have anymore questions!
Happy Knitting!
Jake
Row 2: Work in patterns to 1 stitch before second marker, kfb, work in pattern to end. [83 (100, 116, 137, 143, 147, 154 stitches] –
This is a WS row and therefore purled; kfb ? should that be purl in back and front ?
Hi Beata,
Thank you for the comment! It is not necessary to do a purl front/back since it as at place where the seed stitch neckline changes to stockinette stitch, so doing a knit should not be noticeable. That being said in these instances I often like to try out both options and decide which one I think looks better so it’s definitely worth a shot! I hope this helps clarify and feel free to write back if you have anymore questions!
Happy Knitting!
Jake
This pattern is gorgeous, but it is described as “Easy” and I wonder…easy for whom? I am a beginning knitter and cannot fathom how to knit this “one piece” sweater. Do you have tutorials for every step of this pattern? Knitting is very discouraging for me, but I want very much to learn. Any advice?
Hello Lily!
We admire your perseverance in learning this new craft! This pattern is knit in a sort of “t” formation with a hole in the center for the head. Then you fold it in half and seam under the arms and along the sides. I usually have to draw these things out for myself to have a visual aide! The most advance parts of this pattern would be the increasing and decreasing to shape around the neck. Is there a specific part you are having trouble with? Feel free to write again with any other questions. Thanks for your comment! -Alyson
I’m still hoping for an adult sized version, is there any chance of that yet? Thanks!
Hello Marlys!
Thanks for your request! We will keep it in mind! Thanks for writing in! -Alyson
I am confused about starting the sleeve. In a previous post you said that after the cast on to leave them on the needle and use another one to do the sleeve. What does that mean? Do you mean use a stitch holder for the body and then work the sleeve?
Hi Kim,
Thanks for your interest in this pattern! The sleeve portion starts with a cable cast on (this all takes place on the left-hand needle) and then you knit into these stitches in pattern. After you knit all of your cable cast on stitches, you will knit across the body and then turn your work. After you turn your work, you will cable cast on again for the next sleeve. This pattern can seem confusing but essentially you are making a big “plus” sign and then sewing the underarm and side seams. I hope this helps you to visualize the pattern! Once again, thank you for writing in!
Best,
Adam
Love this pattern- it’s helping to pass the time with baby #3. One question, while knitting the sleeves, should you measure the seed stitch or stockinet the stitch. The seed stitch is about 1/2″ shorter on mine. Thanks!!
Hi Nell,
Thanks for writing us! If you are trying to measure the sleeve you should include the seed stitch and stockinette in the measurement. I hope I’ve answered your question. Let us know!
Best,
Adam