Working into the Stitch Below
Working into the row below is easier than it sounds! Check out our video explaining how to knit into the stitch below, aka “knit one below” or “k1b.”
Excited to try out this new technique?
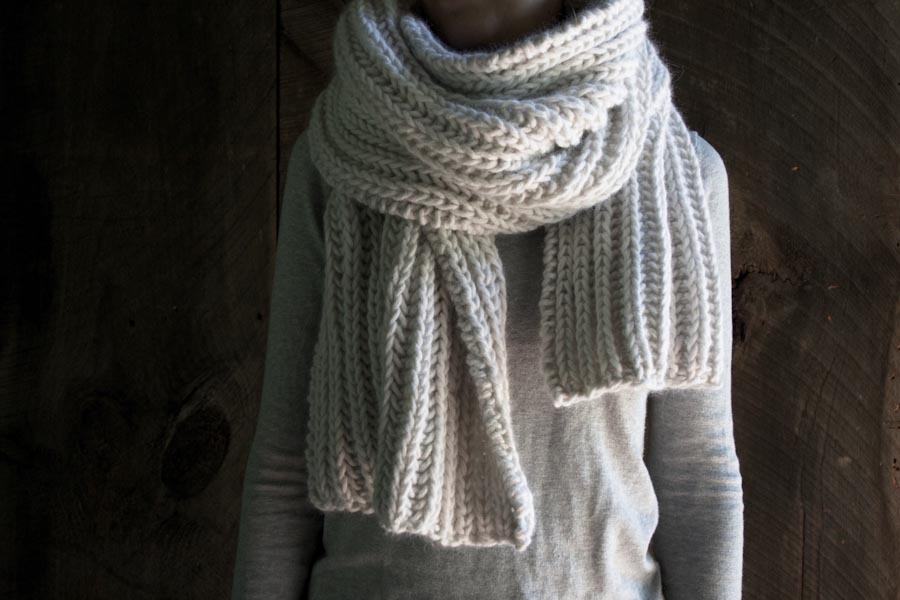
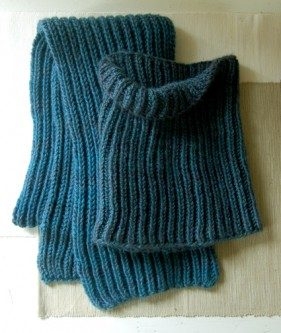
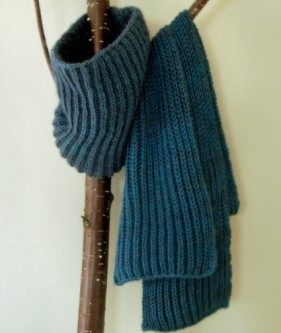
Try our Seafaring Scarf (pictured above) or Color Dipped Hat and Color Dipped Scarf (pictured below) or Fisherman’s Rib Scarf + Cowl, (pictured at the bottom).
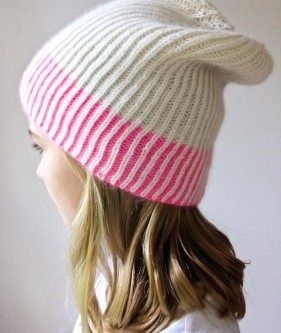
Photo Tutorial
The following tutorial also explains knitting (and then, purling) into the stitch below, but with still photographs instead of moving video…
Knit 1 Below
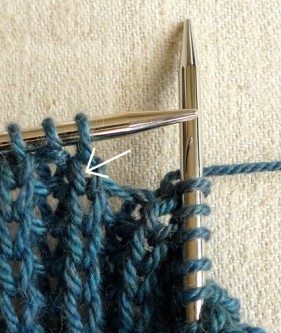
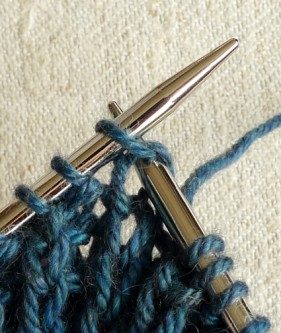
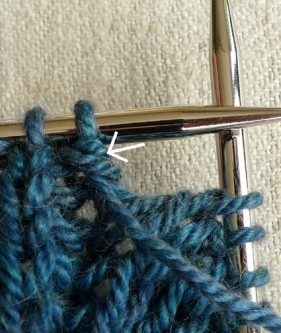
- Insert the right needle into the space right below the next stitch, indicated by the white arrow, above left.
- Knit as you normally would, allowing the stitch to fall off the left needle as usual (feels a little scary at first, but don’t worry!).
- If you turn the work over, you will see that 2 stitches are wrapped around the stitch you just made.
Purl 1 Below
And here is how to purl into the stitch below, commonly phrased “purl one below” and abbreviated “p1b”…

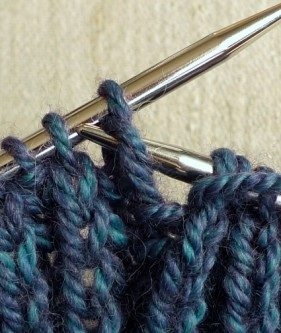
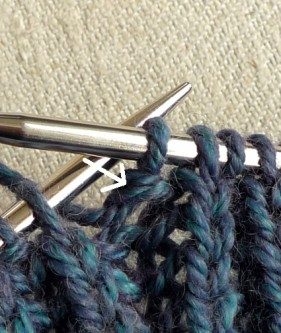
- Insert the right needle from back to front (just like normal purling) into the space below the next stitch, right under the purl bump. The white arrow, above left, shows the spot.
- Purl as you normally would, allowing the stitch to fall off the left needle as usual.
- If you look below the stitch you just made, you will see that it is wrapped by 2 stitches.
And that’s all there is to working into the stitch below!


Thank you so much for this video. I find it so much easier to learn from watching a video than looking at a series of photos, so I’d love to see you keep adding to your video collection to supplement all your great patterns. Thanks again!
I find it so much easier to learn from a series of photos than from a video – so many knitting tutorials are on videos these days, but I find it annoying to have to keep pausing every thirty or trying to see detail in a grainy video. I really love that you have it both ways here, to support different styles of learning.
Oh, I am with you Paula – I can copy a series of photos and save them with the text in a document to consult whenever I need to be reminded. The video might not be available when I want to work on something. Nice to have both, but photos are great.
If you press the 3 vertical dots in upper R corner and have the option to
“open in browser” you will find video there. Having both is decidely more
helpful.
Where’s the little button that creates a PDF?
Hello Nancy!
If you click the little icon that says Print, the option to save the file as a PDF will become one of the choices. Best of luck and happy knitting! -Alyson
Thank you so much for sharing your patterns which are all so lovely, and your videos which are the most helpful out there.
I first came upon Purl Soho when I began knitting 3 years ago and saw your cute owl. I’ve been a fan ever since!
The Color Dipped Hat looks lovely, I can’t wait to give it a try!
However, can you kindly explain how to unknit the row below?
Thank you!
Hello Lois!
There is no official way to do this, but I would recommend going one stitch at a time and being very patient! Please let us know if you need anything while you’re working on the pattern!
Best of luck! -Alyson
I want to use this technique for the “Beautyberry Blanket”, but I am confused now, does this still work if I am knitting european style?
Hello Esther!
Yes, despite which hand you carry your working yarn with, you will insert the needle into the stitch in the same manner. Please don’t hesitate to write in again if you have outstanding questions! Thanks! -Alyson
Love the k1b going to try it
Hi,
I’m a new knitter and love knitting the fisherman’s rib, but I can’t figure out how to tink the knit 1 below stitch. I would love to learn how to unknit the stitch.
Hi Lauren,
Thanks for writing us! While we don’t have a video for fixing fisherman’s rib, there is a great video that I found on YouTube pasted below. I think it will help you get back on track! Happy knitting!
https://www.youtube.com/watch?v=jrd8MtohamI&nohtml5=False
Best,
Adam
What is the advantage/reason for knitting in row below?
Hi Norma,
There are so many advantages! Working into the row below lets you create many kinds of fabrics, such as two color ribs, elongated knit stitches, double sided fabrics, dense fabrics and much more. It’s a wonderful technique!
-Adam
Cool! Thank you. (LOVE PurlSoho, by the way. I visited NYC for surgery and PS was the first destination as soon as I was mobile again.)
Thank you for the tutorial! So can you not k1b over and over? Each time you k1b you would follow it with a purl. Is there a reason for that?
Hi Jenn,
Yes! There is a reason for this. If you imagine knitting into the stitch below, you are essentially releasing the stitch on that lies directly on the left-hand needle. This is what creates the elongated knit stitch and the “brioche” look. If you knitted below in every stitch, you’d get nowhere because you’d be canceling out the row above. Knitting below requires that you k1b, p1 and then do the opposite for the next row/round so that the stitches can progress upward. Hope this clears things up! Let me know if you have any other questions!
-Adam
Is there a chevron pattern using this technique. I cannot for the life of me figure out brioche chevron using 2 colors…….this could solve my problem. Thanks.
Hello Penny,
Thanks for writing in to us! I have never seen a fisherman’s rib chevron and couldn’t find one online. The “Chevron Camisole” by Elise Duvekot was the closest thing I found on Ravelry. Let me know what you think!
-Adam
I LOVE the addition of videos! They help so much, especially for us beginners!
I love this stitch & have figured out how to tink k1b, however is there a way to correct p1b?? Please help if you can & thanks for the great patterns!
Hi Karen,
Thanks for writing in! There is a way to fix this stitch. It involves ripping out the incorrect stitches and re-stranding the stitches like brioche stitches. I would YouTube this method because it’s much easier to show than to explain! Best of luck and let me know if you have any other questions!
-Adam
can you show how to lift the st 2 below the one just knitted. I have seen lifting 1 but if I am starting on the 3 row it is hard to figure out.
Hi Beverly,
Do you mean knitting into two stitches below? I’ve actually never seen this. Please clarify and I’d be happy to help as best as I can.
-Adam
The problem I’m having is, how to k1b when you only have your cast on stitches, Did I miss something?
Hi Marsha,
Thanks for the question. It depends on what kind of cast on you are doing. If you are doing a knitted cast on like the long tail cast on, you’ll be able to knit below. If not, you’ll probably have to do a K1, P1 rib stitch to get a base upon which you can knit below. Best of luck!
-Adam
I’m having the same problem. In the pattern I’m trying to make it says to work a k1b after the cast on row. In other words do a k1b in the first row. I did a knitted cast on. So where do I insert the needle to do the k1b?
Hi Teresa,
Thanks for writing in! We have several patterns where you will be knitting 1 into the stitch below after the cast on. Using the long tail cast-on, you will be able to knit into the cast on for this first row!
I hope that this helps!
Cassy
Same problem. The words you are saying make sense but when I look into the cast on row to complete this maneuver, I don’t see what part of the cast on “stitch” to insert the needle in. I’m making the swatch for the linen quill mini bundle blanket right now. Perhaps it is easier to see what to do using larger yarn? I’ll give that a shot but am I going to ruin things if I just purl the very first row and then begin the pattern? My old eyes can’t see the way they used to and this yarn on size three needles makes for a very small stitch. (I know the pattern calls for size 4 but I typically have to go a needle size down to hit the correct gauge, lest you think, “Oh no, this batty bird is using the wrong size needles!”)
Hi Christie,
Thank you for writing in! The Incredible Blanket begins with a set-up row that eliminates the need to K1b into the cast on edge. Although you can knit a stitch this way, we found that working the set-up row for this pattern was a bit more manageable. I hope this helps!
Happy knitting,
Gavriella
please explain ‘ cording stitch ‘ done on sleeve of raglan sweater. I have great difficulty picking up purl bump 3 rows below next stitch.
Hi Barbara,
Thanks for writing us. The cording stitch is explained in the pattern with photos. If you want to eliminate the cording stitch it doesn’t change the pattern much. It might be easier (and a cool effect in my opinion) if you do the cording in a contrast color. This way you’ll clearly see into which stitch you need to pick up. Best of luck!
-Adam
when using k1b on smaller needles, is there a trick to ensuring that the stitch that you’re dropping from the left needle is flush with the stitch you just made? I’m finding that even with a small tug upwards, the stitch dropping off of the left needle wants to bubble on the left side of new stitch instead of being flush. When this happens, I tend to hold in the back of the work while working the p1.
Hi Ritz,
Thanks for the question! When knitting below there will always be a wonky stitch after dropping the stitch above. This should fix itself on the next row, however. If it doesn’t, then you might be knitting too loosely. A tighter tension might put your stitches where they ought to be!
All the best,
Adam
I totally agree with Liz that the videos are the best for tutorials, much better than the written(picture).
I have a pattern that says after 2 rows of garter st, you k 1, k1b to end
With right needle k the sl st of previous row with the st above ,k1 repeat to end.
I’m having trouble keeping the sl st from dropping to the bottom .
Hi Sheila,
Thank you so much for reaching out to us. Unfortunately I am not familiar with this pattern and am having a hard time imagining the stitch you are doing. I would try reaching out to the author of that pattern for better guidance on the stitch. I hope you find an answer!
-Adam
Hi Adam.
Try ” knittingfool.com.
There is a stitch made in brioche I recently came to in above site. Also on You Tube but it is recently added.
As such it uses one of the two loops in P1b, the looser of the two, knit the knit stich that is next in the row to be knitted. I will try to find video, but site above has similar to what the query was.
Hi Adam, I’m knitting a pattern which uses the above technique on the first row but on the second row it asks to “knit 1, knit 2 to next stitch and loose strand across this stitch”. Could you please explain how to do this? Many thanks
Hi Gillian,
Thanks for writing in! I am afraid that I do not understand the directions that you have included here. I am not sure what is meant by “loose strand across this stitch”. I knit up a small sample but was not able to figure out what might be meant.
Best,
Cassy
The video for knit-one-below was very helpful; however, I’d like
to know how to do it when working with 2 colors, i.e. 2-color Fisherman’s Rib. Thanks!
Hi Annie,
Thanks for writing in! While we do not have a tutorial for 2 color Fisherman’s rib, we do have a few patterns that utilizes that technique. Check out our Two Color Cotton Cowl and our Color Dipped Scarves. The techniques described there for working fisherman’s rib in 2 colors could be helpful for you!
I hope that this helps!
Cassy
thank you so much. I love learning new things
I have a bar across the stitch, makes it look like a triangle. Trying to do 2 color cotton cowl. Have ripped out twice. Help
Hi Donna,
Thanks for writing in! I am not sure what could be causing this issue. If you send a photo to us at store@purlsoho.com, we can take a look!
Best,
Cassy
I have instructions that say: “K4, (k1below, k1 in same st) 1x, knit to last 5 sts, SSK, k3. I know how to knit 1 below thanks to your video but am puzzled about the k1 in same st. I don’t know how to execute this! Can you help?
Hello Trish,
To K1 in same stitch you will knit but instead of taking the stitch off of your left needle as you normally would,you will keep it there you will then put your right needle back into the same stitch and knit again this time taking the stitch off of the left, you now have two extra stitches.
I hope this helped,
Melissa
A friend of mine was describing this technique, she is very industrious and has stuck to the project. Awesomeness and Beyond”
How to knit K1below when the stitch below is a decrease stitch, Sl1 K2tog.psso?
Hi Helen,
Good question! Although this is technically possible, it is unusual that pattern will have you knit into a decrease from the row below – patterns written in Fisherman’s Rib and brioche usually use specialized decreases and they are placed so that you will be working a regular knit stitch in that column on the row after the decrease. If you would like to give it a try though, you will simply have to make sure your needle goes through all three stitches involved in the decrease when knitting into the row below.
I hope that helps!
Julianna
I found this page looking for info on knitting in the row below. BUT now I have to K1below in a row just below a decrease row (into the decreased stitch). I cannot seem to get it right. Is there a video I can watch? Thanks!
Hello Mimi,
Thank you for reaching out! Unfortunately we do not have this specific technique as a video tutorial. What type of decrease is it? Are there any specific notes regarding this in your pattern?
I hope I can help!
Warmly,
Marilla
Hi, I am trying a Japanese lace pattern and the instructions state to knit into 6th row below however, it is clear from the image that the 5 rows above are not unraveled as the patterning still exist and there isn’t a stitch increase – I am confused on the correct action to take apart from knitting into the 6th stitch and then knitting the new stitch and ‘old’ stitch together. Thanks for any help!
Hi Gemma,
Thanks for reaching out! It is possible to knit into a stitch that is multiple rows below the current row and you usually do not let the current stitch fall off the needle when working this technique, unlike Fisherman’s Rib. Since knitting into the row below does create an extra stitch when done this way, you will usually decrease this stitch, either immediately or on the next row, to maintain your stitch count. I’m not sure how your pattern handles this, but I would check both the next row and the chart key to see if there is any additional information on when to decrease the extra stitch.
I hope that helps!
Julianna
Hello,
I’m knitting the ‘Two-tone cotton cowl’. (k1b, p1b)
l have to rip back a few rows but I’m feeling nervous about it in case I don’t pick up the sts properly, any advice please on how to achieve this successfully
Hello Helen,
Thank you for reaching out! Ripping back this stitch is always a challenge. I find that going slow is key as well as being aware of which row you are on. You will want to remember that when you are going back into your stitches, your purled stitches are the ones the have been knit into the stitch below on the revered side.
I hope this helps and Let us know if you have any more questions!
-Marilla
I am knitting this blanket using your Gentle Giant yarn. When k1b on back side(wrong side) the k1b requires working with the 2 strand purl stitch. Do I go below 2 strands, or go between the 2 strands or what?
Hello Teresa,
Thank you for reaching out! Are you working on the Beautyberry Blanket? If so, your stitches should line up so that when knitting into the stitch below it is never going into a stitch that was knit into the stitch below from the previous row. This means that you will never have a doubled up strand that you knit into. I would be careful that you are knitting 2 stitches before beginning the repeat on row 2.
I hope this helps and let us know if you have any further questions!
-Marilla
Thanks for this. I am a continental knitter. Would be nice to see the video using this technique. I get confused watching throwers.
Hi Ulrika,
Thanks so much for writing in! Unfortunately we don’t have the resources at the moment to do a video tutorial of this technique using the continental method. We will keep your request in mind though for the future! Thanks!
Best,
Julianna
Thank you for the tutorial for K1b, it is easier with video than read the instruction. Can you please saw for brioche stich to? I would lime to learn it.
Thank you again
Hi Agnes,
Thanks for reaching out! Yes, we do have videos for both One-Color Brioche and Two-Color Brioche that should be quite helpful!
Best,
Julianna
I am so anxious to get the pattern started; and, your tutorial is very good. Here’s my problem. When knitting the first row of the pattern (after the set up row) I, more often than not, get the needle in the wrong spot and, when I slip the stitch off the left needle, I have a hole. I clearly understand where the needle is supposed to go but can’t get a clear view. I’m thinking it’s because there is only one row below and then the cast on row. Is there any hint you can give to getting past the first pattern row. Or, do you think another”set up” row would help? Thanks for any words of wisdom.
Hi Beverly,
Thanks for reaching out! The first row is indeed the trickiest when working into the stitch below, because there is so little space below the needle! It can be helpful to to work an additional row in pattern without the k1b stitches, but sometimes you just have to do the following row – even though there may seem to be a hole, after knitting the next row everything will look just right. I would try first try continuing to knit the pattern to see if the issue resolves itself, and if that doesn’t do the trick, try adding an extra set-up row!
I hope that helps!
Julianna
Knitting pattern with K1b. Ok. I get it. What is K1b with wrap? I am not having fun. Thanks.
Hi Caryl,
Thanks for writing in! I’m afraid I don’t know what a k1b with a wrap is – is this a technique from a Purl Soho pattern? I hope I can help!
Best,
Julianna
I understand the k1b, but the scarf pattern has two knit stitches at the begging and end of the row. Then when you turn to K1, K1b, are you doing this into two purl stitches. Then you p1, k1b to continue and are really off of pattern design. I guess I need to know the start and finish of turn and finding myself with two purl stitches to knit into. I am confused.
Hi Karen,
It is possible to work a k1b into a purl stitch, as we do in our new Staggered Fisherman’s Rib Scarf, but I’m afraid without seeing the pattern I can’t say for sure if that is correct for your instructions. Is this a Purl Soho pattern that you are working from?
Best,
Julianna
How do I do this on the first row? I’ve cast on and am now on the WS and I am supposed to K1B….I’m not sure how to do this on the 1st row.
Hi Marci,
Thanks for reaching out! What pattern are you working on? Typically if the pattern calls for K1B in the first row there is usually a “FOUNDATION ROW” or “SET UP ROW” prior to the 1st row to give you a foundation to begin the stitch pattern! If your pattern doesn’t have one then I would recommend knitting across the first row to give you that foundation!
I hope this helps!
Gianna
Hi Gianna,
I am working on the beautyberry blanket. I do not see in the instructions where it calls for a set up row??
Hi Marci,
Thanks for your reply! My mistake, it looks like this pattern doesn’t have a set up row so you are in fact knitting into the cast on when it says k1b for the first row!
I hope this helps!
All the best,
Gianna
Well, it now has a setup row! 😉 Thanks for your quick replies!
I have a pattern that calls for a K1 below, but the stitch below is a purl. How do I do that? Thanks.
Hi Kimberly,
Thanks for writing in! The technique will be the exact same, but the bottom stitch will look a bit different (being a purl stitch) but nothing changes with how you will knit into the stitch (same as we show in this tutorial!)
I hope this helps, happy knitting!
Gianna
A sock pattern I’m using has long tail cast on, k in round. Row 1 says to knit. Row 2 says *K1, P1B* to end but you only have knit sts and P1B is for P sts. An error? or can you do a P1B in a knit st? or maybe ignore and do K1P1 for 1st row
Hi Mary Lou,
Thanks for reaching out. You can absolutely p1b into a knit stitch! You’ll work it exactly the same way you would a k1b (by putting your needle into the space below the next stitch, except you’ll purl it instead of knit it. Hope this helps clarify things!
All the best,
Lili
I’m knitting 1 stitch below then pearl 1.
I’ve made a mistake, then tried to fix it and I’ve made a mess. No idea how to go back and repair and pick up my stitches. Help.
Hi Anne,
I’m sorry to hear that you’re run into a stopping point in your project! A great tool to use to fix this would be a lifeline so that you can preserve the rest of your work so that you don’t have to start over again entirely. If you’re unfamiliar with the lifeline technique, all it is is threading scrap yarn through a previous row of your work so that those stitches won’t unravel when you rip back. You would want to place the lifeline in a row below the point where you got off pattern by picking up one leg of each stitch all the way across. Then you can undo these rows, slip the on-hold stitches back onto your needles and continue knitting as normal!
All the best,
Lili