Brioche Stitch: Two-Color Brioche + Fixing Mistakes
Brioche knitting with two-colors is a simple multicolor technique that creates a beautiful fabric of ridges and valleys… The exciting color play of Fair Isle or intarsia without the bother of tangled balls of yarn and pesky tails! Brioche fabric is truly as lofty and fluffy as its namesake, the light and buttery brioche bun. Our video includes a very detailed step-by-step explanation of this technique, as well as some bonus footage on how to complete the Set-Up Row and how to Fix Mistakes in Two-Color Brioche!
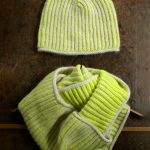
Below is a wonderful photo tutorial for Brioche Stitch in Two-Colors, as well as some helpful notes to keep in mind!
For assistance with more Brioche Stitch techniques, visit our Brioche Stitch: One-Color Brioche + Fixing Mistakes Tutorial and our Brioche Stitch: Basic Decreases Tutorial!
Notes
Flat Knitting
When working Brioche Stitch in two-colors for flat knitting, you will need to use either circular or double pointed needles in order to slide the work every other row.
In The Round
When working Brioche Stitch in two-colors in the round, simply alternate between brioche knit rows and brioche purl rows as indicated by your pattern.
Abbreviations
bk2tog [brioche knit 2 together]: Knit next knit stitch together with its paired yarn over.
bp2tog [brioche purl 2 together]: Purl next purl stitch together with its paired yarn over.
YOS [yarn over slip]: Bring yarn forward, slip one as if to purl, bring yarn over right needle to back of work in order to knit the next stitch.
NOTE: When working a YOS that is followed by a purl stitch, bring yarn over right needle to back of work as you would to knit, then continue bringing yarn to front of work to set yourself up to purl.
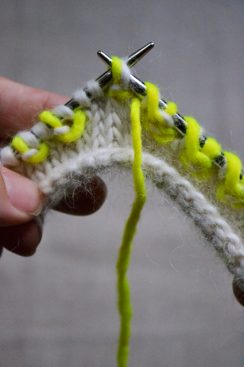
Photo Tutorial
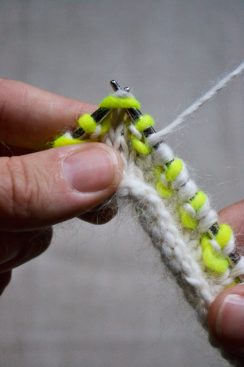
Brioche Knit Row: Work a YOS, by bringing yarn forward and slipping one stitch purlwise, bring yarn over right needle, and then bk2tog, by knitting next stitch with its paired yarn over.
Brioche Purl Row: Work a YOS, by slipping one stitch purlwise and bringing yarn over right needle to back of work and continue bringing yarn to front of work in order to purl, then bp2tog, by purling next stitch with its paired yarn over.
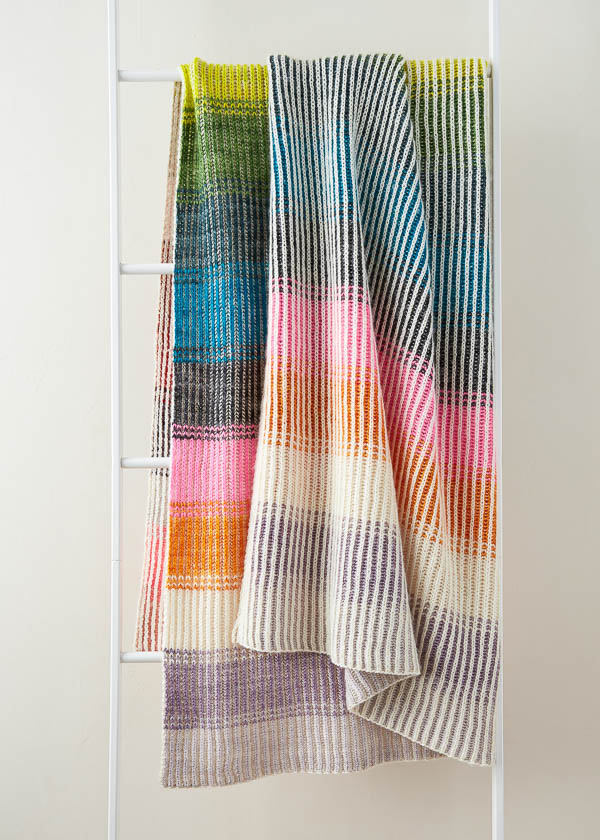
Give It A Try
Want to give Two-Color Brioche a try? Our Pocket Full Of Posy Blanket is an exciting place to explore this technique!


OK in dutch we call this “patent-steek”. It should be noted that while using this stitch is more labor intensive per stitch, however per inch you need less stitches. I once made a hat for my daughter that I ended up wearing myself (it's even too big for me) because of that.
Thanks so much for this great tutorial. Love your blog!
Hi: This may seem obvious but could you explain how you would knit this with just a single color yarn? I am confused as to where to position the yarn in each of the rounds…. Thanks so much! n
Tell me what do u mean by round right and wrong side
Hi Raminder,
Thanks for writing us. There is no wrong side to this pattern, but there is a side that will always be facing you. If you are referring to leaving yarn A or B in front or in back of the work, this means that whichever yarn you are leaving in front will show the knit “v’s” on the front and the yarn left in back will show the knit “v’s” in back. I hope this clears some things up!
-Adam
Hi Hoga,
Unfortunately we do not have a pattern written for single color brioche stitch in the round at the moment. Here is a link to a tutorial for single color brioche stitch knit flat: https://www.purlsoho.com/create/brioche-stitch/ -Laura
Hi Laura: Thanks so much for your response! I will check it out! Best, n
help! mine doesnt look right, especially the back. do you have a video?
Hi Cathryn,
We do not have a video at the moment, but hopefully will soon.
Thanks for the interest!
Laura
Hi there, any videos yet?
Hello, Sellydst!
Thank you so much for writing in! We don’t yet have a video for this tutorial, but we may in the future! Stay tuned!
Happy knitting,
Kumeko
Any video for this yet?? ?
I’m hopeless and my project keeps coming up wrong
Hello Ruby,
Thank you for asking! We have a new video for this above!
Happy knitting!
-Marilla
I have tried a few times to practice this stitch before committing to the project, and I think I'm getting stuck on where it says: (yarn over from previous round + following stitch). I usually am k2tog or p2tog with the stitch then the yo (in order from right to left) help!
Hi Jenny.
The note in the parenthesis is just letting you know that the two stitches that you are knitting together are the next stitch and it's “sash” or stitch created by your yarning over on the previous round.
Hope this helps.
Laura
Silly question – but is the YOS slipped purlwise in both pattern rows? I'm determined not to let this defeat me!
Hi RachelinLondon,
Not a silly question at ALL!
They are purlwise slips in both rounds!
You're going to love this once you get in the rhythm.
Holler if you have any other questions.
Laura
OK, I have tried to swatch this so many times trying different techniques, and I have a problem with it not turning out reversible, which is the whole point of this beautiful scarf! My 'yarn A' has ridges and valleys, but on the other side, there are no defined ridges, it looks like my yarn vomited all over the place in both colors. I know this description isn't really helping, but I would love a video tutorial for this particular stitch:) I've searched on youtube for someone to show me how to stitch this with the throw method, but there's none out there! Please help purlbee! (as you can see, I'm desperate!!) I even posted my swatch on instagram to see if anyone out there had any helpful hints! I don't mean to be one of those people…but help would be so greatly appreciated!! Thank you 🙂
Hi Jenny-
If you send us a photo we might be able to figure out what's going on. You can send it to customerservice@purlsoho.com
Thanks for getting in touch!
Molly
I have tried many times ,can't seem to get it Always seems to go wrong at end and beginning of row Wish you had a. Video Can you help
Hi Cheron,
Thanks for writing in. We will be sure to put two-color brioche stitch on (the top of) our list of videos to make.
Sometimes at the end of the round, people forget about the yarn over. Do you think you may be getting off by one yarn over?
Laura
I am having the same problem with the YO. It would be great if you could post a video of that stitch!!
I love this pattern but also have had so much trouble even adding the second color and can’t seem to find anything online or pros in knitting circles that can figure it out. I keep coming back to it every year thinking I’ll be able to tackle it, but to no avail! I’m gonna put in another word for a video tutorial 😉
I am having the same problems as the others who have written. It seems the beginning of the round doesn’t look right. Does it possibly have to do with when Yarn A is added? Is it meant to be added on the last stitch of the previous round? I desperately want to make this but I also keep failing! I, too, vote for a video! Please! 🙂
Hi there!
The important thing to remember is that on your “knit rounds,” the YOS requires you to move the yarn to the front before slipping the next stitch and moving the yarn over the right needle. On your “purl rounds,” the yarn is already in the front, so you will slip the next stitch, bring the yarn over the right needle, and then bring the yarn back forward after, so that you are ready to do your next brioche purl.
Also, be sure that you aren’t losing your last YO when you do the very last brioche purl in round 3 of the pattern.
Hope this helps! Happy Knitting!
Thomas
What is the best way to join new yarn in two-color brioche stitch in the round?
Hi Shirleen!
In brioche, I do the same thing I do in regular knitting: I knit one stitch with both the old and the new strand of yarn, and then continue on knitting with the new strand. Later, you can weave in your two ends you left! One nice thing about brioche is that you can hide your ends in the vertical “tube” created by the brioche stitch pattern.
Happy Knitting!
Thomas
Hi! Thank you for posting this beautiful pattern. I’d love to knit it, but am having trouble with something. When I introduce yarn A, the first instruction is to YOS, but I don’t understand how to create a yarn over with yarn that isn’t attached or joined to the piece yet, if that makes sense. Do I first join yarn A by knitting it into the first stitch of this round, or by possibly knitting it into the last stitch of the previous round? I’m confused. Hope you can help!! Thanks!
Hello Rachael,
Thank you for the comment! For joining yarn A start with the yarn in back, then bring it to the front and wrap it around the needle as your slipping that first stitch. This will position your yarn in front to set you up to create that p1. Then when you complete the round and begin knitting with color B again just make sure that the yarn over is knit in with the first brk2tog step.
Hope this helps and please don’t hesitate to write back with more questions!
Happy Knitting
Jake
Hello – Love your beautiful blog. Are there any plans to create tutorial photos for the various brioche stitches and projects in the continental style? Thank you.
Hello Kathy,
We don’t have these tutorials in the works at the moment, but thanks for voicing your preference and we’ll definitely keep your request in mind for the future! Thanks for your kind words about the blog! -Alyson
I am knitting a brioche beanie in the round. Casted on 72 stitches. Ready to decrease. Help! Have viewed several sites but not exactly what I want. Hopefully you have a suggestion?
Hello, Linda!
I am so sorry for the delay in responding to your comment! We have had an overwhelming number of comments lately! We really do appreciate your taking the time to reach out to us. A few years back we released a brioche hat and cowl pattern (https://www.purlsoho.com/create/2011/10/16/ginas-brioche-hat-and-cowl/). You could definatly adjust this pattern to suit your needs! If you need assistance with that, feel free to comment back or give our shop a call at (212) 420-8796 – anyone there can give you immediate assistance! Happy knitting!
Best,
Kumeko
Do you have a tutorial for doing 2 color brioche cast on in the round and 2 color brioche using magic loop?
Thank you
Hi Donna,
Thanks for writing in! We do not have tutorials for either of these techniques but we will certainly keep your suggestion in mind.
Best,
Cassy
When 2 color brioche is used as a 25 stitch design element in an otherwise purled garment, do you still leave the purl color to the front and the knit color to the back. My transition from brioche back to purl going from Color A to Color B is not as “seamless” as I would like. I realize this is not pertinent to this pattern, but I value your responses and advice.
Judy
Hello Judy,
Thank you for reaching out and your kind words! Is this pattern in the round or knit flat? Is the issue happening at the YOS? Does the pattern give you any special notes for this portion? I hope I can help, brioche is always a bit tricky.
Warmly!
-Marilla
Gina’s Brioche Hat Question
I love the pattern. Thank you for making it available.
I’m at the decreases. The 1st decrease is a knit 3tog which leans a bit . Then knit 2 more brioche rows. Then use knit 3 together decrease. This will be knitting the decrease using the purl round color.
I have frogged this 3 times because it looks wrong.
The 1st decrease appears to have color B in middle. Which of the 3 stitches being decreased should end up on top?
Am I supposed to make 2nd round of decrease using purl color and knitting 3 together?
Hi Karen,
Thanks for reaching out! Since the decreases alternate which color they are worked in, they will not all look the same, but will alternate which color is dominant for a decorative effect, which you can see in the second picture in the story above. When working the decrease in a Yarn B row, Yarn A will be the dominant color, and when worked in a Yarn A row, Yarn B will be dominant. The decreases should be worked every third row so the colors alternate.
I hope that clears things up!
Julianna
I lover this stitch, however have failed to master. Although the actual stitches is easy to learn. I am unable to read my work in order to correct any mistakes. I have taken a class but the instructor corrected my error and was not able to help me learn how to do it.
Hello Barbara,
Thank you for reaching out! I agree, the hardest part about Brioche stitch is figuring out how to fix mistakes. I still struggle with it sometimes.
Good luck on your Brioche Journey and happy knitting!
-Marilla
This is a wonderful instructor. She is very clear and easy to understand and follow. I thought that brioche was difficult but she makes it easy.
Thank you so much for the tutorial. It’s beautiful when done.
Looking for sick tutorials in the future
Thank you Laura and Purl Soho for these video tutorials on brioche. I’ve been wanting to try brioche but like many have been intimidated. I love your videos, they are clear and concise and I’ve learned so much from you. I’m super excited to give this a try.
THANKS AGAIN!
Enjoyed, so well explained! Thank-you….for the repair too!
Hi there, I have tried this tutorial out a few times now, and come up against the same issue. After the CO and set up row, I am ending up with a stitch at the end of each row which I don’t know what to do with, and the video doesn’t mention what should happen at the end of each row. Example: for row 1, I have worked P1 (YOS, BP2TOG) repeat til end of row. I end up with 2 stitches, not enough to complete another YOS and BP2TOG. What do I do with these 2 stitches? YOS then slip? YOS then purl? Please help – I love how brioche looks and am desperate to conquer it!
Hi Hannah,
Thanks for reaching out! Although we don’t show it in the video, Row 1 should end with YOS, K1. You can see the full written out instructions for the two color brioche stitch which is demonstrated in this video in our Pocket Full of Posy Blanket, under “Stitch Pattern.”
I hope that helps!
Julianna
I love this pattern and yarn. I have started this project about 25 times, but the edge is wrong. Rows 2 and 4 indicate the last two stitches are to be worked by working 2 together and slipping one.That means there should be three stitches. Can you clarify this?
Thank you
Hello Kim,
Thank you for reaching out- I hope I can help! Which pattern are you working on?
Best,
Marilla
Thank you so much for this great tutorial on Brioche knitting! I worked in the swatch last night and did pretty well – my main confusion was the ending of each row, as that wasn’t always explained. Did I miss a printed version of the four row pattern, which might include those edges? Is that something you could possibly include or send to me? Again, many thanks! (I’m anxious to start the cowl- which I know knits in the round and does have complete directions…. ).
Hi Nancy,
Thanks for reaching out, and I’m so happy to hear that you are finding our tutorial helpful! This video can be used with any of our two color brioche patterns, but I would suggest starting with our Pocket Full of Posy Blanket. It includes the selvage stitches we used in the video and is a great beginner brioche project!
Happy knitting!
Julianna
At the end of the set-up row for the pocket full of Posey pattern, I am ending up with only one stitch of CC before the last stitch of MC, but I think it should be 2 stitches of CC and then ending with one of MC (that’s what it looks like in the video). I’m not sure what I’m doing wrong!
Hi Rachel,
Thanks for reaching out! Since you started with an odd number of stitches, the last three stitches of the set-up row should be a YOS, k1, and then slip 1 wyif, so there shouldn’t be two stitches of CC next to each other. The YOS will look like a MC stitch with a CC yarn over wrapped around it, the K1 will be in CC, and the last slipped stitch will be MC. If you aren’t ending up with this pattern at the end, I would suggest double checking that you have an odd number of stitches cast on.
I hope that helps!
Julianna
I am having trouble with going from row 4 to row 1. I end up with 3 single stitches after row 4 is completed and I slide the work down.
Hi Susan,
Thanks for reaching out! I hope I can help clear this up for you! Since different patterns do vary slightly in how their selvage stitches and instructions are written, can you tell me which of our patterns you are following?
Best,
Julianna
Could you please explain what you do with the last stitch in each row. You say what you should do in the set up row, but not in any of the other rows. I want to make sure my edges look good on both ends/sides. I am trying to get a pattern for what you do on the first stitch of each row as well — sometimes we knit, sometimes we slip. Can you list what you do with the first stitch and last stitch of each row? Thanks, Ann
Hi Ann,
Thank you for reaching out with this great question! Because brioche can be worked flat or in the round, initial stitches will vary according to the project. Brioche patterns will typically include instructions for how they’d like the first stitch to be worked, sometimes on a row-by-row basis. One great example of this is our Pocket Full of Posy Blanket, which uses slipped stitches, knits, or purls depending on the specific row!
I hope this helps!
Gaby
Hi,
When I start out with an odd number of stitches I always end up with only one stitch left at the end and not two as the posy blanket says you’re supposed to have. The pattern says to knit and then slip the last two stitches. I’ve cast on and worked it numerous times and watched the video but don’t know what I’m doing wrong.
Thanks.
Hi Victoria,
Thanks for writing in! The odd number of stitches is correct and will work for the pattern! Basically, when you get to the final two stitches, the second to last stitch will have a paired yarn over from the previous row. So technically there will be “3” stitches but one is not actually a stitch, it is just the yarn over. So you will work the bp2tog (with the stitch and its paired yarn over) and then slip the final stitch!
I hope this clears things up!
Gianna
Question on video of 2 color brioche flat. I do not know how to do the last stitch (salvage stitch) in each row. I think the video tells you how to end the setup row, but not rows 1-4. Are the first stitch in the row and the last stitch (the two salvage stitches) the same? Thanks for your help! I am loving brioche!
Hi Merry,
Thanks for writing in! We’re so happy to hear that you’re enjoying knitting brioche!
It might be helpful to take a look at the written-out 2-color brioche pattern featured in the Pocket Full of Posy Blanket, as that’s what you’d do for 2-color brioche in general! So after the setup row, which ends with “k1, slip 1 wyif. Slide work,” you’d then proceed to the stitch pattern here:
Row 1 (wrong side): With Main Color (MC), p1, *YOS (see Brioche Abbreviations, above), bp2tog (see above), repeat from * to last 2 stitches, YOS, k1. Turn work (see Turn + Slide, above).
Row 2 (right side): Slip 1 (see Slip Stitches, above) with MC in front and Contrast Color (CC) in back; with CC, *bp2tog, YOS, repeat from * to last 2 stitches, bp2tog, slip 1 with yarn in back (wyib). Slide work (see above).
Row 3 (right side): With MC, k1, *YOS, bk2tog (see above), repeat from * to last 2 stitches, YOS, p1. Turn work.
Row 4 (wrong side): Slip 1 with MC in back and CC in front; with CC, *bk2tog, YOS, repeat from * to last 2 stitches, bk2tog, slip 1 with yarn in front (wyif). Slide work.
So the selvage stitches are different depending on if you’re working on the right side or the wrong side of the work. For the wrong side rows, you’d start and end each row with a purl or knit and then for the right side rows, you’d start and end each row with a slip stitch.
I hope this helps! Let us know if you have any other questions!
All the best,
Cat
Hello and thank you for the patterns and all.of the tutorials! I have been seeing some really gorgeous brioche projects and I convinced myself that it is probably super difficult! But thanks to your patterns and tutorials, I’m in love with this stitch! One thing that I am noticing with my work is that my loose tension doesn’t really look right. My question is, would you recommend tightening up my tension? My stitches look correct, but the ribbing is not defined. Do you have any advice on choosing colors for the 2 color brioche?
Thanks again! When I first discovered your website, I felt like I struck gold! I still do! ~~Karen
Hi Karen,
Thanks so much for the kind words, and we are so happy to hear that you tried a stitch outside of your comfort zone and ended up loving it! I wouldn’t recommend tightening your tension, but instead, going down a needle size might make enough of a difference. It might also be helpful to block a swatch on the needle size you are currently using to make sure that it’s not a problem that can be fixed by a gentle blocking when you are finished with your project! This will help even out your tension and might even help the ribs to stand out a bit more.
There are no strict rules for picking out colors for a 2 color brioche project, but when I can’t decide I generally try to stick with a main color and a more neutral color that has a complementary undertone. An example using Linen Quill would be Sweet Potato and Honey Pink, or Blue Pansy and Lavender Opal.
I hope this helps!
All the best,
Carly
Joining the two colors in the set up in the round has me stumped, and there are no hints, tips, or techniques to ensure the rounds are joined correctly. I’ve frogged at least seven times, and I’m beginning to be discouraged. The instructions need to be clarified to describe the joining with both brk and prp. Help?
Hi Carol,
Thanks for reaching out. Actually, you won’t need to do anything special to join the two colors at the beginning! We recommend just to begin knitting with the second color, leaving the end loose. Then, once you’ve knit more length, you can weave the end in to secure it. Hope this helps, and please let me know if you have any other questions!
All the best,
Lili
No. My issue s setting up the first three or four rows. Connecting the two ends and then adding the second color. If it was as easy as you say, I’d be finished with the cowl. And yes, I’m aware of YouTube, but I bought PurlSoho yarn and pattern and thought you might help.
Hi Carol,
I’m so sorry that I haven’t been able to help solve the issue you’re running into! Would you please send a photo of your work so far to customerservice@purlsoho.com? And would you also please let me know what pattern you’re working from? That way, I’ll be able to better visualize what’s going on so that I can give you more specific advice!
All the best,
Lili