Double Knitting
The wonderful technique of double knitting creates a two-layer fabric with knit stitches on both sides. The finished fabric is completely reversible, lending itself to colorwork, contrasting fibers, or simply a knit-faced fabric that is twice as warm!
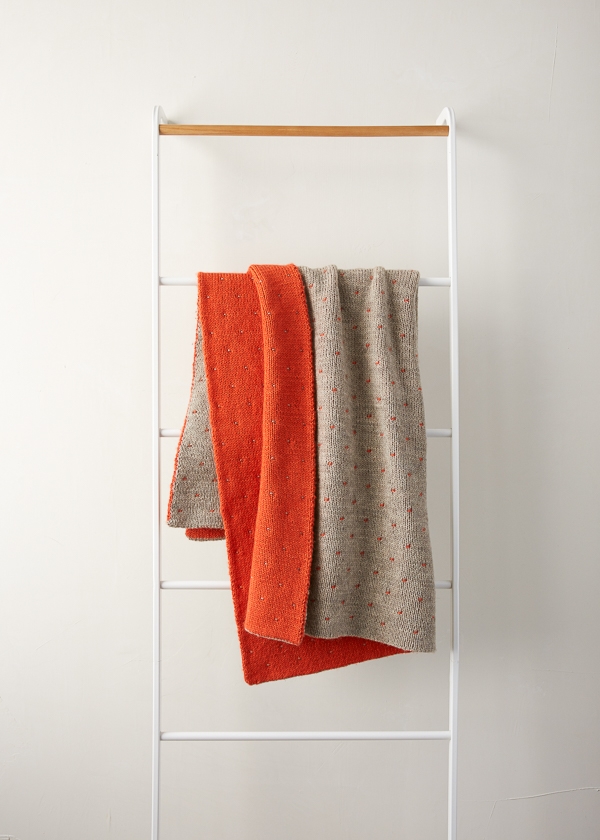
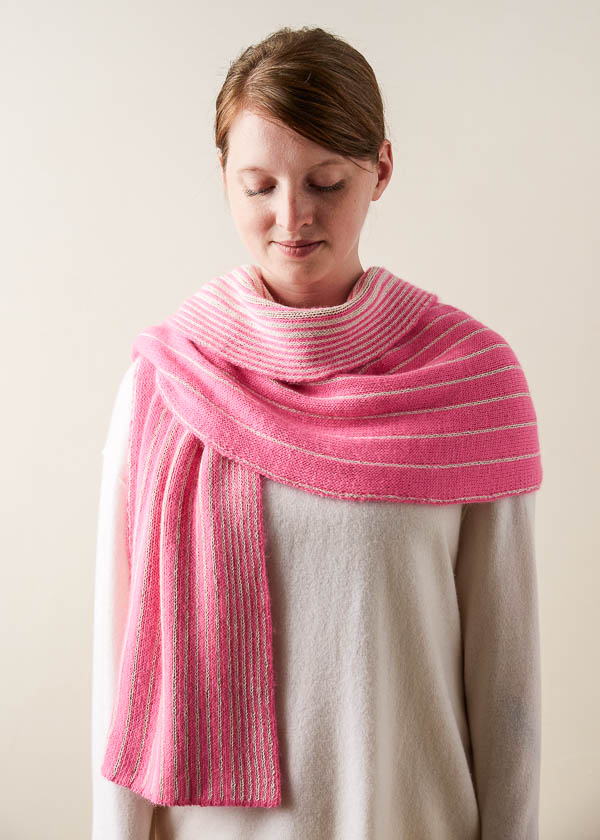
Want to give Double Knitting a try? Both our Double Knit Blanket and our Verse + Reverse Scarf use two colors and two yarns, and either a great place to practice your new skills!


How do I get the pattern I want that is free? I see no download button.
Hi Linda,
Thanks for writing in! You can find our new free pattern for the Verse + Reverse Scarf by clicking here: Verse + Reverse Scarf. If you’re on a desktop version of the site, you will find a “print” icon in the right column just below the date and tags. If you’re on a mobile version of the site, you will find a “print” icon below the pattern and above the comments.
Follow the easy on-screen instructions to delete whichever parts of the pattern you don’t want to print or save. For example, you may decide to shorten the pattern by omitting certain images or the list of materials. To remove images, click the drop down next to the image icon and change from 100% to 0%.
I hope that helps!
Julianna
I would be interested in making this verse reverse scarf in Vikings colors (purple and yellow/gold) do you have the appropriate yarn in those colors?
Hi Kristy,
Thanks for reaching out! I would suggest substituting Brooklyn Tweed Peerie for this pattern to find team colors – it has a fantastic color range which includes quite a few purples and golds! You can also mix and match colors between any fingering weight yarns, including Peerie and the original Line Weight and Cattail Silk, to find the perfect color scheme. You will need five skeins of each color when substituting Peerie.
Best of luck and happy knitting!
Julianna
It’s great that you are showing the double knitting technique. However, in less I’m missing something, you need to show the cast-on! That is a key part.
Hi Purl Soho!
Thanks for the great video and pattern. In my research for double knitting, I’ve seen that both yarns are either knitted or purled each row. Can you explain the difference in the end result with this double knitting technique?
Hi Sue,
Thanks for writing in! The two methods do produce exactly the same fabric – our technique is just a bit more beginner friendly to help out knitters who are new to Double Knitting.
Happy knitting!
Julianna
I’m grateful that you’re trying to simplify the double knitting technique, but I’m having trouble with the tutorial.At this point I’m just trying to get the gauge sample started, but I can’t figure out how to do that. Having cast on using a double knitting long tail cast on, both strands of my yarns are on the same side. But in your tutorial, you start row one with one color yarn coming off each end. How does that work and how do I get my yarns on the proper side?
Hello Joann,
Thank you for reaching out- I hope I can help! When you cast on, you just cast on with Yarn A and you continue to just use yarn A for your foundation rows as well. This will set you up to slide your row to the other side and begin knitting with yarn B meaning you will have yarn B on one side and Yarn A on the other.
I hope this clears things up and let us know if you have any further questions!
-Marilla
Im having trouble with Row 1, by my count I am working 302 stitches! Yikes, not quite 210! I think my problem is in this part
[p1 sl 1,(k1, sl1)5 times] 2 times
I count this as 24 stitches?? Help
Hello Sally,
Thank you for reaching out- I hope I can help! You are correct that this portion is 24 stitches total. There must be something going wrong in another section. I went through and counted up the stitches to double check and it does come to 210 stitches. What helped me with this pattern was to copy and past each row into bullet points.
I hope this helps and let let us know if you continue to have issues!
Happy knitting!
-Marilla
Happy new year
After a few attempts, I have finally cast on the right number of stitches using the long tail tubular cast on for the verse + reverse pattern and worked my way through the set up rows but I am a little confused by how to join yarn b and carry the yarn in front of the old (yarn a) as described in the note after row 1.
I have watched the double knitting video above and attempted rows 1 and 2 but by row 3, I realised I made a mistake and ripped back.
Do you have a video to demonstrate joining the new colour and carrying it as described in the pattern or can you please confirm whether the yarn has been carried in the front or in the back for row 2 and row 4 in this video
Hi Davinia,
Thanks for reaching out! Unfortunately we do not have the resources to create a video for this particular step; however, you will only be using one color per row, and the other color will not be carried along with it. When working Row 3 with Color B, Color A will simply be left at the edge of the work and not carried along through Row 3.
I hope that clears things up!
Julianna
Thank you for your reply. I figured it out in the end. When adding yarn b, I held the tail in the back and brought the main part of the strand up and then over yarn a. The first stitch was slip 1 wyib so it made a ‘C’ shape when carrying the yarn in front.
Row 3 is the opposite so yarn b was brought down to make a ‘ D’ shape in order to the carry the first stitch of that row and slip 1 wyif.
I think that was the point you were making in the video but knowing whether the yarn was held in front or back it took me a while to get it.
This is a great tutorial — I can’t wait to try this on my next winter project. I’ve noticed most of your photography/videography shows your projects on bamboo needles; do you prefer them for this or does it just photograph better?
Hello,
Thanks for reaching out and for your kind words! It really just comes down to personal preference. I like using metal needles for most projects, but if I’m working with a particularly slippery yarn I will often use bamboo needles to counteract how slippery the yarn is.
I hope this helps and happy knitting!
-Marilla
Why the tack down stitch? I’ve DK/d before and didn’t use a tack down stitch. Thanks! (Love your tut, btw!)
Hi Donna,
Thanks so much for the kind words and for writing in! The tack down stitch isn’t a special stitch per se, but is simply how we refer to working the pattern rows that create the pops of alternating colors on each side of our Double Knit Blanket. It is the same technique you would to add colorwork to any double knit pattern!
I hope that clears things up!
Julianna
Can this stitch be done in the round?
Hi Melissa,
Thanks for reaching out! Although double knitting can be done in the round, we do not have instructions for doing so using our method. If you search on Ravelry for double knitting patterns, you will find quite a few cowls and other pieces that are worked in the round. I will be sure to pass your suggestion along to the design team!
Best,
Julianna
I recently learned double knitting. The technique you demonstrate is different from other techniques. I’m wondering can this style of double knitting be used for charted patterns with a lot of color changes throughout row? How does it work if a different color is used in the middle of a row since only one strand of yarn is used at a time per row?
Hi Bettina,
Great question! To use our method with a chart, you will essentially knit each row of the chart twice. When following a chart using a different double knitting technique, you work two stitches for each square, one with the color indicated as a knit and one with the opposite color as a purl. To use our technique, you will follow the chart row, working each knit stitch as the color indicated in the chart and slipping stitches in between, and then turn your work and follow the same row, but reading it in the opposite direction and reversing your colors.
I hope that helps clear things up!
Julianna
Hi Julianna- I have just left you a message on the video for slip stitch double knitting. And I also, just saw your response for December 2019, asking a similar question. But I still don’t understand how to use a 2 color charted pattern, with the design on both sides, for example, a pink heart on one side and a grey heart on the other. My pattern is actually more complicated than a single heart, but still 2 colors. How do you carry the yarn across the row to make the color change? Please help. I am getting ready to start a baby blanket for a new baby.
Hi Patti,
I hope I can clear this up for you! For your example, let’s call grey Color A and pink Color B, and keep in mind that you will be working each row of the chart twice, once on the right side and once on the wrong side. Starting with a right side row, you will work the rows as follows:
Row 1 (Right side): With Color A, following the first row of the chart, for each gray square, (knit 1, slip 1 wyif). For each pink square, (slip 1 wyib, purl 1).
Row 2 (Right side): Slide the work. With Color B, following the first row of the chart again, for each gray square, (slip 1 wyib, purl 1). For each pink square, (knit 1, slip 1 wyif).
Row 3 (Wrong side): Turn the work. With Color A, following the second row of the chart, for each gray square, (slip 1 wyib, purl 1). For each pink square, (knit 1, slip 1 wyif).
Row 4 (Wrong Side): Slide the work. With Color B, following the second row of the chart again, for each gray square, (knit 1, slip 1 wyif). For each pink square, (slip 1 wyib, purl 1).
From there, you will continue repeating rows 1 through 4, moving up a row in the chart after rows 2 and 4. I hope that helps, and if you have any other questions, please don’t hesitate to ask!
Best,
Julianna
Hello,
Would you please provide a video on how to bind off the double knitting?
If there is already one, would you please provide the link? I can not find it 🙁
Many thanks,
Nasrin
Hi Nasrin,
Thanks for reaching out! Unfortunately we do not have a video for binding off Double Knitting; however, depending on how you casted on and the instructions for your pattern, you will first slip all of your knit stitches onto one needle and all your purl stitches onto another. You can then either use Kitchener Stitch or a Three-Needle Bind Off to bind off all the stitches.
I hope that helps!
Julianna
Thank you! I will use that video.
Thank you for all your tutorials!
Nasrin
Do you have any tips for keeping track of where you leave off when you leave your work? I’ve done DK before, but knitting and purling with both colors across. In that case, and with single knitting, you start where your yarn is left. But not with this technique! Hoping you have some advice!
Hi Emily,
Great question! For myself, I tend to make a written note on the row that I will be starting up with. I have also found it helpful to up a sticky flag on my pattern that I can move around to indicate what row I should work on next. I find that making notes or using a row counter with your rows on your pattern numbered, to be the most fool proof way to go with this method!
I hope that this helps!
Cassy
Best way to add new ball of wool in double knitting?
Hi Ruth,
Great question! I recommend adding the yarn either by simply starting to knit with the new yarn, as we show in our Adding A Ball of Yarn tutorial, or by working one stitch with both the old and new yarns led together. Either way, however, make sure the tails stay on the right side or outside of the blanket so you can still access them when it’s time to weave them in!
Happy knitting!
Julianna
I have two questions for you folks. First, is the multiple you give for changing the width of the pattern correct, 10 + 7, or should it be 10 + 4?
Secondly, how to avoid the “gap”(separation of rows) when changing colors/yarns? You seem to use bringing new yarn under before Row 2 and over before Row 4, or am I missing something? Is there a universal rule for changing yarns in double knitting to avoid the gap/separation of rows? Is there a reason you use two different methods, meaning do the stitches to work in the next row determine the method you use when changing yarns? I’m as clear as mud, aren’t I?
Hi Kathleen,
Thanks for reaching out! Yes that is correct, to adjust the size of the pattern the stitch multiple should be 10 + 7! Also yes, in the video tutorial we show exactly how to cary the yarn up to insure that there is no gap! The way you cary the yarn up is based on which side you are working on (Main Color or Contrasting Color!)
I hope this helps, happy knitting!
Gianna
If I want to work this pattern using both yarns at the same time knitting and purling as across the row as in regular double knitting are there any other changes necessary?
Can I make a gauge swatch using only one layer and double the number of stitches in the swatch to match a double knitting pattern gauge?
Hi Liz,
Thanks for reaching out! To make sure you get the most accurate gauge reading for double knit I would recommend making a double knit swatch and not a single layer swatch.
Warmly,
Gianna
Hi –
I just completed rows 1-4 of the double knit and the first 4 rows of the tack down. When I go back to row 1 (yarn A) to start the pattern over again the pattern says to purl. When I purl the with yarn A the whole row looks wrong – yarn A is visible on the back where yarn B is . What am I doing wrong? (
I hope this makes sense)
Hi Constance,
Thanks for reaching out! It sounds like you’re working on the Double Knit Blanket, which does have a slightly different order to how the rows are laid out, which is why the video tutorial shown here doesn’t match up exactly (in terms of what steps are Row 1 and what steps are Row 2). For example, in this video, Laura is beginning with what would actually be Set-Up Row 1 in the Double Knit Blanket Pattern. While all the steps demonstrated in this tutorial are the same steps that you’ll be working in the blanket, you should defer to the instructions listed in the pattern rather than working what is referred to as Row 1, Row 2, etc. in this video, to make sure that your blanket is knit accurately.
When you’re working the Double Knit Blanket and have completed the 4th row of the TACK DOWN section, you should have the right side of the work facing you, with the working end of Yarn B going off the left-hand side of your work and the working end of Yarn A on the right-hand side. You should now be able to slide the work (rather than turning it) so that you can begin working Row 1 of the Double Knitting with Yarn A. The first stitch on your needle should be a knit stitch in Yarn B, which you should slip with the yarn held in back. You should then be able to bring the yarn to the front to purl the next stitch, which should be in Yarn A (the same as the yarn you’re currently working with). That should allow you to continue on correctly, and you shouldn’t notice a difference in the look of the fabric. I’d suggest making sure that you’re sliding the work, rather than turning it, or double-check that you haven’t accidentally skipped a row in the process (which would throw off the 4 Row repeats).
If you’re still having trouble, you can reach out to us at customerservice@purlsoho.com and include photos of what’s going on, and we’d be happy to assist you further there!
Warmly,
Kelsey
Hi –
I forgot to mention in my comment above that the video tutorial starts with a knit row but the directions say to start with a purl row when beginning the double knit rows (rows 1 and 2).
I’m having problems changing colors at the beginning of rows. On rows 1 and 3, only yarn A is present so there is no other yarn to twist and close the side seam. How do you keep the side seam closed? Also, your instructions say to carry the new yarn (before rows 2 and 4) behind the old yarn. However, in your tutorial, you instruct to carry the new yarn in front of the old yarn.
Hi Alexa,
Thanks for reaching out! The two colors of yarn get twisted on rows 2 and 4, so you won’t need to twist them for rows 1 or 4. Because 2 rows of double knitting are equal to one row of stockinette, you are basically tacking the edge seam together on each row, even though it doesn’t feel like it! Also, when changing colors between rows, you are carrying the new yarn up the selvage in back of the other color. In the tutorial, we use the word “underneath” instead of “behind”, but we do mean to carry that behind!
I hope this helps!
All the best,
Carly
I should say that I’m working from your Double Knit Blanket pattern and referencing these tutorials as I go along. For example, in this tutorial, row 1 is k1, sl 1, wyif. In the pattern, row 1 is sl 1, wyib, p1. This might explain some of the confusion.
Hi Alexa!
When double knitting, there will be an open edge where the two working yarns cannot cross to pull that gap closed, which is why the “Tack Down” stitch is included in our Double Knit Blanket pattern. This way, the two fabrics can be held together throughout the body of the blanket. If you would like to close up the open edge, you can leave a long tail at the end and hand stitch that seam closed!
I hope this helps, and happy (double) knitting!
All the best,
Margaret
i would like to make a scarf using the double stockinette stitch (knit 1, slip 1 purlwise, repeat) with your sunshower cotton yarn about 7″ x 60″. do you think that would be a good yarn to use and can you help me figure out how much yarn i will need? thanks, deborah
Hi Deborah,
That sounds like a fun project! Sunshower Cotton would be a good yarn for it, but it’s very difficult for us to give an accurate estimate for a project like this, since we haven’t designed any similar ones in Sunshower Cotton yet. However, I’d say that 3 skeins of each color (so, 6 skeins total) would be a safe rough estimate.
I also wanted to let you know that we accept returns of skeins in their original condition. So if you purchase 6 skeins, I’d recommend only winding each one until you’re certain you need to use it. That way, you can return any left over ones for store credit if you don’t end up using them!
All the best,
Lili
I love this way of double knitting set out in your tutorial. However, I would love to know/see how actual color work is done with this technique. It’s easy to understand with both yarns moving in the same direction, however, I don’t see how color work can be done this way. Please help me out. Thank you!
Hi Janey,
Thanks for reaching out. Your observation is correct! With this method of double knitting, you won’t be able to make any designs with the two colors in the body of the knit fabric. If that’s a technique that you’re hoping to try out, I’d recommend using the other style of double knitting, where you bring both strands of yarn along on each row. While we don’t have a tutorial for this style, there are plenty of great videos and instructions on the internet, if you want to see it in action!
All the best,
Lili
I am making the double knitting blanket. I have a question related to # of stitches to cast on . If I want to add 20 stitches for width do I add 20 +7 then double it or do I add 20+14 then double it ? I am confused as to the +7. Is it with each 10 stitch increase or just once? What would the final # of stitches be with a 20 stitch increase. Thank you for your help. Katy
Hi Katy,
Thanks for reaching out! If you want to add 20 stitches to the Double Knit Blanket, all you’d actually need to do is add 40 stitches to the original cast-on number, bringing it up from 294 (414) stitches to 334 (454) stitches. That’s because half of these stitches end up as the front layer, and the other half end up as the back layer! So with the additional 40 stitches, you’d really only be adding 20 additional stitches to either side, making the full blanket 20 stitches wider. Hope this helps!
All the best,
Lili
Hi
Am I missing something? I am trying to find the pattern for the double sided blanket.
Thank you,
Kimberly
Hi Kimberly,
Thank you for writing in! You can find the Double Knit Blanket Pattern here! I hope this helps but please let me know if you have any other questions!
Happy knitting,
Gavriella