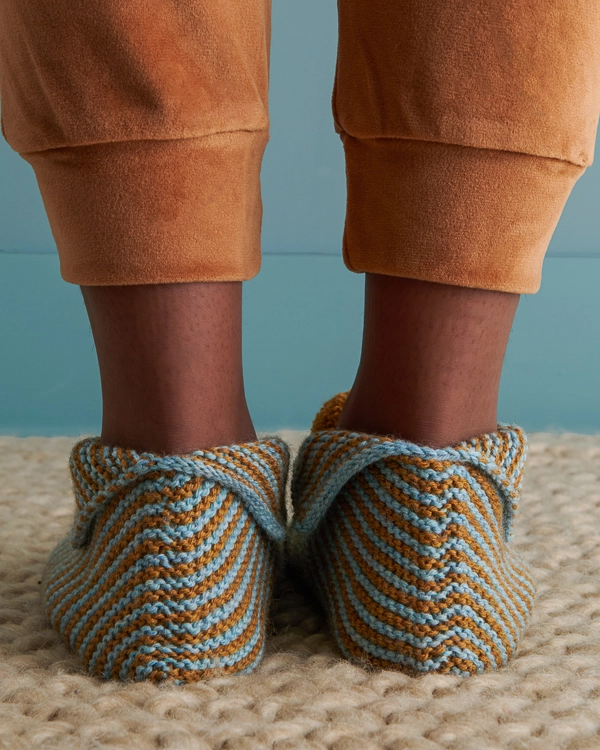
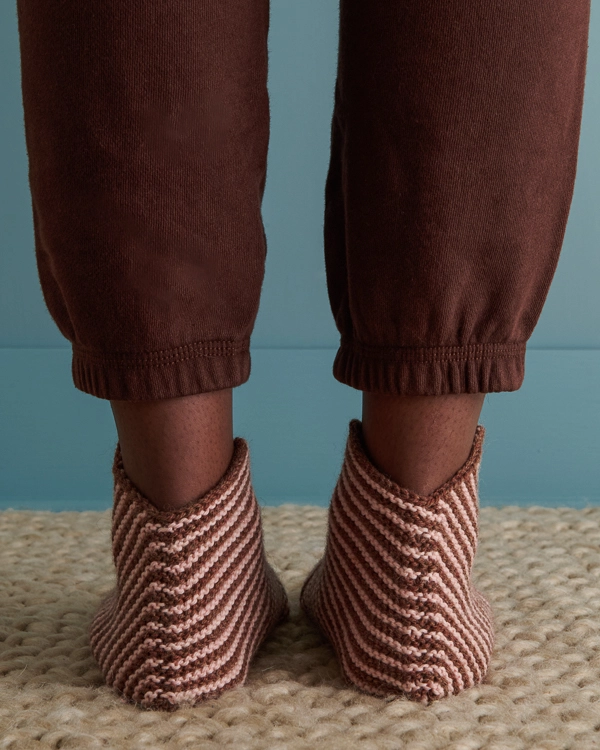

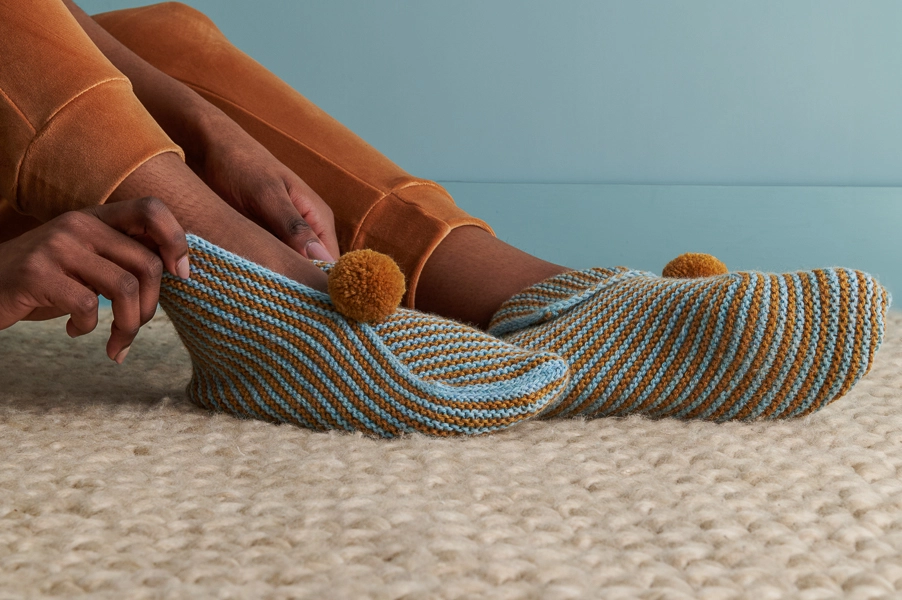
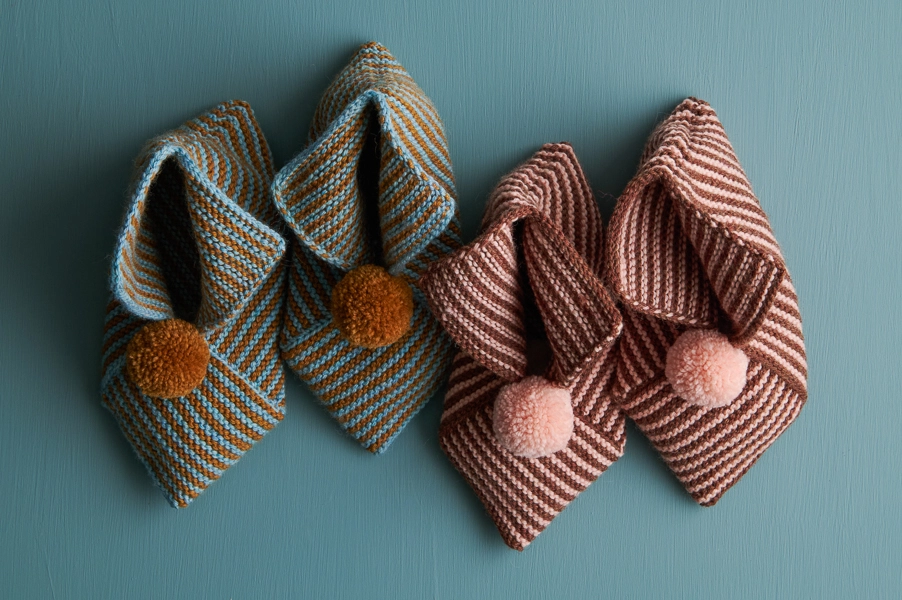
Knit + Fold Slippers
Our free Knit + Fold Slippers pattern is a delightful surprise from start to finish! Knit a seemingly enigmatic flat shape and then—like magic—fold it up to create the cutest, cleverest slippers you can imagine. It’s just the right project to play with Knitting Yarn, our tried, true, and trusted DK-weight merino yarn.
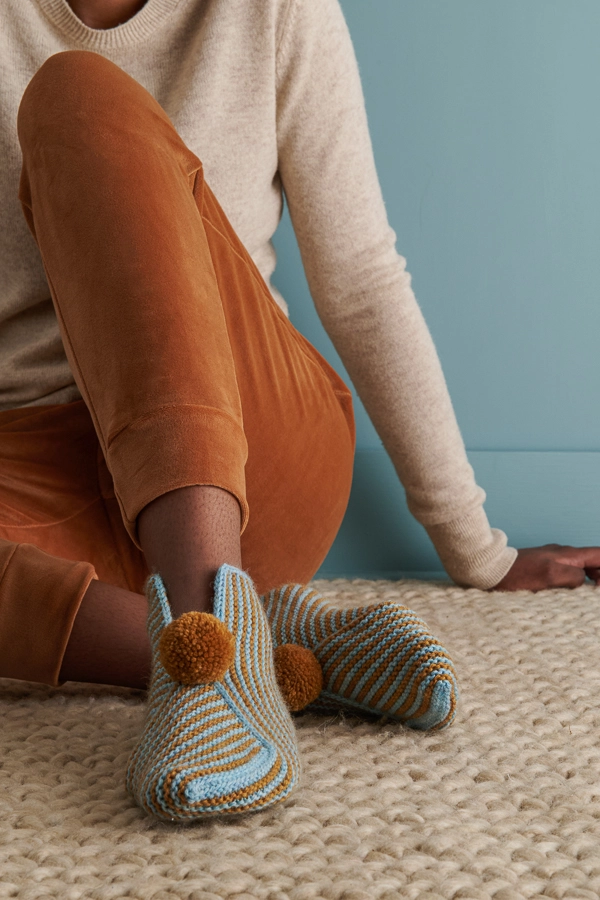
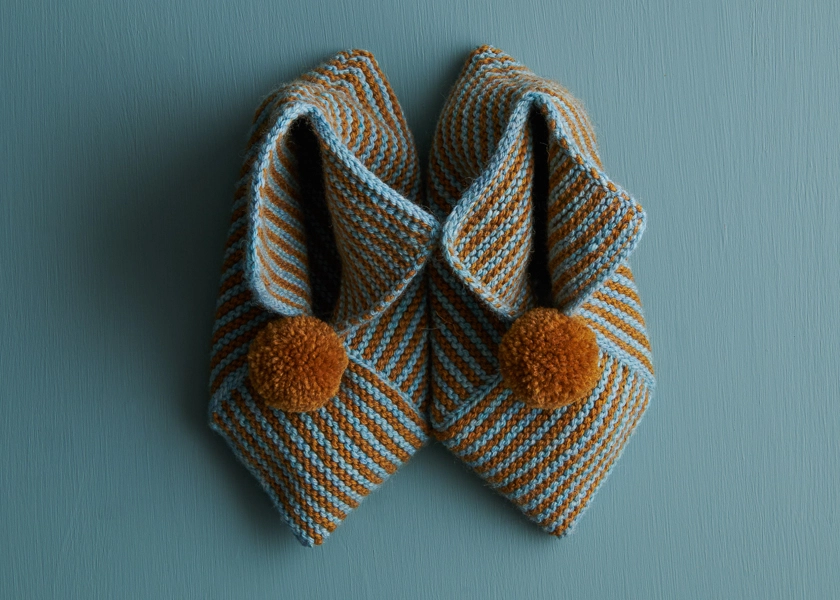
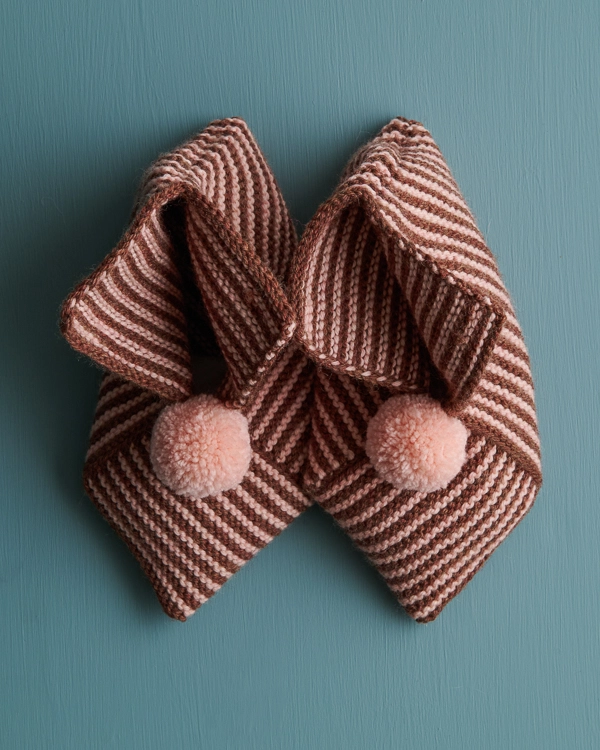
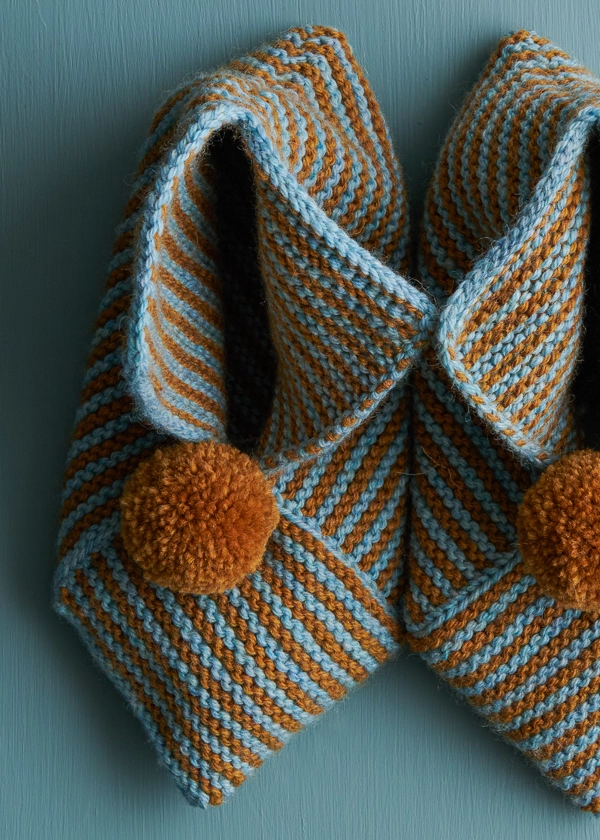
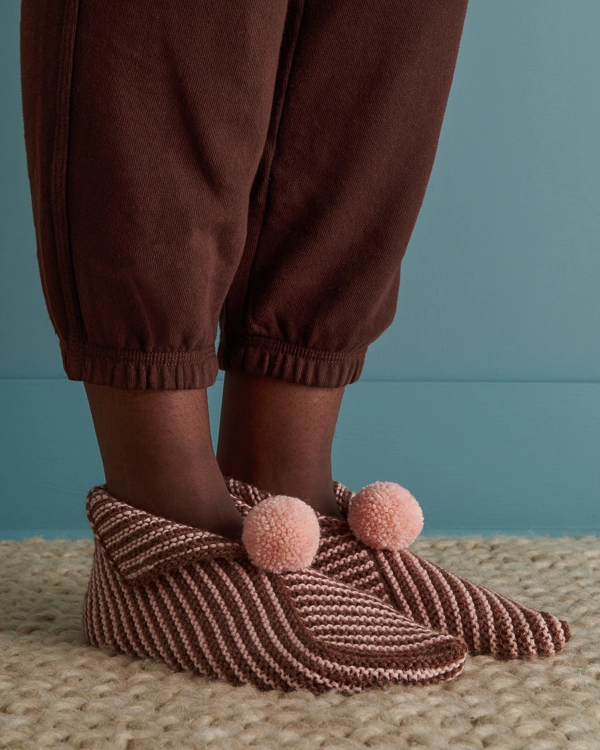
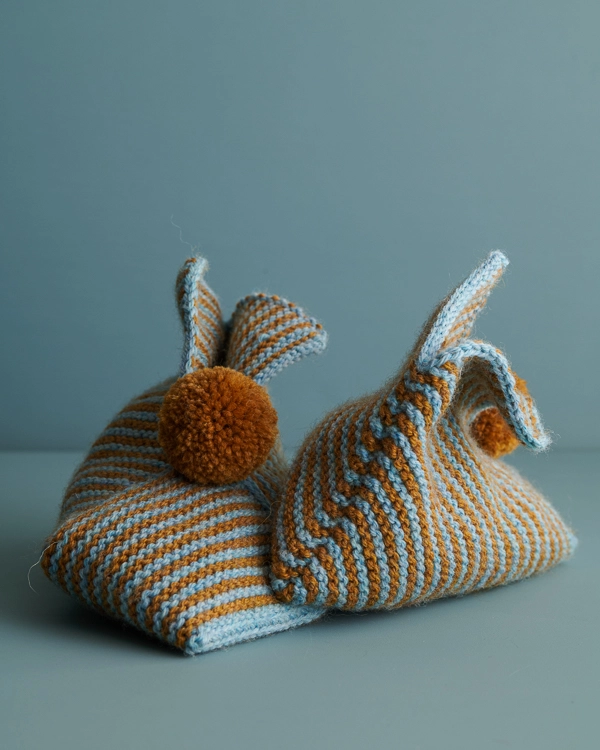
Stretchy striped garter stitch and easy decreases are the only stitches you need to knit your slippers, and the three-dimensional shape is secured with just a few easy seams. So satisfying and we have tutorials and detailed photos to make every step a snap!
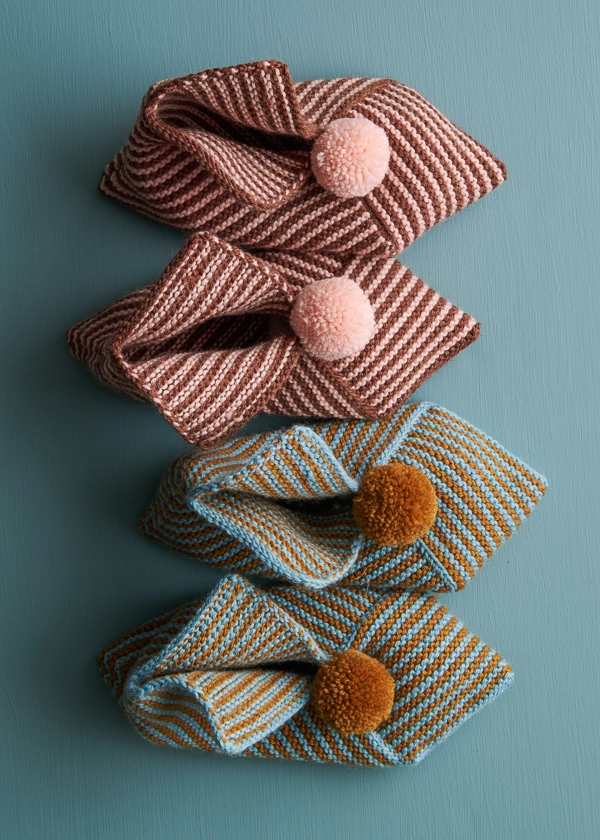
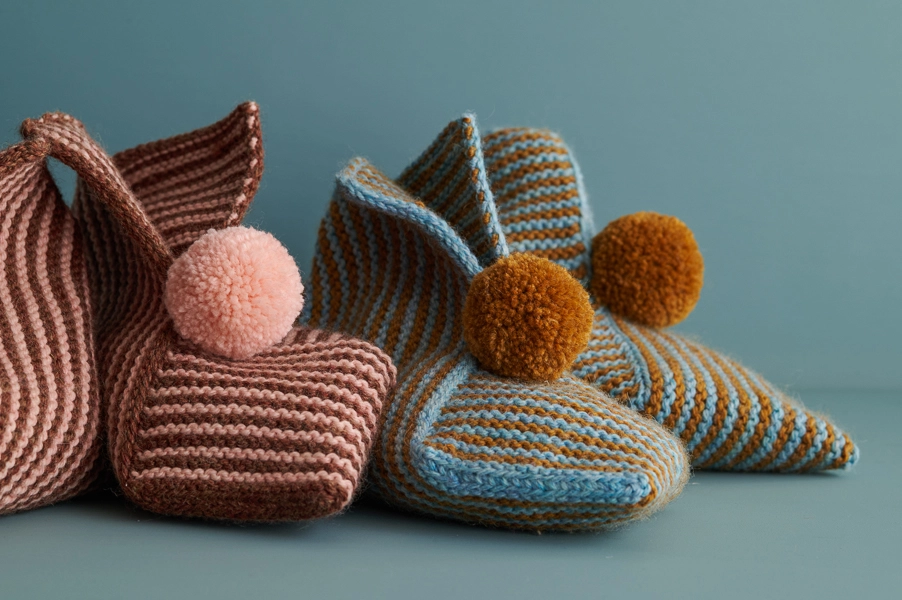
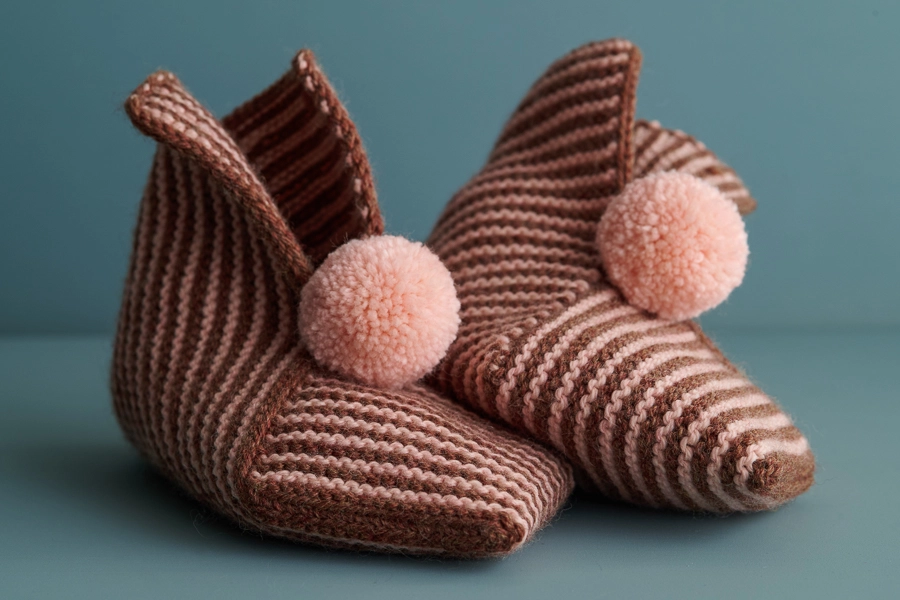
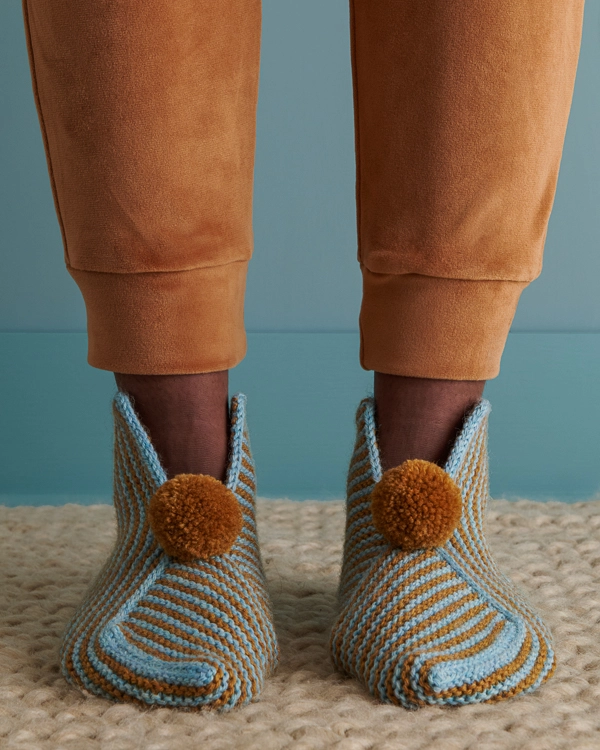
Generous cuffs keep your ankles toasty, and cheery pom poms add a whimsical finish to these incredibly adorable slippers!

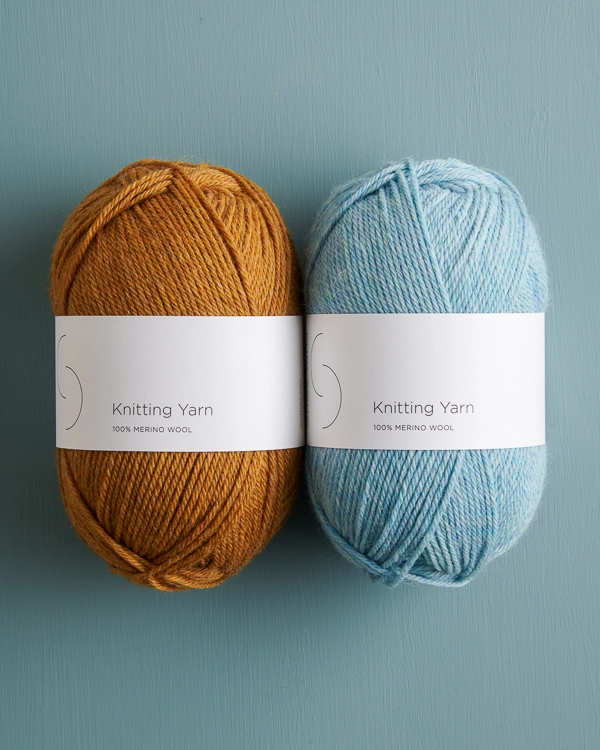
Our classic DK-weight Knitting Yarn, in springy 100% merino wool, is the perfect pick for warm and cozy slippers. We went down a few needle sizes from Knitting Yarn’s usual gauge to make a dense fabric that stretches beautifully to hug your foot.
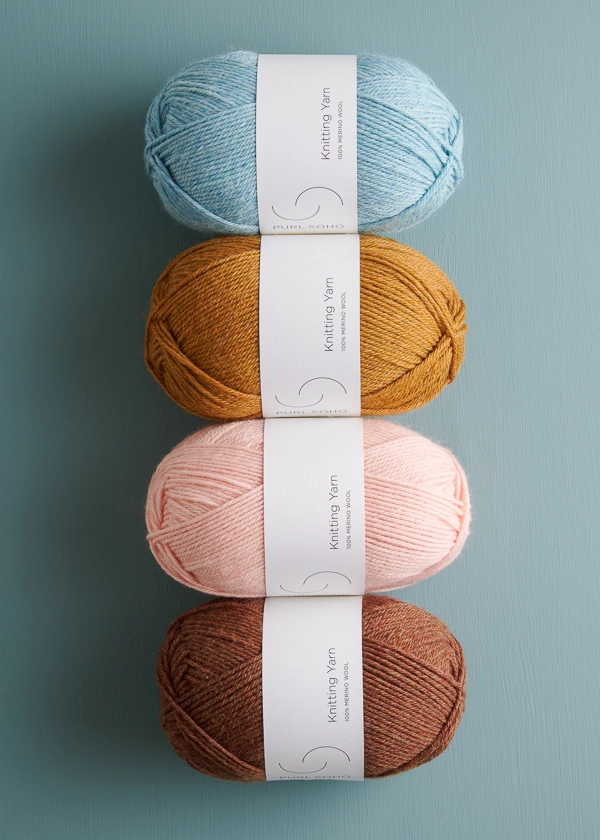
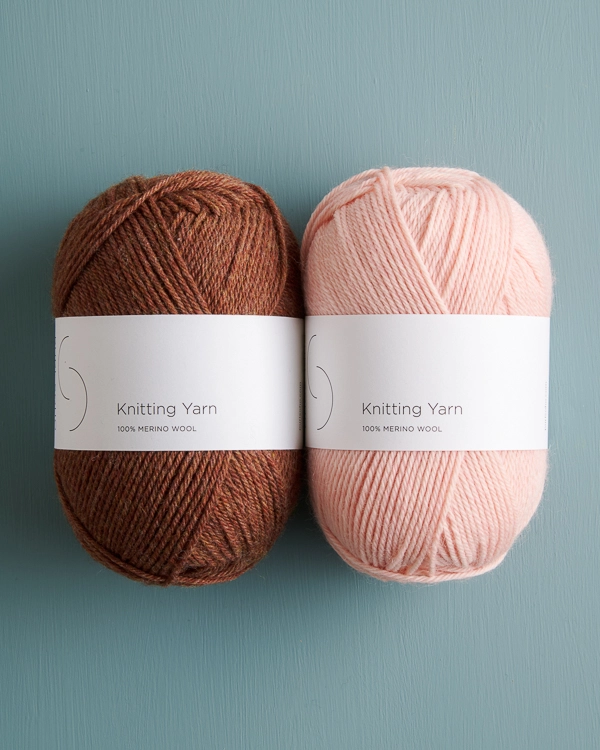
Pick two colors from Knitting Yarn’s huge palette, newly expanded to 37 colors with the addition of 13 brand-new ones. For our Knit + Fold Slippers, we played with newbies Spring Sky, Golden Raisin, and Petal Pink, as well as perennial favorite Acorn Brown.
Our generous, ready-to-knit balls of Knitting Yarn have plenty of yardage. You only need one ball of each color to make any of nine sizes, from baby to adult, including the pom poms!
Perfect for gifting or keeping your own feet warm for the rest of winter, pick two colors that sing and whip up a winsome pair of Knit + Fold Slippers!
Yarn lovers, if you adore the yarn used in this project, you’ll love exploring all of our other yarn collections! Discover over 45 thoughtfully designed yarns in nearly every natural fiber and in every spectacular color you can imagine. Only available here at Purl Soho’s online yarn store, where every skein is created with care and your creativity in mind!
Designed by Purl Soho designer, Hiromi Glover. See even more of Hiromi’s work on her Instagram!
Share your progress and connect with the community by tagging your pics with #PurlSoho. We can’t wait to see what you make!
Want to print this pattern? On desktop, find the “print” icon in the right margin, and on mobile, scroll to the end of the pattern for it. Use the on-screen instructions to remove anything you don’t want to print!
Materials

- Purl Soho’s Knitting Yarn, 100% merino wool. Each ball of this light worsted/DK-weight yarn is approximately 219 yards/ 100 grams.
- Color A: 1 ball; approximately 25 (40, 55, 70, 90) (115, 140, 170, 200) total yards required. We used Spring Sky for one set and Acorn Brown for the other.
- Color B: 1 ball; approximately 60 (75, 85, 105, 120) (145, 165, 195, 219) total yards required. We used Golden Raisin with Spring Sky and Petal Pink with Acorn Brown.
- US 3 (3.25 mm), 20-inch circular knitting needles
- 5 removable stitch markers
- Optional: Purl Soho’s Pom Pom Maker Set, Small + Large size
GAUGE
24 stitches and 48 rows = 4 inches in garter stitch
SIZES
Baby (Toddler Small, Toddler Large, Little Kid, Big Kid) (Adult Small, Adult Medium, Adult Large, Adult Extra Large)
To fit actual foot length of 4–4½ (4½–5½, 5½–6½, 6½–7½, 7½–8½) (8½–9½, 9½–10½, 10½–11¼, 11¼–12¼) inches with 0 to 1 inch(es) of negative ease
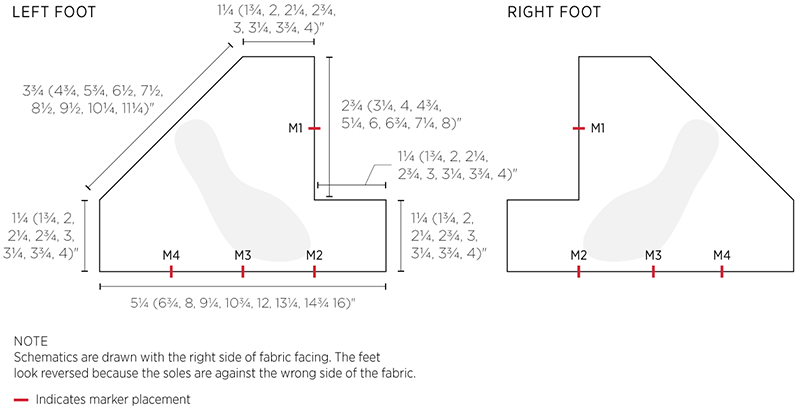
- Finished Foot Length: 3¾ (4¾, 5¾, 6½, 7½) (8½, 9½, 10¼, 11¼) inches
- Finished Foot Width: 2 (2¼, 2¾, 3¼, 3¾) (4¼, 4¾, 5¼, 5¾) inches
Samples: We knit the Adult Medium size, worn on a women’s US 8 size foot.
NOTE: Want to see this schematic bigger? Click here!
NOTES
CONSTRUCTION
You will knit each slipper flat, shaping the piece with simple decreases and binding offs. Then, you will fold each slipper and seam corresponding edges together to create a three-dimensional slipper.
GARTER RIDGE
A “garter ridge” equals two rows of garter stitch. It looks like a prominent horizontal ridge and is an easy way to count rows!
CARRYING UP YARN
When changing colors, do not cut the yarns, but carry the non-working yarn up the selvage. To do this, simply hold the yarn you just used in front of the new yarn as you knit the first stitch of the row.
PATTERN
NOTE: Work this pattern twice, once following instructions for the Left Foot and once following instructions for the Right Foot.
FLAT SECTION: BOTH FEET
With Color A, cast on 32 (40, 48, 56, 64) (72, 80, 88, 96) stitches. We used a basic Long Tail Cast On.
Set-Up Row (wrong side): With Color A, knit to end of row.
NOTE: Place a removable stitch marker or piece of scrap yarn on Row 1 to indicate right side.
Carrying the non-working yarn up the selvage at color changes (see Notes)…
Rows 1 and 2: With Color B, knit to end of row.
Rows 3 and 4: With Color A, knit to end of row.
Repeat Rows 1–4 two (3, 4, 5, 6) (7, 8, 9, 10) more times, then repeat Rows 1 and 2 one more time. [8 (10, 12, 14, 16) (18, 20, 22, 24) total garter ridges]
DECREASE SECTION
LEFT FOOT ONLY
Cut Color B.
Row 1 (right side): With Color A, bind off 8 (10, 12, 14, 16) (18, 20, 22, 24) stitches knitwise, knit to last 3 stitches, knit two together (k2tog), k1. [23 (29, 35, 41, 47) (53, 59, 65, 71) stitches remain]
Row 2 (wrong side): Knit to end of row.
Rejoin Color B, ready to work a right-side row.
Row 3: With Color B, knit to last 3 stitches, k2tog, k1. [1 stitch decreased]
Row 4: With Color B, knit to end of row.
Row 5: With Color A, knit to last 3 stitches, k2tog, k1. [1 stitch decreased]
Row 6: With Color A, knit to end of row.
Repeat Rows 3–6 six (8, 10, 12, 14) (16, 18, 20, 22) more times, then repeat Rows 3 and 4 one more time. [8 (10, 12, 14, 16) (18, 20, 22, 24) stitches remain]
Cut Color B.
With right side facing you and Color A, bind off knitwise.
Cut Color A, leaving a tail 8 (8, 9, 9, 10) (10, 11, 12, 12) inches long for seaming.
Go on to Finishing, below.
RIGHT FOOT ONLY
Row 1 (right side): With Color A, k1, slip slip knit (ssk), knit to last 8 (10, 12, 14, 16) (18, 20, 22, 24) stitches, bind off knitwise to end of row. [23 (29, 35, 41, 47) (53, 59, 65, 71) stitches remain]
Cut Color A.
Re-join Color A to remaining stitches, ready to work a wrong-side row.
Row 2 (wrong side): With Color A, knit to end of row.
Row 3: With Color B, k1, ssk, knit to end of row. [1 stitch decreased]
Row 4: With Color B, knit to end of row.
Row 5: With Color A, k1, ssk, knit to end of row. [1 stitch decreased]
Row 6: With Color A, knit to end of row.
Repeat Rows 3–6 six (8, 10, 12, 14) (16, 18, 20, 22) more times, then repeat Rows 3 and 4 one more time. [8 (10, 12, 14, 16) (18, 20, 22, 24) stitches remain]
Cut Color B.
With right side facing you and Color A, bind off knitwise.
Cut Color A.
Go on to Finishing.
FINISHING
WEAVE IN ENDS + BLOCK
Weave in all ends, except for long tail on Left Foot. Wet block to the dimensions in the schematic.
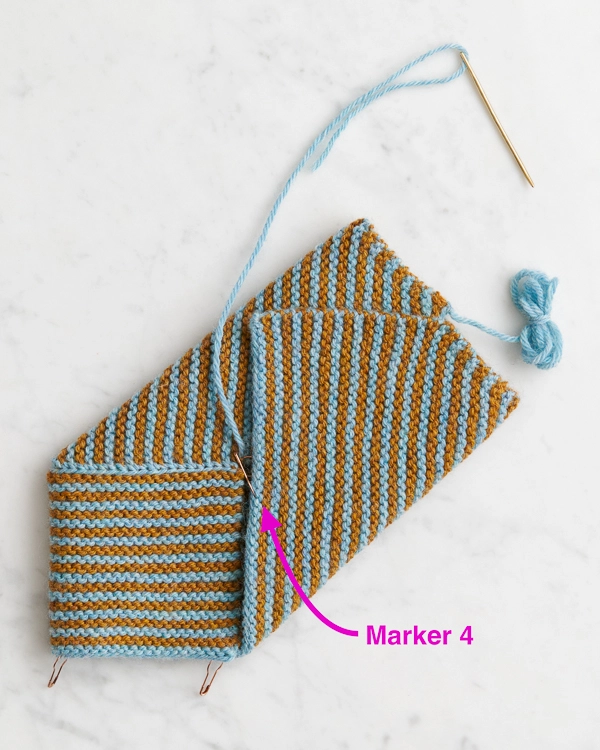
SEAMING: LEFT FOOT
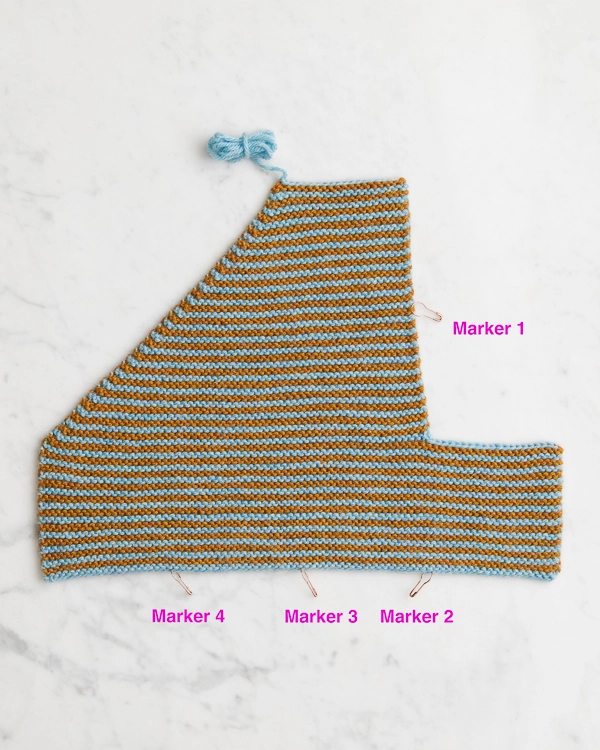
With right side facing you and cast-on edge at the bottom, count from the top right corner down and place a removable marker on the 8th (10th, 12th, 14th, 16th) (18th, 20th, 22nd, 24th) garter ridge along the right selvage edge and mentally label this Marker 1, then place a removable marker on every 8th (10th, 12th, 14th, 16th) (18th, 20th, 22nd, 24th) stitch along the cast-on edge and mentally label them from right to left Markers 2, 3, and 4. [4 markers placed]
Turn piece over so wrong side is facing you.
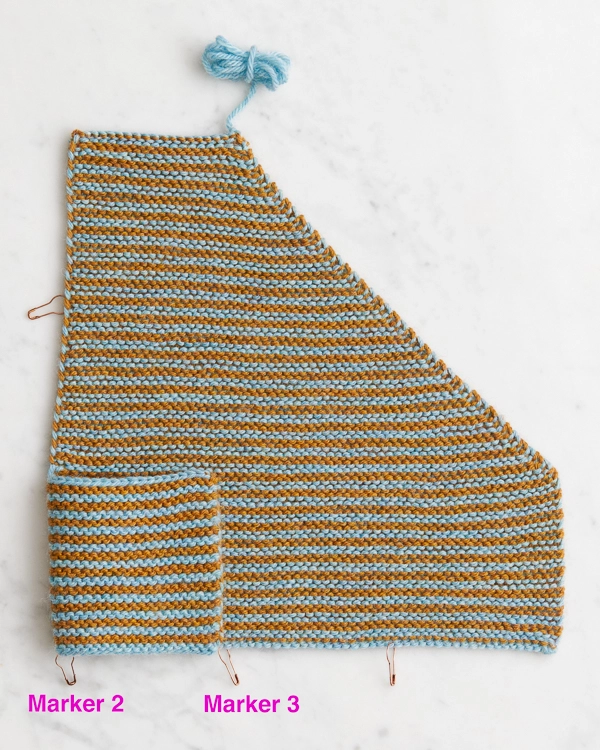
Fold the bottom left corner to the right until it meets Marker 3 along the cast-on edge, with the fold at Marker 2 and the cast-on edges aligned, as shown above.
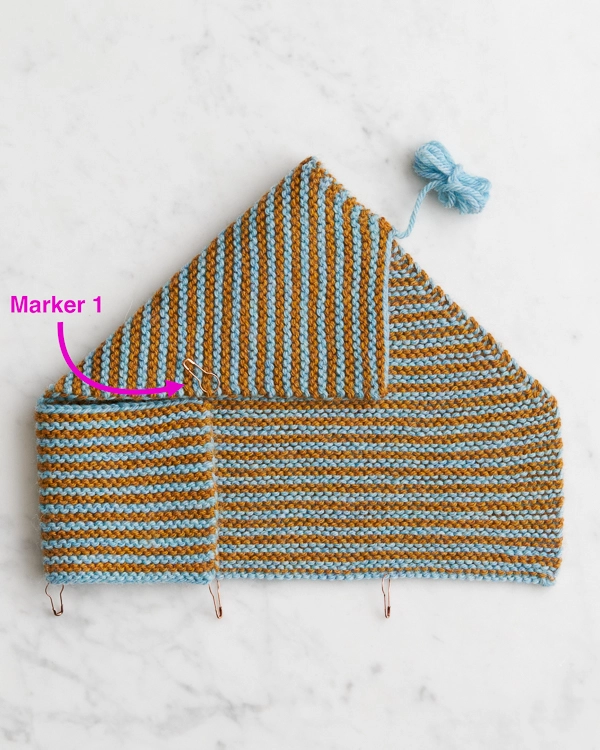
Fold the top of the piece down so the left selvage edge aligns with the short bind-off edge (Marker 1 should meet the first bound-off stitch), as shown above.
With a new 1 (1, 1, 1½, 1½) (1½, 2, 2, 2) foot long piece of Color A and working from left to right, use a whipstitch to seam from the fold to Marker 1 (as indicated by arrow in photo above).
Note: For help with seaming, visit our Whipstitch Tutorial.
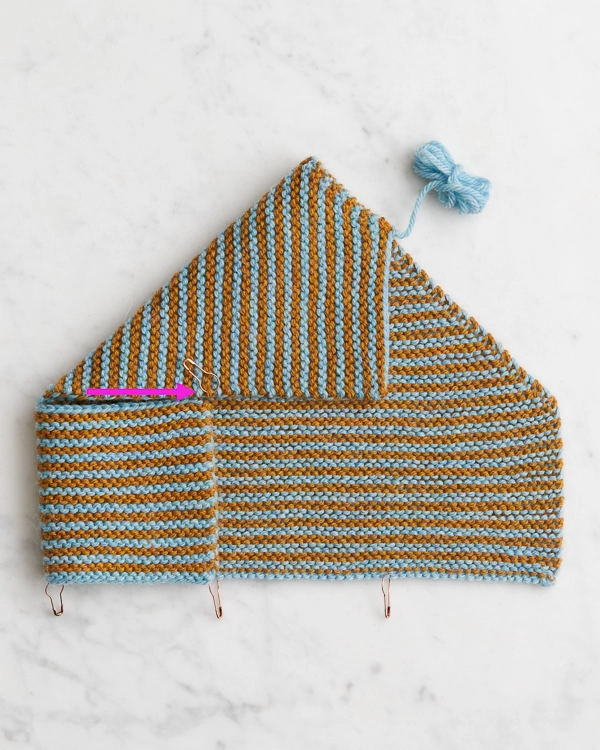
Do not cut yarn.
Now fold the bottom right corner up so Marker 4 meets the end of the seam you just worked, as shown above.
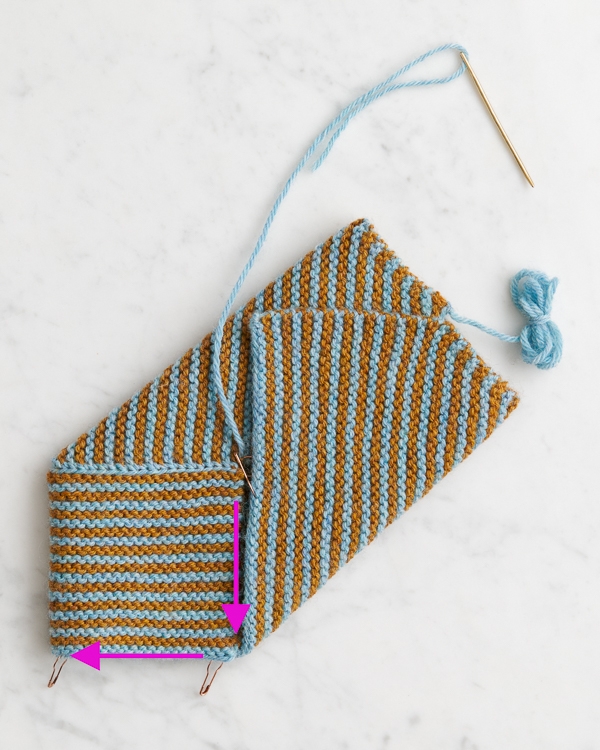
Continuing with the same yarn used for the previous seam, use a whipstitch to seam from Marker 4 to Marker 3 (see down-pointing arrow, above), then continue along the bottom edge from right to left, seaming the cast-on edges together from Marker 3 to Marker 2 (see left-pointing arrow, above).
Remove all markers.
Go on to Seaming: Both Feet, below.
SEAMING: RIGHT FOOT
NOTE: The Right Foot is worked in the same manner as the Left Foot, but opposite!
With right side facing you and cast-on edge at the bottom, count from the top left corner down and place a removable marker on the 8th (10th, 12th, 14th, 16th) (18th, 20th, 22nd, 24th) garter ridge along the left selvage edge and “label” this Marker 1, then place a removable marker at every 8th (10th, 12th, 14th, 16th) (18th, 20th, 22nd, 24th) stitch along cast-on edge and “label” them from left to right Markers 2, 3, and 4. [4 markers placed]
Turn piece over so wrong side is facing you.
Fold the bottom right corner to the left until it meets Marker 3 along the cast-on edge, with the fold at Marker 2 and the cast-on edges aligned.
Fold the top of the piece down so the right selvage edge aligns with the short bind-off edge (Marker 1 should meet the first bound-off stitch).
With a new 1 (1, 1, 1½, 1½) (1½, 2, 2, 2) foot long piece of Color A and working from right to left, use a whipstitch to seam from the fold to Marker 1.
Do not cut yarn.
Fold the bottom left corner up so Marker 4 meets the end of the seam you just worked.
Continuing with the same yarn used for the previous seam, use a whipstitch to seam from Marker 4 to Marker 3, then continue along the bottom edge from left to right, seaming the cast-on edges together from Marker 3 to Marker 2.
Remove all markers.
Go on to Seaming: Both Feet.
SEAMING: BOTH FEET
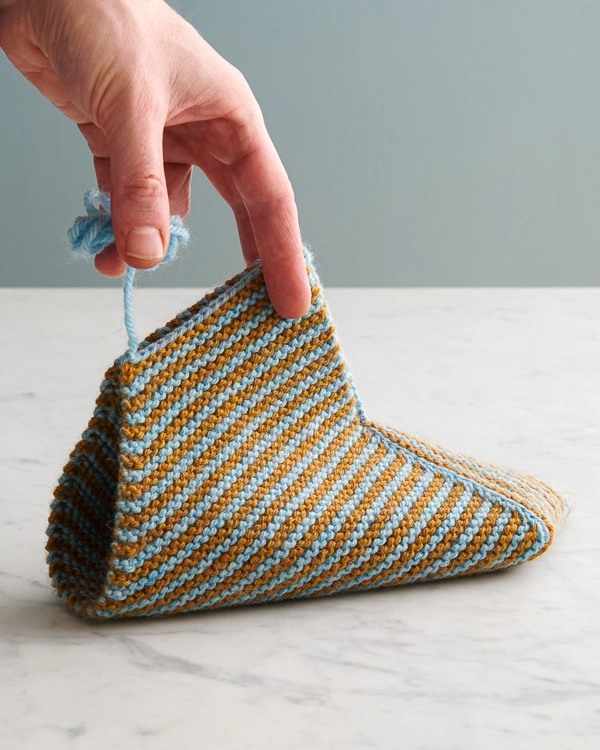
Now situate the slipper by holding the diagonal flaps together. The top of the foot is the diamond shape you just created with seaming, the sole is on the floor, and the back heel is still open, as shown above.
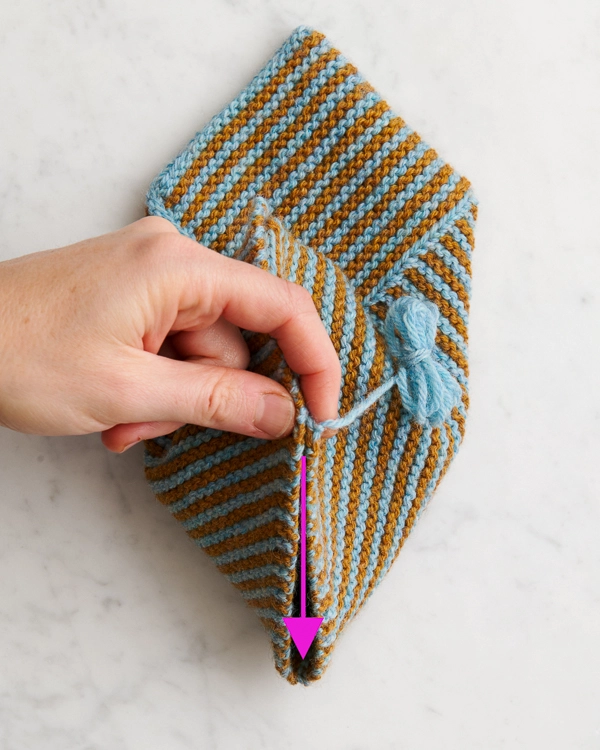
With long tail for Left Foot or a new 1 (1, 1, 1, 1) (1½, 1½, 2, 2) foot long piece of Color A for Right Foot, working from top down, seam the back edges together (as indicated by arrow, above).
NOTE: For help with seaming garter stitch, visit our Seaming Garter Stitch Tutorial.
WORK CUFF EDGING
NOTE: For help picking up stitches, please visit our Picking Up Stitches Tutorial and scroll down to the Along A Horizontal Edge video and also the Along A Vertical Edge: Garter Stitch, Between The Ridges step-by-step photos.
With Color A and starting at front center, pick up and bind off stitches around the entire ankle opening, working up the right front edge of the ankle (as worn), then down the right back edge to the back seam, then up the left back edge, and down the left front edge to front center. Pick up one stitch for every stitch along cast on/bind off edges and one stitch between every garter ridge along selvage edges (or into the carried-up yarn along color-change edges).
Here’s how…
Pick up and knit into first right front edge stitch/row, *pick up and knit into next edge stitch/row, pass first stitch over second stitch to bind off, repeat from * around entire ankle opening.
Weave in all remaining ends.
Do the same for the other slipper.
POM POMS
MAKE POM POM
If you’re using Purl Soho’s Pom Pom Maker Set, use the Small Pom Pom Maker and the 1½-inch Trim Guide to make a pom pom with your leftover Color B yarn. Follow the basic instructions for a Solid Pom Pom found in our Pom Pom Tutorial.
ATTACH POM POM
Thread each pom pom tail separately through front center of Cuff Edging to inside of slipper. Tie the tails into a knot, thread the tails back through the slipper and up through the pom pom itself, and trim them flush with the pom pom.
Do the same for the other slipper and you’re done!
Learn About Knitting Yarn + All Our Beautiful Yarns
A true classic loved by knitters and crocheters alike, Knitting Yarn brings its crisp stitch definition, soft strength, and cushiony feel to this project! Made with 100% New Zealand merino wool, Knitting Yarn is a light worsted/DK-weight yarn in a ready-to-knit ball you’ll love to knit from. Simple stitches, dimensional textures, beautifully articulated cables, and glorious colorwork… Everything looks amazing in Knitting Yarn! Making something big, like a blanket or sweater? Shop our 1000-gram Knitting Yarn On A Cone collection, too!
More Free Knitting Patterns
- Be sure to explore our collection of (mostly free!) Knitting Yarn knitting patterns and cast on!
More Light Worsted/DK-Weight Yarns
- Shop our entire collection of light worsted/DK-weight yarns (What does DK-weight yarn mean, really? Our guide to DK yarn will answer your questions and demystify.)
- If you want to use a different yarn, be sure to take the time to get the correct gauge. Need help? Check our All About Gauge Tutorial!
More Yarns With Similar Fiber
- Shop merino wool yarn
Looking for more inspiration? Explore all of our free knitting patterns and knitting tutorials, buy one of our many knitting kits and yarn bundles, and shop for beautiful yarn. We have over 35 gorgeous natural fiber yarns in 100’s of magnificent colors, designed to bring integrity, beauty, and joy to your next knitting project and only available at Purl Soho!


Aren’t they cute
Can these be knitted on straight needles?
Hi Mobi,
That will depend on what size you’re making! For the smaller sizes, the finished width is definitely narrow enough to fit on standard straight needles without risk of the stitches falling off. For the larger sizes though, you’ll either need to use extra long straight needles, or circular needles, to make sure all the stitches fit at once!
All the best,
Lili
These are absolutely darling. However, non-slip is a must in my experience. How best could these have the non-slip incorporated?
Hi Annette,
Thanks for writing in! We recommend using tacky glue if you want to add traction to the bottom of your slippers!
All the best,
Lili
I there anything available to put on the bottom so they don’t slip on hard wood floors?
Hi Joan,
Thanks for writing in! We recommend using tacky glue if you want to add traction to the bottom of your slippers!
All the best,
Lili
I’m a bit confused on the sizing. I think you mean for the Big Kid size to be included with the parentheses with the other kid sizes? It looks like it is included with the adult sizing.
Hi Linda,
You’re absolutely correct, the Big Kid size should have been included in the other set of parentheses! We just caught this typo a few days ago, and our design team has updated it on the pattern page!
All the best,
Lili
I’m on the decrease section for left foot only and for row 4 it says to knit with color b which is a right side row and then row five is a wrong side row and they want me to start with color a I think row four should be color a but could somebody clarify that for me
Hi Diana,
Thanks for writing in! Row 4 is actually a wrong side row. It sounds like you may have skipped over Row 3, which is a right side row, knit with Color B!
All the best,
Lili
Adorable! Any chance of showing a photo of the smallest baby size with pom pom? Im wondering how that looks because it seems like it would overwhelm a tiny slipper. What size pom pom do you suggest?
(Your ideas and photos are fabulous!)
Hi Irene,
Thanks for writing in! I’m afraid that we did not knit up a sample in the smallest size. But you can absolutely make a smaller pom pom if you want! The smallest trim guide in our Pom Pom Maker Set is 1 inch, but you can certainly trim it down even further if necessary.
All the best,
Lili
How do I buy this pattern?
Hi Claudia,
This is actually a free pattern–no purchase necessary! You can find the pattern instructions on this page.
All the best,
Lili
Where can i find a good translation in German?
Hi Christine,
We’re so sorry to share that we’re currently unable to offer our patterns in German, but we recommend using tools like Google Translate to translate the patterns you purchased. In case it helps, there should be an option in Google Translate to upload an entire PDF to be translated as well.
Please don’t hesitate to email us at [email protected] if you have any other questions. We’re very happy to help!
All the best,
Lili
Is there a video for the seaming? Spent hours trying to figure this out.
Hi Vanessa,
We do indeed have two tutorials showing the two seaming techniques used in this pattern! You can find them at the links below:
Whipstitch
Seaming Garter Stitch
I hope these tutorials are useful, but please let me know if you have any other questions!
All the best,
Lili
Is there some way to make the pattern printer-friendly? I get either 40 pages or 28 pages when I try to print off the website. Please help!
Hi Ellen,
Thanks for writing in! I would recommend using the “print” function on our website to make a printer friendly version of any of our free pattern pages. Here’s how to do that: If you’re on your computer, you’ll find a “print” icon in the right column just below the “Save To Favorites” button. If you’re on a mobile version of the site, you will find the “print” icon below the pattern and above the comments.
Click on this button, and a window will pop up where you can delete whichever parts of the pattern you don’t want to print. When you hover over any image or a text block, it will be highlighted in yellow and a “trash” icon will appear. Just click on this icon to delete anything that’s not necessary to the pattern! For example, you may decide to shorten the pattern by omitting certain images or the list of materials. Then, just click on the “Print” button in the upper left-hand corner of the pop-up window!
As a heads up though, this pattern includes a lot of really helpful pictures, since there’s an entire photo tutorial on how to seam the slippers. If you choose to keep those pictures in the document, it may still end up being pretty long. But if you feel confident in your seaming skills, then you could totally omit them in order to save space!
All the best,
Lili
Thank you! Worked great! Can’t wait to knit these little beauties!
Hello! What a fun pattern, I’m already casting on for my gauge swatch. Is the gauge swatch referenced blocked or unblocked? Also, have the slippers been blocked in the photo? Just want to be sure as garter grows a lot! Thank you
Hello,
Thanks for writing in! Our gauge measurements were taken after blocking the swatch, and our samples were blocked as well!
All the best,
Lili
Hi! I’m having trouble with knitting the first section before binding off. For Big Kid, I counted that I need to knit 27 rows total (1 set up + 26 rows). This would mean I would have 13 garter ridges or 14 depending on which side is facing me. However, the pattern states I’m supposed to have 16 garter ridges. Am I misunderstanding something? Which side should I reference when counting garter ridges? Thanks!
Hello,
Thanks for writing in! For the Big Kid size, you’ll actually end up knitting 32 total rows. Here’s how that works out:
Cast-on and Set-Up Row = 2 rows
Rows 1 and 2 = 2 rows
Rows 3 and 4 = 2 rows
Repeat Rows 1 – 4 six more times = 24 rows
Work Rows 1 and 2 one more time = 2 rows
That all adds up to 32, which results in 16 garter ridges!
All the best,
Lili
Thanks Lili! I ended realizing the pattern says “more times” than “in total” so I was able to figure this one out soon after. Thanks for being responsive!
Hi there. Thanks for this adorable pattern! My sister is going to LOVE these! I’m hoping you can help me figure out how to adjust the sizing per my gauge swatch. Even going down to a size 2 needle, I’m still only getting 20 stitches x 38 rows per 4”. I’m a Continental knitter but I don’t usually have so much trouble reaching gauge (I’m using your suggested Knitting Yarn and yes, I blocked and fully dried my swatch). But unlike a sweater pattern where I can usually pretty easily adjust based on the measurements of the finished piece in the instructions, I cannot seem to figure out what measurement on your instructions to use! I am knitting for a 9.5” foot length. With my gauge, I’m getting 5 stitches per inch and 9.5 rows per inch. Thanks in advance for helping me figure out which size I should be following. Sometimes math is hard! Maybe I just need another cup of tea first?
Hi Julia,
I’m so sorry that you’re having trouble matching the gauge of this pattern! It sounds like you’re aiming for the Adult Medium size, so I would recommend knitting either the Toddler Large or Little Kid size to best match the original size at a different gauge. The way I figured that out is by first multiplying the number of stitches per inch (5 stitches, according to your gauge) by the length of the cast-on edge of the Adult Medium size (10.25 inches). That came to 51.25. I then compared that number to the cast-on numbers of each size (32 (40, 48, 56, 64) (72, 80, 88, 96) stitches), and it came closest to 48 and 56. Either of those sizes will get you close to the Adult Medium size at your gauge! You could even go back up to size US 3 needles (and therefore a slightly larger gauge) to make the smaller size work even better.
All the best,
Lili
thanks so much, Lili. I appreciate you!
I think I know the answer to this, having already knitted up a few of these, but is there a way to alter the pattern or assembly for fairly narrow feet? I knit the adult small and the length is great, but they’re way too wide for me and my feet slip around inside them. Given the way they’re folded and assembled, I’m not sure the math would work out for rearranging the pattern, and I might have to just do some sketching and playing with dimensions, but I thought I’d ask. Love the pattern! My kids have already requested several different colors!
Hi Emily,
I’m afraid that a modification like that would be very involved, but I’m glad that you feel up for the challenge! As you mentioned, sketching and playing with dimensions should be very helpful, and we’re eager to hear about what you end up doing!
All the best,
Lili
May I ask for some clarification on what it means to x
“Cut color” and then rejoin it later?
Is this actually cutting the color B, leaving a tail to weave in later, and then starting with a new end of that color when it says to rejoin?
It sounds obvious enough but I have learned so never assume a term means the same thing in life that it does in a craft or art!
Hi Devan,
Yes, that’s correct! You’ll cut Color B, leaving a tail to weave in later, and then just start knitting with the remaining ball of yarn when the pattern says to rejoin the color. Hope this helps clarify things!
All the best,
Lili
This is such a fun pattern! I wonder if it would be possible to knit it in Novella, using just one color but letting it self stripe?
Hi Debby,
Using Novella for these would be so awesome! Novella is a bit thinner than Knitting Yarn since it’s a sportweight yarn, but the gauge of this pattern is on the tight side, so you should be able to achieve it with Novella. Please let us know if you try this–we’d love to see a photo of your finished slippers!
All the best,
Lili
Great, will do! Thanks!
Such a fun pattern and I loved knitting up a pair! One thing that I would recommend to note in the pattern – although it might be obvious to everyone but me – when you weave in the ends on the wrong side around the ankle, make sure you do it as invisible as possible because that area will show when you are wearing them. I didn’t think about it until after I was done.
Hi Ellen,
That’s a great tip! You could also weave in those ends on the right side of the fabric, since it will be folded over to show the wrong side at that spot and hide anything on the right side.
All the best,
Lili