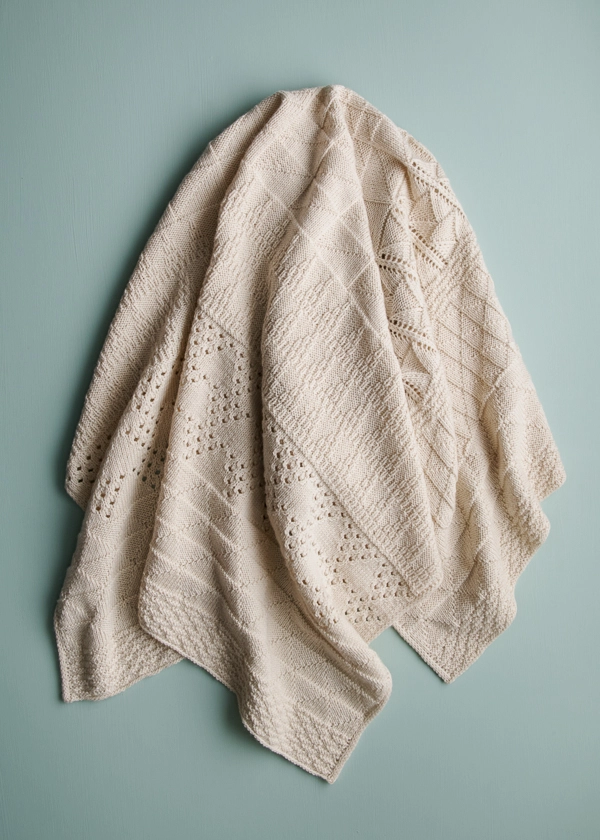
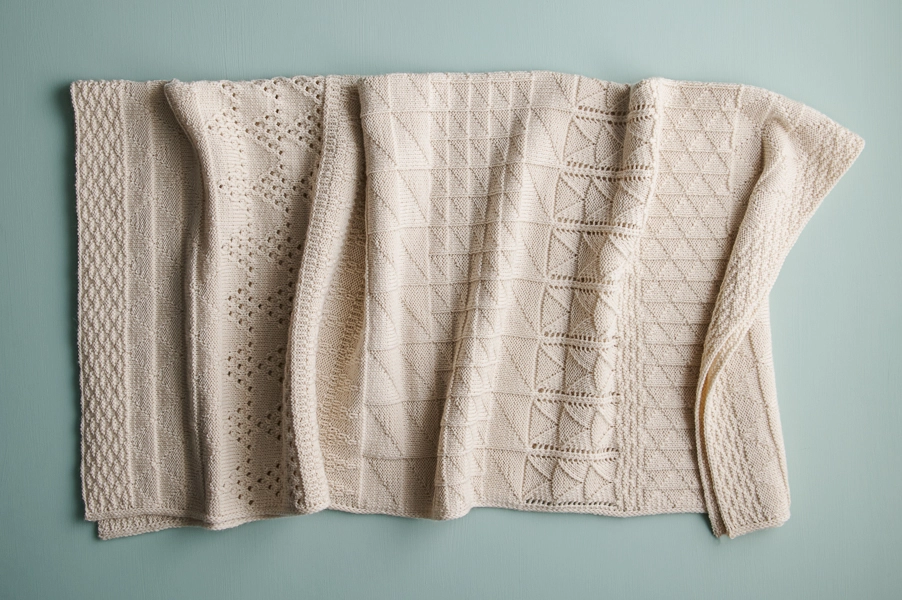
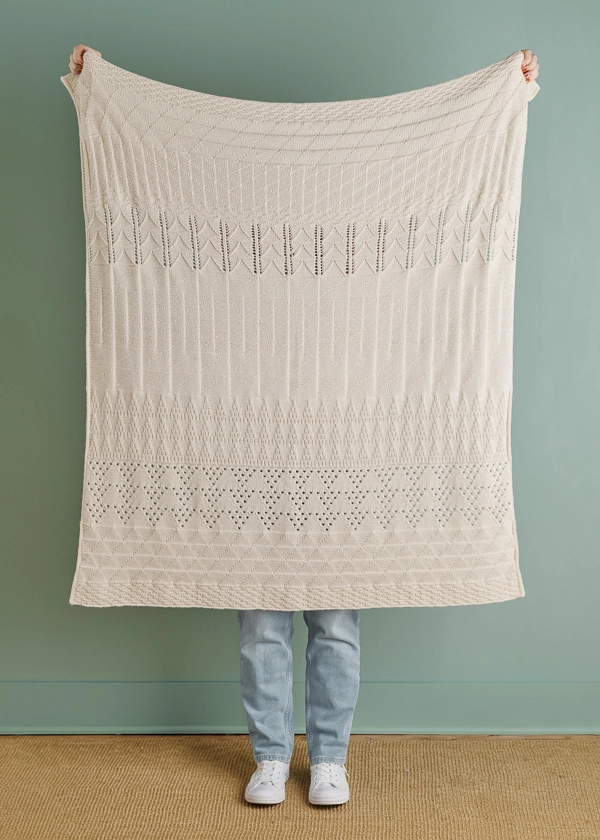
Porto Blanket
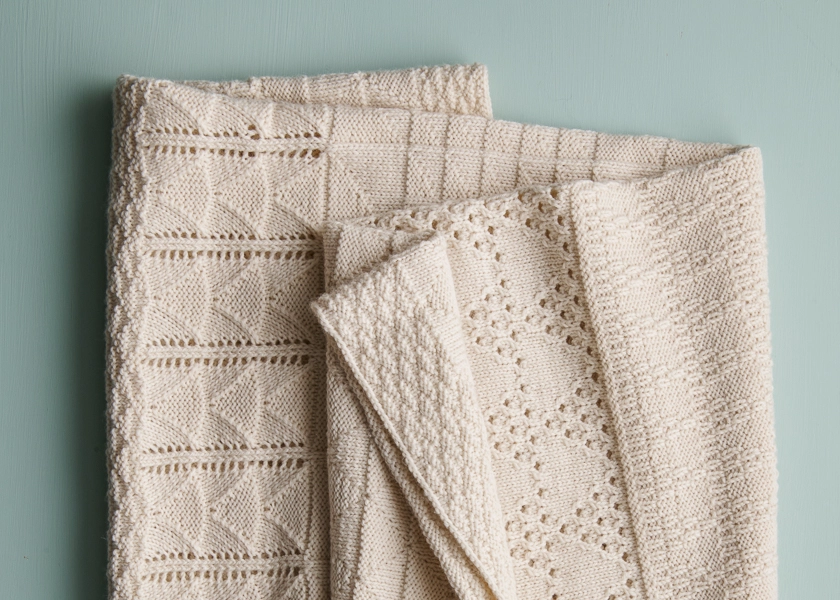
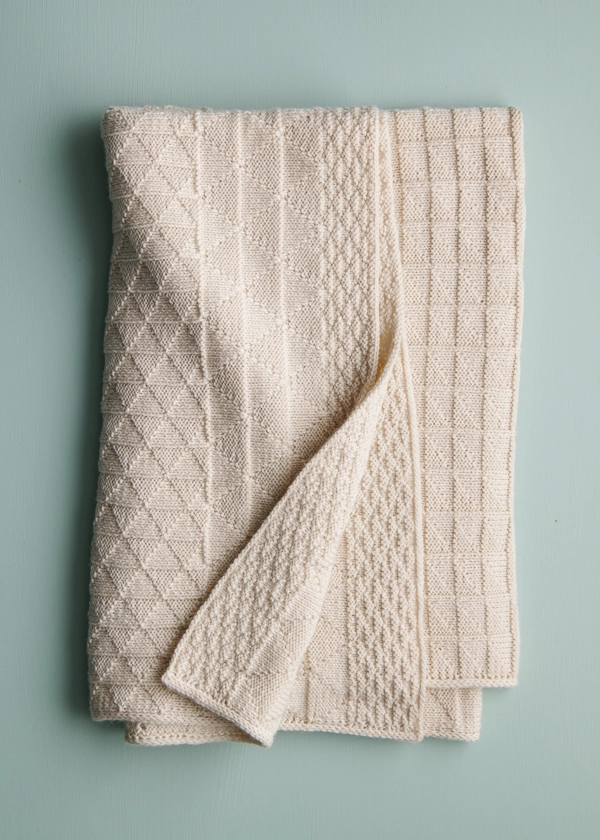
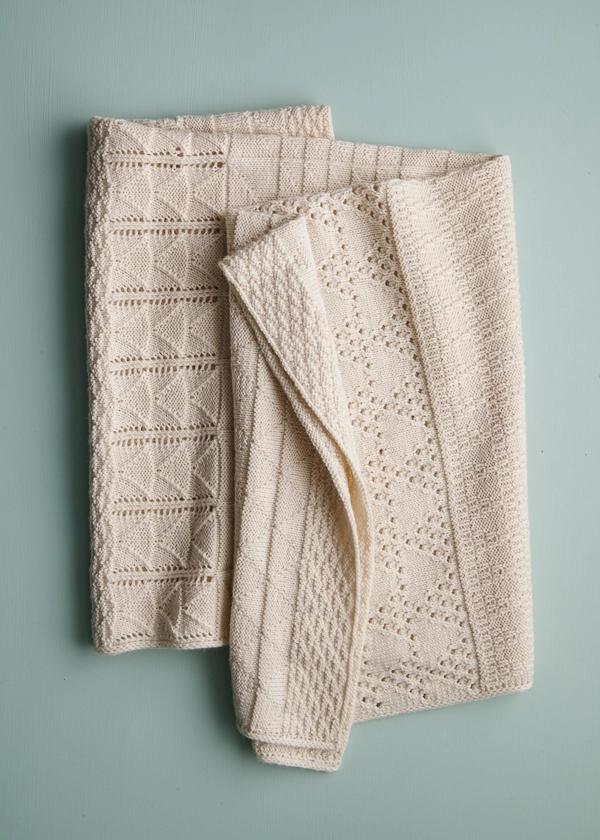
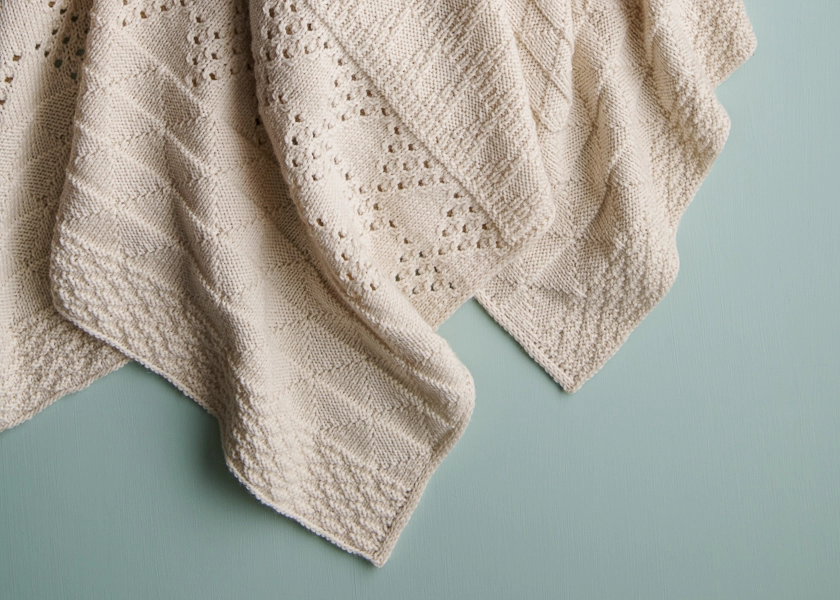
Our Porto Blanket is the most knitting fun you can imagine, and best of all, everyone is invited… Beginners, too! Inspired by the geometric school of Portugal’s azulejo tilework, this free pattern has you knit through 9 engaging stitch patterns, each one building on the skills of the one before it and all culminating in a spectacular mosaic of finely interlocking triangles. And our new Knitting Yarn On A Cone, a whopping 1000 grams of gorgeous merino wool, is just the yarn to complement your craftsmanship!
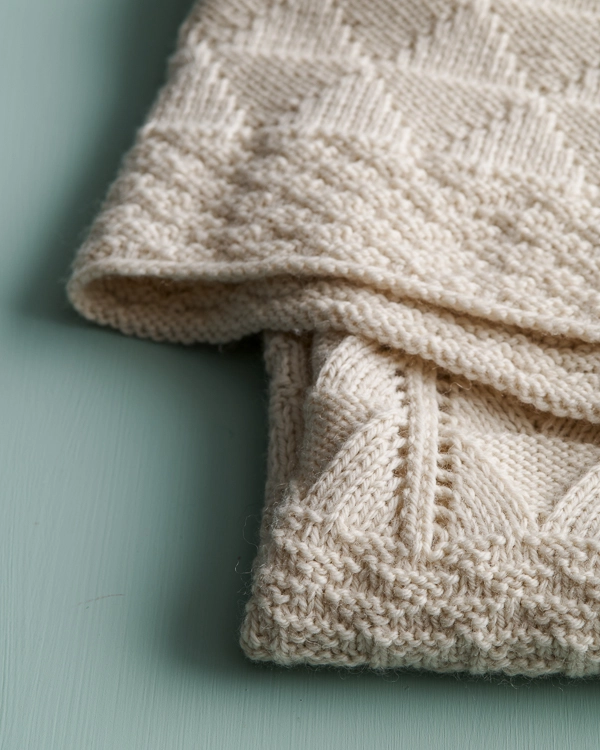
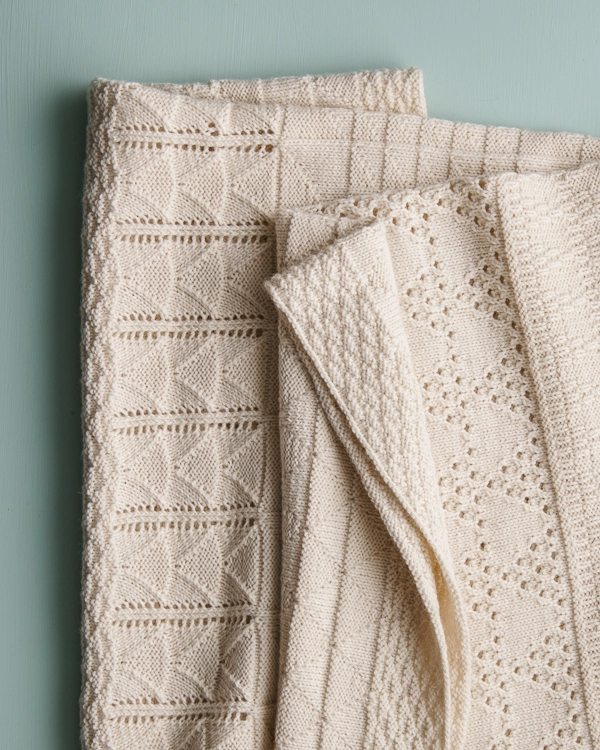
As intricate as it may look, you only need a handful of beginner-friendly stitches to knit your Porto Blanket. Just some basic knits, purls, simple decreases, yarn overs, and through the back loops, it’s a true testament to the creative power of simple stitches!
Beginners and seasoned knitters alike will savor the novelty of each section while looking forward to the next… And maybe you’ll find a favorite pattern you’d like to use again for a different project!
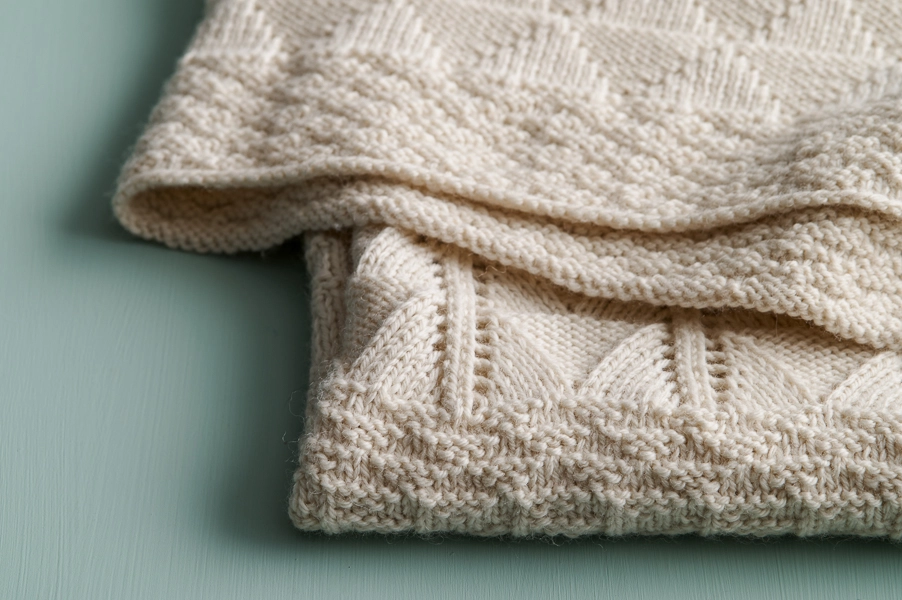
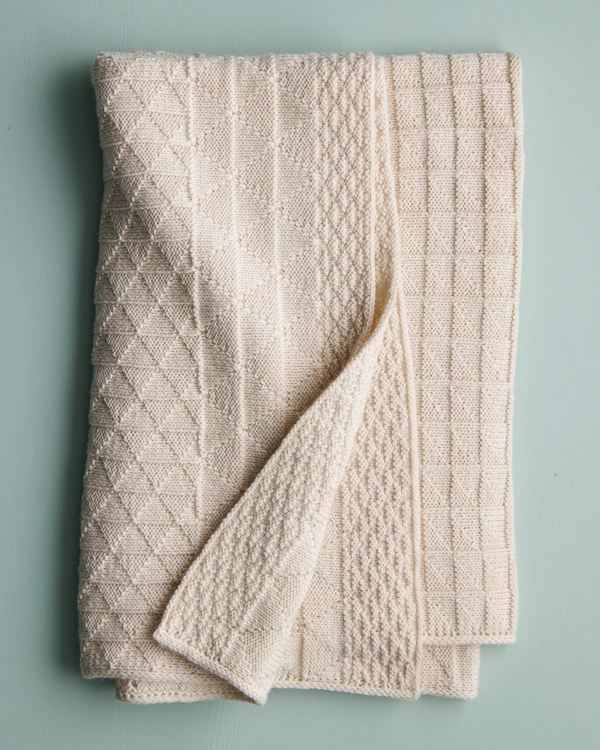
With its cushiony 4-ply spin, Knitting Yarn gives you clear, crisp stitch definition and marvelously articulated textures across the entire blanket, while 100% New Zealand merino wool makes every inch soft and cozy!
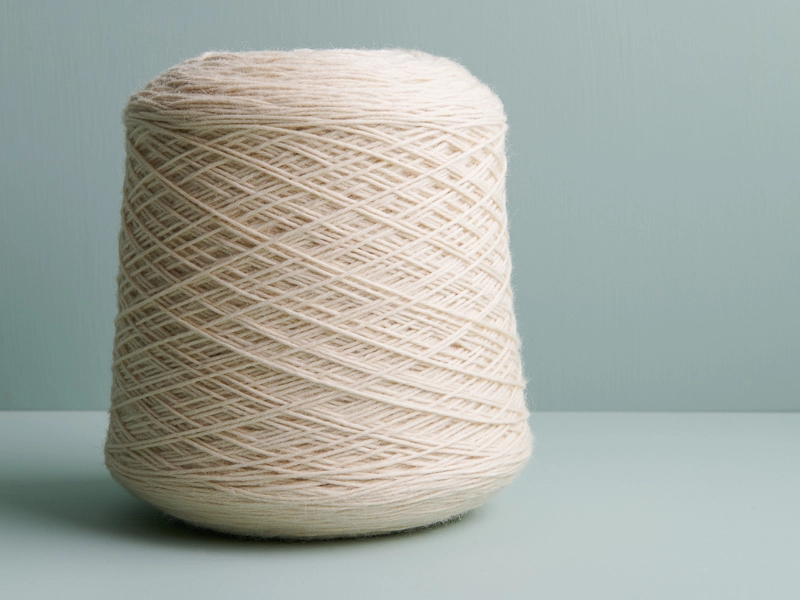
You only need one Knitting Yarn On A Cone to craft your Porto Blanket, which means no skeins to wind and only two ends to weave in when you’re finished. That’s 2,187 yards of happy knitting to look forward to, all with this truly classic light worsted/DK-weight yarn!
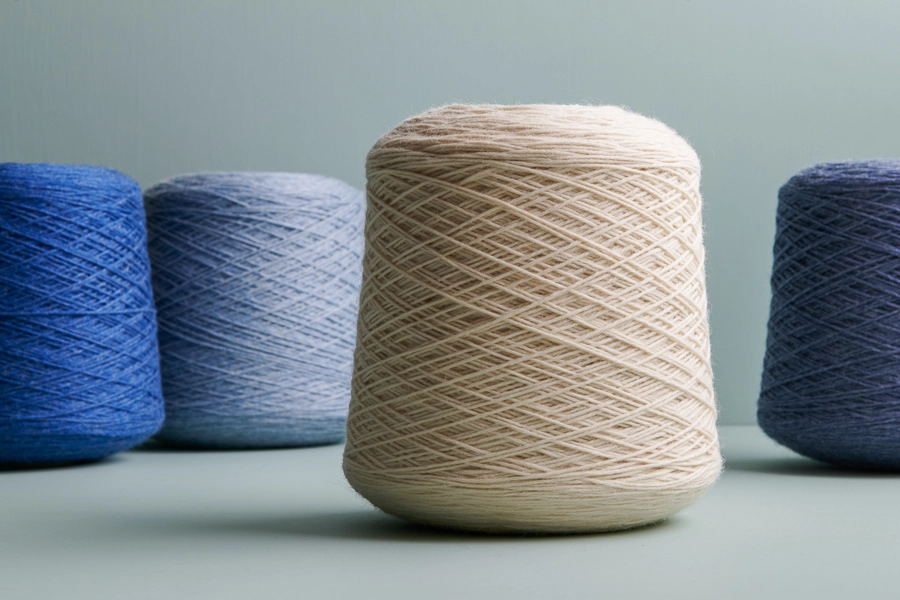
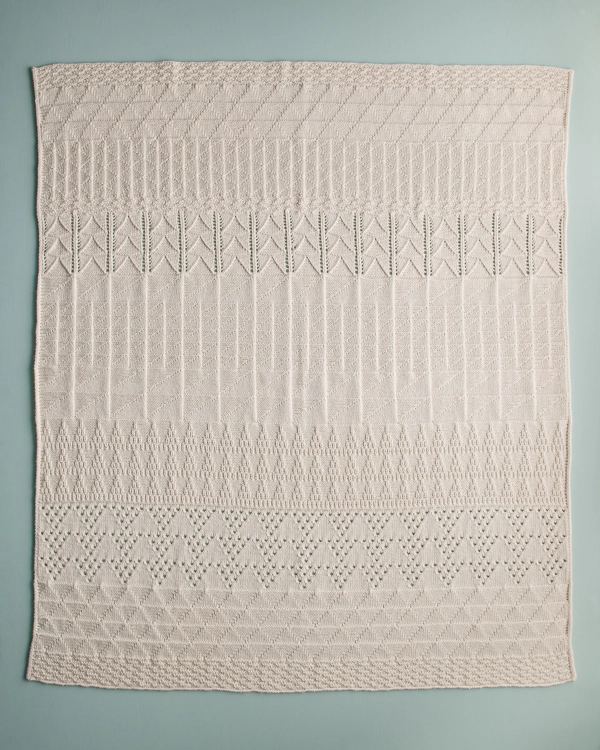
We chose to knit our version in warm Heirloom White, but you can choose from an array of blues reminiscent of traditional Portuguese tilework or any of Knitting Yarn On A Cone’s 37 rich and fascinating colors.
This super engaging sampler-style knit gives you a taste of so many different designs, like an inspiring stroll down a street with a different geometric tile pattern on every building. Pick up a cone of Knitting Yarn and cast on for an adventure of beautiful yarn and beautiful stitches!
Yarn lovers, if you adore the yarn used in this project, you’ll love exploring all of our other yarn collections! Discover over 45 thoughtfully designed yarns in nearly every natural fiber and in every spectacular color you can imagine. Only available here at Purl Soho’s online yarn store, where every skein is created with care and your creativity in mind!
Designed by Purl Soho designer, Hiromi Glover. See even more of Hiromi’s work on her Instagram!
Share your progress and connect with the community by tagging your pics with #PurlSoho. We can’t wait to see what you make!
Want to print this pattern? On desktop, find the “print” icon in the right margin, and on mobile, scroll to the end of the pattern for it. Use the on-screen instructions to remove anything you don’t want to print!
Materials
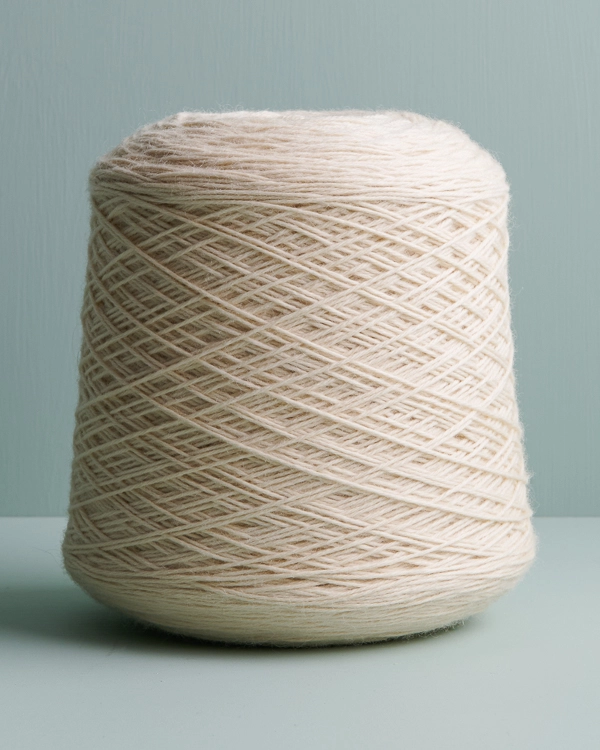
- 1 of Purl Soho’s Knitting Yarn On A Cone, 100% merino wool yarn. Each skein of this light worsted/dk-weight yarn is approximately 2,190 yards/1,000 grams; approximately 2,075 total yards required. We used Heirloom White.
- US 6 (4 mm), 40-inch circular knitting needles
- Optional: T-pins, blocking pins, and/or blocking wires
GAUGE
22 stitches and 36 rows = 4 inches in Knit Little Pyramid Stitch (see Notes)
NOTE: All the patterns used in this blanket have slightly different gauges, but if you can achieve the gauge listed above, your blanket will turn out the correct size!
SIZE
Finished Dimensions: 45 inches wide x 52½ inches tall
NOTES
STITCH MULTIPLE
This pattern is worked over a multiple of 48 plus 8 stitches. (Note that the stitch patterns in each section may technically work over different stitch multiples, but the blanket as a whole works over the multiple stated here.)
KNIT LITTLE PYRAMID STITCH PATTERN (FOR GAUGE SWATCH)
Cast on a multiple of 6 stitches.
Set-Up Row: (wrong side): Purl to end of row.
Row 1 (right side): *K2, p1, k3, repeat from * to end of row.
Row 2 (wrong side): *P2, k3, p1, repeat from * to end of row.
Row 3: *P5, k1, repeat from * to end of row.
Row 4: *K1, p5, repeat from * to end of row.
Row 5: *P1, k3, p2, repeat from * to end of row.
Row 6: *K3, p1, k2, repeat from * to end of row.
Repeat Rows 1–6 for pattern.
SLIP STITCHES
On right-side rows: Slip stitches purlwise with yarn in back (wyib).
On wrong-side rows: Slip stitches purlwise with yarn in front (wyif).
PATTERN
Cast on 248 stitches. We used a basic Long Tail Cast On.
Set-Up Row (wrong side): Slip 3 (see Notes), k1, purl to last 4 stitches, k1, p3.
Work Mixed Triangles Pattern either from Written Instructions or Chart, both below.
MIXED TRIANGLES PATTERN: WRITTEN INSTRUCTIONS
SECTION A: Knit Little Pyramid
Row 1 (right side): Slip 3, p1, *k2, p1, k3, repeat from * to last 4 stitches, p1, k3.
Row 2 (wrong side): Slip 3, k1, *p2, k3, p1, repeat from * to last 4 stitches, k1, p3.
Row 3: Slip 3, p1, *p5, k1, repeat from * to last 4 stitches, p1, k3.
Row 4: Slip 3, k1, *k1, p5, repeat from * to last 4 stitches, k1, p3.
Row 5: Slip 3, p1, *p1, k3, p2, repeat from * to last 4 stitches, p1, k3.
Row 6: Slip 3, k1, *k3, p1, k2, repeat from * to last 4 stitches, k1, p3.
Repeat Rows 1–6 three more times.
SECTION B: Halved Diamond
Row 1 (right side): Slip 3, p1, *k6, p1, k5, repeat from * to last 4 stitches, p1, k3.
Row 2 (wrong side): Slip 3, k1, *p5, k1, p6, repeat from * to last 4 stitches, k1, p3.
Row 3: Slip 3, p1, *k5, p3, k4, repeat from * to last 4 stitches, p1, k3.
Row 4: Slip 3, k1, *p4, k3, p5, repeat from * to last 4 stitches, k1, p3.
Row 5: Slip 3, p1, *k4, p5, k3, repeat from * to last 4 stitches, p1, k3.
Row 6: Slip 3, k1, *p3, k5, p4, repeat from * to last 4 stitches, k1, p3.
Row 7: Slip 3, p1, *k3, p7, k2, repeat from * to last 4 stitches, p1, k3.
Row 8: Slip 3, k1, *p2, k7, p3, repeat from * to last 4 stitches, k1, p3.
Row 9: Slip 3, p1, *k2, p9, k1, repeat from * to last 4 stitches, p1, k3.
Row 10: Slip 3, k1, *p1, k9, p2, repeat from * to last 4 stitches, k1, p3.
Row 11: Slip 3, p1, *k1, p11, repeat from * to last 4 stitches, p1, k3.
Row 12: Slip 3, k1, *k11, p1, repeat from * to last 4 stitches, k1, p3.
Row 13: Slip 3, p1, *p1, k11, repeat from * to last 4 stitches, p1, k3.
Row 14: Slip 3, k1, *p11, k1, repeat from * to last 4 stitches, k1, p3.
Row 15: Slip 3, p1, *p2, k9, p1, repeat from * to last 4 stitches, p1, k3.
Row 16: Slip 3, k1, *k1, p9, k2, repeat from * to last 4 stitches, k1, p3.
Row 17: Slip 3, p1, *p3, k7, p2, repeat from * to last 4 stitches, p1, k3.
Row 18: Slip 3, k1, *k2, p7, k3, repeat from * to last 4 stitches, k1, p3.
Row 19: Slip 3, p1, *p4, k5, p3, repeat from * to last 4 stitches, p1, k3.
Row 20: Slip 3, k1, *k3, p5, k4, repeat from * to last 4 stitches, k1, p3.
Row 21: Slip 3, p1, *p5, k3, p4, repeat from * to last 4 stitches, p1, k3.
Row 22: Slip 3, k1, *k4, p3, k5, repeat from * to last 4 stitches, k1, p3.
Row 23: Slip 3, p1, *p6, k1, p5, repeat from * to last 4 stitches, p1, k3.
Row 24: Slip 3, k1, *k5, p1, k6, repeat from * to last 4 stitches, k1, p3.
Repeat Rows 1–24 one more time.
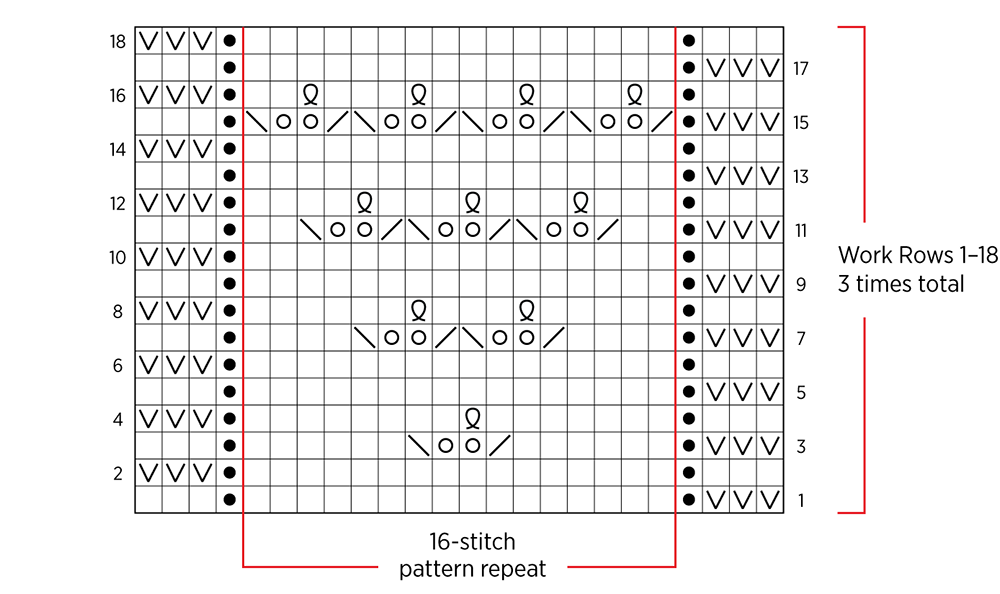
SECTION C: Eyelet Triangle
Row 1 (right side): Slip 3, p1, knit to last 4 stitches, p1, k3.
Row 2 (wrong side): Slip 3, k1, purl to last 4 stitches, k1, p3.
Row 3: Slip 3, p1, *k6, knit 2 together (k2tog), [yarn over (yo)] 2 times, slip slip knit (ssk), k6, repeat from * to last 4 stitches, p1, k3.
Row 4: Slip 3, k1, *p8, p1 through back loop (p1 tbl), p7, repeat from * to last 4 stitches, k1, p3.
Rows 5 and 6: Repeat Rows 1 and 2.
Row 7: Slip 3, p1, *k4, [k2tog, (yo) 2 times, ssk] 2 times, k4, repeat from * to last 4 stitches, p1, k3.
Row 8: Slip 3, k1, *p6, p1 tbl, p3, p1 tbl, p5, repeat from * to last 4 stitches, k1, p3.
Rows 9 and 10: Repeat Rows 1 and 2.
Row 11: Slip 3, p1, *k2, [k2tog, (yo) 2 times, ssk] 3 times, k2, repeat from * to last 4 stitches, p1, k3.
Row 12: Slip 3, k1, *p4, [p1 tbl, p3] 3 times, repeat from * to last 4 stitches, k1, p3.
Rows 13 and 14: Repeat Rows 1 and 2.
Row 15: Slip 3, p1, *k2tog, (yo) 2 times, ssk, repeat from * to last 4 stitches, p1, k3.
Row 16: Slip 3, k1, *p2, p1 tbl, p1, repeat from * to last 4 stitches, k1, p3.
Rows 17 and 18: Repeat Rows 1 and 2.
Repeat Rows 1–18 two more times.
SECTION D: Ribbed Pyramid
Set-Up Row 1 (right side): Slip 3, purl to last 3 stitches, k3.
Set-Up Row 2 (wrong side): Slip 3, knit to last 3 stitches, p3.
Row 1: Slip 3, p1, *p1, k1, repeat from * to last 4 stitches, p1, k3.
Row 2: Slip 3, k1, *p1, k1, repeat from * to last 4 stitches, k1, p3.
Rows 3 and 4: Repeat Rows 1 and 2.
Row 5: Slip 3, p1, *p2, [k1, p1] 3 times, repeat from * to last 4 stitches, p1, k3.
Row 6: Slip 3, k1, *[k1, p1] 3 times, k2, repeat from * to last 4 stitches, k1, p3.
Rows 7 and 8: Repeat Rows 5 and 6.
Row 9: Slip 3, p1, *p3, k1, p1, k1, p2, repeat from * to last 4 stitches, p1, k3.
Row 10: Slip 3, k1, *k2, p1, k1, p1, k3, repeat from * to last 4 stitches, k1, p3.
Rows 11 and 12: Repeat Rows 9 and 10.
Row 13: Slip 3, p1, *p4, k1, p3, repeat from * to last 4 stitches, p1, k3.
Row 14: Slip 3, k1, *k3, p1, k4, repeat from * to last 4 stitches, k1, p3.
Rows 15 and 16: Repeat Rows 13 and 14.
Repeat Rows 1–16 two more times.
Repeat Set-Up Rows 1 and 2 one more time.
SECTION E: Large Flag
Row 1 (right side): Slip 3, p1, knit to last 4 stitches, p1, k3.
Row 2 (wrong side): Slip 3, k1, *k1, p15, repeat from * to last 4 stitches, k1, p3.
Row 3: Slip 3, p1, *k14, p2, repeat from * to last 4 stitches, p1, k3.
Row 4: Slip 3, k1, *k3, p13, repeat from * to last 4 stitches, k1, p3.
Row 5: Slip 3, p1, *k12, p4, repeat from * to last 4 stitches, p1, k3.
Row 6: Slip 3, k1, *k5, p11, repeat from * to last 4 stitches, k1, p3.
Row 7: Slip 3, p1, *k10, p6, repeat from * to last 4 stitches, p1, k3.
Row 8: Slip 3, k1, *k7, p9, repeat from * to last 4 stitches, k1, p3.
Row 9: Slip 3, p1, *k8, p8, repeat from * to last 4 stitches, p1, k3.
Row 10: Slip 3, k1, *k9, p7, repeat from * to last 4 stitches, k1, p3.
Row 11: Slip 3, p1, *k6, p10, repeat from * to last 4 stitches, p1, k3.
Row 12: Slip 3, k1, *k11, p5, repeat from * to last 4 stitches, k1, p3.
Row 13: Slip 3, p1, *k4, p12, repeat from * to last 4 stitches, p1, k3.
Row 14: Slip 3, k1, *k13, p3, repeat from * to last 4 stitches, k1, p3.
Row 15: Slip 3, p1, *k2, p14, repeat from * to last 4 stitches, p1, k3.
Row 16: Slip 3, k1, *k15, p1, repeat from * to last 4 stitches, k1, p3.
Repeat Rows 1–16 one more time.
SECTION F: Small Flag
Row 1 (right side): Slip 3, p1, knit to last 4 stitches, p1, k3.
Row 2 (wrong side): Slip 3, k1, *k1, p7, repeat from * to last 4 stitches, k1, p3.
Row 3: Slip 3, p1, *k6, p2, repeat from * to last 4 stitches, p1, k3.
Row 4: Slip 3, k1, *k3, p5, repeat from * to last 4 stitches, k1, p3.
Row 5: Slip 3, p1, *k4, p4, repeat from * to last 4 stitches, p1, k3.
Row 6: Slip 3, k1, *k5, p3, repeat from * to last 4 stitches, k1, p3.
Row 7: Slip 3, p1, *k2, p6, repeat from * to last 4 stitches, p1, k3.
Row 8: Slip 3, k1, *k7, p1, repeat from * to last 4 stitches, k1, p3.
Repeat Rows 1–8 four more times.
SECTION G: Large Flag
Repeat Rows 1–16 of Section E one time.
SECTION H: Stacked Triangles
Set-Up Row (right side): Slip 3, p1, knit to last 4 stitches, p1, k3.
Set-Up Row (wrong side): Slip 3, k1, purl to last 4 stitches, k1, p3.
Row 1 (right side): Slip 3, p1, *knit 1 through the back loop (k1 tbl), yo, ssk, p10, k2tog, yo, k1 tbl, repeat from * to last 4 stitches, p1, k3.
Row 2 (wrong side): Slip 3, k1, *p1 tbl, p2, k10, p2, p1 tbl, repeat from * to last 4 stitches, k1, p3.
Row 3: Slip 3, p1, *k1 tbl, yo, k1, ssk, p8, k2tog, k1, yo, k1 tbl, repeat from * to last 4 stitches, p1, k3.
Row 4: Slip 3, k1, *p1 tbl, p3, k8, p3, p1 tbl, repeat from * to last 4 stitches, k1, p3.
Row 5: Slip 3, p1, *k1 tbl, yo, k2, ssk, p6, k2tog, k2, yo, k1 tbl, repeat from * to last 4 stitches, p1, k3.
Row 6: Slip 3, k1, *p1 tbl, p4, k6, p4, p1 tbl, repeat from * to last 4 stitches, k1, p3.
Row 7: Slip 3, p1, *k1 tbl, yo, k3, ssk, p4, k2tog, k3, yo, k1 tbl, repeat from * to last 4 stitches, p1, k3.
Row 8: Slip 3, k1, *p1 tbl, p5, k4, p5, p1 tbl, repeat from * to last 4 stitches, k1, p3.
Row 9: Slip 3, p1, *k1 tbl, yo, k4, ssk, p2, k2tog, k4, yo, k1 tbl, repeat from * to last 4 stitches, p1, k3.
Row 10: Slip 3, k1, *p1 tbl, p6, k2, p6, p1 tbl, repeat from * to last 4 stitches, k1, p3.
Row 11: Slip 3, p1, *k1 tbl, yo, k5, ssk, k2tog, k5, yo, k1 tbl, repeat from * to last 4 stitches, p1, k3.
Row 12: Slip 3, k1, *p1 tbl, p14, p1 tbl, repeat from * to last 4 stitches, k1, p3.
Repeat Rows 1–12 two more times.
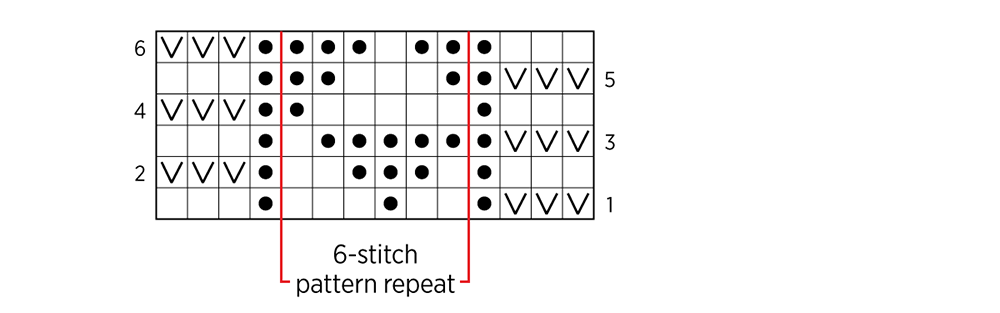
SECTION I: Purl Little Pyramid
Row 1 (right side): Slip 3, p1, *p2, k1, p3, repeat from * to last 4 stitches, p1, k3.
Row 2 (wrong side): Slip 3, k1, *k2, p3, k1, repeat from * to last 4 stitches, k1, p3.
Row 3: Slip 3, p1, *k5, p1, repeat from * to last 4 stitches, p1, k3.
Row 4: Slip 3, k1, *p1, k5, repeat from * to last 4 stitches, k1, p3.
Row 5: Slip 3, p1, *k1, p3, k2, repeat from * to last 4 stitches, p1, k3.
Row 6: Slip 3, k1, *p3, k1, p2, repeat from * to last 4 stitches, k1, p3.
Repeat Rows 1–6 one more time.
SECTION J: Flying Geese
Row 1: Slip 3, p1, *k1, p5, k5, p1, repeat from * to last 4 stitches, p1, k3.
Row 2: Slip 3, k1, *k2, p4, k4, p2, repeat from * to last 4 stitches, k1, p3.
Row 3: Slip 3, p1, *k3, p3, repeat from * to last 4 stitches, p1, k3.
Row 4: Slip 3, k1, *k4, p2, k2, p4, repeat from * to last 4 stitches, k1, p3.
Row 5: Slip 3, p1, *k5, p1, k1, p5, repeat from * to last 4 stitches, p1, k3.
Row 6: Slip 3, k1, *k6, p6, repeat from * to last 4 stitches, k1, p3.
Row 7: Repeat Row 5.
Row 8: Repeat Row 4.
Row 9: Repeat Row 3.
Row 10: Repeat Row 2.
Row 11: Repeat Row 1.
Row 12: Slip 3, k1, *p6, k6, repeat from * to last 4 stitches, k1, p3.
Repeat Rows 1–12 one more time.
Repeat Rows 1–11 one more time.
Last Row (wrong side): Slip 3, k6, p1, *k11, p1, repeat from * to last 10 stitches, k7, p3.
SECTION K: Halved Diamond
Repeat Rows 1–24 of Section B once, then repeat Rows 1–12 one more time.
SECTION L: Knit Little Pyramid
Repeat Rows 1–6 of Section A 3 times.
Go on to Finishing, below.
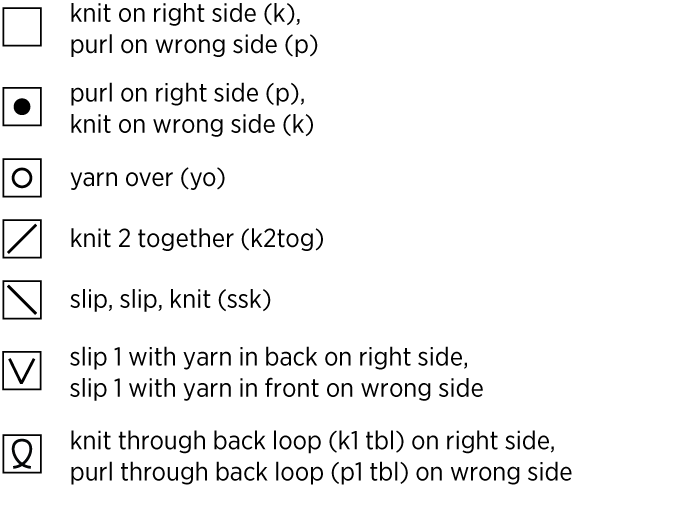
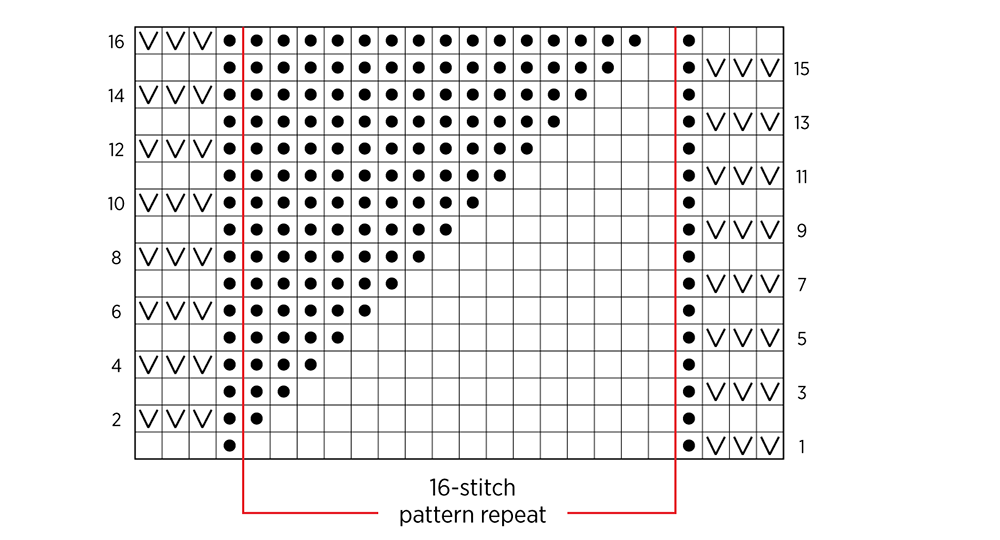
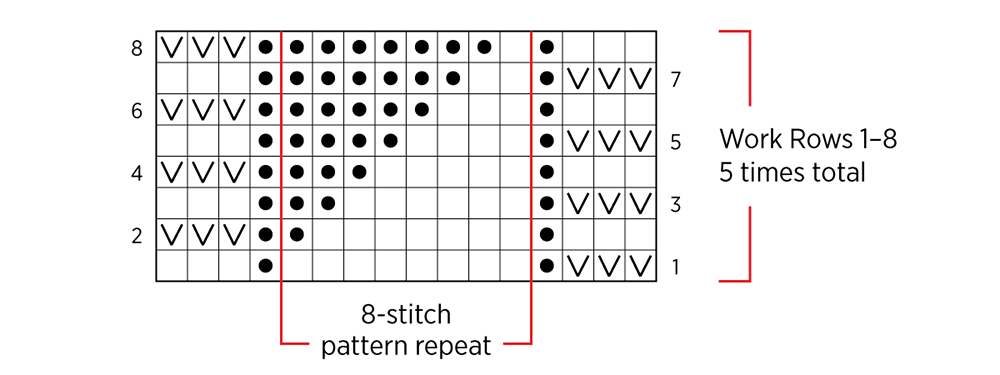
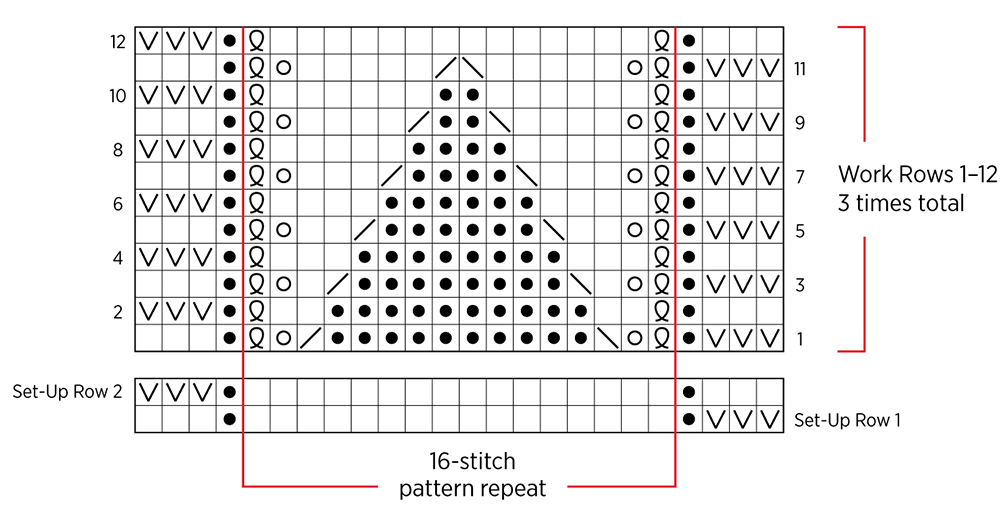
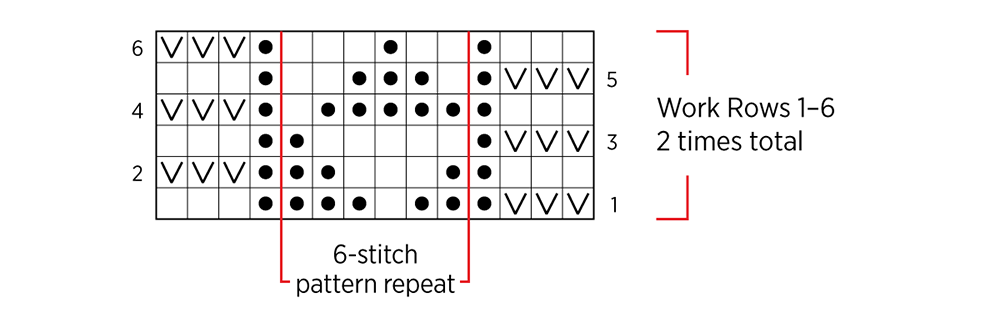
MIXED TRIANGLES PATTERN: CHARTS
NOTE: New to reading charts? Unravel the mysteries with our Reading a Chart Tutorial.
Starting in the bottom right corner of the Charts below, work right-side (odd number) rows from right to left and wrong-side (even number) rows from left to right.
For Section A, reading the Knit Little Pyramid chart, work Rows 1–6 four times.
For Section B, reading the Halved Diamond chart, work Rows 1–24 two times.
For Section C, reading the Eyelet Triangle chart, work Rows 1–18 three times.
For Section D, reading the Ribbed Pyramid chart, work Set-Up Rows 1 and 2, then work Rows 1–16 three times, then work Set-Up Rows 1 and 2 one more time.
For Section E, reading the Large Flag chart, work Rows 1–16 two times.
For Section F, reading the Small Flag chart, work Rows 1–8 five times.
For Section G, reading the Large Flag chart, work Rows 1–16 once.
For Section H, reading the Stacked Triangles chart, work Set-Up Rows 1 and 2, then work Rows 1–12 three times.
For Section I, reading the Purl Little Pyramid chart, work Rows 1–6 two times.
For Section J, reading the Flying Geese chart, work Rows 1–12 two times, then repeat Rows 1–11 one more time, then work Last Row.
For Section K, reading the Halved Diamond chart, work Rows 1–24, then repeat Rows 1–12 one more time.
For Section L, reading the Knit Little Pyramid chart, work Rows 1–6 three times.
KEY
SECTIONS A + L: Knit Little Pyramid
SECTIONS B + K: Halved Diamond

SECTION C: Eyelet Triangle
SECTION D: Ribbed Pyramid

SECTIONS E + G: Large Flag
SECTION F: Small Flag
SECTION H: Stacked Triangles
SECTION I: Purl Little Pyramid
SECTION J: Flying Geese
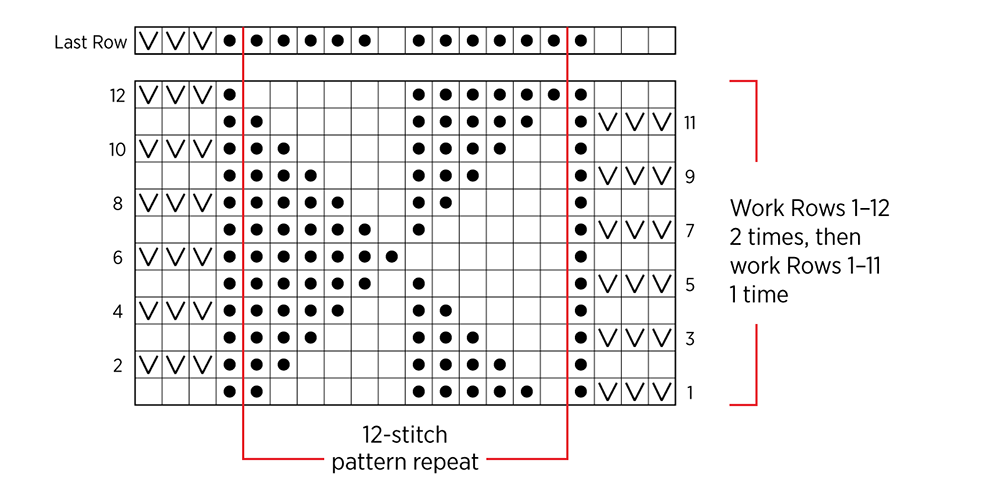
NOTE: Want to see it bigger? Download this chart (and key) as a PDF!
FINISHING
With right-side facing you, bind off knitwise.
Weave in the ends and gently wet block to finished dimensions (using T-pins, blocking pins, or blocking wires as needed).
Learn About Knitting Yarn On A Cone + All Our Beautiful Yarns
Knitting Yarn On A Cone is an absolute dream for knitting blankets and garments! A beautiful, ready-to-knit 1000-gram cone of light worsted/DK-weight yarn means that for 2,187 yards of knitting, you’ll only have two ends to weave in… What could be better? Made with 100% beautiful merino wool from New Zealand, Knitting Yarn’s 4-ply spin and toothy feel gives textures, cables, and colorwork incredible stitch definition and cushiony dimension. Need some contrast colors or not quite so much yarn? Shop our collection of Knitting Yarn in 100-gram balls, too!
More Free Knitting Patterns
- Be sure to explore our vast collection of (mostly free!) Knitting Yarn knitting patterns and cast on!
More Light Worsted/DK-Weight Yarns
- Shop our entire collection of light worsted/DK-weight yarns (What does DK-weight yarn mean, really? Our guide to DK yarn will answer your questions and demystify.)
- If you want to use a different yarn, be sure to take the time to get the correct gauge. Need help? Check our All About Gauge Tutorial!
More Yarns With Similar Fiber
- Shop merino wool yarn
Looking for more inspiration? Explore all of our free knitting patterns and knitting tutorials, buy one of our many knitting kits and yarn bundles, and shop for beautiful yarn. We have over 35 gorgeous natural fiber yarns in 100’s of magnificent colors, designed to bring integrity, beauty, and joy to your next knitting project and only available at Purl Soho!


Beautiful pattern. Would this work with your cotton on a cone yarn too? Can I make it smaller by decreasing cast on by 48 stitches ?
Thinking of a baby blanket Thanks for information
Hi Cynthia,
We’re so glad to hear that this blanket has caught your eye! You could certainly make it with Cotton Pure, but because that yarn is thinner than Knitting Yarn (it’s a sport weight yarn while Knitting Yarn is a DK weight), the knit fabric will be looser when knit at the gauge of the pattern. You could also knit it at a tighter gauge though, and it will come out smaller which seems to be what you’re hoping for anyway!
All the best,
Lili
Is this pattern available as a baby blanket?
Hi Carolyn,
I’m afraid that we have only designed this blanket in one size, but you could absolutely adjust the size! To figure out your new cast-on number, you’ll need to multiply the number of stitches per inch (5.5 stitches, according to the gauge of the pattern) by the width that you would like and cast on the nearest multiple of 48 + 8 stitches. Then you can follow the pattern essentially as written! The only other change you would need to make is adjusting for a shorter length. To do that, you can either work each section for a shorter distance, or you can omit sections. Hope this helps you get started!
All the best,
Lili
Your comments have helped me even though the original question wasn’t mine. 🙂 Thank you for putting time and effort into the obviously thoughtful detail of your answers.
You’re very welcome! I’m so glad to hear that you’ve found them so helpful!
All the best,
Lili
I want to make this blanket. I purchased the yarn in yellow. I am excited to start.
Hi Carolyn,
What Lili didn’t mention was that you could knit the blanket pattern in a finer weight of yarn. If you used fingering weight yarn, because the gauge will be less than that stated in the pattern, the final project will be smaller.
You could knit a sample swatch, see what your gauge is, then do the simple math to see what the final dimensions of your project will be.
Hope this helps.
Joanna
That’s another great way to make this blanket smaller if you’re open to choosing a different yarn to use! Thanks for suggesting that!
All the best,
Lili
This porto blanket pattern is the most beautiful blanket pattern I have ever seen you post. I have ordered cone yarn & can’t wait for it to arrive & start knitting. Thanks to designer Hiromi Glover.
If I wanted to make this wider could I increase by multiples of 48 stitches?
Looks like the repeats would work that way.
Thank you.
Hi Janet,
Thanks for writing in! Yes, you can adjust the width of the blanket by increasing or decreasing by multiples of 48. The overall stitch multiple for this pattern is 48 + 8–the 48 being the pattern repeats, and the 8 for the selvages!
All the best,
Lili
That is beautiful. The cone is genius idea. My nemesis is weaving ends. I am excited about trying this.
This is a beautiful blanket and I’d love to try making it. I’m confused by how many stitches to cast on. It’s a multiple of 48+8 stitches, and I’m to cast on a multiple of 6… does that mean, to make it as you have in the example, I’d start with 56 stitches? And to make it bigger or smaller I’d increase or decrease by a multiple of 48?
Hi Sarah,
So glad to hear you love this blanket pattern! This pattern as a whole is worked over a multiple of 48 + 8 stitches, so you will need to increase or decrease the cast-on number by multiples of 48 if you want to make it larger or smaller. The stitch patterns in each section may technically work over different stitch multiples, but the blanket as a whole works over the multiple stated here! The multiple of 6 cast-on is just for the gauge swatch, since you’re only knitting that in one stitch pattern.
All the best,
Lili
I love this blanket so much! I think Sarah’s confusion stems from the pattern’s gauge section. To establish gauge, you need to cast on a multiple of 6 stitches. (I cast on 24.) The section that follows is for the gauge, not the pattern itself. After that, the directions go on to provide the blanket cast on, which is where the multiple of 48+8 comes in.
A beautiful blanket. Does it have a right side and wrong side or is it reversible?
Hi Karen,
Thanks for writing in! This pattern does have a right and wrong side that look different from each other. While some of the stitch patterns may be reversible, not all of them are!
All the best,
Lili
I, like several others have a keen desire to make this lovely blanket in baby size! I am happy to buy the full cone, as I can use it for other projects, but would one of you please take the time to create a baby blanket pattern for us? I don’t feel confident enough to work out the reduction Lila suggested. I think it would be a huge success for your many loyal customers and most of us don’t want to take on such a large project — we want to make baby blankets!
Hi Carole,
I’m happy to pass along your interest in a baby blanket size to our design team! In the meantime, could you let me know what specific dimensions (length and width) you’re hoping to knit? I’m happy to work out the calculations for the cast-on number and the yardage for you!
All the best,
Lili
Does the merino wool only comes in the cone. I would like to make the Porto blanket larger. I will buy the cone and any additional yarn needed.
Hi Marina,
You can also buy 100g skeins of Knitting Yarn! Hope this helps!
All the best,
Lili
I’m drawn to the deeper colors of the cones, but worry the pattern might not be as visible. Opinions?
Hi Wendy,
Using a darker color will make the pattern a bit less visible, but it will still be beautiful nonetheless! It should still show up clearly in a well-lit room, and it will be just as visible when viewed up close. Plus the texture will still be present no matter what!
All the best,
Lili
Just wondering if these cones have knotted joins in them? I am just finishing a complicated blanket – Daybreak blanket – with many skeins of yarn and was disappointed to come across several knotted joints in the skeins that happened mid row. Had to rip out the stitches and clip the joint and start a “new” yarn. So many ends to weave in.
Just want to make sure that isn’t going to happen with the cone.
Hi Melissa,
We’re so sorry to hear that you found knots in your yarn in the past! If you found more than one knot per skein, we encourage you to reach out to us directly by sending an email to [email protected] so that we can note the dye lot and rectify the issue.
As some background information, knots can occur when mill workers join new threads or repair breaks during the spinning process. Our quality standard is no more than 3 knots per kilo of yarn, which means that you may occasionally find a knot in your skein or cone. We always aim for better than this though! We work hard with our mills to ensure yarn with as few of these knots as possible, but in truth, knots or joins in yarn are unavoidable.
Each cone of Knitting Yarn is 1kg, so if you find more than 3 knots in it, please don’t hesitate to reach out to us directly. We’ll do everything we can to make things right!
All the best,
Lili
The design reminds me of Islamic geometrics. This is my next project. Currently finishing the Double Knit in colors that remind me of a manta ray.
Me, too! Want to make it for a baby blanket and was thinking of using spirt weight yarn following the same instructions. I would also aim for a washable yarn.
It is a beautiful pattern. For years I have been
looking for ideas for the perfect baby blanket for my first great grandchild who will likely be born long after I am around!
Will the sportweight yarn work?
Hi Liz,
You could definitely use a sport weight yarn for this blanket! Just be sure to knit up a gauge swatch beforehand so that you can adjust the cast-on number. Once you know how many stitches you’re getting per inch, just multiply that number by the width of the blanket and cast on the nearest multiple of 48 + 8 stitches.
All the best,
Lili
What a beautiful intention, Liz! To work on something for a descendent, you may never meet. I love that 🫶🏽.
I’m excited to begin this project. My question is the will the edges (right and left) roll since the picture seems to show a simple knit edge. Is it possible to add a border like the top and bottom so it doesn’t roll?
Hello,
We’re so glad that you’re looking forward to this project! This blanket is designed with an I-cord edge, which does indeed look like simple knit stitches. In general though, you shouldn’t experience much rolling or curling at all since the stitch patterns used throughout the blanket are not plain stockinette. You can totally add an I-cord edge to the top and bottom as well though–that will look very cool! The easiest way to do so would be to work an attached I-cord along each edge at the end of the project. Alternatively, you could begin with an I-cord cast-on and end with an I-cord bind-off.
All the best,
Lili
Is there a pdf of thus blanket pattern?
Hi Vivian,
Thanks for writing in! Here’s how to download a PDF version of any of our free patterns: If you’re on your computer, you’ll find a “print” icon in the right column just below the “Save To Favorites” button. If you’re on a mobile version of the site, you will find the “print” icon below the pattern and above the comments.
Click on this button, and a window will pop up where you can delete whichever parts of the pattern you don’t want to print. When you hover over any image or a text block, it will be highlighted in yellow and a “trash” icon will appear. Just click on this icon to delete anything that’s not necessary to the pattern! For example, you may decide to shorten the pattern by omitting certain images or the list of materials. Then, click on the “PDF” button in the upper left-hand corner of the pop-up window. Once your PDF has finished downloading, just click the “Download PDF” button, and it will be saved to your computer! (You can also just click the “Print” button if you’d like to print the pattern.)
All the best,
Lili
Beautiful blanket indeed!
The link to the pdf goes to another pattern. Maybe you can look into that?
Hi Barbara,
That’s very concerning to hear! I tried the download process on my end and got the correct pattern. Would you mind reaching out to us at [email protected] and sending along the PDF of the pattern you downloaded instead? Or some screenshots of what you’re seeing when you try to download the pattern would be incredibly helpful!
I’ll keep an eye out for your message with more information, and then we’ll be able to start troubleshooting from there!
All the best,
Lili
What bind off do you suggest?
Hi Ann,
We used a basic bind-off for this pattern!
All the best,
Lili
Hi, if I used two cones/strands of the Cotton on a Cone would it knit up similar to the wool?
Thx!
Hi Andrea,
Thanks for writing in! I think that two strands of Cotton Pure would end up being thicker than Knitting Yarn. You could absolutely use 1 or 2 strands of Cotton Pure though and just adjust the cast-on number so that the blanket comes to the correct width!
To figure out your new cast-on number, you will want to first knit a gauge swatch in pattern. Once you know how many stitches you are getting per inch, you can multiply that number by the width and cast on the nearest multiple of 48 + 8. Then you can follow the pattern essentially as written! The only other change you would need to make is adjusting for the length. To do that, you can either work each section for a shorter/longer distance, or you can omit/add sections.
Hope this helps you get started!
All the best,
Lili
Thanks for such a beautiful pattern! Will all these lovely colors that are available in the knitting yarn on a cone be available in the 100g balls eventually? I’m thinking of some smaller projects….
Hi Laura,
Yes, we will be releasing all the new colors in the 100g skeins of Knitting Yarn as well!
All the best,
Lili
Is it possible to knit this using Good Wool? I wonder if it would not be quite as refined as with the merino.
Hi Kim,
Thanks for writing in! Good Wool is thinner than Knitting Yarn, but you could definitely make it work. You could either knit the pattern at the same gauge and have a looser, less dense knit fabric, or you could knit at a tighter gauge and cast on more stitches to make up the width. Hope this helps!
All the best,
Lili
Porto is such a lovely pattern! I can imagine it in Knitting Yarn, Note, or Good Wool. But, just to be realistic, I would prefer taking the project on as a throw instead of a blanket. Can you tell me if I’m figuring more or less accurately for a throw?
The pattern as written for a blanket (45″ wide x 52.5″ tall) has five 48-sts repeats. A throw would require four 48-sts repeats to be a reasonable size of (very roughly) 35″ wide x 40″ tall.
If the blanket requires 2075 yds. of Knitting Yarn, a throw with four instead of five repeats would require about 1660 yds. of Knitting Yarn. Figuring very generously to be safe and to account for the +8 sts in each row, for a throw I would need nine 219-yd. skeins of Knitting Yarn; or ten 200-yd. skeins of Note; or at least five 383-yd. skeins of Good Wool.
Just offhand, I’d be inclined to reduce the height by eliminating all the repeats in the Ribbed Pyramid section and possibly some repeats in the Small Flag section.
Does this make sense?
Thank you very much, and my apologies for the crudeness of my scheme.
Hi Judith,
So glad to hear that you love this pattern! I did the calculations, and you would need a total of 1230 yards of DK weight yarn to make a blanket that measures 35 by 40 inches. That would mean you’d need 6 skeins of Knitting Yarn or 7 skeins of Note. Good Wool is thinner than those two yarns, so your gauge will likely be smaller. As a rough estimate though, I think you would need 4 or 5 skeins of Good Wool for the same dimensions. Hope this helps you plan your project!
All the best,
Lili
Thank you so much for all of your help, Lily. Your expertise and encouragement are most appreciated!
I am having trouble getting started after casting on
How do I slip 3 purlwise at beginning of row ? I seem to always have a loose connection?
I’ve restarted a few times but cannt seem to fix it?
Hi Lorenda,
Thanks for writing in! You will have a bit of a loose feeling float behind the 3 stitches you slip. This will go away as you keep knitting though, since the tension evens out! If it continues to both you after knitting a few inches (you can try on a swatch first so that you don’t have to knit so many stitches), then please send a photo to [email protected] so we can take a closer look!
All the best,
Lili
I’m having the same issue – I’m starting over one more time and adding a stitch to each end. I’ll knit that single stitch then proceed with the pattern in hopes I can avoid the sloppy look. I’d finished section A and my edge looked so bad
Hi Kathy,
We’re so sorry that you weren’t happy with the way your edge turned out the first time! If you’d ever like us to take a look at your work, just email us a photo so we can help figure out what might be going wrong.
All the best,
Lili
Everyone has mentioned wanting to make the blanket baby-sized, but I want to make it as a wedding blanket for my 6’3” tall son. What strategy would you suggest?
Hi Janette,
That sounds like a very fun project! You can follow my advice to previous commenters, just using the width you plan to use (which would be wider instead of narrower).
All the best,
Lili
Okay, sport weight, machine washable. How much yarn do I need for a baby blanket of this wonderful pattern?
Happy holidays!
Hi Liz,
Thanks for writing in! Can you please let me know what yarn you’re thinking of? Are you interested in Cotton Pure On A Cone perhaps?
All the best,
Lili
When purchasing a cone for the blanket will you send a hard copy of the pattern? There is so much extra stuff included it makes too many pages to print.
Thanks,
Phyllis
Hi Phyllis,
Thanks for writing in! We’re happy to include a hard copy of this pattern in an order. Just request a hard copy in the Special Instructions field on the checkout page, making sure to mention the pattern by name so we know which one you want!
Alternatively, you can follow these instructions to print out a copy on your end: If you’re on your computer, you’ll find a “print” icon in the right column just below the “Save To Favorites” button. If you’re on a mobile version of the site, you will find the “print” icon below the pattern and above the comments.
Click on this button, and a window will pop up where you can delete whichever parts of the pattern you don’t want to print. When you hover over any image or a text block, it will be highlighted in yellow and a “trash” icon will appear. Just click on this icon to delete anything that’s not necessary to the pattern! For example, you may decide to shorten the pattern by omitting certain images or the list of materials. Then, just click on the “Print” button in the upper left-hand corner of the pop-up window!
All the best,
Lili
Sorry for being incomplete. Machine washable wool is my preference or a blend of machine washable fibers without any acrylic or nylon. Only plant or animal fibers please. Baby blanket size for Porto.
Thanks.
We don’t have any sportweight superwash wool yarns that would work for this pattern, but Cotton Pure would be a great choice! This yarn is 100% cotton, so it’s machine washable. You would need about 5 skeins for a baby blanket size!
All the best,
Lili
Hi, I purchased the 10 skein kit for the Sand Drift Blanket in Sweetgrass. I think I would like to make the Porto with this yarn instead. Would two strands of Sweetgrass knit together work to make the Porto blanket?
Many thanks
Hi Kathryn,
Thanks for writing in! You should be able to hold Sweetgrass together to reach the gauge of this pattern. Since you already have the yarn, I’d just recommend knitting up a gauge swatch to test that out! You may just need to size your needles up or down to achieve the gauge.
All the best,
Lili
I am about to start on this major project.
Like Lorenda I am concerned about those (3) slipped stitches at the beginning of most (all?) rows. Is there a reason for me not to alter patter to just slip one and then knit or purled the next two instead?
Hi Anneke,
Thanks for writing in! This pattern was designed with an i-cord edge, which is a very common (and beautiful!) type of selvage. The great part about an i-cord edge is that it only shows the knit side of the fabric all the way around. If you knit/purl two of the stitches, then you will be able to unroll the edge and view the purl side on the back. You can certainly do it this way, but you’ll get a slightly different result than an i-cord edge!
All the best,
Lili
Hi just wondering what washable yarn do you carry for this Porto blanket
Hi Pat,
Thank you for writing in! Pepper in Heirloom White would be a great alternative for this pattern but Morning would also be a wonderful option!
I hope this helps!
All the best,
Gavriella
Hi Lili,
Purchased a cone in Iron Grey for the beautiful Porto Blanket as my 2025 big knitting project that has no finish date : ). My question – is I am looking at knitting one of the sections in a color to compliment all the grey. I see the Knitting Yarn comes in skeins, not all colors of the cone, but I think I found one that would work for me, Sweet Melon. It is the section that looks like Mountain Peaks. How many skeins should I purchase to knit this section?
Thank you! This is a great 2025 project, Looking forward to it.
Jean
Hi Jean,
Thanks for writing in! I’m afraid we don’t have yardage estimates for each section but I have an idea oh how you can get a rough estimate! You will want to start by knitting a gauge swatch with Knitting yarn for just the section you will be working the Sweet Melon. After you have created your gauge swatch you can weigh it in grams and divide the square footage (in inches) of your swatch by the total number of grams. This will give you your grams per square inch which you can then use to calculate your yardage for each section!
I hope this helps and happy making!
All the best,
Gavriella
Thank you Gabriella, that is great….. that is what I will do, perfect solution! I will do that, then I will know how much Melon to order.
Thank you so much : )
Jean
You are very welcome and happy making!
I love the looks of this Porto blanket and all the different stitches. Is there any chance you could adapt the basics of this and write us a pattern as a shawl or as a scarf?
Hi Carol,
So happy that you love this pattern! You can absolutely knit a narrower version for a wrap or scarf. The overall stitch multiple is 48 + 8 stitches, so just make sure that your new stitch count aligns with that!
All the best,
Lili
Hi Lili,
Will I be playing yarn chicken? I started with a full Yarn on a Cone; just finished Section I, all knit per the pattern. I calculate 90 more rows. Has anyone reported running out?
If I knew the weight of the cardboard cone, I could calculate the remaining yardage. Of course I might leave out a repeat, but if necessary I’d rather do that sooner than later.
BTW, I am loving the yarn: there’s nary a knot!
Hi Marsha,
Thanks for writing in! Can you please let me know what the measurements from your gauge swatch were? Checking your gauge is the best way to determine if you’re on track with the yardage!
All the best,
Lili
I love everything about this — the pattern, the ease of using a cone of yarn — except … the yarn is not washable. It would be great to have a washable yarn available on a cone.
Hi Jane,
I think that our Cotton Pure On A Cone would be the perfect yarn for you to try out!
All the best,
Lili
I appreciate this option, Lili. Thank you.
Why do you put the cone on sale and all the colors are sold out? I’ve been wanting to purchase the yarn for this blanket for a while and cones are never available.
Hi Becky,
We’re so sorry that Knitting Yarn On A Cone is out of stock right now! We received an unprecedented amount of interest in this yarn, and we’re working hard to make it available again as soon as possible. We’re hoping to have all colors of Knitting Yarn On A Cone back in stock by mid-February. We’re so sorry for the delay and are anxious to see it back too!
If that’s not too late for you, we’d recommend signing up to be notified when it returns by going to the product page, selecting any color you’re interested in, and entering your email address. This way, you’ll be among the first to know!
I hope this helps, and please let me know if you have any other questions.
All the best,
Lili
Hi, I am at the eyelet triangle pattern and not sure I understand the instructions for YO 2 times… I K2tog which decreases my stitch count by 1, but if I YO 2 times doesn’t that increase my stitch count by 1? Or is it saying (K2tog , YO, K2tog YO)?
PS – I am using cotton pure on a cone and 200 stitches… I left out 12 rows on the triangle pattern and will shorten up the middle section and I think k it will be a perfect baby blanket size for those asking.
Hi Andrea,
I’m happy to help explain! Within the pattern repeat (the segment between square brackets), there are 2 total increase stitches and 2 total decrease stitches. The 2 increase stitches are the 2 yarn overs you work in a row, and the 2 decrease stitches are the k2tog and the ssk. This balances out all the stitches so that the stitch count remains the same!
All the best,
Lili
I am having problems with this part from Section C: Eyelet Triangle;
Row 3: Slip 3, p1, *k6, knit 2 together (k2tog), [yarn over (yo)] 2 times, slip slip knit (ssk), k6, repeat from * to last 4 stitches, p1, k3
The repeat for this pattern is supposed to be 16sts but when I follow the instructions it will be 18sts:
6(k) + 1(k2tog) + 2(1st yo) + 2(2nd yo) + 1(ssk) + 6(k) = 18sts
Hi Lin,
It looks like you’re counting each yo as 2 stitches, when they should each just be 1 stitch! Here’s how the math works out: 6(k) + 1(k2tog) + 1(1st yo) + 1(2nd yo) + 1(ssk) + 6(k) = 16sts. Let me know if that makes more sense now!
All the best,
Lili
Hi,
I am having the same problem.
When I get to the end of the repeated pattern at row 3 I have 6 stitches left over (before the 4 stitches of the edge)
When you count the stitches it ends up being
6 (k) + 1 (k2tog) + 2(yo- as stitch increased) + 2 (yo) + 1 (ssk) + 6 (k) = 18
Am I doing something wrong?
Hi Sohee,
It looks like you’re counting the yo’s twice! Each yo increases from 0 to 1 stitch, so when you work two yo’s in a row, that goes from 0 stitches to 2 stitches total.
All the best,
Lili
Hi, This is a lovely pattern. Is there a PDF or other downloadable version available? I do see the PDF for the charts.
Thanks, Elizabeth
Hi Elizabeth,
We’re so glad this pattern has caught your eye! Here is how you can download a PDF version of any of our free patterns: If you’re on your computer, you’ll find a “print” icon in the right column just below the “Save To Favorites” button. If you’re on a mobile version of the site, you will find the “print” icon below the pattern and above the comments.
Click on this button, and a window will pop up where you can delete whichever parts of the pattern you don’t want to print. When you hover over any image or a text block, it will be highlighted in yellow and a “trash” icon will appear. Just click on this icon to delete anything that’s not necessary to the pattern! For example, you may decide to shorten the pattern by omitting certain images or the list of materials. Then, click on the “PDF” button in the upper left-hand corner of the pop-up window. Once your PDF has finished downloading, just click the “Download PDF” button, and it will be saved to your computer! (You can also just click the “Print” button if you’d like to print the pattern.)
All the best,
Lili
I want to calculate yardage on an already used cotton pure in a cone. Can you guide me using the weight of the cone? I have 648 grams left
Hi Mimi,
The cardboard within the cone weighs approximately 30g, so you would have 618g (or 1724 yards) of yarn left!
All the best,
Lili
I’m a bit confused with Section 3 Eyelet Triangle. I’ve completed rows 1-18 and rows 17 & 18 are repeats of rows 1 & 2. Then the pattern begins again. So between the repeats there is knit row (17) purl row (18) then knit row (1) purl row (2). The photo of the blanket seems to only have one knit and purl row between repeats. Can you explain what I’m doing wrong here.
Hi Lee,
Thanks for writing in! I can confirm that there are indeed four rows total of plain stockinette between the end of the first lace section and the beginning of the second. The eyelets in the tips of the second set of triangles rest slightly higher than the eyelets within each set of triangles!
All the best,
Lili
Does anyone else have problems counting the rows? I am a new knitter…
Thanks
Hi Marilyn,
Never fear, that’s a super common problem to run into, for beginner and experienced knitters alike! I’d recommend using a row counter, or simply write down tally marks, to keep track of what row you’re on.
All the best,
Lili
Hi. My question has more to do with the yarn than the pattern, which is lovely. Specifically, I was wondering if the Kinitting Yarn on a Cone still contains spinning yarn from the mill and if so, how does that affect gauge and the feel of the knitted fabric. Thanks
Hi Jody,
Thank you for writing in! The yarn itself is exactly the same on a cone vs in a skein, but we have found that it tends to be wound a bit tighter around the cone which can lead to the yarn feeling a bit thinner at first but this yarn does not contain spinning oil. It relaxes quickly once off the cone, and blocking also helps make it a bit more fluffy!
All the best,
Lili
Thanks. One more question—I assume the pattern calls for 3 slipped stitches at the beginning of each row and 3 K stitches at the end to create an I-cord edge. Could it also be done by slipping 3 stitches at the beginning of the row and knitting 3 at the end. I’ve done it that way on other patterns so I was wondering if it would work here. Thx
You’re very welcome! I-cord edges can be created in many different ways, so you’re welcome to choose a different method that you prefer!
All the best,
Lili
Can you make a cotton yarn suggestion for this beautiful blanket?
Hi Suzanne,
Thanks for writing in! This pattern was designed for a DK weight yarn, so I’d recommend using either Serif or Morning for DK weight cotton options. While Serif is made from 100% cotton, Morning is 75% cotton and 25% yak fiber, which adds a bit of elasticity.
Some people have also been interested in modifying the blanket to work for Cotton Pure or Cotton Pure On A Cone, which is a 100% cotton sportweight yarn! To make this blanket work for this thinner yarn, you would just need to cast on more stitches to make sure it comes out to the intended size. This pattern works over any multiple of 48 + 8 stitches!
All the best,
Lili
Hello Purl team.
I am knitting the Porto Blanket but am confused on Section C: Eyelet Triangle.
Row 3:
Slip 3, p 1,k6 (no problem) then…
k2tog, yarn over, 2 times. slip slip knit.
Each time I do this I am left with 5 stitches instead of 6.
Should the yarn over not come before the k2tog.?
For example: If I pull the bring the yarn to the front (after the k6) then k2tog I end up with the right number of stitches but if I k2tog first then pull the yarn fwd. (twice) then ssk, I end up with 5. 🤔
Am I making sense?
Hi Ann-Marie,
Thanks for writing in, and I’m happy to help out! Have you tried taking a look at the charted version of this stitch pattern yet? I always find it helpful to look at charts for lace patterns since they help me visualize how each stitch lines up with the other stitches. I’d recommend taking a look at that if you haven’t already done so!
Overall though, you should always have a total of 16 stitches per pattern repeat. This is how Row 3 adds up:
k6 – 6 stitches
k2tog – 1 stitch
yo – 1 stitch
yo – 1 stitch
ssk – 1 stitch
k6 – 6 stitches
I hope this helps you get back on track, but please let me know if you have any other questions!
All the best,
Lili
Ah! I was reading it incorrectly.
I thought it meant k2tog. yo 2 times. Instead of yo 2 times. I had ignored the comma in between.
Thank you Lili. 🙏🏻
It really is a beautiful and interesting pattern.
Ah, that would do it! And you’re very welcome!
All the best,
Lili
Slip three with yarn in front? Or slip three with yarn in back? The pattern says to see “notes” but there is nothing written under notes on my computer. Thanks, Pat. (Porto blanket)
Hi Pat,
I’m not sure why nothing is appearing in the NOTES section for you, but here’s what the note on slipped stitches says!
SLIP STITCHES
On right-side rows: Slip stitches purlwise with yarn in back (wyib).
On wrong-side rows: Slip stitches purlwise with yarn in front (wyif).
All the best,
Lili
Hello!!
I have such a DUMB question! When knitting a gauge swatch, the instructions usually say to block my swatch before counting stitches per four inches. I assume that that is what I need to do here, but do I end up frogging the entire swatch to use for making the blanket? Sorry!! I hate swatching and just want to make sure that I’m doing it right.
Thank you.
That’s a good question! If you plan on blocking your finished project, you should block the gauge swatch as well, since that will give you the most accurate prediction of your finished gauge. You’ll have enough extra yardage to not have to reuse your swatch yarn for this project, but in other cases where you have to conserve yarn, then yes, you can absolutely reuse it! Any inconsistencies in the texture will even out once you block your entire project after you finish knitting it.
All the best,
Lili
These comments were regarding the Good Morning Blanket. I’m sorry! I got the two confused in my browser.
No worries! The same goes for any knitting project, so it’s good advice regardless!
All the best,
Lili
Thanks, Lili! I’ve never gotten a solid answer on this. I appreciate it.
Help! I’ve tried to work out section C, the eyelet triangles, frogging it back 8-10 rows twice now, and I still don’t know what I’m doing wrong. When I get to the end of the third row of this section, where I should k6 before the last 4 stitches for the I-cord edge, I have only 5 stitches, not 6. The second time around I quadruple checked and didn’t drop a stitch anywhere, started with the correct number of stitches, followed the pattern (or so I think), but couldn’t find any errors, so I tried adding a stitch and saying a prayer lol! But when I get to the end of row 6, the eyelet holes aren’t lined up correctly. What could I be doing wrong?? I don’t want to give up on this blanket, but my frustration is rising.
Hi Meredith,
I’m so sorry that you’re running into trouble, and I’m happy to help! Since you ended up with one too few stitches by the end of that row, it sounds like you may have skipped just one decrease stitch somewhere along the way. I’m not sure exactly where that would have happened, but I can give you a suggestion on how to avoid it next time you try again! If you place a stitch marker after the first 4 edge stitches, and then another marker after every 16 stitches, you can double check your stitch count on every single pattern repeat to make sure you end up with the correct number for each one of them. This should help you stay on track throughout the entire row!
All the best,
Lili
Dear Lili,
How can I print out the comments or save them as a PDF. There are so many helpful comments connected to this blanket patterns and I would like to be able to reference them when I start the project. Thanks!
Hi Lisa,
That’s a great idea! I’m afraid that we don’t have a great way of printing out or saving the comment section specifically (unless you print the entire page directly from your browser, but we’ve found that that doesn’t always have the best formatting). I’ll pass along your message to the rest of my team so that we can look into adding that option in the future!
All the best,
Lili
You can always select the pages you want to print. So if the pattern ends, let’s say at the 10th page, but the whole page goes for 40, you can select 1-10 pages to print while printing from browser or from pdf.
Hi! I was knitting the pattern and I’m at the Eyelet Triangle section. I was wondering if there ias a mistake. So I knitted the first 1-16 and wanted to start to one eyelet row (3-4) but pattern says I need two more rows of stockinette knitting. So I did but my section looks different from the photos. Should I really skip the first(or last) two rows?
Hi Pelin,
I can confirm that the pattern is correct as written! It’s a bit hard to tell due to how the triangles are oriented, but there are indeed four rows of stockinette between the end of the first set of triangles and the beginning of the second set.
All the best,
Lili
If I want to knit this lovely blanket as a throw of 35 x 40 how much should I cast on ?
I think I need 1600 yards.
Hi Patti,
Thanks for writing in! To figure out your new cast-on number, you’ll first multiply the number of stitches per inch (5.5 stitches, according to the gauge of the pattern) by the width that you would like and cast on the nearest multiple of 48 + 8 stitches. Then you can follow the pattern essentially as written! The only other change you would need to make is adjusting for a shorter length. To do that, you can either work each section for a shorter distance, or you can omit sections.
Happy making!
Gavriella
Hi! Could you provide the height in inches of each section? My row gauge is off (I’m getting fewer rows per inch than the pattern gauge), and I want to know how tall each finished section should be, so I can add the extra rows I need. Thanks!
Hi Emily,
Thanks for writing in! Because each section has a pretty large pattern repeat in terms of the number of rows, it may be best to distribute the changes in row count across sections, rather than try to match each exactly. That way, you can fully complete pattern repeats! Also, I wanted to mention that if you’re getting fewer rows per inch, then you’ll need to omit rows (rather than add them) since your row gauge is bigger than the pattern’s.
I hope this helps, and please let me know if you have any other questions!
All the best,
Lili
I thought I finally did row 3 of the eyelet triangle correctly after a couple of tries, but when I try to move on to row 4, the purl through the back loop occurs at the yo 2 times. Do I treat the 2 yarn overs as 1 loop for the purl through the back loop? It makes a large opening if I do that. Is that correct?
Thank you!
Hi Eileen,
When you reach the two yarn overs on Row 4, you will purl the first one normally through the front loop, and then purl the second one through the back loop. This does end up creating a pretty large eyelet! If you’re worried your work doesn’t look correct though, please send a photo to [email protected]. That way we can better visualize what’s going on!
All the best,
Lili
Hello again –
Never mind my question about row 4 of the eyelet triangles from last night. I figured it out. Purl #8 is done with the first yarn over and the purl through the back loop is done with the second yarn over. It makes a little border around the opening- which is lovely!
Thanks!
I’m a bit confused about section D. The chart looks like there should be a Purl row, then a knit row as a base and then p1 k1 for row 1 then k1 p1 for row 2 then repeat for 3 and 4.
But the instructions have p1 k1 for both rows 1 and 2. Am I missing something or does the pattern have a mistake
But t
Hi Bethany,
Thank you for writing in! Both the chart and the written instructions reflect the same set of instructions on our end but we’d love to have a deeper look into this issue if you are seeing something different!
Both instructions should reflect:
Row 1: Slip 3, purl 1, *purl 1, knit 1, repeat from * to last 4 stitches, purl 1, knit 3.
Row 2: Slip 3, knit 1, *purl 1, knit 1, repeat from * to last 4 stitches, knit 1, purl 3.
I hope this helps but please let us know if you have any other questions!
All the best,
Gavriella
Hi there, just wondering if this sampler could be made using the Cotton Pure On a Cone?
Hi Leasel,
You can absolutely make this blanket with Cotton Pure! However, because that yarn is thinner than Knitting Yarn (it’s a sport weight yarn while Knitting Yarn is a DK weight), the knit fabric will be looser when knit at the gauge of the pattern. You could also knit it at a tighter gauge and cast on more stitches! This pattern works over a multiple of 48 + 8 stitches.
All the best,
Lili