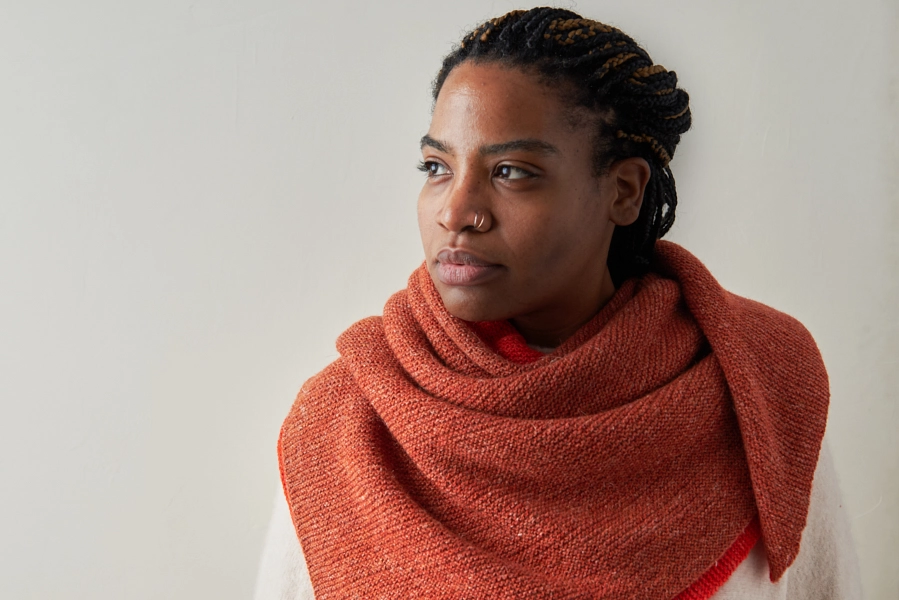
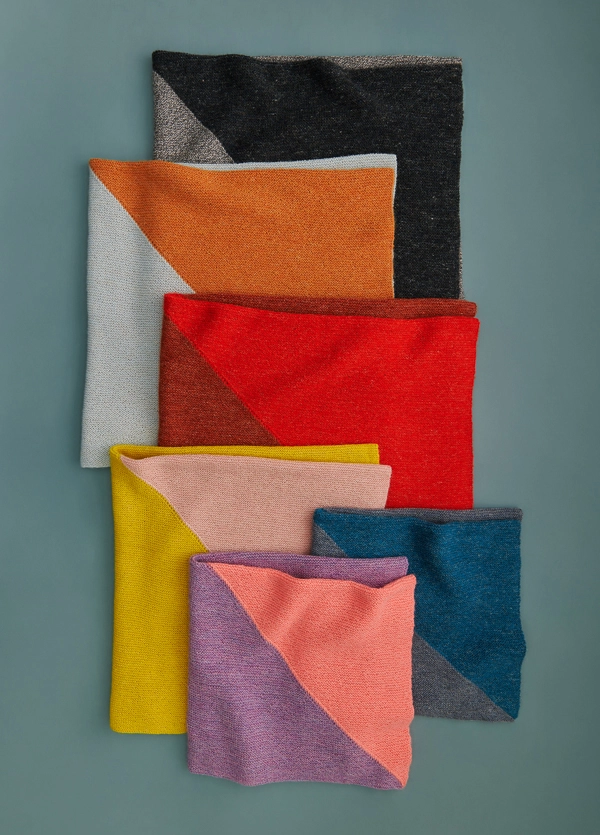
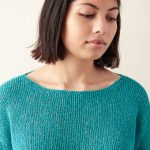
Half + Half Triangles Wrap
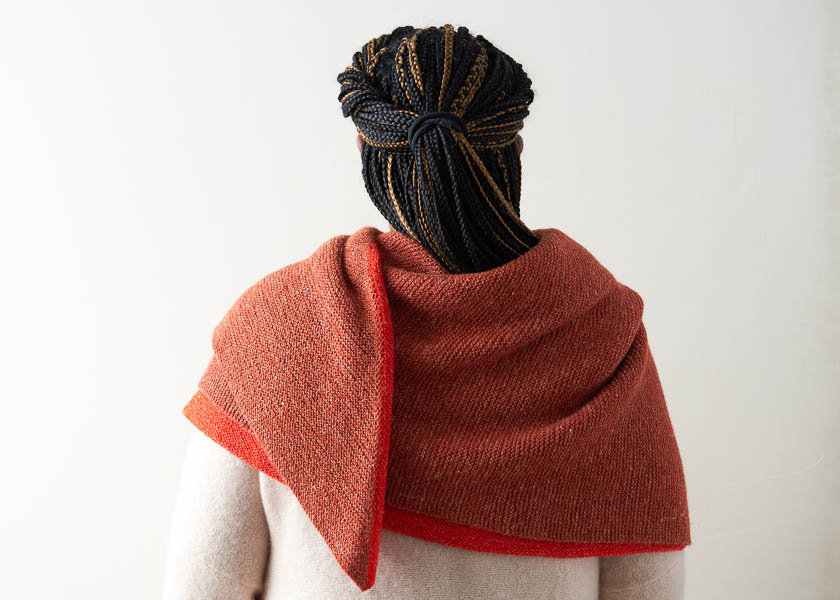
Our Half + Half Triangles Wrap embraces the wearer in a play of shape and color, like a gorgeous faceted gem!
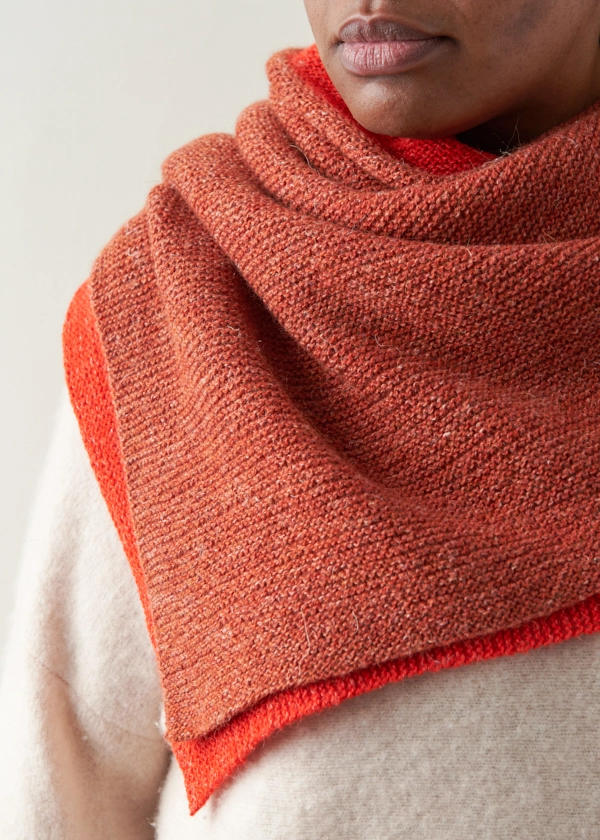
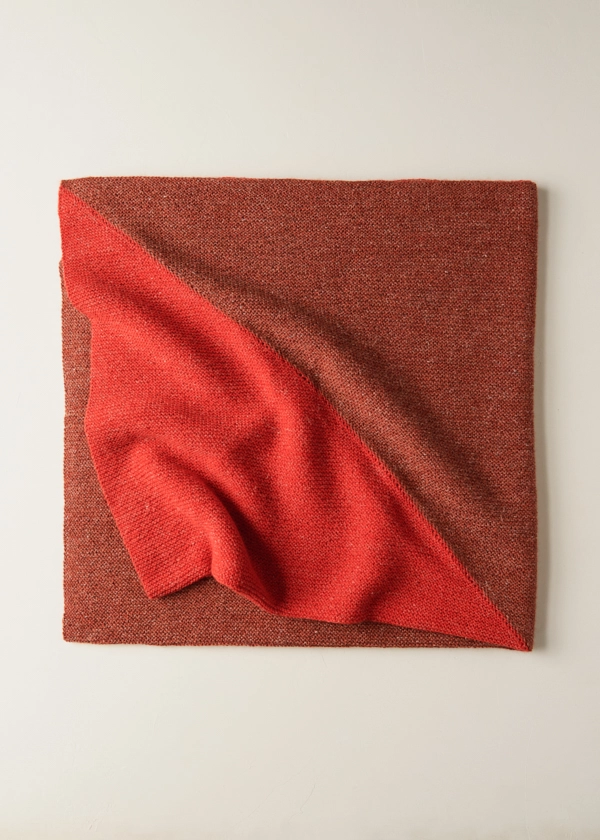
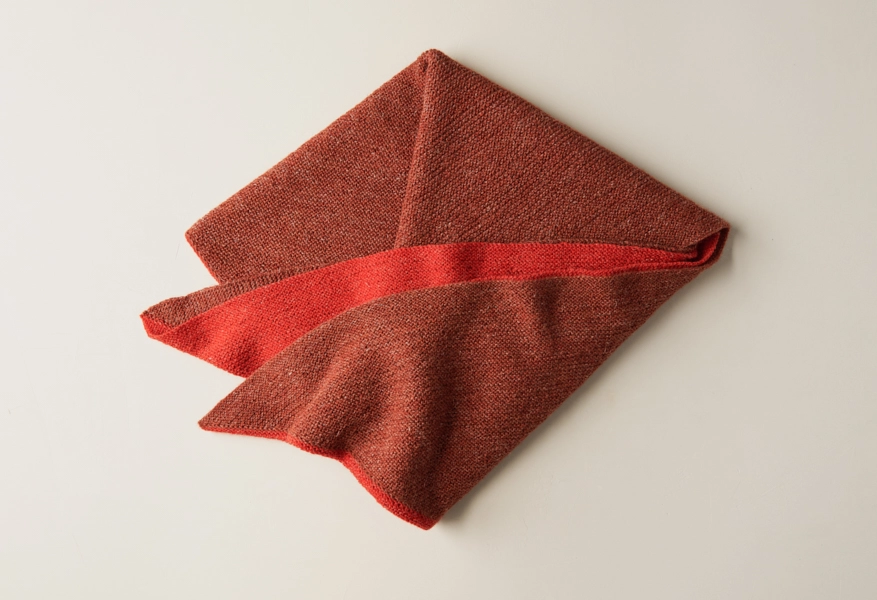
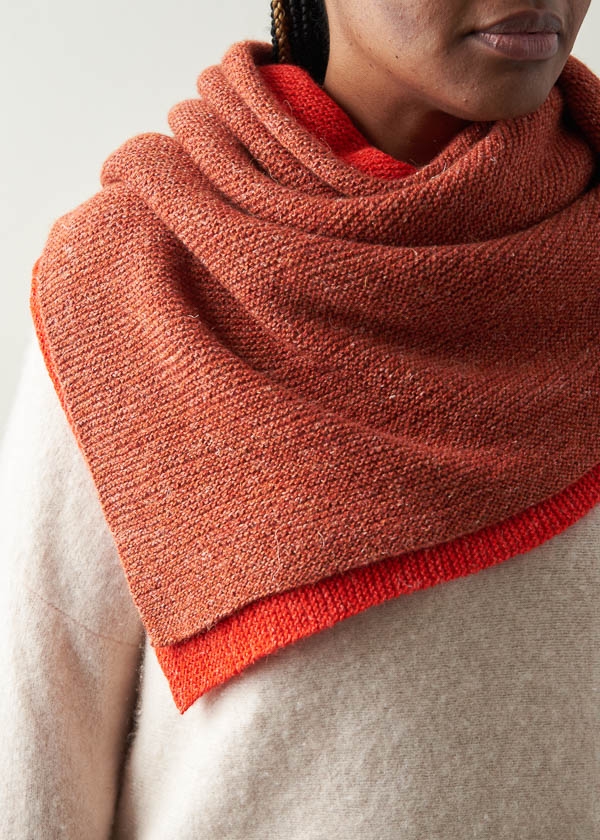
A clever construction where short rows create two connected triangles, this knit transforms a simple garter stitch square into a double layered triangle. Fold the square along the color divide and choose which side will be front and center for the day!

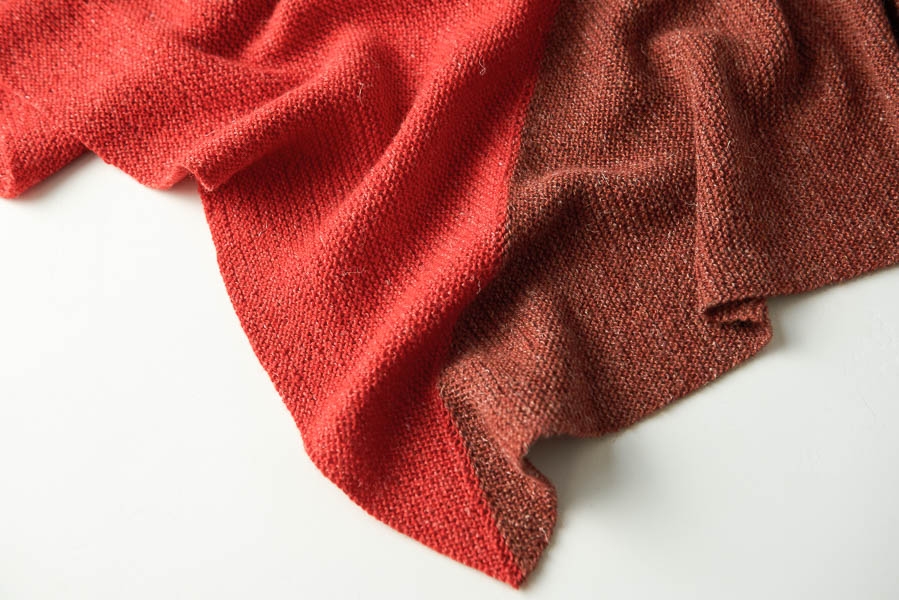
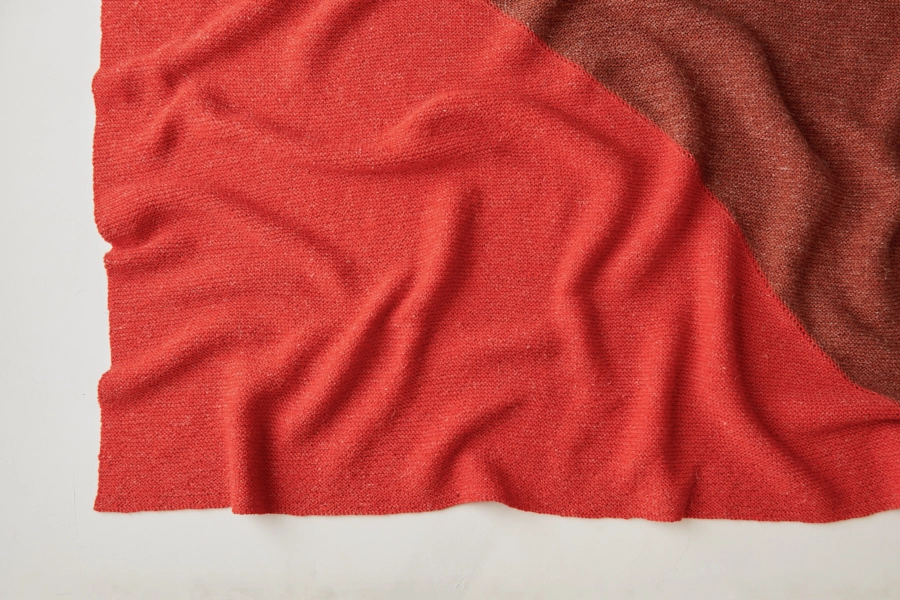
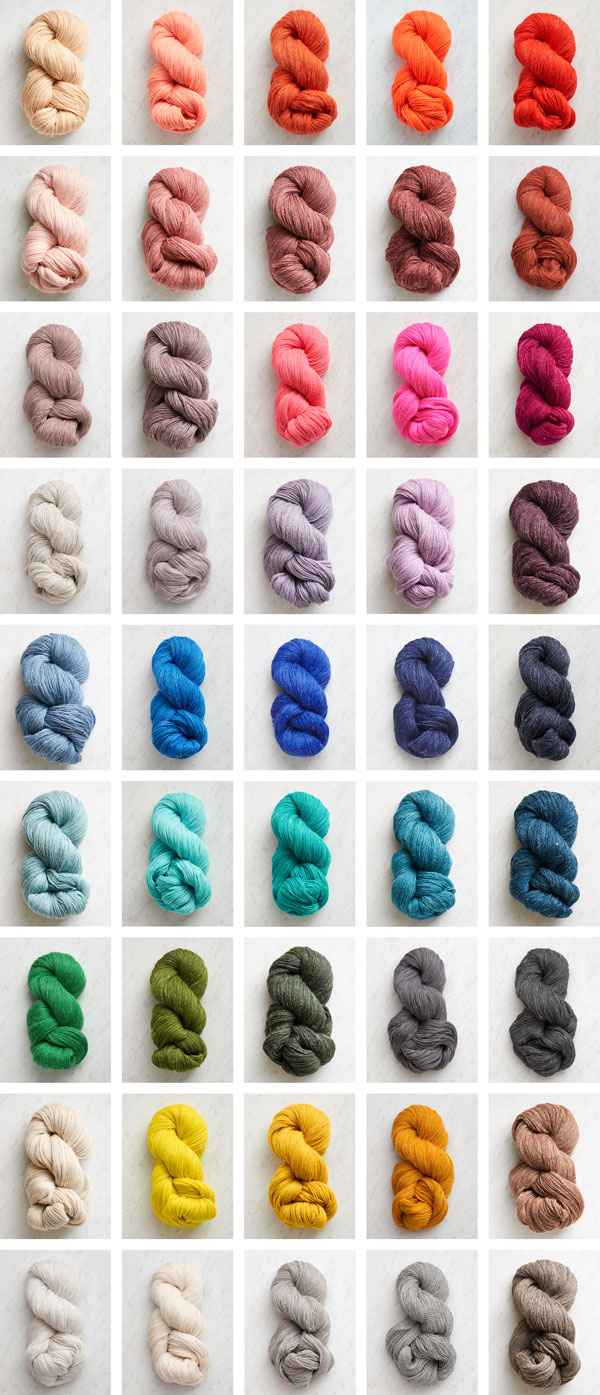
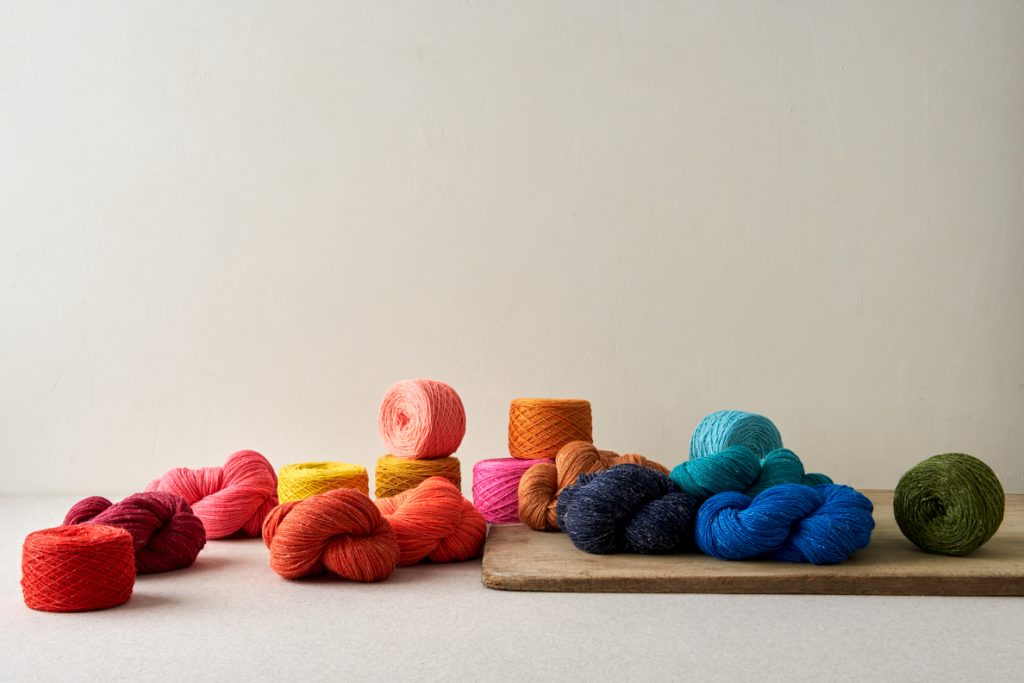
We’re pretty excited about all the color possibilities, having just added 16 brand new colors to our collection of Linen Quill. A fingering weight yarn softly spun from fine highland wool, alpaca, and linen, Linen Quill now comes in almost fifty incredible colors!
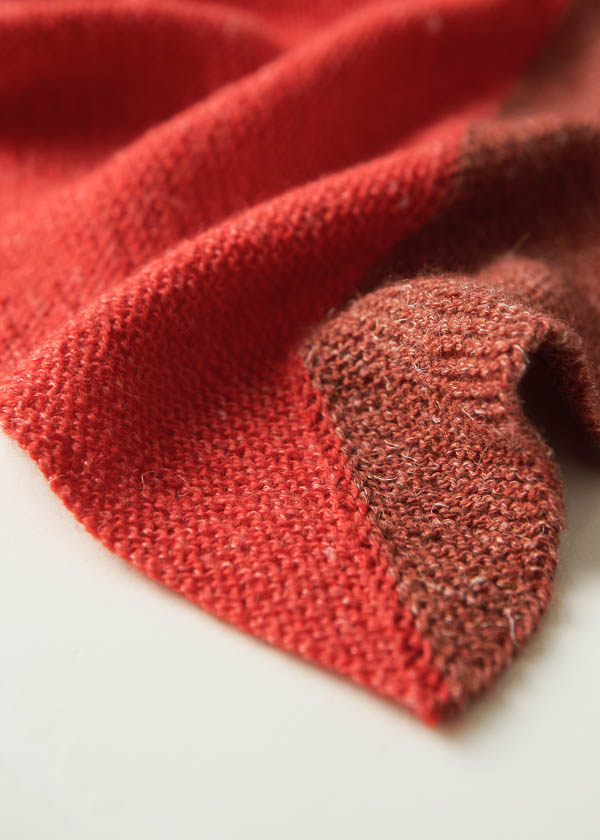
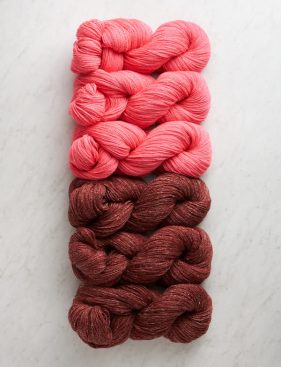
We used classic Kiln Red with fresh-from-the-mill Poppy Red for an earth and fire incandescent glow. Scroll down for tons more combo ideas, each pulling from a different slice of the rainbow!
Our Half + Half Triangles Wrap pattern has instructions for two sizes: Big and Bigger (we went with bigger!). Either way, it’s wonderfully easy knitting, totally beautiful color fun, and exactly what we want to wear!
UPDATE: DOUBLE THE FUN WITH STRIPES!
SEPTEMBER 2022
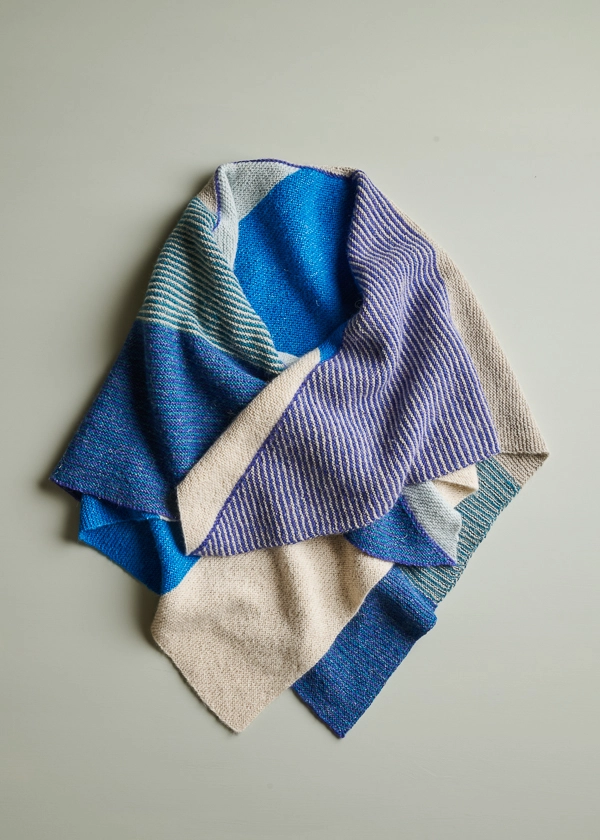
Our Striped Half + Half Triangles Wrap uses the same clever construction as the original, but now with an engaging array of stripes to give knitters that just-one-more-row-ness that makes this project so satisfying. Cozy as ever, Linen Quill is still the star of the show, now in Striped Half + Half Triangles Wrap Bundles!
UPDATE: NOW IN LOTS OF NEW COLORS!
SEPTEMBER 2023
For the love of knitting, we are happy to offer a new collection of bundles for this wonderful wrap! The pattern is both easy and inventive, but the true impact of this knit is due to one-of-a-kind Linen Quill and its humongous palette of over fifty colors. From such plenty, we had a blast making sixteen new bundles, for a total of nineteen Half + Half Triangles Wrap Bundles! Pick your favorite and cast on for this beloved knit!
Designed by Purl Soho designer, Jake Canton. Click here to see even more of Jake’s designs!
Share your progress and connect with the community by tagging your pics with #PurlSoho, #PurlSohoBusyHands, #PurlSohoHalfAndHalfTrianglesWrap, and #PurlSohoLinenQuill. We can’t wait to see what you make!
Materials

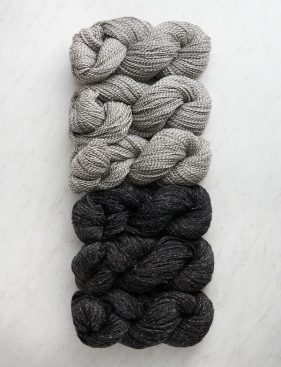
- Color A: 2 (3) skeins of Purl Soho’s Linen Quill, 50% fine highland wool, 35% alpaca and 15% linen. Each skein is 439 yards/ 100 grams; approximately 791 (1,087) yards required. We used Kiln Red.
- Color B: 2 (3) skeins of Linen Quill; approximately 845 (1,160) yards required. We used Red Poppy.
- US 3 (3.25 mm) straight or circular needles
- A stitch marker
Our Half + Half Triangles Wrap Bundle includes the yarn you’ll need for a Big (Bigger) size wrap. Pick your favorite bundle!
NOTE: Some palettes below may no longer be available as bundles, but you can still buy the skeins individually or create your own combo with over 50 Linen Quill colors to choose from!
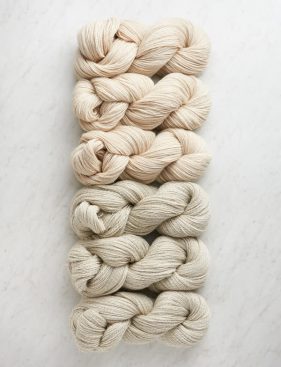
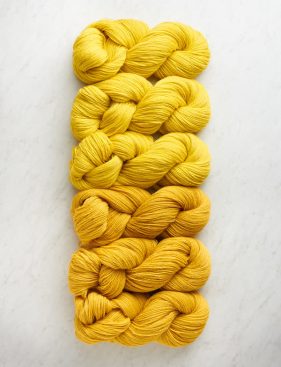

Top Row
- Color A: Wheat Flour; Color B: Oatmeal Gray
- Color A: Dandelion Yellow; Color B: Mustard Seed
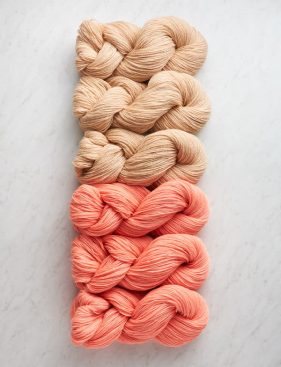
Second Row
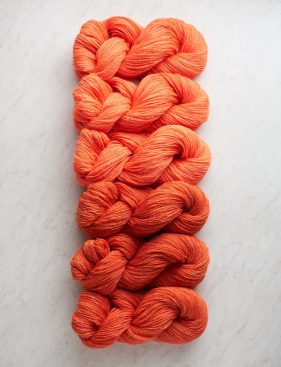
- Color A: Honey Pink; Color B: Peachy Pink
- Color A: Super Orange; Color B: Sweet Potato
Third Row
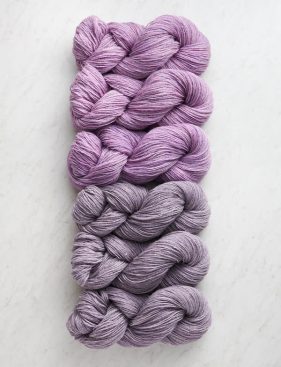
- Color A: Crocus Bud; Color B: Purple Smoke
- Color A: Pink Pop; Color B: Rhubarb Pink
Fourth Row
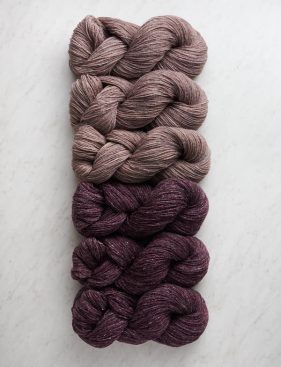
- Color A: Peach Stone; Color B: Dark Iris
- Color A: Salt + Pepper; Color B: Kettle Black
Bottom Row
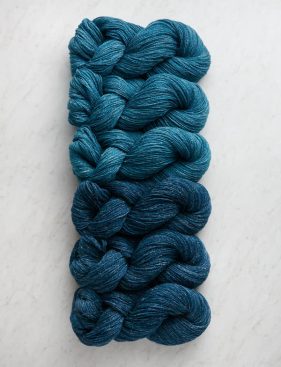
- Color A: Eggshell Blue; Color B: Green Turquoise
- Color A: True Turquoise; Color B: High Tide
Gauge
24 stitches and 48 rows = 4 inches in garter stitch
Sizes
Big (Bigger)
Unblocked Dimensions: 27½ (37¾) inches wide x 32 (44) inches long; approximately 42 (58) inches along the fold
Finished Dimensions: 31¾ (43) inches wide x 31¾ (43) inches long; approximately 45 (61) inches along the fold
Sample: We knit up the Bigger size here.
Notes
WRP-T (Wrap And Turn)
Keeping yarn in back, slip next stitch purlwise from left needle to right needle. Bring yarn to front. Return slipped stitch to left needle. Turn work so wrong side is facing you.
To see this technique in action, visit our Short Row Tutorial and follow along with the wrap and turn on the knit side section (at 0:30 seconds), except do not bring the yarn to the back before you turn.
Knit With Wrap
Keeping yarn in back, pick up the wrap with the right needle from front to back, then insert the needle into the wrapped stitch knitwise. Knit the stitch and wrap together. Find step-by-step photos of this technique under the Picking Up The Wrapped Stitch On The Knit Side section in our Short Row Tutorial!
Construction
You will knit this piece lengthwise.
Due to its construction, the unblocked dimensions are fixed to a set ratio. The length of the scarf can be altered by casting on any number of stitches, and the width dimensions will always be approximately 90% of the length. If wet blocking, the piece should block out to an approximate square.
Pattern
Triangle 1
With Color A, cast on (190) 260 stitches.
Row 1 (right side): Knit to end of row.
Row 2 (wrong side): Knit to last 3 stitches, place marker (pm), k1, wrap and turn (wrp-t, see Notes).
Row 3: Knit to end of row.
Row 4: Knit to marker, remove marker, wrp-t.
Row 5: K1, pm, knit to end of row.
Repeat Rows 4 and 5 until you have wrapped every stitch except the last two, ending with Row 5.
Next Row (wrong side): K1, remove marker, wrp-t.
Next Row (right side): K1.
Next Row: K1, *knit next stitch with its wrap (see Notes), repeat from * to last stitch, k1.
Cut Color A.
Triangle 2
Row 1 (right side): With Color B, knit to end of row.
Row 2 (wrong side): Knit to end of row.
Row 3 (right side): K1, wrp-t.
Row 4 (wrong side): K1.
Row 5 (right side): K1, knit next stitch with its wrap, place marker, wrp- t.
Row 6 (wrong side): Slip marker, knit to end of row.
Row 7 (right side): Knit to marker, remove marker, knit next stitch with its wrap, place marker, wrp-t.
Repeat Rows 6 and 7 until you have completed a wrap and turn on the second to last stitch.
Repeat Row 6.
Next Row (right side): Knit to last marker, remove marker, knit next stitch with its wrap, k1.
With the wrong side facing you, bind off knitwise.
Weave in the ends and block!


I am curious why Purl Soho (which I love) recommends the wrap and turn short row method vs the German short row method. I am new to short rows and this is why I am asking.
Thank you,
Peggy
Hi Peggy,
Thanks for reaching out, and that’s a great question! While we generally recommend using whichever method you prefer (they’re usually interchangeable), wrap + turn short rows work much better for the Half + Half Triangles Wrap. They create a more uniform “seam” along the diagonal of the wrap, and the wraps also blend into the garter bumps of the knit fabric. I hope this helps clarify things!
All the best,
Lili
Do you knit one side separate, then the other, What size length of cable do you use.
Hi Linda,
Thanks for reaching out! In this pattern, you will knit Triangle 1 first, using short rows, and then you will join in the next color to knit Triangle 2 (also with short rows). I’d recommend using 47-inch long circular needles if you’re knitting the Big size or 60-inch long needles if you’re knitting the Bigger size. They’ll just need to be longer than the length of the diagonal of the wrap, so that your stitches aren’t in danger of falling off the needle!
All the best,
Lili
I’m, finally, starting my second color and have a question. Hopefully you’ll understand what I’m asking.
I work the second triangle with the new color exactly as I did the first (using GSR, I leave two unwrapped stitches at the beginning and at the end). I did this and it looks good.
Now I start on # 2(the new yarn is on)…I knit 3 stitches, turn the work, wrap that third stitch and knit to end of row. Next row knit the three, “resolving” that third stitch, add a stitch, turn work, wrap the new stitch and knit to end of row…and so on until I’ve completed the second triangle. Perhaps I’m over thinking this but I want to make certain I’ve got this right. I wish there was a written pattern using GSRs.
Thank you!
Hi Joyce,
I believe you have the right idea! When using German short rows instead of wrap + turn short rows, all you’ll need to do is knit one additional stitch before making the double stitch. So for example, if the pattern says “Knit to marker, remove marker, knit next stitch with its wrap, place marker, wrp-t,” you’ll actually need to “Knit to marker, remove marker, knit next stitch as single stitch, place marker, k1, make double stitch.”
All the best,
Lili
Thank you for this. Just one more question, is there a way to ensure I’ll have nice 90 degree corners on my wrap where the triangles meet? I just made a mini swatch and the fabric looks good, but the corners are not quite right. Using GSRs I am leaving the first 2 and the last 2 stitches unwrapped. Any tips on this?
Thank you very much for your help.
Hi Joyce,
Blocking your wrap is the best way to neaten up your corners! I also wanted to let you know that the corners do look a bit messier on a small swatch, but they actually end up much straighter when you knit the wrap at its full size.
When using German short rows, you should be making the first double stitch in the first triangle on the second to last stitch of the row. There should only be one “unknit” stitch after this, not two! Then, on the second triangle, you should be making the first double stitch on the very second stitch of the row (there should only be one normal stitch before this, not two). If you haven’t already been doing it this way, this will also end up making your corners slightly more crisp!
All the best,
Lili
Hi! I ha e some yarn I love but it is DK. Any idea how many yards of that I would need?
Hi Lora,
Thanks for reaching out! This is admittedly a very difficult sort of calculation to do, but I’d be happy to try and give you a ballpark estimate. Can you let me know if you’re planning on making the Big or Bigger version of this wrap?
All the best,
Lili
Hello Lili,
I’m taking advantage of Lora’s question, maybe you can give me your opinion 🙂
I have 4 skeins of beautiful Scottish Aran yarn (182yards each) and I’d love to knit this cosy wrap (the bigger size the better)
Do you think it is a good idea ? And if so, how many stitches would you cast on ? I’m really bad when it comes to this kind of changes…. I can’t even decide if 5mm needles are fine or if I should go bigger.
Thank you in advance!
Hi Rubi,
We’re glad you’re curious about ways to modify this pattern as well! Our advice however is going to depend on a little extra work from your end for the most accurate advice. If you can make a gauge swatch in garter stitch with the needles you plan on using (5mm sounds good, but you can always try out others to determine what you prefer!) and measure the length, width, and weight in grams, then I’d be able to calculate the rest. Let us know what you come up with if you try this!
Before you get to work on that though, I did want to warn you that the large version of this wrap takes a significant amount of yardage due to its size and stitch pattern. If you only have 728 yards of an aran weight yarn, that’s likely not enough to make a very large wrap. You’re probably better off thinking of another project or using a different yarn.
We’ll keep an eye out for your gauge results or if you’d like some other suggestions!
All the best,
Lili
Hi Lili! Thank you for reaching back out! I want to make the bigger version. Thank you!
Hi Lora,
Thanks for letting me know! I’d say you’ll probably need somewhere in the 700 – 800 yard range for each color. But for more accurate advice, I’d recommend the following: If you can make a gauge swatch in garter stitch with the needles you plan on using and measure the length, width, and weight in grams, then I’d be able to calculate the rest. Let us know what you come up with if you try this!
All the best,
Lili
Did you figure this out? I want to make it in worsted weight as well. Thanks
Hi Hariamrit,
It looks like I answered this person in another comment a little further down the page! They were planning on making the Bigger version of the wrap, so if you plan on making the Big (smaller) version, the yardage estimate would be different.
All the best,
Lili
Hi
I’m fairly new to knitting and working on this wrap. I got distracted and can’t remember if I turned or not. What is the easiest way to tell?
I knitted back and I’m at my cast on point so I think I forgot to turn. Please help !
Hi Louise,
Thanks for reaching out! If you used a long tail cast-on and you’ve knit all the way back to the edge where your yarn tail is, then that means you didn’t do the wrap + turn on that row. Let me know if this is what you’re observing in your work! I’d also recommend sending a photo of your wrap to customerservice@purlsoho.com so that we can visualize exactly what’s going on.
All the best,
Lili
Hi Lili,
Yes that was exactly what I did wrong. I corrected and finished first half. Now I am ready to add the second color for triangle two but I think I didn’t end on the row 5. I am on the wrong side and I’m supposed to be on the right side to begin the color. I already knit the wraps. Help!!
Hi Louise,
Glad to hear that you’ve been able to move along in your project! Can you let me know what’s indicating that you’re on the wrong side? I’m asking because this pattern is a little unusual when it comes to right vs wrong side. The cast-on edge (which is usually an indicator for determining which side you’re on) looks like a wrong side when you’re on the right side, and vice versa. I just wanted to double check before giving you advice! It would also help if you could send photos of your work to customerservice@purlsoho.com, since we’ll be able to troubleshoot more effectively that way.
All the best,
Lili
Hi!
I don’t think anyone has asked how to fix a dropped W&T or a GSR stitch for this wrap. I’m surprised because it seems pretty tricky …. I’ve had to tink back a couple of rows to fix mine.
Is there a video/instruction on this?
Thank you!
Joyce
Hi Joyce,
I’m afraid that we do not have a tutorial of our own on fixing mistakes in short rows, but there may be some helpful resources on the internet. I’d recommend looking up “fixing short row mistakes” in your favorite search engine, and I bet lots of videos will come up, if you want to see this in action!
All the best,
Lili
Hello! I am new to wrap and turns. When I knit the first row of color B (knit across all stitches), should I pick up the wraps from color A? Thank you!
Hi Natalie,
Thanks for writing in! You will be knitting each wrapped stitch with its wrap on the final “Next Row” in the TRIANGLE 1 section, which is still with Color A. By the time you knit the first row of TRIANGLE 2 (with Color B) there will be no more wraps left to pick up!
All the best,
Lili
Goodness, that seems so obvious now! I’m sorry for not seeing this sooner and thank you so much for your help!
You’re very welcome!
All the best,
Lili
I’m new to knitting, at the end of row two after the wrap and turn what happens to the last two stitches left after the turn? Do I just leave them? Sorry I’m very confused.
Hi Emily,
Thanks for reaching out! Because these rows are short rows, they’re shorter than a normal row. You will not work all the stitches on the row, since you are only working a portion of them in order to make the row shorter. After you work the wrp-t, you will then be able to work back in the other direction without needing to work the final few stitches on the row! If this technique is daunting, I’d recommend checking out our Short Rows: Wrap + Turn tutorial for a great visualization. Hope this helps!
All the best,
Lili
It may be easier if the “wrap and turn” method described in the Half And Half Triangles Wrap instructions and video were described as “wrap and turn” method when knitting garter stitch”, (knit every row), when in fact, those are the instructions. In my opinion, it’s less confusing because when knitting garter stitch, there are no purl rows as outlined in the video.
YouTube has a very clear and easy to understand tutorial for the wrap and turn method when knitting garter stitch, which in my opinion, is less confusing considering, as mentioned, there are no purl rows.
I agree. Also in the written instructions it says turn work with wrong side facing. When you turn the work, the right side is facing since the wrap is performed on the wrong side (row 4). As you say, it’s best to look for a video on wrap and turn on garter.
I am completely flummoxed by Jackie’s of CadyJax Knits fabulous striped wraps. How does she get the stripes to meet at the diagonal? That is not how the stitches lie. Does she do two triangles and three-needle-bind-off them together ? Does anyone know ? Maybe I should ask her 🤔
Hi Helen,
That’s a great question, and there’s actually a really simple answer! I’ve watched Jackie’s “Half + Half Triangle Wrap Tutorial with German short rows” video on YouTube, and I noticed that she omits the final row of Triangle 1. She ends up knitting her double stitches with the new color on Row 1 of Triangle 2. This essentially flips the right and wrong sides of the wrap and causes the short rows for Triangle 2 to begin at the opposite corner.
Hope this helps! It’s a very cool effect.
All the best,
Lili
Ah ! I wondered if it was something like that, but discounted the idea. Must look again. Many thanks! It certainly is a cool effect and I hope to emulate it. Thank you again.
I just received my beautiful yarn from you.
I’d like to do an icord edging on the shawl, but cant figure out how to do it. I’ve watched videos on utube saying that’s what they’ve done, but not how it’s done on the short row edge?
Can you help please?
Hi Catherine,
Thanks for writing in! We highly recommend working an attached i-cord after you’re finished, if you’d like that type of edge on this project. It quickly becomes very complicated to try to add one while knitting, and you would also need to do an i-cord cast-on and i-cord bind-off to create an i-cord that travels all the way around the wrap. But if you add an attached i-cord afterwards, it’s extremely easy to make the i-cord extend the entire way around! If you’re unfamiliar with the attached i-cord technique, we have a great tutorial right here.
All the best,
Lili
Hi….I’m doing German short rows & discovered that if I knit the double stitch “through the back loop” it creates a nice ridge .
Hi there! I am working on the Bigger size shawl (and living the linen quill yarn)…and I am new to wrap and turn. I seem to be accumulating a ton of extra stitches and, although I can quite wrap my head around why, I am assuming this is how the scarf grows? Can you possibly explain this phenomenon to me? Many thanks in advance 🙂
Kindest regards,
Jenny
Hi Jenny,
Thanks for reaching out! Would you be able to send us a photo of your project by emailing it to customerservice@purlsoho.com? That way, we can visualize exactly what’s going on and give more specific advice from there!
All the best,
Lili
Is this available as a pdf? of course paid!
Hi Anna,
Thanks for reaching out! Here’s how to download a PDF of any of our free patterns: If you’re on your computer, you’ll find a “print” icon in the right column just below the “Save To Favorites” button. If you’re on a mobile version of the site, you will find the “print” icon below the pattern and above the comments.
Click on this button, and a window will pop up where you can delete whichever parts of the pattern you don’t want to print. When you hover over any image or a text block, it will be highlighted in yellow and a “trash” icon will appear. Just click on this icon to delete anything that’s not necessary to the pattern! For example, you may decide to shorten the pattern by omitting certain images or the list of materials. Then, click on the “PDF” button in the upper left-hand corner of the pop-up window. Once your PDF has finished downloading, just click the “Download PDF” button, and it will be saved to your computer! (You can also just click the “Print” button if you’d like to print the pattern.)
Hope this helps!
All the best,
Lili
Hi,
I am curious about something, why did they decided to knit this wrap using short rows technique instead of bias knitting? (Since they are 2 perfect triangles)
Hi Michelle,
Thanks for writing in. That’s a great question! There are so many ways to knit a triangle and we thought short rows were a great way to work the two halves into this pattern. I hope this helps but let us know if you have any other questions!
Happy knitting,
Gavriella
I’m struggling with reduced eyesight. Has anyone ever knit thus with a large needle size? 3, 4 and 5 is just too small for my eyesight.
Any comments would be appreciated. Thank you.
Hi Kandace,
Thank you for writing in! You can definitely alter this pattern for larger needles and thicker yarn! To modify this pattern you will want to start with a gauge swatch. You will then measure your stitches per inch and multiply that number by the desired width of your Half and Half wrap and that will give you your cast on number. I hope this helps but please let us know if you have any other questions!
All the best,
Gavriella