
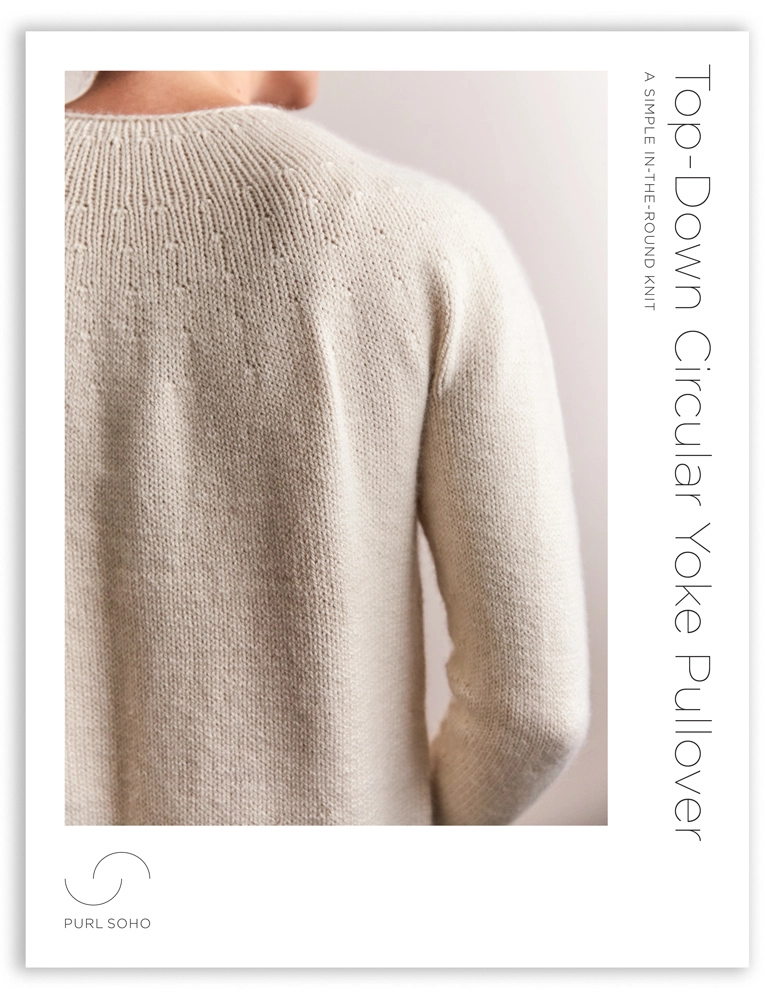
Top-Down Circular Yoke Pullover
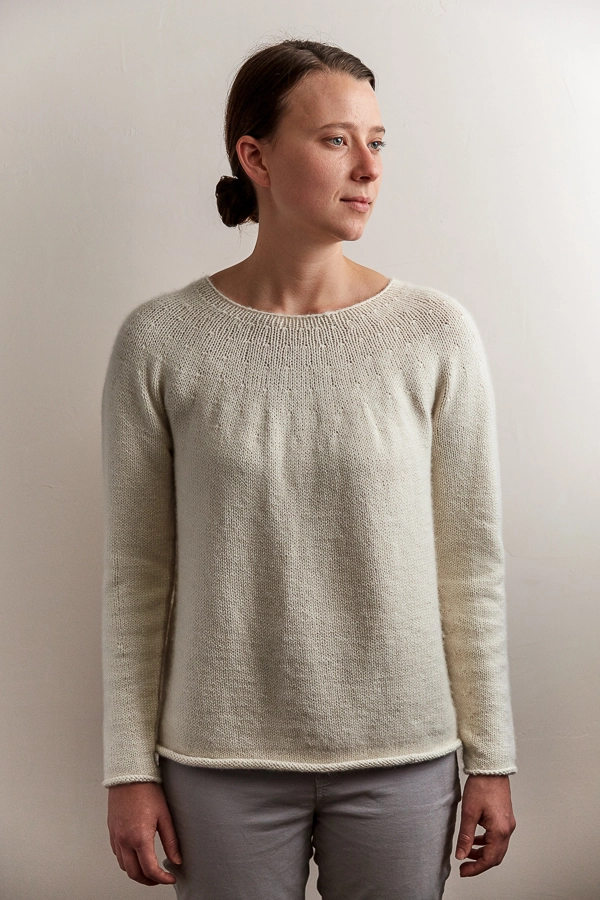
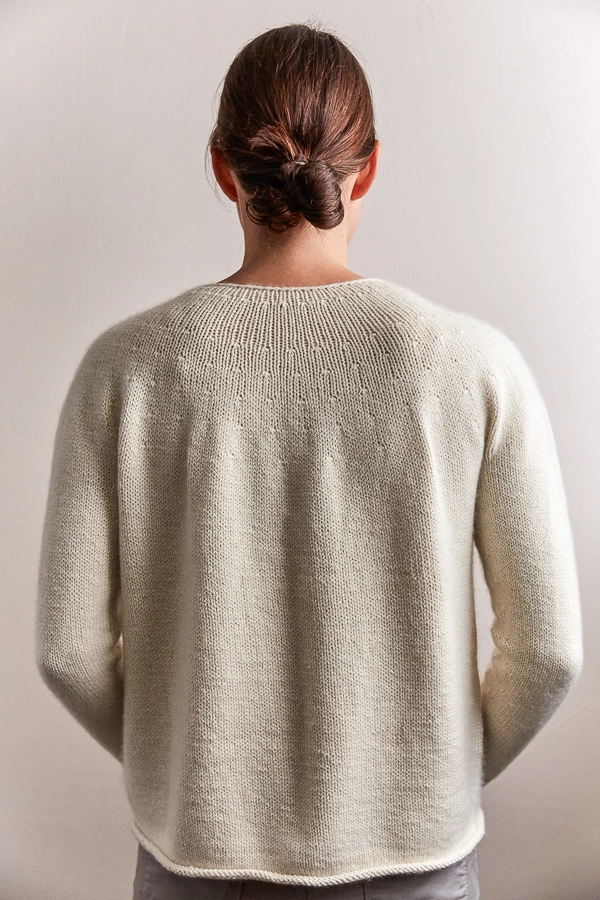
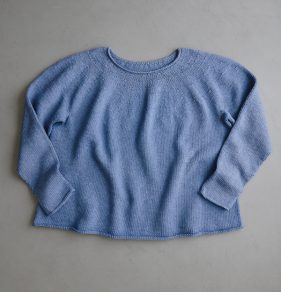
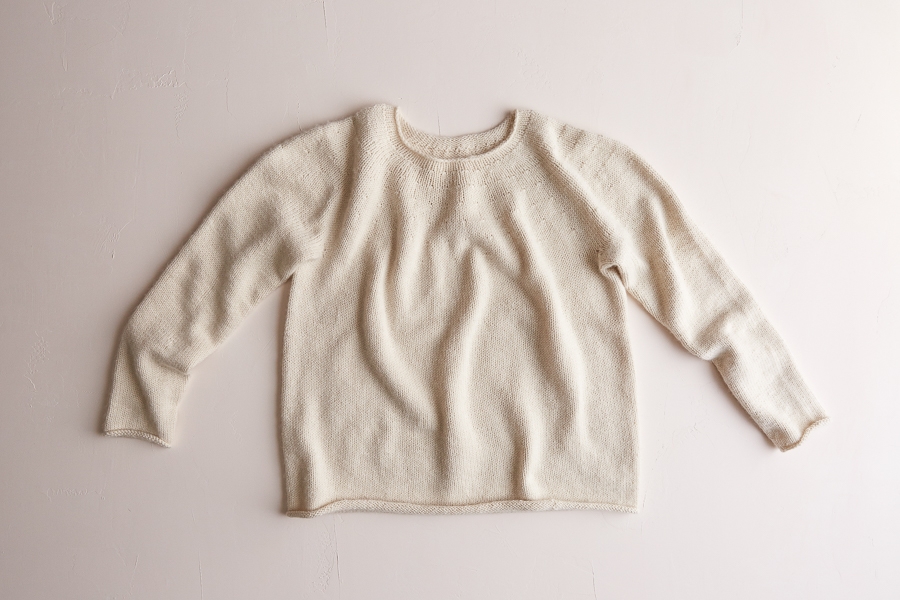
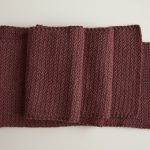
In the less-is-more department: Our very pretty, pared-down, delightfully soft Top-Down Circular Yoke Pullover. When a bulky sweater is heftier than you can handle and a gossamer one is too light, this medium weight beauty is just right.
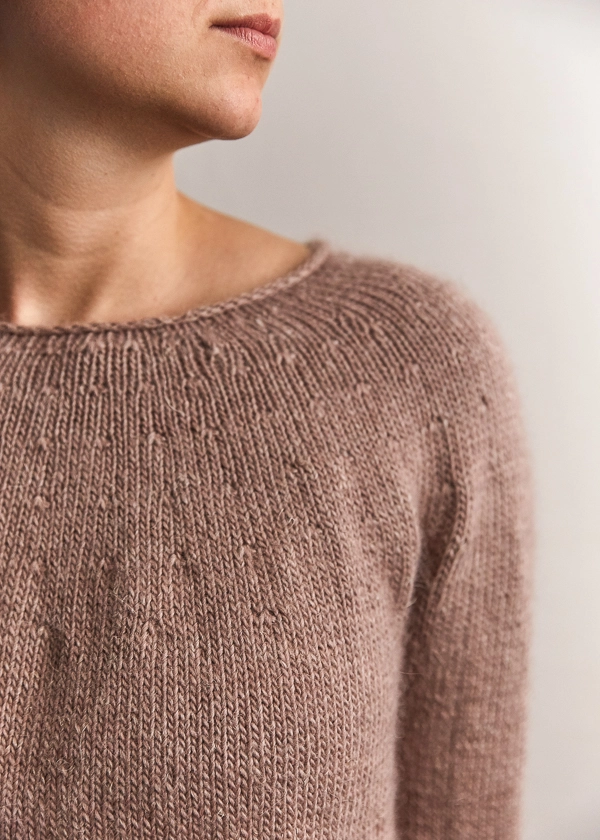
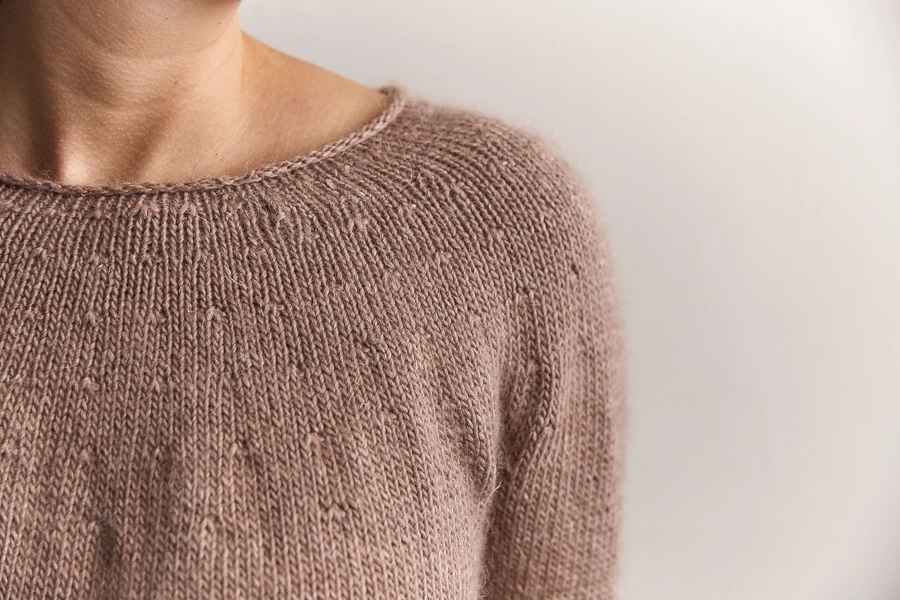
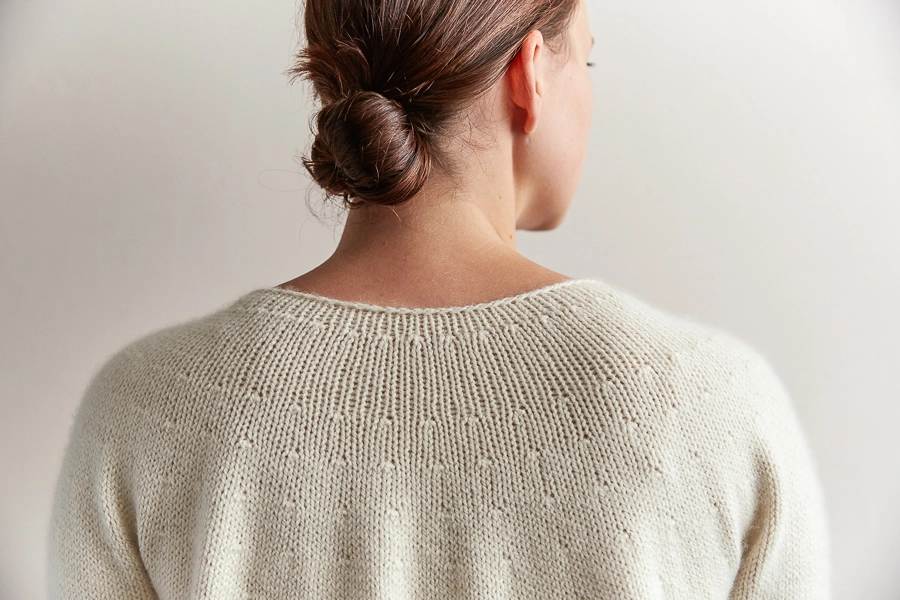
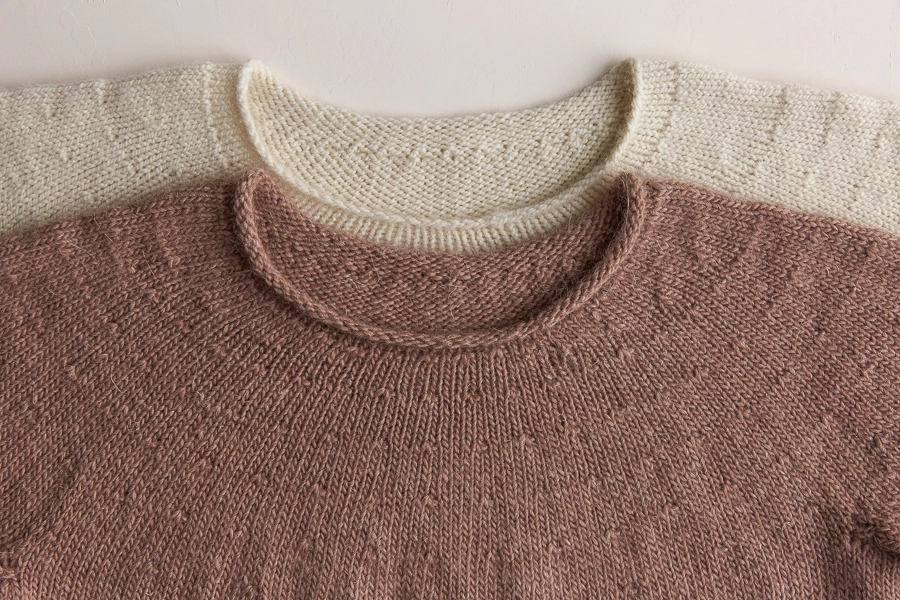
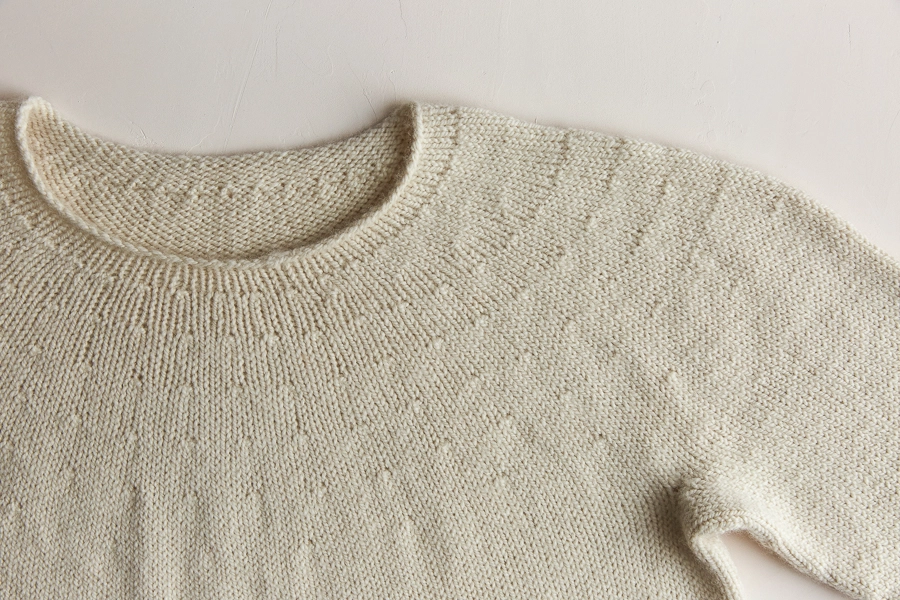
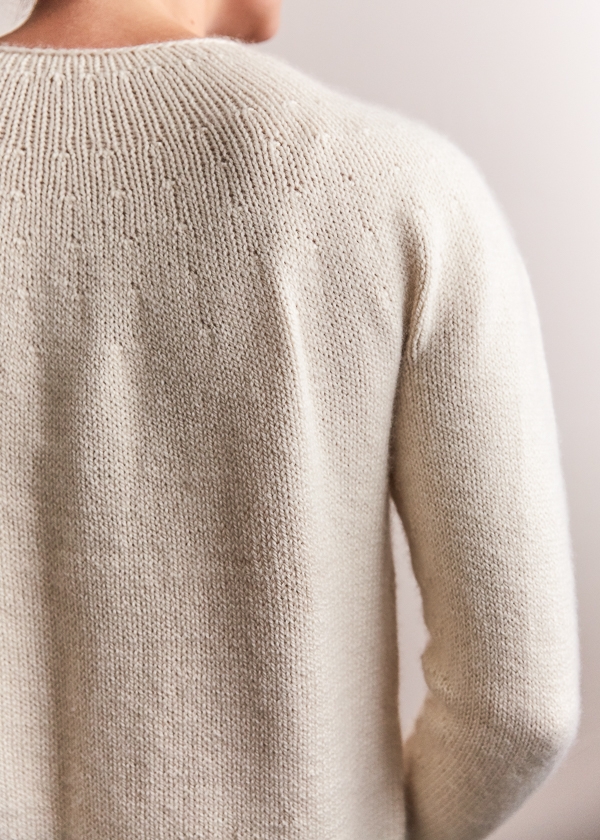
Its beauty is, in part, in the simply executed details: its delicate neckline and subtle yoke, whose textural increases are an excellent example of the elegance of form following function. Our favorite rolled edge cuffs and hem give this sweater that “Oh, I just threw this on” air.

Knit as simply as possible in the round from the top down, with some basic short row shaping at the back of the neck, the Top-Down Circular Yoke Pullover Pattern is an excellent place to start for new sweater knitters. But long-time knitters will also find satisfaction in this pullover’s classic engineering.
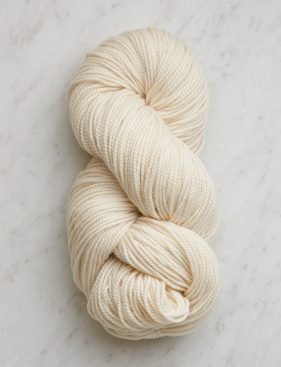
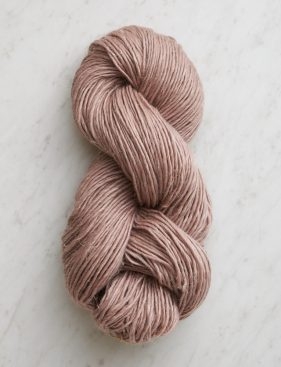
This pattern works with two of our very favorite yarns: our Cashmere Merino Bloom and our Flax Down, a baby alpaca, extra fine merino and linen blend. Worked at the same gauge with the same size needles, choose either one! Here we used Heirloom White in Cashmere Merino Bloom and Rose Granite in Flax Down. Both are timeless, never tiresome.

UPDATE: NOW IN MORNING
MARCH 2022

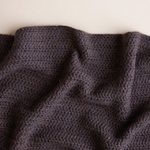
A new day has dawned for this classic Purl Soho pattern! Now also in cotton-yak Morning yarn, this version has a satisfying weight, a very soft feel, and an incredibly lovely hand… and it’s machine washable, too. Cast on with this Dungarees Blue, or any of Morning’s fresh-as-a-new-day colors!
Designed by Purl Soho designer, Laura Ferguson.
Share your progress and connect with the community by tagging your pics with #PurlSoho, #PurlSohoBusyHands, #PurlSohoTopDownCircularYokePullover, #PurlSohoCashmereMerinoBloom, and #PurlSohoFlaxDown. We can’t wait to see what you make!
Materials
Choose from three different Purl Soho yarns. Each works perfectly for this pattern!
- 5 (5, 6, 6) (7, 7, 8) (8, 9, 9, 10) skeins of Purl Soho’s Cashmere Merino Bloom, 75% extra fine merino wool and 25% cashmere. Each skein is 218 yards/ 100 grams; approximately 1010 (1085, 1190, 1305) (1395, 1525, 1625, 1725) (1860, 1940, 2035, 2130) yards required. We used Heirloom White.
Or
- 5 (5, 6, 6) (7, 7, 7, 8) (8, 9, 9, 10) skeins of Purl Soho’s Flax Down, 43% baby alpaca, 42% extra fine merino wool, 15% linen. Each skein is 218 yards/ 100 grams; approximately 1010 (1085, 1190, 1305) (1395, 1525, 1625, 1725) (1860, 1940, 2035, 2130) yards required.We used Rose Granite. (NOTE: We no longer offer Flax Down, but choose from one of our other light worsted/dk weight yarns.)
You will also need…
- US 6 (4mm), 16-inch circular needles
- US 6, 32- or 40-inch circular needles
- A set of US 6 double pointed needles
- A stitch marker
- Scrap yarn or stitch holders
- A Top-Down Circular Yoke Pullover Pattern
Gauge
21 stitches and 29 rows = 4 inches in stockinette stitch
Sizes
NOTE For help picking a size, please check out our Understanding Ease + Selecting Size Tutorial!
34 (37, 40, 43) (46, 49¼, 52¼, 54¾) (58, 61, 64, 67)
To fit actual chest circumference of 28–30 (31–33, 34–36, 37–39) (40–42, 43¼–45¼, 46¼–48¼, 48¾–50¾) (52–54, 55–57, 58–60, 61–63) inches, with 4–6 inches of ease
- Finished Chest Circumference: 34 (37, 40, 43) (46, 49¼, 52¼, 54¾) (58, 61, 64, 67) inches
- Finished Length from Back Neck to Bottom Edge: 21¼ (21½, 22, 23) (23½, 24½, 24¾, 25) (25¾, 26, 26¼, 26½) inches
- Finished Length from Underarm to Bottom Edge: 14 (14, 14, 14½) (14½, 15, 15, 15) (15½, 15½, 15½, 15½) inches
- Finished Length from Cuff to Underarm:
18 (18, 18, 18½) (18½, 19, 19, 19) (19½, 19½, 19½, 19½) inches
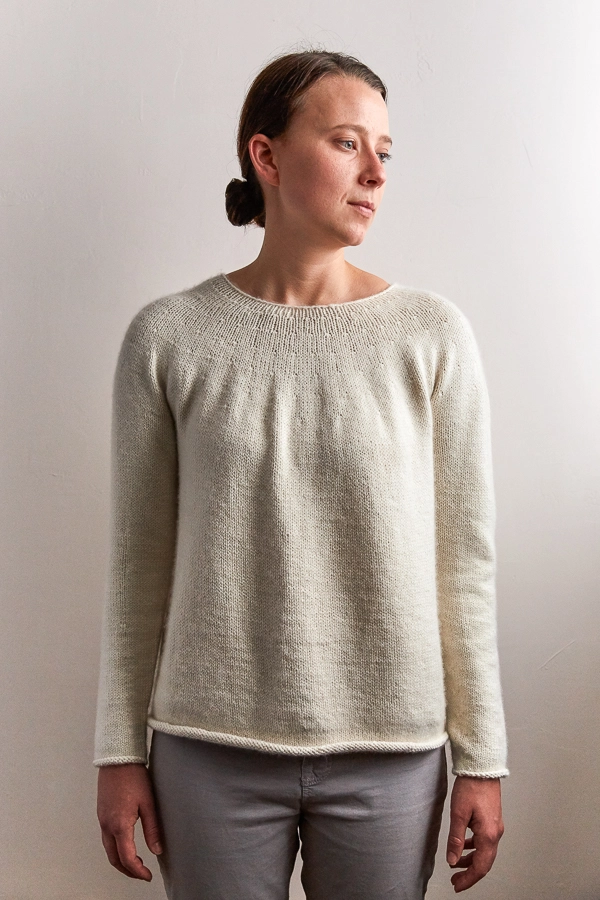
SAMPLE: The sweater pictured here is size 40 inches modeled with 4 inches of ease.
Pattern
The Top-Down Circular Yoke Pullover Pattern is available for purchase as a PDF download.
Update: More Sizes
January 2020
We’ve expanded the size range for our Top-Down Circular Yoke Pullover Pattern! Since last spring, all of our new sweaters fit at least a 60-inch chest. If you downloaded this pattern in the past, please update your pattern for free, either in My Pattern PDFs on your My Account page at purlsoho.com or in your Ravelry library.


I purchased both the download and the pattern but I can’t find the download.
Hi,
To download your PDFs, you log in to your purlsoho.com account. From there, go to MY DOWNLOADABLE PRODUCTS and the pattern is there to download.
Thanks!
Anna
Seeing how this sweater hangs on the model gives me the idea that in a cardigan version it would make a marvelous bed jacket for those of us who love to read sitting up in bed in a chilly room. What do you think of that idea?
Hi Pat,
Lovely idea! I will certainly pass it on!
Best,
Cassy
If I wanted to knit this with the same neck as the pullover, any suggestions on how to do that? Would I just knit even for a few inches from the last neckline row? Thanks for another beautiful pattern!
Hi Monica,
What a great idea! I think that best course of action would be to continue to work even knit rows for a few inches as you have suggested!
Best,
Cassy
I love this sweater! How much yarn does it take? I want to purchase the patern and yarn
Hi Char,
Thanks for writing in! This lovely pattern called for between 5 and 7 skeins of either Cashmere Merino Bloom or Flax Down depending on the size that you would like to make. If you check above under the Materials and Size sections, you can choose your size and then select the corresponding number of skeins!
I hope that this helps!
Cassy
Hi! I love this sweater and flax down. However, I am currently knitting the optic blanket and the flax down sheds all over everything. That may be tolerable for a blanket, but not a sweater. Is there anything I can do (when washing for blocking, for instance) to help with this?
Hi Sarah,
Thanks for writing in! We find that once Flax Down is knit and blocked, the shedding cuts down dramatically. For sweaters, I tend to prefer wet blocking. I’d suggest knitting up a gauge swatch using some of your remaining Flax Down and then wet block it. This will give you a good idea of how the finished sweater will be!
Best,
Cassy
Do you think this sweater would work in cotton, bamboo or linen since wool doesn’t work for me? Or silk? Which would be the best substitute? Thanks.
Hi Arlene,
Thanks for writing in! This sweater certainly could work in an alternate fiber! I think that it would be lovely in Cotton Pure. As with any yarn substitution, I would be certain to knit up a gauge swatch to ensure that you like the fabric at the gauge required for this lovely sweater! Bamboo may have too much drape to make this a pleasing fit. You could also try out linen. You will be looking for a linen that knits up at 5.25 stitches per inch.
I hope that this helps!
Cassy
I’ve started making this sweater using Flax Down. It’s not the easiest yarn to work with (I’m an ‘advanced beginner’). I’ve been thinking that a cotton yarn would be easier to work with as it splits often, slowing the knitting process down considerably. I’ll finish with the Flax Down, block it then see if I feel it was worth it. It’s all an experience!
Hi Paula,
I’m sorry to hear you’re having difficulties with our Flax Down, but glad you are persevering anyways! One thing that might help with splitting yarn is using a duller needle. The original Addi Turbo needles have a less pointy tip than Addi Turbo Rockets or other similar sharp needles, which helps get the tip of your needle into the stitch instead of the middle of the yarn! Although I usually prefer a pointier needle myself, if I find I am having trouble with the yarn splitting, I’ll reach for my Addi Turbos to remedy the problem!
Best of luck and happy knitting!
Julianna
Hi!
I am knitting this pullover and was so happy with the short rows, the wrap and turns, and also the first row on the right side where I had to knit the wrapped stitches with their wraps. But on the second ‘next round’ on the right side I have to work the wrapped stitches I made on the purl side and suddenly I have holes and big loops and am wondering how I should do this, not turn the work and work them on the purl side I suppose.
I could really use your knitting wisdom ☺️
Thank you
Hi Elsje!
We have a super helpful blog post about just this thing!
Short Rows
Let me know if this fixes your problem! Sometimes the wrapped stitches look a little funny if they accidentally get twisted!
Best,
Carly
The short row tutorial does not fix the problem. The problem appears to be that wts made on the purl side are picked up on the knit side. The wrap is super tight and even when picked up and put on the needle and knit it leaves a hole. No problem with the wts made on the knit side being picked up on the knit side. But picking up the wts made on the purl side on the knit side is the problem. Why can’t the wts made on the purl side be picked up on the purl side. The pattern is perplexing. I have been all over the Internet and have tried every suggested technique to remedy and none of themwork. Help would be appreciated. I’ve ripped out my work 5 times now.
Hello Robin,
Thank you for reaching out! I’m sorry to hear you are having such a frustrating experience. Picking up wraps that were completed on the purl side can be a bit tricky at first but it need not create holes! Using the right hand needle, you will pick up the wrap, placing it next to the wrapped stitch on the left hand needle and then you will knit the wrap together with its wrapped stitch. This should prevent holes from forming while still picking up the wrap!
I hope this helps and happy knitting!
-Marilla
Try German short rows.
Could I knit this in something other than wool? I’m allergic. How do you think it would look in either silk, cotton, bamboo or linen. Thanks.
Hey Arlene!
Any of these fibers could work very well for a sweater! I would recommend doing gauge swatches of the yarns with a drastically different fiber content to be sure you like the way they drape.
Best,
Carly
Am heading towards Increase Round 2, but still have no idea which part of the pullover is where the end of round marker is.
I mean mid-front or mid-back !
Hi Elsje,
Thanks for writing in and great question! When you are in the Shape Yoke section and about to work increase round 2, the beginning of round marker will be in the middle front of the sweater!
I hope that this helps and happy knitting!
Cassy
Just starting with Flax Down. At the yoke section, I’m looking for a repeat of the short rows. I looked on Ravelry for errata, but it looks like you mean what you wrote in the pattern.
Short rows only on that back section for now?
Hi Val,
Thanks for reaching out! You are correct that the short rows will only be worked on the back of the sweater. This serves to raise the back neckline higher than the front for a more tailored fit.
Best,
Julianna
I purchased this pattern and have just begun my sweater. It will be my first adult-sized sweater and so far it’s moving along well. I have worked with short rows previously making your Bandana Cowl. I’ve probably made about 25 of them and I actually enjoy short rows. However, I always need to place a marker at the wrapped stitch or I will just keep on knitting through it. Perhaps this happened with Elsje’s knitting?? I haven’t gotten to that part of the pattern yet but will I be able to remove my marker or should I make a marker out of a different color yarn and just snip it out when I’m done?
Thank you so much for your beautiful patterns. In my family and circle of friends, those who haven’t received a Bandana Cowl feel left out until they get theirs. Two more alpaca ones are ready for Christmas giving this year—maybe more!
Hi Michelle,
Thanks for writing in and for sharing your experience! Wraps can sometimes be a challenge to see. In these cases, I like to use locking stitch markers and place them on each wrap. Then when I work the wrap, I remove the stitch marker. I find that this makes it much easier for me to know exactly where I am going in a pattern and they have saved me more than a few times!
I hope that this helps and happy knitting!
Cassy
After spending endless hours un-doing my work because I kept knitting past hard-to-see “regular” wraps, I discovered the utter simplicity of the “German w&t” (which in Germany is called the “double stitch”/”ds” – go figure!).
There is no wrap at all. Merely a firm tug on what would normally be the wrapped stitch – resulting in what looks like a weird double stitch sitting on the needle in plain view. Really hard to ignore. when one comes to it in the second row, where it is knitted as if it were a single stitch. That’s it! No markers needed!
This produces superbly tight and near-invisible short-row turns; even tidier than the Japanese method (which DEPENDS on markers).
Hi Ila,
Thanks for writing in! I am so glad that you found a method that works for you! To be honest, I am not an expert in German short rows. From my understanding, German short rows use an additional stitch and were you to use them, you would need to rework stitch counts. Our patterns are written using traditional short rows, so if you wand to use German short rows, you will need to alter the pattern a bit to accommodate them! I’d suggest checking out some resources on line on how to substitute German short rows for traditional short rows!
I hope that this helps!
Cassy
a clarification please on the pattern !!for the wrapped sts. when knitting back it says to knit wrap st. WITH the wrap, is this as one st. or knit the stitch and then the wrap ,making 2 stitches ??
OH my gosh I just found it on the site so never m ind , lovies G.
Hi Georgia,
When you knit the wrapped stitch, you are knitting the wrap and the wrapped stitch together into one stitch.
I hope this helps!
Carly
Hello,
Is it possible buy this pattern in french ?
Thank you.
Anny
Hi Anny,
Thanks for writing in! At present, our patterns are only available in English.
Best,
Cassy
Ce modèle est vraiment très beau, délicat…. C’est bien dommage pour moi qui suis nulle en anglais ! Mais peut être qu’à l’avenir, il sera traduit ?
Merci de m’avoir répondu.
Meilleurs voeux pour l’année 2018.
Anny
Hi Anny,
Merci pour votre message! Malheureusement, nos patrons sont toujours en anglais!
Merci,
Cassy
I’m confused about increase round 7…is this one for all sizes? I’m not sure what to do here, I’m knitting size 37. Maybe I’m overthinking it.
Hi Amy,
Thanks for writing in! Increase Round 7 is only worked for the size 46 and 49¼. For your size, after working the appropriate Increase Round 6, you will move on to the directions for All Sizes.
I hope that this helps to clear things up!
Cassy
Hi, I bought the pattern and I’m working to it.
My spoken language is italian and I need an help.
I have a problem with:
SEPARATE BODY + SLEEVES.
Round 1: K75, place previous 53
stitches on stitch holder.
What does It mean? Do I have to work 22 stitches and suspend 53 stitches? Or the contrary? Or something else?
Thank you very much,
Maria.
Hello Maria,
Thank you for reaching out! What this means is after you have knit 75 stitches you will place your previous 53 stitches ( the stitches you just finished knitting) on a stitch holder. So you will work all 75 stitches, but place 53 of those stitches on a stitch holder. This will situate your working yarn so you will be able to continue knitting your round.
I hope this helps and please let me know if you have any further questions!
Warmly,
Marilla
Thank you so much Marilla, you’ve solved all my doubts!
So, now, let’s go on working.
Ciao!
I apologize if you’ve already answered this, but please explain increase row 6. I’m doing size 40. Thank you, Michael
Hello Michael,
Thank you for writing us! I hope I can help clear this up for you! For increase round 6 in size 40 you will knit 9 stitches and then knit one stitch front and back (increasing by one stitch). You will repeat this section a total of 28 times and then knit to the end of the round. This means you will increase a total of 28 stitches.
I hope this makes sense and please let us know if you have any further questions!
Happy knitting,
Marilla
Hello all you wonderful Purl Soho peeps!
I am currently working on this pattern and had a couple of questions:
In the pictures it looks like you may have used smaller needles for the hem but no mention of it in the pattern, am I just seeing things?!
The other question is about the short rows:
I have been working on another sweater (Pickles – Pearly Sweater) which is worked bottom up in the round with raglan sleeves. I’ve made it twice (in different yarn) but keep getting a ripple of excess fabric at the front below the neckline as there is no shaping. Could I use short rows in the same same way as this sweater? As far as I can tell I’ve got about 6 rows of excess at the front but it sits nicely at the back. This is the first time I’ve tried short rows so don’t fully understand how they work although I am in awe of them now!
Thanks so much and I just wanted to also say a huge thank you to the Purl Soho team for all the lovely patterns (particularly the free ones!), the videos & tutorials and for tirelessly answering people’s questions (sometimes for the 3rd or 4th time!)
I salute you!
Alexis
Hi Alexis,
Thanks for writing in and for your very kind words! I can certainly see how the images look like we used smaller needles but do be assured that we used the same size for the bottom!
You can certainly add short rows to a sweater! While I am not familiar with the pattern that you are working on, you can always add short rows to the back of the sweater to add more fabric to the back of the sweater creating a more flattering fit! It may take a little bit of trial and error to figure it out but I would give it a go!
I hope that this helps!
Cassy
io volevo fare una domanda sulla separazione delle maniche dal davanti e dietro. La tua risposta non l’ho capita: ” Ciò significa che dopo aver realizzato 75 punti, posizionerai i 53 punti precedenti (i punti che hai appena finito di lavorare) su un fermamaglie. Quindi lavorerai tutti i 75 punti, ma metti 53 di questi punti su un fermamaglie. Questo posizionerà il tuo filo di lavoro in modo da poter continuare a lavorare a maglia.
Spero che questo aiuti e per favore fatemi sapere se avete ulteriori domande!
Calorosamente,
Marilla” mi puoi fare un esempio più comprensibile . Grazie
Mariella
Hi Maria,
Thanks for writing back! I am not sure that I can explain it better than Marilla did! You will knit 75 stitches and then place the last 53 of those stitches on a holder. These stitches will be worked at the very end of the pattern.
I hope that this helps!
Cassy
Good Morning!
Lovely pattern 🙂
On Short Row 3, “previously wrapped stitch” refers to the wrap on Short Row 2, correct? If that is the case, why is “working wrapped stitches with their wraps” not mentioned until “Next Row” which by my estimation, would be row 9.
Unless the pattern would be referring to the knit side wrap on Short Row 1, rather than the previously wrapped stitch, in which case I would not pass the Short Row 2 wrap.
Please advise 🙂
Thank you.
Claudia
Hi Claudia,
Thanks for writing in and for your kind words! On Short Row 3, the previously wrapped stitch refers to the stitch that you wrapped in Short Row 1. The stitch that you just wrapped in Short Row 2 should be on your right hand needle after having turned the work at the end of your wrap and turn. In the short row section, you will be working back and forth 5 stitches short of the wrapped stitch that you created on the previous odd row if you are working an odd row or even row if you are working an even row.
I hope that this clears things up!
Cassy
Hello! So far so good on my first sweater adventure! I do have a question about beginning sleeves I’m hoping you can help with. I’m following the pattern for size 43, which has 14 stitches added (cable cast-on) for the underarms. When beginning the sleeves, I’m instructed to pick up a total of 15 stitches along the cable cast-on edge, as well as stitches in the yoke before/after. To pick up 15 stitches when I’ve cast-on 14, just pick up 2 in one place? Thank you!
Hello Sue,
Thank you for reaching out! This is a great question, when you are picking up your stitches the most important thing is that they are placed evenly. You will essentially be picking up two stitches in one, by picking up your extra stitch between stitches, that is to say if each stitch, of the 14 stitches cast on, is being picked up you will also pick up a stitch between two of those stitches. I would place this stitch at the beginning of the picked up stitches as because the pattern has the extra stitch on the first half of the picked up stitches.
I hope this makes sense and let us know if you have any further questions!
Happy knitting,
Marilla
Hello, also working on my first sweater and have a similar question about starting the sleeves. I’m doing size 46 so cable cast on 15 for the underarms and am picking up a total of 16 (8 and then 8) to begin the sleeves. Would I pick up the extra stitch in the middle since it has the same number of stitches in both halves of the picked up stitches?
Thank you!
Hi Lily,
That’s a great question! For this section of the pattern, you will want to pick up the additional stitches from either side of the underarm stitches. This will help minimize holes in the underarm of your sweater and ensure a nice seamless finish for your sleeves. I hope this helps but please let us know if you have any more questions!
Happy knitting,
Gavriella
I have just begun this sweater in Cashmere Merino Bloom. I am making a size 34 and the pattern calls for a cast on of 74 stitches onto the 16in circular kneedles. I am stretching these stitches to the max in order to knit in the round. Is this to be expected or am I doing something incorrectly? Thank you so much.
Hi Susan,
Thanks for writing in! Although it will be a bit of a stretch for the first row or two, it should be possible to join 74 stitches in the round relatively comfortably on a 16″ circular needle as long as you have cast on loosely enough. You may want to start over with a looser cast on since a too-tight cast on will also affect the size of the neck opening of your sweater. Either way, once you have knitted a few rows, the elastic nature of knitting should kick in and it will be much easier to knit around on the 16″ needles!
Best of luck and happy knitting!
Julianna
Do you have any video tutorials on how to separate the yoke for the sleeves? The video tutorial for adding sleeves to the bottom-up sweater was very helpful.
Hello Annie,
Thank you for reaching out! We do not currently have a tutorial for this particular maneuver, but do you have a specific question about it that I could possible help you with?
I hope I can help!
-Marilla
I’ve made it this far but I’m baffled by Round 6: SIZES 34 (37, 40, 43, –, – ) ONLY:
Increase Round 6: [K50 (23, 9, 10, –, – ), kfb] five (11, 28, 26, –, – ) times, knit to end of round. [264 (284, 308, 320,–, – ) stitches]. I want to make a 40. So I knit 50, then 9, then kfb, then (knit 9 kfb) another 27 times, then knit to end of round….?
It’s the square bracket, K50, round bracket that’s freaking me out.
I do wonder in the digital age why everything has to be so abbreviated.
Thanks for your help
Hi Ruth,
Thanks for reaching out! I am happy to help! The squarer brackets are present because, for this section, there are multiple brackets! You will want to look at everything contained within the squarer brackets and treat that as one set of directions, followed by the interior rounder brackets. Here the rounder brackets enclose the numbers for each size.
I find that it can be helpful to write out the whole line for the size that you are hoping to make. For the size 40, the line written out for just that size would read:
Increase Round 6: [K9, kfb] 28 times, knit to end of round. [308 stitches]
We certainly understand the wish to write out all sizes and all directions in patterns fully. As a written pattern, we try as hard as we can to keep the cost of printing down so that we don’t need to past the cost on. With our free patterns online we also try our best to be conscious off those who print their patterns as opposed to view them on digital devices by using abbreviations and brackets to keep the number of pages in each pattern to a minimum.
We so appreciate your thoughts! We take them very much to heart.
Best,
Cassy
Yikes! So what is the K50 instruction? I understand we K50 before launching into the above – correct?
Hi Ruth,
Thanks for writing back! The k50 here is for the size 34! Each number after that is for the next size in the progression! So the 23 would be k23 for the size 37 and the 9 would be k9 for the size 40. For your size, the increase round will be:
Increase Round 6: [K9, kfb] 28 times, knit to end of round. [308 stitches]
I hope that this clears things up!
Cassy
Hi there. Would it be possible to make this sweater using Understory?
Thank you.
Diane Hill
Hello Diane,
Thank you for reaching out! It looks like Understory has a close enough gauge to work well for this pattern, though I would highly recommend knitting a gauge swatch to prevent any surprises along the way!
Happy knitting!
-Marilla
Thank you!!
Hi,
This is my first sweater adventure and this pattern has several techniques that are new to me. I have completed the neckband and watched the Short Rows Tutorial. I am ready to begin the Yoke. Do I continue with the circular needles and simply turn them to get to the wrong side? Thank you for helping me.
Susan.
Hello Susan,
Thank you for reaching out! You are exactly right, there is no need to change needle, all you do is turn your work.
I hope this helps and happy knitting!
-Marilla
I have knitted a couple of “circular Yoke Summer shirt” patterns and love them. Is this the same pattern with long sleeves? Just didn’t want to purchase if the only difference was long sleeves.
Linda
Hello Linda,
Thank you for reaching out! Though this sweater is knit using the same technique it is a different design. One of the biggest difference is that it is knit at a totally different gauge, which means all of the numbers are not the same. It also has short row shaping.
I hope this clears things up and happy knitting!
-Marilla
I’m having difficulty understanding Increase Round 6. According to my calculations I should *K9, kfb* 28 times. Is that correct?
Hi Magdalena,
Thanks for writing in! For Size 40, which is the third size, yes, you will repeat *K9, kfb* 28 times before knitting to the end of the round.
I hope that clears things up!
Julianna
Greetings
Would it be particularly difficult to adapt this pattern to a men’s sweater, other than just increasing various dimensions? Sorry for this not being the brightest question.
Curt
Hi Curt,
Thanks for reaching out! Like most of our patterns, our Top Down Circular Yoke Pullover can be knit as a unisex sweater without any significant changes! You will just have to select a size that will fit your chest measurement, and depending on your height, you may need to lengthen the body and/or sleeves, but since it is a top down sweater, you can try it on as you go to customize these lengths.
I hope that helps, and please let us know how it turns out!
Julianna
Hi, what a lovely pattern. However, I am not used to this kind of sizes (34 (37, 40, 43, 46, 49¼) inches) – what are they e.g. using S, M, L, XL etc.? thanks!
Hello Chris,
Thank you for reaching out! This sizing is based on your chest circumference and is a more accurate way to determine your size. Under the size portion of the pattern you will get a break down of measurements that I think you will find helpful.
I hope this helps and happy knitting!
-Marilla
Hi,
I am excited to start this sweater but have only made a couple of sweaters before (and it’s been a few years since I did those!). I have two questions:
1. What type of cast-on do you recommend for this pattern?
2. Do you have suggestions on the best method to join the round so it blends into the neckline and isn’t visible?
Thanks you for your suggestions!
Hi Susan,
Thanks for reaching out! We used a Long Tail Cast On for this sweater as it is quite elastic, but you do want to make sure you work it loosely so that the neckline doesn’t come out too tight to fit over your head. Although there are a few methods for joining, I prefer to simply start knitting into the first stitch you casted on without doing anything special – although it does leave a noticeable jog at first, when weaving in the tail from the cast on you can even this out so that it blends in completely.
Best of luck with your sweater and happy knitting!
Julianna
Hi there,
Would this pattern work well using Tussock?
This will be my first sweater, so looking for an easier start for success, but also am in love with the Tussock yarn!
Hello Michelle,
Thank you for reaching out! Tussock would be a tricky choice for this project as the gauge would not work. You could get close to the correct gauge by doubling up your yarn, though this might be to many extra things for your first sweater. If you do go this route the most important thing will be to make sure your gauge is on point before jumping in.
I hope this helps and let us know if you have any further questions!
Happy knitting,
Marilla
Hi,
I was wondering if I could get some help with this pattern. I am currently on the shaping shoulders section, on the very last step (Next Round: Continuing with right side facing you, knit to end of round, working remaining wrapped stitches with their wraps.). I have worked the remaining wrapped stitches that were created on the purl side but when I reach the wrapped stitches that I already worked on the step before (that were made on the right side), do I just knit over them even though they look different from normal knit stitches? I’ve noticed that when I just knit over them they kind of leave a small hole – is that supposed to be there? Thanks!
Hello Tina,
Thank you for reaching out! When working in the round you will often be picking up your “purl” wrap and turns as you come to them on the knit side of your project. Using the right hand needle, you will pick up the wrap, placing it next to the wrapped stitch on the left hand needle and then you will knit the wrap together with its wrapped stitch. This should prevent holes from forming while still picking up the wrap!
I hope this helps and happy knitting!
-Marilla
I would like to have the purl side facing out. does that require any change to the pattern?
Hello Patti,
Thank you for reaching out! Because there are no seams you shouldn’t need to change anything to have the purl side on the outside.
Happy knitting!
-Marilla
Thank you for sharing this. I’ve just finished my first top down knit in one piece pullover and realised l loathe the straight neckline. This one looks perfect. Might be time for another try. Do you think it would be possible to add a bead at the increase so it becomes even more of a design feature? Thanks.
Hi Niki,
Thank you so much for writing in and for the kind words! I think that sounds like a lovely idea! We don’t have instructions for adding beads to this top, but if you are familiar with it already, I would suggest using a steel crochet hook to add a bead to the stitch where you will be working each kfb before increasing.
I hope that helps, and please do let us know how it turns out!
Julianna
At what point do I take the sleeve stitches off the needle to knit the body? Thank you!
Hi Suzanne,
Thanks for reaching out! Once the yoke is complete, you will find instructions for placing the sleeve stitches on hold in the pattern under the header “Separate Body + Sleeves.”
I hope that helps, and happy knitting!
Julianna
Hello!
I just finished this gorgeous sweater in the Flax Down and since I run hot it’s a bit heavy for me. I know you said the Cotton Pure would be a good choice as an alternate yarn but I’m wondering if the Silken Straw would work? Or do you have any suggestions for other yarns that would result in a lighter weight top?
I appreciate your help!
Hello Angela,
Thank you for reaching out! I would recommend Using two strands of Cattail Silk together. This will give you a closer gauge than Silken Straw.
I hope this helps and happy knitting!
-Marilla
Hello!I’ve knit this in the yarn suggested with the needle suggested for size 37. It is measuring only 32″ at the chest ( just below the armholes) Is blocking expected to enlarge it 3″ ???? I’ve double checked stitch counts and made certain I’ve done the proper increases. Help!
Hi Barb,
Thanks for reaching out! Have you checked to make sure your gauge matches our gauge of 21 stitches and 29 rows to four inches in stockinette stitch? Even though you are using the same yarn and needles we did, everyone knits differently, so it’s certainly possible that you could be knitting tighter than our gauge, which would result in a smaller sweater. If your gauge is correct and you have the correct number of stitches, which should be 194 stitches for size 37, then it is probably fine – it can be difficult to get an accurate measurement of a sweater while it is still on the needles.
If your gauge is too small, it might be best to start over with a larger needle size. The size 37 should measure 37 inches at the chest, and it’s unfortunately unlikely that you would be able to block it 5 inches larger. You could also put the sweater on scrap yarn or a very long circular needle to try it on and see how it fits!
I hope that helps!
Julianna
Hi!
I’m wondering if you think Worsted Cotton or Cotton Pure would be a better fit for this pattern? I really love the pale green color options in those two yarns. Or if there is another cotton that would be better?
Thank you 🙂
Gertrude
Hi Gertrude!
Thanks so much for reaching out! Cotton Pure would make a lovely substitute for a multi-season pullover. As with any yarn substitution, I’d be certain to knit up a gauge swatch to make sure you like the fabric at the correct gauge for the pattern. I hope this helps!
Happy Knitting!
Cassandra
I am working on this sweater and am at “Separate Body and Sleeves” Round 1 . I want to know if the marker I started with for end of round at beginning of sweater ends up being the Center back of sweater or on the back left hand side of sweater 24 stitches from original marker and left sleeve opening? I just want to confirm marker position before I proceed.
Thank you
Hi Glenna,
Thank you for writing in with this question! When you reach the section titled “Separate Body and Sleeves” your marker will be slightly left-of-center on the front of your sweater. Once this section is complete, you will work the cast-on row for the underarms, knitting the 24 stitches before your on-hold Left Sleeve and placing your new end-of-round marker there (this also marks where your left sleeve meets the front of the sweater). I hope this was helpful!
Happy knitting!
Gaby
Hi need a hand here. I will start to increase the yoke and the directions here say: work evenly knitting each round until piece measures 7/8 inches from increase Round 1, measuring at the end of the round marker, not over the short row fabric ???? Could not find a ref. to figure this out.
Hi Sandra,
Thanks for writing in! This means that you will be measuring following an imaginary line straight down from the end of round marker to measure how far you have knitted from the first increase round. The short rows add extra length at the back neck, so you want to make sure you measure at the front neck instead.
I hope that clears things up!
Julianna
Hello, Can anyone please advise what would be the best type of bind off for this pattern?
Hi Elaine
Thanks for the great question! A regular Basic Bind Off would be fine here, you may need to increase your needle size to make sure it is bound off loosely. I hope this helps!
Happy knitting
Jessica
Hey everyone,
I have a question concerning the shape yoke section. Where do I place the end-of-round marker? Does it stay vertical above the end of the previous round? Or does it go left when I finish a round with an increase?
I am a bit confused because the end of round is supposed to be in the front middle, but the short rows are not evenly distributed on either side of the end of round. Therefore I assume that the end-of-round must somehow move somewhere (otherwise the short row section is not in the middle of the back).
I am scared that by making a mistake the shape shoulders part might end up in the wrong place (and therefore the fit would be off).
Thanks a lot for your help!
Hi Barbara,
Thanks for reaching out! The end of round marker should have been placed when first joining the work in the round after casting on in the NECKBAND section. Once it is placed and the work is joined in the round the marker should not move from its spot so you can keep track of the center front.
I hope this clarifies things!
All the best,
Gianna
Hi again,
Sorry for writing again so soon! I think my gauge is correct with 4mm needles @ 21 stitches = 4 in. I am just in between sizes! I’m a 32″ bust and am typically a size S or M in women’s sweaters. This is my first sweater so I don’t want to mess up the size and I want to follow the pattern exactly. I am using Miss Babs DK Yowza Superwash Merino. Which size should I knit or should I go up to 4.5mm needles on the size 30? Thanks again!
Evan
Hi Evan,
Thanks for reaching out! If you’re gauge is 21 stitches = 4″ you are on the right track and I would not adjusted you needle size from there! I would suggest checking out our lovely new tutorial, Understanding Ease + Selecting Your Size. It will help determine which size is right for you!
I hope this helps but please feel free to reach out with any other questions!
Warmly,
Gianna
Hi again! thank you so much for your amazing instructions and comment support!
I am at the separate body and sleeves part. When I get to the instructions “place previous X number of stitches onto stitch holder or scrap yarn,” do I “transfer” the stitches onto scrap yarn or just place the scrap yarn “in addition” to the cable running through the stitches? This is the first time I’ve seen instructions asking for “previous stitches” to be placed on scrap yarn.
Thanks a million!
Hi Evan,
Thanks for reaching out again! I am happy to help! Whenever we say to place (previous) stitches on a stitch holder or scrap yarn you will be transferring the stitches off the needle onto your scrap yarn!
I hope this helps, happy knitting!
Gianna
Hi Gianna,
I am half way down my first sleeve and all is going well! I think I’m going to attempt a cropped length for the sweater and I want to make a hem that will lie flat. What do you recommend? I’m leaning towards ribbing but am concerned it won’t look good with the rolled neckline. Whatever hem I choose, I’ll copy in the sleeves hem I believe. Thanks for your help and suggestions!
Evan
Hi Evan,
I am glad to hear that everything is going well!! I think a cropped length would look great with this pattern! I do agree that ribbing might look a bit out of place since this pullover has such a unique rolled neckline. I would recommend checking out our Knit Hem tutorial, this might be exactly what you are looking for to get a nice flat hem!
Please let me know if you have any more questions!
Warmly,
Gianna
Hi, I’m working on a Size 37; everything has been going great up until I got up to picking up the underarm stitches where after I ssk twice, I’m supposed to end up with 70 stitches on the needle. However, I currently have 72. Is there an easy fix where I can just knit 2 together twice to get 70 ( but I know I have another k2tog twice coming up to get 68 stitches). Hope this makes sense & keeping my fingers crossed that you won’t tell me to unknit everything : )
Hi Betty,
Thanks for reaching out! Yes, this is totally an easy fix, you can k2tog or ssk twice to get to 70 stitches!
Happy knitting!
Gianna
Hi
I have a question regarding the instructions for the division round dividing sleeves from the body. I’m making size 48 1/2. Do I knit 120 stitches and then place the last 68 stitches I just knit on the scrap yarn for the sleeve?
Thanks, Faye
Hi Faye,
Thanks for reaching out! The Top-Down Circular Yoke Pullover includes sizes 34 (37, 40, 43) (46, 49 1⁄4, 52 1⁄4, 54 3⁄4) (58, 61,
64, 67). Are you possibly knitting the size 49 1⁄4? If so, the Divide Sleeves section should be worked as follows, keeping in mind that the 67 stitches that are placed on hold should be from the stitches that you just knit previously:
Division Round: K95, place previous 67 stitches onto stitch holders or scrap yarn for Left Sleeve; k179, place previous 67 stitches onto stitch holders or scrap yarn for Right Sleeve; knit to end of round. [224 total stitches: 112 stitches each for Front and Back]
Please let me know if you have any questions!
All the best,
Carly
Hello! I have a question about separating for the body and sleeves. I am knitting Size 40. If I am understanding the pattern I should have 308 stitches on my needles before I do sleeve separation and I understand that the BOR marker is in the center front of the sweater. I also understand that I should have in the end 94 stitches in the front and 94 in the back and for each sleeve I should have 60 stitches on a stitch holder.
So here is my question. It seems to me I would knit 47 ( half the the 94), then put 60 stitches on a stitch holder, then knit 94 stitches, put another 60 on a stitch holder, then knit another 47 stitches to complete the 94 for the front.
The pattern directions say differently. Can you help me figure out what I am not understanding?
Thanks so much.
Hi Linda,
Thanks for reaching out! The BOR marker is actually not at the center front of the sweater. It’s slightly off to the left side! Because of this, the stitch counts may seem a bit uneven, but they do work out in the end. Hope this helps clarify things!
All the best,
Lili