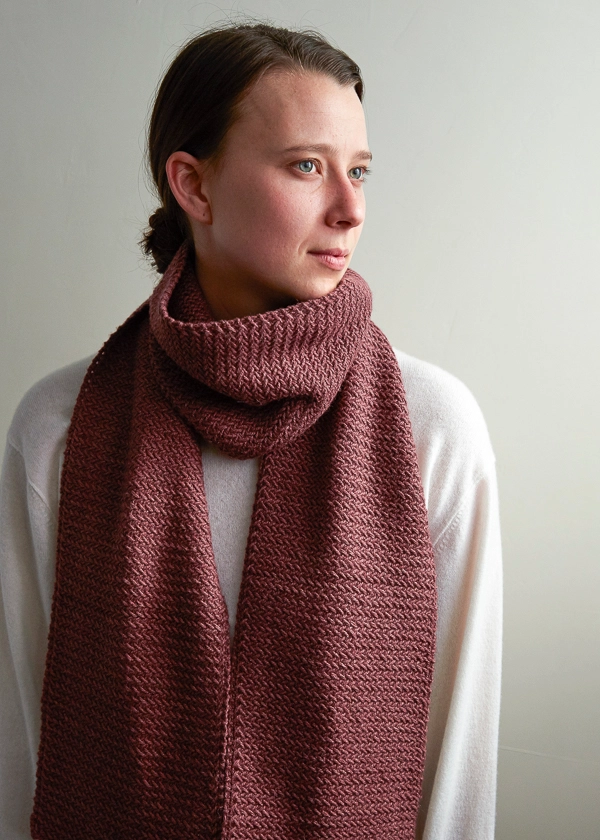
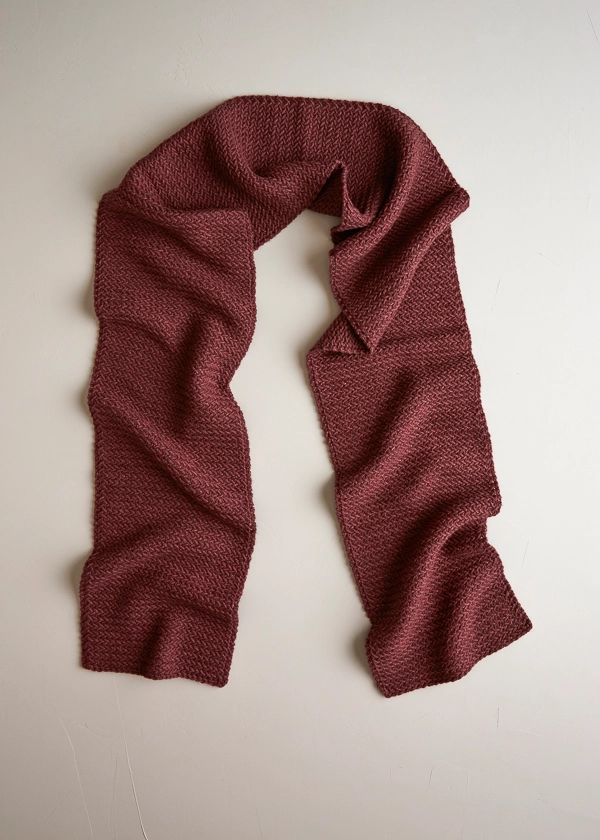
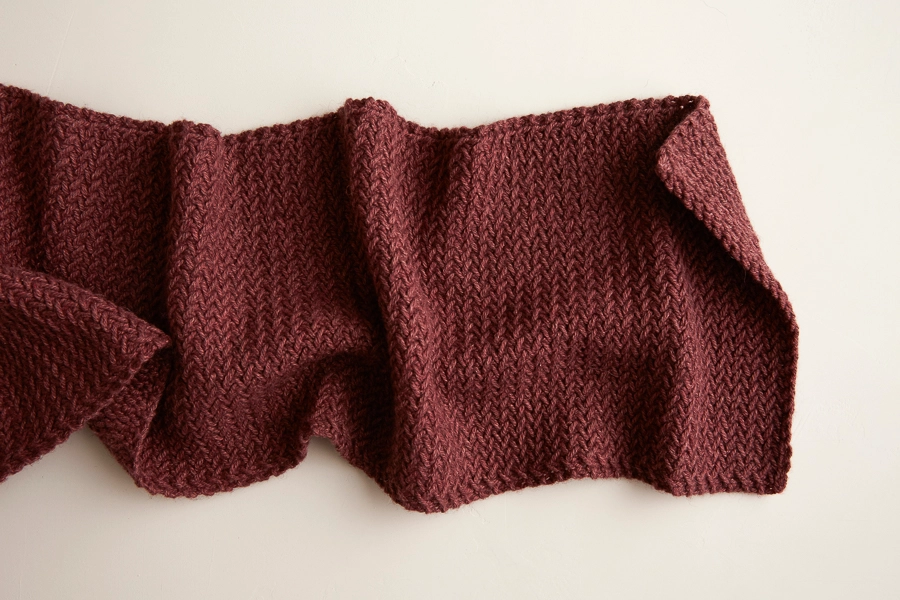
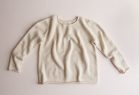
Mini Herringbone Scarf in Understory
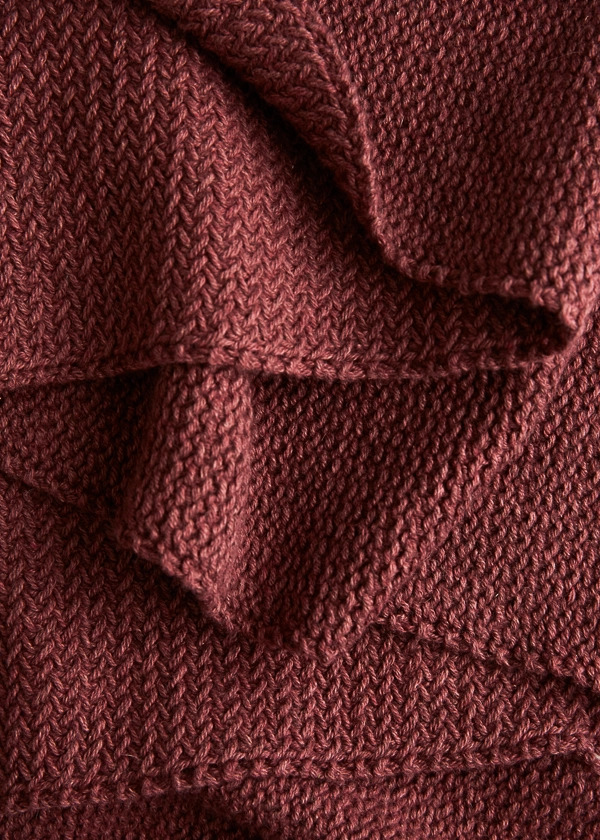
As its name so plainly suggests, a herringbone pattern mimics the bones of a fish such as, well, a herring. We’re not so sure that a fish skeleton was our inspiration here, so much as a parqueted French oak floor or an English tweed suit, but whatever herringbone makes you think of, it is undoubtedly a beautiful stitch!
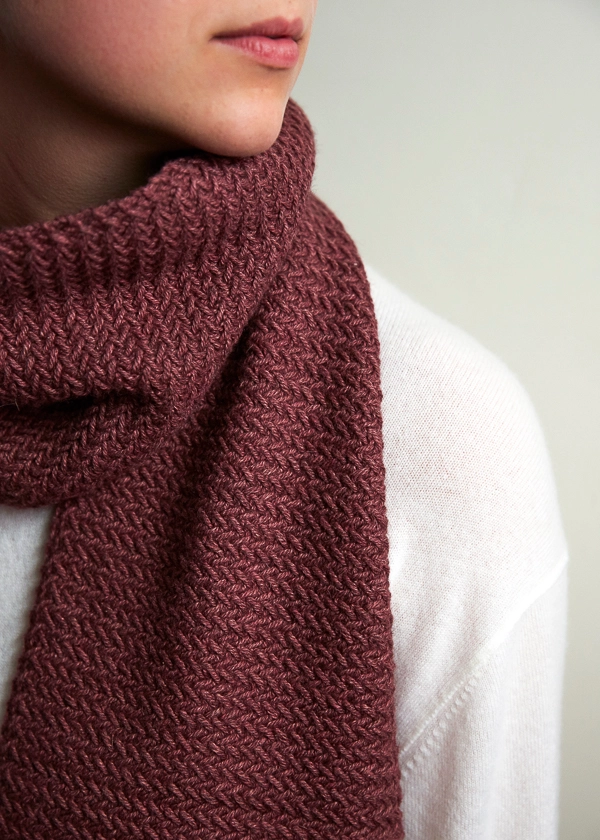
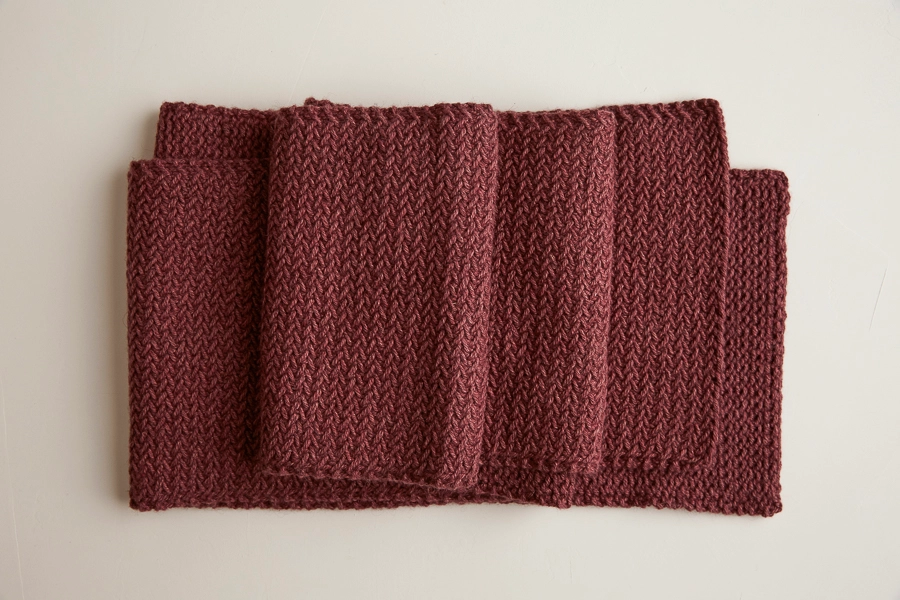
This Mini Herringbone Scarf in Understory is based on a version we made years ago that we called the Men’s Mini Herringbone Scarf. What were we thinking? A scarf is a scarf is a scarf is a scarf, and this scarf certainly suits everyone.
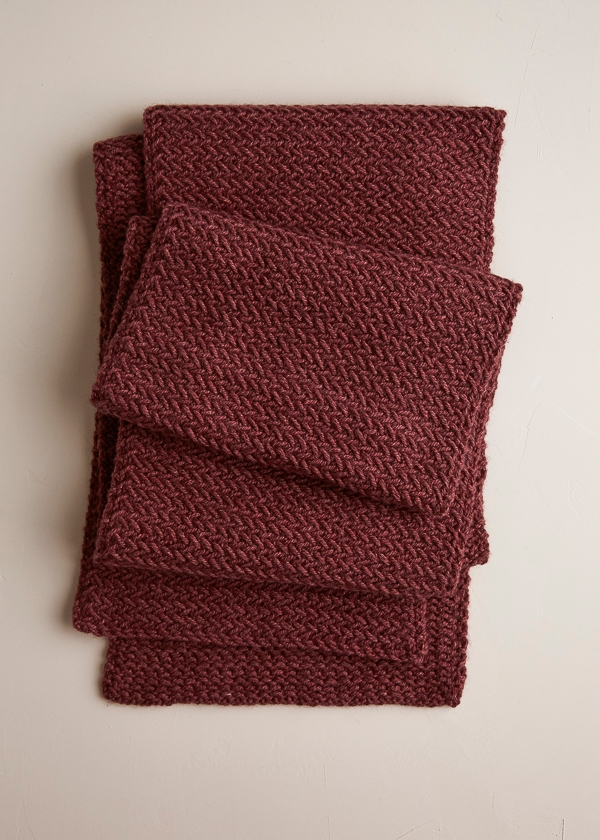
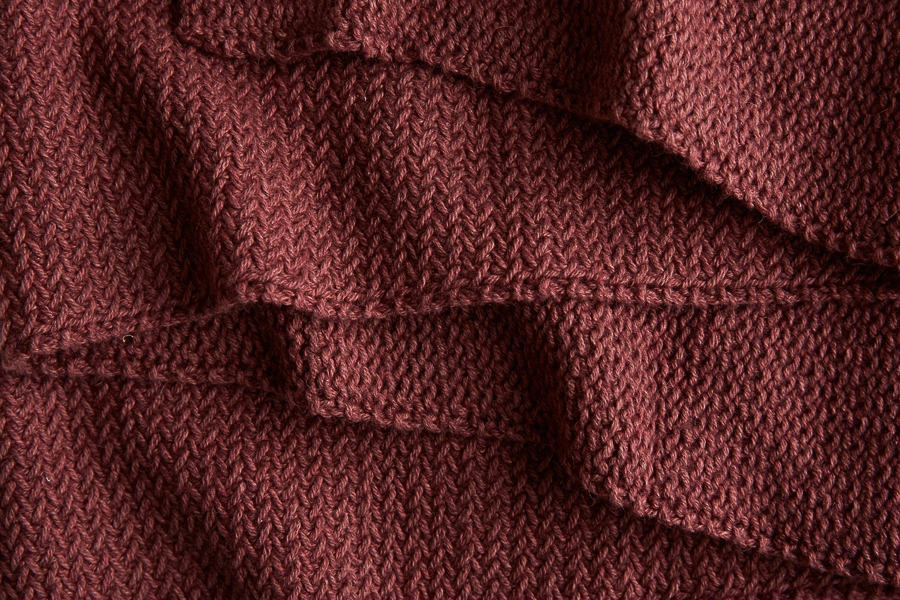
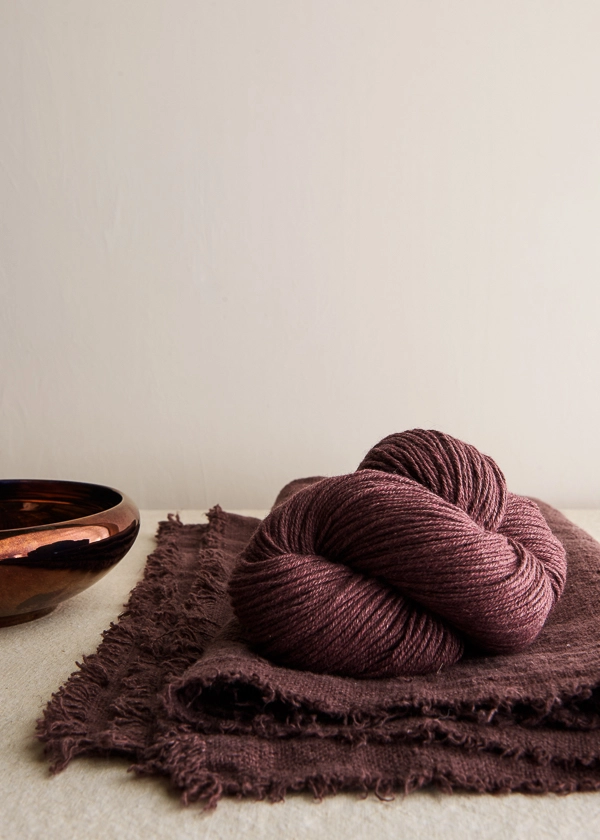
A little bit bigger than our original version, this one also gets a yarn update. We knit it up in our unspeakably soft Understory, a baby alpaca, baby yak and silk blend, here in the rich and juicy color Ripe Plum. It also has new selvage stitches, as well as an accompanying all-new Mini Herringbone video tutorial that shows you how it’s done!
Seeing how the herringbone pattern take shape, unfold, and blossom is a great knitting thrill. It’s a super interesting stitch that is rather easy to learn and fun to knit forever. It’s a bit like the Mini Herringbone Scarf itself: a classic that will never, ever go out of style.
Designed by Purl Soho designer, Laura Ferguson.
Share your progress and connect with the community by tagging your pics with #PurlSoho, #PurlSohoBusyHands, #PurlSohoMiniHarringboneScarf, and #PurlSohoUnderstory. We can’t wait to see what you make!
Materials
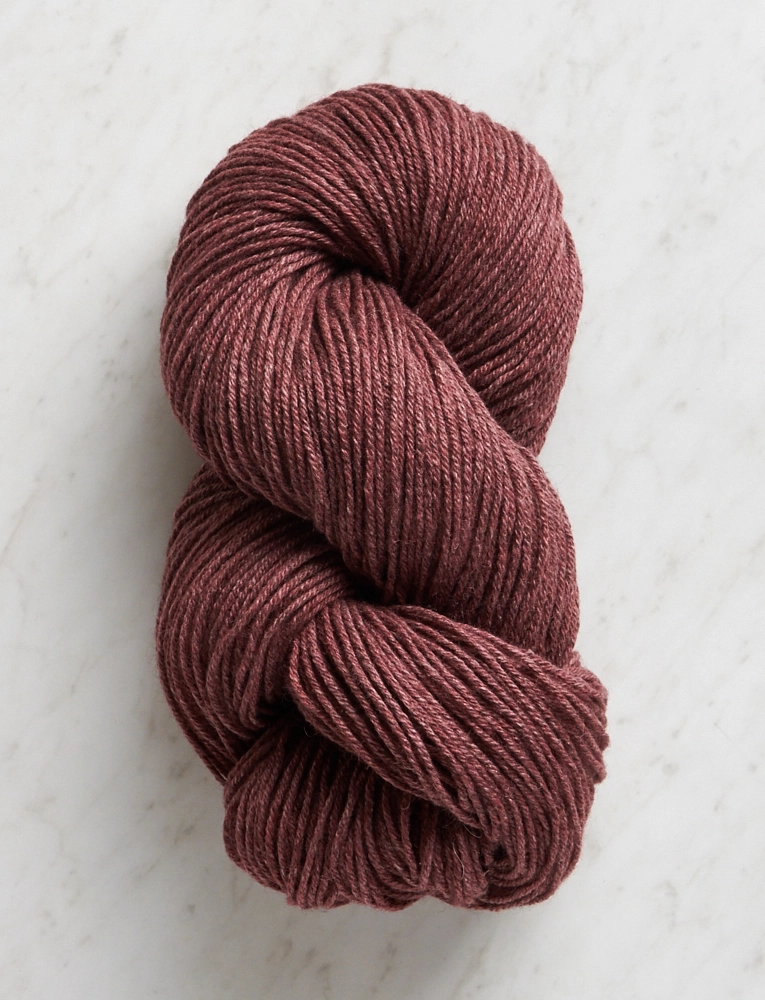
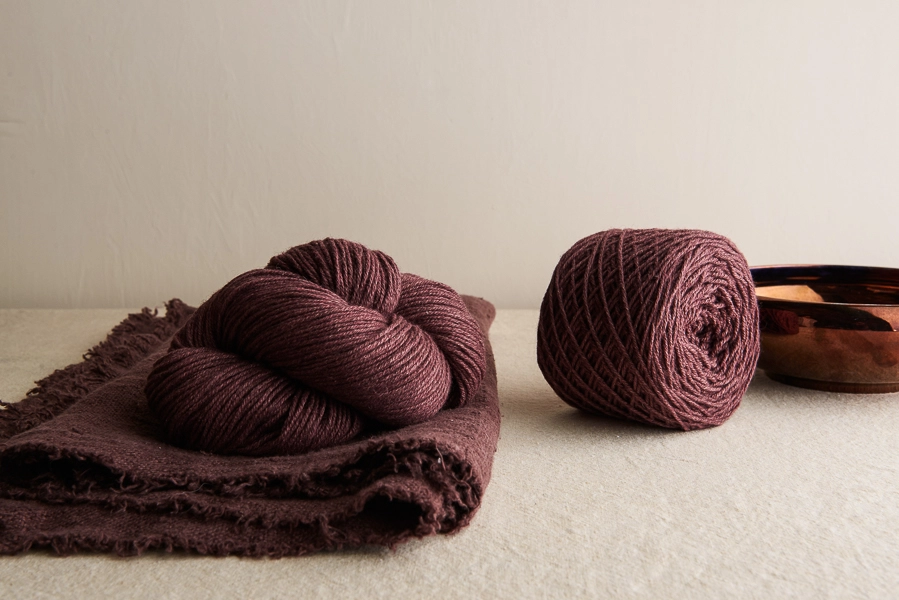
- 3 skeins of Purl Soho’s Understory, 50% baby alpaca, 25% baby yak, and 25% silk. Each skein is 250 yards/ 100 grams; approximately 650 yards required. We used the color Ripe Plum. (NOTE: We no longer offer Understory, but choose from one of our other light worsted/dk weight yarns.)
- US 10 (6mm), straight or circular needles
Gauge
28 stitches and 20 rows = 4 inches in stitch pattern
Size
Finished Dimensions: 8 inches wide x 68 inches long
Notes
STITCH MULTIPLE
You can work this stitch pattern over any odd number greater than 5.
SLIPPED STITCHES
Slip all slip stitches purlwise.
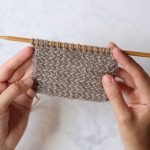
STITCH PATTERN
For some extra help figuring out how to work this stitch, check out our Mini Herringbone video tutorial.
Pattern
Using Long Tail Cast On, cast on 57 stitches.
Row 1 (wrong side): K1, p1, *p2tog and leave stitches on needle, purl the first stitch again and drop both stitches together from left-hand needle, repeat from * to last stitch, k1.
Row 2 (right side): K2, * slip 1 with yarn in back, k1, then with left-hand needle raise up the slipped stitch as if to bind off but before dropping off right-hand needle, knit it and then drop from needle, repeat from * to last stitch, k1.
Repeat Rows 1 and 2 until piece measures 68 inches from the cast-on row, ending with a wrong-side row.
Bind Off Row (right side): K2, bind the first stitch off by pulling it up and over the second stitch, *k2tog, bind off one, repeat from * to last stitch, k1, bind one off, cut tail and pull through remaining stitch.
Weave in the ends and block as desired.


Hi – I can’t wait to try this for a present I want to give! If I use the Mulberry Merino, how many skeins do I need, and should I use size 9 needles? Also, what is the difference between this pattern and the Men’s Mini Herringbone pattern? Can I use the Mulberry Merino for that pattern since I like the edge of that pattern?
Thank you!
Lauren
Hi Lauren,
Thanks for reaching out! The two herringbone scarves are very similar. The edging is slightly different, as you have noticed, as is the size of the scarf, and the original scarf used a slightly heavier weight yarn and a US 10 needle instead of a US 9. The main stitch is the same in both patterns, and since Mulberry Merino is a good bit thinner than the yarn used in either version, you can knit whichever version you prefer, but will have to knit a gauge swatch to determine how many stitches to cast on. I would suggest knitting your gauge swatch in pattern on a US 8 needle. You can then multiply your stitches per inch by however wide you would like your scarf to be and round to the nearest odd number.
I hope that helps, and happy knitting!
Julianna
I love this pattern! I wonder if there is a way to make it in the round, on a circular needle?
Hi Joyce,
Thanks for reaching out! Although the stitch is slightly different, our Big Herringbone Cowl is knit in the round and should turn out very similar to this scarf!
Best,
Julianna
I hope you can help me. I love this pattern but find that I am gaining a stitch for every row I knit. Or, to be more clear: I cast on 57 as per instructions, knitted row one and row two. Counting the stitches on my needles, I now have 61 for row three. Any idea what I might be doing that would increase a stitch? Thanks, tearing my hair and many starts out.
Hello Sarah,
Thank you for reaching out! This sounds very mysterious. Are you remembering to begin and end with your knit stitches? It could be possible that both stitches didn’t fall off your needle at some point?
How are your stitches lining up, do you see a pattern forming? Is there a spot that disrupts the pattern? This could give us a clue as to what could be happening.
I hope I can help!
Warmly,
Marilla
Thank you so much for your troubleshooting suggestions. I did take another skein of yarn—a plain cotton one—and practiced the stitch over and over until I finally “got it.” Yes, I do think it was the issue of both stitches *not* falling off the needle that was the culprit. Easy to add one to that second stitch.
My husband hopes I figure this out before spring. 🙂 Thanks again and have a happy holiday season.
I am left-handed. I’m trying to follow your video, but it doesn’t seem to work the same. I’ve knitted for many years, so experience shouldn’t be an issue.
Hi Barbara,
Thanks for reaching out! If you are knitting from left to right because you are left handed, I would recommend following the written instructions for the Mini Herringbone Stitch instead – it should be a bit easier than reversing the video as you watch!
Best,
Julianna
Hi. I’m wondering if you have a tinking video for this stitch. I see that there are several ways to do herringbone stitch and have seen videos for tinking those but none for this particular method. Stuck with a dropped stitch and pulling the needle from an entire row is a NIGHTmare. Thanks.
Hello Sarah,
Thank you for reaching out! Sadly, we do not have a video for fixing mistakes in this stitch, I know that its a pain. As for picking up in this stitch, the best advice I can give here, is to slowing rip out a few rows, carefully watching how the loops and stitches interact with one another. That way, by the time you pull out your knitting down to the error, you’ll know what the stitches should look like and how to pick them back up.
I hope this is helpful and good luck!
-Marilla
That does help; thank you. I also received advice to add a lifeline every now and again so that the knitting is saved at that point. I’m counting, counting, counting. 🙂
Hi
Love the scarf, can you suggest a yarn without wool content please that would be suitable. Thanks
Hi Karen,
Thanks for writing in! Although it is slightly heavier weight than Understory, I think this scarf would be lovely in Blue Sky Worsted Cotton! To adjust the pattern, I would recommend knitting a gauge swatch in pattern on a US 11 needle. You can then multiply your stitches per inch by 8 inches and round to the nearest odd number to determine how many stitches to cast on.
I hope that helps, and happy knitting!
Julianna
What is that fabric in one of the photos? A skein of yarn is on it and both are a dark red color.Is it a fabric you carry?
Hi Gail,
Great question! Sadly we do not carry this fabric. It is a vintage piece of linen that our lovely photographer used as a prop as it so perfectly matched out lovely yarn. I believe that it is a plain weave with distressed edges that may be due to age and use!
Best,
Cassy
Hiya,
If I want to make a wider scarf, do I increase the number of stitches in multiples of 2?
Hi Teddy,
Great question! This lovely stitch pattern works over any odd number greater than 5.
Happy knitting!
Cassy
Scarf looks beautiful and am trying it out but I don’t actually have a st left to do the K1 at the end of the 2nd row. Have tried with 15 and 19 sts (swatch) and the same thing happens! The pattern still seems to work but my selvedge edges don’t look the same. Nobody else seems to have this problem (ravelry projects) so I wonder what I’m doing wrong?!
Hi Lea,
Thanks for writing in! Hmm, it’s really hard to say what might be going wrong without seeing your work. Are you sure you are working two stitches at the beginning of each row before starting the herringbone pattern, and have you tried following along with our Mini Herringbone Video? If you are still having trouble with this pattern, please let me know!
Best,
Julianna
Hi,
Somehow my edges aren’t turning out the same as in the photos. I have been slipping the first stitch of every row instead of knitting. Could that possibly be the problem?
Hi Lucy,
Thanks for writing in! Slipping the first stitch does create a different appearance than knitting the first stitch, so I think that’s likely the culprit! I would suggest knitting a swatch without slipping the first stitch to see if you prefer how it looks!
Happy knitting!
Julianna
For the row right after I cast on, I’m following the directions in the pattern but I’m ending up with really loose loops, I can’t get it to tighten up like I think it should. I’ve taken it apart and started over 10 times always with this same result. What am I doing wrong?
Hi Danielle,
I think there is a good chance you aren’t doing anything wrong! We used Understory, a light worsted weight yarn, with needles a couple sizes larger than you would normally use with it, US size 10, for this pattern. While loose stitches can be frustrating, they can be expected to happen in the first row with the Mini Herrinbone stitch in a light worsted weight yarn with size 10 needles. This looseness will work itself out as you continue on to other rows. If you haven’t already, I recommend knitting a small gauge swatch. This way you can see if the loose stitches even out as you work more rows. If you are finding that the stitches are still too loose, then you may need to go down in needle size.
I hope this helps – let me know how it turns out!
Oscar
I’m interested in using this yarn and pattern as a queen bed throw. Any recommendations for number of cast on stitches and number of yarn? Thank you!
Hi Elizabeth,
What a magnificent coverlet that will be! An average queen size comforter that hangs over the sides of the bed measures 90 inches square, so you will need to cast on 631 stitches and you will need 36 skeins of Understory.
I hope that helps, and please do let us know how it turns out!
Julianna
Hi,
I seem to be losing a stitch every time I knit a new row. The second row says Knit2 which I think is causing the issue but I’m
not sure how to rectify it and keep the same number of stitches. Any help is most welcome!
Hi Vaishna,
Thanks for writing in! Knitting 2 at the beginning of row 2 shouldn’t cause any problems with the overall stitch count. Due to the nature of this stitch pattern the number of stitches will vary from row to row with the increases and dropping stitches. If your stitches are looking consistent with the pattern and the width is 8″ wide you should be alright!
I hope this helps, happy knitting!
Gianna
Beautiful! I am going to make this scarf as a Christmas present and as someone still fairly new to knitting I have a couple of questions:
1) is a long tail cast on technique appropriate or do you suggest another one?
2) I notice the elegant edges of the scarf are a little different to the rest of the pattern. What is this called please and where can I find a tutorial on how to do it?
Many thanks!
Hi Lucy,
Thanks for reaching out! Long tail cast on is fine to use for this pattern! The edge of the scarf is just the effect you get when starting and ending each of the rows with the knit stitches as we have written in the pattern! On the pattern page we also have a lovely tutorial showing exactly how to work the Herringbone stitch!
I hope this helps, happy knitting!
Gianna
hello! the pattern calls for US 10 needles, but the yarn you point to (understory) calls for US 5-7 needles — which is it?
the yarn i have calls for US 7 needles — how could i scale the pattern for this yarn?
thanks!
Hi Sinduja,
Thanks for reaching out! Even though Understory is a light worsted weight yarn and calls for a US 5-7 needle, we used a size 10 for this pattern due to the herringbone stitch! If you were to use a 5-7 needle on the stitch pattern it would come out far too tight. If your yarn calls for a 7 needle I would recommend sticking to the pattern and using a US 10! I also suggest working a gauge swatch whenever using a yarn different from the pattern to insure that you are consistent before beginning!
I hope this clears things up!
Warmly,
Gianna
Will you be getting more Mulberry Merino yarn in soon? I have started this Minni Herringbone Scarf in Blue Inlet Heather in the lovely Mulberry Merino yarn. It is coming along beautifully. However, I am still in need of one more skein to complete the scarf. I am hoping that you are not discontinuing this yarn. Please help.
Hi Phyllis,
Thanks for writing in! Unfortunately Mulberry Merino is being discontinued so what we have on the site is all we have left in our stock. You can email us at costomerservice@purlsoho.com and we can see if its possible to locate a skein for you!
Warmly,
Gianna
Hello! I want to make this scarf a bit wider. I have 4 skeins of Understory. How many stitches do you recommend I cast on? Thanks! 🙂
Hi SS,
Thanks for reaching out! Depending on how wide you would like the scarf, and if your gauge is consistent with the pattern you can easily adjust the width from there! For example, if you would like a 12″ wide scarf you would cast on 85 stitches (calculated based on the gauges stitches per inch) just be sure to keep in mind that this pattern works over any odd number of stitches!
I hope this helps, happy knitting!
Gianna
I want to knit this scarf on straight needles—which length do you recommend? Thank you
Caroline Tierney
Hi Caroline,
The finished width of the scarf is 8 inches, so I’d recommend using straight needles that are at least that long! Hope this helps.
All the best,
Lili
Hello,
I would like to make the Mini Herringbone Scarf in your Simply Camel yarn. I would like to know how to adjust the pattern, especially needle size and any additional pattern changes needed.
Thanks in advance for your kind assistance,
Jeanine
Hi Jeanine,
Thanks for reaching out. Since Simply Camel is a fingering weight yarn, whereas Understory is DK, you will need to adjust your needle size and cast-on number to make the design work for the smaller yarn. I would suggest using size US 2 or 3 needles, as those are what we find work best with Simply Camel!
To figure out your cast-on number, you will want to first knit a gauge swatch in pattern (if you need help with this step please visit our tutorial All About Gauge). Once you know how many stitches you are getting per inch, you can multiply that number by the width that you would like, and then cast on the closest odd number.
Hope this helps, and please let me know if you have any other questions!
All the best,
Lili
I love this pattern. Unfortunately have started in 5 times (at least) and cannot make the numbers work. It seems there is a decrease in stitches …. and the edging isn’t working. I am certain I have the stitch correct and it works throughout …. until I reach the end.
I have read through some of the comments and others have had the same issues. Should I use markers for the ending stitches.
Should I use 59 stitches and put markers on the first two on each row – knitting first two stitches?
Hi Elizabeth,
Thanks for writing in! You only need an odd number of stitches greater than 5 to make this pattern, so I’m afraid changing to 59 stitches won’t really help you in the long term and we should try to narrow down where the extra two are being added in.
After browsing through some older comments, a common trouble spot seemed to be the transition from knit to purl in the first row. Someone would knit 1, then the yarn was in back and they would then purl 1 that way. The way the yarn must move over the needle creates 2 stitches instead of 1 on your right needle. They were able to fix this by moving the yarn after the knit stitch to be in front, then purl, which nicely creates 1 stitch on the right needle instead. Some other ideas that could be throwing things off are if you are perhaps adding a stitch on right side rows by placing the slipped stitch and the stitch that you knit using it on the needle. You also want to keep your eyes out for any accidental yarn overs which can happen when you are getting used to a pattern that contains slip stitches like in the first example!
Adding some stitch markers in should help you in general though. I’d recommend the first marker on the wrong side after the first two stitches, and the second marker before your last stitch on that row. If this doesn’t help I’d recommend sending some photos of your work to our customerservice@purlsoho.com address so we can get a better look!
All the best,
Zha Zha
Is there a tutorial for how to remove stitches on the correct and wrong side so you don’t have to start over if you make a mistake?
Hi Laura,
Thanks for writing in! We don’t have a tutorial for this, but if you would like to send a clear photo of your work along with the information above to our customer service team at customerservice@purlsoho.com they can take a look and asses how to resolve the issues!
I hope this helps, happy knitting!
Gianna
Please advise me on where I can find the PATTERN instructions for the small version of the big herringbone cowl.
Thank you!
Hi Rose!
Thank you for your question. You can find our free pattern for the Big Herringbone Cowl right here! We only offer the pattern in one size, however if you would like to adjust the circumference of the cowl, you can cast on any number of stitches to create a shorter or longer cowl. If you have a specific size in mind, you can make a gauge swatch of the herringbone stitch and measure how many stitches you are getting per inch, then multiply that number by your desired circumference in inches to determine your cast-on amount!
I hope this helps, and happy knitting!
All the best,
Margaret
Hi! This scarf is just so lovely! I would love to knit it with your Linen Quill Worsted and was wondering what size needle you’d recommend (I was thinking US 11). Also, I may knit it with multiple colors. When changing colors on this knit, what stitch pattern would I use? Just a basic knit stitch to swap the colors? I appreciate your insight!
Hi Jill,
Thanks for reaching out! I think that size US 11 or 13 needles would be perfect for this pattern in Linen Quill Worsted. You can even make a small swatch with each needle size to determine which fabric you like the density and texture of best!
Regarding color changes, I’d actually recommend staying in pattern completely. That will ensure that there is no gap in the herringbone pattern between the colors!
All the best,
Lili
Thank you, Lili! ☺️
I wonder if this pattern would work as blanket. I have 12 skeins of linen quill and planned to knit with 10.5 needles. My gauge is about 7 stitches to an inch. If the blanket is 60 inches wide I would cast on 420 stitches? With 12 skeins about how long would the blanket be? Can you suggest another pattern that may knit up a blanket 54-60″ x 54-60″ using 12 skeins of linen worsted. As always I appreciate your help.
Kay
Hi Kay,
This pattern would definitely work as a blanket, but you may need to make it smaller than you had planned with 12 skeins of Linen Quill Worsted. You will probably only be able to make an approximately 40.5 by 40.5 inch blanket (or other dimensions with the same area) with the yarn you have in this stitch pattern, since it naturally takes up a lot of yarn compared to other stitch patterns.
If you’re interested in considering some other patterns, I’d recommend our new Diamond + Dot Blanket. You’ll be able to make a blanket that’s slightly larger than the Throw size with 12 skeins of Linen Quill Worsted!
All the best,
Lili
Hello!
I ordered your Nogh DK cashmere to make this scarf. I see that the pattern calls for size 10 needles, yet the yarn itself calls for size 4-6.
Is it the stitch, then, that calls for larger needles?
The photos don’t show it as being a “loopy” stitch, but it wasn’t made with Nigh… You said that the yarns used are no longer available. Do you think that using Nigh will give me something that looks like the scarf pictured?
Thanks so much!
Hi Jenny,
The mini herringbone stitch is naturally very tight, so it’s always recommended to use larger needles to achieve a good density to the knit fabric! Larger needles also makes it easier to knit the stitches themselves, since they’ll be loose enough to get the needle through. And I think Nigh DK would be lovely choice for this pattern, and the stitch pattern will look the same!
All the best,
Lili
The scarf turned out absolutely gorgeous! (And thank you for the IG compliment on my knitting, @_slow_knitting_)
A question, however: As I knit, I noticed how beautifully even and flat the mini herringbone stitch laid.
Now that my husband is wearing the scarf, we’re finding that it keeps wanting to curl! I’ve carefully blocked it (first dry, then wet), but it still…wants to curl. I’m grateful for any advice you might have.
Hi Jenny,
I’m sorry to hear that you’re experiencing so much curling in your scarf! Blocking once more using a different method may help minimize that. In particular, steam blocking might do the trick! If you’re still experiencing significant curling though, then I’d recommend adding more of a border to the wrap! You can pick up the stitches all the way around and use a symmetrical stitch (like garter stitch, ribbing, seed stitch, etc.). This will help prevent the edges from curling at all!
All the best,
Gavriella
Gavriella, I think the idea of adding a simple border will probably be what works best. At the end of my previous blocking, I actually used steam over damp cloths, going over and over it. I’ll
Try this out. Thank you!
You are very welcome and please feel free to let us know how it goes!
I came across this pattern while searching for a project to work with a stash of Morning. What needle size would you recommend?
Hi Barbara,
Thank you for writing in! You could definitely use Morning for this pattern with the same size needles. I hope this helps!
Happy knitting,
Gavriella