
Simple Ribbed Shrug
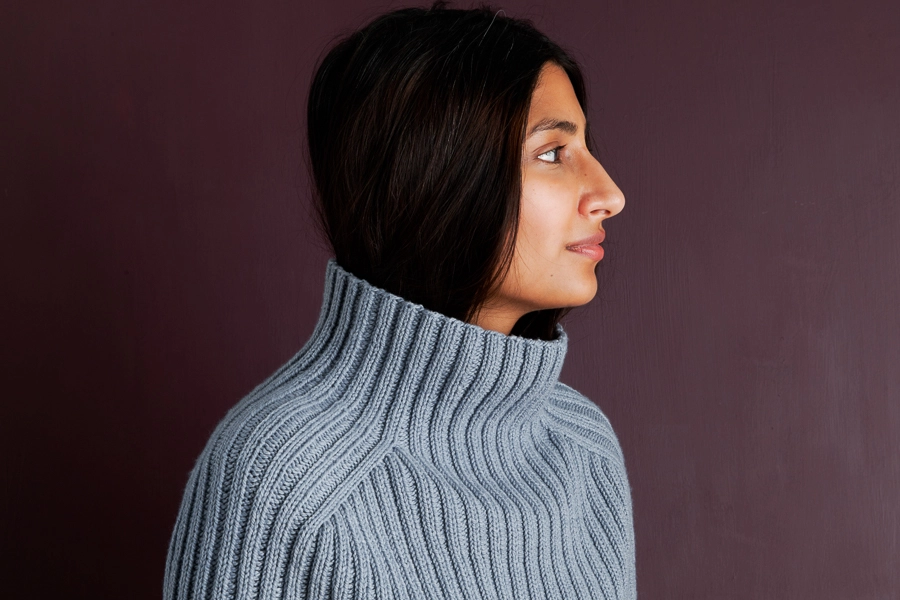
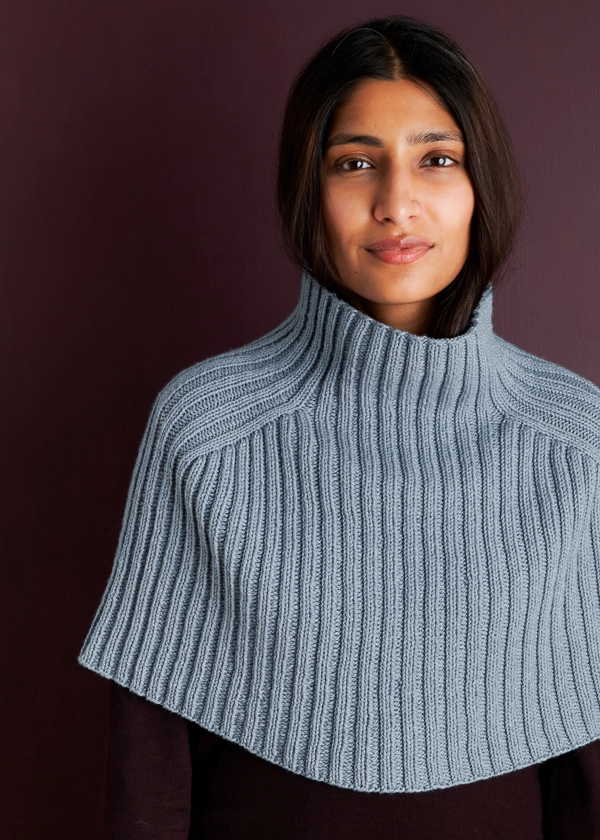
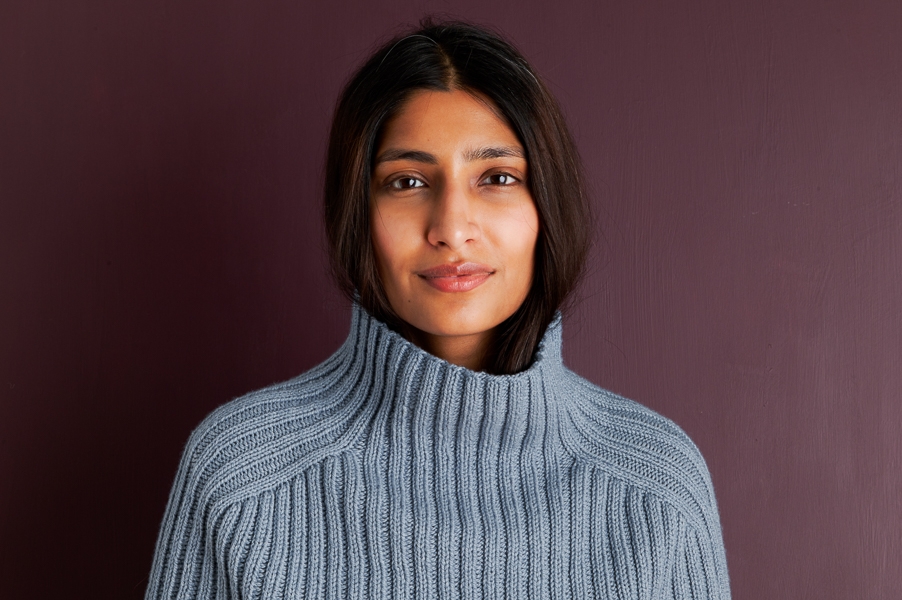
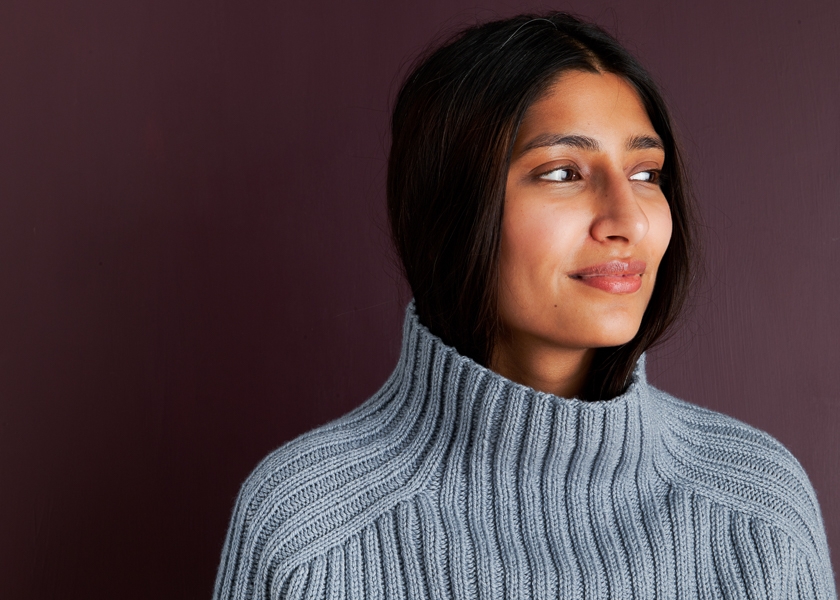
A display of utility and elegance, our Simple Ribbed Shrug takes the function of basic increases and turns them into a magnificent form, like a perfectly balanced vase.

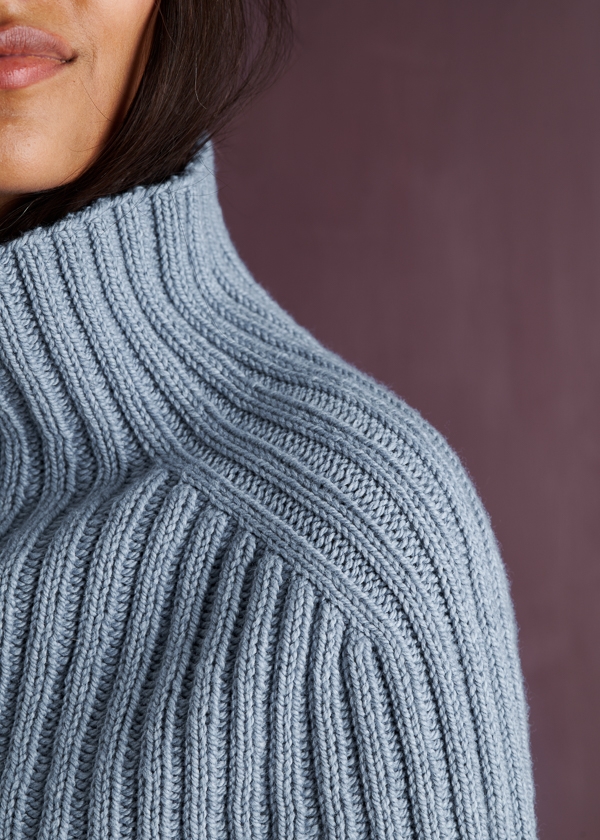
As simple as can be, you knit this graceful shrug from the top down (so you can try it on as you go!) all in 2×2 ribbing that traces the lines of your shoulders and provides a perfect balance of flexibility and structure…. Comfortable and gorgeous, too!

Whether you’ve knit a cabinet-full of sweaters or have yet to dive into knitting garments, the Simple Ribbed Shrug gives you a taste of the fun. Enjoy shaping for fit and wearing something made just for you but without the parts of sweater knitting that may slow you down (no visits to sleeve island!).
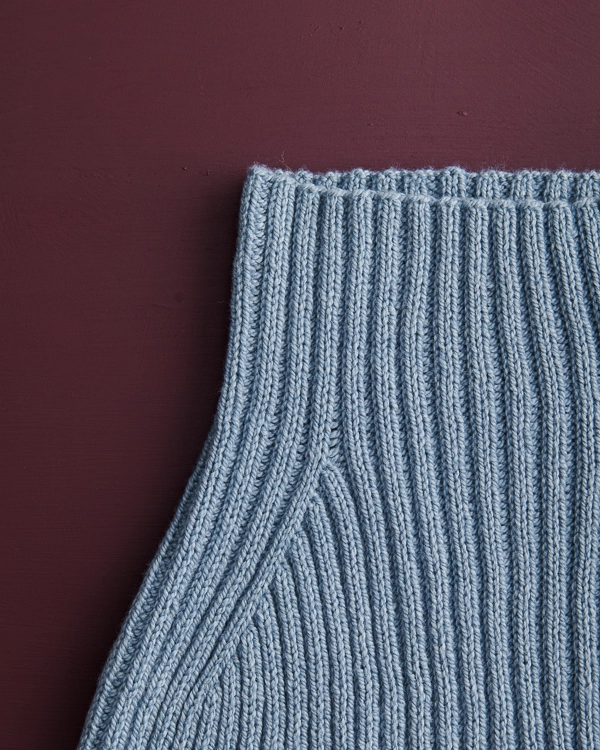
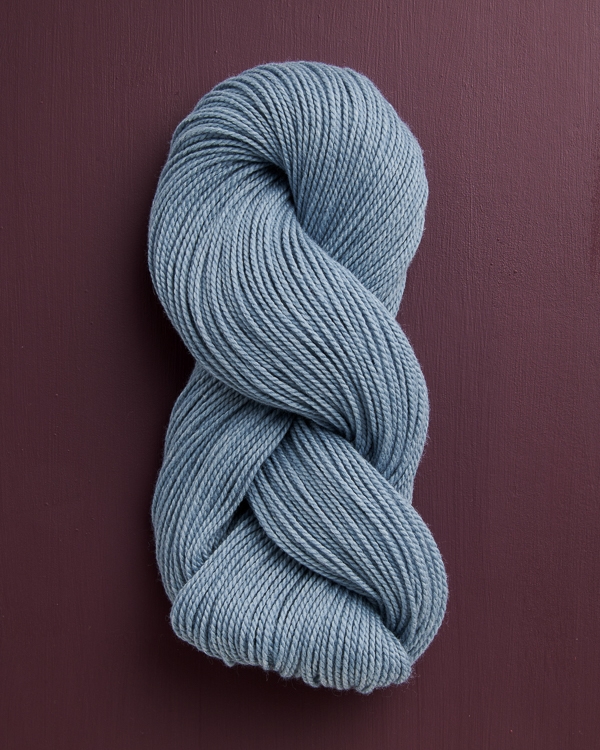
The tidy spin and wool-cotton fiber of our gorgeous Plein Air create ribbing that is wonderfully distinct and with enough structure that the collar of your shrug holds its shape.
A light worsted weight, you can wear this shrug under a coat or over a cardigan. It’s the layer you need no matter the season!
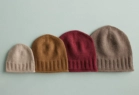
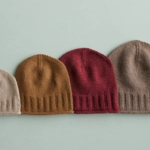
Plein Air’s colors have a gorgeous heathered quality that comes from the slight difference in how the wool and cotton absorb dye, adding even more depth and character to the fabric. Dive into Plein Air’s palette of 16 stunning colors and cast on with just three or four skeins!
Designed by Purl Soho designer, Hiromi Glover. Click here to see even more of Hiromi’s work!
Share your progress and connect with the community by tagging your pics with #PurlSoho, #PurlSohoBusyHands, #PurlSohoSimpleRibbedShrug, and #PurlSohoPleinAir. We can’t wait to see what you make!
Materials

- 3 (3, 3, 4, 4) skeins of Purl Soho’s Plein Air, 67% wool and 33% organically grown cotton. Each skein is 218 yards/ 100 grams; approximately 480 (565, 675, 780, 870) total yards required. We used the color Blue Chambray.
- US 6 (4 mm), 20- or 24-inch-inch circular needles, depending on size you are making
- US 6, 32-, 40- or 47-inch circular needles, depending on size you are making
- Stitch markers, including one unique
GAUGE
28 stitches and 28 rounds = 4 inches in 2 x 2 rib, unstretched
SIZES
NOTE To find your chest-plus-arms circumference, hold both arms to your sides and measure around the widest part of your chest, including your arms. To learn about “negative ease,” please visit our Understanding Ease + Selecting Size Tutorial!
30¾ (36½, 42¼, 48, 53¾)
To fit approximate chest-plus-arms circumference of 36–42 (42–48, 48–54, 54–60, 60–66) inches with approximately 6–12 inches of negative ease
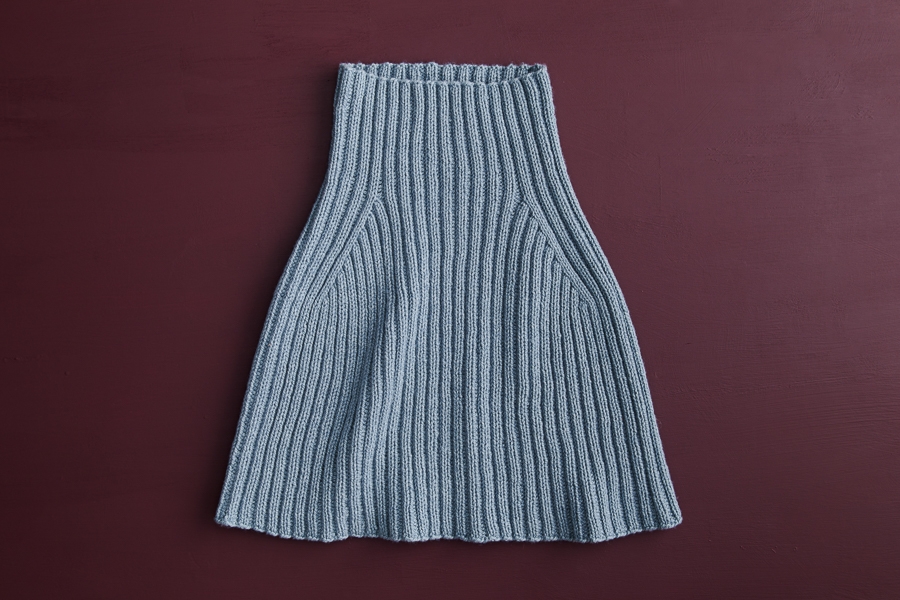
- Finished Circumference at Hem, unstretched: 30¾ (36½, 42¼, 48, 53¾) inches
- Finished Circumference at Neck, unstretched: 17¼ (18¼, 19½, 20½, 21¾) inches
- Finished Height: 16 (16½, 17, 17½, 18) inches, with instructions to modify
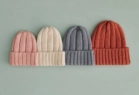
Sample: The sample shown here is size 36½, worn with approximately 5 inches of negative ease (a bit less negative ease than we recommend, but still very nice!).
NOTES
CONSTRUCTION
You will make this shrug in the round, from top down, starting with the Collar and working in 2 x 2
rib. For the Yoke, you will work 4 sets of raglan increases, then work evenly to finish with the Body.
SPECIAL INSTRUCTIONS
M1R + M1L (MAKE 1 RIGHT + LEFT)
NOTE: For more help with these increases, visit our Make 1 Right (M1R) + Make 1 Left (M1L) tutorial at purlsoho.com/create/make-one-right-m1r-make-one-left-m1l
M1R (Make 1 Right): Use left needle to pick up strand (or “bar”) between last stitch and next stitch, from back to front. Knit into front leg. [1 stitch increased]
M1L (Make 1 Left): Use left needle to pick up strand between last stitch and next stitch, from front to back. Knit into back leg. [1 stitch increased]
MAKE 1 RIGHT + LEFT PURLWISE
NOTE: For more help with these increases, please visit our Make 1 Purlwise Tutorial at purlsoho.com/create/make-1-purlwise-m1p
M1R purlwise: Use left needle to pick up strand (or “bar”) between last stitch and next stitch, from back to front. Purl into front leg. [1 stitch increased]
M1L purlwise: Use left needle to pick up strand between last stitch and next stitch, from front to back. Purl into back leg. [1 stitch increased]
PATTERN
CAST ON
With shorter needles, cast on 120 (128, 136, 144, 152) stitches. We used a basic Long Tail Cast On, but any stretchy cast-on will do!
Place unique marker and join for working in the round, being careful not to twist the stitches.
SIZES 30¾, 36½ AND 53¾ ONLY
Set-Up Round: K1, [p2, k2] 4 (4, -, -, 5) times, p2, place marker (pm) for Back Left, [k2, p2] 5 (6, -, -, 7) times, k2, pm for Front Left, [p2, k2] 9 (9, -, -, 11) times, p2, pm for Front Right, [k2, p2] 5 (6, -, -, 7) times, k2, pm for Back Right, [p2, k2] 4 (4, -, -, 5) times, p2, k1. [4 markers placed; 5 markers total]
SIZES 42¼ AND 48 ONLY
Set-Up Round: P1, [k2, p2] – (-, 5, 5, -) times, place marker (pm) for Back Left, [k2, p2] – (-, 6, 7, -) times, k2, pm for Front Left, [p2, k2] – (-, 10, 10, -) times, p2, pm for Front Right, [k2, p2] – (-, 6, 7, -) times, k2, pm for Back Right, [p2, k2] – (-, 5, 5, -) times, p1. [4 markers placed; 5 markers total]
COLLAR
SIZES 30¾, 36½ AND 53¾ ONLY
Round 1: K1, *p2, k2, repeat from * to last 3 stitches, slipping markers as you come to them, p2, k1.
SIZES 42¼ AND 48 ONLY
Round 1: P1, *k2, p2, repeat from * to last 3 stitches, slipping markers as you come to them, k2, p1.
ALL SIZES
Repeat Round 1 until piece measures 4 inches from cast-on edge.
YOKE
Changing to longer circular needles as needed . . .
Increase Round 1: [Work in rib pattern (knitting the knits and purling the purls) to next marker, m1R (see Special Instructions), slip marker (sm), work in pattern to next marker, sm, m1L (see Special Instructions)] 2 times, work in pattern to end of round. [4 stitches increased]
Next Round: Repeat Increase Round 1. [4 stitches increased]
Increase Round 2: [Work in pattern to next marker, m1R purlwise (see Special Instructions), sm, work in pattern to next marker, sm, m1L purlwise (see Special Instructions)] 2 times, work in pattern to end of round. [4 stitches increased]
Next Round: Repeat Increase Round 2. [4 stitches increased]
Repeat last 4 rounds 5 (7, 9, 11, 13) more times. [216 (256, 296, 336, 376) stitches]
BODY
NOTE: Remove stitch markers, except unique endof-round marker, on first round.
Work evenly in established pattern (knitting the knits and purling the purls) until piece measures 16 (16½, 17, 17½, 18) inches from cast-on edge, or to desired length.
Bind off loosely in pattern.
FINISHING
Weave in all ends and gently wet block.


Looking forward to knitting the shrug!!!
Thank you for the Simple Ribbed Shrug pattern.
Love so many of your patterns
Thank you for the pattern. I am allergic to wool. What other kind of your yarn can I use.
Hi Jennie,
That’s a great question! We would recommend checking out our Nigh DK which is 100% cashmere or our Morning yarn which consists of 75% organically grown cotton and 25% yak! Although wool allergies vary from person to person, both cashmere and yak contain no lanolin, so they are perfect fibers for someone with a lanolin allergy. They’re also super soft and fine fibers, so they won’t scratch like most wool does! I hope this helps but please let us know if you have any other questions!
Happy knitting,
Gavriella
Love the pattern but not the yarn. Any other recommendations. I would prefer a softer drape at the collar.
Hi Paula,
Thank you for your question! To get more drape, I would recommend knitting with a yarn that is slightly thinner than what is recommended in the pattern. Wigeon or Season Alpaca could both be great options for this pattern and will also be wonderfully soft!
Wamrly,
Gavriella
Thank you for a lovely pattern. I am currently knitting the shrug and noticed an error on page 2 of the written instructions. Under the special instructions section for the M1L, the instructions say (1 stitch decreased) and it should read (1 stitch increased).
Hi Marian,
Thanks so much for letting us know! I’ll alert our design team about the typo, and they’ll fix it as soon as possible. Thanks again for bringing this to our attention!
All the best,
Lili
In the set up round [42 1/4]: P1, [k2,p2] – (-, 5,5,-) times, etc.
What does this mean?
Hi Judith,
Thanks for writing in! These instructions mean that you will purl 1 stitch, and then for sizes 42 1/4 and 48 only, you will repeat [k2, p2] 5 times. For any of the other sizes, you just purl that first stitch and then skip to the next direction in the round!
All the best,
Lili
For 42 1/4 size, I cast on 136 stitches, join, and pm. If I follow the “set up” round for that size, I will purl/knit 21 stitches and pm; then, purl/knit 28 stitches and pm; then, purl/knit 42 stitches and pm; and purl/knit 28 and pm and then finish up with 21 additional stitches. That makes 140 stitches with 4 markers and 1 unique marker and I have cast on 136 and have 4 stitches too many. What is wrong? How to fix it? In the second and fourth sections should I be purling 7 times? Please advise.
Hi Judith,
Thank you for writing in! In this section, it looks like you may be working the [k2,p2] instruction two times too many. Your stitches should be split into 21,26,42,26,21! So your setup row should be worked as follows for the 3rd (42 1/4) size: Set-Up Round: P1, [k2, p2] 5 times, place marker (pm) for Back Left, [k2, p2] 6 times, k2, pm for Front Left, [p2, k2] 10 times, p2, pm for Front Right, [k2, p2] 6 times, k2, pm for Back Right, [p2, k2] 5 times, p1. We always recommend highlighting your size throughout the pattern just to be sure you are working the correct instructions according to your size. I hope this helps!
Happy knitting,
Gavriella
Thank you.
In the Yoke section, increase round 1: after completing the knit and purl ribbing to the marker to M1R, do you have a suggestion on making this increase knitwise or purlwise, as described in the special instructions. And also please suggest what to do at the next marker increases, knitwise or purlwise in round one. These increases fall before and after purl sections and I can’t tell which way will actually look the best. In Round 2 you give the direction as purlwise so there’s no question there.
Thanks!
Hi Susan,
That is a great question! You will always work the M1L + M1R knitwise unless otherwise noted in the instruction. For example, you should work all the M1L + M1R knitwise since there is no indication that they are worked purlwise but in increase round 2, the instructions let you know that you will be working these stitches purlwise. I hope this helps but please let me know if you have any other questions!
Happy knitting,
Gavriella
Hi,
I’m a left-handed knitter. Do I need to swap the left and right increases or reverse anything in the instructions? Thanks.
Hi Gina,
Thank you for writing in! Since this pattern is completely symmetrical, you will not have to make any changes in the instruction. I hope this helps!
Happy knitting,
Gavriella
Thank you! Looking forward to digging in!