

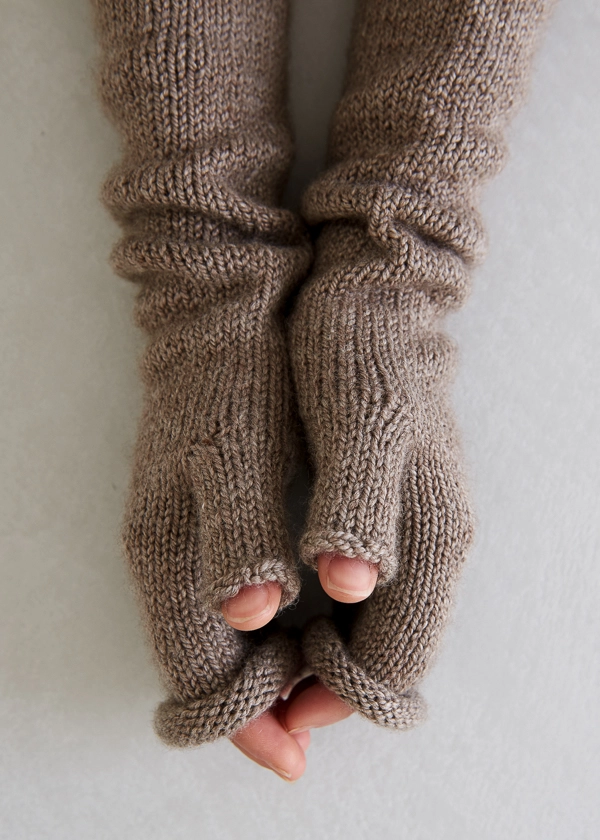
Stockinette Hand Warmers
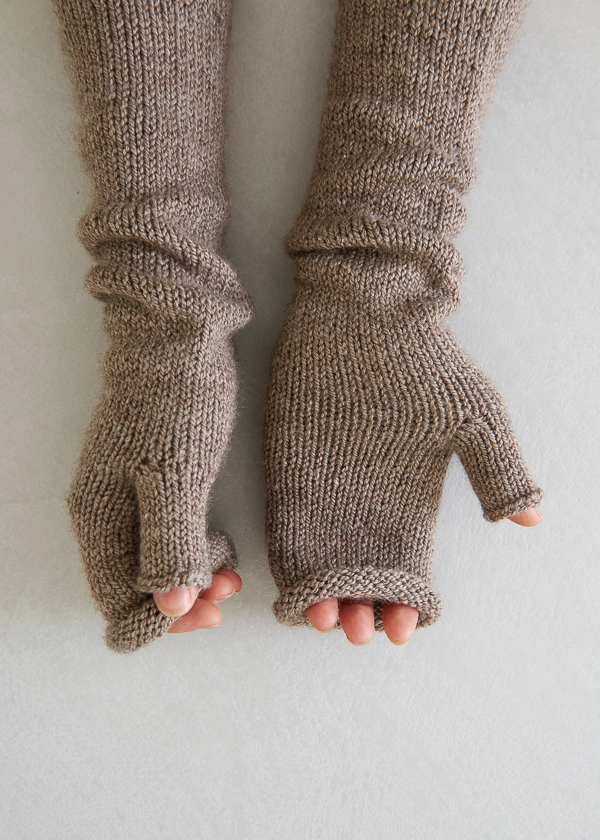
Pared down, functional, and very good-looking, our Stockinette Hand Warmers are elegant in design and straightforward in practice. They also make for wonderful movie-night knitting!

We used just one skein of Mulberry Merino for our pair of Stockinette Hand Warmers. For us, our beautiful new neutral, Field Mouse, says everything we needed to say, but feel free to throw in some stripes, colorblocking, or Fair Isle work. With nine incredibly gorgeous new colors of Mulberry Merino on the scene, we wouldn’t blame you!

These Stockinette Hand Warmers are such a simple pleasure to make, I’m thinking about knitting up a pair for myself, my family, my friends, and maybe even a stranger or two! -Jake
Designed by Purl Soho designer, Jake Canton. Click here to see even more of Jake’s designs!
Share your progress and connect with the community by tagging your pics with #PurlSoho, #PurlSohoBusyHands, and #PurlSohoStockinetteHandWarmers. We can’t wait to see what you make!
Materials
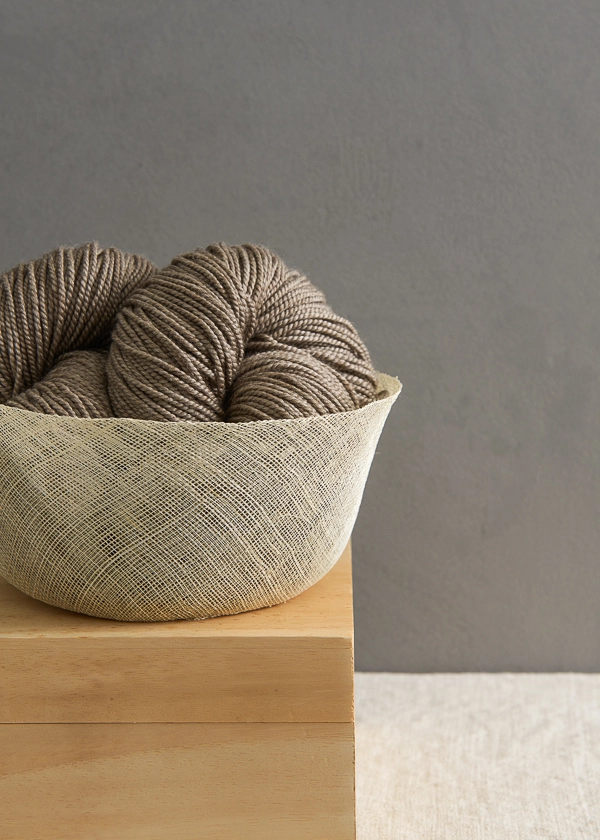
- 1 skein of Purl Soho’s Mulberry Merino, 80% extra fine merino wool, and 20% mulberry silk, or 247 total yards required. We used the color Field Mouse. (NOTE: We no longer offer Mulberry Merino, but choose from one of our other sport weight yarns.)
- A set of US 4 (3.5mm) double pointed needles
- A stitch holder or scrap yarn
Optional: Instead of using double pointed needles to knit the Body and Hand, you can try Addi FlexiFlips US 4, 8-inch circular needles. You will still need double pointed needles for the Thumb, though!
Gauge
22 stitches and 34 rounds = 4 inches in stockinette stitch
Size
Small (Large)
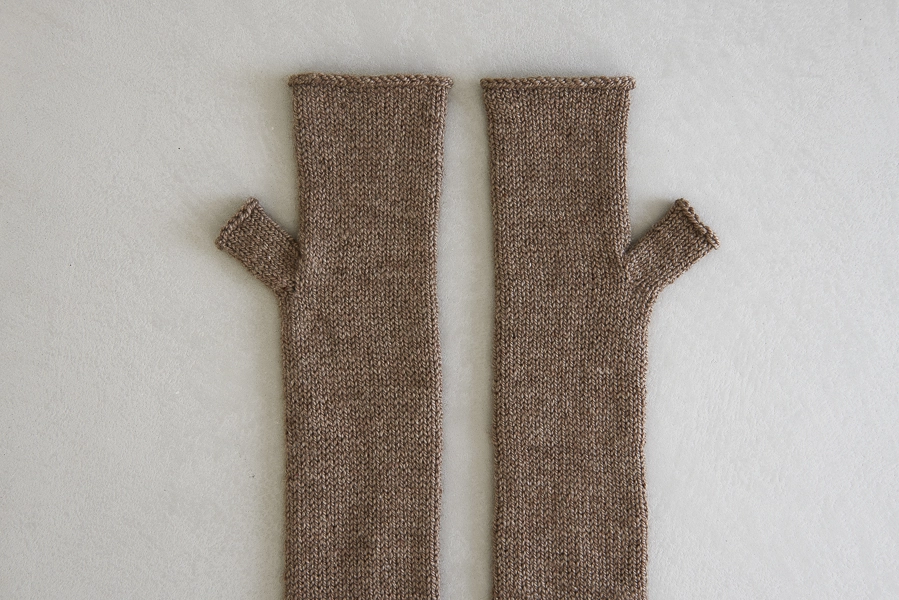
- Finished Circumference: 7¼ (8½) inches
- Finished Length: 12½ inches
Pattern
Begin
Cast on 40 (46) stitches and distribute them among three double pointed needles. We used a basic Long Tail Cast On.
Place marker (optional) and join for working in the round, being careful to not twist the stitches.
Work in stockinette stitch, knitting every round, until piece measures 8 inches from cast-on-edge, or until desired length to base of thumb.
Thumb Hole
Round 1: Slip previous 4 (6) stitches from the right needle onto a stitch holder or scrap yarn, knit to end of round, remove marker (if you used one), turn work so wrong side (i.e. the purl side) is facing you. [36 (40) stitches remain]
NOTE: For the rest of the Thumb Hole you will work back and forth in rows, turning the work at the end of each row, as you would a flat piece of knitting. Work the stitches on the double pointed needles just as they are, moving from one needle to the next.
Row 1 (wrong side): Purl all 36 (40) live stitches, turn work.
Row 2 (right side): Knit all 36 (40) live stitches, turn work.
Repeat Rows 1 and 2 one (two) more time(s). Do not turn work at end of last Row 2.
Hand
NOTE: For the Hand you will work in the round again with the outside of the piece (i.e. the knit side) facing you.
Joining Round: With the right side facing you, place a marker and connect the two sides of the Thumb Hole by using the working yarn to knit into the next stitch, knit to end of round.
Continue in stockinette stitch, knitting every round, until piece measures 4 inches from end of Thumb Hole or until desired length to top of Hand.
Bind off loosely.
Thumb
Slip the 4 (6) on-hold stitches onto a double pointed needle.
With the right side facing you and the piece oriented with the cast-on edge at the bottom and the bind-off edge at the top, join yarn and knit across these 4 (6) stitches.
With a new double pointed needle and the right side still facing you, pick up 4 (6) stitches along the left edge of the Thumb Hole, and with a third double pointed needle and the right side facing you, pick up 4 (6) stitches along the right edge of the Thumb Hole. [12 (18) stitches]
Place a marker and join for working in the round.
Work in stockinette stitch, knitting every round, until Thumb measures 2 inches, or until desired length.
Bind off loosely.
Weave in the ends and then make another!


LOVE the free patterns!
Does the circumference measurement refer to the upper arm , palm, or wrist???
thanks!
Hi mj,
Thanks for writing in! The measurement here is the finished circumference of the hand warmers. I would measure your upper arm and your wrist and be sure that the largest measurement isn’t much in excess of the finished circumference. These hand warmers do stretch a little so long as your cast on and cast off are not too tight. You could get around an half an inch to an inch of stretch depending on how tightly you knit.
I hope that this helps!
Cassy
Hi! I can’t wait to knit these.
If the recipient of the hand warmers measure 7″ at the largest parts of hand/arm, will the Small size fit (given I am getting the correct gauge) or will it be just loose enough that it won’t fit well?
Is it possible that going down to size US #3 will have a better result?
Hi Natalie,
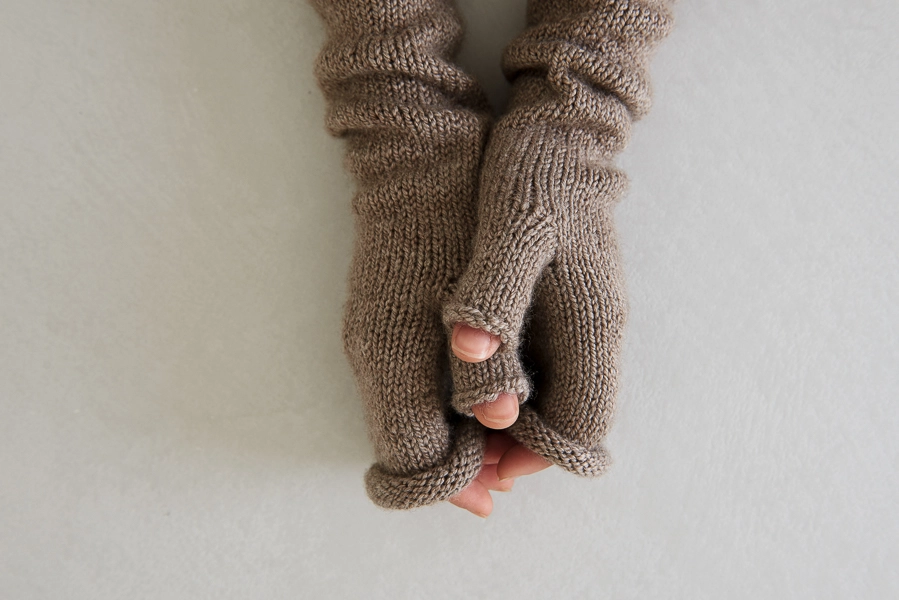
Great question! These hand warmers should be just a tad oversized so you get the nice slouchy effect at the wrist you an see in our images, so I think the small will fit a 7″ hand well!
Best,
Julianna
How much yarn was used? (In yards and/or grams)
Hi Natalie!
We used about 203 yards (82 grams) of Mulberry Merino for the small size handwarmers. Small or large, a single skein of Mulberry Merino is enough to make a pair! Thanks for reaching out!
Best,
Cassandra
Hi,
Which size is pictured here?
Hi Natalie,
Our sample is the small size!
Best,
Julianna
“turn work so wrong side (i.e. the purl side) is facing you. [36 (40) stitches remain]”
I am confused at this part. At first I thought it meant to turn the work inside out, so I did, but then I had to slide the stitch with the working yarn to the right needle in order to start purling.
Then I realized “turn” probably didn’t mean turn inside out….
I think I got the idea, so I’m knitting and purling back and forth, leaving the space for the thumbhole. Just wish there was a diagram for this one!
Hi Natalie,
It sounds like you’ve got it now! It certainly seems odd at first to turn and purl on the wrong side of the work after working in the round, but you will see this instruction more as you knit other garments. It feels pretty similar to working a short row, and is quite commonly used in sweaters that are knit in the round!
Best,
Julianna
Hi,
In the instructions where it says to knit the hand 4″ from end of thumb hole. I assume that means the base of the thumb hole, the end that’s furthest away?
Also, now that I am far along in the project, I am curious if the finished circumference was meant for the top hand portion or the lower portion.
Lastly, the handwarmers look so amazing in the photos here. Had they been blocked?
Hi Natalie,
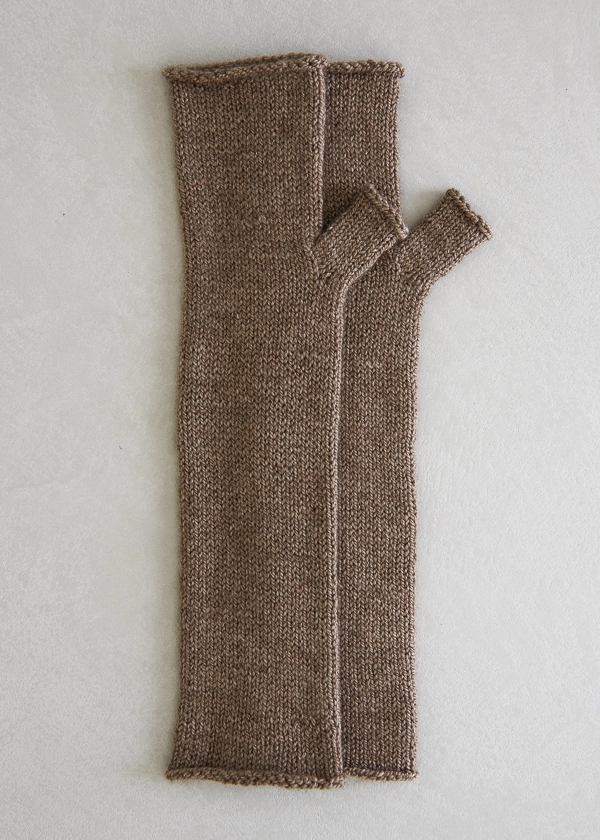
You will actually be measuring the hand from where you ended knitting the thumb hole, or from the top of the thumb hole. Other than the thumb, these hand warmers are a tube without any increases or decreases, so the circumference is the same for both the arm and the hand portions. And yes, we block all of our knits before photographing them – it really helps to neaten everything up!
Best,
Julianna
Hi Julianna, you mention that the hand warmers are essentially a tube with the thumbs added, being the same width at both ends. I’m confused on this since I start with 40 stitches, then 4 on hold and continue flat with 36 stitches up to the hand section, which joins at that point, and I still have 36 stitches. Where do I pick up the extra 4 stitches to make this equal to the original 40 stitches I started with? This is my first try at something other than hats and throws and I’m excited to master this pattern, these will make wonderful stocking stuffers! Thanks, Vickie
Hi Vickie,
Thanks for writing in, and I apologize for the confusion my previous comment caused! It is correct that the hand above the thumb only has 36 stitches. At this point, you can just resume knitting in the round in the same manner as before, with the 36 stitches you have, until the hand warmer is the correct length!
I hope that clears things up!
Julianna
I love your free patterns, but really wish there’d be a way to print them without all the pictures! Just takes so much paper and ink:)
Hi Nadine,
Thanks for writing in! There is a way to print all of our patterns! If you’re on a desktop version of the site, you will find a “print” icon in the right column just below the date and tags. If you’re on a mobile version of the site, you will find a “print” icon below the pattern and above the comments.
Follow the easy on-screen instructions to delete whichever parts of the pattern you don’t want to print or save. For example, you may decide to shorten the pattern by omitting certain images or the list of materials.
Best,
Cassy
Thanks so much!
This pattern and yarn combo is just what I’ve been looking for! I can’t wait to get started. One question: in the image that shows the hand warmers on a model, the top edge is rolled up. Was that done intentionally or is the bind-off edge prone to curling?
Hi Gita,
Thanks for writing in and for your kind words! As these lovely hand warmers are stockinette, they do tend to roll a bit when worn. In the photo we have them rolled down intentionally but they can also be worn straight or folded. We find that the natural roll of stockinette hear is minimal.
I hope that this helps!
Cassy
Thanks, Cassy! That’s helpful. I love the way they look without the intentional rolling but am loathe to add ribbing (to keep them from rolling) to the simplicity of these , so I’m happy to hear the natural roll is minimal.
Such a lovely pattern! Is it available in a more compact format? This is too much to print. Thanks.
Hi Lisa,
Thanks for writing in! You certainly can print the pattern in a more compact form. If you’re on a desktop version of the site, you will find a “print” icon in the right column just below the date and tags. If you’re on a mobile version of the site, you will find a “print” icon below the pattern and above the comments.
Follow the easy on-screen instructions to delete whichever parts of the pattern you don’t want to print or save. For example, you may decide to shorten the pattern by omitting certain images or the list of materials.
Best,
Cassy
I can’t wait to try the thumb technique. I have knit several mittens/hand warmers and have never seen this clever method. Thank you for the inspiration and the generous free patterns.
Thank you for the pattern. If using 2 circular needles is it 20 sits on each? Where do we start the thumb? I love knitting socks but I find gloves”challenging”!! Some step by step photos would be very helpful. Thank you again for your generous website
Bronwyn
Hi there,
Thanks for writing us. If you use two circulars you’ll have 20 stitches on each and you’ll start the thumb in the same spot as in the pattern. The thumb starts at the beginning of the round after knitting up 8″ in stockinette in the round. Let me know if you have any other questions!
-Adam
Love these! Do you think Blue Sky alpaca sport weight would work for these, the gauge looks similar on a size 4?
Hi Karrie,
Thanks for writing in! I think that these hand warmers would be lovely in alpaca. The fabric will be far more drapey using alpaca and given the tendency of alpaca to drape and grow over time, I would suggest going down to US 3 needles to complete the project!
I hope that this helps!
Cassy
Hello.
I think I made a mistake because when I do slip the next 4 (6) stitches onto a stitch holder or scrap yarn and start to knit to the end of the round, I end up with a loose bit of yarn that is connecting the stitches before the slipped stitches to the ones after. Is that supposed to be there?
Thanks! I love your patterns.
Hi Christie,
Thanks for writing in! When you get to the beginning of the round you’ll want to slip the previous 4(6) stitches on to a holder and then continue knitting the round. From here on you’ll work flat until the pattern says to join in the round. Hope this helps!
Best,
Cassy
I have the same question. When I pull the yarn tight after slipping the 6 stitches, it cuts the thumb hole in two. When I don’t pull it tight, the segment of yarn that crosses those 6 slipped stitches (to continue the round) cuts the thumb hole in two. Thinking I should just skip finishing that round and go directly to purling to avoid cutting the thumb hole in two.
Hi Helen,
Thanks for the question! You’ve actually caught an error in the pattern. We are currently working on fixing the pattern. In the meantime, please read below for thumb directions.
“Round 1: Slip previous 4 (6) stitches from the right needle onto a stitch holder or scrap yarn, knit to end of round, remove marker (if you used one), turn work so wrong side (i.e. the purl side) is facing you. [36 (40) stitches remain]”
Sorry about this! Thanks for your patience and for writing in to let us know!
-Adam
I’m having the same problem with a long piece of loose yarn that forms right when you slip the thumb stitches onto a stitch holder. If you immediately slip those first stitches without knitting them, your working yarn is on the right side of the slipped stitches but you need to knit into the stitches on the other side or left of the slipped stitches. I thought that perhaps you knit those stitches before transferring them to the stitch holder. That way your working yarn is moved to the right spot and doesn’t create that long strand that’s just sitting there??
Hi Jackie,
Thanks for the question! The comment team had a slight misunderstanding about the construction of this pattern when it came out. We are on track now though! I have updated Cassy’s response and the pattern has been edited. When you get to the thumb section you’ll place your previous 4(6) stitches on hold and knit to the end of the round. Putting the previous stitches on hold, like you said, puts your yarn in the right place and you will not have any stranding.
All the best,
Adam
Hi There,
I, too, am having trouble understanding the thumbhole instructions! When you say “previous” stitches, do you mean the ones that have been just knit in the round that has just finished? So, stitches from the right needle get put on hold and then you take the working from this set of on hold stitches? Or do you mean stitches from the left needle (that were knit at the beginning of the previous round)? Thanks!
Hello Lisa,
Thank you for reaching out! When it says previous stitches it means the stitches you just knit that are now on your right needle. This means that after you have placed your stitches on your holder your working yarn will be placed to continue working in the round.
I hope this clears things up for you and let us know if you have any further questions.
Happy knitting!
-Marilla
Hi-
Can I use the magic loop with this pattern instead of double point?
Thanks,
Nan
Hi Nan,
Thanks for writing us! Yes, you can definitely use the magic loop method for these hand warmers if you have a long enough cord in the right needle size.
All the best,
Adam
I just finished the first one and it’s unbelievably easy. This is my first time doing fingers/thumb. Before this I”d only made the hand warmers in your kit which has just a hole for the thumb and knitted in the flat. I can’t thank you enough for the accurate and excellent patterns. There is a seamless joint for the thumb, not a hole or gap in sight. I just blindly follow your directions and each time it comes out great!
Hello!
This is my first time knitting hand warmers and I have come to halt and need your help. I am at the point where you turn the work so that the purl side is facing me. It says that I should purl all life stitches and turn work. I understand that, but when I turn the work so that the WS is facing me my yarn is coming from the left side and I have no clue how or where to start purling. Know what I mean? I am so stuck and am sure it is a silly thing.
Please help!
Hello Alejandra,
Thanks for the question. In the directions you’ll see that you knit to the end of the round after placing the previous 4(6) stitches on hold. When you turn your work, your working yarn should be in your left hand (wrong side facing). This is what you want to see. From here you’ll start purling, working flat until instructed to join back in the round. It seems from your comment that your working yarn is in your left hand, so I think you are on the right track.
Adam
Would it be possible to close up the top and make regular mittens? How would you suggest doing that?
i Shawn,
Thanks for writing in! We do have a mitten pattern in a similar weight yarn. The Classic Mittens would work well using Mulberry Merino. If you like the look of the rolled hem, longer cuffs, you could start by knitting to the length required by this pattern and then begin the shaping and top of the Classic Mittens.
I hope that this helps!
Cassy
I loved that pattern.Simple and beautiful.I love your work so much.These handwarmers are so comfy and cozy.You are the best guys♥
When you talk about knitting gauge (which I will admit I haven’t been doing in my learning process but realize I NEED to start doing ;P ) you say “22 stitches and 32 “ROUNDS” does that mean I should knit my swatch in the round as opposed to just knitting a flat swatch? You have a few patterns on your site that say “ROUNDS” as opposed to “ROWS” in the gauge part of the pattern . Hope this isn’t too silly of a question….
Also, when giving the qty of yarn needed in your patterns, does that generally include the amount needed to knit a proper swatch plus the project and not run out? Especially for one skein projects….
Thank you so much for your help!
Hi,
Yes, when doing gauge and it says “round” you will want to knit in the round to get the correct gauge if you knit flat your gauge will be incorrect. On our sight under tutorial we do have a description on how to do this.
The gauge swatch is usually added into account when talking about the amount needed. When doing a gauge swatch, once I get the correct gauge I just unravel it and start knitting.
I hope this helps,
Melissa
Hi! I’m making this pattern using the size 4, 10 inch circular needles and am stuck on the thumb hole. I slipped my 4 stitches onto the scrap yarn, however I’m not sure how I’m working back and forth while on the circular needle? Do I just keep knitting in the round? Thanks!
Hi Rebecca,
You will not be working in the round. You will be knitting back and forth each row turning your work as if it was a flat piece of knitting. From one needle to the next.
I hope this helps,
Melissa
Hello! I have 1 skein of the Anzula For Better or For Worsted that I would love to use for this pattern. Would it work? If so, any specific adjustments that you would recommend? Thanks!
Hi Loren,
Thanks for writing in! The Mulberry Merino that we used here is more of a Sport/DK weight and would similar in gauge to Anzula Cricket. If you would like to use For Better or Worsted, our Seed Stitch Handwarmers might be a good fit!
I hope that this helps!
Cassy
I love, love, love this pattern. I wish there was a video. I’m fairly new at reading patterns and I’m such a visual learner. Thank you for this amazing project. I will likely go to a yarn store and ask for help, but a video would be awesome!
Hello Lisa,
Thank you for writing in- i’m happy to hear how much you love this pattern! I will pass along your suggestion.
Happy knitting,
Marilla
Hi! I too, like Lisa Christianson really love this pattern! I was also thinking the same thing! Is there any way that you could make a short video! Surely would help a lot. I’ve just been having a bit of a hard time understanding this pattern. I have to say that it’s the best pattern I’ve seen yet! Thank you so much for sharing.
Karla
Hello Karla,
Thank you for your interest and your kind words! I will certainly pass along the suggestion.
Happy knitting,
Marilla
Love this pattern and really love these small circulars so I don’t have to use DP’s for the whole thing. The mulberry merino in Tumeric is divine. My question ,to block or not? What do you think?
Hi Tere,
I would block, it really helps to set the stitches, and give your knitted garment a more finished look.
Enjoy,
Melissa
Thanks so much:) Blocking it is then
Can you tell me how much Mulberry Merino changes in size when blocked? Thanks
Hi Kathleen,
Thanks for writing in! We find that Mulberry Merino does not appreciably change in size when blocked. We recently knit a full skein swatch and after blocking, it was pretty much the same size!
I hope that this helps!
Cassy
Perfect. Thank you!
These are beautiful! Is it possible to use the Merino Script yarn as a substitute? Thank you!
Hi Liz,
Thanks for writing in and for your kind words! Our Merino Script is a good deal thicker than the Mulberry Merino that we used here. If you would like to use an alternate yarn here, I would suggest looking for a yarn that knits up at a gauge of 5.5 – 6.5 stitches per inch.
I hope that this helps!
Cassy
I am not having luck transitioning to “put 4 (6) stitches on stitch holder) there is a piece of yarn spanning the gap???
Hi Marian,
Thanks for writing in! I think that I can help! There was an error in the pattern that has since been corrected. At this stage you will slip previous 4 (6) stitches from the right needle onto a stitch holder or scrap yarn, knit to end of round, remove marker (if you used one), turn work so wrong side (i.e. the purl side) is facing you. This means that you will have knit the stitches straight before you put them on a holder. There should then be no yarn spanning the gap!
I hope that this helps!
Cassy
I love how these fingerless mitts look. I too am having a diffucult time understanding the thumb row. Do I stop knitting in the round with DPN or do these instructions refer to just the thumb piece with right side and wrong side. I’m thinking there is no Purl/knit component to a stockinette stitch. Thank you it’s probably very simple but I don’t get it!
Hello Carolyn,
Thank you for reaching out! You are correct- for the thumb hole you will work back and forth in rows, turning the work at the end of each row, as you would a flat piece of knitting. Work the stitches on the double pointed needles just as they are, moving from one needle to the next.
I hope this clears things up and happy knitting!
-Marilla
Help I can’t down load the pattern… I’m particle blind in one eye and the color of your font in every hard to see it’s pretty but difficult to see… is there away to darken the print a little more….I lost all the free pattern you sent…is that why I can’t download again
Hi Linda,
Thanks for writing in! I am sorry to hear that you are having difficulties! We have darkened our font significantly in response to difficulties with being able to read our patterns. Some web browsers will have an Accessibility function that will allow you to darken text, enlarge text, etc. This could certainly help with reading on your computer. For printing, depending on your computer and web browser, when you are taken to your print dialog, you can select Media & Quality or Paper & Quality and change the quality of the print from Normal to Best and this should darken things up a bit.
To download a pattern as a PDF or to print a pattern, if you’re on a desktop version of the site, you will find a “print” icon in the right column just below the date and tags. If you’re on a mobile version of the site, you will find a “print” icon below the pattern and above the comments.
Follow the easy on-screen instructions to delete whichever parts of the pattern you don’t want to print or save. For example, you may decide to shorten the pattern by omitting certain images or the list of materials. To remove images, click the drop down next to the image icon and change from 100% to 0%
I hope that this helps!
Cassy
So I’m finding the thumb holes to be tricky – I understand how to do it but always wind up with gaps that look like holes. Any advice? ?
Hi Mary,
Thanks for writing in! After completing the hand warmer it might help to go back in with a tapestry needle and yarn to reinforce those areas with little gaps. There is always going to be some sort of gap right around the thumb though and if the hole isn’t too big you can always block it to see if it evens itself out!
I hope this helps!
Carly
Hi… I too love these mitts. Thank you(: I struggle a little with picking up the stitches and making it look neat. Any tips?
Hi Mary,
Thanks for writing in! We do have a video tutorial on Picking Up Stitches which may be helpful; however, it is very common and normal when picking up stitches for a mitten or glove thumb to have several small holes or loose areas at the corners. When you are weaving in your ends, you can use the tail left from picking up stitches to sew or reinforce these areas as necessary.
I hope that helps!
Julianna
Hi, thanks for this beautiful pattern! I have knitted 8″ using magic loop method, and now I don’t know how to continue with the thumb hole. Help! I’m fairly new at knitting and so scared to botch it all at this point! Can you please give instructions for magic loop? Thanks!
Hi Karen,
Thanks for writing in, and congratulations on your nearly finished mitts! Although we don’t have a tutorial on the Magic Loop method, it does work in exactly the same manner it did for the rest of the mitt, just with far fewer stitches. To begin, you will knit the held stitches, then pick up with the same needle until you are halfway through your total number of thumb stitches – either 6 stitches for the smaller size of 9 stitches for the larger. You will then pull the knitting needle through the stitches so they are on the cable of the needle, rotate the mitt so the other side of the thumb opening is facing you, then bring the needle tip around to form the “bunny ear” of the Magic Loop and pick up the other half of the stitches. You will now be set up to Magic Loop your thumb!
I hope that helps!
Julianna
If I wanted to use sock yarn instead of mulberry merino, what would be the adjustments(cast on,etc) and what size needles would you recommend?
Hi Laura,
Thanks for writing in! While we don’t have a fingering weight version of this particular pattern, our Long Striped Hand Warmers are written for a fingering weight yarn, and by omitting the ribbing and simply knitting a bit more stockinette stitch, you will get the exact same rolled edges as our Stockinette Hand Warmers!
Happy knitting!
Julianna
I’m curious what size the sample shown is made in?
Hello Erin,
Thank you for reaching out! The size shown here is the size small.
I hope this helps and happy knitting!
-Marilla
Please could you clarify the thickness of the yarn, would it be DK as in 8ply? This is such a delightful design but I would love to know just how to knit it by using my scraps, then send for your lovely mulberry. Thank you.
Hi Krystyna,
Thanks for reaching out! The Mulberry Merino that we used here is closer to a Sport Weight than to DK but really falls a bit between the two. In the Australian scale would be between a 5 ply and an 8 ply and in the UK scale it would be between a 4 ply and DK.
I hope that this helps!
Cassy
Hello again.
So. Connecting the working yarn to the next stitch to begin working in the round again, above the thumb hole, I’m getting a bar. No matter how tight I pull the working yarn the bar remains. Please help. Thank you so much. Kathleen.
Hi Kathleen,
Thanks for reaching out! This is very common and totally normal when working mitten and glove thumbs. When you rejoin your yarn to knit the thumb this hole should be less noticeable, but I would suggest leaving a longer tail than usual so you can use this tail to close up any holes when you are weaving in your ends.
I hope that clears things up!
Julianna
Hello,
Could this pattern be adjusted to use a U.S. Worsted Weight yarn? If so, is it a matter of casting on less stitches to start? Thank you! The pattern is beautiful!
Hello Angie,
Thank you for reaching out! These Hand Warmers are knit up in our Mulberry Merino, which is a DK weight yarn. For a worsted weight yarn I would recommend going up to a US5 or US6 needle and cast on less stitches. I would knit up a gauge swatch to find out how many stitches per inch you are getting and then use that number to figure out your cast on number.
I hope this helps and happy knitting!
-Marilla
Hi-
do you know if this pattern would work using addicrasytrio needles? I have never used DPN’s before and was advised to skip them entirely and try these instead but as a beginner knitter I don’t know if it’s possible for all patterns asking for DPN’s- they only have about 3 cm of cord between the tips so they are quite short ( 21cm)
I am definitely stuck at the thumbhole!
Please help me!
Thank you!
Hello Emma,
Thanks for reaching out! You certainly can use these needles to knit these warmers up. The only time that it becomes to substitute in, is when a pattern using the dpn numbers as part of the pattern.
What seems to be the trouble, in regards to the thumb? Is there something specific that is tripping you up?
I hope I can help!
-Marilla
I bought Woolfolk Tov yarn at the store. The lady said to use size 6 needles. Will this work on this pattern?
Thank you
Hi Ann,
Thanks for reaching out! Woolfolk Tov is a worsted weight yarn, which is quite a bit thicker than the Mulberry Merino we used for these hand warmers, so unfortunately it won’t work for this pattern. Instead, I would recommend using Tov for our Essential Hand Warmers or Seed Stitch Hand Warmers! Woolfolk recommends knitting up Tov on a US 7 to 9 needle, so I you should be able to knit up a swatch on the needle size for the pattern you select to see if the gauge matches or if you need to adjust your needle size.
I hope that helps, and happy knitting!
Julianna
Hi,
How hard would it be to adapt this pattern to make individual finger openings? Maybe it would be simpler to just use this pattern:
https://www.purlsoho.com/create/2008/11/04/whits-knits-cashmere-fingerless-gloves/
However, I have the Mulberry Merino yarn, and I love the look of the stockinette stitch.
Hi Natalie,
Thanks for writing in! Adding fingers to gloves can be tricky since each finger is usually sized a little differently, but if you are making the small size, you could use the instructions in our Cashmere Fingerless Gloves to figure out how to add them. That pattern has two more stitches than the Hand Warmers, so I would probably just cast on 42 stitches instead to make things easier!
Best,
Julianna
Thanks! I will make things simple and just follow the pattern as is! They look lovely, and I like that you have the option to roll them up to cover more of your hand.
Can you explain, or direct me to a tutorial that explains how to turn the work for the thumb hole part? I’ve looked on YouTube but can’t find anything that exactly explains it. Many thanks!
Hi Rose,
Thanks for reaching out! We don’t currently have a tutorial for that technique, but thank you for expressing your interest and I will be sure to pass this along to the rest of the team!
All the best,
Gianna
Is there any way to work this on the 3 needles [knitting with the 4th] and not getting a “ladder” in the stitches between the needles?? [Using the Mulberry Merino yarn I purchased from PurlSoho.]
Will blocking these mitts after completed get rid of the ladder?
I tried using a US4 circular needles, but it seemed to stretch the stitches too much. Is that also something that blocking will take care of??
I am a self-taught knitter…..and most of my knitting is trial-and-error. I usually don’t “block” after completing, but maybe I should…..
THANK YOU!!
Hi Coyote,
Thanks for reaching out! I find that with a project like this, using double pointed needles is the best option and will help to eliminate ladders since it wont overstretch the stitches like a circular needle can! This is also something that blocking can help with a lot, it is a great way to redistribute stitches for an all over even look! I would recommend checking out our Blocking tutorial, it explains the process in depth and is an excellent resource to use.
I hope this helps!
Warmly,
Gianna
I’m knitting these with magic loop and I’m confused about what to do once I reach the thumb. Do I still slip stitches? If you could find another way to explain the magic loop process I would appreciate it.
Hi Kelly,
Thanks for reaching out! Since the pattern is written for Double Pointed Needles it can be a little difficult to translate it for Magic Loop. The best way to work the thumb hole is to slip and pick up the 12 (18) stitches and distribute them evenly on the 2 needles and then continue working in the round until Thumb measures 2 inches, or until desired length.
I hope this helps!
Warmly,
Gianna
Have knitted two pairs of these mitts now. Yet to keep one for myself, but shall keep the next pair for me. Very lovely pattern. I chose to use the 40 stitches measurement, but put SIX rows at the thumb opening to give 16 stitches to the thumb, making it a more comfortable (less snug) thumb. Thank you, Purl SoHo, for this pattern!! And, thank you to the staff that answers questions here in the comments section!! xO
I’m new to knitting and I’ve never made gloves before. I’m having trouble understanding how to make the thumb hole, more specifically what you mean by slipping of stitches. If I were to just move them to a piece of scrap yarn, my working yarn would end up on the scrap yarn and I couldn’t continue with the project. So am I supposed to unknit the previous 4 stitches onto a needle with scrap yarn? Or is slipping something completely different?
Thanks in advance for your response
Hi Angelina,
Thanks for reaching out! In this pattern, you’ll be slipping the 4 stitches you just knit onto scrap yarn. Your working yarn will stay on the left-hand side of these stitches, so that you can continue knitting the following stitches with it! It may seem a bit strange that the working yarn is still attached to the final on-hold stitch, but I promise that this is correct. Hope this explanation helps!
All the best,
Lili
Thanks so much for your reply! It was really helpfull, I’ve already finished one of two hand warmers 🙂
Love this pattern can it be knit using MAGIC LOOP
thanks
Hi Dawn,
Thanks for your question! This pattern can definitely be done using magic loop; you would just need to make sure you have a long enough cord for this technique and that you’re getting gauge with your selected needle size.
I hope this helps! Have a great weekend!
All the best,
Cat
Thanks and I forgot to ask the yarn in the pattern do you carry it anymore
Hi Dawn,
No problem, I’m happy to help! I’m afraid we’ve discontinued the yarn this pattern originally featured, Mulberry Merino, but I would suggest Wigeon as a great alternative! As with all yarn substitutions, I’d also recommend doing a gauge swatch to make sure you’re consistent with the gauge in the pattern. We have a tutorial called All About Gauge in case you’re interested in more information! I hope this helps!
All the best,
Cat
Would Good Wool be a good substitution???
thanks for always being there for all our questions.
it is so nice of you to give this personal attention.
I love your patterns, yarn, and web site.
Thank You
Hi Patty,
Thanks for reaching out and for your kind words! Good Wool would be a great option for this pattern! I do recommend working a gauge swatch prior to beginning just to ensure you are consistent with the pattern.
I hope this helps, happy knitting!
Gianna
Can these be for men?
Hi Barbara,
All of our patterns are designed to be worn by people of any gender, but some may fit different body types better than others. I’d recommend taking a look at the measurements listed under SIZE to get a sense of how it fits. If you’d like advice on making any specific modifications, just let me know what you want to change, and I can absolutely help out!
All the best,
Lili
Hi Lili – thank you for your response. I I think I will knit the size L and take my chances. I am knitting the hand warmers for my grown son and he doesn’t live near me so I can’t measure is hand. Thank you for offering your help.