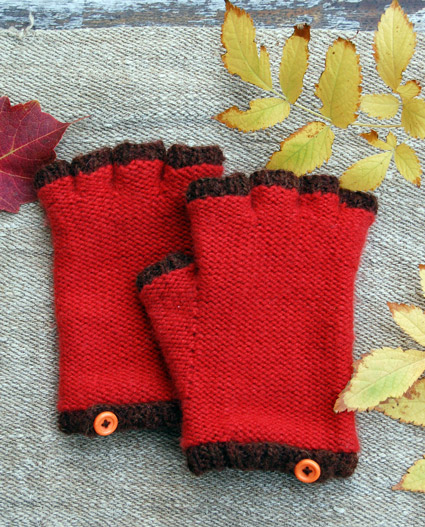
Cashmere Fingerless Gloves

I was almost sorry to finish these gloves – I never wanted the pleasure of knitting Jade Sapphire’s cashmere to end. They are definitely on my holiday knit list… if I can bring myself to give them away!

Designed by Purl Soho designer, Whitney Van Nes.
Share your progress and connect with the community by tagging your pics with #PurlSoho, #PurlSohoBusyHands, and #PurlSohoCashmereFingerlessGloves. We can’t wait to see what you make!
Materials

- 1 skein of Jade Sapphire’s Zageo 6 Ply Cashmere. Approximately 150 yards required. (This color is Papricash)(NOTE: We no longer offer Jade Sapphire’s Zageo 6-Ply Cashmere, but choose from one of our other light worsted/dk weight yarns.)
- 1 skein of Blue Sky Alpaca’s Sportweight Alpaca (This color is Pumpernickel)
- 1 set of US 4 (3.5 mm) double pointed needles
- 1 set of US 5 (3.75 mm) double pointed needles
- A couple of stitch markers
- Two 13 mm buttons
Gauge
24 stitches = 4 inches in reverse stockinette stitch
Size
Finished Palm Circumference: 7 inches, to fit average woman’s hand
Note
You will be knitting these gloves inside out. So, when you’re knitting the main color, the wrong side (or knit side) will face you. This is so you can knit the whole time instead of having to purl, which lots of people consider slower and/or more difficult.
Pattern
Right Glove
Cuff
With the Contrast Color (CC), cast 53 stitches onto a US 4 needle (For this step you can use 2 double pointed needles, straight needles or circular needles.) We used a basic Long Tail Cast On.
Row 1: K1, *p1, k1, repeat from * to end of row.
Row 2 (buttonhole row): K2, p1, *k1, p1, repeat from * to last 6 stitches, k2tog, yo, k1, p1, k2.
Row 3: Repeat Row 1.
Row 4: K2, p1, *k1, p1, repeat from * until there are 41 stitches on the right needle and 12 stitches on the left needle, bind off the last 12 stitches.

Cut the yarn and pull the tail through the last stitch. (41 stitches remain)
Hold the needle so the buttonhole tab is to the left. With a US# 5 double pointed needle and the Main Color (MC), purl 1 row.

Distribute the 41 stitches onto three US#5 double pointed needles.

Join into the round with a knit stitch.

Knit 10 rounds.
Gusset
Next Round: Knit to 5 stitches before the end of the round, place a marker, m1R, k1, M1L, place a marker, knit to the end of the round. (43 stitches)

Knit 2 rounds.
Next Round: Knit to the first marker, slip the marker, M1R, knit to the next marker, M1L, slip the marker, knit to the end of the round. (2 stitches increased)
Repeat the last 3 rounds until there are 15 stitches between the markers (55 stitches total).
Knit 1 round.

Separating the Thumb and Fingers
Thumb
Next Round: Knit to the first marker, put the 15 gusset stitches onto scrap yarn (removing the markers)…

…use the Cable Cast On to cast on 2 stitches…

…knitting into the next stitch to join the round, knit to the end of the round. (42 stitches)

Knit every round until the glove reaches the base of your pinky, or for about 1 1/2 more inches.
End the last round 10 stitches before the end of the round.
Index Finger
Put the next 14 stitches onto scrap yarn.

Place a marker, use the Cable Cast On to cast on 2 stitches…

…and knitting into the next stitch to join the round, knit to 5 stitches before the marker.
Middle Finger
Put the next 12 stitches onto scrap yarn, place a marker, cast on 2 stitches, and knit to 4 stitches before the marker.
Ring Finger
Put the next 10 stitches onto scrap yarn, cast on 2 stitches and place a marker. (12 stitches remaining)

Knitting Fingers and Thumb
Starting with the pinky:
Join the remaining 12 stitches into the round and knit 3 rounds. Cut the yarn.
Changing to US #4 double pointed needles and the CC, purl 1 round.
Next Round: *K1, p1, repeat from * to end of round.
Repeat the last round.
Bind off in the rib pattern. Cut the yarn and pull it through the last stitch.

** Put the next finger’s stitches onto three US #5 double pointed needles.

With MC, pick up 2 stitches from the base of the previous finger. (To make sure the pick up seam ends up on the inside of the glove, bring the needle from the inside of the glove out to the side that’s facing you.)

Then purl the stitch to pick it up. Pick up one more stitch in the same way, purling with the pick up seam on the knit side of the fabric. (12 stitches)

Place a marker and knit 4 rounds.
Changing to CC and US #4 double pointed needles, purl 1 round.
Next Round: *K1, p1, repeat from * to end of round.
Repeat last round.
Bind off in the rib pattern. Cut the yarn and pull it through the last stitch. ***

Repeat from ** to *** for the remaining two fingers and thumb.
Notes:
The middle finger is 14 stitches after picking up 2; the index finger is 16 stitches; and the thumb is 17 stitches.
Also, instead of knitting 4 rounds of the MC, knit 5 rounds.
And, for the thumb, end the first round of the k1, p1 rib with p2tog.
Finishing
When you’ve knit all the fingers and thumb, you may think what a mess!

But, just patiently weave in all the ends, and you’ll be surprised how great it all looks! (Use the MC tails to sew up all the little gaps and holes, and remember to weave the ends into the knit side of the fabric.)

Now sew the inside edge of the cuff to the buttonhole tab.

Finally, try on the glove and test where you want the button to go. Then sew it on. (I used the CC to sew on the button, but the MC would look good too!)

Left Glove
Cuff
With the CC, cast 53 stitches onto a US#4 needle.
Row 1: K1, *p1, k1, repeat from * to end of row.
Row 2 (buttonhole row): K2, p1, k1, yo, k2tog, *p1, k1, repeat from * to last stitch, k1.
Row 3: Repeat Row 1.
Row 4: Bind off 12 stitches, slip the stitch left on the right needle back to the left needle…

…changing to a US #5 double pointed needle and the MC, purl to the end of the row. (41 stitches)
Distribute the stitches on three US#5 double pointed needles.
Join into the round.
Knit 10 rounds.
Gusset
Round 1: K4, place a marker, m1R, k1, m1L, place a marker, knit to the end of the round. (43 stitches)
Knit 2 rounds.
Next round: Knit to marker, slip the marker, m1R, knit to next marker, m1L, slip the marker, knit to the end of the round. (2 stitches increased)
Repeat the last 3 rounds until there are 15 stitches between the markers (55 stitches total).
Knit 1 row.
The Rest of the Left Glove
Knit the rest of the Left Glove as you did the Right Glove, EXCEPT when you’ve knit to the base of the pinky, end the last round 2 stitches before the end of the round (instead of 10 stitches before the end). Then continue as for the Right Glove, putting the next 14 stitches onto scrap yarn, etc. until you’re done!


Thank you for posting the instructions for the great looking gloves! I’m excited to try a pair!
i LOVE these! absolutely adorable! the colors are sweet.
thank you for sharing this great pattern!
These are beautiful. How many pairs of gloves could one expect to make from 1 skein of the Jade Sapphire yarn?
Thank you for the glove pattern and the easy to follow instructions.
Hi everyone-who-wonders-if-one-skein-of-cashmere-is-enough-for-two-pair-of-gloves,
Unfortunately, no, you can’t squeak out a second pair from one skein. But, you could buy two skeins of cashmere (instead of 1 cashmere and 1 alpaca) and do the trim in cashmere and reverse the colors to get two pairs.
Thanks for asking!
Whitney
Whtiney, I love these! I want them, immediately. You only have two skeins of the cashmere in that color left, and none of the Blue Sky. Do you expect more of each?
Thanks!
These are absolutely beautiful! I’d love to try to make a pair, but I have only knitted scarves and very basic hats before. If I took a stab at this and ran into a question, can I come into the store for help?
Hi Ruth,
You can definitely come to the shop for help on this or any other project, anytime!
Good luck to you.
I am now on my third pair of these. the first pair I made was steel grey with some redbuttons down the side. I was so excited about them. wore them to meet my daughter for coffee, needless to say , came home without them. My grandson who was with her wanted some too. So made a very small version, with ribbed cuffs for him.[he’s four] Same colour as hers but he chose yellow buttons. the next pair I made was especially for me , with quite expensive [automatically striping] sock wool that was in the basket.. I made ribbed cuffs about 5 inches long for these to keep me truly warm. [wore them out last night, many compliments]Then I have orders to make a pink pair with pearls on for Oonagh who is eight this weekend. Not sure where the pearls are going yet, will decide that after they are finished. Great instructions, and so warm and pretty. Thanks so much….SDK
PS Cant
you tell that I am becoming an addict?
The discovery of your site and of this pattern is the highlight of my day… Can’t wait to try the pattern (I have to finish a few projects first)… thank you so much for sharing the pattern! I love the colours you used…
My daughter asked for a pair for Christmas she saw at a store, but I would love to make these for her. Could I make them without the button hole portion with just a bit longer cuff?
Thanks for making this available!!
beautiful! i’ve enjoyed making several pair of ‘fingerless’ gloves (Fetching pattern) and am a fan of DPN’s! this pattern is inspiring and one that i think i may have to try as i get started on my gift knitting for Holidays 2009! thanks so much for sharing the pattern and pictures.
Is it really 6 stitches/inch on gauge? I’m down to size 2 needles trying to get gauge on the cashmere and the best I’m doing is 5.5 stitches/inch and my knitting looks too tight? Can anyone help?
Thanks!
Hi Stacy,
While it’s true that the gauge of this pattern is a little tighter than I would normally knit cashmere, it shouldn’t feel stiff and super tight. The fabric should be slightly dense so that the gloves will be warm and cozy, but not inflexible.
One explanation for your gauge problems is that you’re loose knitter, in which case it’s totally fine to go down a few needle sizes to get the right gauge.
Another possibility is that there are technical problems with your swatch. For a really accurate gauge swatch, I would recommend knitting the swatch the way you will be knitting the glove (ie knitting every stitch in the round. For instructions on how to knit an in-the-round-gauge swatch visit our Circular Gauge Tutorial at
https://www.purlsoho.com/create/the-purl-bee/2008/4/7/whits-knits-circular-gauge-tutorial.html
And for a refresher on how to count your swatch stitches check out our Swatch Tutorial at https://www.purlsoho.com/create/swatch-tutorial/.
I hope this helps. Gauge issues can be really mystifying, not to mention frustrating! Please let us know if you have any follow up questions and good luck!
Whitney
Hi,I get this yarn and want to start but could not find you tutorial.Can you please help.
Hello Stefney,
Thank you for reaching out! The pattern for this project is on this page above the comment section. If you would like to print or save the pdf of this pattern you can do the following;
If you’re on a desktop version of the site, you will find a “print” icon in the right column just below the date and tags. If you’re on a mobile version of the site, you will find a “print” icon below the pattern and above the comments.
Follow the easy on-screen instructions to delete whichever parts of the pattern you don’t want to print or save. For example, you may decide to shorten the pattern by omitting certain images or the list of materials. To remove images, click the drop down next to the image icon and change from 100% to 0%.
I hope this helps and happy knitting!
-Marilla
You were completely right! I just had to go down a needle size. The tutorial on measuring gauge knitting in the round was great!! Thanks so much. Can the cuff be made longer? Would I increase the stitches to start and then decrease as I work toward the wrist?
Thanks!
Stacy
Hi, I really like this pattern and have substituted out the yarns shown here for something less expensive.
Anyway, my question is regarding how you join in the new color of yarn. While I am familiar with doing various new joins when there is already a yarn strand present, I can’t seem to manage making a tight “in the round” join with the method I think is being done in the pictures.
Would you mind telling me how you joined in the red yarn to start your purl row? It looks like you simply draped a long-tailed piece of yarn into the first purl stitch and kept working from there, but perhaps I’m wrong.
Thanks!
Hi Jamie,
Yes, just drape a long tail of the new color and go. If you find that its a bit loose when you’re done, you can tighten up the gap when you sew in your tail.
Hi,
I’m probably missing something basic or missing something really obvious but I’m on my 5th failed attempt at these and though i’d better ask. When I transfer onto my double pointed needles I seem to hit a bit of a snag. No matter what I do i always end up with the seams on the inside so that i’m not making them inside out. when i try and change it either the needles end up backwards or the seam is on the inside. I’ve tried everything and its driving me mad. Am I doing something really stupid? Please help!
Alice
Hi Alice,
I’m sorry you’re having such a frustrating time! I hope it helps if I tell you that, after you distribute the stitches onto three needles, you need to arrange the needles so that the working yarn is coming from the right. The seam side will be facing you and you will make the joining stitch by inserting the right needle into the first stitch on the left needle. I would also recommend really looking at the photos. Try to arrange your knitting so it looks just like the pictures.
Good luck!
Whitney
these are so cute. I’m a real beginner (approached my first pair of needles two months ago with a scarf). i must say that my work with these gloves kinda went pretty smooth until – after having shaped the basis of each finger – i start to shape the 4 rounds of each finger. im guessing im having problems with the size of the dpn im using or either im working too tight (nervous?) cuz at this point it just gets so messy. im sure ill give it more shots until they come out good. For Alice, dpn seems really tricky at first but i think i’m already hooked. I came across the same problem that you’re having.
I am in love with your website and all your beautiful patterns. The patterns are written so well and with great accompanying photos, making knitting from them a delight!
I would really like to knit these, with a different yarn for my father. I am not great at guessing how many stitches to add on for going up a size, could you help me out? For example, would I need to add on extra stitches from the beginning, or just in the main and thumb area?
If you can help, thank you 😀
Hi,
Can I do these gloves with a circular needles in place of DPN? I've to follow the pattern at the same manner, haven't I?
I too would like to know how to adjust this pattern for a man's hand.
Thanks in advance!!
I love this pattern and am happy to have received the yarns as Christmas gifts. I must be a little sleep-deprived from holiday-related stuff, because I think I must be counting my rows wrong. The 'tail' from the first cast-on stitch is at the other end when I get to the end of my fourth row. In the picture, it's pretty clear that the 'tails' are on the same end. Am I doing something backwards?
I went to my LYS and picked up what I thought was the correct yarn, but ended up realizing my mistake once I returned home. I ended up getting the 4-ply fingering Jade Sapphire yarn (instead of 6-ply). If I use this yarn, will the gloves still have the same warmth to them that the worsted weight version provides?
Hi Cindy,
If you knit the 4-ply at the pattern's gauge of 6 stitches to the inch, then your finished gloves won't be quite as dense and cozy as the 6-ply version. You should knit a gauge swatch and see what you think!
If you decide that the 4-ply as too loose, you could add a strand of something to beef it up a little. Of course, the perfect filler would be Jade Sapphire's 2-ply cashmere which would turn your 4-ply into a 6-ply. Here's a link to that yarn: https://www.purlsoho.com/purl/products/item/614-Jade-Sapphire-2-ply-Cashmere Another nice option might be a laceweight mohair, something like Alchemy's Haiku: https://www.purlsoho.com/purl/products/item/1025-Alchemy-Haiku
I hope this helps you decide! Please let us know if you have any other questions and thanks for this one!
Good luck!
Whitney
Hi, I just started these cute mittens and when I got the the gusset, I got a little bit confused with the marker placements. The picture shows three stitches in between the markers, but following the instructions, I have 5 stitches: from m1R (2) k (1) and m1L (2). Dd I read the patterns wrong? Thanks!
Hi Nina,
It sounds like you might be increasing by knitting into the front and back of the stitch instead of "making 1 right /left." Here's our tutorial for this kind of increase: https://www.purlsoho.com/create/make-1-right-left-tutorial/2008/4/23/make-1-right-make-1-left-tutorial.html
Since it doesn't come from a stitch, but rather from the strand of yarn between stitches, you should find that your stitch count is three!
Please let me know if you run into any problems and thanks so much for your question!
Whitney
Hi Whitney!
Love this pattern and finally ready to try it. I was wondering how I might go about making one so that the finished size would be approximately 8.5 inches in circumference?
Thank you!
Hi Kym,
Unfortunately, we don't have the resources to customize patterns, especially fairly complicated ones (like this!). But to get you started, it may help to know that Instead of starting the hand with 41 stitches, you'll want to start with 51. Everything before and after that point should change proportionately.
I hope this gets you going! Please let us know if you have any more questions and thanks for this one!
Whitney
I like the stockinette pattern instead of the wrong side pattern. If I knit with a single colour yarn, will the gloves not be inside out but stay the right side out?
Thanks
Shubha
Hi Shubha,
Yes, you should just follow the directions as written (ignoring the color changes, if you plan to only use one color). You simply won't turn your hand warmers inside out when you're done!
Thanks for the great question and good luck!
Whitney
I’ve seen patterns call for knitting the thumb gusset with m1L after the first marker and m1R right before the second and patterns that call for m1R first, then m1L. What’s the difference in the placement of the increases?
Hi Lee,
It’s a decorative difference. Make 1 left’s, of course, lean to the left and make 1 right’s lean to the right, so it’s really just a question of which you think looks better. I tend to write patterns so that the increases lean in the direction of the line that’s being created by them. So, since a gusset makes a “V” shape, I make 1 right along the right-leaning side of the V and make 1 left along the left-leaning side. Other designers like it the other way, but the good news is, you can decide which you personally like best and just do it that way!
Great question! Please let us know if you have any others and good luck!
Whitney
They look cute I think I will try making them now