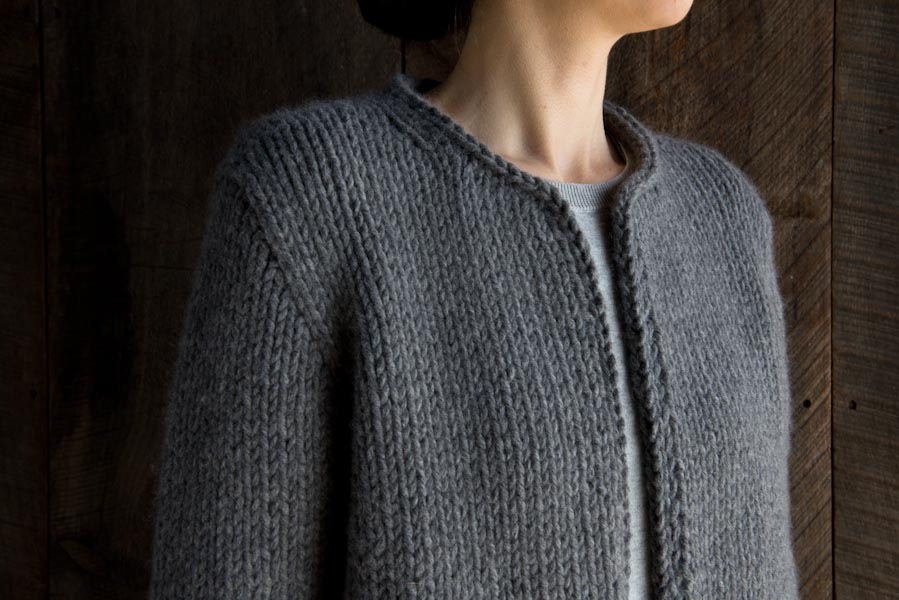
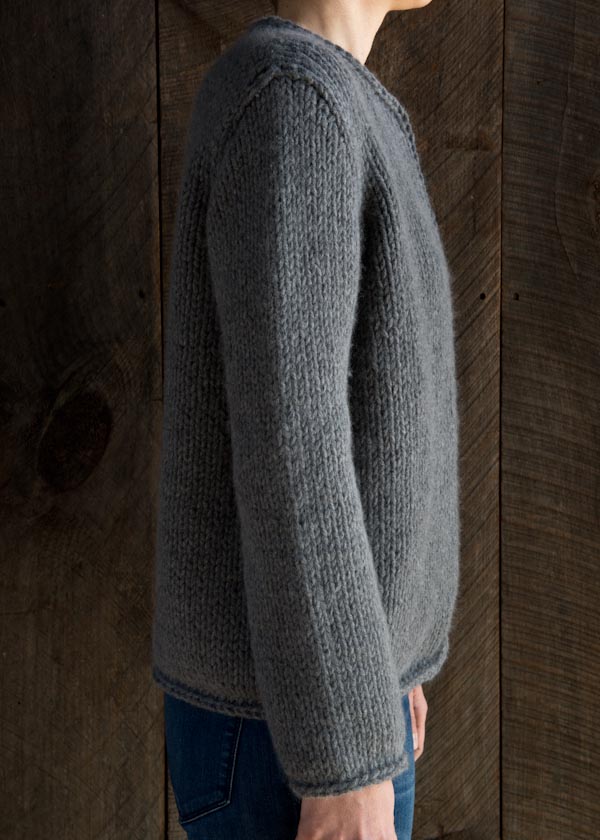
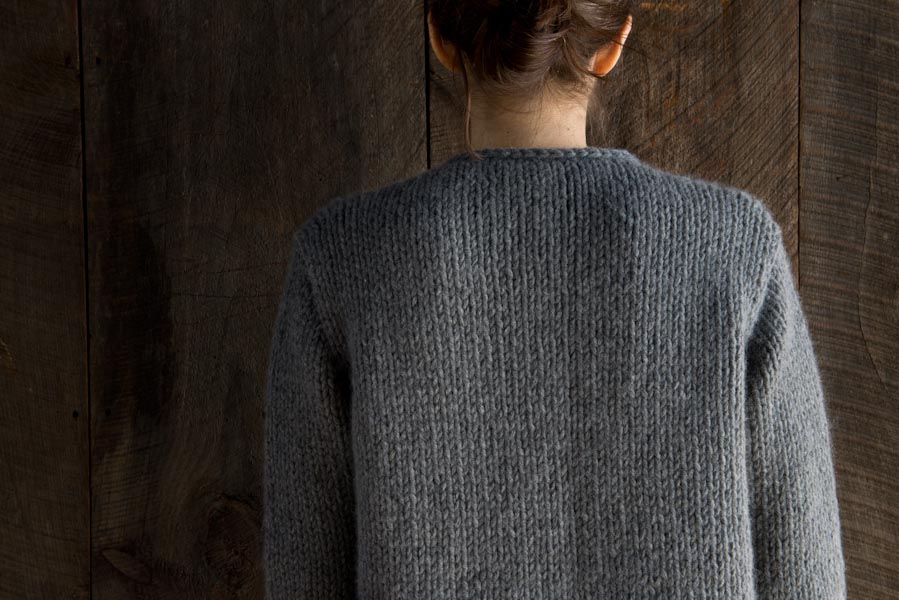
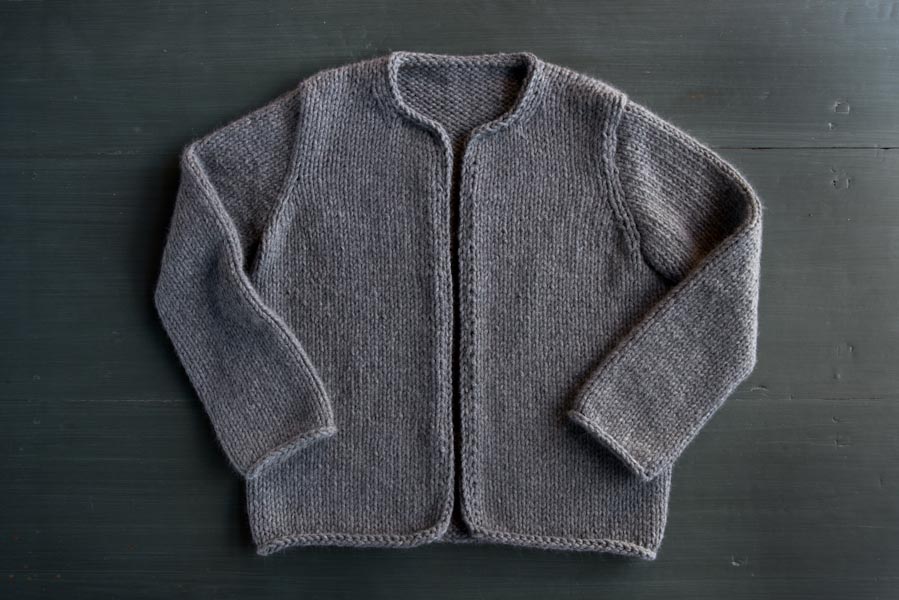

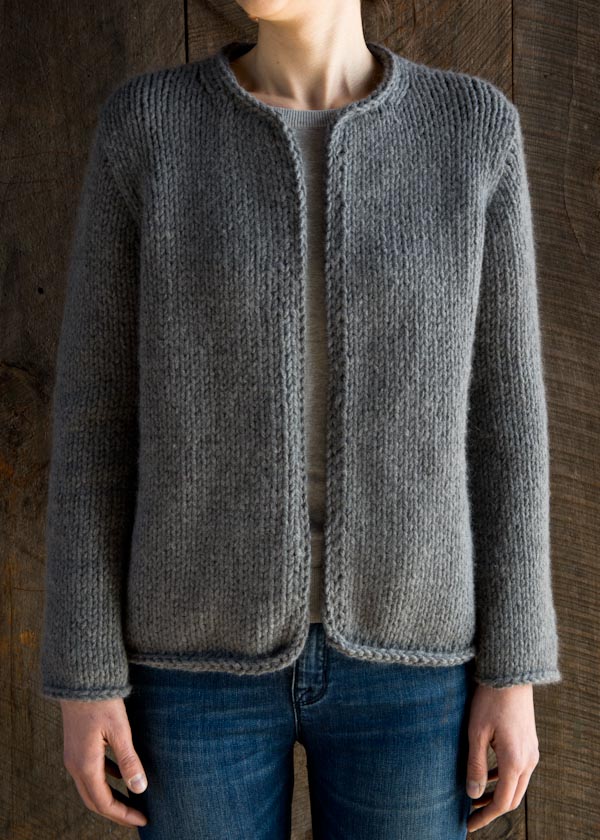
Classic Knit Jacket
Our Classic Knit Jacket embraces the Japanese aesthetic principle of kanso. Kanso is the idea that a sense of grace and calm emerges from designs that are pared down to their most basic forms.

To keep our Jacket simple, we knit up a timeless silhouette in smooth stockinette stitch. Our no-fuss approach highlights the unique beauty of Purl Soho’s Lanecardate Feltro, a super cozy and sturdy blend of superfine wool and angora.
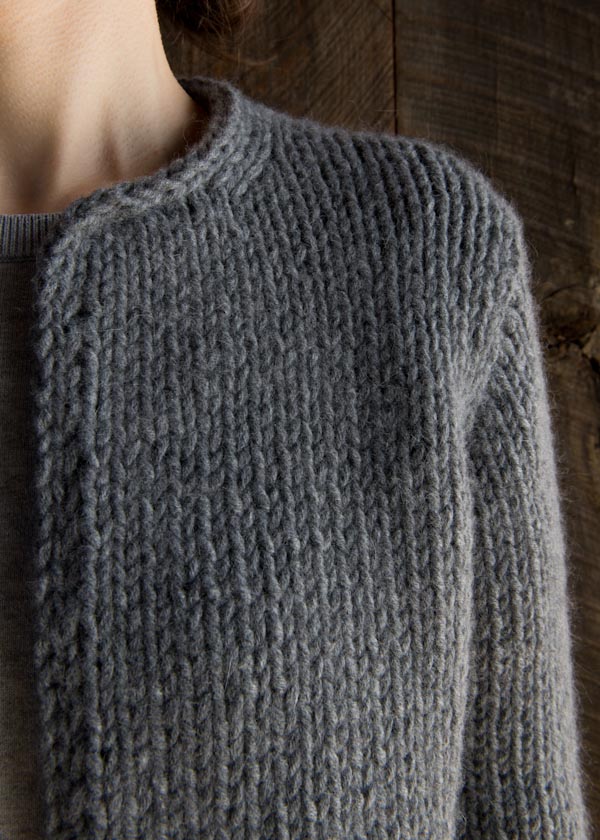
Knit from the top down with set-in sleeves, we also kept our Classic Knit Jacket’s construction as easy as can be. Simple, elegant, and refined… Kanso! -Kristy

Designed by Purl Soho designer, Kristina McGowan. Click here to see even more of Kristina’s designs!
Share your progress and connect with the community by tagging your pics with #PurlSoho, #PurlSohoBusyHands, and #PurlSohoClassicKnitJacket. We can’t wait to see what you make!
Materials
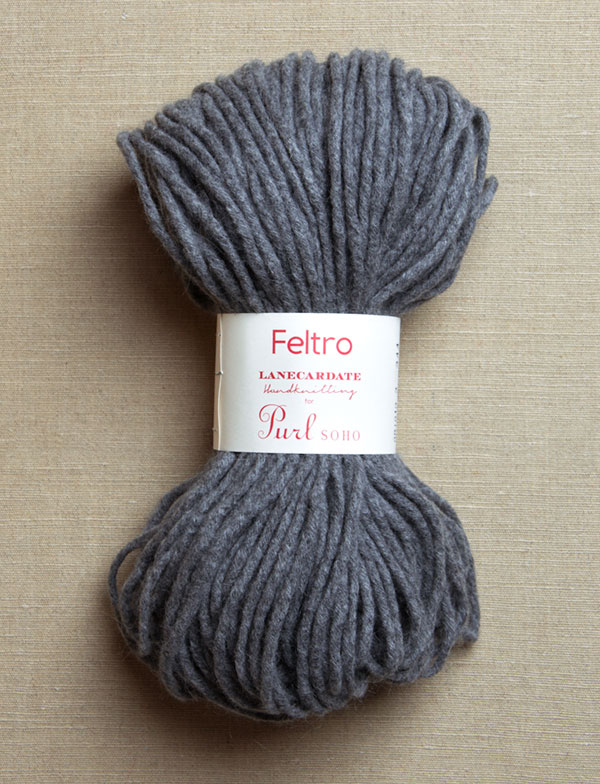
- 6 (7, 7, 8) (9, 9, 10) (10, 11, 12, 12) skeins of Purl Soho’s Lanecardate Feltro, 75% superfine wool, 25% Caregora angora. Each skein is approximately 98 yards/100 grams; approximately 585 (635, 685, 750) (795, 860, 915) (965, 1020, 1085, 1140) yards required. We used the color Medium Gray, Grigio 3. (NOTE: We no longer carry this yarn. Some alternatives are Purl Soho’s Lovebird or Manos Del Uruguay’s Franca.)
- US 15 (10 mm), 32-inch circular needles
- US 15, 16-inch circular needles
- A set of US 15 double pointed needles
- Two jumbo stitch markers
- Stitch holders or scrap yarn
Gauge
10 stitches and 14 rows = 4 inches in stockinette stitch
Sizes
NOTE For help picking a size, please check out our Understanding Ease + Selecting Size Tutorial!
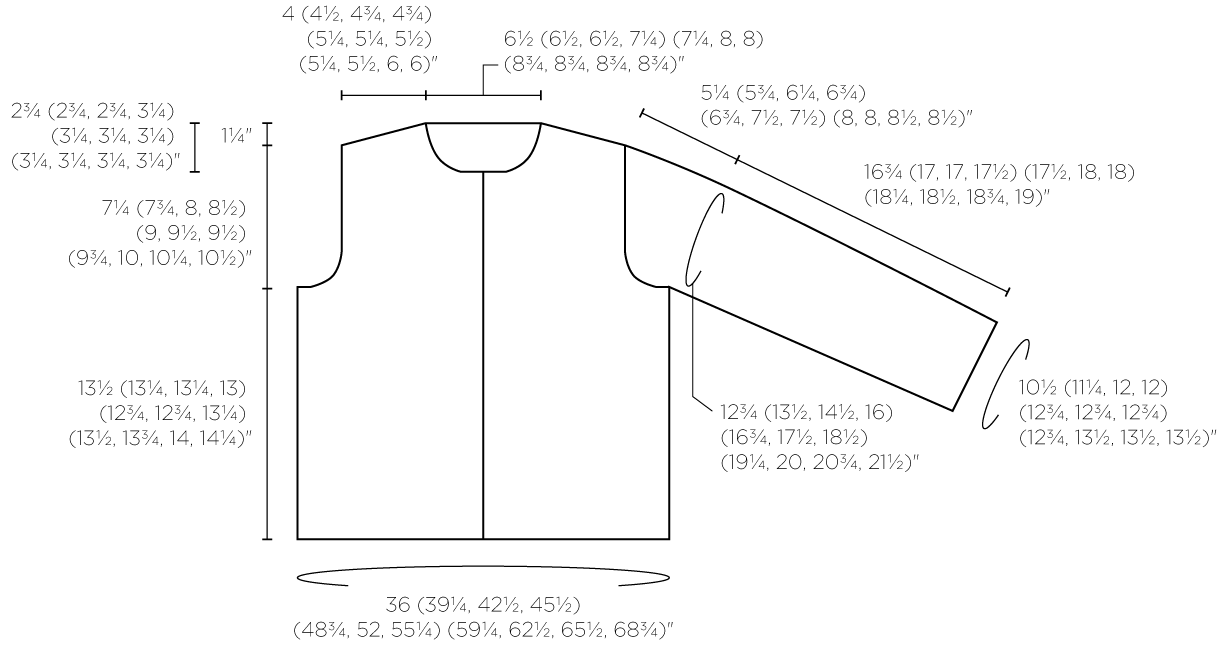
36 (39¼, 42½, 45½) (48¾, 52, 55¼) (59¼, 62½, 65½, 68¾)
To fit actual chest circumference of approximately 30–32 (33–35, 36–38, 39–41) (42–44¾, 45¾–48, 49–51¼) (52¼–55, 56–58, 59–61½, 62½–64¾) inches, with 4–7 inches of positive ease
- Finished Chest Circumference: 36 (39¼, 42½, 45½) (48¾, 52, 55¼) (59¼, 62½, 65½, 68¾) inches
- Finished Length from Shoulder to Bottom Edge: 22 (22¼, 22½, 22¾) (23, 23½, 24) (24½, 25, 25½, 26) inches
- Finished Length from Underarm to Bottom Edge: 13½ (13¼, 13¼, 13) (12¾, 12¾, 13¼) (13½, 13¾, 14, 14¼) inches
- Finished Length from Underarm to Cuff: 16¾ (17, 17, 17½) (17½, 18, 18) (18¼, 18½, 18¾, 19) inches
SAMPLE: The sweater shown here is size 42½, worn with 6 inches of ease.
Notes
Construction
You will work this garment from top down, starting with the Back and working down to bottom of Armholes. You pill pick up at Back Shoulders and simultaneously work Right and Left Fronts down to bottom of Armholes, then cast on for Underarms and work Body in one piece down to bottom. There, you will pick up stitches around entire edge in order to work an I-Cord bind off. Finally, you will pick up and knit each Sleeve in the round from top to bottom.
Abbreviations
SHORT-ROW SHAPING: WRP-T (WRAP AND TURN)
NOTE: For more information about this technique, please visit our Short Rows Tutorial.
On the right side: Keeping yarn in back, slip next stitch purlwise from left needle to right needle. Bring yarn to front. Return slipped stitch to left needle. Bring yarn to back. Turn work so wrong side is facing you.
On the wrong side: Keeping yarn in front, slip next stitch purlwise from left needle to right needle. Bring yarn to back. Return slipped stitch to left needle. Bring yarn to front. Turn work so right side is facing you.
RLI (RIGHT LIFTED INCREASE)
NOTE: For more help with this increase, visit our Lifted Increase Tutorial.
Lift right leg of stitch below next stitch on left needle onto left needle and knit it. [1 stitch increased]
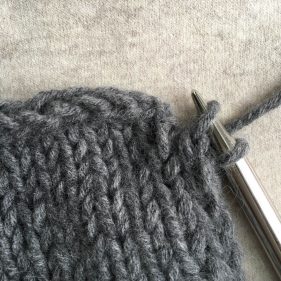
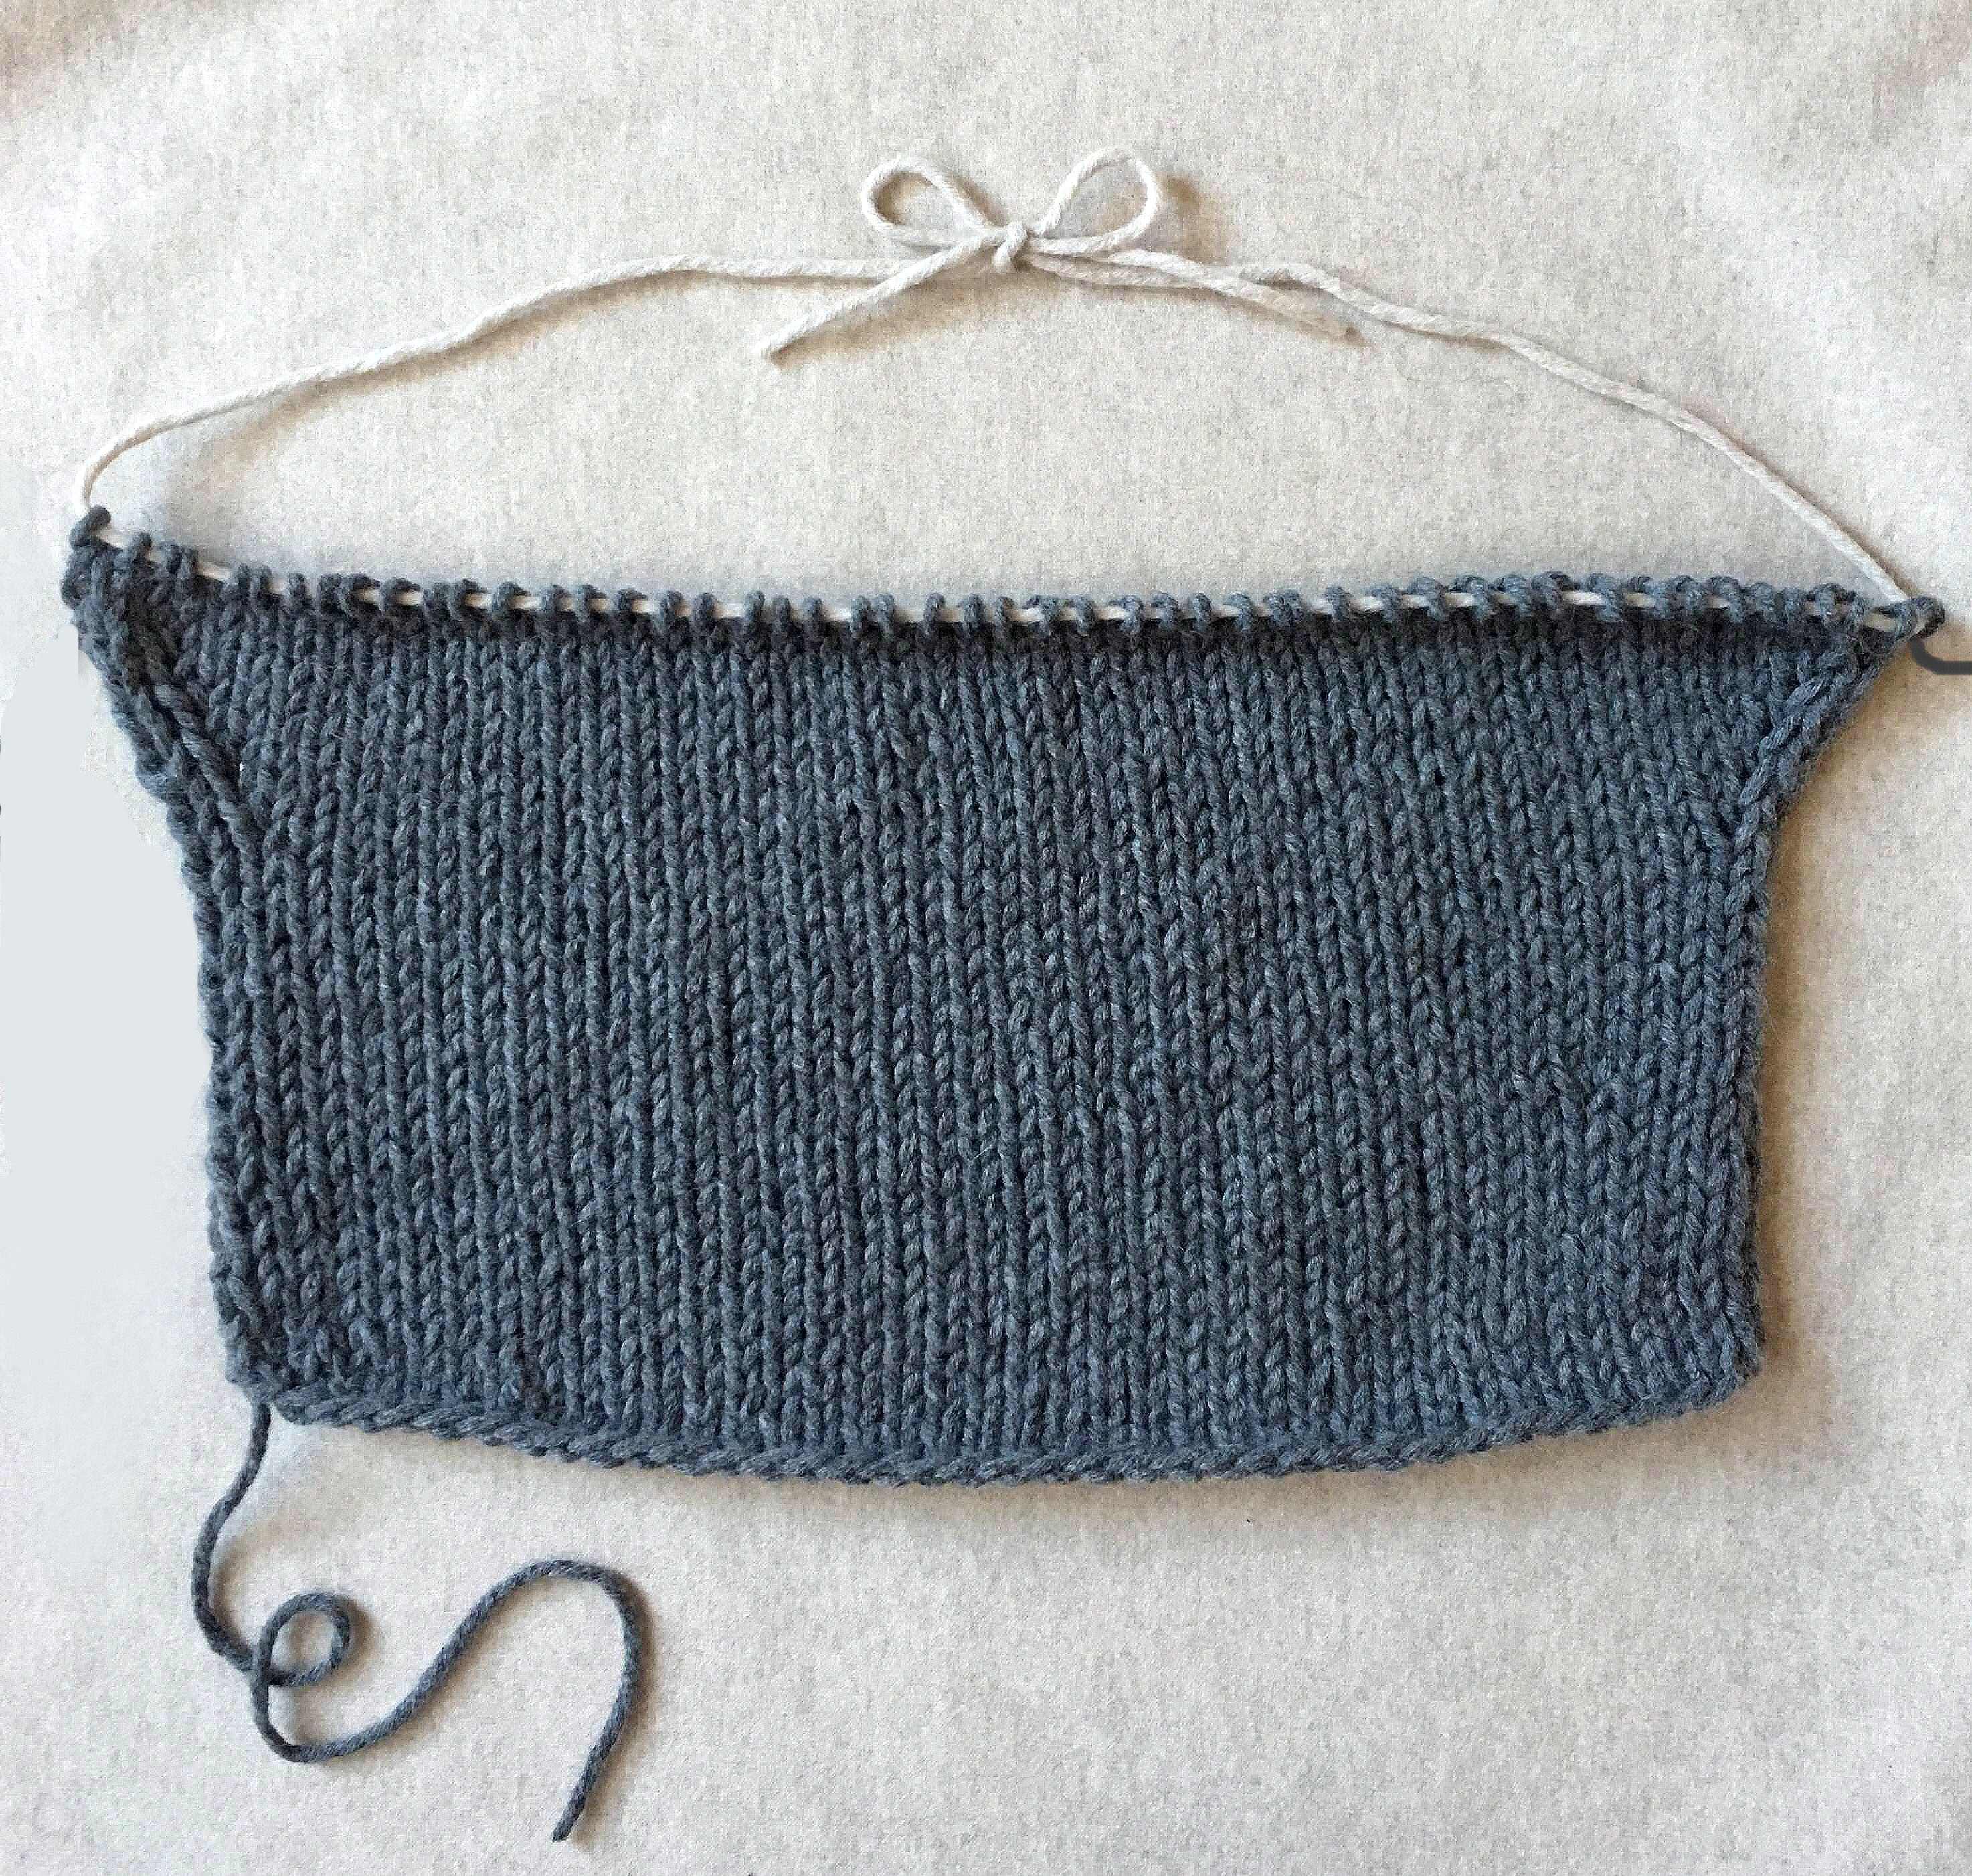
2-Stitch I-cord Bind Off
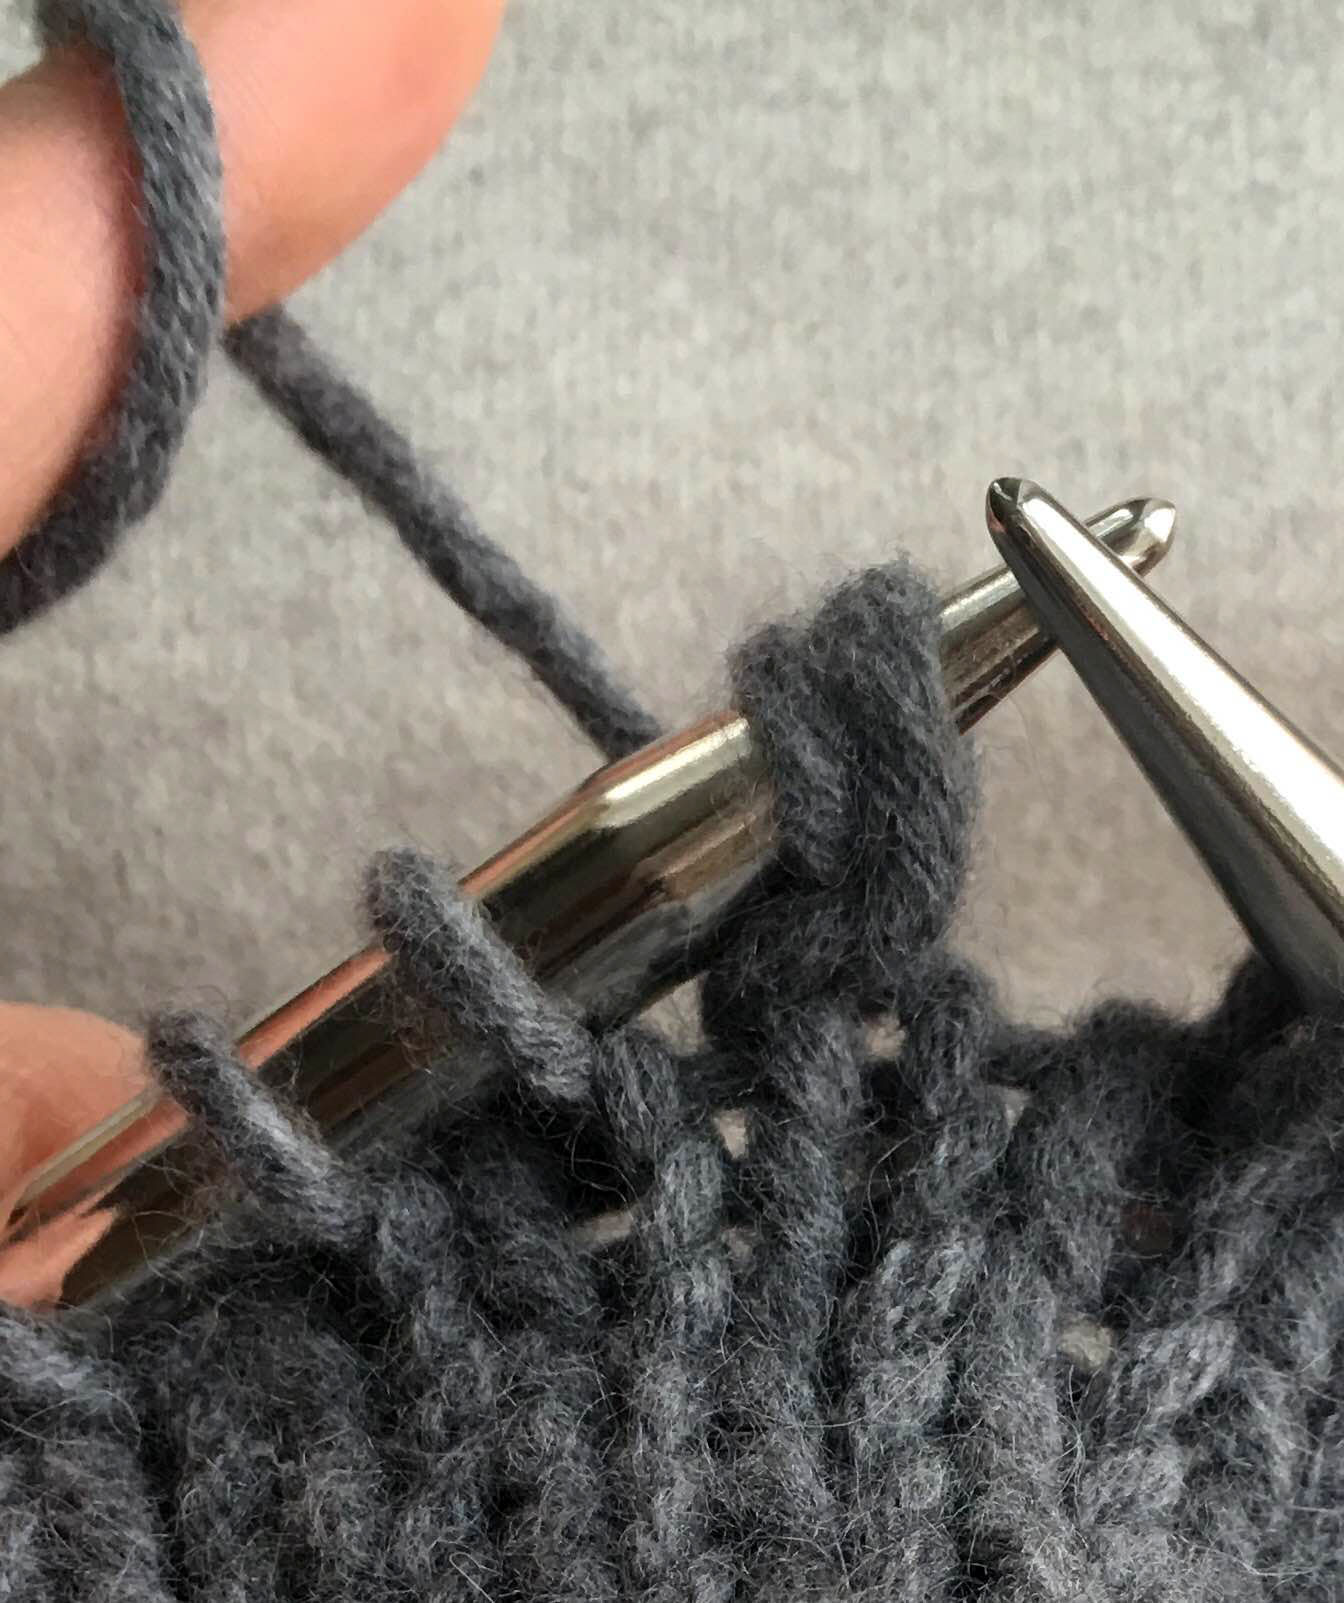
Cable cast on 1 stitch.

*Knit first stitch on left needle, then knit second and third stitches together through the back loops. Slip two stitches on right needle back to left needle and repeat from * until you have bound off all stitches and you are back at the beginning of the round and two I-cord stitches remain on right needle.
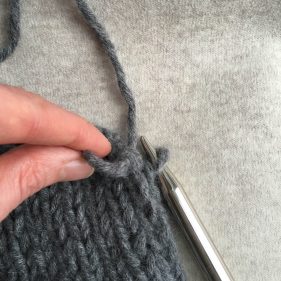
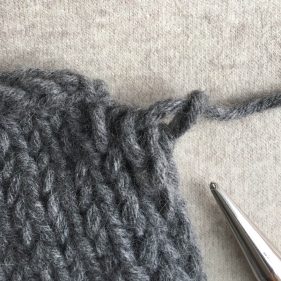
Cut yarn, leaving an 8-inch tail.
Remove first stitch from right needle and pull on the loop of the stitch to bring tail through so that there is no longer a loop, just a tail. Thread the tail through the remaining stitch.
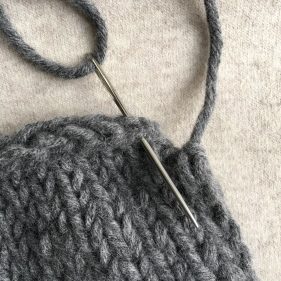
With a tapestry needle, neatly join the end of the I-cord to the beginning by threading the yarn underneath the first bound-off stitch.
Pattern
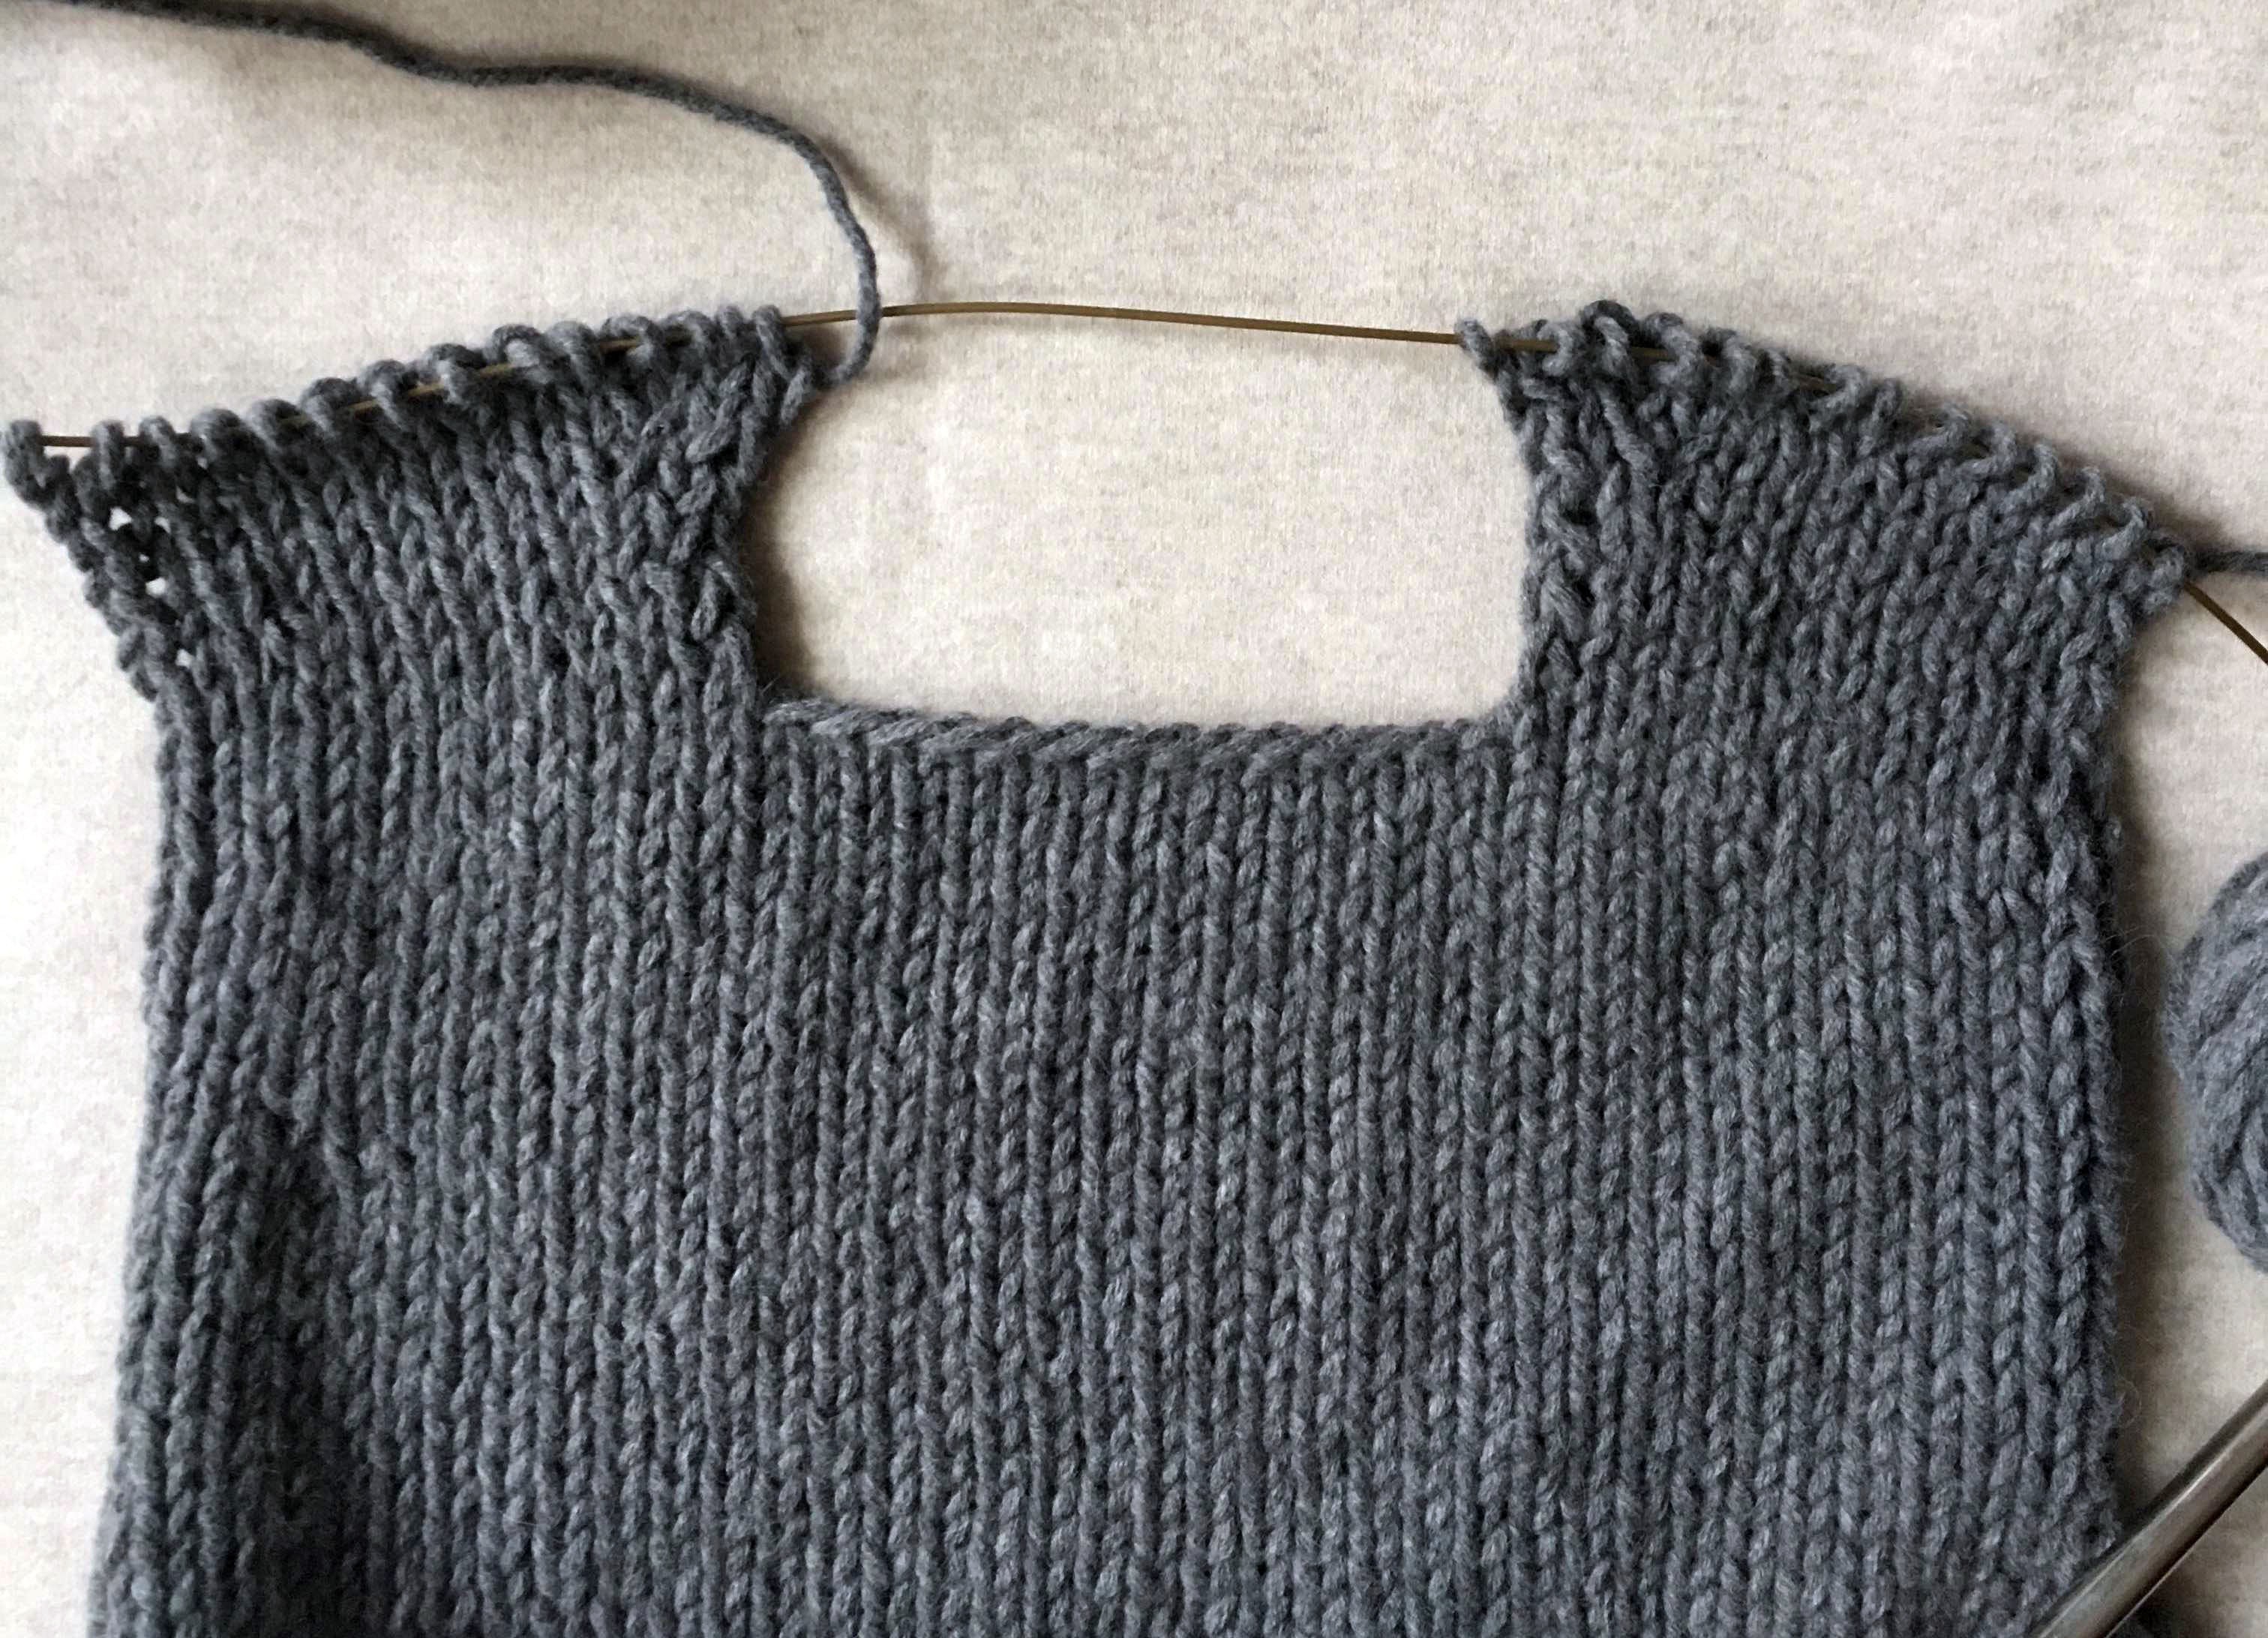
Back
BEGIN
Use a Long Tail Cast On to cast 36 (38, 40, 42) (44, 46, 48) (48, 50, 52, 52) stitches onto 32-inch circular needles. Do not join for working in the round.
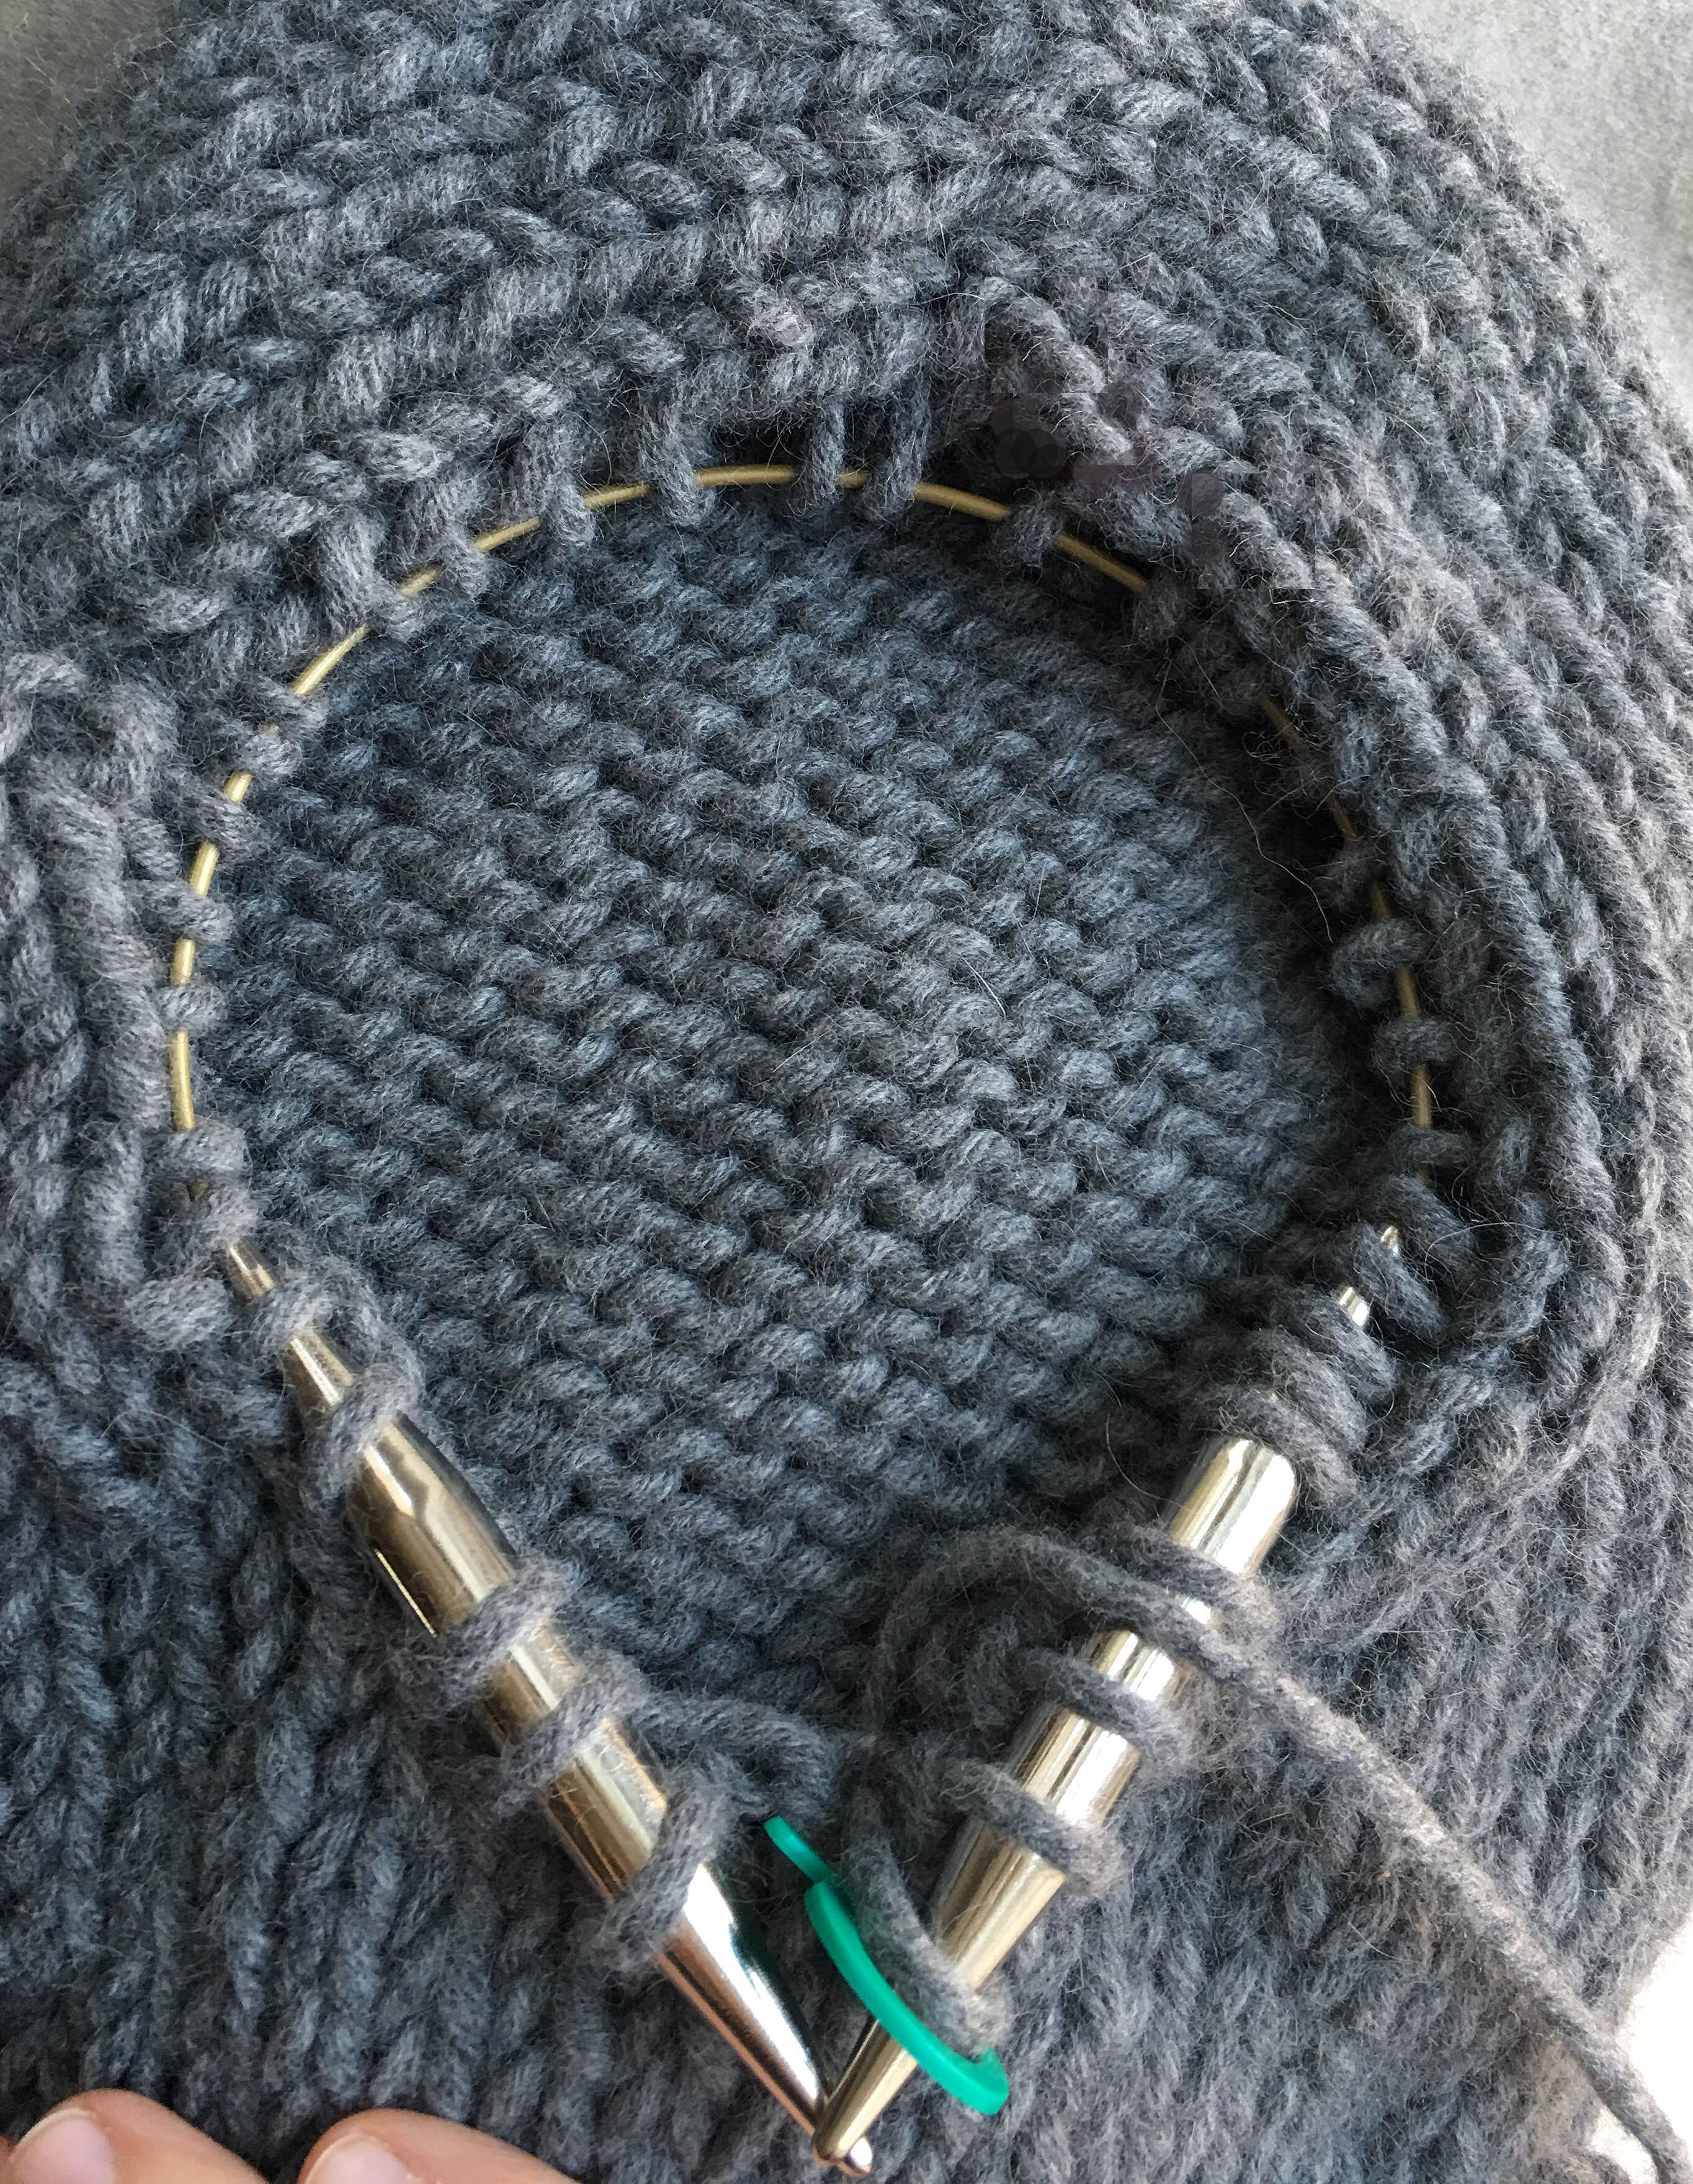
Set-Up Row (wrong side): P10 (11, 12, 12) (13, 13, 14) (13, 14, 15, 15), pm (place marker), p16 (16, 16, 18) (18, 20, 20) (22, 22, 22, 22), pm, p10 (11, 12, 12) (13, 13, 14) (13, 14, 15, 15).
SHAPE SHOULDERS
NOTE: In this section you will be working back and forth in short rows, turning the work partway through each row. For extra help, see Notes.
Short Row 1 (right side): [Knit to next marker, sm (slip marker)] 2 times, k3 (3, 4, 4) (4, 4, 5) (5, 5, 5, 5), wrp-t (see Notes).
Short Row 2 (wrong side): [Purl to next marker, sm] 2 times, p3 (3, 4, 4) (4, 4, 5) (5, 5, 5, 5), wrp-t.
Short Row 3: Knit to wrapped stitch, knit wrapped stitch with its wrap, k3 (3, 4, 4) (4, 4, 5) (5, 5, 5, 5), wrp-t.
Short Row 4: Purl to wrapped stitch, purl wrapped stitch with its wrap, p3 (3, 4, 4) (4, 4, 5) (5, 5, 5, 5), wrp-t.
Short Row 5: Knit to wrapped stitch, knit wrapped stitch with its wrap, knit to end of row.
Row 6: Purl to wrapped stitch, purl wrapped stitch with its wrap, purl to end of row.
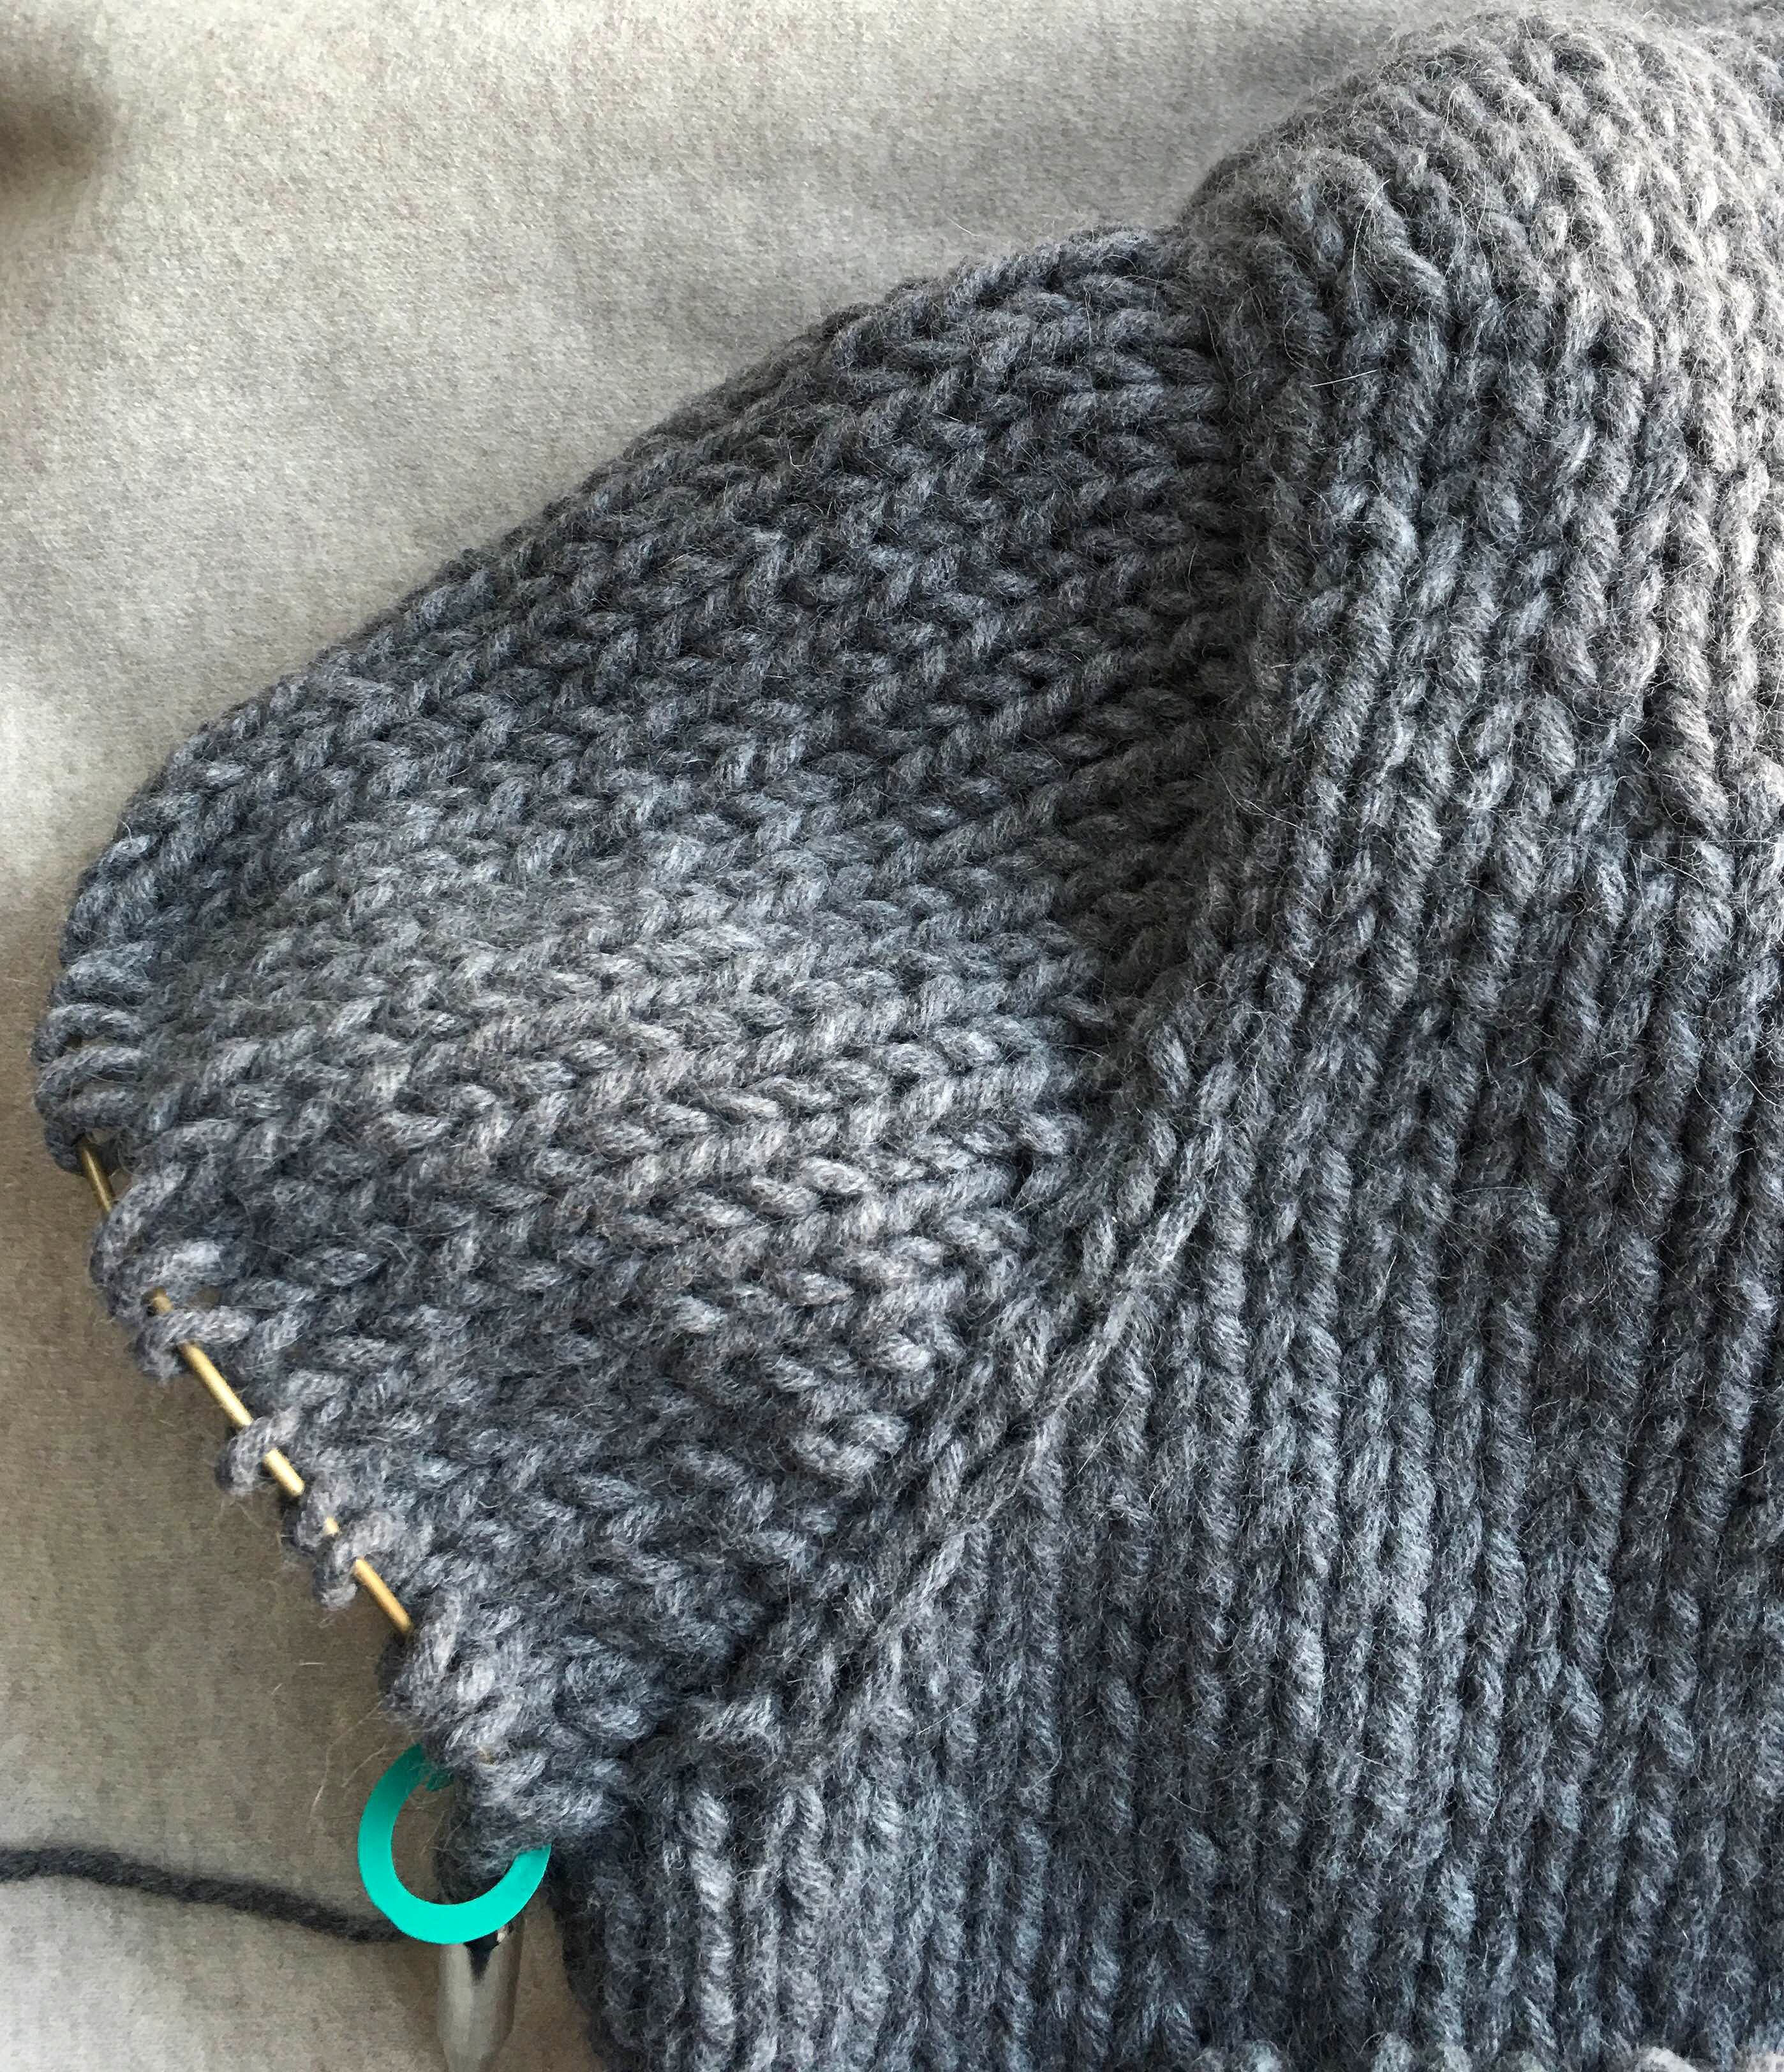
Removing stitch markers, work even in stockinette stitch until piece measures 5 (5½, 5¼, 5) (5½, 5½, 5½) (4, 4¾, 4½, 4¼) inches, measuring along selvage. End with a wrong-side row.
Shape Armholes
Increase Row (right side): K2, RLI (see Notes), knit to last 3 stitches, RLI, k3. [2 stitches increased]
Next Row (wrong side): Purl to end of row.
Repeat last two rows 3 (3, 4, 5) (5, 6, 6) (9, 8, 9, 10) more times. [44 (46, 50, 54) (56, 60, 62) (68, 68, 72, 74) stitches]
Cut yarn and place stitches onto stitch holders or scrap yarn.
Front
Pick Up at Shoulders
Pick-Up Row (right side): With right side of Back facing you and using 32-inch circular needles, join yarn and pick up and knit 10 (11, 12, 12) (13, 13, 14) (13, 14, 15, 15) stitches along cast-on edge (for Right Front); skip center 16 (16, 16, 18) (18, 20, 20) (22, 22, 22, 22) cast-on stitches (for Back Neck); with a separate ball of yarn, join yarn and pick up and knit 10 (11, 12, 12) (13, 13, 14) (13, 14, 15, 15) stitches along remaining cast-on edge (for Left Front). [10 (11, 12, 12) (13, 13, 14) (13, 14, 15, 15) stitches for each Front]

Shape Shoulders
NOTE: In this section you will use short rows for shaping and will work Left and Right Fronts at the same time, using separate balls of yarn for each Front.
Set-Up Row (wrong side): For Left Front, purl to Neck edge; for Right Front, purl to end of row.
Short Row 1 (right side): For Right Front, knit to Neck edge; for Left Front, k3 (3, 4, 4) (4, 4, 5) (5, 5, 5, 5), wrp-t.
Short Row 2: For Left Front, purl to Neck edge; for Right Front, p3 (3, 4, 4) (4, 4, 5) (5, 5, 5, 5), wrp-t.
Short Row 3: For Right Front, knit to Neck edge; for Left Front, knit to wrapped stitch, knit wrapped stitch with its wrap, k3 (3, 4, 4) (4, 4, 5) (5, 5, 5, 5), wrp-t.
Short Row 4: For Left Front, purl to Neck edge; for Right Front, purl to wrapped stitch, purl wrapped stitch with its wrap, p3 (3, 4, 4) (4, 4, 5) (5, 5, 5, 5), wrp-t.
Short Row 5: For Right Front, knit to Neck edge; for Left Front, knit to wrapped stitch, knit wrapped stitch with its wrap, knit to end of row.
Row 6: For Left Front, purl to Neck edge; for Right Front, purl to wrapped stitch, purl wrapped stitch with its wrap, purl to end of row.
Shape Neck
Row 1 (right side): For Right Front, knit to 3 stitches before Neck edge, RLI, k3; for Left Front, k3, RLI, knit to end of row. [1 stitch increased at each Neck edge]
Row 2 (wrong side): For Left Front, purl to Neck edge; for Right Front, purl to end of row.
Repeat Rows 1 and 2 one (1, 1, 2) (2, 2, 2) (2, 2, 2, 2) more time(s). [12 (13, 14, 15) (16, 16, 17) (16, 17, 18, 18) stitches each Front]
Cast on for Front Neck + Continue Fronts
Row 1 (right side): For Right Front, knit to Neck edge, turn so wrong side is facing you, cable cast on 6 (6, 6, 6) (6, 7, 7) (7, 7, 7, 7) stitches, turn so right side is facing you; for Left Front, knit to end of row. [18 (19, 20, 21) (22, 23, 24) (23, 24, 25, 25) stitches for Right Front; 12 (13, 14, 15) (16, 16, 17) (16, 17, 18, 18) stitches for Left Front]
Row 2 (wrong side): For Left Front, purl to Neck edge, turn so right side is facing you, cable cast on 6 (6, 6, 6) (6, 7, 7) (7, 7, 7, 7) stitches, turn so wrong side is facing you; for Right Front, p6 (6, 6, 6) (6, 7, 7) (7, 7, 7, 7), p1 through the back loop (tbl), purl to end of row. [12 (13, 14, 15) (16, 16, 17) (16, 17, 18, 18) stitches each Front]
Row 3: For Right Front, knit to Neck edge; for Left Front, k6 (6, 6, 6) (6, 7, 7) (7, 7, 7, 7), k1 tbl, knit to end of row.
Work even in stockinette stitch until Fronts measure 5 (5½, 5¼, 5) (5½, 5½, 5½) (4, 4¾, 4½, 4¼) inches from pick-up row, measuring along selvage of Armhole.
Shape Armholes
Row 1 (right side): For Right Front, k3, RLI, knit to Neck edge; for Left Front, knit to last 3 stitches, RLI, k3. [1 stitch increased at each Armhole edge]
Row 2 (wrong side): For Left Front, purl to Neck edge; for Right Front, purl to end of row.
Repeat Rows 1 and 2 three (3, 4, 5) (5, 6, 6) (9, 8, 9, 10) more times. [22 (23, 25, 27) (28, 30, 31) (33, 33, 35, 36) stitches each Front]
Cut yarn for Right Front.

Body
Prepare To Join Back and Fronts
With wrong sides facing you, slip Back stitches onto needles next to Left Front stitches, then slip Right Front stitches onto needles next to Back stitches. Resume with yarn attached to Left Front and right side facing you.
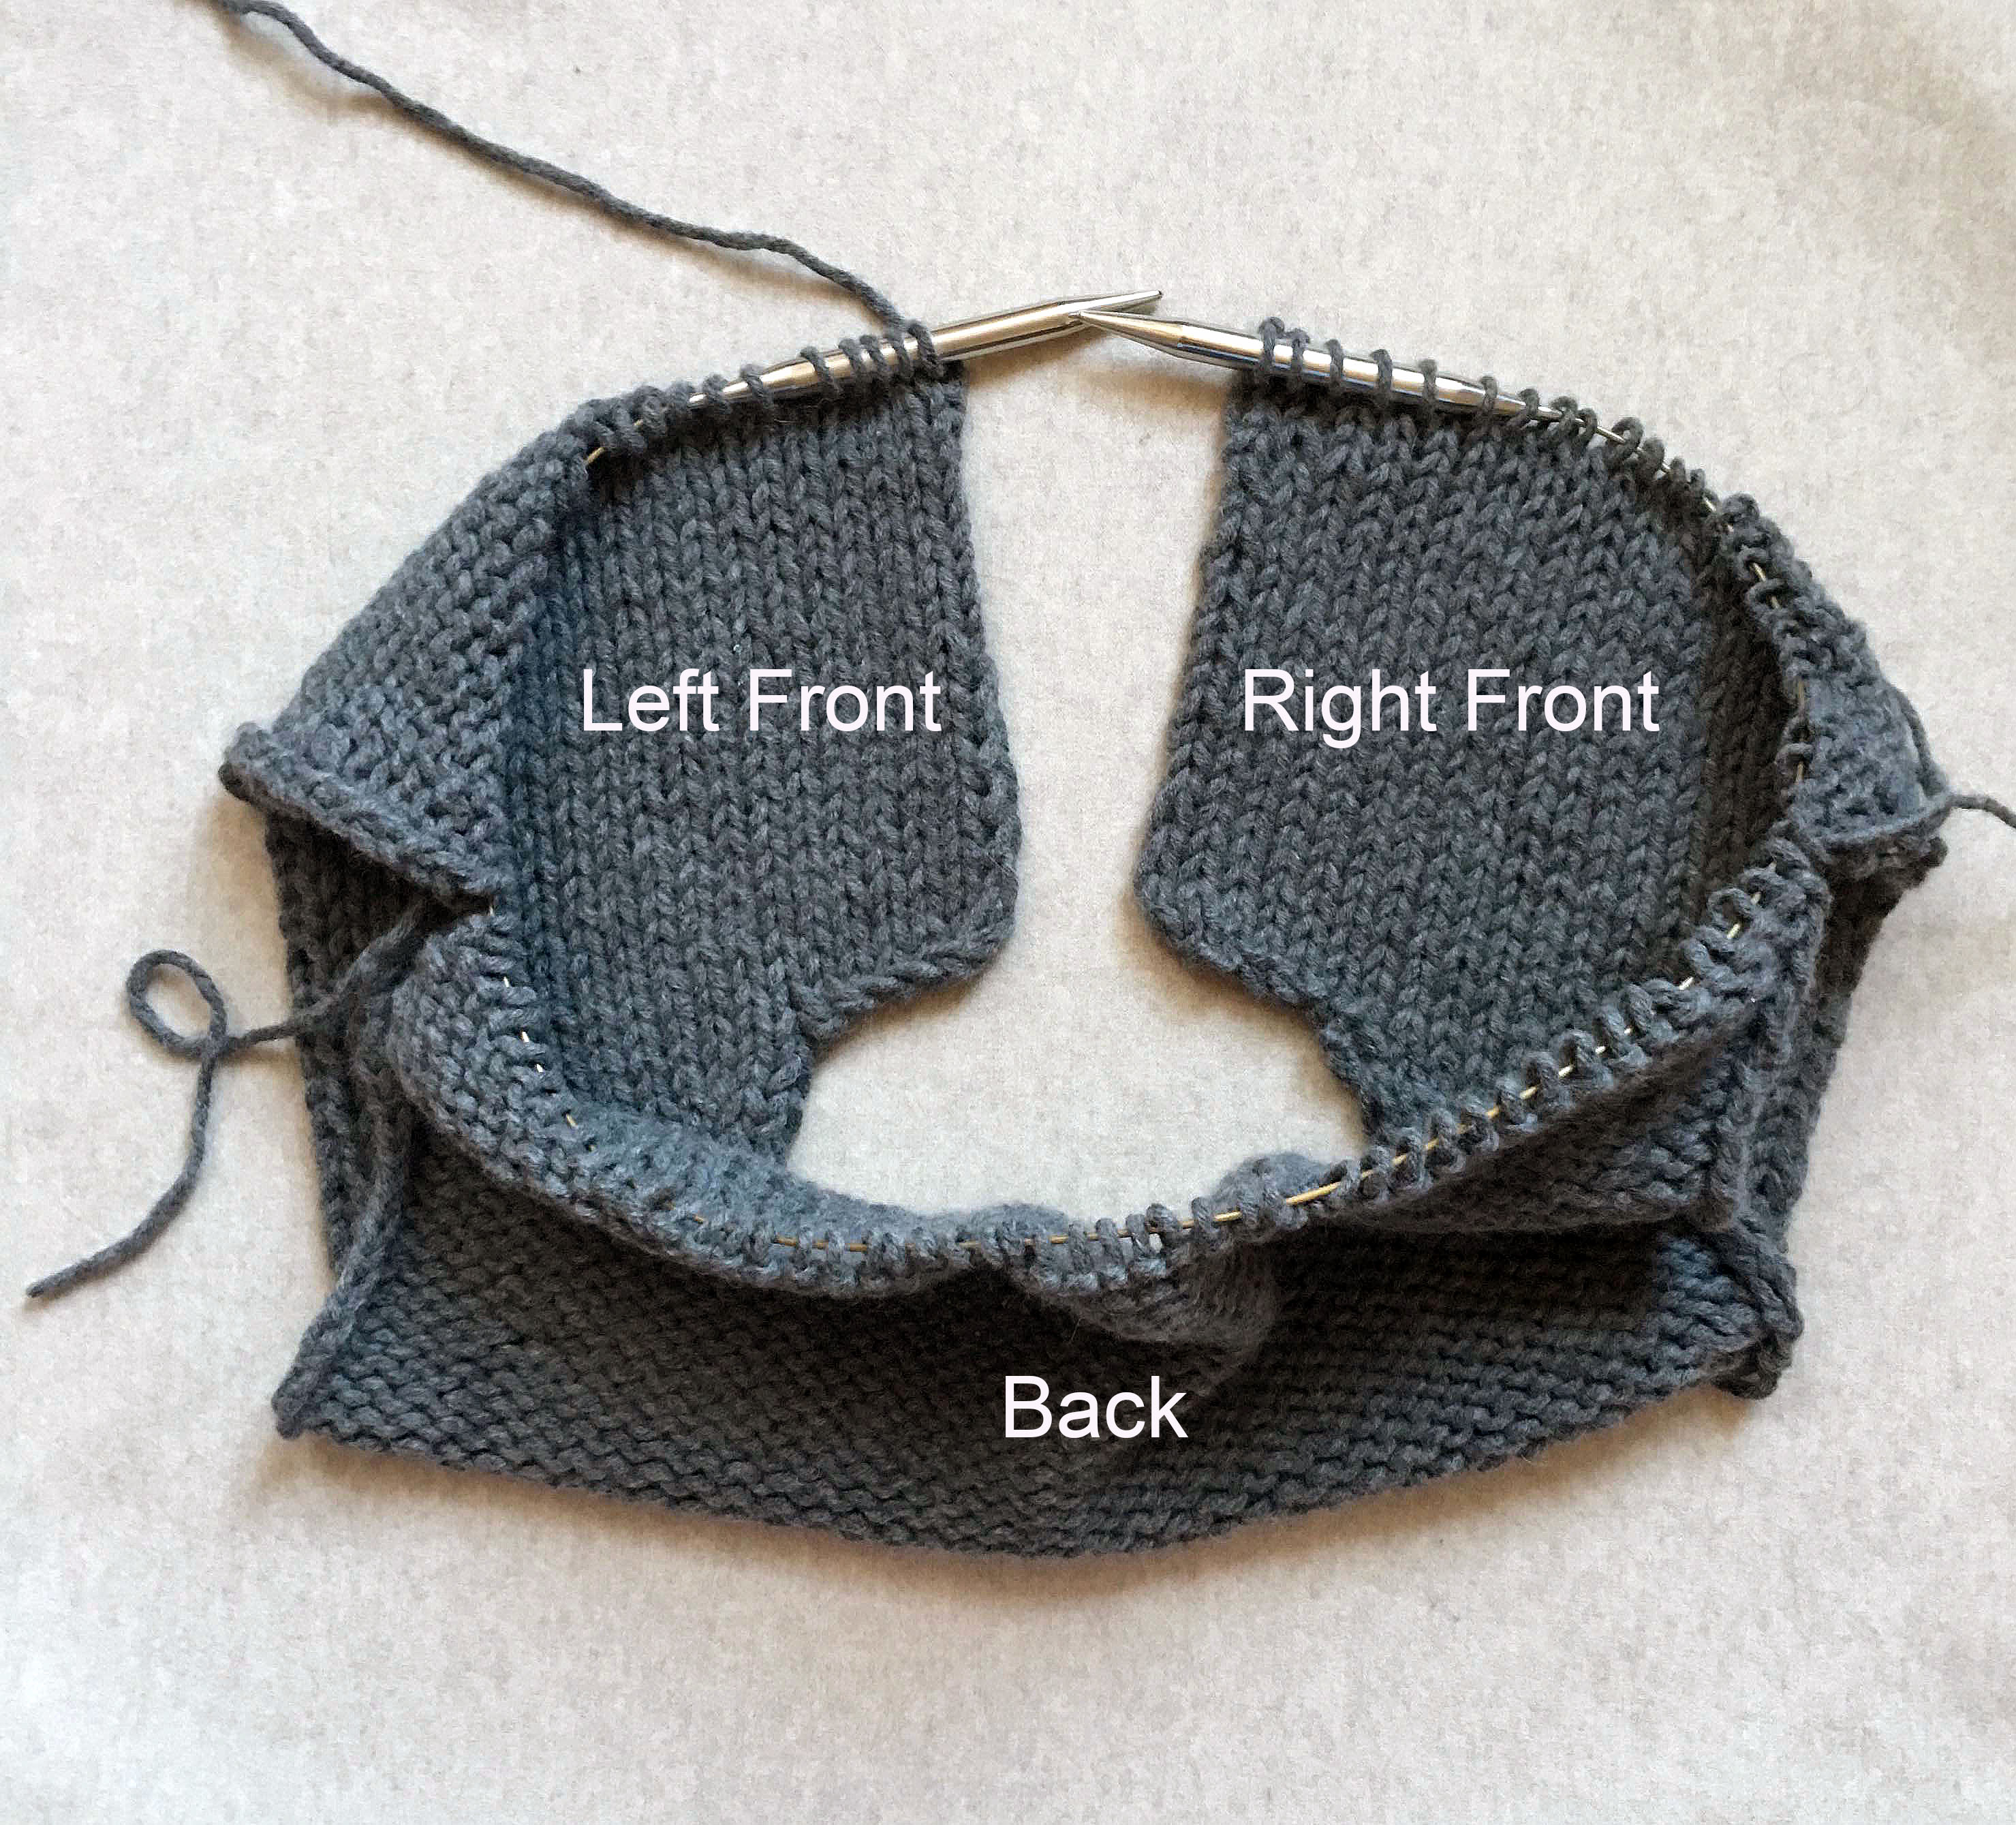
Cast on for Underarms + Continue
Cast-On Row (right side): Knit to end of Left Front, *turn so wrong side is facing you and cable cast on 1 (3, 3, 3) (5, 5, 7) (7, 11, 11, 13) stitch(es) for Underarm, turn so right side is facing you,** knit to end of Back, repeat from * to **, knit to end of Right Front. [90 (98, 106, 114) (122, 130, 138) (148, 156, 164, 172) total stitches]
Work in stockinette stitch until Body measures 13½ (13¼, 13¼, 13) (12¾, 12¾, 13¼) (13½, 13¾, 14, 14¼) inches from Underarms, ending with a right-side row.
Work I-Cord Edging
With right side facing you and starting at bottom corner of Right Front, pick up and knit 2 stitches for every 3 rows up Right Front selvage.

With right side still facing you, pick up and knit 6 (6, 6, 6) (6, 7, 7) (7, 7, 7, 7) stitches along Right Front Neck cast-on; pick up and knit 2 stitches for every 3 rows around Right Neck edge; pick up and knit one stitch in each stitch across Back Neck; pick up and knit 2 stitches for every 3 rows around Left Neck edge; pick up and knit 6 (6, 6, 6) (6, 7, 7) (7, 7, 7, 7) stitches along Left Front Neck cast-on; pick up and knit 2 stitches for every 3 rows down Left Front selvage.
With right side facing you and working across bottom Body stitches first, bind off all stitches using 2-Stitch I-Cord Bind Off (see Notes).
Sleeves
Pick Up
Pick-Up Round: With right side facing you and using 16-inch circular needles, begin at center of Underarm and pick up and knit 16 (17, 18, 20) (21, 22, 23) (24, 25, 26, 27) stitches evenly up one side of Armhole to top of Shoulder; pick up and knit 16 (17, 18, 20) (21, 22, 23) (24, 25, 26, 27) stitches evenly down other side of Armhole to center of Underarm. Place marker for end of round and join to work in the round. [32 (34, 36, 40) (42, 44, 46) (48, 50, 52, 54) stitches]
Shape Sleeve Cap
NOTE: In this section you will use short rows to shape Sleeve Caps.
Short Row 1 (right side): K22 (23, 24, 27) (29, 30, 31) (32, 33, 34, 37), wrp-t.
Short Row 2 (wrong side): P12 (12, 12, 14) (16, 16, 18) (18, 20, 20, 22), wrp-t.
Short Row 3: Knit to wrapped stitch, knit wrapped stitch with its wrap, wrp-t.
Short Row 4: Purl to wrapped stitch, purl wrapped stitch with its wrap, wrp-t.
Repeat Short Rows 3 and 4 seven (8, 9, 10) (10, 11, 11) (12, 12, 13, 13) more times.
Next Row: Knit to wrapped stitch, knit wrapped stitch with its wrap, knit to end-of-round marker.
Continuing in the round…
Next Round: Knit to end of round, knitting wrapped stitch with its wrap.
Knit 2 rounds.
Shape Sleeve
Note: Change to double pointed needles when necessary.
Decrease Round: Slip slip knit, knit to last 2 stitches, knit 2 together. [2 stitches decreased]
Continuing in stockinette stitch, knitting each round, repeat Decrease Round every 1 (1, 1, 2) (2, 2, 2) (1, 1, 1, 1) inch(es) 2 (2, 2, 4) (4, 5, 6) (7, 7, 8, 9) more times. [26 (28, 30, 30) (32, 32, 32) (32, 34, 34, 34) stitches remain]
Continue in stockinette stitch until Sleeve measures 16¾ (17, 17, 17½) (17½, 18, 18) (18¼, 18½, 18¾, 19) inches from Underarm or to desired length.
Bind off all stitches using 2-Stitch I-Cord Bind-Off.
Work second Sleeve identical to first.
Weave + Block
Weave in ends. If using plied yarn, separate plies and weave in each separately for a tidy finish. Block as desired.


This is so pretty and classic. Hopefully one day I will be confident enough to do this. This is the loveliest jacket I’ve seen. Love your daily posts.
Well said, all of it. And one day we both will be making this, I’ll bet!
Oh, this is absolutey wonderful in its simplicity.
While I am really an experienced knitter and tried so many techniques, the 2-stitch I-cord Bind Off is completely new to me and I cannot wait to try it out.
I simply love your patterns and the fantastic step-by-step instructions. Thank you so much for sharing!
Thank you for providing detailed instruction (including photographs) of the classic knit jacket. The photographs provides a view for me that the instructions did not provide. With never doing such a project the photographs adds a level of confidence that I can complete this project with ease.
I love when you do this to me! I just knitted a scarf out of some beautiful red bulky yard that was languishing. Bye bye scarf, hello elegant cardigan. Now do I do it before or after the Purl Soho sweater I just started? OK, I’ll have both going! Thanks for your wonderful patterns, advise and community
I love the look of this jacket, but my figure would not do it justice. Is there a way I could introduce some shape to it, with short rows maybe, without destroying the look?
Hi Lynn,
Thanks for writing! The nice thing about keeping the design elements for our Jacket simple is that adjustments are relatively easy to make, and adding short rows to shape the piece would not be too difficult. Two links that might be most helpful (and explain the process of introducing short rows in a clear way) would be http://www.conniehester.com/knitting-bust-darts.htm and http://www.craftsy.com/article/knitting-darts-for-the-perfect-fit. I hope this helps and please let us know if you have any further questions!
Kristy
I love this pattern! How many skeins would be required if you did not knit the sleeves and left it as a vest?
Hi Gina,
What size would you be looking to make?
Thanks,
Kristy
I am in LOVE! This is simple, classic & cute….I truly need one and think it will make a great gift or two as well.
My question is about the sizing. Does your measurement include the ease, or should I be sizing this with the measurement stated? Is the best measurement to use the bust sizing? In other words, should I choose the closest bust size to mine, or should I size down knowing that there is 4 to 6 inches of ease, and subtract that ease in order to get the right size.
Hi Debbie!
The sizes listed are the finished measurements of the Jacket. What might be most useful is to take your bust measurement and then add about 4-6 inches to that number and make the size closest to it (for example, with a bust size of 36, it might make the most sense to make the size 42 1/2) Conferring with our schematic and seeing how those measurements compare to your own (especially at the shoulders) is also useful in helping to decide the best size to make. The nice thing about making the Jacket from the top down is that your final Body and Sleeve lengths will be easy to adjust, and you can place your stitches on a piece of waste yarn at any point in the process and try the piece on. I hope this helps and please let us know if you have any further questions!
Kristy
Should the bust measurment be taken at widest point of bust or below? I’m making the second smallest size and whille I do get the gauche, I’m a bit worried because it seems a bit small…
Hi Agata,
The bust measurement should be taken as the widest point. Where are you in the process? Often (when working the Back) the piece can seem smaller than it will ultimately be. You will also be casting on 3 stitches on each side when joining the Back to the Fronts which may give you the additional width you currently feel you’re lacking. I hope this helps clarify and please let us know if you have any further questions!
Thanks for writing,
Kristy
Thank you! What a beautiful & simple jacket. And thank you for your clear instructions with photos, so helpful!
This is a beautiful jacket and pattern. The amount of work that
went into creating these detailed instructions is incredible.
I have never done a project such as this, but after studying the
detailed instructions, feel confident I can create a thing of
beauty I will enjoy a long time. Thank you.
Merci pour ce patron très belle veste.
Il faut que j’ose entreprendre un tel travail, même si vos explications sont très claires.
If I want to make this larger could I just add extra stitches in the back or do I have to add in front also?
Thank you so much for your generosity with this free pattern and wonderful illustrations!
Hi Carol,
If you add inches to the Back, those same inches will need to be added to the Front. And although it’s a bit tricky to take into consideration all of the alterations you will need to make to the pattern in order to resize it (and beyond the scope of what I can write out here), we’re here to answer any general questions you may have along the way! Good luck and thanks for writing!
Kristy
Thank you so much for this beautiful jacket pattern. I am going to make this soon
Lovely, classicly styled jacket. Thanks for sharing the pattern. I’m a big fan of your designs.
This one tho, is not for me. I’ve tried using larger needles and just can’t tolerate them. I knit English, continental, right handed, left handed and Portuguese with ease, but any needle over a size 10 1/2 gives me terrible hand cramps.
Is there any chance you’ll be doing a cardigan with the same simple style using a size 7 (for instance)?
Hi Deborah!
We’re so sorry to hear that you experience bad hand cramping with larger size needles. Although we don’t currently have this pattern available at a smaller gauge, we will definitely keep your suggestion in mind going forward! Thanks for writing and for your kind comments!
Kristy
Deborah, I’m experimenting with smaller needles and different weight yarns to find the gauge that will work for this pattern. I also can’t manage anything larger than a US 11. I’ll comment here in a few days when I’ve worked it out.
Okay, so far, stitching two strands of Aran weight together on a US size 9 needle seems to be working. I haven’t blocked my practice piece yet, but the shoulders fit properly.
Also working well: Moonshine (Juniper Moon Farms) chunky on size 12 needles. I think I’m going with this one.
Oops…the chunky yarn on US size 11, sorry!
Okay, so I’ve stitched the back, shoulders, and armholes using two strands of Aran weight on US size 9 & 10, and with the chunky weight yarn on US size 11. This specific chunky yarn is not quite as thick as the Feltro.
I’m using stitch counts and measurements for a 39″ chest circumference. For the Aran weight with the size 9s, I cast on five more stitches than called for (remember, I’m knitting with two strands at once) for the back and shoulders, and four more stitches for the armholes. On size 10 needles, I cast on four and three extra, respectively. I’m not going to say these stitch counts are set in stone because I’m knitting with a looser tension than usual, so you’ll still have to swatch for gauge. Stitching with two strands together might get a bit tricky when it’s time to pick up and knit, but so far the fit is true.
The chunky Moonshine was more dense than I’d like when stitched on size 9 & 10 needles. It just didn’t shape as well and felt odd around the shoulders. On those two sizes of needles, I have a feeling the armholes would be uncomfortable just because the fabric you knit up is so thick and heavy. This yarn worked better for me on size 11s.
I keep going back and forth on which yarn I’m going to end up using for the for-real-not-testing-for-gauge jacket. So far, the double strands of Aran weight actually hold the structure better, but the chunky weight yarn looks more like the Feltro.
I won’t be able to work on the jacket anymore this week (we’re moving in two days, ugh), so at this point I can say yes, you can go with a lighter weight yarn and smaller needles, but 1) Aran or worsted would have to be stitched two strands together unless you’re committed enough to spend many hours working up the right gauge, but even so, 2) anything lighter, even if stitched two strands together, just won’t give this jacket the structure that Aran and chunkier yarns do, so I wouldn’t go with anything lighter than an Aran or a smaller needle than a US 10, and that’s probably pushing it. (Just for grins, I stitched part of the back and shoulders with light worsted on US size 8 needles, and…no. Just don’t. Ugh.)
So…I think it’s worth it to experiment with other yarns and needle sizes as long as you keep in mind that yarns in the mid-to-heavier weights are needed to retain the structure of the jacket.
I hope this helps, and I hope I made some sense here. I’m a bit fuzzy-headed because I’ve stayed up too late!
^^ Omg, longest comment ever. ^^
Hi, Liz!
Thank you for your comment! Your attention to detail in your description of your gauge swatching is very helpful! Thank you for taking the time to write in, we greatly appreciate it! Best wishes on your move and please keep us updated on your progress with the Jacket!
Happy knitting,
Kumeko
I also have issues with larger needles and would love to make this, but knitting something on such large needles will kill my hands!
liz n. if you come up with something, please post here. I’ve knit sweaters using bulky yarn on size 9-10 needles without any issues but not sure if this would end up too dense to wear comfortably in this yarn.
liz n, I’m hoping for the same thing, and I’ll be watching for your info. hope you can work it out!
I love the look of this jacket and mostly, I’d like to make it in a lighter weight yarn than bulky.
This is lovely!
You should have a pin-in button on your site so we can save it to our knit/crochet boards 😉
Hi! Thanks a lot for the suggestion!
You can go to Pinterest and download their pin tool that sits on your toolbar, to pin anything you see on any page that you are on. I successfully pinned this to my knit and crochet board and it links perfectly to this article (still 7 wip’s, so you understand….). This pattern is on the to do list for a few months from now. It will be perfect for next fall!
What a beautiful design & written pattern ! THANK you for it. I will try hard to make it to perfection.
Pls., just if you may and can: Does is mean that for the first size of your pattern the final count of stitches (the circumference..) is 90 Sts. ? Thank you in advance & mainly for your work (!!).
(My mother tongue is not English, nor inches are my measurement, even my gauge for kids size I have in mind.. are going to vary; so I am trying hard to do my adjustments. So far I am having ball)
Hi Marketa,
Thanks so much for writing and very sorry for the delayed response! We’re really glad that you’ve been enjoying making the jacket! And yes! The circumference for the smallest size is 90 stitches, or 36 inches. Please don’t hesitate to write with any further questions you may have and thanks again for writing with this one!
Kristy
You can add a Pin it button to your browser, which lets you pin anything from websites that allow pinning. The how-to is in Pinterest’s help section.
Hello, this looks amazing! My mom would love this jacket, but unfortunately is allergic to wool. Could you suggest a substitute yarn? I know — tough to get away from wool in beauties like this.
Hi Holly,
Although we don’t carry a bulky weight yarn that doesn’t contain wool and such a yarn is actually not easy to find, there are a few others you might try:
http://www.universalyarn.com/quality_color.php?quality=338
http://www.loveknitting.com/us/lion-brand-hometown-usa
We hope this helps and thanks for writing!
Kristy
This is just stunning, thank you for sharing the pattern! I’m in south Louisiana… do you think it can be made with Ultra Pima if you used double strands? Would that achieve roughly the same gauge? Thanks!
Hi Adele,
Our best guess would be that even held double, the Ultra Pima may be a bit too thin to match the gauge of the jacket (10 stitches and 14 rows = 4 inches in stockinette stitch on size 15 needles), but you could certainly try it! On size 15s, doubled Ultra Pima may just provide a more open fabric (which may still work!). I hope this is somewhat help in answering your question! We appreciate that you wrote in and send good luck!
Kristy
The pattern looks wonderful, simple construction and yet elegant. And a big thank you for the photos of it on a human model; makes such a difference than just on a mannequin.
This is a beautiful pattern. Could this pattern work if knitted in your super soft Merino? i have not knitted with either yarn so I am unfamiliar with how they behave.. thank you Victoria
Hi Victoria,
With a suggested needle size of 13-15, our Super Soft Merino should definitely work for this pattern. It is a lovely yarn, loosely spun, cozy and fluffy. The Lanecardate Feltro is equally beautiful and soft, perhaps a bit sturdier. I hope this helps and please let us know if you have any additional questions!
Kristy
I can/t find the yarn that you used. Could another yarn be used.
Hi Lorraine,
The yarn we used for this project can be found on our website here: https://www.purlsoho.com/yarn/knitting-crochet/lanecardate-feltro.html. With any substitutions, you’ll just wanted to try to get as close to the pattern’s gauge as you can (10 stitches and 14 rows = 4 inches in stockinette stitch on size 15 needles). We hope this helps and please let us know if you have any further questions!
Kristy
Would you be able to publish a smaller size (34) for this pattern? I’m quite petite.
Hi Lisa,
I’m sorry that we don’t currently have this pattern available in a size 34, but it is definitely a request that we will keep in mind for future patterns. Thanks for writing in!
Kristy
How many yards is the yarn you are using?
Hi Karen,
One skein of our Lanecardate Feltro is 98 yards (90 meters).
Best,
Kristy
the simplicity of your design is breathtaking. it is so striking. this is my style…wish I was a better knitter, yes, I would knit it.
Wow! Your photos are amazing…this is the first time i’ve ever been able to see how to pick up a stitch from the row below. Thank you, thank you! You have always been so generous to share your patterns. Can’t wait to stop in at your shop the next time i’m in NYC!
This is an amazing, great pattern! You are very generous to share it, along with all the others you have shared: thank you so much!
This looks lovely. Love the pattern and finished look. I’m trying to man up and go for it but still not so great at reading pattern. Would love to see video tutorial for this one!
Thank you! This is exactly the simple, classic and beautiful jacket pattern I’ve been looking for. Thank you for being so generous!
Too bad it starts in a size 36. What about us XS and XXS people?
Hi Michele,
We’re sorry that the pattern for our jacket doesn’t come in your size, but we will definitely keep your comment in mind for future projects.
Thanks for writing,
Kristy
Love love love this pattern. Might it be published in the future using a somewhat smaller needle and appropriate yarn.
Living in Canada makes ordering yarn from you difficult and yarn this bulky in good colours seems quite rare near me. Would love to knit it on smaller needle and not quite so chunky yarn.
Cass
Hi Cass,
Although we don’t currently have this pattern available in a lighter weight yarn, it is definitely something we will keep in mind for the future. Thanks for writing in!
Kristy
Hi
I printed the pattern and on page 10 where it says to cast on, I think I missed something. It has you cast on, then move onto the set up rows, then it jumps to shaping shoulders? How many inches of the back do you work before you shape the shoulders?
Thanks
Hi Audrey,
Working the jacket from the top down, you will work one set-up row and then move directly to shaping the shoulders with short rows. I hope this helps clarify, and please let us know if you have any further questions! Thanks for writing!
Kristy
Hello
wonderful jacket but rather difficult for me , because I live in France and if I sew with English patterns; knitting is difficult because of the vocabulary but I hope to succeed. Could you please tell me which stitch you use for making so perfect edges in front of the jacket and around the neck ?
Hi Jacqueline,
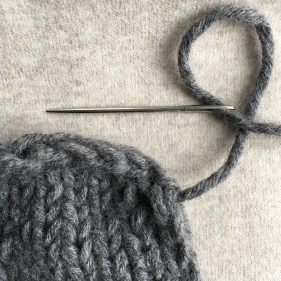
Thanks for writing! There are a few English to French knitting terminology translation sheets that might be helpful to you, and they can be found here (http://www.ravelry.com/projects/estherkate/how-to—translate-foreign-patterns—english-to-french). The edging on the jacket is a 2-stitch I-cord bind off, and is described with images just under the “Tips and Techniques” section of the pattern. I hope this helps and we are always here to answer any additional questions you may have. Happy knitting!
Kristy
I love the classic style of this jacket. Is there a way to knit it bottom-up? I’m not confident enough to knit it top down.
Hi Suzanne,
Thanks for writing and sincere apologies for the delay in getting back to you! Although we don’t currently have a version of this jacket knit from the bottom up, we will definitely keep your comment in mind for future designs. Thanks again for taking the time to write in!
Kristy
This jacket/wool is stunning! I have picked up the stitches for the sleeves and the instructions say to place a marker and join to work in the round.
How can the sleeve cap Short Rows 2 & 4 say purl?
If the row is joined to work in the round, all rows are Knit. Please clarify this for me as I hope to be able to wear my jacket before it is too warm!
Thanks for sharing so many wonderful designs!
Susan
Hi Susan!
Thanks for writing and very sorry about the delayed response! For a short while when creating your sleeves for the jacket, you will work short rows at the top of the sleeve, back and forth in rows, in order to shape the sleeve cap. Once you’ve completed the cap, you will then join to work the rest of the sleeve in the round and will no longer work in rows. I hope this helps clarify and welcome any additional questions you may have as you finish the jacket!
Kristy
Thank you so much for sharing this- I just purchased some Super Soft Merino is Ballet Pink- cant wait to get started! Is there a way to print out this pattern? I don’t see a link. Thanks again!
Hi Kerry!
Thank you for writing and sorry for the delayed response! The print icon can be found on the righthand side at the top of the pattern, just under the tab “Save to Favorites.” You should see a small printer icon there, and if you click on that, it should allow you to print the pattern. Please let us know if you have any trouble at all or any further questions!
Kristy
What a beautiful channel knitted jacket,I am so looking forward to the long hours of pleasure this project will give me..
Thank you so much for sharing
Fabuloous pattern! I have been looking for this exact pattern for ages. My quandry is that my size is an XS is a commercially knit sweater or a 32. I know there has to be some “room” in the finished garment, especially since it is a jacket, however, your smallest size is a 36. How do I accommodate my size with this pattern? Many thanks for your answer!
Hi Michael,
Thank you for your kind comment and very sorry for the delayed response. Although we don’t have this pattern available in a size 32, your comment is an important reminder for us going forward to include smaller sizes. We very much appreciate your interest in the pattern and thank you for writing in.
Kristy
I am just starting to knit this lovely “chanel’ style jacket. I have long tailed cast on 44 stitches. Short row 2: [purl to marker, sm] twice, purl 4, wrap-t.
Ok, my question is this: after purling to first marker and sm, I purl 4, make one wrap-t, do I then continue on to end of second row making a wrap-t every four purl stitches to last sm? I adore this sweater and want to knit it perfectly so any help you can give me, much appreciated.
Hi Sally!
Thanks for writing and very sorry for the delayed response! On Short Row 2, you will purl to the marker and slip the marker TWICE (it’s important that you do this twice). So you will purl to the first marker, slip the marker and then purl to the second marker and slip that marker. After you have slipped the second marker, you will purl 4, and then wrap and turn. On the following row, Row 3, you will knit to wrapped stitch from previous right side row (which will be after the second marker), knit the wrap together with wrapped stitch, k4, and then wrap and turn. Short rows can be confusing, and I hope this helps clarify! Please let us know if you have any further questions! Thanks again for writing in!
Kristy
I like the style of the jacket, but not the size of the yarn and needles. Is there a way to have this work out in dk or sport weight yarn and 6 or 7 needles?
Hi Mary Ann,
Although we currently don’t have this pattern available in a different yarn or needle size, we will certainly keep your comment in mind going forward and may be able to offer the pattern in a DK or sport weight in the future. We appreciate your writing in!
Best,
Kristy
Love the cardigan jacket pattern! I live in HoustonTx and winters are mild and don’t start until Dec. After reading
all the comments , do you think
a merino blend in a double seed stitch pattern to give it stability and using a 6/7 needle (my poor hands) Might work ?.I realize there would be stitch adjustments etc. Thanks for sharing love your web site
Ms Barb
Hi Barb!
Very sorry for the delayed response! In its simplicity, the pattern would definitely work well in a variety of yarns and at different gauges. Since it was written for size 15 needles and bulkier yarn, as you mention, you would have to adjust the pattern in order for it to work at a smaller gauge, and with a alternate stitch pattern. But the pattern would definitely lend itself well to the lighter weight jacket you’re describing! We wish you good luck and thanks for writing!
Kristy
I consider myself an experienced knitter but have never used needles larger than a US10 1/2. I have started this sweater several times only to pull it apart. I have having difficulty with the beginning of my rows. They are very bumpy. Is this because of the size needle and the weight of the yarn? What is the best way to handle the first stitch? Knit/purl it or slip it? Any suggestion would be welcome.
Hi Lisa,
We’re sorry to hear that you’ve been having difficulty with the larger size needles! It can definitely take some adjusting. Often, your stitches may look a bit bumpy as you describe them until you’ve worked a few rows. You may also find that it helps to gently pull the stitches down and into place after you’ve worked them and that this can help to smooth out larger stitches. For this pattern, you will knit the first stitch in each row (instead slipping them). The edge created by knitting each of the stitches (instead of slipping) will allow you to pick up the correct number of stitches for the edging. Please let us know if the above helps or if you have any further questions! Thanks for writing,
Kristy
Hello,
Like everyone else, I love this pattern and I love your Merino Script. The Script hanks are 180 meters while the Feltro are 90 meters. Any help on how many skeins I should buy for the largest size? The pattern calls for 9 skeins- I’m thinking 6-7 would work. Until I play with a swatch, I guess I won’t know how many stitches/inch I will need! Thanks!
Hi Laurel,
Thank you for writing and sorry for the delayed response! Estimating the amount of yarn you will need to make the largest size of this Jacket, (using a different yarn and gauge) requires a bit guesswork. But a best estimate would be about 7 skeins to be on the safe side. I hope this helps and please let us know if you have any further questions!
Kristy
Hello,
I’m French and i’d really like to knit it. Unfortunetly I don’t understand everything. The size’s conversion and everything is quite hard. Any possibilities to translate it in french.
Thank you
Hi Noémie,
Thank you for your interest in this pattern! Unfortunately we don’t currently have a version of this pattern in French. There are several links that might be helpful to you though. The first helps convert inches to centimeters and might be useful in understanding the schematic and measurements. The second is a link to a list of knitting terms translated from English to French.
http://www.inches-to-cm.com
http://www.ravelry.com/projects/estherkate/how-to—translate-foreign-patterns—english-to-french
Best of luck and thanks for writing in,
Kristy
Thank you sooooooo much for your beautiful pattern. You have explained everything in great detail. I just finished reading and reviewing your pattern. I am going to start your Classic Knit Jacket. I am a bit anxious but I know if I have a question you will be there to answer it. Again, thank you. : )
Tess
Thanks so much, Tess! Good luck and please do let us know if you have any questions along the way!
Kristy
Hello I have just discovered your amazing jacket pattern and hope you are still around to answer questions. It would be really helpful with the sizings if you can say what size the model in the photograph is. Thank you for such a great design.
Hi Jean,
Thanks for the kind comment! The sweater on the model is mentioned in the size section. The model is wearing size 42 1/2. Best of luck!
-Adam
Hello, I’d like to make this sweater in Purl Soho Super Soft Merino, size S or M, how many skeins would you recommend?
Thanks.
Hi Quynh,
Thanks for writing in! To substitute Super Soft for Feltro, you will need 7,8,8,9,10,11 skeins depending on the size that you are hoping to knit!
I hope that this helps and happy knitting!
Cassy
Hi Cassy,
Thanks for your reply. And can you remind me how the size list works- is it XS, S, M, L, XL, XXL?
Thanks,
Quynh
Hi Quynh,
Thanks for writing in! Our sizes are based on finished chest size. The sizes are 36 (39 ¼, 42 ½, 45 ½, 48 ¾, 52) inches. These are not based on conventional xs-xl sizes. We hope by providing the finished chest measurements, you will see a better fit that is more accurate to your true measurements! This sweater is designed to be worn with a 4- to 6-inch ease around the chest. So you should measure your chest and add 4-6 inches and choose the closest size!
I hope that this helps!
Cassy
Dear Cassy, thanks for your very comprehensive answer.
piacerebbe avere le istruzioni in italiano.
Hi Attilia,
Thanks for writing in! At the moment, our patterns are only available in English. We very much appreciate you writing in and best of luck!
Best,
Cassy
Hi,
This jacket is beautiful, thank you for sharing this pattern with us.
I’m trying to learn about fit in knitting and in sewing and I have a question about the shoulders on this pattern. Usually, I aim to have the shoulder seam fall at the “head” of the shoulder, where the pivot point of my shoulder is. I see that in this pattern, the shoulder seam falls quite far off the shoulder. I’m interested to hear why you designed it that way – is there a utilitarian reason or were you trying to achieve a bit of a drop-shoulder look?
Thank you!
-Olivia
Hi Olivia,
Thanks for the kind words! I think that the jacket was intentionally designed to have a slight drop shoulder. It’s meant to fit on the roomy side, so this is also why it drops off a bit. If you’d like, you can do two or three more decreases on the fronts and back in order to achieve a more set-in look. Let me know how it goes!
Best of luck,
Adam
Hello,
I am wondering if the shorter circular needles are needed or I can complete this project with the longer circular needle and double pointed needles?
Thanks
Hi Quynh,
Thanks for the question! You could use just the DPNs instead of the 16 inch needle if you would like. We do think that picking up the sleeve stitches and knitting the sleeve cap is a little easier with the 16 inch needle. However, you certainly can accomplish the same look with the DPNs alone.
Best,
Cassy
Can’t wear Angora (makes me itchlike crazy). Can you recommend another wool? Thanks.
Hi Annette,
Great question! If you would like to use an alternate yarn, I would suggest our Super Soft Merino. It knits up at a similar gauge to the Feltro. To substitute Super Soft for Feltro, you will need 7,8,8,9,10,11 skeins depending on the size that you are hoping to knit!
I hope that this helps and happy knitting!
Cassy
Hello,
I’m stuck on Knit Edging: how to pick up the indicated stitches (from right front, neck and left front) having already so many stiches from the bottom edge (size 48 3/4)? Do I have to place bottom stiches on a stich holder before starting picking up right front stitches?
Hi Silvia,
Thanks for writing in! You will be picking up all of the stitches on one needle. I realize that this can get kind of crowded so feel free to use multiple needles and knit across them as if they are one. While a bit challenging at first, this does give a really lovely finished edge that just makes this elegant jacket!
I hope that this helps and happy knitting!
Cassy