Ancient Stitch Mittens
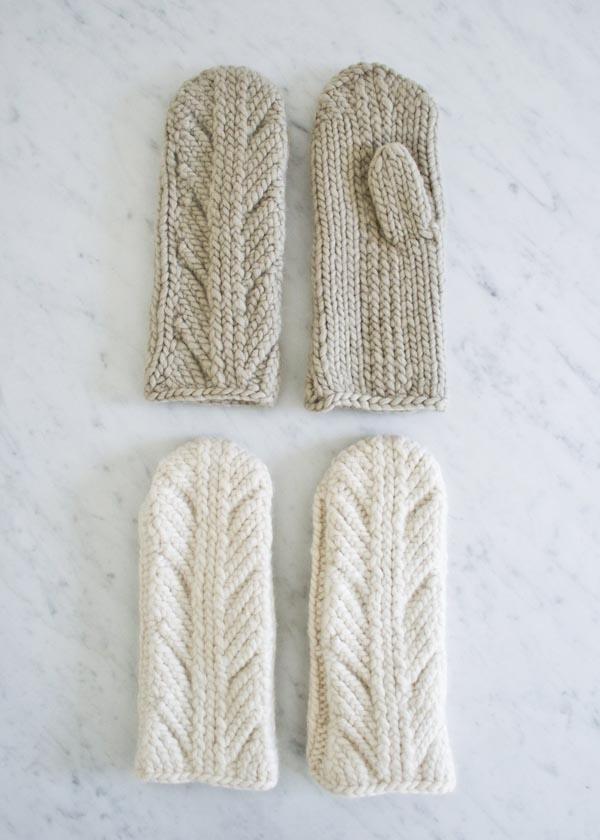
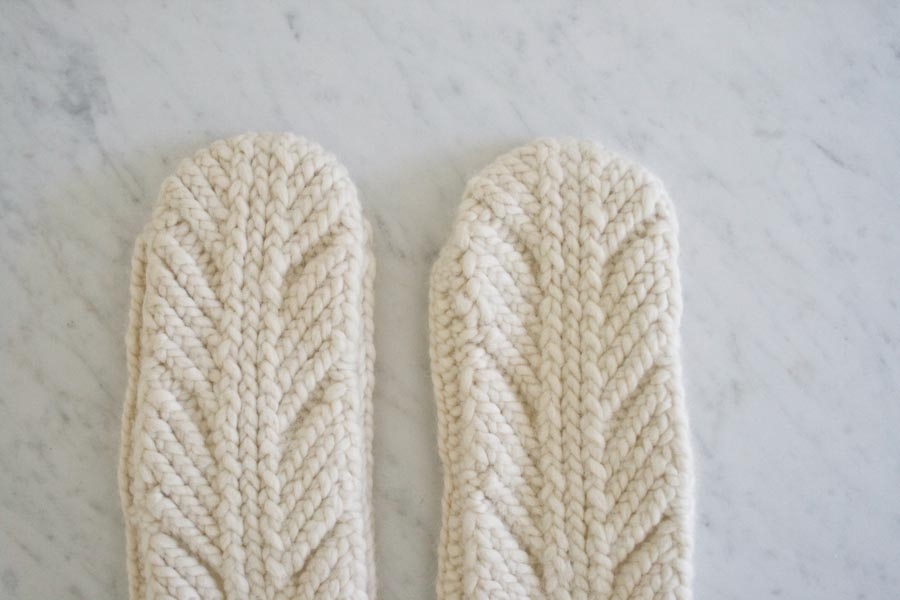
Like the naval engineer who one day spied a wire spring wobbling down his shelf and the next day invented the Slinky, I discovered the design for our Ancient Stitch Mittens quite by accident. In trying to figure out how to work a straight edge for our Ancient Stitch Scarf, the pronounced scalloped swatches I was setting aside soon struck me as the perfect mitten top.

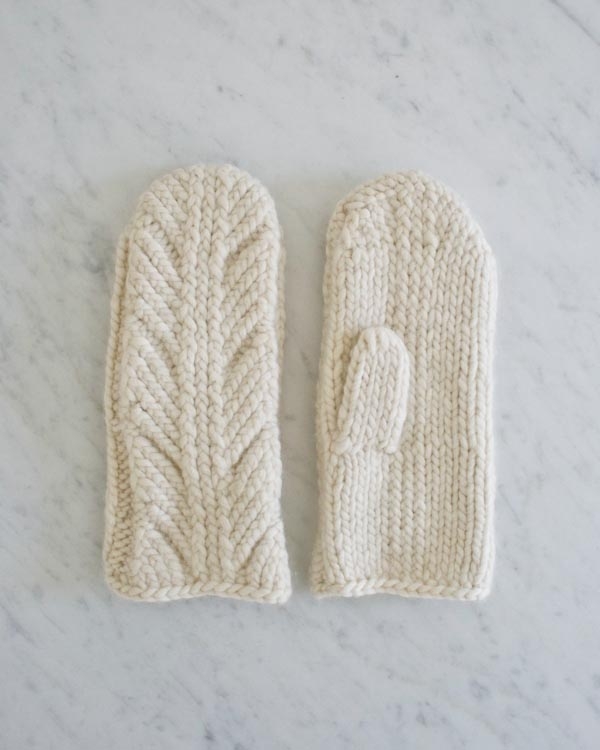
Embracing the easiest construction possible, I knit each mitten in two pieces and seamed them neatly together. Like the innate spring of a Slinky, the natural curve of the stitch pattern does most of the work here.

In our fluffy Super Soft Merino, these Ancient Stitch Mittens make a wonderfully quick and cozy project. Their design may have been a lucky surprise, but this season’s favorite mittens are guaranteed! – Kristy

Designed by Purl Soho designer, Kristina McGowan. Click here to see even more of Kristina’s designs!
Share your progress and connect with the community by tagging your pics with #PurlSoho, #PurlSohoBusyHands, #PurlSohoAncientStitchMittens, and #PurlSohoSuperSoftMerino. We can’t wait to see what you make!
Materials

To make one pair of mittens…
• 2 skeins of Purl Soho’s Super Soft Merino, 100% merino wool. Each skein is 87 yards/ 100 grams; approximately 160 (174) yards required. We used the colors Heirloom White (shown above) for size Large and Pale Stone for size Medium.
• A set of US 11 (8 mm) double pointed needles (or size needed to get the correct gauge)
Gauge
12 stitches and 16 rows = 4 inches in stockinette stitch
Sizes
Medium (Large)
• Finished circumference at palm: Approximately 8 (9) inches
• Finished length from cuff to top of mitten: 10 inches
Notes
Techniques
p tbl (purl through the back loop):
Bringing the working needle toward you (in a usual purl motion), purl through the back leg of the stitch, rather than the front. This twists the stitch.
inc (increase into purl bump):
Knit into the purl bump of the next stitch, leave the stitch on the needle, then knit into the back of the next stitch. This is a 1-stitch increase.
pfb (purl front and back):
Purl as usual into the front of the next stitch, leave the stitch on the needle, then purl into the back of the stitch. This is a 1-stitch increase.
Pattern
Back of Hand

Note: For this section you will work back and forth on two double pointed needles. Also, you will start at the top of the mitten and work down toward the cuff.
Cast 15 (17) stitches onto one double pointed needle. We used a basic Long Tail Cast On.
Row 1 (right side): P1 (2), pfb (see Notes, above), k3 through the back loop (tbl), k2tog, k1 tbl, k2tog tbl, k3 tbl, pfb, p1 (2).
Row 2 (wrong side): K2 (3), p11 tbl, k2 (3).
Row 3: Repeat Row 1.
Row 4: K1 (2), p1 tbl, k1, p9 tbl, k1, p1 tbl, k1 (2).
Row 5: P1 (2), inc (see Notes, above), p1, k2 tbl, k2tog, k1 tbl, k2tog tbl, k2 tbl, p1, inc, p1 (2).
Row 6: K1 (2), p2 tbl, k1, p7 tbl, k1, p2 tbl, k1 (2).
Row 7: P1 (2), inc, k1 tbl, p1, k1 tbl, k2tog, k1 tbl, k2tog tbl, k1 tbl, p1, k1 tbl, inc, p1 (2).
Row 8: K1 (2), p3 tbl, k1, p5 tbl, k1, p3 tbl, k1 (2).
Row 9: P1 (2), inc, k2 tbl, p1, k2tog, k1 tbl, k2tog tbl, p1, k2 tbl, inc, p1 (2).
Row 10: K1 (2), p4 tbl, k1, p3 tbl, k1, p4 tbl, k1 (2).
Repeat Rows 1-10 three more times.
Cut yarn and place stitches on waste yarn.
Make a second Back of Hand, identical to the first.
Palm
Begin
Note: For this section you will work back and forth on just two double pointed needles. And again, you will work from the top of the mitten down toward the cuff, stopping along the way to insert a thumbhole!
Cast 15 (17) stitches onto one double pointed needle.
Row 1 (right side): P1 (2), kfb, k3 tbl, k2tog, k1 tbl, k2tog tbl, k3 tbl, kfb, p1 (2).
Row 2 (wrong side): K2, p11 (13) tbl, k2.
Rows 3 and 4: Repeat Rows 1 and 2.
Row 5: P1 (2), kfb, k1, k2 tbl, k2tog, k1 tbl, k2tog tbl, k2 tbl, k1, kfb, p1 (2).
Row 6: K1 (2), p5, p3 tbl, p5, k1 (2).
Row 7: P1 (2), k5, k3 tbl, k5, p1 (2).
Repeat Rows 6 and 7 four (seven) more times. Work Row 6 once more.
Note: In the following section, you will make the thumbhole. In order to ensure a good fit and placement of the hole, lay the Palm over your fingers with your thumb extended out to the side. The top to the mitten should extend slightly over the tips of your fingers, and the bottom should graze the top of your thumb web. You can repeat Rows 6 and 7 fewer or more times as needed to adjust, making sure to end with a Row 6.
Make the Thumbhole
Left Thumbhole
Next Row (right side): P1 (2), k2 (k1); drop working yarn and join waste yarn, k3 (4); slip stitches just worked in waste yarn back to left-hand needle; pick up working yarn and knit the 3 (4) slipped stitches just made; then, k3 tbl, k5, p1 (2). Cut scrap yarn.
Right Thumbhole
Next Row (right side): P1 (2), k5, k3 tbl; drop working yarn and join waste yarn, k3 (4); slip stitches just worked in waste yarn back to left-hand needle; pick up working yarn and knit the 3 (4) slipped stitches just made; then, k2 (k1), p1 (p2). Cut scrap yarn.
Finish Palm
Starting with Row 6, repeat Rows 6 and 7 until the length of the Palm matches the length of the Back of Hand
Cut yarn and place stitches on waste yarn.
Make a second Palm, this time placing the thumbhole on the other side.
Thumb
Note: For this section you will use four double pointed needles to work in the round, as explained below.
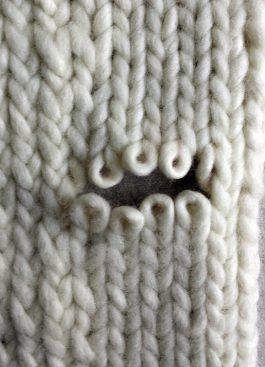
Carefully remove the scrap yarn (size Large shown here).

Slip the 3 (4) stitches below the Thumb Hole onto a double pointed needle.
Slip the 2 (3) stitches above the Thumb Hole onto another double pointed needle.

Next Round: Joining yarn, knit lower 3 (4) stitches; spin the piece 90º counterclockwise and using another needle, pick up 2 stitches (in the places indicated by arrows, above), twisting them as you place them on your needle; spin the piece 90º again and knit upper 2 (3) stitches; spin again and using another needle, pick up 2 stitches, twisting them as you place them on your needle; place marker and join for working in round. [9 (11) stitches]
Distribute the stitches evenly over the three double pointed needles.
Size Large Only
Decrease Round: K4, k2tog, k3, k2tog. [9 stitches]
Both Sizes
Knit evenly for 9 (8) rounds or 1/4 inch less than desired length.
Decrease Round: K3, k2tog, k2, ssk. [7 (7) stitches]
Cut yarn and thread it through the remaining stitches.
Make the second Thumb identical to the first.
Seam Together
With right sides facing up, place the Back of the Hand and the Palm pieces next to each other.

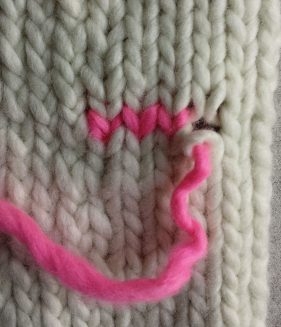
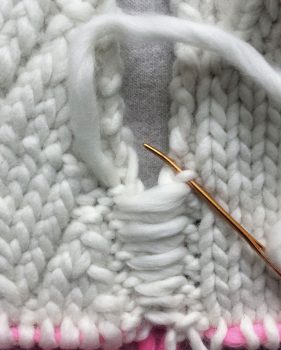
Locate the column of horizontal stitches that runs just inside each selvage. (We threaded a piece of pink yarn underneath these stitches to show them clearly here.) These are the stitches you will sew under when you seam the mitten together. Here’s how…
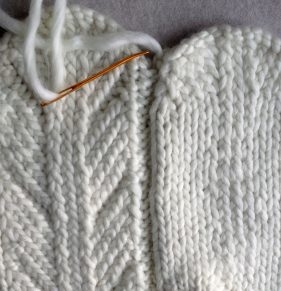
Starting at the cuff and working back and forth, use mattress stitch to seam up the first side. Carefully pull the stitches tight every 10 stitches or so.

Seam the tops together by sewing under the inside of the cast-on stitches.
Continue to seam down the other side of mitten, using mattress stitch, just as you did the first side.
Repeat for the other mitten.
Finish
Place the on-hold cuff stitches evenly onto three double pointed needles. Hold the mitten upside down, join yarn at either seam and bind off all stitches as follows: *K2tog tbl, place stitch back on left needle, repeat from * to end of round.
Cut yarn and pull it through the remaining stitch.
Repeat for the other mitten.
Weave in the ends of both mittens and block as desired.








I’ve skipped “queuing” this on Ravelry and have gone directly to adding as a new project! Love these!
Thanks, Joy! That’s great to hear that you’ll be making the mittens! Thanks for writing in!
Kristy
I weould love it if you had any patterns for 2 needle mittens. I can’t do double pointede needles
Hi Veronica!
The pattern for these mittens actually uses just two needles for everything except the thumbs. But even with the thumbs, you could conceivably also knit those on just two needles if you wanted. You could divide the 11 stitches needed to make the thumbs between two needles, say 6 stitches on one and 5 stitches on another and work each piece evenly, decreasing one stitch from each piece when you have achieved the length you want. You could leave the stitches live and place them on a piece of waste yarn, seaming the sides together and then pulling an end through all 9 remaining stitches to close the top. This should work, and you wouldn’t have to use double pointed needles. Thanks for writing in and good luck!
Kristy
If ordering the US 11 double pointed needles, should I order the 8″ length? Thanks.
Hi Noreen!
Yes! Thanks for writing in — the double pointed needles should be 8″ in length, and I will make note of it in the pattern!
Kristy
Great clear instuctions
Love the pattern! Will be giving it a try!
bellissimi !! fantastic !
I happened to get this e-mail during a day trip to New York and decided to come by your shop during a free hour – when I saw these mittens in person, I immediately bought the yarn to make them. I really love the construction, can’t wait to get started on these, and I have to say also that your shop is gorgeous in person. Wish I had more time, but your staff was so helpful and friendly that it was an effective visit. Thank you!
Hi Kaitlin,
That’s so great that you were able to visit the store! Best of luck with the mittens and thank you for your lovely comment!
Kristy
why double pointed needles??
my english is not too good…
tanks
Hi Rakkie,
The double pointed needles are used to make the thumbs, since the circumference of them is so narrow, but the rest of the mitten is created on just two needles. Hope this helps and thanks for writing in!
Kristy
When I knit row 5 I have two extra stitches… What have I done wrong? Desperate to knit these up for my Mums birthday. Yarn delivered today. I ready to go but I can’t! Help… Anyone???
Hi Niki,
What size are you making? I’m here to help figure out what might be going wrong!
Kristy
I have tried both sizes as I thought there may be a print error. Going on smaller size you end up with 15 stitches at the end of row 4. But row 5 only utilises 13 stitches…… I am increasing as in the video with makes an extra two stitches but I end up with two extra stitches even with the increases? Thanks for any help.
Hi Niki,
I’m glad you wrote! I thought it might be most helpful to go through each stitch of Row 5, and show the number of stitches you should be ending up with after each. It is possible you may be working two stitches together that you shouldn’t be, but I thought going through step by step might be the clearest way for us to figure this out. For Row 5:
P1 (1 stitch)
inc (1 stitch becomes 2)
p1 (1 stitch)
k2 tbl (2 stitches)
k2tog (2 becomes 1)
k1 tbl (1 stitch)
k2tog tbl (2 becomes 1)
k2 tbl (2 stitches)
p1 (1 stitch)
inc (1 stitch becomes 2)
p1 (1 stitch)
This should give you 15 stitches at the end of Row 5. Please let me know if this helps and if not, we’ll get to the bottom of the problem another way!
Kristy
I had problems with 5 also – I misunderstood that when you say increase you mean create the new stitch and work the stitch you created it from – 2 stitches. I was creating the new stitch only and the stitch I created it from I worked as the next stitch – just so you know why some of us are having an issue with that row!
Thanks, Anita! And yes! The “inc” or “increase into purl bump” is a bit of an unusual increase, and it’s helpful that you wrote in to share your experience with us! We also posted a video clip of the “inc” to help in case others might be getting stuck. Thanks a lot and good luck with the mittens!
Kristy
This row 5 is not working for me. I have done it over at least 10 times. Decided to just pearl the last three stitches. Oh well!
Got it!! Yes!!!! Just had to write that I could not find success and then.. tada!!?
Hi Elizabeth,
I’m sorry to hear you are having trouble with this row! If you are off by three stitches at the end, I suspect the issue may be with the increase, or possibly you are working the knit 2 tbl as a k2tog tbl. When you are working the increase, you will knit the purl bump and then knit the actual stitch as part of the increase before knitting or purling the following stitch.
I hope that clears things up!
Julianna
I cannot wait to start need to order the wool thank u for inspiration
Hello,
From the pictures it looks like you are knitting the front and back on circulars but it says double pts. Help me to understand please.
Want to make these for our daughter!
Hi Mary!
Thanks for writing! I made the fronts and backs of the mittens (the back of hand and palm) in two separate pieces, using two 8″ double pointed needles. You could use a circular needle for these two pieces if you wanted! The reason I used doubled pointed needles is because I use them later to make the thumbs. The circumference of the thumbs is so narrow that I needed to use the double pointed needles to make them. I hope that this helps clarify and that you’re able to make a pair for your daughter! Best of luck!
Kristy
Hello! Great pattern!
I was wondering how I could transfer this goergeous pattern to knit it in the round? I have made mittens in the past and the sewing joint was always stiff and showing. I now knit them in the round and find it more convenient. Do you think it would be possible with this pattern?
Thanks!
Christine
Hi Christine!
I’m with you, I love knitting in the round! What just makes this pattern challenging to convert is that for the tops of the mittens, I took advantage of the stitch pattern’s inherent nature to curve and scallop at the outset, and I’m not sure how one could easily replicate the look of this edge in another way. I will say that the seams for the sample pairs did not end up being overly stiff and they might provide a better experience than ones you’ve had in the past.
Thanks for your great question,
Kristy
I also prefer knitting in the round, since I often find seams bulky. While knitting up a pair (wonderful mittens and thank you for introducing me to my new favorite increases!) I wondered if it might be possible to join the back and palm after the top most scalloped portion and knit in the round from there on, leaving only the cast on edge and the top few rows to join. My guess is that this will make the final construction quicker, being able to cast off right away instead of using waste yarn and coming back to it later, reducing the seaming by 2/3, and resulting in fewer ends to weave in.
Will the scalloping show up in the second and third repetition of the pattern? While thinking through the pattern tells me no, the mittens I made have a slight curve to them, which may be an expression of the scalloping. If so, joining and working in the round may not work. What do you think?
This knit up so quickly (up until the seaming) and elegantly, that I may try this modified process with another pair.
Hi Mim,
Thanks for writing in and for your kind words! I am a fan of working in the round as well. For this pattern, the complexity of the stitch pattern makes it challenging to knit in the round and we only have it available as a flat pattern. You can certainly give converting the pattern to knitting in the round. I think that it will take a fair amount of trail and error but if you like a challenge, I would give it a go!
Apart from the rounded top, there is no real shaping to these mittens so if you are able to figure out the stitch pattern in the round, it may well work!
Best,
Cassy
These are BEAUTIFUL! A perfect for holiday gift giving and of course one pair for me too! 🙂 Thanks Kristy!
THANK YOU FOR BEATIFUL PATTERNS FOR MITTENS
Love this pattern — stayed up last night after work and made both fronts…. thanks Purl Soho!
Wonderful to hear, Margaret! Good luck making the mittens!
Hi, I would love to knit these mittens but never made mittens before and before I purchase the yarn, I was wondering what level of experience is needed. Thank you.
Hi Nancy,
The construction of the mittens is very simple in that you basically knit two pieces and seam them together. But what might put the experience level at intermediate would be the stitch pattern itself. If you’re familiar with how to knit two stitches together and working through the backs of stitches, you should have no trouble at all. There are also clips to show any of the stitches you may not be readily familiar with. The thumb is made on double pointed needles, and again, I think this would place the experience level at intermediate. There is nothing too tricky about how the mittens made, it just depends on what you’re comfortable with. Also, if you get stuck in any part of the process as you try them out, we’re hear to help!
Kristy
Kristy, thank you for getting back to me. I took the plunge and ordered the yarn. Can’t wait to get started.
That’s great, Nancy! If you get stuck in any way, please let us know! Good luck!
Love this beautiful pattern and started yesterday immediately after receiving the email! Perfect Christmas presents! Okay, so I’m ready for the thumbs (smaller size) and I’ve run into trouble. Looking at the thumb hole I have 3 stitches on top and 2 on the bottom rather than the other way around…. Everything seems right. My mitten is facing the right way 🙂 What gives!?!?! Any suggestions? Would it be a problem if I had 2 on the bottom and 3 on the top?
Hi Jackie!
When you work the thumbs (with three stitches on the bottom and two on top), your work will have the cast on, scalloped edge at the bottom. However, when you wear the mittens, the scalloped edge is of course on top, and this may be what’s causing confusion as to whether your work is facing the right way. But with that distribution, you’re absolutely on track and working the thumb correctly! I hope this helps clarify! Good luck and thanks for writing in!
Kristy
Thank goodness! They turned out beautiful. Thank you so much.
Wonderful to hear, Jackie!!
Kristy I have one question regarding the increase on row 5. Do you hold the working yarn in the front or back? I looked at the video and she is holding the yarn as to knit. thank you for your help.
Hi Nancy! You’ll want to hold your working yarn to the back when working the “inc.” I hope this helps and please let us know if you have any further questions!
Kristy
I finished the first 10 rows. The directions read to repeat rows 1-10 3 times. My question is and maybe I can’t see it yet but isn’t the first few rows shaping of the mitten? Why would you repeat them in the middle of the work?
Hi Nancy,
It’s a great question! The ends of the stitch pattern scallop and curve and help to create the mitten tops, but the middle section does not curve (even though you are repeating those same 10 rows) and will work up straight and even. The length of the mitten is 40 rows total, so after completing the first ten you will work rows 1-10 3 more times. Hope this helps and thanks for writing in!
Kristy
Your pattern is wonderful! Can’t wait to wear them! I noticed your selvedge rows are so nice and tight and mine aren’t:( I know it doesn’t really matter as the sides will be seamed but I was just wondering if you were doing a little something to keep them so neat. Thank you!
Hi Cynthia! We’re so glad you like the pattern! Selvedge edges can definitley tend to be a bit wonky for a lot of us, and you’re right that mercifully with seaming them we don’t have to worry about them too much. One easy fix that can help a lot is just to be mindful as you start each row, to pull your starting stitch slightly tighter. In doing this, you’ll likely get to a point where it will simply happen naturally and it can go a long way in keeping those edges in line and tight. Let us know if this helps and good luck! Thanks for writing in!
Kristy
These look lovely & so simple to whip up! I can’t wait to get some yarn & get started. Is there a way perhaps to add a second color? Maybe adding a cuff, as in the felt mittens w knitted cuff? Also, do you suggest any particular hat to coordinate with these? Thanks again for the pattern!
Hi Kristin!
Adding a cuff in a second color would be easy to do, and one way you could try it would be to work Rows 1-10 two more times (instead of three more times as instructed) and to work those last 10 rows as a cuff instead, say 2 x 2 rib or any non-curling stitch pattern, in any color you’d like. Our Boyfriend Hat and Classic Cuffed Hat would both coordinate very well, you could even make the pom pom for the Classic Cuffed Hat in the same color as the mitten cuffs. Good luck! And please let us know if you have any further questions! Thanks for writing in!
Kristy
Hi there,
I’m having some problems with the thumb on the large size. I knit the bottom four stitches, and then pick up two stitches counterclockwise – do I also knit those two stitches before knitting the top 3, so that I am knitting one complete round before I begin the thumb?
Thank you!
Hi Christine!
For the size Large thumb, you will pick up and knit the bottom four stitches, pick up two stitches on the sides counterclockwise, knit the top three stitches and end with picking up two more stitches on the other side. You will pick up the side stitches to start and will not work them again until the following round. The following round is a decrease round, where you will work the bottom 4 stitches, knit the two side stitches together, work the top 3 stitches and work the remaining two side stitches together, for a total of 9 stitches at the end of the round. Let us know if you get stuck when doing this in any way and please let us know if you have any further questions! Thanks for writing in!
Kristy
Hi!
I’m a huge Purl Soho fan … thank you for all the beautiful patterns!
As I’m knitting this pattern, I’m noticing that one side of the back mitt (from the centre) looks different from the other side and I’m wondering if it was because for the even numbered rows, there’s a k2tog on one side and a k2tog tbl on the other side. I’m also a continental knitter so that may have something to do with it. Should I be doing one of my k2tog’s looser or tighter?
Thanks!
Rose
Hi Rose,
It can sometimes be a bit tricky with this pattern to see exactly how the stitches are coming together until you’ve worked a full repeat (10 rows), but the stitches will appear to mirror each other on the right and left sides for the Back of Hand piece. As a continental knitter, I can assure you that that won’t affect how the stitches are worked, and as long as your tension is consistent throughout, that should also not be a problem! Please let us know if this helps clarify and if not, we’ll find another way to figure it out! Thanks for writing!
Kristy
Thanks for the quick reply, Kristy! (I realize I said even numbered rows when I meant odd numbered rows.)
I’ve worked up to almost one full back side but will continue. And thanks for confirming my continental knitting will work just fine!
Rose
Hi Kristy,
I am almost done with the mittens! What is the best way to block them? Yours look so wonderful in the picture.
Thanks.. Nancy
Ni Nancy!
That’s great to hear that you’re almost done! The way I blocked our sample was to wet block them by putting them in a bath of room temperature water, then gently squeezing out the excess water and rolling them in a towel. I then shaped them a bit and let them air dry. I found this helped set the stitches well. Good luck with it and please let us know if you have any further questions!
Kristy
What beautiful mittens! I have found my weekend project! My hands are small, just barely over 3″ at the palm and I would like to trim this down by an inch without messing up the pattern. What would be the best way to do this or do you think sizing down the needle would work?
Thank you.
Hi Rene,
Thanks for writing and apologies for the delayed response! There are a few ways to try to decrease the circumference of your mittens by an inch (a total of three stitches in the pattern’s gauge). Working the Super Soft Merino on a smaller needle (a size 9, for example) would provide a denser knit and could decrease your width by inch, and might be the easiest solution. There is no way to decrease stitches within the pattern without altering the look of it, but a smaller needle might work. You could also try knitting up a swatch on a finer weight yarn (like our Worsted Twist on size 8 needles), and seeing how wide a swatch of the stitch pattern is in that yarn. For any additional width you might need, you could add a few knit stitches on either side of the central pattern. We’d be happy to help you figure out the math if you decide to try an alternate yarn, please just let us know. I hope this helps and send good luck!
Kristy
Hello! Did you block before or after you stitched everything together? In finding my palm pieces are rolling up on themselves a bit and I’m thinking it’ll be easier post blocking to stitch? Thanks for your thoughts!
Hi Eleanor,
Thanks for writing in! For these mittens, we blocked them after they were sewn together and the ends woven in. If you are having difficulties with pieces rolling up, you can definitely block them before sewing them together. I hope that this helps!
Happy knitting!
Cassy
I’m nearly finished with the first palm after doing the two backs very quickly last night! I really enjoy the look of the stitch pattern on the backs, but I would have enjoyed it even more if it were in a chart. I sometimes have trouble reading instructions like this when they’re written out and find that a chart is clearer.
Hi Kathryn,
Thanks for writing in and for the suggestion! We will certainly keep your request in mind for the future!
Best and happy knitting!
Cassy
Hi Kristy/purl bee!
these are so beautiful! I hope to make them as a Christmas present for my mother. I wanted to use us size 10 rather than 11 though – would that change the pattern much? Appreciate your advice! Thank you!
Hi Angela,
Thanks for writing in! I would suggest knitting a gauge swatch with US 10 needles. If you can get the gauge we suggest here, you should be all set to go with the smaller needles. If your gauge is off, it may result in smaller mittens. Depending on how much smaller, they may fit or they may be too small! Starting with a gauge swatch is a good way to judge before you begin!
Best,
Cassy
Is it possible to amend the pattern slightly for 6mm needles please ? Thank you!
Hi Angela,
Thanks for writing back! At present we do not have the resources to gauge these mittens down to work with smaller needles. You may be able to add a few stitches to the selvedge on each side and complete an extra repeat of the pattern but this will certainly take some trial and error as I expect that difference in gauge using 6mm as opposed to 8mm needles will be significant. If you are up for a bit of a challenge, you should certainly take a stab at it!
Best,
Cassy
Knitting the mittens has been an enjoyable breeze. But the thumbs! Directions say knit bottom 3 stitches. On another needle pick up 2 side stitches. Then knit 2 top stitches etc. Question is: do I knit the two stiches i pick up before knitting the top 2 stitches? If I dont i have a long unknitted strand of yarn between the top and the bottom. I am not an expert knitter. Please clarify. Thank you
Hi Laurie!
Thanks for writing in! The two stitches that are picked up on the side are knitted as you pick them up so that way none of the stitches are too tight and you don’t have a long float behind those stitches.
I hope this helps!
Carly
Hi Carly. That explains everything. Perfectly clear now. Thanks for replying so quickly. I cant wait to wear my mittens before wibters over. Lol.
Laurie
I have never heard of knitting 2 together when the stitches were just cast on. Is this an error? It would be helpful if there were an indication of how many stitches are intended on rows you have several increase stitches, unless k or ptbl is NOT meant to increase. Photo looks good, but pattern not working out
Hi!
Thanks for writing in! The k2tog and k2togtbl in the first row are correct! You will work them as normal, it will just be into the cast on row. It may feel a bit weird but it does work!
Additionally, all rows on the back of the hand begin and end with the same number of stitches. When you ktbl or ptbl, this does not add stitches but rather just twists them. When you kfb or pfb, this will add a stitch but there are corresponding decreases in each row for every increase. For example, in row 1, you will P1 (2), pfb, k3 through the back loop (tbl), k2tog, k1 tbl, k2tog tbl, k3 tbl, pfb, p1 (2). Here you increase by 2 but you also decrease by 2. I find that it is sometimes helpful to write this out with the increase and decrease noted.
P1 (2)
pfb ADD 1 STITCH
k3 tbl
k2tog DECREASE 1 STITCH
k1 tbl
k2tog tbl DECREASE 1 STITCH
k3 tbl
pfb ADD 1 STITCH
p1 (2)
Overall, this stitch pattern can take some getting used to but once you do, it flies!
I hope that this clears things up!
Cassy
Hi there,
I am thinking about making these with an extra skein of the linen quill that I have – do you think that the yarn would work for the pattern? Should I consider doubling the yarn? Any advice on how to convert the instructions would be very appreciated!
Thank you,
Juliana
Hi Juliana,
Thanks for reaching out! The jump from fingering weight Linen Quill to bulky weight Super Soft Merino is quite drastic and mittens, unlike scarves or blankets, do need to be knitted at the correct gauge for the pattern so that the shaping all works out and they turn out the right size. If you are going to give it a go, I would recommend knitting a gauge swatch using Linen Quill tripled or possibly quadrupled to see if it will turn out the correct gauge. We do have a different mitten pattern that is written for fingering weight yarn that you might want to consider instead! I would recommend taking a look at our Long Lovely Mittens since they will work with Linen Quill without any alterations.
Best of luck and happy knitting!
Julianna
Hi Julianna,
Thanks for the feedback and the alternative! I will experiment a bit.
Best,
Juliana
Are those mittens difficult to make? I used to be an intermediate knitter but have not been knitting since my university times. And now I’m a semi retired citizen, dreaming great yarn dreams.
Hi Milla,
Thanks for reaching out! I would consider these an advanced beginner to intermediate pattern – although the mittens are small, there are quite a few techniques going on! You will need to increase and decrease, work on double pointed needles, and seam the mittens together. We do however have tutorials for all of these methods linked in the pattern or on our Tutorials page, so if you are up for a bit of a challenge, these could be a great way to get back into the swing of things, and we are always here to help if you run into any questions!
Best,
Julianna
Hello, I’m excited to try to make these beautiful mitts. Why are we using 2 double pointed needles instead of two regular straight needles?
Thanks
Hi Mila,
Great question! Since you will need the double pointed needles no matter what to work the thumb of the mittens, we chose to work the entire mitten on double pointed needles so that you only need one type of needle. However, if you have straight US 11 needles, you could certainly use them for the main part of the mittens if you prefer!
Happy knitting!
Julianna
I would like to make these mittens in a size 6, small. How would I convert the pattern?
Also, I’m using a 100% wool, same weight and yardage as the supersoft merino. US 11’s seem like a big needle for this project.
Thanks,
Susan
Hi Susan,
Thanks for reaching out! Unfortunately we do not have instructions for knitting a smaller size of these mittens, as the stitch pattern extends all the way to the edge of the mittens for the medium, so the cast-on can’t be reduced. Super Soft Merino is a super bulky yarn that knits up very nicely on US 11 needles, but I would recommend knitting a gauge swatch to make sure your yarn will work for the pattern.
Best,
Julianna
Hi Susan,
I’m thinking about making some of these beautiful mittens for my 3 year old Granddaughter so putting a worsted yarn on a 4.5-5mm needle. The pattern could still be done over the 15 stitches then a person would only have to tweak the length. Or maybe it would be a DK yarn over 3.5-4.5 mm needles.
Best of luck with it! Erica in Alberta
I love this pattern and almost done with my first back of hand. My one issue is that I like to have ribbing at the base of my mittens to keep the cold out! Do you think that would be a good idea?
Hi Marcella,
Thanks for reaching out and for your kind words! I think you can easily add a ribbed cuff to this pattern!
All the best,
Gianna
Hi! Thank you so much for this pattern. This is my first set of mittens–what does it mean to join in the working yarn on the thumbs? Do I just use a separate piece of yarn and knit with that? How much of a tail should I leave? Thanks in advance!
Hi Arianne,
Thanks for writing in! Yes, when we say join the working yarn it just means to pick up and start knitting the on hold stitches for the thumb with your yarn! I would recommend leaving at least a 4″ tail so you have enough to leave in at the end!
Happy knitting!
Gianna
Hi! I really want to make these mittens but I am stuck on the thumb hole instructions. I don’t understand how to make the thumbs at all. Could you please help simplify this as these will be my first attempt at making mittens!
Hi Emily,
Thanks for reaching out! I am happy to help! After you have finished the palm you will first make the left side thumb home and then the right. For the left side thumb hole you will either P1 (or 2 depending on the size you are making), then k2 (k1); you will then drop your working yarn and begin using a waste or scrap yarn. With this scrap yarn you will then k3 (4); then you will slip the stitches you just worked in the scrap yarn back to left-hand needle; Then you will pick up your original working yarn again and knit the 3 (4) slipped stitches just made; you will then continue on, k3 tbl, k5, p1 (2). Cut scrap yarn.
I hope this helps and please let me know if you have any more questions!
Warmly,
Gianna
Hi, I actually meant when you knit them on the double pointed needles. I tried doing it following the directions, but the pattern wasn’t stockinette, it was the opposite therefore not matching the rest of the glove 🙁 i don’t understand the bind off either and how to get it to look neat like the photo. i tried binding off using the directions but it just didn’t make sense. could you please help me with this?? Also sewing the gloves together was hard as the palm kept curling so i couldn’t see the bar you need to sew under. I made a left handed mitten but the thumb came out wrong and i stitched it together very sloppy since i couldn’t figure out the mattress stitch :’(
Hi Emily,
Thanks for your response! You can send some photos to our team at customerservice@ourlsoho.com and we can troubleshoot further from there and come up with the best solution to get your mittens on track!
Warmly,
Gianna
Hello,
I purchased two skeins of the super soft merino in two different colors without a real plan for them. Now I’m thinking of using them for these mittens. Do you think it would work okay to knit the tops in one color and the palms in another? Or perhaps stripping them?
Hi Adrienne,
Thanks for writing in! I think that knitting the tops and palms in different colors is a great idea and will make for some very cool mittens. Let us know how it goes if you decide to try this!
All the best,
Lili