
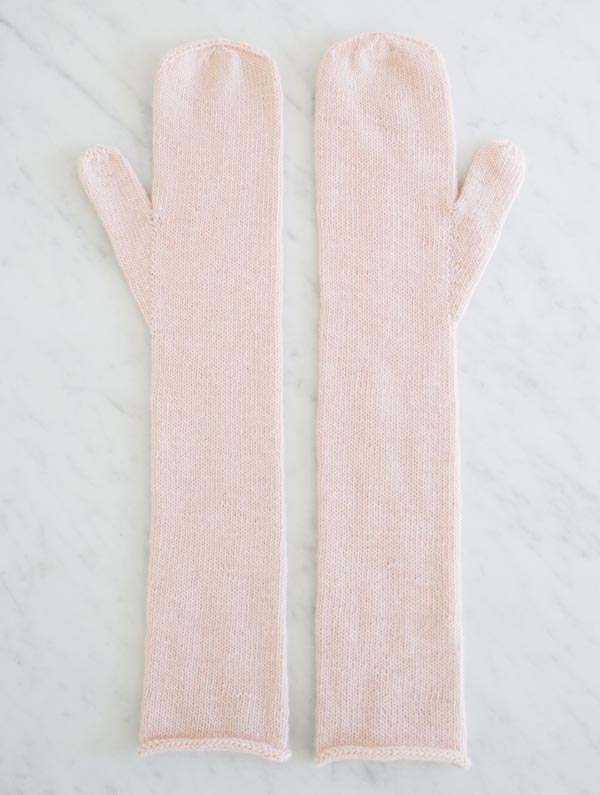


Long Lovely Mittens
As the temperatures drop and the layers build up, wintertime apparel slowly claims our womanly physiques, sometimes making it a struggle to feel like a lady at all. A dash of red lipstick can do wonders, but the best way to fight off that down-coat-yeti look? Beautiful accessories! A soft cabled hat, a brilliantly colored wrap, or my answer this season, these Long Lovely Mittens.

Reaching just shy of the elbow, the mere gesture required to slip on these mittens suggests a certain elegance. Purl Soho’s newest merino yarn, Line Weight, is perfect for this pared-down design. The stockinette fabric is incredibly soft to the touch, and it emits a gentle glow that is just right for winter’s harsh reality.

Pair these Long Lovely Mittens with anything. Even if they get buried under all those layers, having them on will definitely add an extra swing to your step. -Laura

PS: These require just one skein of Line Weight, a perfect holiday gift knit!
Designed by Purl Soho designer, Laura Ferguson.
Share your progress and connect with the community by tagging your pics with #PurlSoho, #PurlSohoBusyHands, #PurlSohoLongLovelyMittens, and #PurlSohoLineWeight. We can’t wait to see what you make!
Materials

- 1 skein of Purl Soho’s Line Weight, 100% merino wool. Each skein is 494 yards/ 100 grams; approximately 494 yards required. We used the color Ballet Pink.
- A set of US 2 (3 mm) double pointed needles
- A set of US 4 (3.5 mm) double pointed needles
- 2 stitch markers
- A stitch holder or scrap yarn
Gauge
34 stitches = 4 inch in stockinette stitch, using smaller needles
Sizes
Small/Medium (Medium/Large)
- Circumference around palm: 6½ (7½) inches, stretching to 7¼ (8¼) inches
- Length from cuff to mitten top: 17 (17¾) with adjustments given in the pattern
Pattern
Begin with Rolled Cuff
With the larger needles, cast on 54 (62) stitches, distributing them onto three double pointed needles. We used a basic Long Tail Cast On.
Place marker and join for working in the round, being careful to not twist the stitches.
Knit one round.
Change to smaller needles; work in stockinette stitch, knitting each round, until piece measures 10 inches from rolled edge.
Shape Thumb Gusset
Round 1: K27 (31), place marker (pm), make 1 left (m1L), k1, make 1 right (m1R), pm, knit to end of round. [56 (64) stitches]
Round 2: Knit.
Round 3: Knit to marker, slip marker, m1L, knit to next marker, m1R, slip marker, knit to end of round. (2 stitches increased)
Rounds 4 and 5: Knit.
Repeat Rounds 3-5 seven (eight) more times. [72 (82) stitches total; 19 (21) stitches between the markers]

Next Round: Knit to first marker, remove marker, slip next 19 (21) stitches onto a stitch holder or scrap yarn, remove next marker…

…then, with the wrong side facing you, cable cast on 3 stitches…

…now, with the right side facing you, join to left side of Thumb Gusset and continue to knit to the end of the round. [56 (64) stitches]
Knit Hand
Knit evenly until piece measures 3 3/4 (4) inches from the base of the thumb (where you cable cast on stitches) or until 3/4 (1) inch from desired finished length.
Shape Mitten Top
Set Up Round: K28 (32), pm, knit to end.
Round 1: *K1, k2tog, knit to two before next marker, ssk, repeat from * to end of round. (4 stitches decreased)
Round 2: Knit.
Repeat Rounds 1-2 zero (two) more times. [52 (52) stitches]
Repeat Round 1 two more times. [44 (44) stitches]
Next Round: *K1, k2tog, k3, ssk, k7, k2tog, k3, ssk, repeat from * to end of round. [36 (36) stitches]
Next Round: Repeat Round 1. [32 (32) stitches]
Next Round: *K1, k2tog, k2, ssk, k3, k2tog, k2, ssk, repeat from * to end of round. [24 (24) stitches]
Next Round: *K1, k2tog, k1, ssk, k1, k2tog, k1, ssk, repeat from * to end of round. [16 (16) stitches]
Next Round: Repeat Round 1. [12 (12) stitches]
Cut yarn and thread it through the remaining stitches.
Finish Thumb
Slip the 19 (21) stitches that are on hold onto two double pointed needles.

Hold the mitten so that the gusset is on the left; join yarn leaving a 10-inch tail.
Knit 8 stitches from the front needle. With another double pointed needle, knit the remaining stitches from that front needle and then knit from the back needle until there are 8 stitches on the working needle. With yet another double pointed needle, knit the remaining stitches from that back needle and then pick up 3 stitches from the base of the thumb. [22 (24) stitches]
Place marker and join for working in the round.
Work in stockinette stitch until piece measures 2 inches from the base of the thumb (where you picked up the 3 stitches) or until 1/8 inch from desired finished length.
For Small/Medium Size Only
Round 1: *K1, k2tog, repeat from * to last stitch, k1. [15 (–) stitches]
Round 2: *K2tog, repeat from * to last stitch, k1. [8 (–) stitches]
For Medium/Large Size Only
Round 1: *K1, k2tog, repeat from * to end of round. [– (16) stitches]
Round 2: *K2tog, repeat from * to end of round. [– (8) stitches]
For All Sizes
Cut yarn and thread it through the remaining stitches.
Weave in the cast on tail and the tail at the top of the mitten and the top of the thumb. Then use the tail at the base of the thumb to carefully sew up the gap.
Make another identical mitten.


Elegant and practical-a perfect blend! I hated the draft up the sleeves and this would eliminate that feeling! Great pattern!
Love, love, love. Reminiscent of long, white evening gloves. But better.
Just ordered some of the line weight yarn, and it is quickly growing on me. Am new to knitting, and this was my first experience with yarn of this type. In the beginning, it felt as though I was knitting with tooth picks and dental floss. However, the further I go, the better it gets. So soft.
It is perfect for these mittens!
I definitively love these long mittens! 🙂
I like how simple but yet elegant they look.
I love them! It's a great pattern not only for knitting in hand but also for a knitting machine! great job! and thank you very much for this pattern!
Do you have a way to make these gloves?
Lovely mittens. I plan to make. Is there a similar pattern for fingerless gloves using the same yarn?
Thank you.
Hi Cynthia-
Yes, we have a long handwarmer pattern in this same yarn here: https://www.purlsoho.com/create/the-purl-bee/2013/10/17/line-weight-colorblock-hand-warmers.html
You could do it all in one color for a similar look.
Thank you!
Molly
Hi Cynthia-
Yes, we have a long handwarmer pattern in this same yarn here: https://www.purlsoho.com/create/the-purl-bee/2013/10/17/line-weight-colorblock-hand-warmers.html
You could do it all in one color for a similar look.
Thank you!
Molly
how beautifil, thanks for sharing !! I am going to try this as soon as I finish my crochet socks 🙂
Hi Rebeckah-
The full pattern is posted above.
Please let us know if you have any more questions!
Molly
I just love these mittens! They look so glamorous and luxurious, I can't wait to knit a pair for myself!! 🙂
Do you think Anzula "Cloud" could be used for these? I have some in my stash and I am looking for a project.
"With the larger needles, cast 54 (62) stitches onto three double pointed needles."
This read to me at first as if i ought to be casting onto three double pointed needles held together, which is clearly not the case. It makes more sense to instruct to cast on with larger needles, then join in the round, distributing the stitches evenly over three DPNs, being careful not to twist.
Hi Caitlin,
Thank you for writing in and sharing your experience with us and our readers about this pattern. I have re-worded the pattern above.
Best,
Laura
Marilyn,
Anzula's Could would be so very lovely for this pattern. It is going to feel a bit thinner while you're working it, but that 10% of cashmere should bloom beautifully, filling them out a bit. Let us know how they end up!
Laura
Do you think I could knit these up in the gorgeous Jade Sapphire 2 ply cashmere? Would I need to change needle size to get the same gauge?
Hi Kerist,
Jade Sapphire's 2-Ply Cashmere will be a lovely substitution. US #2 needles might work, but I would definitely swatch first to make sure. Here is a link to swatching in the round… https://www.purlsoho.com/create/knitting-tutorials-working-rnd/2012/3/16/swatching-for-circular-gauge.html
Thanks,
Laura
These are beautiful. Can you use circular needles instead of double-pointed needles? I've never worked with double-pointed needles and they seem pretty complicated.
Thanks!
Hi Elizabeth-
You will need to use double points for this project but they aren't that hard! Here is an easy to follow tutorial!
https://www.purlsoho.com/create/knitting-tutorials-working-rnd/2008/7/25/double-pointed-needles.html
Thank you!
Molly
Is it possible to transfer this pattern into a smaller size for al little girl? Can you give me some advice? Thank you!
Hi Es,
Unfortunately right now we only have these mittens in adult sizes. I appreciate your request though and hopefully this fall / winter we will be able to resize these for kids.
If they were worked at a larger gauge, I would suggest finding a smaller yarn and following the pattern as is. But since the are already in such a fine yarn, I don't have any quick fixes for modifying the pattern.
Please stayed tuned and thank you again for the interest. We will try and get some kids mittens up on the blog soon!
Laura
Hi… So I am part way through knitting these mittens ( a version that is shorter) as a holiday gift (early) I have just finished the thumb gusset and I slipped it on my hand to see how it was looking and… It’s HUGE. so I checked my gauge and The gauge is actually smaller than the recommended. (6 sts to every inch) which is Okayish but shouldn’t that mean the mitten is smaller? (Sorry if this contains some sort of blunt mistake) Thanks for your time!
Hi Emma-
Your gauge is actually much bigger than the gauge of this pattern. The pattern’s gauge is 8 1/2 stitches per inch and the cast on (for the smaller size) is 54 stitches. 54 stitches divided by 8 1/2 stitches per inch will yield a mitten with a (roughly) 6 1/2 inch circumference. Now let’s plug in your gauge: If you cast on 54 stitches at 6 stitches per inch (54/ 6) you will get a mitten with a 9 inch circumference!
It’s really important to get a precise gauge when you are making something like this that needs to fit. The needle size is just a recommendation, you should always use whatever size needle you need to get the gauge. Personally I usually go down 2 needle sizes because I am a loose knitter (which it sounds like you are too!) So I would recommend ripping the mitten out and experimenting with smaller needle sizes until you get to the 8 1/2 stitch gauge.
Thanks so much for getting in touch and please let us know if you have any more questions!
Best-
Molly
AH I see thanks you for explaining how gauge works. I needed that. I am actually using size 1.5 (US) needles I know I’m a bit loose so I figured a smaller needle wouldn’t be too bad… though I kinda hate gauging (I understand I am not alone in this?) So I will try to modify the number of stitches cast on to get the right measure with my gauge? Good idea? Horrible Idea?
By the way thank you guys for being so AWESOME and replying so fast 🙂
Hi Emma-
For something like a scarf this would be a good idea but for something like a mitten which has to fit precisely I’m afraid it won’t work without altering the pattern significantly. You have to keep in mind that you would also have to adjust for the thumb, which isn’t as simple of a calculation (since you will have to shape the thumb gusset.) So unless you have a lot of experience re-writing patterns I wouldn’t suggest you try this pattern with such a different gauge.
You are certainly not alone in disliking making a gauge swatch! But unfortunately it’s unavoidable if you want to make something like a mitten, hat, or sweater that needs to fit correctly. Sorry! I don’t like doing it either but I always regret it when I don’t!
If you want to stick with the gauge you’re getting you might find something that would work in our other mitten and handwarmer patters: https://www.purlsoho.com/create/category/knit/projects-knit/accessories-projects-knit/mittens-gloves-hand-warmers-projects-knit/
Thank you so much for getting in touch and let us know if you have any more questions!
Molly
Hi. Me again, So, If I cast on 39 sts at current gauge (6/in) I should get roughly the same size mitten?
Hi Emma-
Please see my response above.
Best-
Molly
Laura,
I have had a pretty tough year that started last November . I have been to the doctor more than I can count and in and out of the Hospital. They know what is happening to my body but not why. I have not kept up with my email at all and now have over 5000 notes to read. This morning way early, (3 A.M.), I woke my husband from a nightmare and then couldn’t get back to sleep. I finally got up and started going through emails. Then I got to yours from yesterday. Actually I don’t know if you had one yesterday. What I did do was start exploring the “new look”. There were so many things in knitting that I had not seen before. Most likely because they are buried in back pages of mail yet to be read, as I would never delete anything from Purl Soho. I kept on looking at pattern after pattern that caught my eye, because now you have these beautiful pictures. I haven’t even gotten out of knitting yet! Laura, what I wanted to tell you especially is… I’m a recent knitter. My mother handed me a prepared embroidery hoop and a floss threaded needle at the age of four. I’ve been doing needlework ever since. She taught me how to sew on a machine the summer after first grade making a terry cloth swim suit cover up, yes terry cloth. She didn’t want me to get lazy and not pay attention. When I sewed up a seam it had better have been right. I can tat. I do quilling. I smocked my children look-alike outfits for Christmas, Easter, and each of their birthdays until we finally looked at our son at the age of 7 1/2 at his sister’s 9th birthday and said this is your last smocked outfit. He still wanted them but we felt he was just too old to wear them. This was 28 years ago. I have also done some needle felting and other crafts. I just don’t feel comfortable with my knitting yet though I’ve been doing it for 3 years. The thought of a sweater gives me chills. Looking through your posts I feel like I can do something other than washcloths, simple cowls, simple shawls and simple scarves. My husband only gets paid once a month, but I intend to be buying this yarn in November to make my first thing out of the box so to speak. It will have curves and a thumb because you have explained it so well that I know I can do it. Thank you so much Laura!
TerriSue.
I cannot express to you how touching your message is. It bring all of us here on the Purl Bee team and at Purl Soho great joy to hear of your experience with our site. We all wish you the best, health and happiness and of course… loads of crafting time! And of course, please reach out to us with any knitting questions that may arise. It sounds like with your background in needlecrafts you’ll be making sweaters in no time!
Thank you for sharing with us.
It means more than we can say in words.
Sincerely,
Laura (and then entire Purl Soho company)
Gosh. I just love this pattern. I am knitting it with Shepherd’s Wool worsted spun fine Merino wool. It is gorgeous. I will also order the recommended Line Weight yarn and make a second pair … and more. Thanks for sharing this wonderful pattern!
I made a second pair of these in Gray Fig. The first pair I knitted where size large, way to big. The second I made in small/medium fit just right! I love them! I can’t wait to make another pair! I purchase my yarn on line. I do go to many places to check the color of the Purl Soho yarns. If a slight description of the color was added to the site, it would make making a color choice so much easier!
Ok, this might seem a bit strange….but I’m am knitting a pair of socks….I hate the options for the “toe”….I’ve been looking for other styles,but can’t seem to find what I’m looking for! I wanted it round, like your glove….(above)….I just happen to have 64stitches….so I was thinking I could follow ur directions on how to shape the mitten top….? I was wondering what ur thoughts are on my plan….? Or suggestions …..? Thank you 🙂 Jacquie
Hi Jacquie.
This isn’t strange at all!!! I’m thrilled to hear that you respond to the shape of the mittens. As for sock structures, I’m no expert, but I asked a few folks over here and they all thought it was a great idea. I’d love to hear how it goes!!
Thanks for writing in.
Laura
I’m so happy that you guy understood what I was talking about….lol….most people I’ve asked, didn’t get it….ok, I’m going for it….we will see how it turns out. Is there a way to send you a picture when I’m done with the sock? Would love to share it with you:) Cross your fingers….here I go!
Hi.
Great!
We’d love to see a pic. Send it to purlbee@purlsoho.com
Good Luck.
Laura
Laura,
It worked, it worked …..it worked! Lol…I’m so excited! It fits great, looks fine…so happy! Lol…now I just have to figure out how to decrease this when I have a different # of stitches. I’m new to knitting, and I HATE math…Lol…maybe you could help me with that…? I’ll be sending a picture soon…:) Thank you do much Laura!
Jacquie
Hey Jacquie.
That’s great! Would love to help with the math if you’d like. Looking forward to seeing the mittens. Best, -Laura
Hi Laura: I am making these lovely long mittens and have come to the thumb gusset. The final number of stitches in the gusset is stated as 19/21. You are M1L and M1R on each increase row. That is adding 2 stitches on every increase which totals to 18 for the smaller pair. What am I missing? Thank you.
Hi Jane.
Thanks for writing in.
In Round 1 of the gusset section, you’ll see there is a k1 between the two newly placed markers and first two increases. After completing Round 1 you have 3 stitches in your gusset. After Round 3 (the next increase round), you’ll have 5 stitches in your gusset. With each increase round that number will increase by 2, up until 19 (21) total gusset stitches.
Hope this helps!
Please let us know if you have any questions.
Laura
Whoops! It sure does help. Thank you.
I want to try out this pattern, unfortunately I don’t have a full skein of the wool to work with in the colour I want. I’m wondering what the yardage is for this pattern so I can calculate if I have enough to make it with the left over yarn from another project. Thanks for your help and all your beautiful patterns!
Laura
Hi Laura.
Thank you so much for writing in. I believe one of my associates reached out to, but I’m afraid there was a bit of a mix up. These mittens take just under 300 yards. Please let us know if you have any questions and our apologies for the confusion!!
Thanks Again,
Laura
having trouble with shape mitten top area. I/m not sure what the repeat rounds 1-2 zero (2) more times means, and problems following lines of pattern. new to knitting mittens. thanks for help. barb
Hello Barb!
Which size mittens are you making? The instructions that you’re referencing have different directions for the different sizes. You’ll be repeating rows 1 and 2 zero times if you’re making the smaller size and two more times if you’re making the larger one. Congrats on getting so far in your first pair of mittens! Hope this helps and best of luck finishing up! -Alyson
Hi there,
Love these beautiful mittens! Thank you! I am just at the point where the instructions say to ‘weave the gap closed’. Can you point me to any instructions on how to do this neatly? My ugly stitches are ruining the look of the glove!
Hi Rose,
So glad you like the mitten pattern! To close the gap I would turn the mitten inside out and pick up the purl bumps on either side along the length of the gap. After you’ve tightened it up, turn the mitten right side out and inspect your work. There is no specific technique for this, but with a bit of practice you’ll get the hang of it!
Happy knitting!
Adam
HI, I too am a newish knitter. I am finishing up the top of the L L Mittens, and in the directions it shows reducing until (12(12) stitches). then cut yarn and thread thru remaining stitches. That means don’t continue to knit decreasing further? Just pull the yarn thru the last 12 stitches?
Hi Bet,
Welcome to the world of knitting and congratulations on being nearly done with these mittens! You are absolutely correct! You will not continue decreasing but simply thread the yarn through the final 12 stitches!
Happy knitting!
Cassy
I love these! Can they be knit on magic loop? Jane
Hi Jane,
Thanks for writing in! These mittens can certainly be knit using the magic loop method. The thumbs may be more easily achieved using double points but if you are a magic loop aficionado, you can certainly use this methods for these lovely mittens!
Best,
Cassy
Hi Purl Soho,
I was able to visit your shop in person for the first time and picked up this yarn for this project 🙂
I’m having trouble with size/fit, and hoping you might be able to help.
I’m finding I have to knit tightly on smaller needles to achieve the 8.5 sts/inch, and then it is crazy tight around the forearms (upper cuff).
My palm is 6.5 inches, so I’m concerned the hand will be huge if I knit the larger size or at a larger gauge. My forearms are about 9.75″ near the elbow , and about 9.25″ a few inches below elbow. I’m 5’4″ so maybe my arms are shorter than the pattern intends (resulting in a sleeve that reaches further up the forearm, where a larger measurement is needed).
Any thoughts on how to fix it?
Hi Sarah,
Great question! Since these mittens don’t have any shaping in the long cuffs, for many of us they are quite tight around the forearm, but it should be fairly easy to start with more stitches for the cuff of the mitten and reduce down to the correct amount for your hand before you get to the wrist. To best fit your forearm, I would recommend casting on 78 stitches, and decreasing two stitches every 3/4″ as you knit the cuff until you are down to 54 stitches. For the decrease rounds, you should work a ssk at the beginning of the round and a k2tog at the end. Once the decreases are completely, simply continue knitting without decreases until your cuff measures 10″ and the knit the rest of the mitten as written!
I hope that helps, and please do let us know how the mittens turn out!
Julianna
Hi Julianna,
It was so kind of you to work out the decreases for me. I thought I was possibly messing something up with the forearms, or maybe I had giant forearms and didn’t know!
This will probably also be a good idea for the Colorblock Handwarmers, which have a similar construction. Hoping to knit a pair for me and one for a friend soon. Thanks again!
Sarah
Hi Purl Soho,
I’m nearly finished with the 1st mitten and have a question about how long to knit the hand.
My hands are pretty small (6.5 inch length) but the small mittens account for a 7″ hand (17″ mitten – 10″ cuff).
However, when I measure from the bottom of thumb (where cast on stitches are) to the tip of my middle finger, the measurement is 4.5″, which is the same as the pattern as written (it says to knit 3.75″ hand + 3/4″ for the mitten tip decreases).
In my case, should I knit the pattern as written in size small, or should I decrease mitten length by 1/2″?
Basically the main question here is whether good mitten fit depends more on total hand length, or length from the cast on stitches in the thumb. Thanks so much!
Hi Sarah,
Thanks for reaching out! Because hands are three dimensional, it can be tricky to measure a straight line from the bottom of your thumb to the tip of your longest finger, so I suspect your full hand measurement will be more accurate; however, since you are making these mittens for yourself, the easiest way to find out how long to make them is to try them on! Once you think you are getting close to the length of the hand, you can put on the mitten taking care not to lose any stitches off the ends of the double pointed needles. Once it is .75 inches away from the tip of your longest finger, you can start the decreases!
I hope that helps, and happy knitting!
Julianna
A friend asked me to make these for her. They are lovely! Easy and clear pattern directions. Thanks so much!
Hi Louise!
I’m so glad to hear you enjoyed the pattern! Thank you for taking the time to let us know!
All the best,
Kelsey