


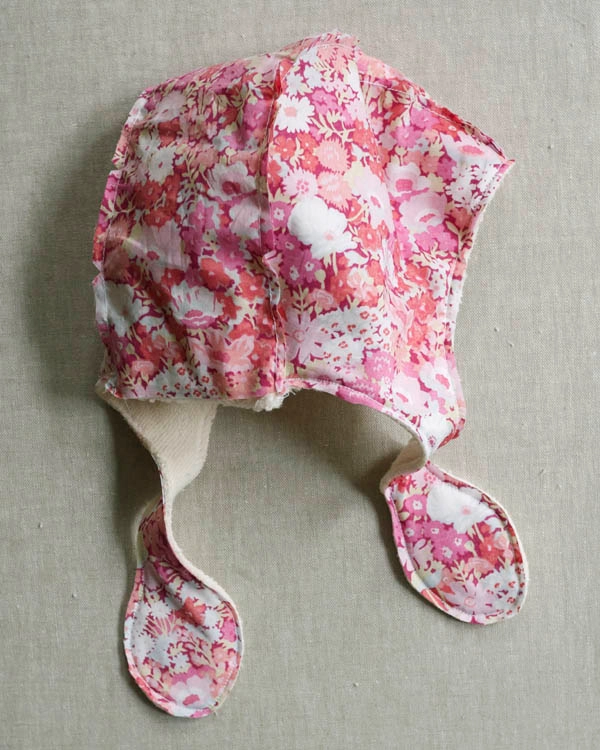
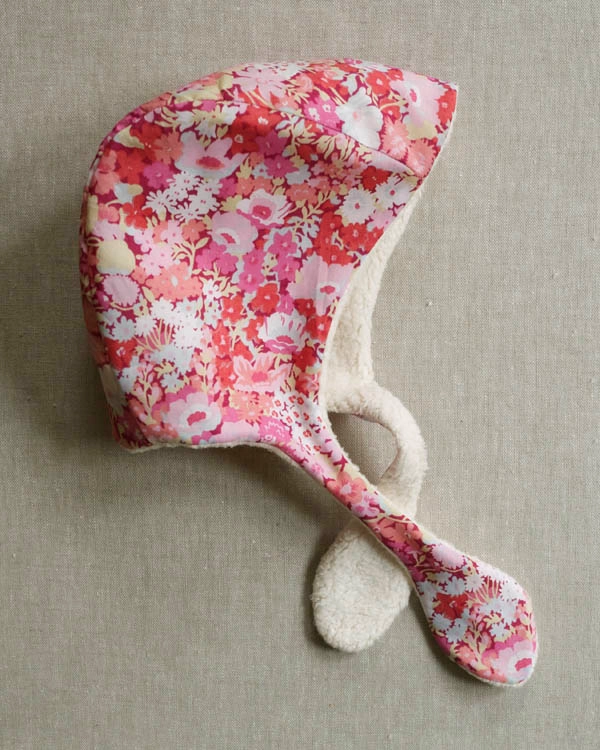
Winter Baby Bonnet
Nothing seems more quintessentially baby to me than a baby bonnet! And no fabric seems better suited for one than Liberty of London’s gorgeous Tana Lawn. It’s just the right material for this classic garment: soft to the touch and in patterns sweet enough to rival even the cutest little baby face.

But when you have a baby born in the height of winter, with snow falling and winds howling, however cute and charming it is, a delicate hat of just lightweight Lawn won’t do. And so, for the winter baby, I made a Winter Baby Bonnet.

Michael Miller’s sumptuous Organic Sherpa adds an extra cozy layer and an extended tie doubles as a mini scarf. Decorative and functional, this Winter Baby Bonnet perfectly frames the baby’s face while keeping her sensitive head protected from the elements.
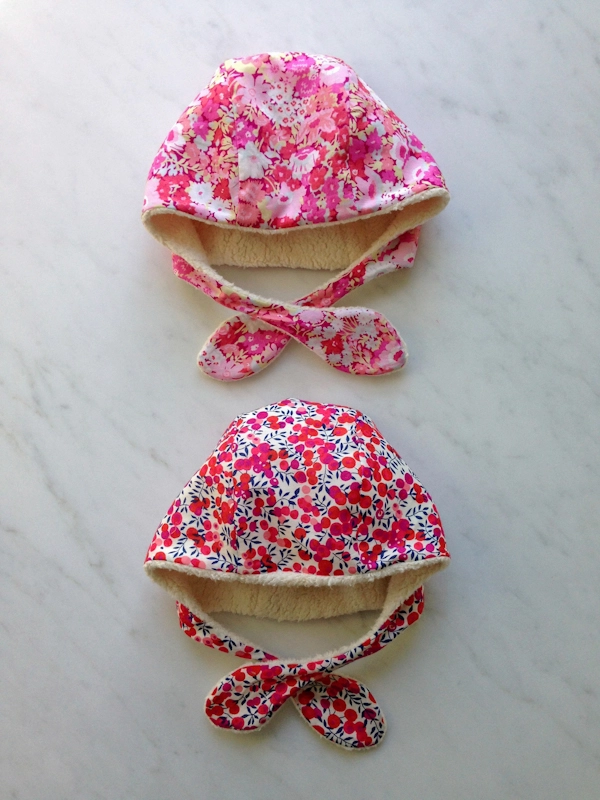
With so many beautiful Liberty prints to choose from, I know I’ll be making one for every winter baby I know! – Corinne
Materials

- Outer Hat: 1/2 yard of Liberty of London’s Tana Lawn. We used Hot Pink Wiltshire (above left) and Pink Thorpe (above right).
- Lining: 1/2 yard of Michael Miller’s Organic Sherpa, 100% organic cotton
- A 110- yard spool of Gutermann’s 100% Cotton Thread. We used color 1040.
These are enough materials to make one hat in any size.
Additional materials needed…
- A Winter Baby Bonnet template, available for free download here, printed and cut out in the appropriate size.
- A walking foot for your sewing machine.
Sizes
Sizes are shown for 0-3 (3-6, 6-12, 12-18, 18-24) months.
Notes
To print the PDF template, be sure to first download the pattern and then print it. This means rather than simply clicking the link and opening the PDF in a browser window, you should click on the pattern link using the “right click” or “control click” option on your mouse or keyboard. This will give you the option to “Download the linked file.” Once the file is downloaded, it should print like a charm!
Prewash all fabrics before starting. This is particularly important with the Organic Sherpa, which shrinks quite a bit with its first wash and dry.
Use ¼-inch seam allowances unless otherwise noted.
The right side of the Organic Sherpa is the fuzzy side.
Pattern
This pattern is also available as a printer-friendly PDF. Just click here!
Cut
You will use the prepared template to pin and cut 2 Hat Sides from the Liberty of London and 2 Hat Sides from the Organic Sherpa, but first be sure to line up the grain line properly. Here’s how…
The Liberty of London has two grain lines, one that runs parallel to the selvedge and one that runs perpendicular to the selvedge. Line up either one with the template.

The Organic Sherpa only has one grain line, and it runs parallel to the selvedge and along the line of the knit. Line it up with the template, as shown above.
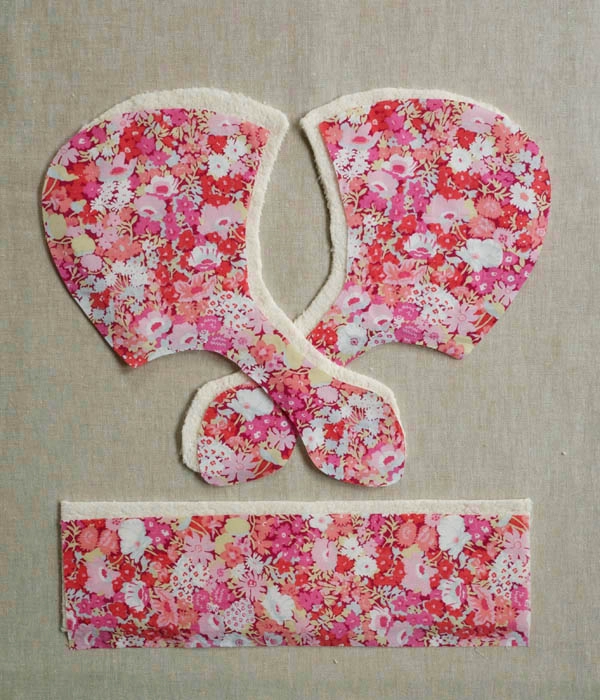
Also, to be sure that you cut the two Hat Sides from each fabric with the proper orientation, cut one Hat Side with the right side of the fabric facing up and one with the wrong side of the fabric facing up. The two Hat Sides from the same fabric should be mirror images of each other.
Cut one 3 ½ by 11 ½ (3 1/2 by 12 1/2, 3 3/4 by 13 1/2, 3 3/4 by 14 1/2, 4 by 15 1/2)-inch Rectangle from both the Liberty of London and the Organic Sherpa. The grain line of the Sherpa should run along the long edge of the Rectangle.
Piece

Working with the Liberty of London pieces and with right sides facing, pin one long edge of the Rectangle to the long outside curve of one of the Hat Sides. It can be tricky to keep curved seams wrinkle-free. Use a lot of pins to ensure that the seam will come out un-puckered and smooth. Sew around the pinned curve.

Cut notches in the seam allowance along the curve. Trim the seam allowance to 1/8-inch.
Repeat with the second side. This is the Outer Hat.

Now, working with the Organic Sherpa and with right sides facing, pin one long edge of the Rectangle to the long outside curve of the Hat Side. The knit fabric is much more flexible around the curve than the Liberty of London, so you shouldn’t need as many pins to keep the seam flat.
To sew, change the foot of your sewing machine to the walking foot and stitch along the pinned curve.
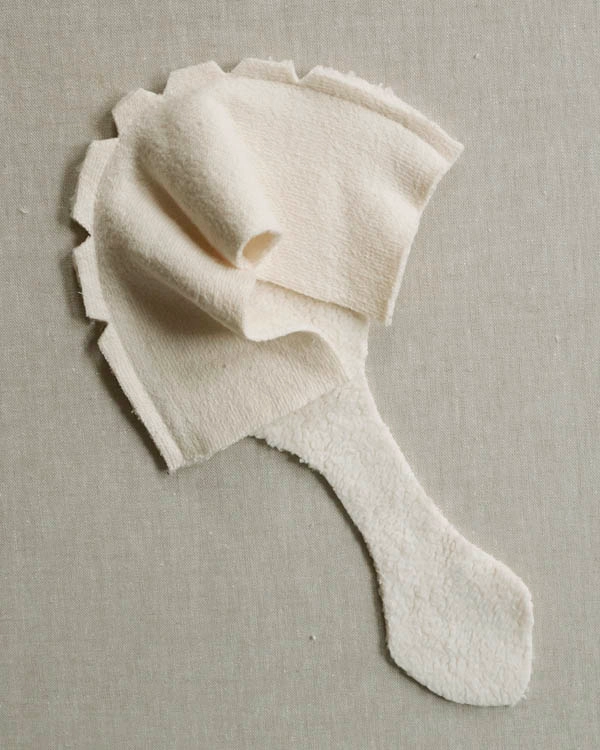
Cut notches in the seam allowance along the curve. Finger press the seam open.
Repeat with the second side. This is the Lining.
Attach the Outer Hat and Lining
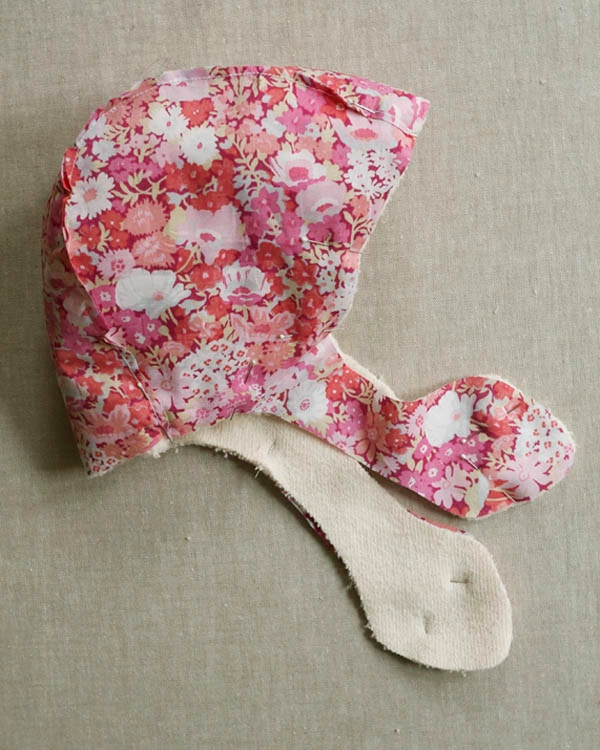
With right sides together, slide the Lining inside the Outer Hat. Pin the pieces together along all edges.
With the walking foot still attached to the machine, sew around the pinned edge, leaving the short end of the Rectangle at the nape of the neck open. Backstitch at the beginning and end of the seam.
Trim the seam allowance along the sewn edge, leaving the unsewn area untrimmed.

Pull the hat right side out through the unsewn gap. You may need to use a tool, such as a chopstick or the eraser-end of a pencil, to push the hanging ties through.

Press the edge flat.
Finish

Thread a length of cotton thread onto a needle and use a ladder stitch to close the gap at the nape of the neck. Here’s how: Fold the edges under so that they align with the adjacent seams. Pull the needle from the wrong side to the right side of the hem’s fold so that the thread’s knot is inside the hat.
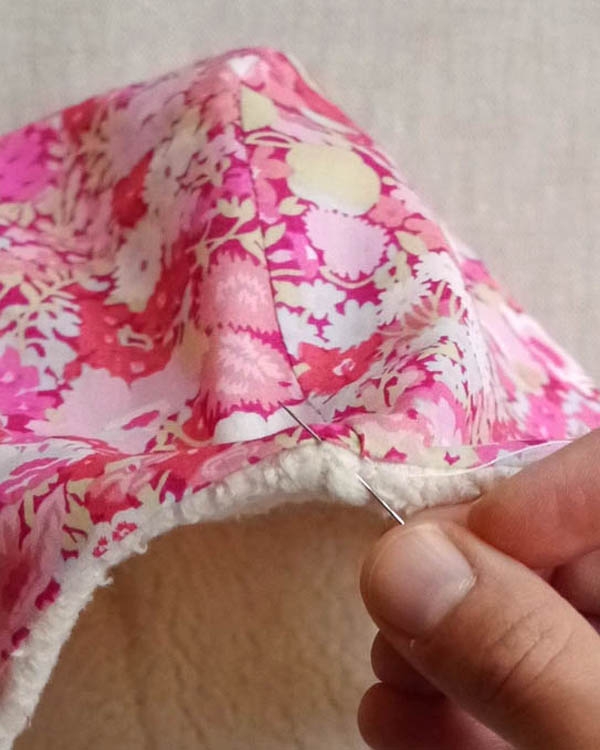
Insert the needle into the opposite fold, directly across from the exit point, picking up about ¼-inch of fabric.

Go back and forth like this, sewing through the folds, until you reach the end of the opening. Tie a knot at the end.
Pull the thread through the hat and snip it at the exit point to hide the end.
You’re all done!


I have been sewing almost 50 years now (gulp) and am a professional seamstress. So many of the tutorials I find on line make me crazy – not in a good way. Yours is so thorough (who else has photos of how to close an opening by hand??) and helpful and not silly. Wish there was a way that all new sewers could automatically be linked to this post. Thank you! You give me hope for the next generation of sewists.
Absolutely darling!! Your site has never disappointed me when I search for ideas and projects to whip up as small gifts for new babies. Thank you ever so much for sharing!
Hello, Anna!
Thank you so much for your kind words! We appreciate your writing in!
Best wishes,
Kumeko
Bonnet original qui pourrait être offert à la naissance d’un bébé en octobre.
Merci pour ce modèle. DM
Hi there, I love this pattern! But I can’t get it to print out correctly, the test square comes out 1/16th of an inch too small. I’m printing on A4, should it be something else? will it work anyway, if I don’t have it quite right?
Cheers, Elowyn
Hi Elowyn!
The easiest way to fix this would be to change your paper setting in your print settings. If your current setting is A4, you’ll want to choose US Legal. That way the pattern will print to scale. Thanks for writing in!
Keith
Thank you!
Did this work? I’m running into the same issue.
I’m getting ready to make this. I’m wondering if it stayed on ok or if I should plan on adding a snap to the straps? Thanks!
Hi Andrea,
Thanks for writing in! Of the babies that I have seen this sweet little bonnet on, the ties were sufficient to keep the bonnet on. You could always add a snap later if you find that the hat is coming off but I do believe that the tie works well!
Happy sewing!
Cassy
I am having trouble finding the pattern could you send me a link please
Many thank Sharon
Hi Sharon,
Thanks for writing in! The directions to make this lovely little bonnet are all listed above and a link to the template can be found in the materials section. I am including a direct link here for your convenience: https://www.purlsoho.com/create/wp-content/uploads/2013/11/winter_baby_bonnet_v2.pdf
I hope that this helps and happy sewing!
Cassy
Thank so much I have only just found this, can’t wait to make it.
I can only find minky fabric that looks similar at my local shop. Would this work for the lining?
Hi Sarah,
Minky fabric should work well as long as the pile is short enough!
I hope this helps!
Carly
Do you think you could line this with knit thermal, or do you think that would change the hat too much? I am thinking of making it for some babies with big noggins, and I know knit thermal can stretch a bit.
Thanks!
Sara
Hi Sara,
Thanks for your question! I think the beauty of this bonnet is that organic sherpa is a lightweight but still sturdy fabric with a bit of stretch. I would recommend that if you substitute this fabric you use something on the thick side so the bonnet doesn’t become too floppy.
I hope this helps!
Carly
Can I use any kind of fabric to make this bonnet? An how can I corner off the part where the straps are? Meaning if I just want to add ribbon, instead of extending the fabric to be connected to the actual hat…
Hi Lena,
Thanks for writing in! For this hat we used a thin/fine cotton for the outside and a thicker, fleece-type fabric for the inside. So long as you use similar weight fabric, the bonnet should fit as expected.
As to altering the shape, that might be bit more complicated. The template is designed to cover the ears so it is not as simple as rounding off just before the ties. You may be able to round off at the thinnest section of the tie and add ribbons at that point. We do have a bonnet pattern that does have thin straps that may work for you as well; the Baby Sunbonnet!
I hope that this helps!
Cassy
Hi – I am hoping to make this for my 3-year old. Do you have any advice for sizing it up a little? Her head is about 48.5 cm circumference. Thank you!
Hi Jennifer,
Thanks for reaching out! At present, this sweet little bonnet is available in just the size listed above. Our Lamb Bonnet goes a bit bigger in size and the largest size fits a head of 19 inches or 48.26 cm. By omitting the ears, you could get quite a similar look!
I hope that this helps!
Cassy
Do you have the pattern for the knit sweater the baby is wearing? Thank you!
** love the bonnet too!
Hi Missy,
Thanks for writing in and for your kind words! Sadly, we do not have a pattern for the sweet sweater this little on is wearing! We do have a variety of sweater patterns that can be made for a little one! They can be found here: https://www.purlsoho.com/create/category/knit-garments/knit-garments-size-babies-toddlers/
Best,
Cassy
Made this for my granddaughter, it’s adorable and was much easier to make than I expected. Thank you!
Hello
I was just about to start this and am unsure if the seam allowance in in the pattern or if I need to cut the fabric bigger?
Hi Vanessa,
Thanks for reaching out! Seam allowances are included in all of our templates and patterns, so you can cut the pattern pieces to the exact same size as the templates.
Happy sewing!
Julianna
It seems the PDF of the pattern is no longer working. Are you able to fix that? Thank you! Can’t wait to make this.
Hello Cory,
Thank you for reaching out! It seams to be working at the moment, but just in case it is still causing you issues here is a link to it; .
Let me know if you continue to have any issues!
-Marilla
Can you tell me the circumference equivalents for the different sizes? My babies always have such small heads. Store bought hats never fit!!
Hi Jill,
Great question! The intended head sizes for the noted sizes are….
Thank you for reaching out! The measurements for the bonnet’s head circumferences are as follows;
Size 0-3 months – 14 1/2 inches
Size 3-6 months – 16 inches
Size 6-12 months – 17 1/2 inches
Size 12-18 months – 18 inches
Size 18-24 months – 19 inches
Best,
Cassy
Hi
Thanks for your great pattern. I’d love to make this but attach a large Pom Pom to the hat. The only problem
Is I have no idea how to do that!! Does anyone have any ideas / tips? At what stage should Insecure the Pom Pom & any too tips for making sure it is very secure.
Hi Amanda,
Thanks for reaching out! To attach a pom pom to a fabric hat, I would wait until the hat is complete. When you are making the pom pom, you can secure the center of the pom pom with embroidery floss, as we show in our Pom Pom Tutorial. You should be able to use a sharp tapestry needle to thread the two ends of the embroidery floss through the top of the hat about a quarter inch apart, and then knot the two ends securely and hide the tails between the two layers of the bonnet.
I hope that helps!
Julianna
Hiya thanks for the pattern! I have searched the Internet for days looking for one abit bigger. I cannot find one ? if I was to make this bigger would I just increase each piece? I’ve read up about grading? But that was cutting each piece into sections and then making Bigger. I’ve never made anything Like this. (new to seeing, usually crochet /knit hats) I have made memory blanket’s and bunting.
Please help, I want to make one of these hats for my 2 year old, but a bigger size, to last her next year too mabye.
Thanks! Look forward to hearing from you. Steph.
Hi Steph,
Thanks for writing in! We don’t have instructions for sizing this bonnet up unfortunately, but if you do try to grade the pattern up, I would suggest sewing up a muslin first to make sure it will turn out as intended. Another option would be to use our Lamb Bonnet as a guide. It goes a bit bigger in size and the largest size fits a head of 19 inches or 48.26 cm. By omitting the ears, you could get quite a similar look!
I hope that helps!
Julianna
When trying to download the link goes to the tutorial, and in that is a link to the pattern, but that link is broken and leads to an error 404 page not found. I would love to make this for my daughter. Thank you.
Hi Trish,
Thank you so much for writing in and for your kind words! Sorry to hear you’re having trouble accessing our links, they all seem to be working on my end. Please find direct links to the PDF pattern and template below, but if you have any more trouble please do let us know!
Winter Baby Bonnet Printer-Friendly PDF
Winter Baby Bonnet Template
Happy sewing!
Gaby
I can’t find the pattern only the pictures of have to do
Hi Dorte,
Thanks for reaching out! You can find a link to the pattern template in the materials list above, or by clicking right here!
Best,
Julianna
Thanks?
I am having difficulty with attaching the 2 half’s together. Should I have a seam where the two rectangles are? Or do the rectangular pieces overlap? It looks huge for 0-3 months!
Hi Kelly,
Thanks for writing in! I am happy to help with this! The two sides pieces get sewn together at either end of the rectangular pattern piece. When complete, there should be two seams attaching the three pieces together!
Hope this helps, happy sewing!
Gianna
Hello,
Thank you so much for this wonderfull pattern. I just don’t understand what means “Use ¼-inch seam allowances unless otherwise noted” . I’m not sure about the meaning of the verb Use (perhaps because i’m French ? ). Does it mean that the seam allowances are already included on the pattern ? Or should I add it ? Thank you so much for your answer.
Hi Aurélie,
Thanks for reaching out! The seam allowance is included in the pattern print out!
I hope this helps!
Best,
Gianna
Good Evening,
I am sewing the winter baby bonnet as a birth present an I am not uset to english sizes…..
I would like to know how much centimeters is the seem allowance, please…
As you writed it, it’s like half a centimeter but on the pictures it’s like 1 centimeter !
Thank you in advance, your bonnet is very beautiful.
Lily
Hi Lily,
Thanks for reaching out! The seam allowance for this pattern in 1/4″ unless otherwise noted, which translates to 0.635 centimeters!
I hope this helps!
Gianna
Hello! I have a couple of questions about this lovely pattern. I have been planning this make for some time–it took me a while to find the cotton sherpa in stock somewhere and now that I’ve hand washed and lined dried it, it is too small. Can I change the angle of my bonnet and not cut parallel to the grain line? I’m new to sewing and don’t know why this is a good or bad idea.
I’ve also read some conflicting advice in the comments about the seam allowance. It has both that it is included and not included in the pattern in the comments section. Can someone confirm? Thank you!
Hi Amalia,
Thanks for reaching out! I wouldn’t recommend changing the grain line since it is laid out so the bias will comfortably stretch around the circumference of the head! Seam allowances are included in all of our templates and patterns, so you can cut the pattern pieces to the exact same size as the templates.
I hope this helps, happy crafting!
Gianna
I’m not sure where or how you determined your sizing. I recently made two caps following the size cut outs (which printed at the correct proportions) one for a 3-6 month size and one for a 18mo-2 year old. the 3-6 month size fit the two year old and the 18mo-2yr size fit my adult daughter. Hmmmm. Something is not right here.
Hi B,
Thanks for reaching out! I am sorry to hear this! I am not sure what could have happened, I know our sizes are accurate as many people have made this little bonnet with no issues fitting the 0-3 (3-6, 6-12, 12-18, 18-24) month sizes! The pattern pieces have the seam allowance already included, did you add additional seam allowance on?
Warmly,
Gianna
Hi, I love all your models! I’d like to do this, however, using a merino wool cut for the outside and cotton jersey for the inside. What do you think? Do I need to touch up something?
Hi Chiara,
Thanks for reaching out! I think you could certainly make this bonnet with merino wool and cotton jersey!
If you do, please let us know how it turns out!
Gianna
Sure! Thank you Gianna 🙂
Hi! I have really enjoyed making the lamb bonnet, and especially the sun bonnet pattern (multiple times) for my now 7 month old granddaughter; My daughter in law and I refer to the sun bonnet as the “Vera” bonnet! I am looking forward to sewing this cute winter bonnet. The graduated sizing is working out perfectly as Vera grows.
Thank you!
Jan
Hi Jan,
We’re thrilled to hear that you’ve been enjoying this sweet pattern! Thank you for your kind words, and happy crafting!
Warmly,
Kelsey
Thank you for gorgeous pattern!
Thank you so much for this sweet pattern! I just became a grandmother a week and a half ago, and we live in New England so there will be many chilly walks in the little guy’s future. I have in my stash some lovely woolen knit, like heavy sweatshirt material, that I can adapt for this pattern. A little kimono jacket to match and he’ll be ready for adventure!
is there a pattern for 3-5 years?
Thanks!
Hi Dhara,
Thanks for writing in! I’m afraid we don’t currently have a version of this pattern for that size. We’re so sorry about that! We do have another sewn bonnet pattern that comes in a larger size, though! Here’s our Wool + Cotton Sewn Ear Flap Hat (https://www.purlsoho.com/create/2016/02/22/wool-cotton-sewn-ear-flap-hat/) in case it’s helpful! Let us know if you have any other questions!
All the best,
Cat
This is so cute! Thank you for sharing. 🙂 I was wondering what kind of fabric is best used. I have a cute rib knit I want to use as top layer and I’m wondering if the sherpa also should be stretchy?
Hi Mathilde,
We are so happy to hear that you will be making the Winter Baby Bonnet sewing pattern! We think that using a ribbed fabric sounds lovely! It is not necessary for the sherpa to be stretchy at all but it is definitely worth trying out if that’s a specific element you are looking for in the fabric. We would just suggest using a material on the heavier side that compares to the weight of the suggested Organic sherpa!
Happy making!
Gavriella