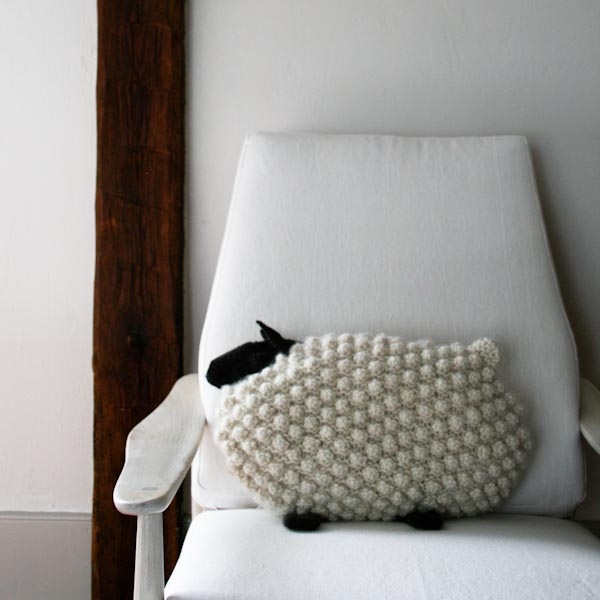
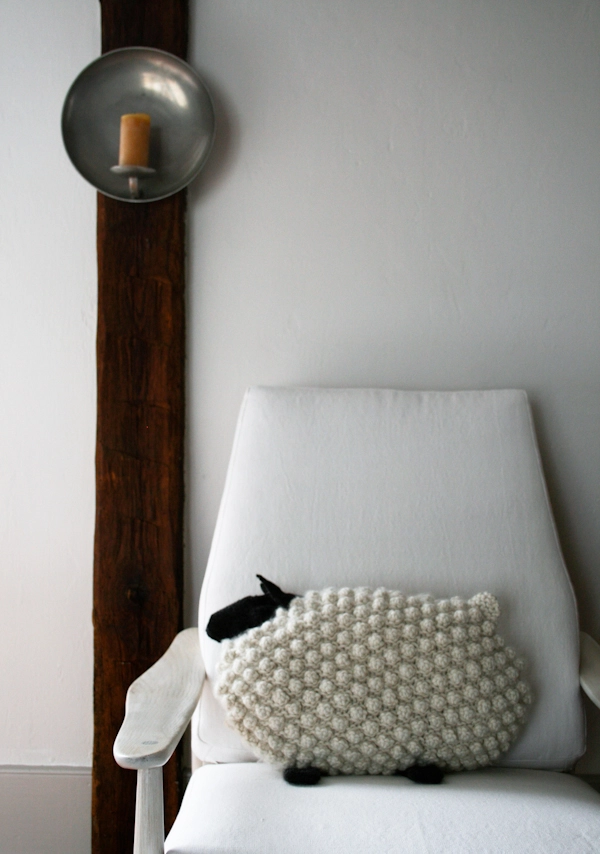
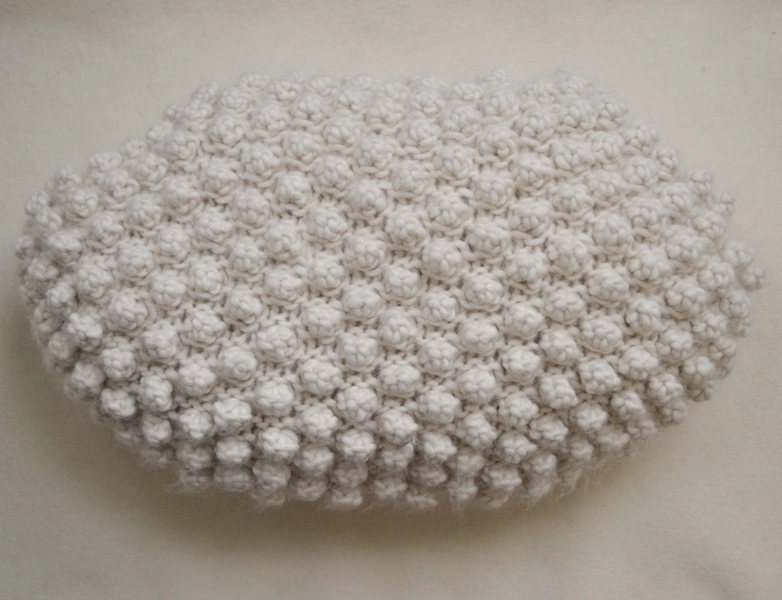
Bobble Sheep Pillow in Super Soft Merino
I guess it isn’t surprising that a knitter has an affinity for sheep. Obviously, some sort of kinship must exist with the animal whose wool provides daily enjoyment (and employment!). So as predictable as it may be, I will say it anyway… I love sheep. They are funny creatures with a neurotic voice and a body perfect for graphic adaptation.
I love their bulbous bellies and knobbly knees, their googly eyes and pointy ears. I love how they amble about in groups, looking like earth-bound clouds. And it goes without saying, I love what they gift us… don’t worry, I’m not about to type “mutton.” I mean, of course, their wool!
A dear friend pointed out that it may be a bit snake-eating-its-own-tail, but anyway, I had to make one… I had to make a sheep, made out of sheep.
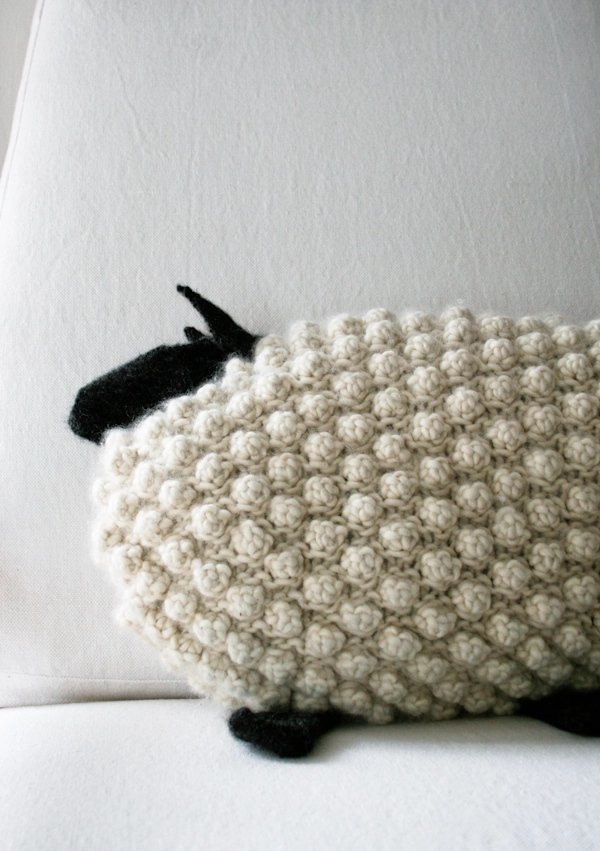

Incredibly soft to the touch, Purl Soho’s Super Soft Merino could not have been more appropriate for this project, right down to its color name, Heirloom White. Your own Bobble Sheep Pillow is sure to be loved by many generations to come! -Laura
Update: New Yarn + Size
February 29, 2016

Being the sheep fanatics that we are, we couldn’t resist making more Bobble Sheep, this time in our incredibly soft jumbo weight Gentle Giant merino. For the list of materials, as well as tips on modifying the pattern, visit our Bobble Sheep Pillow in Gentle Giant post.
UPDATE: NOW IN PARTRIDGE
MARCH 2022
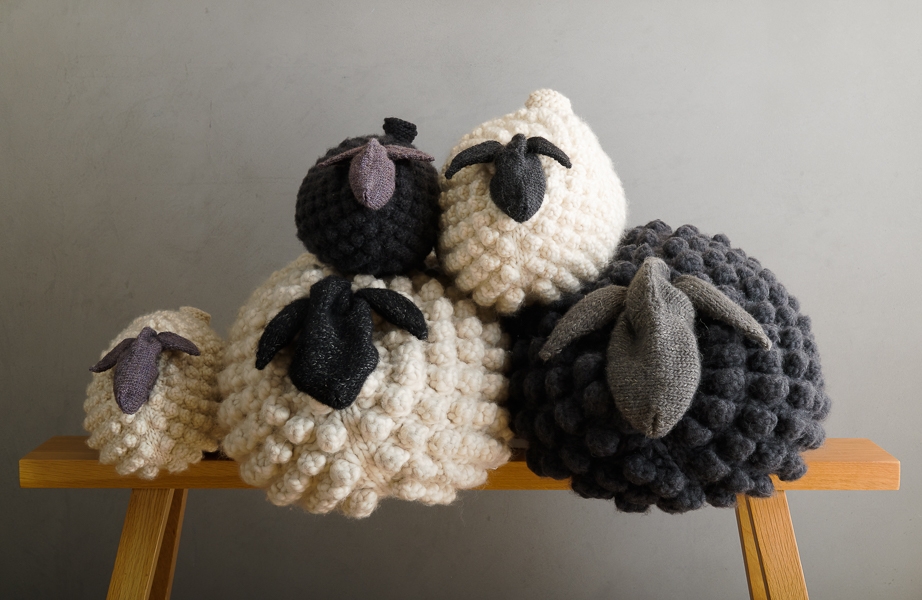
We’ve added a new lamb-sized sheep to our flock… the Bobble Sheep in Partridge! For such a huggable project, soft and squishy Partridge is an excellent choice. A worsted-weight single ply of incredibly sumptuous 100% merino wool, Partridge is thinner than either of our previous versions and knits up a more diminutive sheep. Pick up a Bobble Sheep Pillow Bundle in Partridge and add a new baby lamb to your happy pillow-flock!
Designed by Purl Soho designer, Laura Ferguson.
Share your progress and connect with the community by tagging your pics with #PurlSoho, #PurlSohoBusyHands, #PurlSohoBobbleSheepPillow, #PurlSohoSuperSoftMerino and #PurlSohoSeasonAlpaca. We can’t wait to see what you make!
Materials
Get all the yarn you’ll need to make your own Bobble Sheep Pillow with the Bobble Sheep Pillow Bundle. It includes…
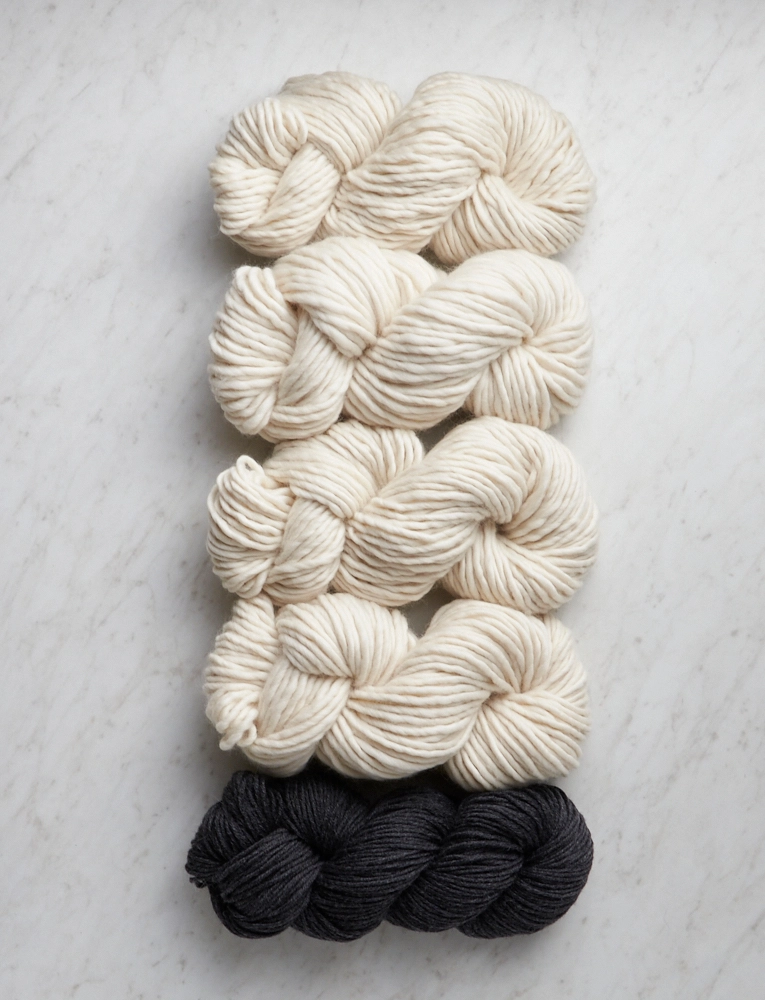
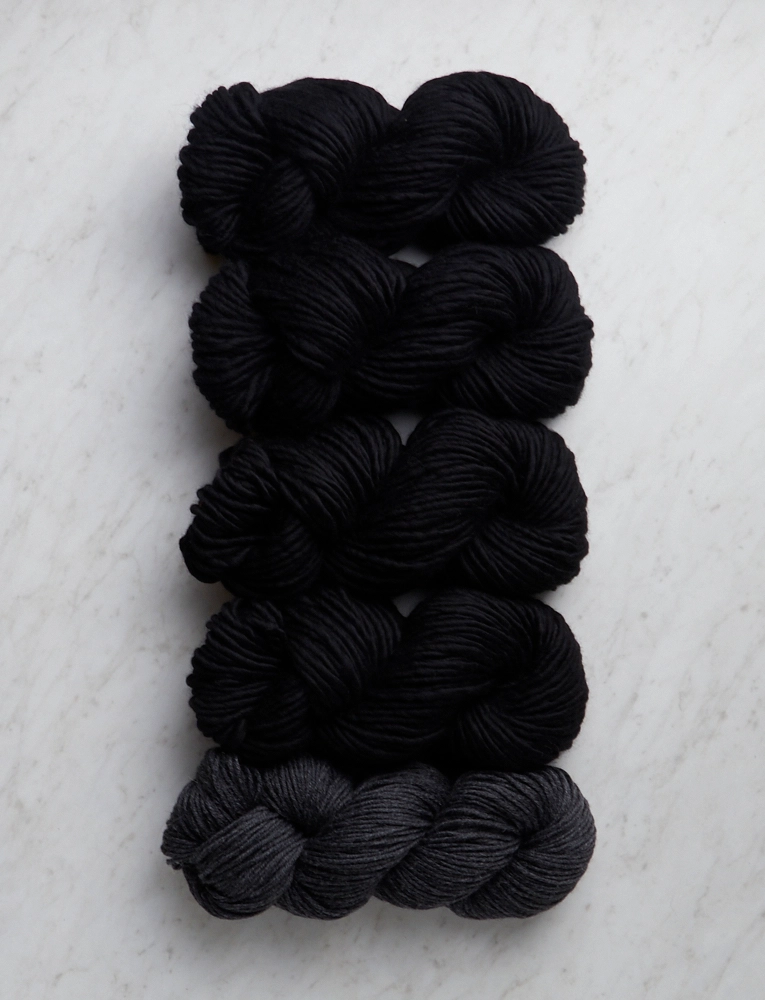
- Main Yarn: 4 skeins of Purl Soho’s Super Soft Merino, 100% merino wool. Each skein is 87 yards/ 100 grams; approximately 348 yards required. We used the color Heirloom White, Toasted Charcoal or Soft Black.
- Contrast Yarn: 1 skein of Purl Soho’s Season Alpaca, 100% super baby alpaca. Each skein is 218 yards/ 100 grams; approximately 110 yards required. We used the color River Rock. (Please Note: Our original Bobble Sheep featured Blue Sky Fiber’s Sport Weight Alpaca, which is no longer available.)
You’ll also need…
- US 11 (8 mm), 16 or 24-inch circular needles
- Set of US 11 double pointed needles
- Set of US 3 (3.25 mm) double pointed needles
- 1 bag of Fairfield’s Poly-fil Stuffing
- Scrap yarn (bulky weight) and crochet hook to match (for provisional cast on)
Gauge
12 stitches = 4 inches in garter stitch with Main Yarn on larger needle
28 stitches = 4 inches in stockinette with Contrast Yarn on smaller needle
Size
19 inches wide (from chest to rear) x 14 inches tall (from top of back to bottom of belly)
Notes
k3tog [knit 3 together]: This is a right-slanting double decrease. Insert right needle into next three stitches as if to knit, knit all three stitches together as if they were one stitch. [2 stitches decreased]
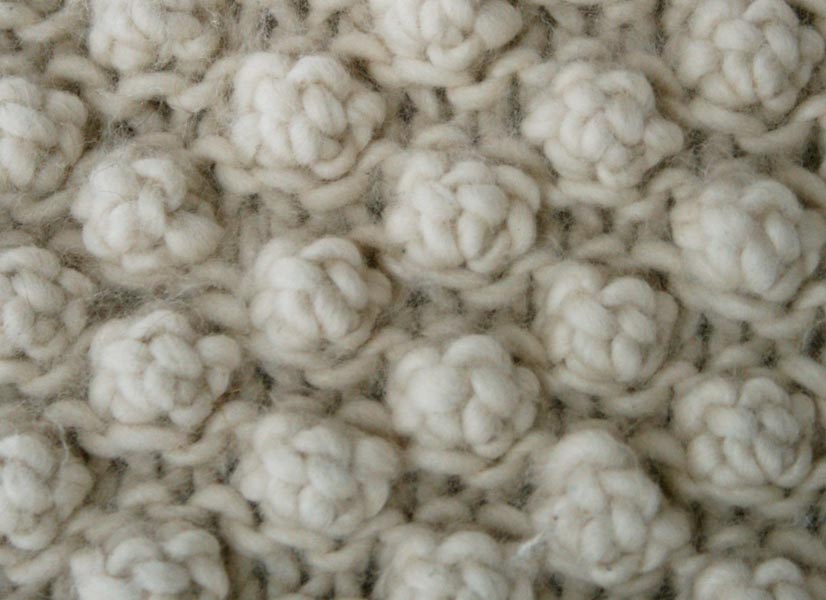
MB [Make Bobble]: Knit into the next stitch, leaving it on the left needle, [(yarn over, knit 1) into same stitch] two times. Turn work so wrong side is facing you, k5; turn work so right side is facing you, k2tog; return stitch to left needle, slip remaining three stitches of bobble over the k2tog stitch, knit that stitch, returning it to the right needle. For a full-photo tutorial on how to make this particular bobble, please click here.
sk2p [slip 1, k2tog, psso]: This is a left-slanting double decrease. Slip 1 purlwise, knit 2 together, pass the slipped stitch over the knit stitch and off the needle. [2 stitches decreased]
Pattern
Body

Begin at the Belly
With the crochet hook and scrap yarn use a Provisional Cast On method to cast 46 stitches onto the larger double pointed needles.
Distribute the stitches on three double pointed needles, place a marker and join for working in the round, being careful to not twist the stitches. Join Main Yarn and…
Round 1: Knit.
Round 2: [P21, place a marker that is a different color than the end-of-the-round marker, k2] two times.
Round 3: Knit.
Round 4: [Purl to next marker, slip marker (sm), k2] two times.
Increase to Shape the Body
NOTE: Change to circular needles when necessary.
Increasing every round…
Round 5: [M1L, k2, *make bobble (MB, see Notes), k3, repeat from * to 3 stitches before next marker, MB, k2, m1R, sm, k2] two times. [4 stitches increased]
Round 6: [M1L, purl to next marker, m1R, sm, k2] two times. [4 stitches increased]
Repeat Rounds 5 and 6 three more times. [78 stitches]
Increasing every other round…
Round 7: [K2, *MB, k3, repeat from * to 3 stitches before next marker, MB, k2, sm, k2] two times.
Round 8: [M1L, purl to next marker, m1R, sm, k2] two times. [4 stitches increased]
Round 9: [K1, *MB, k3, repeat from * to 2 stitches before next marker, MB, k1, sm, k2] two times.
Round 10: Repeat Round 8.
Round 11: [*MB, k3, repeat from * to 1 stitch before next marker, MB, sm, k2] two times.
Round 12: Repeat Round 8.
Round 13: [K3, *MB, k3, repeat from * to 4 stitches before next marker, MB, k3, sm, k2] two times.
Round 14: Repeat Round 8. [94 stitches]
Work Evenly
Round 15: [K2, *MB, k3, repeat from * to 3 stitches before next marker, MB, k2, sm, k2] two times.
Round 16: [Purl to next marker, sm, k2] two times.
Round 17: [*MB, k3, repeat from * to 1 stitch before next marker, MB, sm, k2] two times.
Round 18: Repeat Round 16.
Repeat Rounds 15-18 two more times.
Decrease for Neck and Tail
NOTE: Change to double pointed needles when necessary.
Round 19: K2, *MB, k3, repeat from * to 3 stitches before next marker, sk2p (see Notes), sm, k2, k3tog (see Notes), **k3, MB, repeat from ** to 2 stitches before next marker, k2, sm, k2. [90 stitches, 4 stitches decreased at head]
Round 20: K2tog, purl to 3 stitches before next marker, sk2p, sm, k2, k3tog, purl to 2 stitches before next marker, ssk, sm, k2. [6 stitches decreased: 2 at tail, 4 at head]
Round 21: K3, *MB, k3, repeat from * to 5 stitches before next marker, MB, k1, sk2p, sm, k2, k3tog, k1, **MB, k3, repeat from ** to 4 stitches before next marker, MB, k3, sm, k2. [80 stitches, 4 stitches decreased at head]
Round 22: Repeat Round 20. [74 stitches]
Round 23: *MB, k3, repeat from * to 3 stitches before next marker, MB, k2, sm, k4, **MB, k3, repeat from ** to 1 stitch before next marker, MB, sm, k2.
Round 24: [K2tog, purl to 2 stitches before next marker, ssk, sm, k2] two times. [4 stitches decreased: 2 at tail, 2 at head]
Round 25: K1, *MB, k3, repeat from * to next marker, sm, k5, **MB, k3, repeat from ** to 2 stitches before next marker, MB, k1, sm, k2.
Round 26: Repeat Round 24. [66 stitches]
Round 27: K2tog, *MB, k3, repeat from * to 1 stitch before next marker, MB, sm, k2, **MB, k3, repeat from ** to 3 stitches before next marker, MB, ssk, sm, k2. [64 stitches, 2 stitches decreased at tail]
Round 28: Repeat Round 24. [60 stitches]
Round 29: K2tog, *MB, k3, repeat from * to 2 stitches before next marker, MB, k1, sm, **k3, MB, repeat from ** to 2 stitches before next marker, ssk, sm, k2. [58 stitches, 2 stitches decreased at tail]
Round 30: Repeat Round 24. [54 stitches]
Round 31: K2tog, *MB, k3, repeat from * to 3 stitches before next marker, MB, k2, sm, k4, **MB, k3, repeat from ** to 3 stitches before next marker, MB, ssk, sm, k2. [52 stitches, 2 stitches decreased at tail]
Round 32: Repeat Round 24. [48 stitches]
Round 33: K2tog, *MB, k3, repeat from * to next marker, sm, k5, **MB, k3, repeat from ** to 3 stitches before next marker, MB, ssk, sm, k2. [46 stitches, 2 stitches decreased at tail]
Remove beginning-of-round marker and slip the last stitch of the last round onto the left needle.
Cut yarn, leaving an approximately 30-inch tail.
Divide the stitches in half, sliding 23 stitches to each end of the circular needle or arranging them onto two double pointed needles.
Holding the needles parallel to each other, use Kitchener Stitch to graft together the two sides of the Bobble Sheep’s back.
Weave in the ends.
NOTE: You will notice in the pictures that I next stuffed the Sheep and closed the Belly. However, I recommend making the Face, the Ears, and the Tail before you stuff the Sheep and graft its Belly. Live and learn!
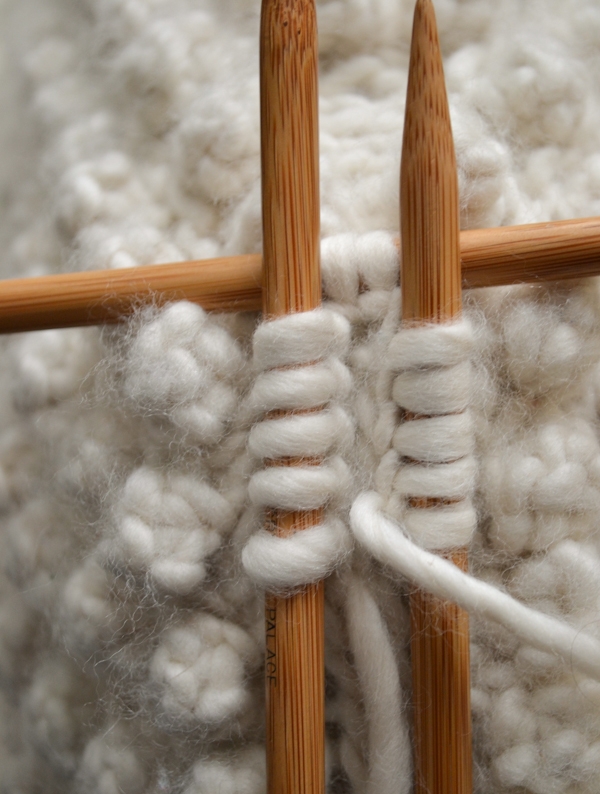
Make Head + Ears

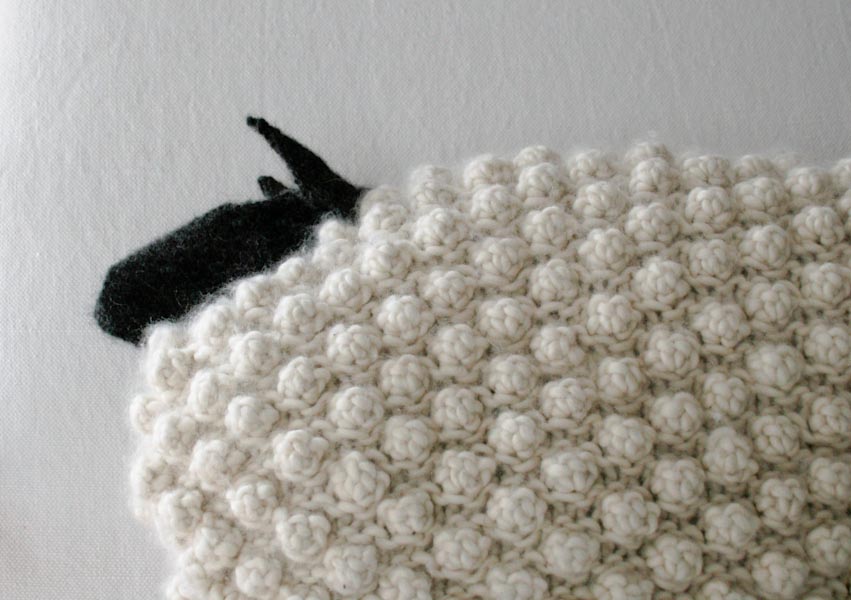
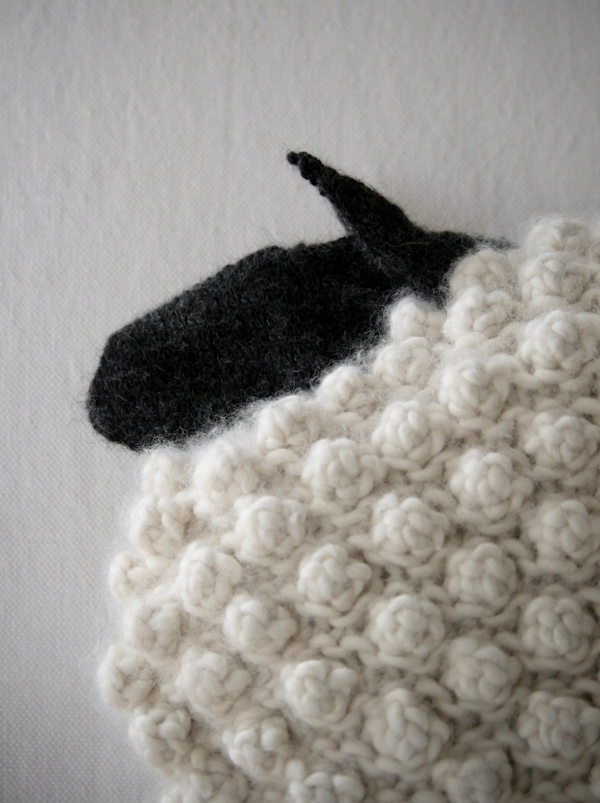
Orienting the Sheep right side up, locate the Neck section, as shown above.

Using the Contrast Yarn and the smaller double pointed needles, pick up 92 stitches around the strip of stockinette stitches at the Neck.
To do this, start at the left bottom of the Neck, pick up 3 stitches in each of the next fifteen stitches along the left side of the Neck, two stitches along the top, rotate the Sheep and pick up 3 stitches in each of the fifteen stitches along the right side. (To pick up 3 stitches in one stitch, pick up and knit one stitch, yarn over, bring the needle back into the same stitch and knit to pick up another stitch.) [92 stitches]
Distribute the stitches on three double pointed needles, place a marker and join for working in the round.
Set-up Round: K16, [place a different color marker, k30] two times, place a different color marker, knit to end of round.
Round 1: K1, m1L, knit to first marker, sm, k2tog, knit to 2 stitches before next marker, ssk, sm, k2tog, knit to 2 stitches before next marker, ssk, sm, knit to last stitch, m1R, k1. [2 stitches decreased]
Round 2: Knit to first marker, sm, k2tog, knit to two before third marker, ssk, sm, knit to end of round. [2 stitches decreased]
Repeat Rounds 1 and 2 five more times. [68 stitches]
Round 3: Knit to first marker, sm, k2tog, knit to 2 stitches before next marker, ssk, sm, k2tog, knit to 2 stitches before next marker, ssk, sm, knit to end of round. [4 stitches decreased]
Repeat Rounds 2 and 3. [58 stitches]
Repeat Round 2 one more time. [56 stitches]
Round 4: K2tog, knit to first marker, sm, k2tog, knit to 2 stitches before next marker, ssk, sm, k2tog, knit to 2 stitches before next marker, ssk, sm, knit to last 2 stitches, ssk. [6 stitches decreased]
Repeat Round 4, removing first and third marker. [44 stitches]
Round 5: K2tog, knit to 2 stitches before next marker, ssk, sm, k2tog, knit to last 2 stitches, ssk. [4 stitches decreased]
Repeat Round 5 two more times. [32 stitches]

Cut yarn leaving an approximately 16-inch tail.
Divide stitches in half, placing the first 16 stitches on the first double pointed needle and the second 16 stitches on the second double pointed needle. Use Kitchener Stitch to graft together the two sides of the Head.
Weave in the ends.
Make the Right Ear

Using the Contrast Yarn and the smaller double pointed needles, pick up 18 stitches for the Right Ear (the ear on the right, if looking at the sheep).
To do this, count four stitches down from the top right side of the Sheep’s Head (just above a bobble). Pick up 3 stitches in this stitch and in the next two stitches above it (9 stitches so far). Then rotate the sheep and pick up 3 stitches in each of the stitches directly across from those you just picked up, working back towards the starting point. (18 stitches)

**Place marker and join for working in the round.
Knit 4 rounds. At the end of the fourth round, remove marker and turn work. You will no longer knit in the round, but back and forth in rows, turning the work at the end of each row.
Row 1 (inside of ear): Purl.
Row 2 (outside of ear): Knit.
Repeat Rows 1 and 2.
Repeat Row 1.
Next Row: K1, ssk, knit to last 3 stitches, k2tog, k1. [2 stitches decreased]
Next Row: Purl.
Repeat last two rows 6 more times. [4 stitches]
Next Row: Ssk, k2tog. [2 stitches]
Bind off purlwise.
Weave in the ends.
Make the Left Ear
Making the Left Ear (the ear on the left, if looking at the sheep) is very similar to making the Right Ear. The only difference is where you pick up the stitches.
Find the bobble across from the bobble you used as the starting point for the Right Ear. Pick up 3 stitches in each of the next 3 stitches above that bobble. Rotate the sheep and pick up 3 stitches in each of the next 3 stitches along the side of the Sheep’s Head, working back towards the starting point. [18 stitches]
Repeat steps under Make the Right Ear starting at **.
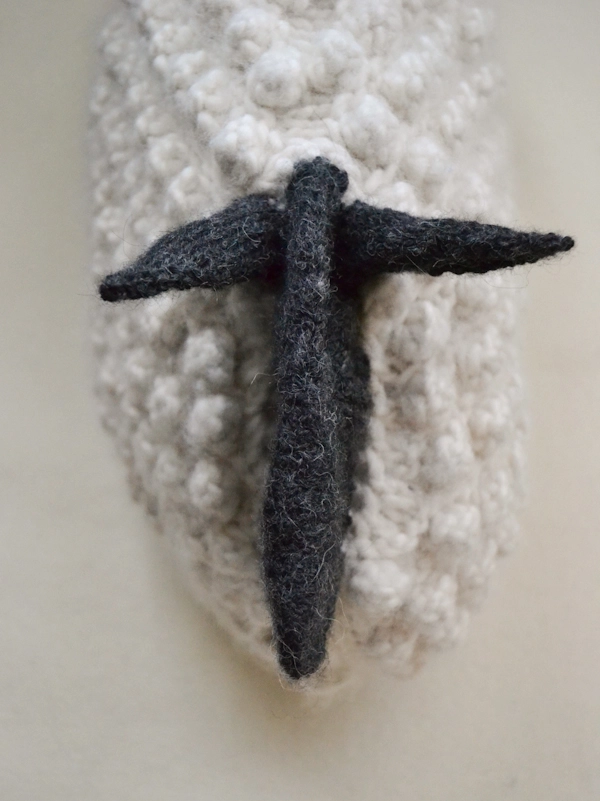
Tail
With Main Yarn and the larger double pointed needles, pick up 12 stitches as shown above. Here’s how…
Facing the Sheep’s rear, locate the left side of the left stitch that is 5 stitches down from the end of the Sheep’s back. Starting there, pick up 5 stitches up the left side, 2 stitches along the ridge of the Sheep’s back and 5 stitches down the right side the Sheep’s rear. [12 stitches]
Working back and forth in rows…
Knit 4 rows.
Next Row: Bind off 1 stitch, knit to end. [1 stitch decreased]
Repeat last row 3 more times. [8 stitches]
Bind off.
Legs
NOTE: Before you make the Legs, stuff the Sheep loosely, then pick up the stitches from the Provisional Cast On, divide them in half and use the Kitchener Stitch to graft the Belly closed.

Using the Contrast Yarn and the smaller double pointed needles, pick up 26 stitches at one end of the Sheep’s Belly, as shown above. Here’s how…
Pick up 3 stitches in each of the 4 stitches along one side of the Belly [12 stitches], pick up 1 stitch along the center of the Belly, rotate the sheep and pick up 12 stitches along the other side of the Belly and one last stitch along the center. [26 stitches]
Distribute stitches on three double pointed needles, place a marker and join for working in the round.
Round 1: [K12, p1] two times.
Repeat Round 1 until Leg measures 4 inches from the pick-up round. NOTE: If you are making the Gentle Giant version, repeat Round 1 until Leg measures 5 inches.
Next Round: [K11, ssk] two times. [24 stitches]
Cut yarn, leaving a 10-inch tail.
Divide stitches in half, placing the first 12 stitches on one double pointed needle and the second 12 stitches on a second double pointed needle. Use Kitchener Stitch to graft together the two sides of the Leg.

Make a second Leg at the other end of the Sheep’s Belly.
Weave in the ends and you are all finished with your Bobble Sheep!


Hello, I am on round 5 and am confused about the increases. I only have 3 stitches increased by the end of the round. I only have two markers, one BOR/EOR and one other one 23 stitches away (p21, k2). Is this correct? It seems I start the round with an increase, increase before my other marker, and then one final increase before the EOR marker. When I try the increase after the second marker the stitches aren’t even on either side of the marker and don’t match the other side. I’m so confused…
Hi Amy,
Thanks for reaching out! You do have your markers placed correctly, and there will be two stitches after each marker before the first increase, but I think you are not repeating all the way back to the first bracket so you are missing an increase. It might help to expand and break the row up onto separate lines as follows:
M1L, K2
(MB, K3), repeat to 3 stitches before next marker
MB, K2, M1R, slip marker, K2
M1L, K2
(MB, K3), repeat to 3 stitches before next marker
MB, K2, M1R, slip marker, K2
These 6 lines comprise the entire Round 5. I hope that helps, and please feel free to reach out if you have any other questions!
Best,
Julianna
In row 5 The asterisk to repeat is within the first bracket after the M1L. Are you saying we should repeat the entire bracket?
Hi Dana,
Thanks for reaching out! Yes, you will be repeating the entire bracketed section of the row; however, within that bracketed section, you will be repeating the stitches between the asterisks until you are 3 stitches before the next marker, then completing the instructions in the brackets before going all the way back to the first bracket.
I hope that clears things up!
Julianna
Hi there,
I was in New York last November and bought the bobble sheep pillow bundle in your shop. I only started knitting it this week and have just noticed there are 4 skeins of Gentle giant, 4 Skeins of super soft merino and I Skein of Blue Sky baby alpaca. Is there a mistake in the packaging as I don’t see any instructions for changing from gentle giant to super soft merino !!
The bundle I bought says bobble sheep in super soft merino
Please advise
Kind regards
Edna
Hello Edna,
Thank you for writing us about this! It sounds like you might have half a Gentle Giant kit and a full Super Soft Kit. To get this figured out as quickly as possible please e-mail us at customerservice@purlsoho.com explaining what happened and they will be able to help you resolve this.
I hope this helps and happy knitting!
-Marilla
Hello
I am working on the head of this fun pattern and I have a problem. I don’t seem to have enough stitches between the second and third markers to complete the decreases called for. After the repeats of rows 1 and 2 my stitch count was correct. But I am left with only 4 stitches between the markers. I’m not sure where I made a mistake. I would be grateful for any help.
Thanks for your help.
Hi Cathy,
Thanks for reaching out! It sounds like your markers might have been placed incorrectly in the first row. When working the set-up round, you should knit 16 once, then place marker, knit 30, place a marker, knit 30, place a marker, and knit the last 16 stitches, so you will have 30 stitches between markers one and two and another 30 between markers two and three. I suspect you might have repeated all the way back to the beginning of the row instead of repeating just the instructions within the brackets.
I hope that clears things up!
Julianna
Hello! I’m also working on the head at the moment. The body is done and looks like it should. I am left-handed and have googled instructions on the different technics, but I am stuck on how to knit the rounds on the head. I use a circular needle and when I follow the instructions I get the purl-side out. Any tips? First, I was thinking I could just purl instead but that doesn’t feel quite right.. What am I missing?
Hi Beatrice!
Thank you for reaching out to us, though I’m sorry to hear your bobble sheep’s head isn’t turning out as expected! It sounds like you may be knitting the head portion inside out, which is causing the purl bumps to appear on the outside of the head as opposed to the inside of the head fabric. Since you are knitting left-handed, you may need to knit in the opposite direction around the stitches you picked up for the head so that V-shaped stitches are facing you while you knit.
I hope this helps, but please feel free to reach out to us at customerservice@purlsoho.com for some extra help if needed!
All the best,
Margaret
Thank you! I bet that’s what happened. I finished the sheep by winging it and it’s ok. I have 2 more to make so I will be more careful placing my markers.
Ack. I knitted the body no problem but I’m having difficulty with the head. It appears to be upside down. So… I’m not sure what I’d did wrong. Has anyone else had this problem?
Hello Ellen,
Thank you for reaching out! This can easily happen if you begin picking up your stitches at the wrong point. You must be sure that you start at the left bottom of the Neck.
I hope this makes sense and let us know if you have any further questions!
Best,
Marilla
I have the same problem. The head is upside down. When you say left bottom of the neck it is not clear where is the left? If the sheep is facing as in the picture with the head placement on the left do I pick the stiches in front or in the back to start with. I am confused!
Hi Paule,
Thanks for writing in! When you are looking at the body of the sheep with the space for the head facing you (so that if the sheep had the head you would be looking face to face), from there you will start picking up the stitches at the left bottom of the neck. For the orientation, please see the image under MAKE HEAD + EARS.
I hope this clears things up!
Gianna
Does the sheep only have two legs, 1 front & 1 back? I cannot figure out the directions for 4 legs!
Hi Chris,
Great question! This little sheep has one leg for the front and one for the back! You can certainly modify the pattern to make 2 legs on the front and the back but you may end up needing more yarn so do be sure to make sure the head is completed first!
Best,
Cassy
Hi. I’ve knitted the tail and am about to bind off but the tail is curved and not flat in line with the sheep’s spine. This is because of the two stitches across the top and the turn which you would expect to give a curve I guess. So the tail is twisting around not flat as in the photo. Please can you help?
Hello Helen,
Thanks for reaching out! This tail is intended to curve. You should have 5 stitches on either side of the body and 2 at the top. The tail may look flat in the photo because i is in profile, but it sounds like you are knitting the tail exactly right!
Happy knitting,
Marilla
Hi there,
I just finished the body on this, the version I have made is a lot smaller. Would it be a problem you think if I crocheted the head and legs instead of knitting it?
Thanks a ton!
Kiran
Hi Kiran,
Great question! We don’t have instructions for crocheting the head and legs of our sheep, but if you are familiar with crocheting and confident you can create the same shape, I don’t see why you couldn’t!
Best of luck, and please do let us know how it turns out!
Julianna
Hi there, I am on Round 13 and I have 90 stitches on my needle so I think I have done everything right so far, but the directions say to K3, MB, K3 to 4 stitches before the marker but after the last bobble before the marker, I only have 3 stitches left. It would be the same for the second repeat of the pattern (3 stitches left before the marker, not 4). Did I do something wrong somewhere? Your patterns are so well written that I doubt it’s an error in the pattern. Thank you!!
Hi Hilary,
Thanks for reaching out! It sounds like you are right on track! The repeat should end with K3, so if you have already worked the MB, that would be the first of the 4 stitches at the end of the round, so all you have left to do is K3.
I hope that clears things up!
Julianna
Which way do the ears face? The purl side facing forward or back?
Hi Lesley,
Thanks for reaching out! The purl side and opening in the ears should face the front of the sheep.
Happy knitting!
Julianna
I am not a very advanced knitter. I am almost done with the body. The directions for doing the head on separate knitting needles seems so confusing to me – I like knitting in the round with round needles. Do you think I could knit the head separate and then sew on to the body? Or use the round needles on the body instead of using the separate straight needles?
If I did the head separate, would I cast on 92 stitches to start?
Hi Christy,
Thanks for reaching out! You could knit the head separately and sew it on if you would like, but you will still have to use double pointed needles. Because the head is much smaller around than any circular needles, double pointed needles will make it possible to still knit the head in the round. It might seem tricky if you haven’t ever tried it before, but our Double Pointed Needles tutorial should help shed some light on the process!
I hope that helps!
Julianna
Julianna, Christy or others might also, if they don’t like using DPs, use a pair of circulars. I haven’t yet made this, but that’s what I do even for baby hats when it’s time to change to DPs. Just a thought.
This is such a fun and cute project! I also have a question about the sheep’s head. Do you start to pick up the stitches from the neck bottom, on the left side of the sheep as you face the sheep? It seems that this is the way the ears are meant to be constructed. Please advise. Thanks!
Hi Ginger,
Thanks for reaching out! It sounds like you’ve got it! If you’re looking at our picture of the start of the head, the lower left hand needle is the first set of stitches that are picked up. If you scroll down a bit, you can see another image that shows how the ears are picked up from the side of the completed head!
Happy knitting!
Julianna
Som jag förstår så går det inte beställa material längre, vilket garn rekommenderar ni istället som jag kan köpa i butik?
Hi Annika,
Thanks for reaching out! We are currently out of the white Super Soft Merino, but it is on order and hopefully will be restocked soon! I suggest clicking “Let me know when this is back in stock” and you’ll be notified via email as soon as the yarn or kit becomes available.
I hope this helps – happy knitting!
Cassandra
I figured out my problem on row 5 x my stitch markers were off
Hi Laurie,
Thanks for writing in, and I’m so glad you were able to figure out this row! It looks like we did reply to your original comment, but you may not have been notified – I’m so sorry for the confusion! We do our best to respond to all comments within a day or two, so if you don’t hear from us in the future, you can always check back here to see if a reply has been posted!
Best,
Julianna
I am confused with row 5. It starts with M1L, k2. I’m not sure how to start a row with M1L. Do I knit the first stitch in the row then make the M1L between the next stitch picking up the bar? Or make the increase at the beginning like a M1 only leaning to the left.
Will I have to move the beginning of the round marker after making the increase to the increased stitch?
reply
Hi Mary,
Thanks for reaching out! To begin the round with a M1L, you will start by slipping the beginning of round marker, then picking up the horizontal bar between the last stitch of the previous round and the first stitch of the new round. The result should be that the new stitch created by the M1L will be the new first stitch of the round, and you won’t have to change the placement of your marker!
I hope that clears things up!
Julianna
I am having trouble with the head of the sheep pillow. On round 2 it says you decrease 2 stitches. But you also make two stitches with the m1l and m1r. So is the number of stitches still 92? Thank you. I am just getting to this project and hope you can help me.
Hi Mary,
Thanks for getting in touch! I think you might be looking at Round 1 of the head, which includes both increases and decreases. In this row, you will work one m1r and one m1l to increase twice, but will then decrease four times, so will end up with two fewer stitches than you started with.
I hope that clears things up!
Julianna
Yes, I said round 2 and did mean Round 1. I think I understand what I did wrong. I will carry on and see.
Thank you for your assistance.
I’ve started a second sheep; love these critters! Question, please regarding the Kitchener for the top of the back. The yarn is on the front needle as the last stitch of the last round was slipped onto the left needle. Do I begin with 2 set up stitches and do I use the regular Kitchener stitch or Garter Kitchener stitch? Please advise when convenient. Thanks!
Hi Ginger,
Thanks for writing in! You can go ahead and start working kitchener stitch as normal, even with the yarn attached to the front needle! The first step of the setup will also start with the front needle which seems odd, but the look of the grafted seam won’t be affected by where the yarn is attached.
I hope that clears things up!
Julianna
Thank you so much Julianna! Super helpful! Kitchener stitch is daunting at any level!
I’m at the end of the tail and the 8 stitches are on two needles. Please advise on how to do the bind off. Are we doing a 3-needle bind off with right sides facing out? Thanks!
Sorry …. anther tail question! A close-up of the finished pillow on the Purl Soho website sure looks like the tail is made of PURLED stitches (which I love the look of!). But, the directions that I followed indicate KNIT stitches, and my tail has knit stitches facing out. What have I done wrong?
Hi Blanche,
Thanks for reaching out! The tail is worked in Garter Stitch so that is how you get that texture that looks like purl bumps but it is actually knit on both sides! As for finishing, once you complete the “DECREASE FOR NECK AND TAIL” section you will Divide the stitches in half, sliding 23 stitches to each end of the circular needle or arranging them onto two double pointed needles. Holding the needles parallel to each other, use Kitchener Stitch to graft together the two sides of the Bobble Sheep’s back.
I hope this helps, happy knitting!
Gianna
I’m at round 9 and am very confused. The instructions says to start of with K1 and to end before the first marker with MB and K1, but if I’ve counted the stitches right I should have 39 stitches before the first marker (82 stitches alltogether), which leaves me with 3 stitches at the end instead of 2? Please help, I don’t understand where I went wrong
Hi Sarah,
Thanks for reaching out! I am happy to help! Which section of the pattern are you working on currently?
All the best,
Gianna
Hi, I’m at round 9 and am starting with 82 stitches in total. This then leaves med with 39 stitches before the first marker, but following the instructions and starting with K1 and then proceeding with MB and K3 leaves me with 3 sitches before the marker and not 2. WHat am I doing wrong?
Hi Sarah,
Thanks for reaching out! Are you using the correct number of stitches when you make the bobble? That may be what is happening here or that your stitch marker is in the wrong place.
I hope this helps, happy knitting!
Gianna
Thanks for the quick respons! when I’m making a bobble I’m using one stitch (knitting into one stich making 5 stitches and making it back to one stitch), so basically I’m doing 1stich for the bobble, then knitting 3 stiches, 1 stitch for the bobble, knitting 3 stitches and so on…..have I interpreted this the right way?
Hi Sarah,
Thanks for your response! That sounds correct! I assume then that you are coming up with an extra stitch at the end because your marker maybe in the wrong place. I would double check that and see if that helps!
All the best,
Gianna
Phew! Thank you for the help, I’ll double check the marker!
I am about to work on the head but am confused because you say start at the bottom left of the neck and pick up and knit stitches up the left side first. If I do that I will be picking up stitches on the wrong side of my work rather than the right side? I am confused, where am I going wrong. Thank you
Hi Susan,
Thanks for reaching out! You start picking up stitches at the left side but continue to pick them up around the entire circumference! You can see how we did this in the pictures posted under that section!
All the best,
Gianna
This is the sweetest pillow! Any chance for a crochet version? I would love to make four for my daughters!
Hi Emily,
Thanks for reaching out! Unfortunately we only have this pattern available as a knit pattern and not crochet, but thank you for sharing your interest! I will be sure to pass this along to the rest of the team!
Warmly,
Gianna
I have just finished round 4 and nervous to proceed to round 5 as it seems tricky and many have had questions. At this early stage of the sheep I’m guessing the knit 2 (that are next to each other) are the front and the back of the sheep. At this point I have 1 marker at the beginning of the row, then 21 stiches, marker (this marker followed by another knit 2, I’m guessing the back of the sheep) then 25 stitches till the next marker. Are my markers in the correct spot to begin round 5.
Hi Carol,
Thanks for reaching out! If you followed the set up round correctly and placed the markers in the necessary spots (which it sounds like you did!) then you should be good to go to move on to round 5! Unless for some reason you moved a maker once you placed it, they should all be in the correct spaces to continue on!
I hope this helps, happy knitting!
Gianna
I’m just starting this lovely pattern but I’m having trouble with round 5, it starts with M1L,K2. How do you make make a stitch at the beginning of a round? All the tutorials on line show that you must always have at least a couple of stitches in a row I’m order to M1L or M1R. Thank you,
Patricia
Hi Patricia,
Thanks for reaching out! You can certainly make a stitch off of the very first stitch of the row, since when working a M1L or M1R you are making the stitch using the stitch below. This allows you to make a stitch no matter where you are in the work! I recommend checking out our Make 1 Right (m1R) + Make 1 Left (m1L) tutorial and follow the instructions but just apply it to the very first stitch instead!
I hope this clears things up!
Warmly,
Gianna
Hi Gianna,
Thank you so much for your response, i now see why I could not make a stitch, I was trying the pattern on straight needles at first, once I switched to double pointed it worked!
I’m really enjoying this pattern, lovely!
Thank you
Hi Patrica,
I am glad to help and happy to hear that you got it figured out and that you are enjoying the pattern!
Please feel free to reach out with any more questions!
Warmly,
Gianna
Hi there,
Can you point me to any tutorials for picking up three stitches in a single stitch to start on the head? I know how to pick up a single stitch but can’t figure out multiples. Thank you!
Hi Mary,
Thanks for recaching out! We don’t have a specific tutorial for this particular pattern, but we do have an excellent Picking Up Stitches tutorial that will show you several ways to pick up multiple stitches!
All the best,
Gianna
Eek! I feel so silly writing in but I have never done a provisional cast on before and I am completely stumped on how to join the waste yarn and then join the main yarn. Maybe I shouldn’t start projects at 9pm! I am so excited about this project and am a bit embarrassed that I am having trouble on the first round. I appreciate your help!
Hi Alexandra,
Thanks for reaching out! I would recommend checking out our Provisional Cast On: a One-Step Method tutorial! It will walk you through the whole project!
I hope this helps, happy knitting!
Gianna
Hi, what circumference will the finished sheep have or measurement from one side to the other? Is there a big difference in measurement between the original bobble sheep and the giant sheep? From the pictures, the original seems to be more of a flat pillow and the giant version seems rounder.
Hi Anna,
Thanks for reaching out! I don’t have the full circumference of the sheep on hand, but the Super Soft Merino version measures 14″ from the top of back to bottom of belly, and the Gentle Giant version measures 15 inches tall from top of back to bottom of belly! The Gentle Giant version is overall bigger, rounder and a bit more plump than the Super Soft Merino version, which is a bit more flat and pillow like just as you described!
I hope this helps and please let me know if you have any more questions!
Warmly,
Gianna
Hi,
I hate to ask another question about row 5, but here I go! I have no problems making the pattern/stitches work out up to the first marker midway through the row. When doing the second section of row 5, I always end up with an extra stitch. I really want to do this the correct way and not just make do. Please help!:} I have read several other posts and I feel certain my markers are placed correctly. Have you had any other questions concerning an extra stitch?
Diane
Hi Diane,
We’re here to help and are always happy to clear up any confusion, so please feel free to ask away anytime!
It may help to know how each section between the markers is broken down. Whenever you make a bobble, you’re only working with a single stitch at a time so I like to think of the “make bobble, k3”, as a 4 stitch repeat until you get to the last 3 stitches before the marker. With that in mind, the first time you work round 5 should look like this if written out fully: [M1L, k2, make bobble, k3, make bobble, k3, make bobble, k3, make bobble, k3, make bobble, k2, m1R, slip marker, k2] repeat once
By the time you get to the first marker you will have increased by 2 stitches, one from the M1L at the start and the other from the M1B towards the end so you should have 23 stitches total within this section. It’s incredibly important to include these two increases and note the k2 AFTER the marker. The next section of round 5 should have 23 stitches. 2 of these stitches are the k2 I just noted to watch out for. The other 21 exactly mirrors the first section. By the end, you should increase from 23 to 25 stitches. Finally, if all is done correctly, you’ll just have 2 stitches between your other marker and the end of round/beginning of round unique marker. This is reserved for that k2 just like before to complete the pattern!
I hope that helps you visualize what you need ahead of time now. Please let us know if you still have any questions though!
All the best,
Zha Zha
Thank you so much! I finally got it by adding a total of 4 markers and it read much better for me. Thanks for the response!
Hi! I’ve been looking at making this for ages! Quick question – is there any stuffing at all in the head?
Hi Diane,
Thanks for writing in! No, there is no stuffing in the head of the sheep, just in the body!
Happy knitting!
Gianna
Hello,
I would like to modify this pattern to make a sheep about half the size.
What is the stitch count repeat? Multiples of ….?
Thanks!
Hi Dawna,
Thanks for reaching out! This pattern works over an odd number of stitches!
Happy knitting!
Gianna
hi! getting everything ordered to start this little guy- approximately how much polyfil was needed to stuff? i’d like to make sure i’m ordering the correct sized bag. thanks!
Hi Wendy,
Thanks for reaching out. You’ll need about 12 ounces of polyfil stuffing for this sheep! Hope this helps.
All the best,
Lili
Hi! I’m confused about the number of legs. Are there 4…? Two in front and two in back? Or just one in front and one in back? Thanks!
Hi Elle,
Thanks for reaching out! There are only two legs, one in front and one in back!
I hope this helps!
Gianna
Are the feet only on one side? Or does the one foot stretch across? Thanks!!
Hi Elle,
The feet are created right down the center of the bottom of the sheep! They are located along the area created by the kitchener stitch when grafting the belly closed.
All the best,
Lili
Hi, your instructions for the gentle giant bubble sheep have been amazingly clear and wonderful. I just have one question . I just finished knitting the head,which it turns out I did inside out so the stockinette stitch isnt on the outside but that doesn’t matter,but before I close it with a Kitchener stitch I’m wondering if I should stuff it? You don’t say anything about stuffing the headbut from the photos it looks like it’s a little fuller and not just flat. I want to do this tomorrow so if you get to this comment I hope you will by then. Thank you
Hi Megan!
Thanks so much for your kind words!
The head of our Bobble Sheep are not stuffed, but you can absolutely stuff yours to make it stand firmer! I have seen quite a few projects featuring stuffed heads on the Ravelry project page for the Bobble Sheep, and I think they look just adorable!
I hope this helps!
All the best,
Carly
Hi, there!
I’m making the head and I’ve run into a small issue. I’ve knitted “rounds 1 and 2 five more times,” but I have 70 stitches, not 68. I know this means I must have not knit a round 2 or otherwise missed two decreases at some point, but I can’t figure out where and I don’t want to start over! Any advice where/how I can decrease the two stitches I missed going forward. My round looks like this: 22 stitches, marker, 13 stitches, marker, 13 stitches, marker, 22 stitches. Should I just knit another round 2 before moving on or something else? Thank you!!
Hi Anjya,
Thanks for reaching out. After completing this decrease section, your round should have 22, 12, 12, and 22 stitches! So I think all you need to do is work another Round 2 to decrease the extra stitches away. I hope this helps!
All the best,
Lili
Thank you so much! I figured it was simple, but hoped it wouldn’t be too wonky to have two row 2s in a row.
When you M1L and M1R, do you do it knit wise or purlwise?
Hi Tracy,
Thanks for reaching out. These increases are both knitwise! In general, if a make 1 increase is meant to be done purlwise, the pattern will likely notate it as “m1p” or “m1R(or L)-purlwise.” Hope this helps clarify things!
All the best,
Lili
Hi! I’m starting this project and wanted to ask if you suggest 16 vs 24 inch needles? I’m still a little new to knitting and not sure which would better suit + get more use out of in future projects. Thank you!
Hi Jo,
Thanks for reaching out! Personally, I think I would actually use both 16- and 24-inch needles. The circumference of the body will end up being about 38 inches at it’s widest point, and that’s easier to work on 24-inch needles. But I would also recommend using the 16-inch needles as an intermediary length so that you can switch off of the DPNs sooner (since they can be fiddly to work with).
In terms of future projects, that entirely depends on what you’re planning on making! 16-inch circulars are great for hats, but you can use 24-inch needles (or larger ones) for sweaters, depending on what size you’re making. Hope this helps!
All the best,
Lili
Hi
I’ve frogged this 4 times! ugh
How many markers in total will I have when I start row 5?
Hi Marian,
I’m sorry to hear that you’ve been having trouble with this point in the pattern! On Round 5 in the INCREASE TO SHAPE THE BODY section, you should have a total of 3 stitch markers on your needles. Your end-of-round marker plus the two additional markers you placed on Round 2. Hope this helps clarify things!
All the best,
Lili
Hi,
i’m french. It is not easy for me to understand the english pattern but i really want to knitt this beautifful sheep.
Could you help me to undersand these abbreviations :
M3, SM, M1R and M1l.
Thank you very much in advance for your help.
King regards,
Caroline
Hi Caroline,
Thanks for reaching out, and no worries at all! This is what the abbreviations mean:
SM: slip marker
M1R and M1L: make one right and make one left (these are increase stitches, and we have a video tutorial)
I’m not sure what M3 refers to though. Can you let me know where you’re seeing this in the pattern?
In the meantime, I also wanted to point you towards our list of Knitting Abbreviations + Terms. This is a very useful resource for any knitter to have at the ready!
All the best,
Lili
Hi Lili,
Thank you very much for your help.
m3 is for example when you are in row number 13 when you knitt the body
Hi Lili,
a little message to tell you that Google translate can makes me crazy because only sometimes i realised that it change k3 in m3.
So i’m very sorry to take time to you to help me in this case.
Best regards,
Caroline
No worries at all! I’m so glad you were able to figure out where the confusion was coming from.
All the best,
Lili
Hi Lili,
i do the Bobble sheep Pillow in partridge. I’m in row number 14 to make the body. I have another question : should the space provided for the head be a hole or is this space closed and you will have to pick up the stitches for the head on the knit stitches (k2). I can’t find in the pattern where the stitches of the body should be separated in two to create the open space for the future head. Thank you again for your help
Hi Caroline,
There actually isn’t any space that goes between the body and the head! The body is completely closed up, and you will pick up stitches from the outside to begin the head. Hope this helps!
All the best,
Lili
Thank you Lili, i understand now it is ok for me,
kind regards,
Caroline
You’re welcome!
All the best,
Lili
Hi, My Bobble Sheep is turning out lovely….. thank you for the accurate pattern. My question. How do you pick up three stitches in one. No tutorials cover this. I winged it on the head, but would love instructions on the correct way to do this. Thx Suzie C.
Hi Suzanne,
Thanks for reaching out. The pattern actually gives instructions on how to do this! “To pick up 3 stitches in one stitch, pick up and knit one stitch, yarn over, bring the needle back into the same stitch and knit to pick up another stitch.” Hope this helps!
All the best,
Lili
Help! I’m ready to start on the head. I know how to pick up stitches, but for the life of me I can’t pick up 3 stitches in one stitch despite your directions. Do you have a video showing this? Seeing it in action would be so helpful and I can’t find a video anywhere online. Thank you!
Hi Kristin,
I’m sorry to hear that this step is giving your trouble, and I’m eager to help out! I’m afraid that we do not have a video of this, but we do have tutorials for both of the components–picking up a stitch and the yarn over stitch. These should give you a good idea of how to do both of those techniques, and then you just need to put them all together to pick up 3 stitches in 1 stitch!
All the best,
Lili
Hi so I’m working on the ears now and I’m wondering if the outside is decreasing while the inside stays the same. I’m just trying to clarify the instructions to make sure I’m reading it right 😊
Hi Anna,
We are so happy to hear you are making a little Bobble Sheep Pillow! You are correct, the ears are slowly decreasing at the sides as you begin to work flat. This will help shape them into small points, kind of like the shape of a leaf! I hope this helps but please let me know if you have any more questions!
All the best,
Gavriella