Heel Stitch Hat
It happens to the best of us… You wander into a yarn shop, anxious, antsy, raring to knit, but then, you are faced with it: the Wall. It’s packed full of vibrantly colored fiber, cubbies upon cubbies of yarn, arranged to inspire. But instead of igniting direction, this vertical display of skeins causes, what I like to call (in a hushed voice), Knitter’s Wall (gasp!).
It’s the knitter’s version of writer’s block. You find yourself standing there, staring aimlessly, hands thrown in the air, asking yourself, asking the wall, “What should I knit?!?!?!”
Although you can’t find Knitter’s Wall in any psychology books, I don’t need to tell you, it is a real affliction. The good news… there’s a solution! All you need is a warm-up project, a project to get those finger muscles moving and knitting neurons shooting. Something that’s sparks your interest, grabs your attention, and gets you back into your knitting groove. The even better news… I’ve got just the thing for you! The Heel Stitch Hat.

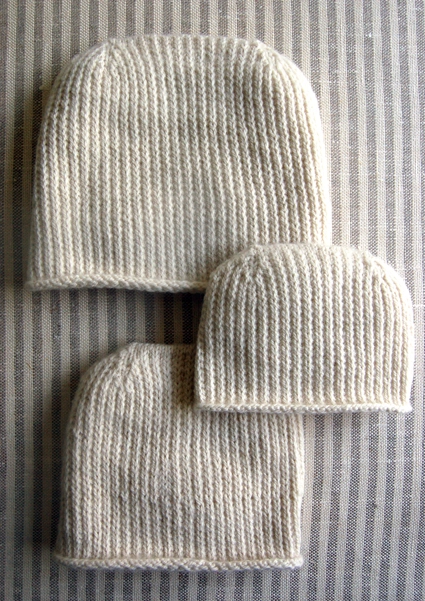
Heel Stitch is traditionally used for, you guessed it, the heel of a sock. Designed for its durability and cushioning effect, I knew such a striking texture and impressive loft would make up an incredibly handsome and cozy hat. For gorgeous stitch definition and sumptuous warmth, I used Swan’s Island’s beautiful Worsted weight organic merino, but most any worsted weight yarn will suit! Once you’ve completed it, you’ll have a hat to keep the cool air out and Knitter’s Wall at bay! -Laura
Designed by Purl Soho designer, Laura Ferguson.
Share your progress and connect with the community by tagging your pics with #PurlSoho, #PurlSohoBusyHands, and #PurlSohoHeelStitchHat. We can’t wait to see what you make!
Materials
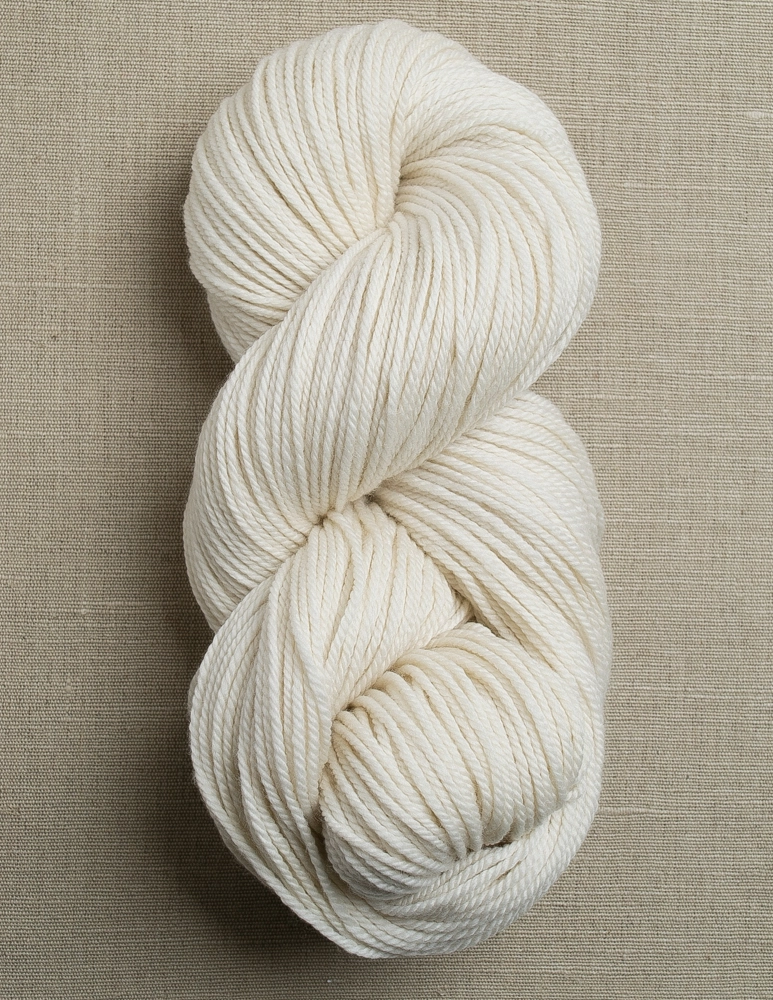
- 1 skein of Swan’s Island’s Worsted Weight organic merino. I just adore Swan’s Island yarn, but so many of Purl Soho’s worsted weight yarns would work for this pattern: Anzula’s for Better or Worsted, Blue Sky’s Cotton, or Brooklyn Tweed’s Shelter. When substituting yarn be careful to consider the differences in yardage between skeins. It takes approximately 80 (105, 135, 160, 185) yards for the Baby (Toddler, Kid, Small Adult, Large Adult) hats.
- A US 8 (5 mm), 16″ circular needle
- A set of US 8, double pointed needles
- stitch markers, 7 total
Gauge
6 stitches and 8 rows = 1 inch in Heel Stitch
Sizes
Baby (Toddler, Kid, Small Adult, Large Adult)
- Finished Circumference: 14⅓ (15⅔, 17, 18⅓, 20⅓) inches
- Height: 5¾ (6¾, 8¼, 9¼, 10¼) inches
If in doubt about which size to make, measure the circumference of the recipient’s head, subtract 2 inches and make the hat that is closest to that number.
Notes
Heel Stitch (for even number or stitches)
Round 1: *Slip 1, K1, repeat from * to end
Round 2: Knit
The first Stitch Marker you place is to indicate the beginning of the round. I find it useful for this marker to be a different type or color from the other six stitch markers which will indicate decreases. Towards the end of the pattern, you are to remove the first, third, forth and sixth stitch marker. This is not counting the beginning of round stitch marker.
Slip stitches purlwise with yarn in back.
Pattern
Using the US 8 circular needle, cast on 86 (94, 102, 110, 122) stitches. Place a marker and join for working in the round, being careful not to twist the stitches. We used a basic Long Tail Cast On.
Round 1: *Slip 1, K1, repeat from * to end
Round 2: Knit
Repeat Rounds 1 and 2 until the piece measures 4¼ (5¼, 6¼, 7¼, 8) inches from the rolled edge, ending with Round 1.
Shape Crown

Set-up Round: k12 (14, 14, 16, 16), place marker, k9 (9, 11, 11, 13), place marker, k9 (9, 11, 11, 13), place marker, k26 (30, 30, 34, 36), place marker, k9 (9, 11, 11, 13), place marker, k9 (9, 11, 11, 13), place marker, knit to the end of the round.
Next Round: Slip 1, K1, repeat from * to end of round.
Decrease Round: *Knit to two stitch before first marker, ssk, slip marker, K1, k2tog, repeat from * for next 5 markers, knit to end of round. [12 stitches decreased]
Repeat previous two rounds 2 (2, 3, 3, 4) more times. On the last decrease round, remove the first, third, fourth and sixth marker. Change to double pointed needles when stitches no longer comfortably fit around needle. [50 (58, 54, 62, 62) stitches]
Next Round: Slip 1, K1, repeat from * to end of round.
Decrease Round: *Knit to two stitch before first marker, ssk, slip marker, K1, k2tog, repeat from * for next marker, knit to end of round. [4 stitches decreased]
Next Round: Slip 1, K1, repeat from * to end of round.
Repeat previous two rounds. [42 (50, 46, 54, 54) stitches]
Finish
Arrange stitches onto two double pointed needles. Here’s how… Slip all the stitches up to the first marker onto a double pointed needle, remove marker, slip one more stitch onto the double pointed needle. Then, onto the second double pointed needle, slip all the stitches up to the next marker, remove marker. Slip remaining stitches onto the first double pointed needle.
Use kitchner stitch to close the top of the hat.
Weave in the ends and block as desired.


Would be great if you could post a picture of the hat on a model! Would like to see how it looks on a head before getting started.
What is the yardage for an adult small? Do you think 200 yds would be enough? Thank you!
I was wondering if you would be able to post the yardage used for the other sizes? I was hoping to be able to find something in my expansive stash for a couple of hats and I really like this pattern.
Jessica,
If you look at the pattern in the section “Materials”, it states the approximate yardage required for all the sizes.
“It takes approximately 80 (105, 135, 160, 185) yards for the Baby (Toddler, Kid, Small Adult, Large Adult) hats.”
Happy Knitting!
Erin P and Jessica, Thank you both for commenting! Here are the yardage requirements for the Baby (Toddler, Kid, Small Adult, Large Adult) hats: 80 (105, 135, 160, 185). Originally I said it took a every last inch of the 250-yard skein of Swan's Island Worsted to make a Large Adult. Correction: It took every last inch to make the Baby and Large Adult. Thanks again for your interest. Hope you enjoy the pattern! -Laura
My little girl hasn't taken this off since I took it off the needles! She looks just lovely in it. Thank you so much for a great pattern!
such a great pattern! one question–when you measure the length before the set up for decreasing, do you leave the roll or stretch the hat flat?
I think this hat style would be excellent in a varigated color mix yarn –for baby the soft baby colors–for teen bright mixed colors–for women a single color with maybe one or two rows with a contrasting color– for men the darker manish colors of tan,cream, light brown, and or some black mixed in.
Those are so cute! I'd make mine in red.
Could you make this hat with big bulky yarn on #13 needles?
Hi Sally-
This pattern wouldn't work on a size 13 needle because you wouldn't be getting the same gauge.
Thanks for your question!
Molly
Sally, you can adjust the pattern using the gauge you get using your bigger yarn and needles. You do this by dividing your gauge by the pattern's guage. For example, if you got 3 sts/inch, you would divide 6 into 3 (the gauge called for in the pattern), which would give you 0.5 (Half the stitches! Makes sense with the bigger yarn.). Then use this number to multiply by the numbers given in the pattern. So if the pattern says to cast on 100 sts, multiply by 0.5 and that gives you 50. Cast on 50 instead! I am sure you'll have to make adjustments, but with the bulky yarn, trying something out and making changes doesn't waste too much time. Right? Hope this works for you!
I'm loving this pattern so far! I have the same question as Amber though. When measuring before starting the decrease, do I leave it rolled up or stretch it out flat?
Thanks!
Hi Anne B.,
Great question.
You leave the edge rolled.
Laura
Has anyone attempted to make the large adult hat with this pattern? I have tried three times, and every time I get to the decrease portion the pattern goes off and I end up with long loops at stitches #15 and #35 in particular (these stitches fall at the slip portion of the ssk and the slip portion of the s1 k1 so they don't get knitted in until the markers get removed later on in the pattern and leave long loops). I suspect the pattern is off for the large adult hat, and was wondering if anyone else ran into this problem.
Hi Meaghen.
First of all I apologize for the extraordinarily long lag time responding.
I am curious how you are getting these long loops. Each stitch is worked at least every other round, as either a knit stitch or as a decrease stitch. I’m wondering if the long loops are a result of how you’re working your ssk.
When doing an ssk, do you slip one stitch knitwise then one stitch purlwise, insert the left needle into the fronts of the two slipped stitches and knit them together. If so, then yes, you do slip the stitches during an ssk, but these slipped stitches are also eventually knit by the end of the ssk. These stitches are worked every other round and shouldn’t be resulting in long loops.
Again, I’m sorry for the long delay in responding. I’m not sure you’ll see this, but please write me back with any questions you have!
Laura
I actually changed the large adult pattern to 17 stitches for the first section, which leaves 17 for the last section. Having them even seemed to make the Slip 1, Knit 1 rows come out much better. I was also leaving long loops when I tried 16/18 because I’d get to spots where the Slip 1/Knit 1 would just be way off, I’d end up doing two or three Slip 1s in a row to keep the rows up & down lined up.
Hello Claire!
It sounds like you made the appropriate adjustments for your project! Thanks for sharing your tips and keep up the good work! -Alyson
I experienced something similar making the baby pattern although it might be an error I made early on. After doing the first decrease row, the s1, k1 pattern didn’t match up. In order to fix this I ended up doing s1, slip marker, slip 1, knit 1 and then continuing in s1, k1. This did result in a small float where I slipped 2 in a row but it didn’t affect anything in the end.
Meaghen,
Thank you so much for sharing your experience with us. I will take a look at the pattern and see what's going on.
Thanks.
Laura
I just started learning to knit. I am not getting the same pattern as you with round 2 knit. What am I doing wrong? Thanks in advance.
Hi Su,
The ribbed texture created from Heel Stitch don't become prevalent until you've worked for a few inches. How far have you worked?
Or are you asking something different? I'd love to get this figured out with you. Please write back if you have any questions / comments.
Laura
Is the stitch slipped as if to knit?
Hi Linda.
I slipped the slipped stitches purlwise with yarn in back.
Thanks,
Laura
I going to do it for my son, wife and twins, matching hats.
Men with brw casting, girls, teal cast on.
Let you know how turns out!
Love this hat! Wondering if the kinks have been worked out of the adult pattern?
Hey Linda!
Thanks for checking in on this. The pattern is in great shape! I actually just worked up the largest size recently. I added some stitch counts to the pattern and a few addition notes.
Hope you enjoy.
Let me know if you have any questions.
Laura
I’m setting up for the kitchner stitch, but my working yarn ended up in the middle of my first needle b/c that’s where you set the end of round. So do I need to knit to the end of the needle? Or is there some other inscrution that I missed?
Hi Sarah.
Thanks for writing in. You have set up your stitches correctly. I noticed now the photo in the pattern does not accurately display where your working yarn should be. You are correct. The photo (which is now gone) is (was) not. To work kitchener, simply cut a length of yarn and thread it onto a tapestry needle in order to work kitchener across the stitches. I actually prefer to work with a non-tail when doing kitchener because you can manipulate both ends of the length of yarn if you need to even out your grafting at all!
Hope this helps.
Sorry for the confusion.
And thank you so much for writing in.
Laura
I love this pattern as well and I was wondering the same question as the one posed above. But, I have an additional question: do I carry the long lenght of yarn I have cut inside one side of the stitches I have on my double pointed needles so I can begin the kitchener stitch at the end of the row?
Hi Lynda.
Thank you for writing in. I’m thrilled to hear you like the pattern! As for your question regarding Kitchener Stitch… cut your working yarn and use a fresh length of yarn to graft the top of the hat closed. It may be helpful to weave in your working yarn before you do Kitchener Stitch so that last stitch you worked isn’t loose or cause any tension irregularities.
Thanks again for writing in.
Please let us know if you have any questions.
Laura
Hi!
I am really enjoying this pattern, using Madeline Tosh in Wassau – beautiful color! But…in order to adjust to my gauge, I cast on 98 stitches. Unfortunately, I didn’t plan ahead in how this would affect the decrease. Yikes? Any helpful hints on how I can either decrease four and then follow the pattern or incorporate 4 extra decreases along the way? Thanks so much!!
Hi Colleen.
I would do like you suggested and do 4 decreases to get down to 94 stitches and then you can follow the pattern the rest of the way.
So your “Set-Up Round” would look more like this…
Set-up Round: k14, place marker, k8, ssk, place marker, k1, k2tog, k7, place marker, k30, place marker, k8, ssk, place marker, k1, k2tog, k7, place marker, knit to the end of the round.
Let me know if you have any questions!
Laura
Hi!
I wrote in a question last evening but am unsure if I submitted it properly….???
Colleen
Hi Colleen.
You did submitted it properly!
I wrote you back around 9:30 this morning.
We try to approve and respond to all comments as quickly as possible, but sometimes we’re busy busy publishing new posts or designing the ones coming up! Thanks for your patience and please let me know if you have any other questions.
Laura
Could this lovely looking pattern be knitted on 2 straight needles?
Hi Ros Pearl.
Thanks for your interest in the pattern.
Unfortunately at this time we only have this pattern available for knitting in the round.
I’m sure there’s a way to modify the hat to work it flat, but we just have not yet developed that pattern.
Sorry and thanks again for writing in.
Laura
Just finished for a neighbor’s little girl that’s taking chemo. Did it in LITTLE BO PEEP by Bernat. I worked 10 rows of K2P2 instead of the roll. Turned out beautiful!
Just finished one for a neighbors little girl that’s taking chemo. I made it in LITTLE BO PEEP by Bernat. I also worked 10 rows of K2P2 at the beginning instead of the roll. Turned out beautiful!
Can the mulberry merino be used with this pattern?
Hi Julie-
Unfortunately the Mulberry Merino is a bit too thin to work for this pattern but our Worsted Twist yarn would be a great substitution!
https://www.purlsoho.com/purl/search/?search_keywords=worsted+twist
Thanks for getting in touch!
Molly
This past fall, I worked up 3 – 4 of these hats to use up some wool I had. I put them in the living room on a table intending to store them for Christmas gifts. My three teenagers snapped them right up and used them right away…the pattern is a big hit at our house!
I would really love to make this hat but wondering if it can be made on straight needles? Would you use the same pattern?
Hello, Anna!
Thank you so much for writing in! Unfortunately at this time we only have this pattern available for knitting in the round. I’m sure there’s a way to modify the hat to work it flat, but we just have not yet developed that pattern. Sorry and thanks again for your question!
Happy knitting,
Kumeko
It’s easier to make hats using a longer circular needle and the Magic Loop method. Then, as you get ready to do the decreasing, you don’t have to change to double-pointed needles. I knit a lot of hats in the round, and don’t even own double-pointed needles.
This is a really silly question…how do you join for working in the round if the first stitch in the pattern is a slip? Did you join with a knit and then start the pattern?
Hi Maureen.
That’s not a silly question at all… You’re going to jump right into the pattern by simply slipping that first stitch. For this pattern, that’ll be the step that joins for working in the round.
Please let us know if you have any questions! Thanks for writing in, Maureen.
Laura
Hi –
I want to knit this for my sister who will lose her hair soon and have ordered a skein of Tosh Merino. The gauge in the suggested yarn is 6 sts per inch and the Tosh will be 4-5. How would I adjust the sts cast on for the adult large and the adult small? Can’t decide yet which size to do.
Thanks,
Julie
Hi Julie,
Thanks for writing in! The gauge you are getting is very similar and if you wet block the hat you can mold it to the size you need. I would cast on for the kid size if your gauge is 5 stitches per inch. This will yield a 20″ circumference roughly if this is around the size you are going for. Also, you can try to use a smaller needle if you want to hit the gauge as in the pattern. I hope this helps.
Best,
Adam
I like the looks of this stitch. It resembles ribbing, but does it “give” the way ribbing does? Does it expand when stretched?
Hi Cathy,
Thanks for the question. The heel stitch is less stretchy than normal ribbing but it does expand a bit. Make a swatch and see how you feel about it. It’s certainly more interesting to knit than a normal ribbing. Best of luck and happy knitting!
-Adam
Hi! I’m a beginner and would love to try this hat! However, I have US 6 and US 11 both 32” circular needles. Can I make this hat with either of these?
Thank you!
Hello Brivee,
Thanks for your question! If you are knitting your hat in the round you will need a 16″ cord for your needles as well as a set of double pointed needles. You can use either a US6 or a US11 depending on you
For this pattern you will need a US #8, 16″ circular needle A set of US # 8, double pointed needles stitch markers, 7 total. This hat is knit using a worsted weight yarn.
Please let me know if you have any further questions!
-Marilla
What does ssk mean i your pattern.
Hi Connie,
SSK means you are going to slip one stitch knitwise, slip the next stitch Purl wise,then knit the two together. It makes a nice clean left leaning decrease. If you go on our sight and go to tutorials we have a nice video that shows you the steps.
Enjoy,
Melissa
What is the web site. And thank u foe explaining for me
Hi Connie,
Thanks for writing back! Our ssk tutorial can be found here: https://www.purlsoho.com/create/slip-slip-knit-ssk/
Additionally, a list our our tutorials can be found here: https://www.purlsoho.com/create/knit/tutorials/
I hope that this helps!
Cassy
I’ve done 22 rows and the knitting is still rolling – it won’t flatten out at all.
Hi Kathleen,
When you finish the hat I would recommend blocking it to stop some of the rolling. If the rolling is making it difficult to knit you can always try to steam it a little bit to loosen up the stitches. The brim on this hat should have a slight curl.
I hope this helps!
Carly
Hello, I just realized I have 95 stitches instead of 94. Will the decrease be a problem ? Thanks
Hi Emilsen,
Thanks for writing in! Hmmmmm, the heel stitch pattern itself actually only works over an even number of stitches, so I’d actually recommend beginning again. If you work this pattern over an odd number of stitches, the slipped stitches won’t line up correctly, which will throw off the look of the knit fabric!
All the best,
Lili
Any thoughts about where I went wrong? When I put the stitches on the double pointed needles, the BOG was in the middle of the needle, so the working yarn was there as well. You need the yarn at the end of the needle to do the Kirchener stitch.
Hi Bobbie,
Thank you for writing in! I don’t think you did anything wrong but instead, it sounds like the stitches need to be redistributed around your needles so they are orientated in a way that works for the Kitchener stitch. You can do this by slipping stitches to the next needle over clockwise until they are even to work the closing of your hat. I hope this helps but please let me know if you need further assistance and I would be happy to help!
Happy knitting,
Gavriella