Rick Rack Rib
Rick Rack Rib creates a beautifully textured and dimensional fabric. The cable-like ridges are created by working the stitches out of order… it’s easier than it sounds! Check out our Rick Rack Rib tutorial video below for a demonstration.
Click To See Video Transcript
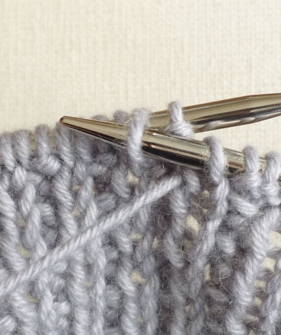
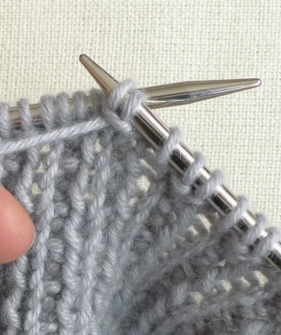
I am going to show you how to do Rick Rack Rib. First, I’m going to show you the right side. Begin the right side with a purl one. Next I’m going to knit into the back of that second stitch, leaving it on the needle. Then I’m going to knit into the front of the first stitch. Once I do that, you can let both the first and second stitch fall from the left needle. Let me show you these steps again: purl one, knit into the back of the second stitch on the left needle, leaving it on the left needle, knit into the front of the first stitch of the left needle. Now letting both the first and second stitch fall from the left needle. Purl one knit into the back of the second stitch, leaving it on the left needle and then knit into the front of the first stitch. Now letting both the first and second stitch fall from the left needle. Continue in this fashion until the last stitch of the row, and then you’ll purl one.
Now I’m going to show you how to work the wrong side of Rick Rack Rib. Begin the row with one single knit stitch. Now bring your yarn to the front in order to purl into the second stitch, leaving that stitch on the left needle and then purl into the first stitch, letting them both the first and second stitch fall off the left needle. Let me show you again, knit one. Bring your yarn to the front, purl into the second stitch, leaving the stitch on the needle. Then purl into the first stitch, and let both the first and second stitch fall from the needle. Continue these easy steps to the last stitch of the row, and you’ll end with a knit one.
Note
Worked over a multiple of 3 + 1 stitches
Stitch Pattern
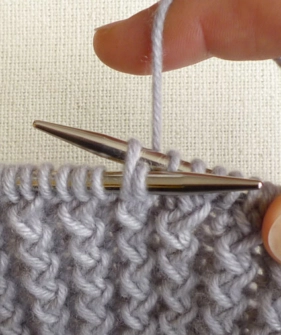
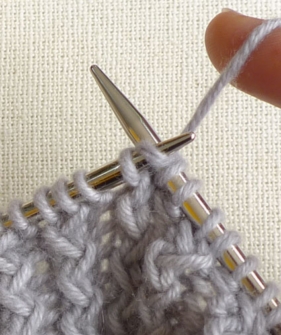
Row 1 (right side): P1, *knit into back loop of second stitch (leaving stitch on left needle), knit into front of first stitch (removing both stitches from left needle), p1, repeat from * to end of row.
Row 2 (wrong side): K1, *purl into second stitch (leaving stitch on left needle), purl into first stitch (removing both stitches from left needle), k1, repeat from * to end of row.
Practice!
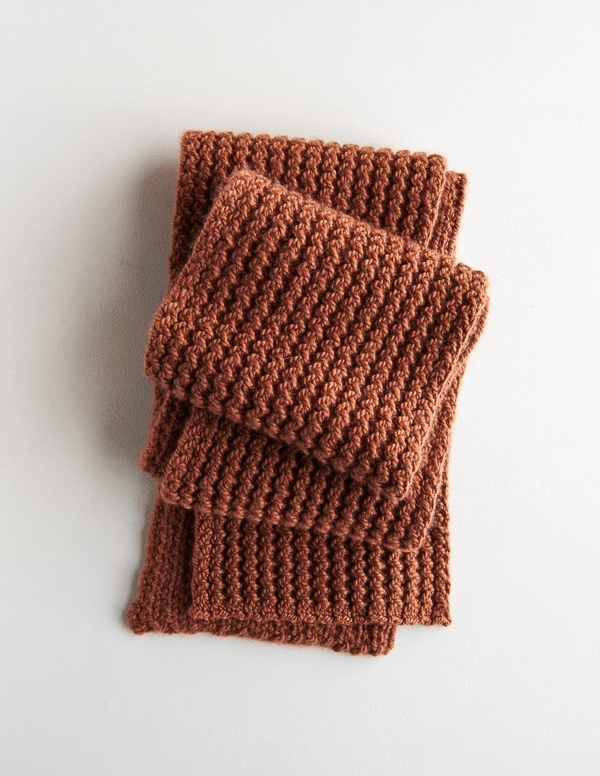
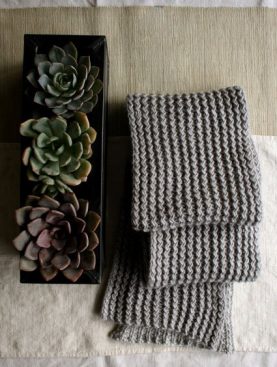
For some Rick Rack Rib practice, cast on for our Rick Rack Scarf! Originally knit up in Jade Sapphire’s 8-Ply Cashmere (below) and more recently redone in our 100% merino Worsted Twist (above).

Looking for more inspiration? Explore all of our free knitting patterns and knitting tutorials, buy one of our many knitting kits and yarn bundles, and shop for beautiful yarn. We have over 35 gorgeous natural fiber yarns in 100’s of magnificent colors, designed to bring integrity, beauty, and joy to your next knitting project and only available at Purl Soho!


Very pretty scarf
Your pattern does not load.
Hi Velma,
I am not clear on what you mean. Do you mean you can’t save as a PDF or you don’t know where to find the pattern?
-Adam
ooh! I love how this looks. Is there a way for the camera to be closer to the needles (like the photos) in the video?
Hi Kim,
Thanks for the suggestion. Unfortunately we can’t reshoot the video but I’d be glad to help you with anything if you have a specific question about this stitch. Thanks!
-Adam
Nice looking stitch but knowing me, there would be a lot of cussing till I got used to not letting those other stitches drop off the needle. 🙂 I will be trying this one for sure!
Love your staff and store! It’s about quality not quantity and you nailed it!
Also love getting new stitches to try.it keeps me wanting to jump into the next project
Thanks again
Such an unique stitch and scarf; will be making this one for sure!
OK. as you said, now Practice!! You girls are so talented…..
Is the tutorial supposed to have audio while the stitch is being demonstrated?
Hi Madeleine,
Thanks for writing in. I tried the video on my computer and it does have sound, so maybe your volume isn’t turned up? Let me know…
-Adam
How is this scarf done in two colors like is seen with the cashmere? It looks like there are vertical stripes of the ribbing with a darker purple background. I was going to knit this scarf just alternating colors after every two rows, but I really like the look of the vertical stripes!!
Hi Peter,
This scarf is actually knitted in one color only. I am not sure how you’d do it with two colors, but if you find out, let me know!
-Adam
Does this pattern have stretch to it?
Hi Lucy,
Great question! Yes, this stitch is quite stretchy – I would say it is just a bit less elastic than a regular 1×1 rib, but certainly much stretchier than stockinette.
Happy knitting!
Julianna
If I were to do this in the round, would I just do multiples of 3 and not 3+1?
Hi Vicki,
Thanks for reaching out! Unfortunately we do not have instructions for knitting this stitch in the round. Since the special stitch continues on the wrong side of the work, I’m afraid that simply adjusting the cast on amount won’t make it work out correctly. I’m so sorry about that!
Best,
Julianna
I’ve been knitting along well with this pattern and love it. However, when I joined a new skein, somewhere/somehow, I added an extra stitch! I’m so upset because I have no clue how to tink or frog in this stitch. Any suggestions? You’d think if I’m able to knit this stitch, I wouldn’t make such a dumb mistake, but I still make silly mistakes.
Hi Barbara,
No worries, extra stitches can pop up at any time! If aren’t very far into your work (one row past the row where you added the new skein of yarn), you can perform a decrease where the extra stitch is and it won’t be noticeable at all. Also, here is our tutorial for Adding a Ball of Yarn. It is a simple technique but it doesn’t allow for extra stitches to occur.
Let me know if you need any additional help.
Happy knitting Oscar