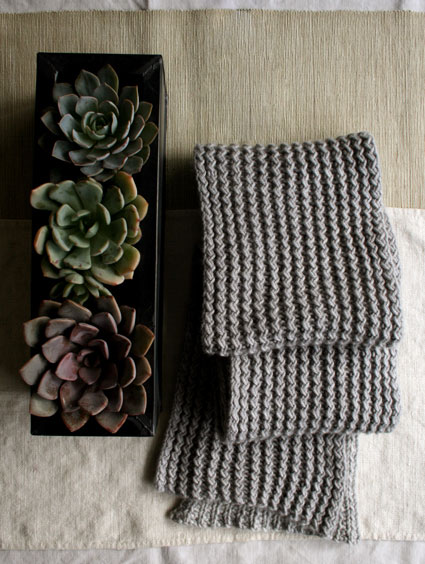
Rick Rack Scarf
I recently unearthed the first project I ever knit, a moth-eaten stockinette scarf. I made it over twenty years ago while I was spending a school year in rural France. My French “mother” was the town librarian and an amazing knitter. She opened her stash basket to me and walked me through every step of that crazy scarf.
Since then I’ve made dozens of scarves, and I wonder sometimes if I’ve run out of fresh ideas for the next one. After all, the criteria for a scarf pattern are rather stringent: something that lies flat, that looks good on both sides and that has a soft and beautiful drape. I was so happy to discover this Rick Rack Rib; it meets all of those standards and also happens to evoke one of my all time favorite things, rick rack! Thanks, Barbara Walker!

With the holiday season upon us, I made sure to use a super special yarn for the super special people on your list, including scarf-o-phobe men! Jade Sapphire’s softer-than-soft 8 Ply Mongolian Cashmere amazes everyone with its cloud-like loft and downy touch. This is definitely a far cry from that first wonky scarf! -Whitney
Update: New Yarn
February 2017


We knit up a new version of our Rick Rack Scarf in our very own 100% merino Worsted Twist. Still totally soft and beautiful, Worsted Twist makes a classic Rick Rack Scarf, and in the color Copper Penny, it also makes a rich and complex statement.
Designed by Purl Soho designer, Whitney Van Nes.
Share your progress and connect with the community by tagging your pics with #PurlSoho, #PurlSohoBusyHands, and #PurlSohoRickRackScarf. We can’t wait to see what you make!
Materials
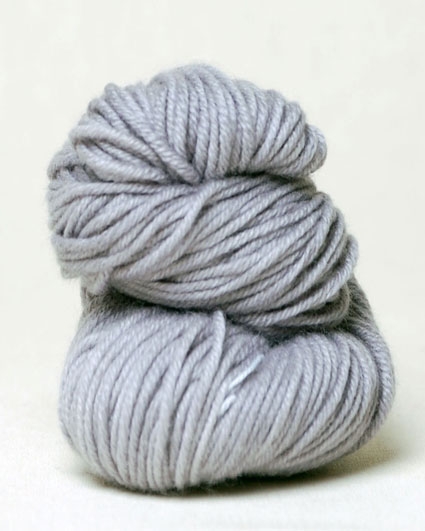
- 4 (5) skeins of Jade Sapphire’s 8-Ply Cashmere, 100% Mongolian cashmere. Each skein is approximately 100 yards/ 55 grams; approximately 400 (500) total yards required. We used the color Sterling. (NOTE: We no longer offer 8-Ply Cashmere, but choose from one of our other worsted/aran weight yarns.)
- US 8 (5 mm) straight or circular needles
GAUGE
26 stitches = 4 inches in Rick Rack Rib stitch
SIZES
Short (Long)
Finished Dimensions: Approximately 7 inches wide x 53 (66) inches long
NOTES
STITCH MULTIPLE
This pattern works over a multiple of 3 + 1 stitches.
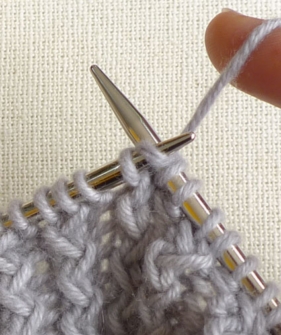
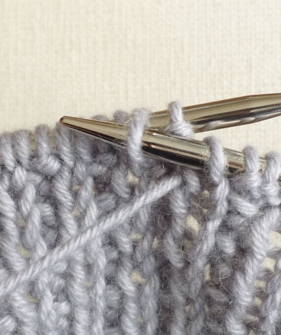
How to Work Rick Rack Rib
Here is a video that shows how to work the Rick Rack Rib, followed by how-to photos explaining the same thing…
Row 1
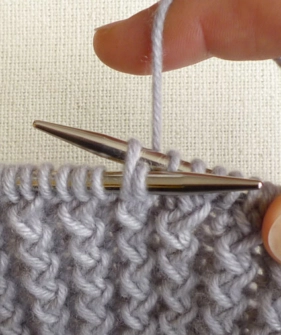
To “knit into back loop of second stitch” bring the right needle to the back of the work and insert it into the back of the second stitch on the left needle and knit.
Then, leaving that stitch on the left needle, “knit into front of first stitch” by bringing the right needle around to the front of the work and knitting the first stitch through the front loop, just like you normally would.
Take both stitches off the left needle, bring the yarn to the front of the work and purl 1 stitch.
Row 2
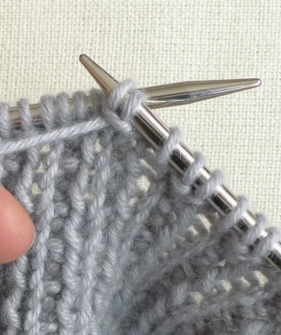
To “purl into second stitch” bring the yarn to the front of the work and purl into the second stitch on the left needle, just like a normal purl stitch.
Then, leaving that stitch on the left needle, “purl into first stitch” by purling the first stitch through the front loop, like you normally would.
Take both stitches off the left needle, bring the yarn to the back of the work and knit 1 stitch.
Pattern
Cast on 46 stitches. We used a basic Long Tail Cast On.
Row 1 (right side): *P1, knit into back loop of second stitch (leaving stitch on left needle), knit into front of first stitch (removing both stitches from left needle), repeat from * to last stitch, p1.
Row 2 (wrong side): *K1, purl into second stitch (leaving stitch on left needle), purl into first stitch (removing both stitches from left needle), repeat from * to last stitch, k1.
Repeat Rows 1 and 2 until piece measures 53 (66) inches long, ending with Row 2.
Bind off in a (p1, k2) pattern. Here’s how…
Bind Off Row (right side): P1, *[k1, pass first stitch over] 2 times, p1, pass first stitch over, repeat from * to last 3 stitches, [k1, pass first stitch over] 2 times, p1.
Weave in all ends and gently wet block.


Would you be able to use this pattern for the cuff of a mitten
Hi Eileen,
Great question! Yes, I think you could use this stitch for a mitten cuff as it is quite stretchy – I would say it is just a bit less elastic than a regular 1×1 rib, but certainly much stretchier than stockinette.
I hope that helps!
Julianna
j’aimerais avoir la traduction en français pour les explications des points de tricot des abréviations employées
Hi Jacqueline,
Thanks for writing in! At present, our patterns are only available in English; however, you may be able to use our Knitting Terms and Abbreviations page with a translation program. We certainly appreciate the request!
Best,
Julianna
is dit patroon ook geschikt om een vest te maken
vg rita
Hello Rita,
Thank you for reaching out! You could certainly use this stitch for a cardigan, but I would recommend using a pattern that is knit flat rather than in the round.
I hope this helps and happy knitting!
-Marilla
hartelijk dank
dat wou ik ook doen
groetjes rita
ps wat een geweldige steek prachtig
I’ve seen so many knit stitches that require knitting in the back of the stitch. I already do that with all my knit stitches because I do Eastern European knitting. Therefore, I’d have to reverse the knit stitch ti knitting in the front of the stitch. I’ve tried doing that but it’s so awkward, so I just stick with patterns not requiring knitting through the back of the stitch. I can’t seem to find enough patterns that utilize Eastern European style knitting or even Portuguese style.
O vídeo não permitiu aumentar a tela e eu não consegui ver a realização do ponto…achobele muito lindo
Hello Ana,
Thank you for reaching out and the kind words! This link might work for you .
I hope this helps and happy knitting!
-Marilla
Muy bello punto y fácil de realizar. La explicación muy entendible.
Gracias por compartir.
un grand merci pour ce point qui en faite est joli est assez simple lorsque vous le faite doucement,par contre pour reveir esceque il faut tricotter les mailles envers??merci de m’aider
bien cordialement
hava
Hi Evelyne,
Thanks for writing in and for your kind words! Our Rick Rack Rib tutorial should help explain the knit/purl stitches!
All the best,
Gianna
muy bonito, pero me gustaría que estuviera en español, gracias
Hi Damarys,
Thanks for reaching out! Unfortunately, our patterns are only available in english but thank you for expressing your interest and I will be sure to pass this along to the rest of the team!
All the best,
Gianna
Mi piace moltissimo ci è punto é possibile utilizzando per una giacca?
Grazie Marilena
Hi Marilena,
Thanks for reaching out! I am sure that this stitch pattern could be adapted to use in a jacket!
If you do, please let us know how it turns out!
Happy knitting!
Gianna
Es muy practico
Hello, beautiful stitch.
Is it possible to knit it in the round.?
Thanks
Hi Ines,
Thanks for reaching out! That is a great questions, I haven’t heard of anyone working this stitch in the round but I think it could certainly be possible!
If you try this out please let us know how it turns out!
Happy knitting!
Gianna
I’ve tried this in the round and it works just fine. CO multiples of 3 (not 3 + 1!) and only work row 1. 🙂
Kann ich dieses Muster auch Socken verwenden, wie geht das?
Hi Brigitte,
Thanks for reaching out! That is a great questions, I haven’t heard of anyone working this stitch in the round or using it for socks, but I think it could certainly be possible and I think this stitch would be adorable on a pair of socks!
If you try this please let us know how it turns out!
Happy knitting!
Gianna
Do you accommodate knitting left handed. I get so tired of having to reverse patterns
Hi Margaret,
Thanks for reaching out! At this time we don’t have different variations of our patterns, but thank you so much for expressing your interest! I will be sure to pass this along to the rest of the team!
Happy knitting!
Gianna
bonjour merci et gratitudes pour vos explication de ce point très joli bonne journée et bien a vous au plaisir
You are very welcome!
All the best,
Margaret
I live in Ontario in Canada where can I purchase this yarn?
Hi Aria,
Thanks for reaching out! We don’t have any stockists in Canada, but we do ship internationally. I recommend going through our shipping page for more details on pricing and average delivery times.
Please do not hesitate to let us know if you have any other questions or concerns, as we are always happy to help our global community of makers!
All the best,
Lili
Hallo,
vielen Dank für die tolle Anleitung.
Ich habe dieses Muster für die Jackenblende verwendet, die ich an die Vorderteile und dem hinteren Halsausschnitt annähen möchte. Jetzt suche ich eine elastische Abkettmethode, die zwar dehnbar ist, aber gleichzeitig die Rippen nicht spreizt. Wie könnte ich es also am besten machen?
Vielen Dank
Waltraut
Hi Waltraut,
Thanks for writing in! I’m afraid that I don’t know of an especially stretchy bind-off technique for 2 x 1 ribbing, but I think that you’ll get a good result by binding off in pattern, as in the instructions. With blocking, you should be able to get the bind-off and cast-on edges to look pretty similar!
All the best,
Lili
I’m one skein into this scarf and it’s so so beautiful already! As it gets heavier I’m finding that the edges are curling in more. Will this come out with wet blocking?
Hi Arianna,
Thanks for writing in! Blocking will indeed help keep those edges from curling! I would also recommend pinning a few additional sections as it dries to give the best result and help the fabric dry in shape. An additional thing you could try is blocking the part of your scarf you have completed by putting it on a length of scrap yarn and blocking it in the fashion you would the finished piece! I hope this helps but please let me know if you have any other questions!
Happy knitting,
Gavriella