I-Cord Cast On
An I-Cord is a neat and tidy way to control and define an edge, like for a hem or neckline. Often, people tend to this detail when all the knitting is done by adding an Attached I-Cord, but an I-Cord Cast On gets the fussy work out of the way right at the beginning of the project… We like that! Here is a video that explains the technique… Please let us know if you have any questions!
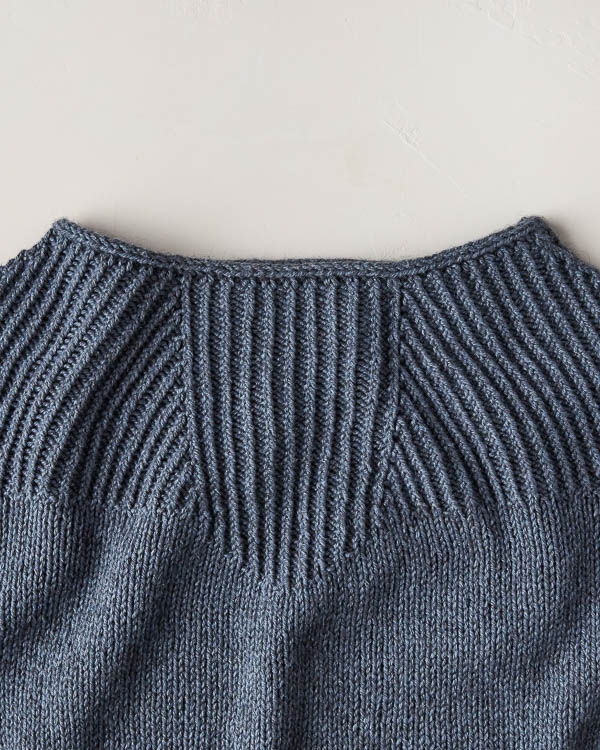
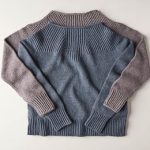
Want to give it a try? Our gorgeous Faceted Yoke Pullover starts at the neckline with an I-Cord Cast On in the round. What a beautiful beginning!


Thanks for the tutorial! I love the look of i-cord edging but when I try doing it as a cast on, my first row of stitches after the cast on is extremely elongated and loose. How can I avoid this?
Hi Megan,
Great question! From your description, it sounds as though you may be purling looser than you knit. I would suggest pulling your yarn a bit more taught when you purl the first stitch after slipping the 4 stitches back to your left hand needle!
I so hope that this helps!
Cassy
So no matter How tight I pull my purl, they always come out elongated
Maren
Hi Maren,
Thanks for reaching out! In the beginning, it may be elongated but as you continue to work the stitches should come together. I would suggest trying to regulate your tension to be as consistent as possible from start to finish! You may also be able to adjust the overall look by blocking the finished piece. I would recommend checking out our Blocking tutorial, it is an excellent resource to use!
Warmly,
Gianna
After the provisional cast on of 4 stitches to you do the short chain and break the yarn before starting the i cord cast on?
Hi Karen,
Thanks for reaching out! You will need to use a scrap yarn, preferably something in a contrasting color, to work the provisional cast on and will be cutting this yarn before joining your main yarn to work the actual I-Cord cast on.
I hope that clears things up!
Julianna
I’m trying the i-cord cast on with provisional cast on for the first 4 stitches, to end up joining and working in the round. When I pull out the scrap thread/ provisional cast on stitches I never end up with 4 live stiches to join to the other end, only 3…. Why is this?
Hi Sara,
Thanks for reaching out! This is not an uncommon problem when taking out a provisional cast on. Since you are now working from the bottom of the stitches, you will technically always have half a stitch less than you do at the top due to the shape of knit stitches. Once you take out the scrap yarn it is easy to skip the half stitch since it’s small and won’t unravel if you skip it, but if you look closely at the stitches before pulling out the scrap yarn, you should be able to spot the half stitch on one end to put it on your needle.
I hope that helps!
Julianna
I am making the faceted yoke pullover. I’ve made the 4 provisional cast on stitches with scrap yarn, then I knit a row with main working yarn. When I go back to begin the i-cord cast on, I pulled the yarn across the 4 stitches, purled the first stitch and then went to pick up the leg of the stitch below. This stitch is the scrap yarn. Is this right? I would think you would not want to do that.
Hi Lori,
Thanks for reaching out! You will actually be working this stitch into the waste yarn from the provisional cast on. It seems a bit odd, but the waste yarn will still be removable at the end.
I hope that clears things up!
Julianna
When you are doing the i-cord cast on with a four stitch provisional cast on, do you:
1. do the chain when you do the four stitch provisional cast on?
2. how do you get the working yarn when it’s at the end of the small chain?
Thanks
Hello Susan,
Thank you for reaching out! When you are creating a provisional cast on, you will be making your chain with scrap yarn. This is so that you can take your scrap yarn out and have live stitches to go back into.
I hope this answers your questions, and let us know if you have any further questions!
Happy knitting,
Marilla
Why do we need to do a provisional cast on for knitting in the round and not for straight knitting.
Hello Susan,
Thank you for reaching out! The reason you create a provisional cast on for knitting this stitch in the round is so that you can can join your cast on to knit in the round.
I hope this helps!
-Marilla
I made a trial of this. I am able to follow, but my iCord looks a bit loopy. Should I just chalk that up to learning how? I can’t figure out how to tighten up the edge. Maybe I need to use a springier yarn to trial. I used cotton. Sacrifice was acrylic. I am known to use iCord whenever possible, so I have the hang of it as an edging.
Hi Barbara,
Thanks for writing in! If you used cotton yarn to practice, I imagine that was the likely culprit, as cotton yarn doesn’t have much stretch, so you really have to yank on it to close up the back of the i-cord. It’s also possible that working the extra steps of the cast-on interfered with your usual i-cord method, so I think with a bit more practice on a bouncier yarn, you should get the hang of it shortly!
Happy knitting!
Julianna
Why not just join in the round after casting on? I don’t understand why the extra steps with a provisional cast on and grafting are necessary.
Thanks for any insight.
Hi Carol,
Thanks for reaching out! This method creates the smoothest join in the i-cord. If you were to join in the round without grafting the two ends together, you would end up with a flattened wide area in the i-cord, or, if you cast off the i-cord ends, two unattached ends of the cord standing out from the rest of the cast on. It is tricky, but the extra effort creates a very polished finish!
Best of luck, and I hope that helps!
Julianna
The faceted yoke pattern provides very useful tutorials to the provisional cast on and to the icord cast on. However I am half way through the icord cast on, and as I read ahead in the pattern, I see that the 10 inch tail from the provisional is used for grafting. But based on the provisional cast on tutorial and the notes above, I used a contrasting yarn! How can I graft with that? Am I misreading something, or can I possibly use the working yarn for grafting?
Per instructions from the video and the above notes, I created a provisional cast on using a contrasting color for the scrap yarn. I am making the faceted yoke sweater and am halfway through the icord cast on. I am reading ahead in the pattern and I see that the 10 inch tail from the provisional is used for grafting, but…that tail is in the contrasting color. Won’t that show? Can I use the working yarn instead?
Hello Carol,
This is a great question! You are absolutely correct. You should have used scrap yarn, but when using scrap yarn to cast on you will have a tail from the scrap yarn as well as your working yarn. If you didn’t leave a tail long enough of your working yarn to use it for your kitchener stitch you can use a new strand of yarn.
I hope this helps and happy knitting!
-Marilla
Thank you for quick replies to my questions.
Hi, i usually see i-cord cast ons use Kfb for the increase, not the purl and knit one below that you suggest. Is your approach chosen because it works well with stockinette patterns, or are there other advantages? Thanks!
Hi Lee,
Thanks for reaching out! You are corrected, a lifted increase blends into stockinette stitch much more smoothly than a KFB, which creates a purl bump. Both methods work well and the difference is fairly subtle, so you may want to try out each version with some scrap yarn before deciding which one top use for your project!
Best,
Julianna
Can you show a picture of what the icord and provisional stitches look like once they are grafted together after all cast ons are complete. I am a visual learner.
Hi Donna,
Thanks for reaching out! Unfortunately we don’t have a close up picture of how the finished cast on looks; however, if it is done correctly, the result is completely seamless and you shouldn’t be able to spot it once your ends are woven in. If you take a look at our Faceted Yoke Pullover, the graft in the i-cord cast on is at the right shoulder in the neckline, but it’s very difficult to see exactly where it is!
I hope that helps!
Julianna
I’m having a devil of a time with this cast on. I seem to get loops of yarn on the back side. It seems natural because we use the live yarn at the left side and pull it across three stitches to do the purl. Should I be pulling things tighter? I wish there was a picture of the BACK side. I’m eager to start the Pullover but can’t get past this cast on..
Hi Elaine,
Thanks for reaching out! Yes, it does sound like you have to pull tighter across the back of the i-cord! Keeping the working yarn snug when working the first stitch of each row should pull the back of the i-cord shut so it looks seamless in the back and matches the front of the cord.
I hope that clears things up!
Julianna
I love the look of the faceted yoke pullover. I have watched the video of the i-cord cast on. Do you have a video of grafting the i-cord ends?
Hi Barbara,
Thank you so much for writing in and for the kind words! We don’t have a video specifically of grafting the ends of the i-cord, but you will be using an ordinary Kitchener Stitch to do so!
Best,
Julianna
Google Stephen Eest for grafting icord. It’s a great tutorial. It’s important to get your stitches oriented correctly (wrong sides, or purl bumps, facing each other.)
I am knitting the Faceted Yoke Pullover and have a question concerning stitch count before joining in the round. First you have 4 stitches on the waste yarn, then cast on 128 stitches, then you use 4 stitches from the 128 to combine with the 4 stitches on the waste yarn to graft, leaving you with 124 stitches (for the size. I am doing) but you need 128 stitches after graft. Do you really need to cast on 4 additional stitches to graft. So really you would cast on 132 stitches for the third size? Hope you can help me with this. Thank you , Sandy E
Hi Sandy,
Thanks for reaching out! For the cast on will be following the I-Cord Cast on instructions as written, after you use provisional cast on for 4 stitches you will be repeating row 2 until there are 4 more stitches on right needle than total number of cast-on stitches desired, so for you that would be 132 (128 + additional 4 stitches!) You will then join the work in the round, grafting the 4 stitches together leaving you with the 128 stitches needed!
I hope this clears things up, happy knitting!
Gianna
Thank you so much for such a neat i-cord cast on technique!
I have successfully cast on all the stitches plus 4 sts, and am about to join to work in the round. My question is; do I make k2tog three times to decrease 3 sts?
Hi Ayako,
Thanks for reaching out! I am so glad to hear that you enjoyed out tutorial! What is the pattern you are working on?
Warmly,
Gianna
Just to clarify (or did I miss its in the tutorial?) This example is for a 4 st icord?
Thank you for the tutorial!
Hi Gayle,
Thanks for reaching out. Yes, in this tutorial we use a 4 stitch i-cord!
All the best,
Lili
Hello…I am a bit confused with the provisional/i-cord cast on for the Faceted Yolk Pullover. Am I to cast on a total of 128+4 provisional stitches ??? I am not making the connection regarding when to begin with my working yarn. This is my maiden voyage with this technique!
Hi Sheree,
That is a great question and you are exactly correct! You will want to have your total starting stitch count according to the size you are knitting plus the 4 additional stitches after the i-cord cast-on is complete! You will be completing all the cast-on stitches with your main color. The only time you will work with the scrap yarn is when you are setting up for the provisional cast on. I hope this helps but please let me know if you have any other questions!
Happy knitting,
Gavriella
I m totally confused. You have 4 stitches from the provisional cast on. Now you do the cord, and it says to pick up stitch underneath… well that would be the scrap yarn. What am I missing?
Hi JoAnn,
Thank you for writing in! I would suggest double-checking your pattern to see exactly what the instructions need you to do as this technique can vary. Occasionally the pattern will instruct you to do just that so you are not adding more stitches than you need by knitting an additional row. For example, our Faceted Yoke Pullover begins this way and actually instructs you to work in this fashion by picking up a stitch from the Provisional cast-on. While it seems funny to work into the Provisional Cast On a second time, that’s exactly what the designer intended! If you were to add an extra row, the I-Cord neckline would have just that, an extra row, and wouldn’t lay smoothly once its Kitchener stitched together. I hope this helps but please let me know if you have any other questions!
Warmly,
Gavriella