


Hood Scarf
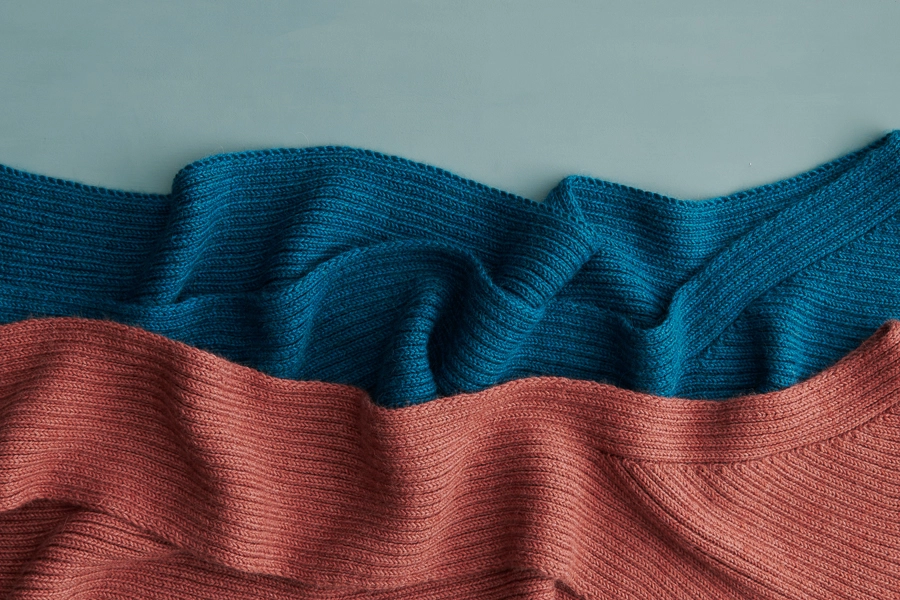
Our Season Alpaca is 100% of the most exquisite alpaca we could find on the planet. And our new free Hood Scarf pattern, designed by Lili Tobias, is an elegant, versatile design that uses each feature of Season Alpaca to its best. It’s a true knitting pleasure! Here’s why…

It’s incredibly soft. 100% super baby alpaca, Season Alpaca‘s grade of fiber is the most prized for softness. “Baby” refers not to the age of the animal it comes from, but to the fineness of its fiber, and “super” means that the fiber has been further sorted for quality, putting you in softest-alpaca-you-can-find-anywhere territory!

Season Alpaca has an astonishingly elegant drape. What is drape anyway? “Drape” refers to the suppleness of your finished piece. A lot of drape means the fabric can’t stand up on its own. Instead, it puddles and flows around you. This is characteristic of alpaca, but the smoothness and body of Season Alpaca’s spin adds a whole new level of beauty to its drape.

It is lively. Sometimes other alpaca yarns can feel a bit listless, but Season Alpaca‘s multi-strand structure (eight plied strands that are plied strands themselves) means it is full of body, with a subtle luster that naturally comes from fine alpaca fiber. It is responsive in your hands and brings joy from cast on to bind off!

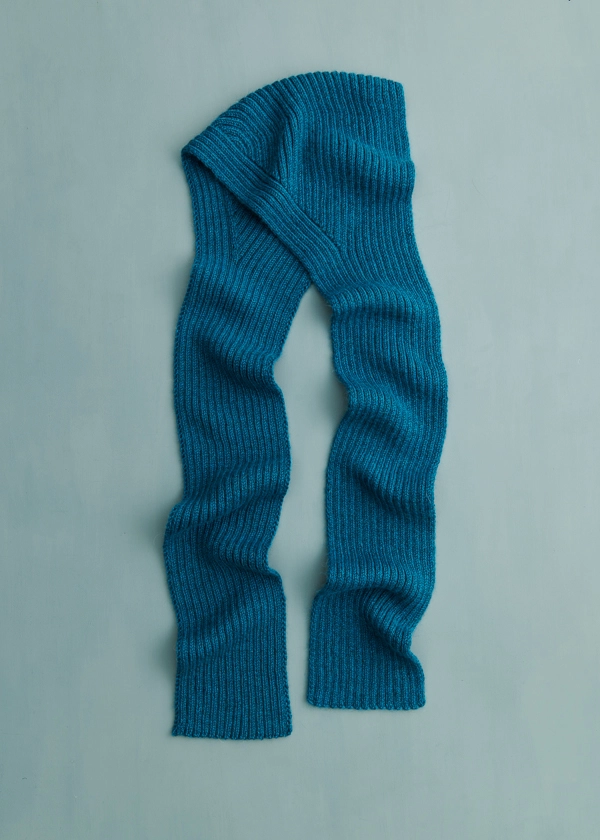
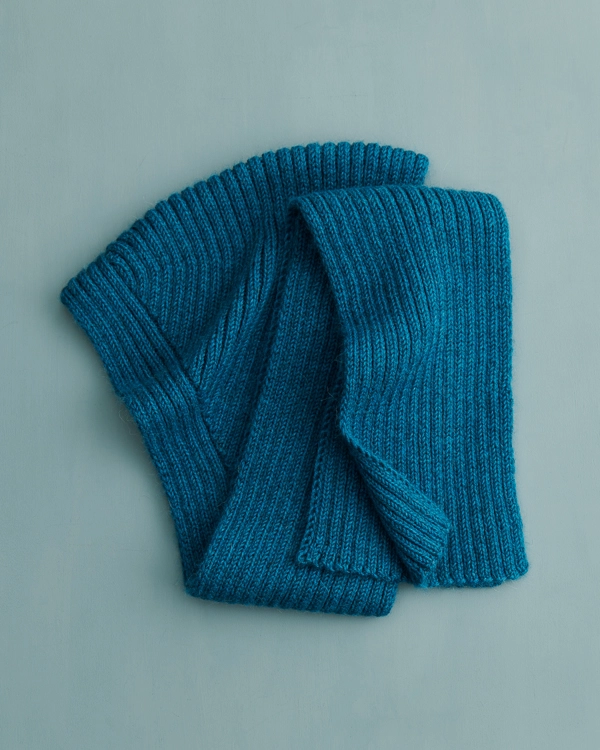
To make your own Hood Scarf, you begin with a basic 2×2 ribbed scarf and knit the length of one side. You increase toward the hood and then shape it with easy wrap-and-turn short rows, keeping in the groove of the ribbing as you go. Next, you travel back the way you came, decreasing and then finishing with another straight length of ribbing. In the end, you have an accessory that functions as a scarf but also offers head cover for blustery wind and snow.


You will love having this incredibly soft fiber brushing your cheek in hood mode or draped around your neck when it’s scarf time. And Season Alpaca‘s stitch definition means the simple ribbing and beautiful hood shaping have a clarity that is truly lovely. Hood up or down, you will love being wrapped in the world’s best alpaca!

Designed for Purl Soho by Lili Tobias. Lili spends most of her time knitting, listening to music, or doing both at the same time. She also happens to be our wonderful Customer Service Coordinator!
Share your progress and connect with the community by tagging your pics with #PurlSoho, #PurlSohoBusyHands, #PurlSohoHoodScarf, and #PurlSohoSeasonAlpaca. We can’t wait to see what you make!
Materials
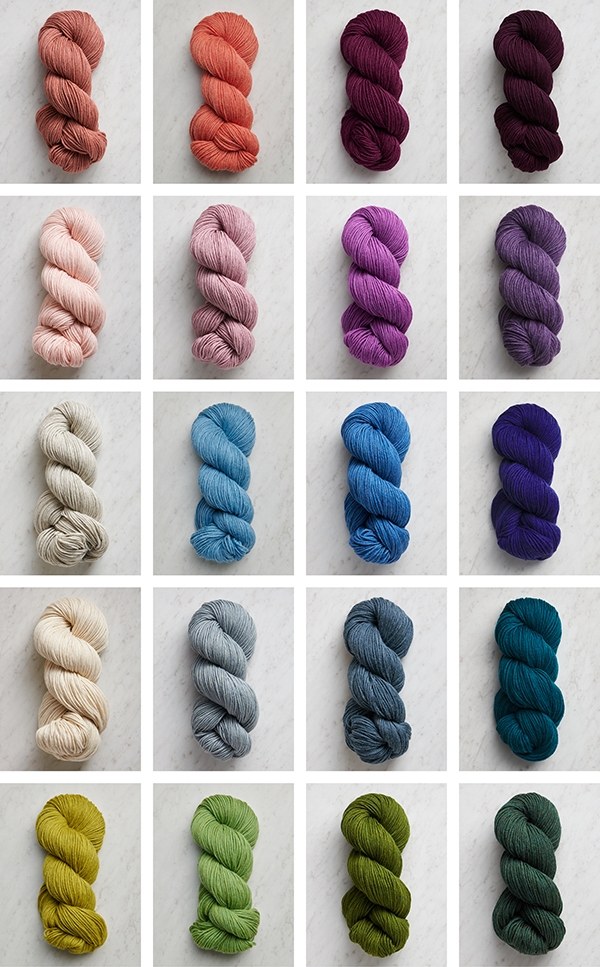
- 4 (5) skeins of Purl Soho’s Season Alpaca, 100% super baby alpaca. Each skein is 218 yards/ 100 grams; approximately 775 (905) total yards required. We used True Turquoise for one version and River Pink for the other.
- US 4 (3.5 mm), 24-inch circular needles
- A stitch marker
GAUGE
42 stitches and 29 rows = 4 inches in 2 x 2 ribbing, unstretched
SIZES
Adult X-Small/Small (Adult Medium/Large)
To fit head circumference of 18–22 (22–26) inches
- Finished Length of Scarf at Neck Edge: 74 (79½) inches
- Finished Depth from Top of Hood to Neck Edge: 11½ (13¼) inches
- Finished Width of Scarf: 5¾ inches
SAMPLES: We knit the True Turquoise sample in the Adult X-Small/Small size and the River Pink sample in the Adult Medium/Large size.
NOTES
SLIP STITCHES
Slip all slipped stitches purlwise.
SPECIAL INSTRUCTIONS
MAKE 1 RIGHT + LEFT
Make 1 Right: Use left needle to pick up strand (or “bar”) between last stitch and next stitch, from back to front. Knit into front leg. [1 stitch increased]
Make 1 Left: Use left needle to pick up strand between last stitch and next stitch, from front to back. Knit into back leg. [1 stitch increased]
For more help with these increases, visit our Make 1 Right (M1R) + Make 1 Left (M1L) tutorial.
MAKE 1 RIGHT + LEFT PURLWISE
m1R purlwise (make one right purlwise): With the left needle, pick up the horizontal strand between the last stitch you knit and the one you’re about to knit, bringing the needle from back to front, then purl through front loop of the strand.
m1L purlwise (make one left purlwise): With the left needle, pick up the horizontal strand between the last stitch you knit and the one you’re about to knit, bringing the needle from front to back, then purl through back loop of the strand.
For more help with these increases, please visit our Make 1 Purlwise Tutorial.
SHORT-ROW SHAPING: WRP-T (WRAP AND TURN)
On the right side: Keeping yarn in front, slip next stitch purlwise from left needle to right needle. Bring yarn to back. Return slipped stitch to left needle. Bring yarn to front. Turn work so wrong side is facing you.
On the wrong side: Keeping yarn in back, slip next stitch purlwise from left needle to right needle. Bring yarn to front. Return slipped stitch to left needle. Bring yarn to back. Turn work so right side is facing you.
For a step-by-step video and photo tutorial of how to work this technique, please visit our Short Rows: Wrap + Turn Tutorial, except note that right and wrong side instructions are reversed for this pattern!
PATTERN
RIGHT SCARF
Using a basic Long Tail Cast On, cast on 60 stitches.
Row 1 (wrong side): Slip 1 with yarn in front (wyif, see Notes), *p2, k2, repeat from * to last 3 stitches, p3.
Row 2 (right side): Slip 1 with yarn in back (wyib), *k2, p2, repeat from * to last 3 stitches, k3.
Repeat Rows 1 and 2 until piece measures 28½ inches from cast-on edge, ending with a right-side row.
HOOD
INCREASE
Set-Up Row (wrong side): Slip 1 wyif, [p2, k2] 5 times, place marker (pm), *p2, k2, repeat from * to last 3 stitches, p3.
Increase Row 1 (right side): Slip 1 wyib, *k2, p2, repeat from * to 2 stitches before marker, k2, make 1 right purlwise (see Notes), slip marker (sm), **p2, k2, repeat from ** to last stitch, k1. [1 stitch increased]
Increase Row 2 (wrong side): Slip 1 wyif, *p2, k2, repeat from * to marker, sm, make 1 left knitwise (see Notes), k1, **p2, k2, repeat from ** to last 3 stitches, p3. [1 stitch increased]
Increase Row 3: Slip 1 wyib, *k2, p2, repeat from * to marker, make 1 right knitwise (see Notes), sm, **p2, k2, repeat from ** to last stitch, k1. [1 stitch increased]
Increase Row 4: Slip 1 wyif, *p2, k2, repeat from * to marker, sm, make 1 left purlwise (see Notes), p1, **k2, p2, repeat from ** to last stitch, p1. [1 stitch increased]
Repeat Increase Rows 1–4 fourteen (19) more times. [120 (140) stitches]
SHAPE HOOD
Short Row 1 (right side): Slip 1 wyib, [k2, p2] 9 (11) times, wrp-t (see Notes).
Short Row 2 (wrong side): [K2, p2] 4 (5) times, k2, wrp-t.
Short Row 3: *P2, k2, repeat from * to 2 stitches before wrapped stitch, p2, knit wrapped stitch with its wrap, k1, p2, k2, p2, wrp-t.
Short Row 4: *K2, p2, repeat from * to 2 stitches before wrapped stitch, k2, purl wrapped stitch with its wrap, p1, k2, wrp-t.
Repeat Short Rows 3 and 4 three (4) more times, then repeat Short Row 3 one more time.
Short Row 5 (wrong side): *K2, p2, repeat from * to 2 stitches before wrapped stitch, k2, purl wrapped stitch with its wrap, p2.
Short Row 6 (right side): Slip 1 wyib, *k2, p2, repeat from * to wrapped stitch, knit wrapped stitch with its wrap, k1, p2, wrp-t.
Short Row 7: *K2, p2, repeat from * to last stitch, p1.
Repeat Short Rows 6 and 7 four (5) more times.
Next Row (right side): Slip 1 wyib, *k2, p2, repeat from * to wrapped stitch, knit wrapped stitch with its wrap, k1, sm, [p2, k2] to last stitch, k1.
Next Row (wrong side): Slip 1 wyif, *p2, k2, repeat from * to last 3 stitches, slipping marker as you come to it, p3.
Short Row 8 (right side): Slip 1 wyib, *k2, p2, repeat from * to 2 stitches before marker, wrp-t.
Short Row 9 (wrong side): *K2, p2, repeat from * to last stitch, p1.
Short Row 10: Slip 1 wyib, *k2, p2, repeat from * to 4 stitches before wrapped stitch, wrp-t.
Repeat Short Rows 9 and 10 four (5) more times.
Short Row 11 (wrong side): *K2, p2, repeat from * to last 5 stitches, k2, wrp-t.
Short Row 12 (right side): *P2, k2, repeat from * to 10 stitches before wrapped stitch, p2, wrp-t.
Short Row 13: *K2, p2, repeat from * to 6 stitches before wrapped stitch, k2, wrp-t.
Repeat Short Rows 12 and 13 three (4) more times, then repeat Short Row 12 one more time.
Short Row 14 (wrong side): *K2, p2, repeat from * to last stitch, purling all wrapped stitches with their wraps, p1.
Next Row (right side): Slip 1 wyib, *k2, p2, repeat from * to last 3 stitches, knitting all wrapped stitches with their wraps and slipping marker when you come to it, k3.
DECREASE
Set-Up Row (wrong side): Slip 1 wyif, *p2, k2, repeat from * to 4 stitches before marker, p2, k1, pm, k1, remove old marker, **p2, k2, repeat from ** to last 3 stitches, p3.
Decrease Row 1 (right side): Slip 1 wyib, *k2, p2, repeat from * to 3 stitches before marker, k1, slip slip purl (ssp), sm, p1, **k2, p2, repeat from ** to last 3 stitches, k3. [1 stitch decreased]
Decrease Row 2 (wrong side): Slip 1 wyif, *p2, k2, repeat from * to 3 stitches before marker, p2, k1, sm, slip slip knit (ssk), **k2, p2, repeat from ** to last stitch, p1. [1 stitch decreased]
Decrease Row 3: Slip 1 wyib, *k2, p2, repeat from * to 5 stitches before marker, k2, p1, ssp, sm, p1, **k2, p2, repeat from ** to last 3 stitches, k3. [1 stitch decreased]
Decrease Row 4: Slip 1 wyif, *p2, k2, repeat from * to 3 stitches before marker, p2, k1, sm, ssk, **p2, k2, repeat from ** to last 3 stitches, p3. [1 stitch decreased]
Repeat Decrease Rows 1–4 fourteen (19) more times, removing the stitch marker on your last row. [60 stitches remain]
LEFT SCARF
Row 1 (right side): Slip 1 wyib, *k2, p2, repeat from * to last 3 stitches, k3.
Row 2 (wrong side): Slip 1 wyif, *p2, k2, repeat from * to last 3 stitches, p3.
Repeat Rows 1 and 2 until Scarf measures 28½ inches from final Decrease Row, ending with a wrong-side row.
Bind off loosely, in pattern.
FINISHING
Weave in all ends, and gently wet block.


I Absolutly Love your Paterns.
Thank You
Is there a way to. Make the gloves fingerless??
N
Hi Michelle,
Thanks for reaching out! Can you please let me know what pattern you’re referring to? The pattern page you commented on is for a scarf, not gloves!
All the best,
Lili
Been looking for a hooded scarf. I just love this pattern thank you so much.
Can this be done with German short rows?
Hi Cindy,
Thanks for writing in, and yes, you can absolutely use German short rows for this pattern! Just be sure to work one additional stitch in pattern before creating the double stitch, so that the stitch counts for each short row are correct. Hope this helps!
All the best,
Lili
What size needle do you recommend for this yarn?
Hi Linda,
Thanks for reaching out! With Season Alpaca in general, we recommend anywhere between a size US 3 and a US 5. For this pattern, we used a size US 4, but you will need to knit up a gauge swatch in pattern to determine what size needle to use. You may need to size up or down your needles in order to get the correct gauge! If you would like to learn more about this, we have a handy tutorial called All About Gauge, which you can find right here. Hope this helps!
All the best,
Lili
It’d be helpful to see a back view of the scarf on models. Does the hood area come down far enough in back to cover the back of your head with the scarf portion wrapped around to make it closed in back?
Hi Diane,
Thanks for reaching out! Yes, the hood does cover the entire back of the head, and there’s no gap between it and the scarf!
All the best,
Lili
Thanks to Lili for asking this question. I really like the head scarf but since they were no pictures of the back of scarf. Didn’t’ want to knit this unless it was closed in the back.
Had dit patroon graag in het Nederlands gekregen
Hi Doris,
Thanks for reaching out! I’m afraid we currently are unable to offer our patterns in Dutch, but we would recommend using tools like Google Translate (https://translate.google.com) to translate this pattern! There’s an option to translate PDFs as well via Google Translate; if you’re interested in doing that, you can upload the full PDF to Google Translate to be translated.
All the best,
Lili
Wonderful pattern. I don’t speak English and to translate the patterns I help myself with the automatic translator. I would like to make this model but I don’t understand the difference in workmanship between the 2 sizes (Adult X-Small/Small (Adult Medium/Large). Thank you for any response.
Luigina
Italy
Hi Luigina,
Thanks for reaching out! There are two main differences between the sizes. First, during the INCREASE section, the larger size has more increases, meaning that the hood becomes both deeper and wider than the hood of the smaller size. Second, during the SHAPE HOOD section, you’ll work more short rows for the larger size–to accommodate the additional stitches on your needles. I hope this helps clarify things!
All the best,
Lili
A thousand thanks
Lili, I will! It’s too beautiful!
luigina
Hello! This is a really nice pattern; I would like to knit itwith the beautiful new Knitting yarn but it is a dk yarn. Not sure how to account for the heavier weight for the hood.
Hi Nadyne,
Thanks for reaching out, and I think this pattern would be lovely in Knitting Yarn! Unfortunately though, the hood would be extremely difficult to modify, so I wouldn’t recommend doing so. But there are other options! Can you let me know if you’re planning on making the smaller or the larger size?
All the best,
Lili
Hi Lilli
I was actually thinking of making the small (instead of the large) with the knitting warn and maybe make it longer. I think that could work?
Nadyne
That could definitely work! If you knit the smaller size at the slightly larger gauge of Knitting Yarn, it’ll end up being roughly the size of the original larger version (depending on your gauge).
All the best,
Lili
What would be a good yarn substitution for those of us allergic to alpaca?
Hi Karrie,
I’d recommend using another sportweight yarn for this pattern, so that you can match the gauge! If it’s just the alpaca that’s the issue, and not animal fibers in general, then I’d recommend using Wigeon. This yarn is 100% merino wool, so the fibers are so fine that they bend to the touch, rather than sticking up and scratching. Most people who are sensitive to other types of animal fibers do not have the same reaction to merino wool!
If merino wool is also an issue though, then I would recommend using a yarn made of plant fibers. Cotton Pure would be a wonderful choice in that case! This yarn is 100% cotton so it definitely won’t cause the same problems as animal fiber yarns might.
I hope this helps provide you with some alternate options for this project!
All the best,
Lili
Thankfully it is only alpaca. Appreciate the recommendation and quick response! Happy knitting.
Hi,
Is the”Right” scarf the larger scarf.
Thanks
Hi Lydia,
Thanks for reaching out! The Right Scarf and the Left Scarf sections will be knit for both sizes. These are the scarf ends that wrap around your neck while the hood is on your head, so both sizes need both of them! If you’re knitting the larger scarf size, then you’ll want to follow the numbers inside the parentheses (and not the numbers before the parentheses). Those numbers are for the larger scarf only!
All the best,
Lili
I love this pattern and want to make it but I am extremely allergic to wool including baby alpaca. Is there a cotton or even silk I could use that would work? (No acrylics please). Thank you
Hi Karen,
Thanks for reaching out! This pattern is designed for a sportweight yarn, so I’d recommend using another sportweight yarn to ensure that you can achieve the correct gauge. Cotton Pure would be a wonderful choice in that case!
As always though, we recommend knitting a gauge swatch before casting on your project, especially when you are substituting yarns. You may need to size up or down your needles in order to get the correct gauge! If you would like to learn more about this, we have a handy tutorial called All About Gauge, which you can find right here.
All the best,
Lili
Hello!
I have a question on m1R and m1L purlwise. Under the notes section, it states that they are worked on the wrong side.
Under the Hood Increase section, the increase row 1 includes m1R purlwise, yet this is a right side row.
I just want to confirm that I am proceeding correctly.
Thank you.
Hi Leah,
Thanks for reaching out about this! You’re absolutely correct–in this pattern, the make 1 purlwise increases are used on both the right and wrong side. That’s because the stitch pattern is ribbing, where both purls and knits occur on both sides! We’ll get that phrase removed from the NOTES section in order to avoid any more confusion going forward. Thanks again for bringing this to our attention, and please don’t hesitate to let us know if you have any other questions or concerns!
All the best,
Lili
“Repeat Short Rows 9 and 10 three (4) more times” – Is this the correct number repeats?
Hi Cecilia,
Yes, that should be the correct number of repeats for those short rows! Can you let me know if you’re noticing something that’s going wrong in your project though? Then I can take a deeper look to determine what might be causing the problem!
All the best,
Lili
Hi Lili: i’m at the hood shaping section and I don’t see anything in the instructions about the stitch marker that we used to mark the first increases. I’m going to go forward and leave the stitch marker where it is while I make sure I’m increasing with your stitch count — sound good?
It’s really fun to work this pattern and see the curve slowly coming to life. It’s kind of magic. 🙂
Hi Emmy,
Thanks for writing in, and that’s a great observation! You’re absolutely right, you won’t encounter the stitch marker for a while during the short rows. You’ll be working back and forth mainly over the front of the “hood” and won’t pass the stitch marker until you work all the way across the row on Next Row (right side) and Next Row (wrong side). And don’t worry, you won’t be changing the stitch count at all during the SHAPE HOOD section. Hope this helps clarify things!
All the best,
Lili
Hello!
I have found myself very confused after completing the increase section prior to beginning the short rows for hood shaping.
Maybe I am doing something wrong? Or not reading the pattern correctly?
Looking at the right side of the scarf (where the ribbing begins K2, P2 after the slipped stitch), my marker is now on the left side of the work. (This makes sense given that the set up row (wrong side) has the initial marker placed after 10 stitches (11 with slipped edge stitch).
But this is where i’m confused.
Row 1 for hood shaping is for the right side — does the hood shaping/short rows then begin on the right hand edge furthest away from the markers?
From the photos, it looks like the short rows start on the side of the work where the increases have occurred.
If i turn the work to start short rows,
I’m now on the wrong side (P2, K2)2) which is not where i should be according to the pattern.
I hope this makes sense.
Please help!
Many thanks.
Hi Karyn,
Thanks for reaching out! The hood shaping actually occurs mainly on the other side of the scarf, furthest away from the increases/stitch marker. For example, the first short row which is on the right side begins at the right edge of the scarf. You work [k2, p2] 9 (11) times and then work the wrp-t, which takes you to the wrong side, ready to work back in the other direction. You won’t actually pass the stitch marker until you work all the way across the row on Next Row (right side) and Next Row (wrong side)!
Hope this helps clear up your concerns!
All the best,
Lili
Lili!!
Thank you.
I actually figured it out.
It seemed so counterintuitive to me (but I am, shamefully, a mathematical idiot).
Thanks for your speedy response.
Project is looking great, and the wool so lovely.
Next up: your hat!!
You’re very welcome, Karyn, and I’m glad to hear that you figured it out!
All the best,
Lili
Is the wrap turn intentionally omitted in short row 7 and 9? If so what is supposed to happen there?
Hi Shen,
There is no wrp-t in Short Rows 7 and 9 because you will be knitting all the way to the edge of the hood! On both of these short rows, you begin in the middle of the row (after the wrp-t on the previous short row), and you knit from there to the edge. This gives the hood more width on the front (where it frames your face) compared to the back (where it goes around the back of your neck).
All the best,
Lili
If my stitching/ counting is accurate the end of short row 5 will leave you at the 3 stiches that end the row. The instructions stop with p2 but does not have a warp turn, by my count short row 7 goes to the end of the row. did I miss something?
Hi Shen,
It’s possible that you missed one repeat of Short Rows 3 and 4! You’ll need to repeat these rows 3 more times for the smaller size, or 4 more times for the larger size.
All the best,
Lili
Hi, Love the pattern and the yarn! I was wondering, how is the yarn so heavy? It’s 100g of sport weight which often is about 350m but here it’s a lot less which means the actual weight of the yarn is a lot higher. Is that due to the 8ply of plies and will the yarn feel “thicker”?
Hi Ilias,
Great question! Different types of fiber have different weights, and alpaca fiber tends to be particularly heavy. Yarn spun from alpaca also tends to be denser because there is less air trapped between the individual fibers (in comparison to many wool yarns that trap a lot of air). Hope this helps give you some background information!
All the best,
Lili
Hi Lili,
I’ve hit a snag at Short Row 14. I put markers for every wrp-t so I don’t miss them on the way back. BUT on Row 14 and Next Row, I very efficiently removed EVERY marker as I knit or purled the stitch with its wrap. And now the last part of Next Row says “slipping marker when you come to it, k3”. So I assume for that row, I should put a marker back before the k3, correct? On to Set Up Row it says “repeat to 4 stitches before marker (which I don’t have!), p2,k1,pm, k1, remove old marker, **p2,k2 repeat to last three stitches p3” – so the big question is: where should insert a marker so that I am making my decreases in the correct spot? Many thanks!
I just started the increase rows and I’m getting holes on every increase. I’ve never had this issue before. Help?
Hi Jessica,
Oh no, I’m sorry to hear that! Would you be able to send a photo of your work to customerservice@purlsoho.com? That’ll help us better visualize what’s going on!
All the best,
Lili
Was there a solution to this? I’m having exactly the same issue! Would love to know
Hi Kate,
Thanks for writing in! We are so sorry you are running into issues. Could you let us know the problem you are having so we can take a closer look?
All the best,
Gavriella
Hello! I’m making this pattern for someone with a head circumference of 28” but the measurement from “bottom of one ear to bottom of the other ear” that I use for hats is 18 1/2”. Do you recommend any adjustments to this pattern for it to fit comfortably?
Hi Denise,
This scarf is very loose and stretchy, so it fits a very wide range of head sizes! The measurements are generously proportioned, and the 2 x 2 ribbing has a ton of stretch, so the measurements are actually even bigger when the hood is worn because the ribs separate a bit. I’d definitely recommend going with the Adult Medium/Large size, but I don’t think you’ll need to make any modifications to the pattern!
All the best,
Lili
Thanks! I am on the increases section right now, so this is.good to know!
Hi there – please amend my overly complicated message above. I’ve spent some time looking at my scarf and the pattern – I believe that I am just supposed to have stitch markers in two places. I have 140 stitches – if you could just help me figure out where the stitch markers should be on the right and wrong side of the scarf, that would be terrific. Thank you .
Hi Lynn,
Thank you so much for your patience! This pattern was written with only one stitch marker throughout (though your method of placing markers for each wrap is very useful!). To replace the original marker, just begin working Set-Up Row (wrong side) of the DECREASE section and place the marker after you’ve worked the 20th stitch.
All the best,
Lili
Thank you for sharing this pattern, it’s exactly what I’d been looking for!
I cast on 40 stitches for the scarf for a thinner scarf section so I will knit the increase for the larger size (to achieve the smaller size’s width of the hood). Should I then still knit the short row for the small to match having less stitches in total?
Thank you!
Hi L,
Thanks for your question. For this pattern, we recommend just increasing to the size of your desired hood (small or large) and then following both short rows and decreasing for that size. It’s not recommended to mix and match as it could alter the result of the pattern altogether.
All the best,
Gavriella
This is an awesome scarf! I want to knit double stranded with two different colors so that I can get a speckled look. If I were to use the alpaca yarn mentioned, would I have to adjust the pattern? Would you recommend using a different yarn altogether if I want to knit with yarn held double? Thanks!
Hi Maria,
We are so happy to hear you are interested in making the Hood Scarf! Our Speckled Hen yarn could be a great alternative for this pattern as it speckles beautifully! If you decide you want to hold your yarn double, we recommend using a lighter fingering weight such as Quartz or Line weight.
I hope this helps but please let me know if you have any other questions!
Happy knitting,
Gavriella
I’ve been waiting for the perfect pattern to use up my Season Alpaca stash! Question – can I make this with a wider scarf?
Hi Anne,
We’re so excited that this pattern is just what you were looking for! We hope you enjoy it but do want to caution against modifying it too much. It might seem simple upon first glance, but the short rows in the hood make this more complicated than you might think. For that reason, we don’t recommend adjusting the pattern too much and am so sorry about that! Please let us know if you have any other questions and we hope you still give this a try.
All the best,
Gavriella
I am confused by the WPT-T directions.
“SHORT-ROW SHAPING: WRP-T (WRAP AND TURN)
On the right side: Keeping yarn in front, slip next stitch purlwise from left needle to right needle. Bring yarn to back. Return slipped stitch to left needle. Bring yarn to front. Turn work so right side is facing you.”
If I am working on the right side then I turn the work once, wouldn’t I be turning the work so that the wrong side is now facing me? Same question for the wrong side directions.
I have watched the tutorial and made dozens of socks so I get what the purpose is here. Please confirm that the curve I am making is oriented closer to the front edge of the hood- this is what would make sense to me. Love this yarn! working on a b-day present so I have a deadline on this project! Thanks for the help!
Hi Natalie,
Thanks for writing in! We have seen your message and are actively working on getting the best answer to your question. We hope to have an answer early next week.
All the best,
Gavriella
I had this same exactly question! If you’re working on the RS and then turn the work, it would seem to me like now the RS is facing AWAY from you… Eager for the answer to your question before I get to this part of the pattern!
Hi Jean,
We have updated the pattern to reflect the correct instructions for the short rows. I hope these edits help but please let us know if you have any more questions!
Happy knitting,
Gavriella
My friend and I are having a disagreement about which way the hood faces. There isn’t a good photo from the side. As the directions read, when you start with the right scarf, the 21 stitches that stay the same are along the neck rather than the forehead. Which is it?
Thank you!
Hi Natalie,
That’s a great question! You are correct, the portion of stitches that stay the same are to be worn at the back of your neck.
Happy knitting,
Gavriella
Dear Pearl Soho,
I have finally finished all the increases on the M/L size Hood Scarf, and so far it looks terrific! However, I am stuck at the short row shaping section, especially since I don’t have a visual sense of what this should look like. Your photos, while evocative, do not really show the ‘work’ of the short rows. Do you have a diagram or photo of this part of the pattern? If I just follow instructions without knowing where I am going, I invariably go awry.
thanks so much!!
Cora
Hi Cora,
Thank you for writing in! Unfortunately, we do not have a diagram for the short rows but we do have a more in-depth tutorial on short rows that you can check out here. If you need further assistance getting through this pattern, please let us know and we would be happy to help!
All the best,
Gavriella
Longtime purl loyalist here. Finished nearly all crochet patterns. I’d be buying a bunch of yarn if this pattern were to be translated to crochet! (Most unisex pattens for that matter; oh, and the latest window quill blanket, too.) Putting a word in for us fiber artists with hooks in hand.
Hi Eric,
Thank you for writing in! A crochet version of this pattern sounds like a wonderful idea! I will pass this along to our team! We truly enjoy inspiring both knitters and crocheters alike!
Happy making,
Gavriella
Hello!
Lovely, easy to follow pattern. I just finished knitting and wanted to know if you had any tips for wet blocking. Should I lie the entire scarf flat or is there a better way make sure the shape of the hood is preserved. Thanks!
Hi Megan,
Thank you for writing in! That’s a great question! I would recommend laying your scarf out flat and placing a bowl under the hood to help it dry to a more round shape. I hope this helps but please let us know if you have any more questions!
Warmly,
Gavriella
Working on this pattern starting the short row doesn’t make sense when you complete the wrap and turn in row 1 your yarn is at the front ready to purl but the next stitches in row 2 are K2 do I just keep going the stitch doesn’t end up looking wrapped.
Hi Margret,
Thank you for writing in! When you wrap and turn, your yarn should be at the back once you turn your work after wrapping your stitch. This will set you up to knit the next stitch after you have turned. I hope this helps but please let me know if you have any questions!
Happy knitting,
Gavriella
Hello! On “I short row 14” and “next row” I removed all markers. I have 120 stitches and am ready to begin the decrease section but don’t know where the marker should go! I saw another comment asking the same thing, but they had 140 stitches rather than 120. Would it be different for me? Thanks!
Hi Maria,
Thanks for writing in! The answer to your question is actually the same as the previous comment. You’ll need to replace the marker after the 20th stitch. Both sizes actually have the same marker placement with regards to the bottom edge of the hood!
All the best,
Lili
Lovely pattern 😍
I’m at the repeats of Short Rows 9 & 10 and I think there is a you have to repeat this 5 times (bigger size) for the right amount of short rows. Did I miscounted?
On the first half of the scarf I count 13 short rows on the right and 6 on the wrong, here I count 12 on the right and 6 on the wrong.
Hi Anne,
Thank you for reaching out about this! I took a close look over the pattern, and you’re absolutely correct–you should repeat Short Rows 9 and 10 five more times for the larger size (and four more times for the smaller size). We’re so sorry for the error in the pattern, and we’ll have it corrected as soon as possible!
Thank you again for bringing this to our attention.
All the best,
Lili