

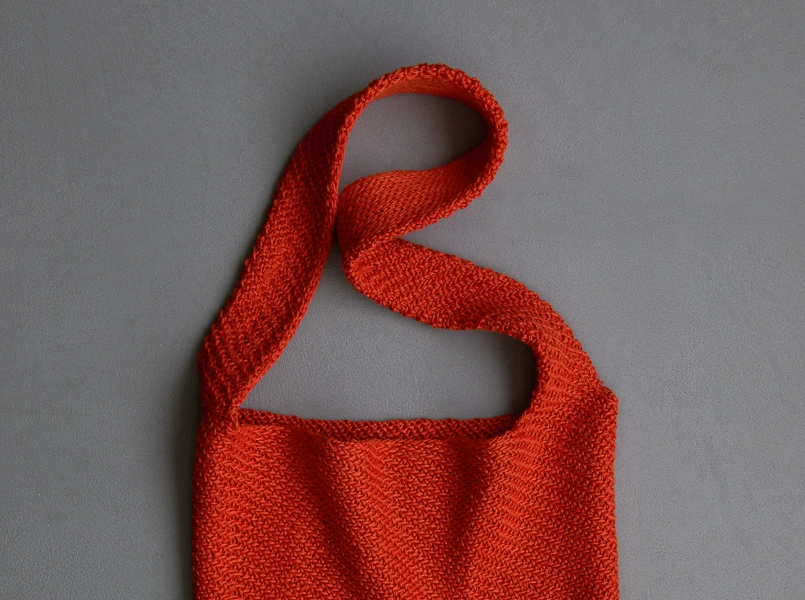

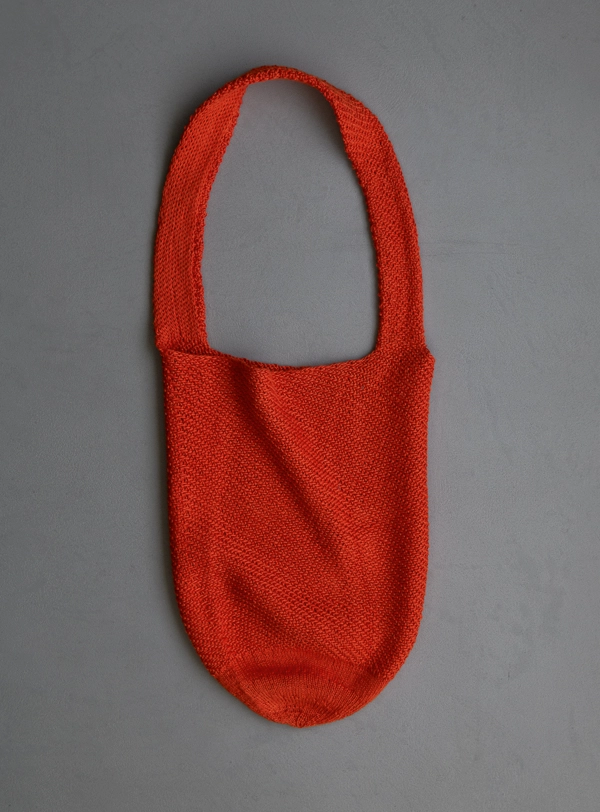
Twill Tote
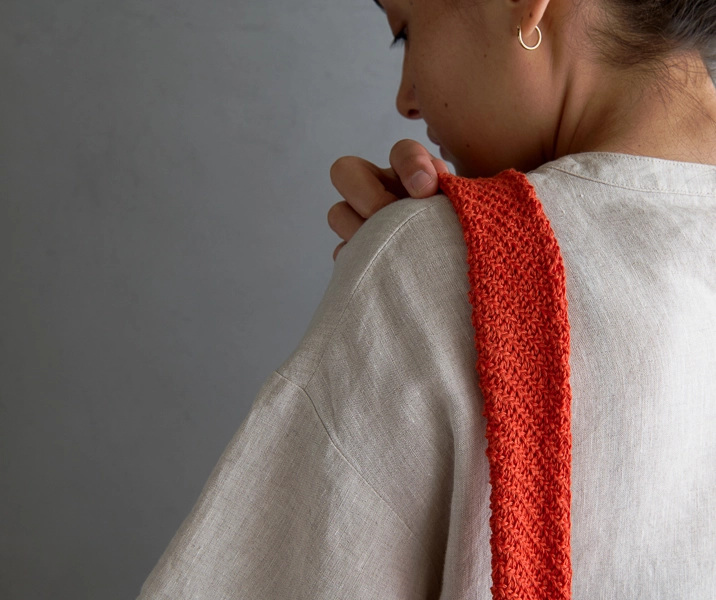
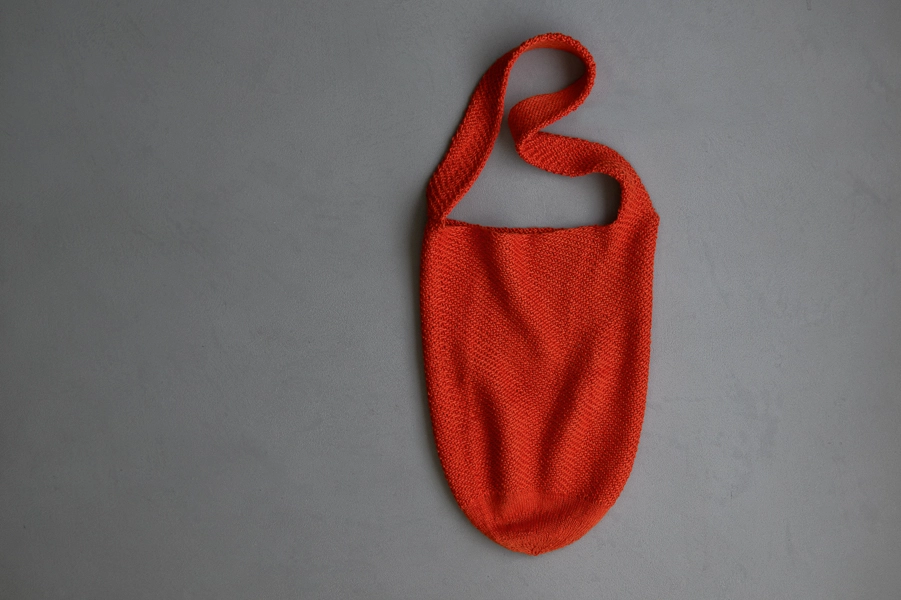
Our knit take on woven twill retains the same distinctive diagonal texture and same sturdy work ethic, but instead of a loom, you can whip up this Twill Tote right on your knitting needles!

The twill is a super simple pattern that only uses slip stitches and knits (correct, no purling!), and the construction is fun and straightforward. You start with a double layer strap, knit in the round with a twill texture on the outside and a smooth one on the inside. You incorporate the strap stitches into the bag’s cast on stitches, then knit the bag in the round down to the bottom, working decreases in stockinette at the base.
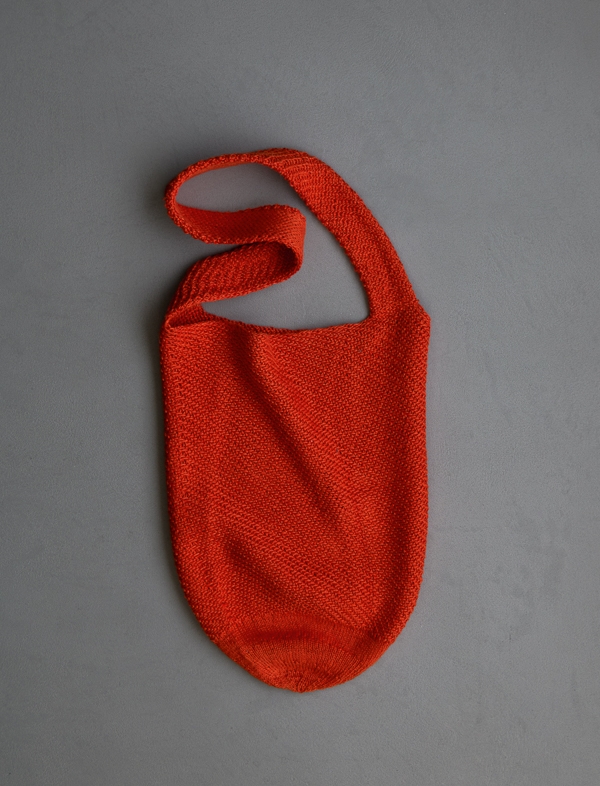
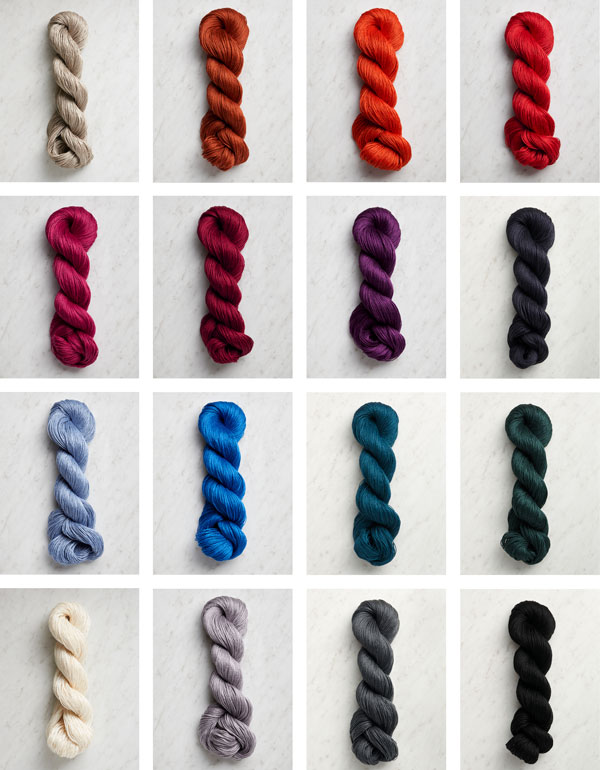
The shape is a quirky bucket, perfect for leeks and potatoes, sandals and a beach towel, or your whatever’s on your needles. And that glow? That’s our Field Linen! One hundred percent linen, it’s as tough as a boot, but as beautiful as the day. We just added nine gorgeous new colors to the palette, including this stunning Carnelian Orange. Pick up just two skeins to get started!

Designed by Purl Soho designer, Jake Canton. Click here to see even more of Jake’s designs!
Share your progress + connect with the community by tagging your pics with #PurlSoho, #PurlSohoBusyHands, #PurlSohoTwillTote, and #PurlSohoBlackbirdLinen. We can’t wait to see what you make!
Materials
- 2 skeins of Purl Soho’s Field Linen, 100% linen. Each skein is 295 yards; approximately 493 yards required. We used the color Carnelian Orange.
- US 4 (3.5 mm), 16- or 20-inch circular needles
- US 2 (2.75 mm), 16-inch circular needles
- A set of five US 4 double pointed needles
- A set of four US 2 double pointed needles
- A stitch marker
- A size C-E (3-3.5 mm) crochet hook and scrap yarn for Provisional Cast On
Gauge
29 stitches and 56 rounds = 4 inches in stitch pattern, using larger needles
30 stitches and 48 rounds = 4 inches in stockinette stitch in the round, using smaller needles
Size
- Finished Circumference: 22 inches
- Finished Height: 12 inches
- Strap Width: 2¼ inches
- Strap Length: 22 inches
Notes
Construction
You will first work the strap in the round, then attach it as you cast on for the bag. You will work the bag top down in the round, decreasing at the Base to finish.
Slip Stitches
Slip all slipped stitches purlwise.
Provisional Cast On
For assistance, including how to put live stitches back onto needles, please visit our Provisional Cast-On: A Two-Step Method Tutorial.
Knit 2 Together From Two Needles (k2tog from two needles)
Holding two double pointed needles parallel to each other, insert working circular needle from front to back through first stitch on front needle and then front to back through first stitch on back needle. Knit the two stitches together.
NOTE: For assistance with this technique, please visit our 3-Needle Bind Off Tutorial, but instead of binding the stitches off, keep them on the right needle.
Pattern
Strap
Using a Provisional Cast On (see Notes) and three larger double pointed needles, cast on 36 stitches. [12 stitches on each needle]
Join for working in the round, being careful not to twist the stitches.
Round 1: [K1, slip 1 (see Notes) with yarn in back (wyib)] 4 times, k1, [slip 2 with yarn in front (wyif), k2] 5 times, [k1, slip 1 wyib] 3 times, k1.
Round 2: [Slip 1 wyib, k1] 5 times, [slip 2 wyif, k2] 4 times, slip 2 wyif, [k1, slip 1 wyib] 4 times.
Round 3: [K1, slip 1 wyib] 5 times, k1, [slip 2 wyif, k2] 4 times, slip 2 wyif, [k1, slip 1 wyib] 3 times, k1.
Round 4: [Slip 1 wyib, k1] 4 times, [slip 2 wyif, k2] 5 times, [k1, slip 1 wyib] 4 times.
Repeat Rows 1-4 until piece measures 22 inches from cast-on edge, ending with Round 2.
Slip 3 stitches from first needle onto second needle, then slip 3 stitches from third needle to second needle. [9 stitches each on first and third needle; 18 stitches on second needle]
Now, slip all stitches from first needle onto third needle. [18 stitches on each of 2 needle]
Cut yarn.
Using three larger double pointed needles, place first 9 Provisional Cast-On stitches onto first needle, next 18 stitches onto second needle, and last 9 stitches onto third needle, then slip all 9 stitches from third needle onto first needle. [18 stitches on each of 2 needles]
Begin Body
Using a basic Long Tail Cast On and starting with a 3-yard tail, cast 62 stitches onto larger circular needles.
Now pick up Strap and hold one set of double pointed parallel to each other with the twill-textured side of the fabric facing you, *[k2tog from two needles (see Notes)] 2 times, [slip 1 from back needle wyif, slip 1 from front needle wyif] 2 times, repeat from * 4 more times, [k2tog from two needles] 2 times. [88 stitches on working needles]
Now thread 3-yard cast-on tail onto a tapestry needle and thread it through center of Strap to opposite end in order to use it for remainder of cast on.
Using a basic Long Tail Cast-On, cast on 62 more stitches. Holding remaining set of double pointed needles parallel to each other with the twill-textured side of the fabric facing you, make sure Strap is not twisted and *[k2tog from two needles] 2 times, [slip 1 from back needle wyif, slip 1 from front needle wyif] 2 times, repeat from * 4 more times, [k2tog from two needles] 2 times. [176 stitches on working needles]
Place unique marker and join for working in the round, being careful not to twist the stitches.
Round 1: *K1, [slip 2 wyif, k2] 15 times, slip 2 wyif, [k1, knit 2 together (k2tog), slip 3 wyif] 4 times, k1, repeat from * one more time. [168 stitches remain]
Round 2: *[K2, slip 2 wyif] 16 times, [k1, k2tog, slip 2 wyif] 4 times, repeat from * one more time. [160 stitches remain]
Continue Body
Round 1: *Slip 1 wyif, k2, slip 1 wyif, repeat from * to end of round.
Round 2: *Slip 2 wyif, k2, repeat from * to end of round.
Round 3: *K1, slip 2 wyif, k1, repeat from * to end of round.
Round 4: *K2, slip 2 wyif, repeat from * to end of round.
Repeat Rounds 1-4 until piece measures 11 inches from cast-on edge of Body, ending with Round 1 of pattern.
Base
Change to smaller circular needles,
Round 1: *K1, k2tog, k1, repeat from * to end of round. [120 stitches remain]
Work in stockinette stitch, knitting every round, for 1 inch.
Round 2: *K1, k2tog, repeat from * to end of round. [80 stitches remain]
Continue in stockinette stitch for ¾ inch.
Change to smaller double pointed needles.
Round 3: *K2, k2tog, repeat from * to end of round. [60 stitches remain]
Continue in stockinette stitch for ¾ inch.
Repeat Round 2. [40 stitches remain]
Knit 2 rounds.
Repeat Round 3. [30 stitches remain]
Knit 2 rounds.
Repeat Round 2. [20 stitches remain]
Knit 1 round.
Repeat Round 3. [15 stitches remain]
Knit 1 round.
Repeat Round 2. [10 stitches remain]
Next Round: *K2tog, repeat from * to end of round. [5 stitches remain]
Cut yarn and thread tail onto a tapestry needle. Sew tail through remaining stitches.
Pull extra taut and bring tail to inside of bag to weave in very thoroughly in order to keep the base of the bag secure.
Finishing
Weave in remaining ends and wet block.


I don’t see my free tote pattern listed in my cart. Please make sure it is included.
Hi Kathleen,
Thanks for reaching out! The Twill Tote is a free pattern that is available just above this comments section on the project page! You can access it here anytime, or you can print out your own version using the “print” icon towards the top of the project page. Or, if you’d like a printed copy of the pattern included with your order, you can always leave a note requesting that in the “Special Instructions” field of the checkout page!
Happy Knitting!
Kelsey
Hi! Can I substitute your cotton pure in lieu of the linen?
Hi Tara,
Thanks for reaching out! You could use Cotton Pure for this pattern, however, Cotton Pure is a sport weight and Feild Linen is a fingering weight. If you are up for a bit of a challenge you could certainly re-gauge the pattern for a thicker yarn, alternatively, I would recommend using Buttercup Cotton instead! It is the same 100% organically grown cotton we use in Cotton Pure but it is a fingering weight yarn so it would work perfectly with the pattern as written! I would also recommend working a gauge swatch prior to beginning to ensure you are consistent with the pattern.
I hope this helps, happy knitting!
Gianna
So you do a dpn provisional cast on? I’ve gone over the first part of the pattern a few times, it looks like starting out may take several tries before I get it…I really hope I do. I love the Field Linen I just received today
Hi Louise,
Thanks for writing in! Yes, that is correct, you will work the provisional cast-on with dpns! For assistance, including how to put live stitches back onto needles, please visit our Provisional Cast-On: A Two-Step Method Tutorial! If you are feeling a little nervous I would also recommend testing this out with some scrap yarn so that you can get comfortable with the process before moving on to the tote!
I hope this helps and please let me know if you have any more questions!
Gianna
What level would you say this pattern is? I have never used double pointed needles before.
Hi Carla,
Thanks for reaching out! I would say this is an advanced beginner-intermediate pattern! Double pointed needles are super easy to use once you get the hang of it, we have an excellent Double Pointed Needles tutorial that will walk you through the process!
Warmly,
Gianna
Hi!
If I want to make the strap bout 4 inches longer, will I still have enough yarn if I order only 2 skeins?
Thank you!
Hi Tanya,
Thanks for reaching out! It takes approximately 493 yards to complete the tote, and two skeins of Field Linen will give you approximately 590 yards, so I think you should have plenty of yarn leftover to add the additional length to your strap!
Warmly,
Kelsey
I’ve recently received the yarn for this pattern and I’m wondering if I can use the Magic Loop method for the strap instead of the double pointed needles. I’ve used it successfully for finishing off hats, but I’ve never begun a project with it. I’m just not fond of working with double pointed needles.
Another question would be how to join for working in the round using Magic Loop.
I’ve made many of your projects and have always found your directions and this question section helpful. However, this one may be the most complicated one I’ve tried yet.
Jane
Hi Jane,
Thanks for writing in! I am so thrilled to hear that you have enjoyed our pattern and find the comment section so useful! I think you can certainly use Magic Loop for the straps instead of double pointed needles (I myself prefer that method as well!) I recommend checking out our Magic Loop tutorial, it will show you exactly how to cast on and join the work in the round for this method!
I hope this helps and please let me know if you have any more questions!
Gianna
I’ve cast on 62 stitches and added the stitches from one end of the strap (knitting 2 tog and slipping stitches as instructed).
I’m not sure what it means to “thread 3 yard cast on tail onto a tapestry needle and thread it through center of strap to opposite end in order to use it for remainder of cast on”.
Is it just a separate 3 yards of yard ? I’m lost when it says thread it through the center to opposite end….
Also, when I picked up stitches from the provisional cast on I did not get the 36 stitches. I’m not seeing any dropped stitches and not sure what to do. Thx in advance
Hi Diane,
Thanks for reaching out! When you begin the BEGIN BODY section and cast on, it instructs you to use basic Long Tail Cast On, starting with a 3-yard tail, to cast on the 62 stitches. Once you cast those stitches on you should have the remainder of the 3-yard tail leftover. So once you move the stitches over and have the 88 total stitches on your working needle you will thread the leftover yarn from the cast on tail through the strap to the end so that you can pick it up and use the rest of the 3-yard tail again to cast on 62 more stitches!
As for the provisional cast on, you should have cast on 36 stitches total, 12 on each needle. If you were missing stitches and didn’t see any dropped, my best guess is that you may not have cast on the total 36 stitches. Since that was just used for the strap, and if you have already finished the strap with fewer stitches I think you should be fine to continue! Just note that going forward your stitch totals may be off by a few (so just be sure to keep in mind how many stitches total you had for the strap.)
I hope this helps clear things up, and please let me know if you have any additional questions!
Gianna
Thx Gianna. I now understand the cast on. Unfortunately I do not have enough yarn to cast on an additional 62 stitches. Can I just start a second cast on once I run out of yarn from the initial?
I did cast on 36 stitches initially and the strap was knit with 36 stitches. Can I cast on additional stitches to make up the difference
Hi Diane,
Thanks for your response! If you don’t have enough yarn to finish that cast on I think you should be fine to start a second cast on with new yarn once you run out! I would also suggest instead of casting on more stitches to make up the difference from the strap, to work a few increases on either side of the strap (till you get the correct number of stitches) so that your stitches are evenly distributed rather than being lopsided!
I hope this helps and please let me know if you have any other questions!
Gianna
Thank you so much Gianna
Hi. I am stuck! Just cast on 62 stitches and am working on getting the strap on my working needle. I understand k2tog 2 times which results in 2 stitches. Here is where I am stuck. If I slip the next back and front stitches wyif 2 times should I end up with 4 stitches on my working needle with the yard wrapped around in front of all 4 ? Seems like this should be easier but I can’t get the math to work to those 26 stitches to get to 88. Hope you can help.
Hi Mary,
Thanks for reaching out. I can confirm that you’re doing everything correctly! It might seem weird to have 4 stitches with the yarn going across the front of all of them, but I promise that that will even out on the subsequent rounds. When you work Rounds 1 and 2 of this section, you will be working k2togs across these 4 stitches, eventually reducing them to the normal 2 stitches you’d expect to see there. It’s certainly an unexpected part of the pattern, but it actually works out very nicely in the end!
All the best,
Lili
Hello,
Can this be made with Blackbird Linen yarn instead? Thanks!
Hi Nicholas,
Thanks for reaching out! This pattern would be pretty difficult to modify for a thicker yarn, so I’d recommend sticking to the original fingering weight yarn. If you do use Blackbird Linen though, you could knit the pattern as written at the larger gauge, and you would end up with a larger tote bag!
All the best,
Lili
I checked the notes of folks who made the bag on Ravelry. One person posted the following, is it correct?
Round 1 of the bag after the handle join should be:
Round 1: *K1, slip 2 wyif, k2 15 times, slip 2 wyif, k1, knit 2 together (k2tog), slip 3 wyif 4 times, k1, repeat from * one more time. 168 stitches remain
And then on the next round k2tog after the marker to make the pattern work well.
The bag is 30” in diameter! Started working on base when bag is 13” tall
Thanks, Mary
Hi Mary,
Thanks so much for reaching out! Our design team reviewed this part of the pattern and did indeed find an error. We’ve updated the pattern, so the instructions written on this page are now correct, and you can review the change we made on our errata page. It is similar to what this Ravelry user suggested, but not exactly the same!
Thank you again for bringing this to our attention!
All the best,
Lili
Hello, do you have instructions for knitting the strap and joining it to the bag using magic loop/short circulars? I would like to make this bag and purchase your linen yarn. However, I am struggling to understand the instructions for the strap and joining to the bag.
Hi Hp,
Thanks for reaching out! We do not have instructions specifically for magic loop or short circulars, but I’d be happy to give you a tip for converting the pattern. When you come to the end of the STRAP section, where you’re slipping stitches onto the second DPN, this results in the following orientation of the stitches: The 9 stitches before the working yarn and the 9 stitches after the working yarn are on one needle, and the remaining 18 stitches are on the other needles. You can work up to this point in your preferred method, and then just be sure to orient your stitches in this manner when you get to this point!
All the best,
Lili
Sorry, but I am finding some of the directions in the strap instructions confusing. You say to cast on the 36 stitches with the larger dpns. Then at the end of the strap, after it says to cut the yarn and then… using 3 larger double pointed needles..”
After the cast on should we switch to the smaller dpns???
Hi Laurie,
Thanks for reaching out! You should knit the entire strap on the same size DPNs (the larger ones). Basically, anytime you’re working in the twill stitch pattern, you’ll need to use the larger needles, and then any time you’re working in stockinette stitch (just for the bottom of the bag), you’ll be using the smaller needles.
To clarify the final instruction in the STRAP section, this is the point at which you’ll need to put the on-hold stitches back onto needles! When you began the strap, you started with a provisional cast-on. Now that you’ve finished the strap, it’s time to put these stitches back onto needles so that you can incorporate them into the body of the bag. That’s why the needles are mentioned again!
I hope this helps clear things up, and please let me know if you have any other questions.
All the best,
Lili
Hello, I’m confused as to why it says to leave a 3-YARD tail to begin the body?? Is it supposed to be 3-FEET? I have such a ridiculously long piece of yarn leftover now…
Hi HK,
Thanks for reaching out to double check! I can confirm that the 3-yard recommendation is correct. The designer was airing on the generous side for the tail length so that knitters don’t run out before completing the cast-on. As you experienced though, not all knitters may need the full 3 yards!
All the best,
Lili
Thanks so much for confirming. I know everyone knits at a bit different tension, but considering I have 6 feet of yarn hanging off the cast-on edge of my project now, it seems a bit excessive! Unless I did something really wrong, I can’t imagine anyone using anywhere near that amount… Maybe 4 or 5 feet would be more reasonable for airing on the generous side?
Hi HK,
We recommend snipping off the tail and winding it into a small ball until you need it further down the line. You could also wind it up and secure it with a clothespin if that is more helpful!
All the best,
Gavriella