
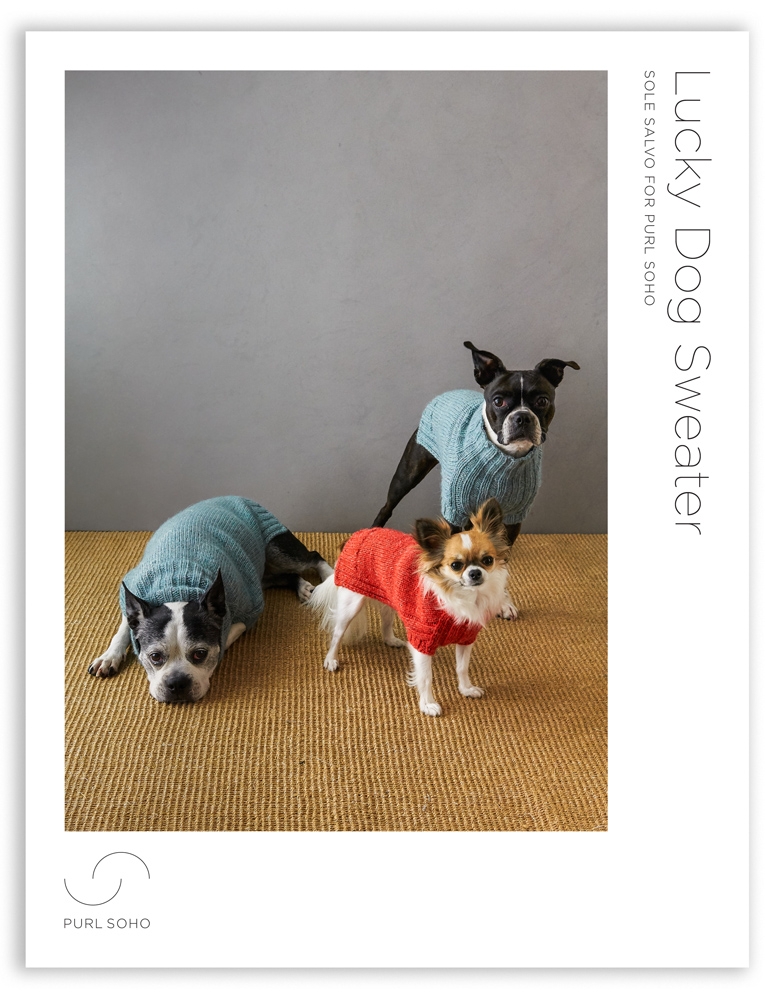
Sole Salvo For Purl Soho: Lucky Dog Sweater
Tapping into her day job as a fashion designer, Sole Salvo‘s runway-inspired dog sweaters are for lucky dogs, indeed. And thanks to her Lucky Dog Sweater, your dog, too, can dress like the puparazzi might be around every corner!
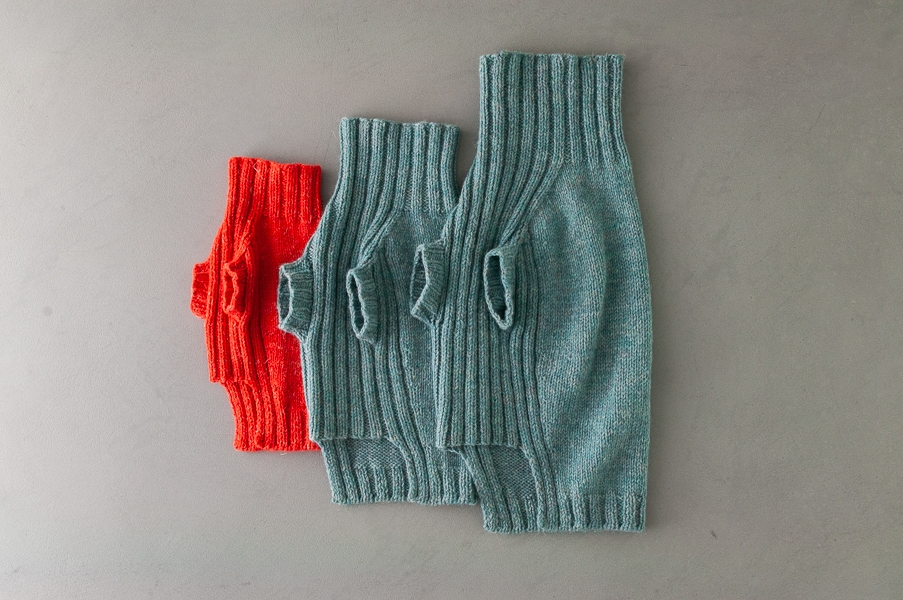
For dogs of most shapes and sizes, from yorkies and bulldogs to greyhounds and golden retrievers, the Lucky Dog Sweater Pattern uses 2 x 2 rib details to contour around the body for a smart and comfortable fit and also to lend a little drama to the collar.
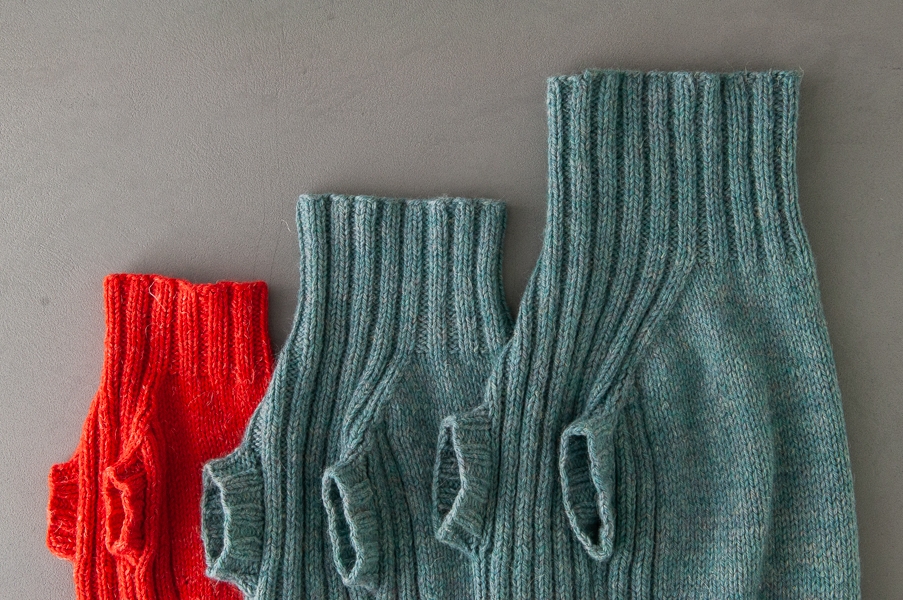
The simple construction is in the round, from tail to head, and is also customizable with well-placed tips for shortening, lengthening, and widening. Plus, girls and boys get different shaping in the belly area, so everyone’s comfy!
Sole remembers that designing this sweater for Purl Soho was her artistic refuge at the beginning of quarantine. In full lock down, the creation of stitch after stitch and the feeling of yarn between her fingers became her solace. We couldn’t relate more!
The yarn that offered so much comfort and satisfaction is our Linen Quill Worsted, a mix of fine highland wool, alpaca, and linen. It’s toasty for chilly dogs on chilly days, and it’s also seriously beautiful, rustic but subtle, durable but very special, too!

And if you’re wondering why someone might hand knit a sweater for their dog, who is, after all, just walking to the dog park to catch a ball or two, the answer is simple. It’s because nothing beats knitting for someone you love!
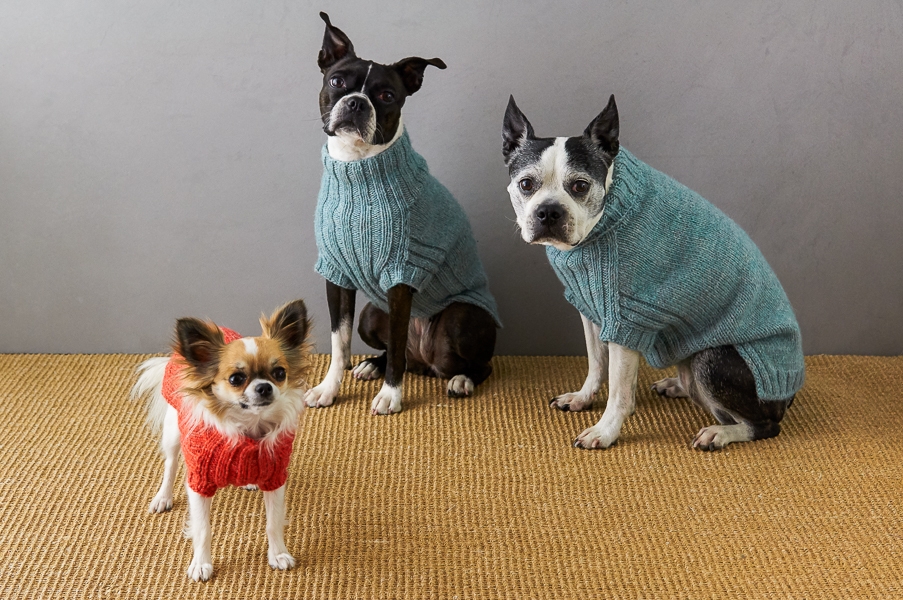
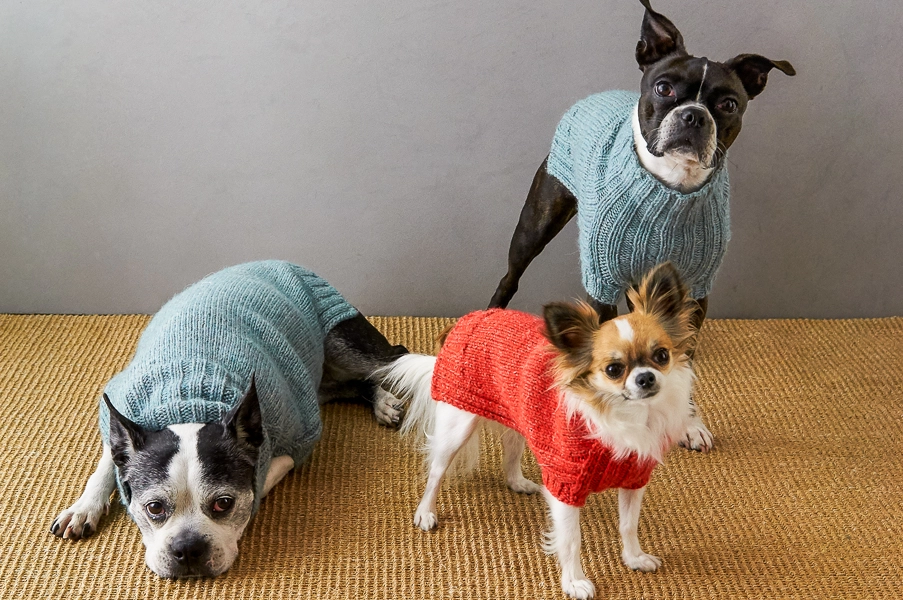
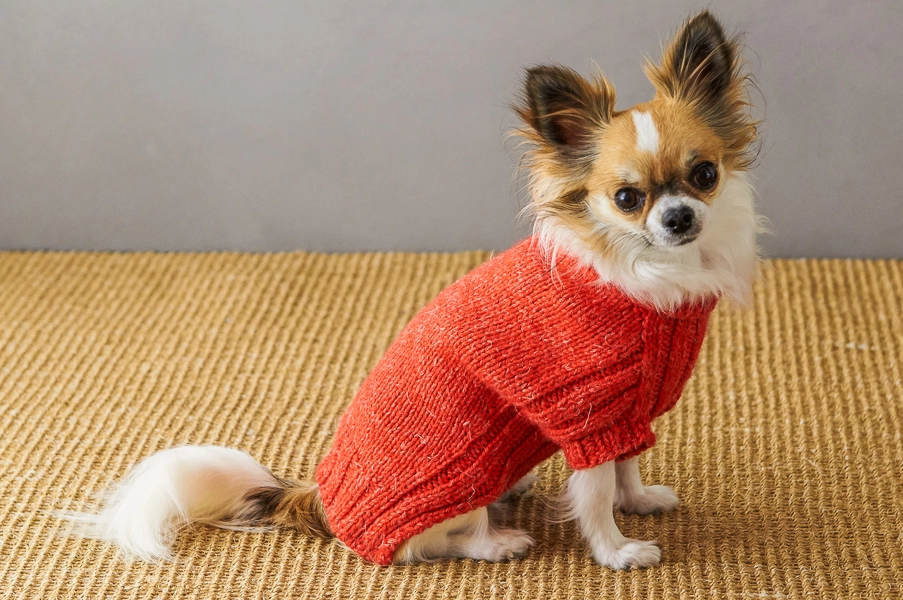
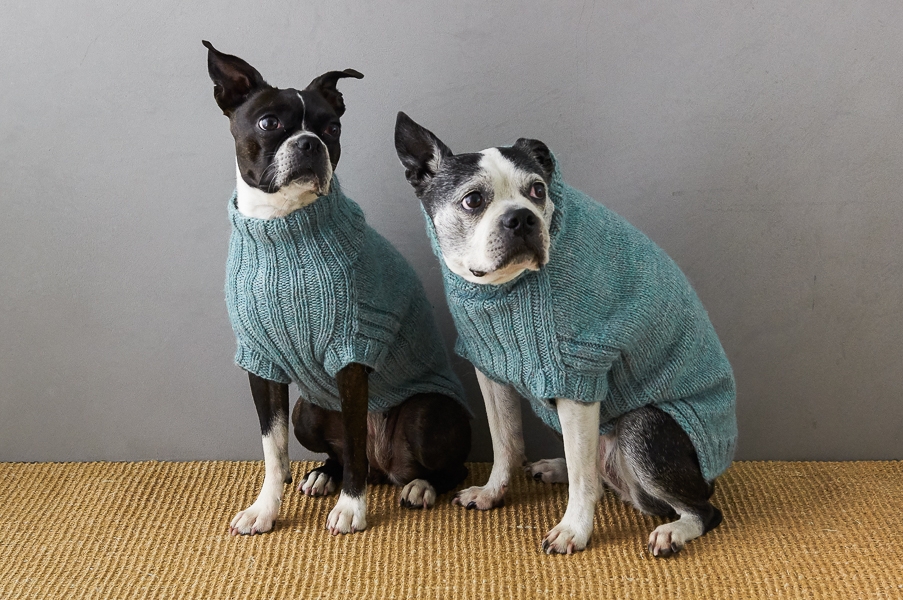
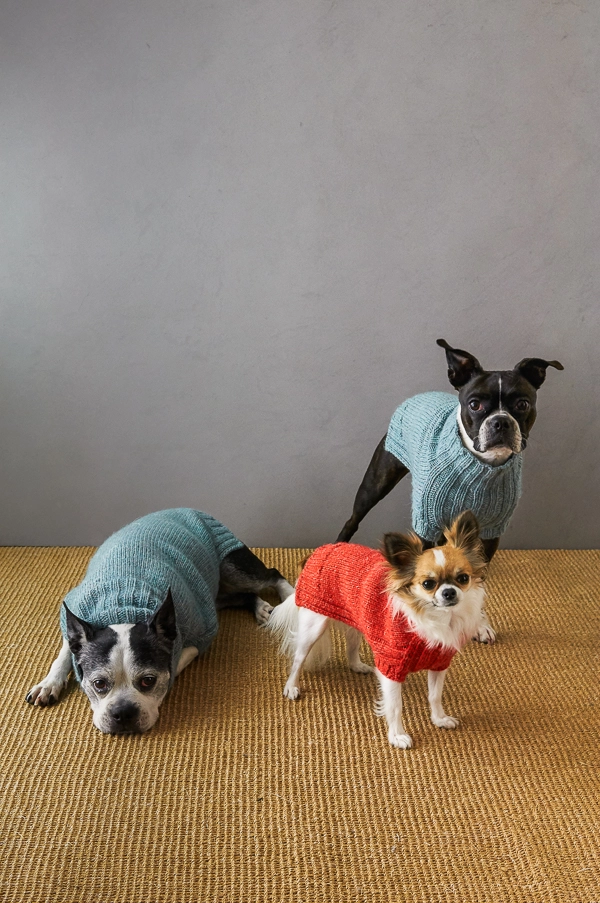
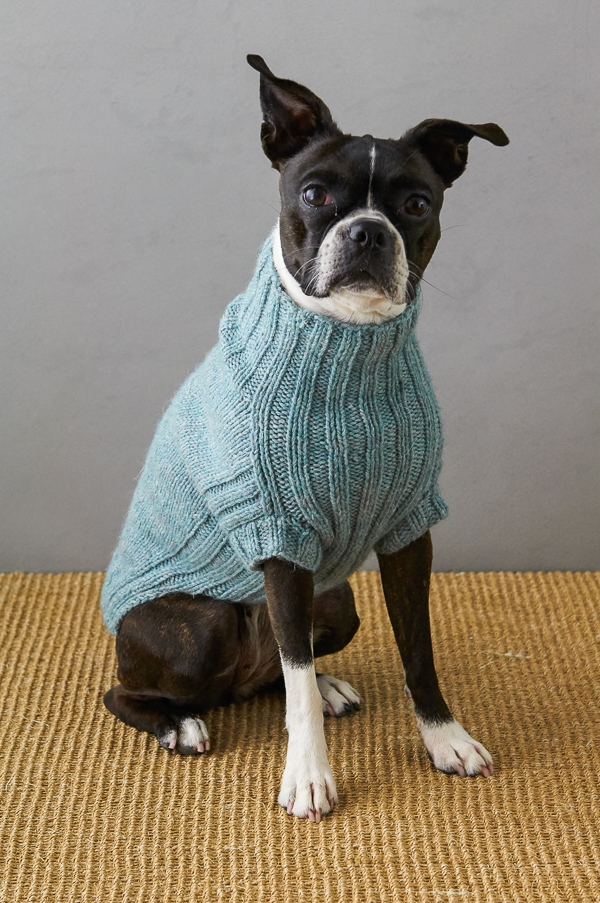
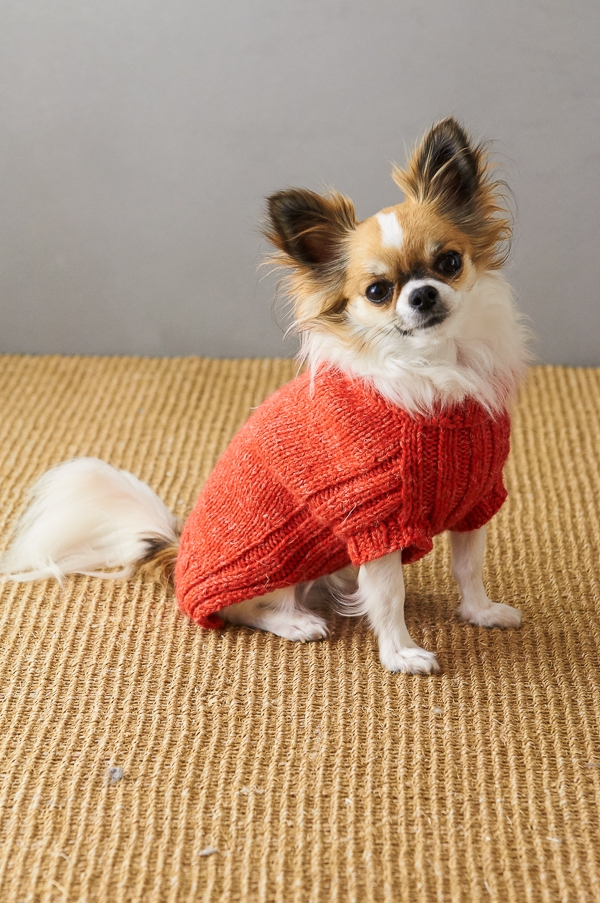
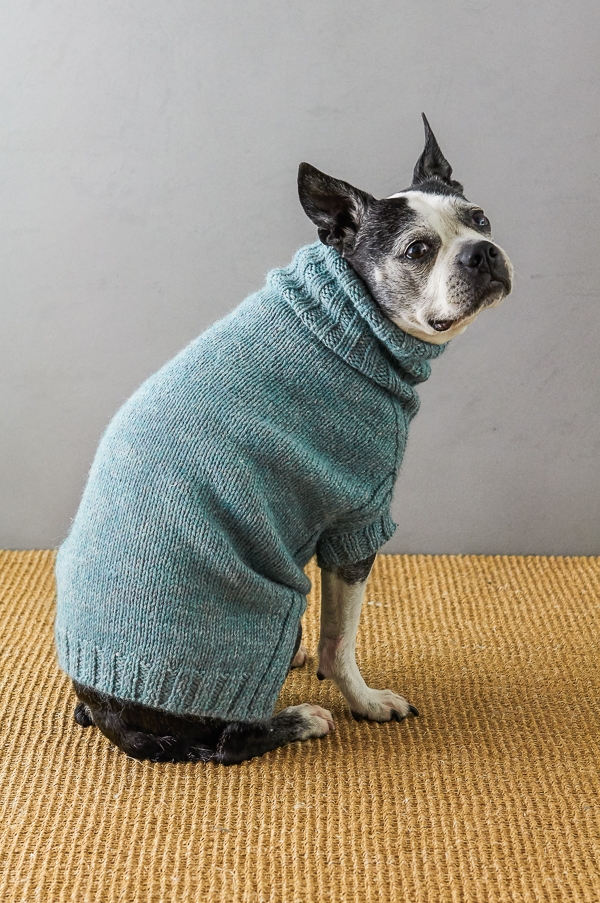
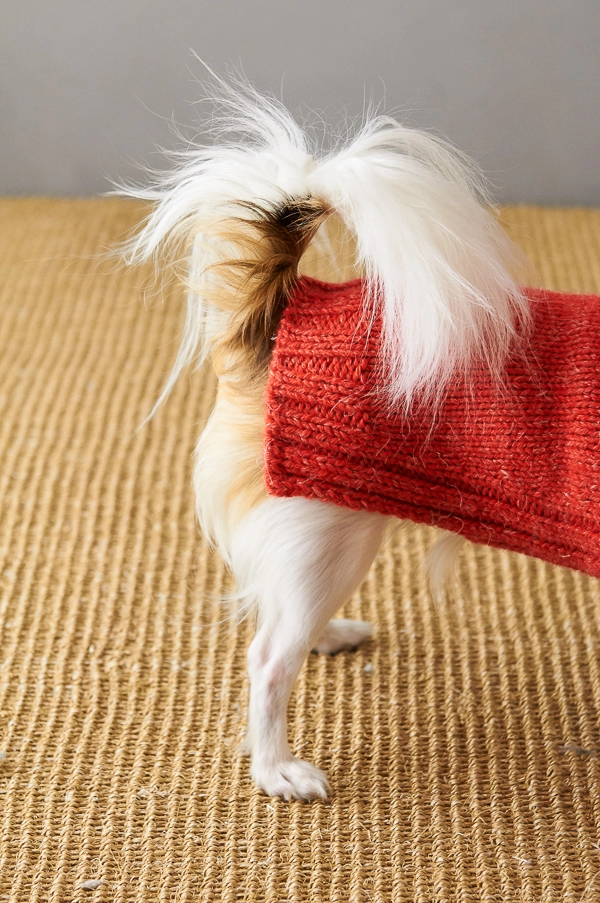
Designed for Purl Soho by Sole Salvo and modeled by Fern (left), Roxy (middle), and Leila (right).
Share your progress + connect with the community by tagging your pics with #PurlSoho, #PurlSohoBusyHands, #PurlSohoLuckyDogSweater, and #PurlSohoLinenQuillWorsted. We can’t wait to see what you make!
Materials
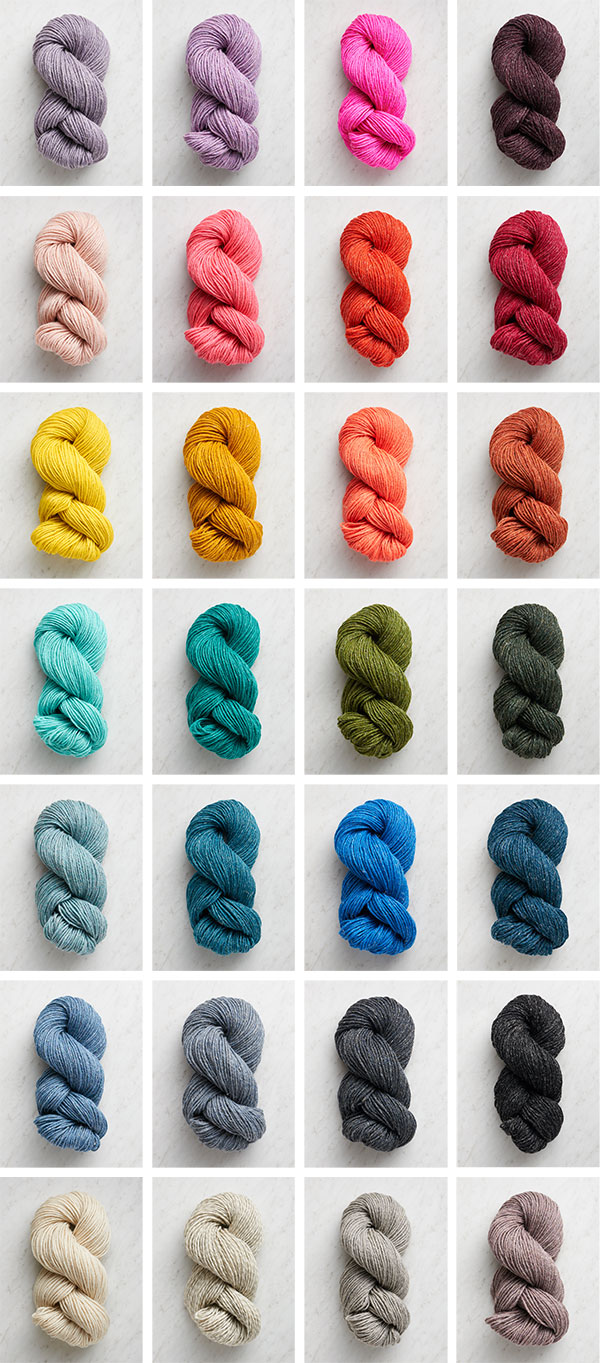
- 1 (2, 2, 3, 3, 4) skein(s) of Purl Soho’s Linen Quill Worsted, 50% fine highland wool, 35% alpaca, and 15% linen. Each skein is approximately 164 yards/ 100 grams; approximately 125 (170, 250, 340, 460, 590) yards required. We used the colors Vintage Celadon and Red Poppy. (Note that this yarn in now discontinued.)
- US 6, 16- or 24-inch circular needles (depending on size you are making)
- A set of US 6 double pointed needles
- Stitch markers, including one unique
- Stitch holders or scrap yarn
OR
- 2 (2, 3, 4, 4, 5–6) skeins of Purl Soho’s Yonder, 50% alpaca and 50% highland wool. Each skein is 140 yards/ 100 grams; approximately 175 (225, 320, 440, 555, 730) yards required.
- US 5 (3.75 mm), 16- or 24-inch circular needles (depending on size you are making)
- A set of US 5 double pointed needles
- Stitch markers, including one unique
- Stitch holders or scrap yarn
Gauge
19 stitches and 27 rows/ rounds = 4 inches in stockinette stitch
32 stitches and 27 rows/ rounds = 4 inches in 2×2 rib, unstretched
Sizes
XXS (XS, S, M, L, XL)
To fit chest circumference of approximately 12–15 (15–18, 18–21, 21–24, 24–28, 27–32) inches, with approximately 0–5 inches of negative ease, depending on the size
- Finished Chest Circumference: 12½ (14¼, 17¾, 20¾, 23¾, 27) inches, unstretched
- Finished Neck Circumference: 6½ (7½, 8½, 9½, 10½, 11½) inches, unstretched
- Finished Length from Base of Neck to Base of Tail (Female): 12¼ (13, 15¾, 19, 21½, 25) inches
- Finished Length from Base of Neck to Base of Tail (Male): 12¼ (13¾, 16½, 19¾, 22¼, 25¼) inches
Samples: The sweaters shown here are sizes XXS (worn by Fern with 0 inches of ease), S (worn by Roxy with ¾ inches of negative ease), and M (worn by Leila with 3 inches of negative ease).
Pattern
The Lucky Dog Sweater is available for purchase as a PDF download only.


For female dogs, section join underside and work belly. What is meant by the last line “work 4 rounds even in established pattern.”?
Hi Abi,
Thanks for reaching out! Work 4 rounds even in the established pattern simply means you will work 4 rows total in the stitch pattern!
I hope this clears things up!
Gianna
I’m sorry but I still don’t understand! I’m working the smallest size so I’m at 70 stitches on the needles now. Is it time to move on to “Divide Chest + Back section”?
Hi Abi,
You’re on the right track! If you have 70 stitches on your needles now, you’re going to work 4 more rows with just those 70 stitches before moving onto the “Divide Chest + Back” section. These 4 rows will consist of you knitting the knits and purling the purls as you come to them. That’s what “working in pattern” means.
I hope that helps clear things up, but please don’t hesitate to let us know if you’re not sure how to determine a knit or purl stitch or anything along those lines!
All the best,
Zha Zha
I am curious why add the 4 rows? Is it just to add length? I don’t want to add any length so I didn’t do them. Hope I don’t run into any problems……
Hi Sally,
Thanks for reaching out. Those four rows are there to provide a smooth transition from the section with increase rounds to the point at which you’ll divide the chest and back. However, if you don’t want the length that they add, it’s totally okay to skip them! Hope this helps clarify things.
All the best,
Lili
I’d love to knit one of these for my dog, but he doesn’t like anything going over his head. So we’d need a fastening, such as a zip or buttons to run along his back, so it fully undoes and feet go in first then pull up around body, fastening along back. I don’t know if I have the skills to work out how to adjust the pattern to do this myself. Could we have a ‘reverse cardigan’ pattern available too, for dogs like mine … pretty please
Hi Lindsey,
Thanks for writing in! Thank you for expressing your interest, that is a great suggestion! I will certainly pass this along to the rest of the team!
Happy knitting!
Gianna
Hi, I just purchased the pattern from Ravelry and I am a little confused with the chart showing how to take the measurements to decide which size to make. Am I measuring in front of my dogs legs to get the chest measurement? Also, are there two measurements taken for the neck? Thanks
Hi Marilyn,
Thanks for reaching out! You can measure just in front or just behind your dog’s front legs to get the measurement for the chest circumference. There are also measurements listed for both the neck circumference and for the length from the base of the neck to the tail. In the pattern’s schematics, you will also notice several other measurements listed for the finished garments, but the only ones you’ll really need to worry about to select your dog’s size will be the chest and neck circumferences!
Warmly,
Kelsey
Hola seria posible el patron en español?.gracias
Hi Encarna,
Thanks for reaching out! Unfortunately, we don’t have this pattern available in Spanish, but thank you for expressing your interest! I will be sure to pass this along to the rest of the team!
Warmly,
Gianna
Hi –
I’m at the Shirt Tail + Belly (Female) section, and completely stuck on this part: Working in stockinette…repeat Increase Round every 7th round 6 more times. 116 stitches. (size M) – How do I determine how many rounds total I’m doing? Both increase rounds and regular rounds, because then the next direction says to work 4 rounds even.
Please help!
Hi Amanda,
Thanks for writing in! One round means you work every stitch all the way through, starting at the “end of round stitch marker” and ending at the end of the round stitch marker! So if you are making the M size you will work the increase every 7th round meaning you will work 6 rows, then on the 7th row, you will work the increases. You will then repeat this 6 more times (6 increases total once you start repeating the increase.) Once you have completed this you will move on to the next set of directions!
To help keep things clear, I would suggest using a scrap piece of paper and marking off each round and the increase rounds! That way you can make sure you complete all the necessary rows and increases before moving on!
I hope this clears things up!
Gianna
Hi,
I am at the Divide Chest and Back section and completely confused as I put down this project for too long and am trying to figure out w here I am on row 1. Where should the markers be including the unique marker be in relation to the tail where I originally cast on at the very beginning of this project or the ribbing section. I guess I don’t know where to start the divide row?? If I knew where the markers are supposed to be I think that would help. I have 116 stitches on my needles at the end of the join underside and belly work.
I should never have put this project down for so long!
Hi Jane,
Thanks for reaching out! I would suggest sending the information above along with clear photos of your work to our customer service team at customerservice@purlsoho.com and they can help verify if your markers are set up correctly!
Warmly,
Gianna
I am about to start this adorable sweater…for my great-granddog, Addie. I am concerned about size. Addie fits all the sizes for Large except for her neck…her neck is 19 inches. I see adjustment options for other body measurements, but not for the neck. Can you help? Thanks so much, Helen
Hi Helen,
Thanks for reaching out. I can certainly help you make a few adjustments so that this sweater will fit Addie. Once you get to the ALL SIZES section, within the YOKE section, you can work through the rows until you have 92 stitches on your needles (and not decrease all the way to 84 stitches). Then, continue on to the COLLAR section! Hope this helps.
All the best,
Lili
Thank you so much! This is exactly the help I need.
Hi, I am working a size M for male dog and am on the ‘working the belly section’. The number of rows for this section (49) are not matching up with the ‘belly length to arm holes’ measurement of 3.25 “ for male dogs listed on the schematics page. Was there an errata update that I missed? i did double check that I am not accidentally working the female dog. i am working the male instructions as intended. The 49 rows in this section, according to gauge, would be almost 8 inches, but the schematic says 3.25.
thank you in advance for your guidance!
Hi Carrie,
Thanks so much for writing in about this! I think you’re working from an older version of this pattern since the latest update did have some changes for the male medium size. The latest PDF should say version 6, so I’d recommend checking to make sure you’re using that one. The work belly section for that size should then only include 28 rows and the schematic should be showing 4 1/4 inches for that size.
We’re so sorry for the inconvenience and hope that helps you get back on track! Please let us know if you still have any questions about that.
All the best,
Zha Zha
Hi! I am on the Shirt Tail + Belly portion for Male dogs and I am very confused on the increase row section. I finished rows 3-6 and I am confused. 1) When do you do the increases (because this is technically row 7 but the pattern says to increase every 10th row for M dogs, what rows specifically do the increases happen), 2) how many rows total are done before moving onto the Join Underside + Work Belly section?
Hi Caroline,
Thanks for reaching out; that’s a good question! You’ll work the increase row on Row 7, Row 17, Row 27, and Row 37. Then, you’ll repeat Row 2 once more, for a total of 38 rows in this entire section before moving on to Join Underside + Work Belly. Hope this helps!
All the best,
Lili
Hello! I am stuck on the decrease round of the yoke. I have worked to the second marker, where it says “work in established rib to 3 sets before next marker”. That next marker is my unique marker, so wouldn’t that end the round? If I continue to follow the pattern- “small, p2, *k2, p2, repeat from * to end of round”- I’ll be on a new round, won’t I? I hope this makes sense! Thanks so much
Hi April,
Thanks for reaching out! We’ve gotten quite a few inquiries about this section, but it usually turns out that people are missing the instructions to place another marker in the first round of the yoke. It’s there, but it’s kind of sneaky! This round reads:
Round 1: [K2, p2] 3 times, sm, knit to next marker, sm, [p2, k2] 3 times, pm, p2, *k2, p2, repeat from *
to end of round.
So after completing this row, you should have 4 stitch markers on your needles, including the end-of-round marker! By missing that “pm,” you’ll end up using the marker that was supposed to separate the stockinette back from the ribbing as the decrease marker and the ribbing will bleed over into the stockinette starting with the second short row. I hope this helps clarify things!
All the best,
Lili
Hi
I buy the ‘Lucky Dog Sweater Pattern’ and I want to put an harness to my dogs under these sweater. Can somebody explain me how I can modify these pattern ?
Thanks
Hi Carole,
Thanks for writing in with such a great idea! If you use a harness for your dog that clips through the back around their shoulders then I’d recommend putting a hole towards the top of the back section. Fortunately this part is worked flat, so you can create it like our video tutorial shown here (https://www.purlsoho.com/create/four-row-yarn-over-buttonhole/) more easily.
I would create the hole in the center of the stockinette section of the back. You might want to hold it against your dog as you’re working to see when it’s closest around to where the harness would come out. I hope that helps!
All the best,
Lili
This is a beautifully designed and written pattern, easily the best I have made for my prince of a poodle. I juiced it up by adding a row of stag horn cable down the spine. If anyone else wants to do that, keep in mind the short row shaping at the shoulder: choose a fairly narrow cable pattern so the short rows don’t run into it.
I found the sizing ran a little on the large size for my very lean little guy, who has a body like a whippet. Fortunately, I was able to adjust by fulling and shrinking in the washer/dryer instead of the usual gentle blocking.
Hi Joel,
Thank you for your incredibly kind words! We’re so happy that you enjoyed making this pattern, and the additional cabling you added sounds absolutely stunning! We really appreciate that you took the time to share your thoughts and suggestions.
Have a wonderful rest of your weekend!
All the best,
Cat
Hello, the side note on page 4 says to add an extra round between each increase round if the recipient is a long dog. It is not clear to me what this means. If I’m doing the XS, does this mean repeat the increase row every 21 rounds instead of 20? Thanks!
Also the pattern reads “every 10th (20th, 8th, 10th, 10th, 10th) row” is 20th correct for the size XS? It seems like a lot of rows to me. Thank you!
Hi again Luzmin,
The reason that there are so many rows between increase rows is because you’ll only need to increase by 4 stitches from the original cast-on number! But since you’ll also need to make this part of the sweater long enough, there end up being a lot of rows in-between each increase row. I hope this clarifies things!
All the best,
Lili
Hi Luzmin,
Thanks for reaching out. You are absolutely correct–for the size XS, you’ll repeat the increase row every 21 rounds instead of 20! Hope this helps.
All the best,
Lili
ok. Have a question. I have made one sweater so am familiar with pattern etc. I want to knit a sweater for a standard dachshund weighing 25 pounds. Neck and length are fine for small but with chest circumference she is 22 so where would I start adding girth? thanks for any quick answer.
Hi Sally,
Thanks for reaching out. I would actually start by knitting the size Medium and making alterations from there! To make the length slightly shorter to match the length for size Small, you can knit one fewer round between each Increase Round in the JOIN UNDERSIDE + WORK BELLY section. And to make the neck smaller as well, you can work a few more decrease rounds in the YOKE section until you have 60 instead of 68 stitches. I hope this helps!
All the best,
Lili
Round
Hi for the short row switch to shadow wraps instead wrap &t?
Please let me know. Thank you.
Hi Gi,
Thanks for reaching out. You can definitely use shadow wraps instead of wrap + turn short rows in this pattern!
All the best,
Lili
Hi Lili,
After I seen you alls wrap +turn tutorial it turn out really easier then other people done it, so I am using you alls way to do the short rows and it is turn out to be beautiful, smooth invisible.
Thank you .
Hi
I am so in awe of this designer’s detailed instructions! And the lovely sweater. I am probably an advanced beginner so have made mistakes and had to restart. New to Wrap & Turn as well as SSP.
Forging ahead anyhow. I am a stickler for following directions to the letter as the W&T leaves me completely at sea. My questions are: in the Small size: Round 1 Size S Only: where it says “K1, ask, p2, [knit to wrapped stitch, knit wrapped stitch with its wrap] TWICE, …. Doesn’t that mean I am knitting another round??
Also: SSP demo on Youtube (not Purlsoho) purls the slipped stitches together in the regular way. Which should it be?
I bought the pattern in May of ’21 so is my pattern up to date for corrections?
Thank you for your help. My puzzlements are due to my inexperience, not the very very meticulous care of the designer!
Hi Kate,
Thanks for reaching out. I can absolutely help clarify the pattern for you! In answer to your question about Round 1, this is the first round that you’ll be working after you finish the short rows earlier. Because short rows are worked back and forth, there are always two ends to each (picture a line segment), which means that there will always be two wraps to pick up! So both of these wraps get picked up on Round 1.
In answer to your question about the ssp technique, there are a couple different ways to work an ssp (and an ssk as well), so there are actually a few perfectly correct options! The way you should choose to do your ssp’s depends on how you’re doing your ssk’s. An ssk can either be done by slipping 2 knitwise and then knitting through the stitches, or by slipping 1 knitwise and then 1 purlwise and knitting through them. To get an ssp that perfectly matches the ssk, then you’ll need to use the corresponding method! So if you’ve been working your previous ssk’s by slipping both stitches knitwise, then you should use the version of the ssp that slips both stitches knitwise. But if you’ve been working your ssk’s by slipping 1 stitch knitwise and 1 purlwise, then you should use the version of the ssp that slips 1 stitch purlwise and 1 knitwise!
I hope this background information helps clear things up!
All the best,
Lili
Big thanks Lili! I think dog sweaters were meant to be learning experiences. I finished mine and even with a few goofs the sweater looks splendid! I’m going to embroider a little to hide the mistakes. Such a good fit though!
I appreciate your thoughtful explanations and have printed them out to save with the pattern for next time I make it.
Hi
Shirt Tail + Belly : female dogs
Rows 3-6 : repeat rows 1 and 2 two more times.
In this section am I doing total 10 rows?
Star counting row 1 through 6.
I am kind confused.
Thank you.
By the way , all your dog sweater pattern is so genius and lovely.
Hi Gi,
Thanks for writing in. In this section, you’ll be doing a total of 8 rows! First, you’ll work Rows 1 and 2 (2 rows total), then you’ll repeat them two more times (4 more rows, 6 rows total), and finally, you’ll work Rows 7 and 8 (2 more rows, 8 rows total). Hope this helps clarify things!
All the best,
Lili
Hi, I’m making this sweater and am a bit confused on the short row shaping on yoke. Once I do the ‘short row wrap’ on short row 1, do I just continue around to the next edge of the ribbing? Am I correct in that the short row decreases are on either side of the ribbing?
TIA
Janet
Hi Janet,
Thanks for reaching out. You are indeed correct that the wrap + turns will happen on either side of the ribbing section! As long as you follow the instructions, you will definitely end up in the correct spot to work the wrap + turn, as well as the yoke decreases that happen on each row. Hope this helps!
All the best,
Lili
This looks like a very nice pattern. Covers neck and stomach nicely. How does one put it on? Legs first, then pop over head? Thank you.
Hi Geraldine,
Thanks for reaching out and for your kind words! Yes, that is correct, the best way to put it on would be to slip the legs in and then pop over the head!
Happy knitting!
Gianna
Hi,
Can you please clarify if the gauge is for stocking stitch knitted flat, or stocking stitch knitted in the round?
Thanks!!
Hi Nanna,
Thanks for reaching out. Since this design is knit mostly in the round, it would be most accurate to swatch in the round as well! Hope this helps clarify things.
All the best,
Lili
hello,
I am working the Divide Chest and Back park of the pattern and a bit confused – I am sure it is due to my skill level, not the pattern.
Do I just go back and forth, back and forth on row 1 and 2 7 times (making a small) and then once I finish that move on to the chest instructions? These two pieces will remain separate?
Hello,
Thanks for reaching out, and you are correct! You will be working rows 1 and 2 of the back section 6 times, then knitting row 1 again. From there, you will place these stitches on hold and then pick up and knit the chest panel to begin working that separately.
I hope this helps, and please let us know if you have any questions!
All the best,
Carly
Hi PS,
Great pattern, thank you! I have knitted for my dachshund, I’m. Lack mania super wash. It fits well, but his short stumpy arms keep getting stuck inside, then come out the neck hole which is too narrow for his body to follow through, and he ends up hobbled sideways on the ground. Has anyone else had this problem? I can’t see exactly the mechanics of it, whether removing the cuffs or tightening the arm holes, or what could be done to make it useable? Looks great when he’s able to trot around in it though! (And he loves wearing too which is a first for jackets and that dog).
Sorry autocorrect changed my return email address. Fixed here.
Hi Lucy,
Thanks so much for your question! We’ve gone ahead and reached out to you via email so we can get more information about the fit of your dog’s sweater.
I’ll be sure to keep an eye out for your reply!
All the best,
Carly
I really want to make a sweater for one of our dogs who gets cold in the winter. Would this be a good pattern for an advanced beginner?
My dog is 25 lbs and slender (a rough coat Kromfohrlander), so would I need to make a lot of pattern adjustments? I have zero experience with this.
Also, Grace Kelly loves to roll around on the ground. Would your recommended wool hold up to repeated washings?
Thanks so much for your time.
Hi Jenny,
Thanks for reaching out. The Lucky Dog Sweater is great for an advanced beginner! And if you have any questions along the way, we’re always happy to help out.
In terms of sizing, I’d recommend taking a look at the finished measurements that we give on the pattern page. Then, you can measure your dog and compare those measurements to the ones for each size. That way, you can determine exactly where you might need to make modifications to the pattern (and if you would need to at all).
In answer to your question about yarn, I wanted to let you know that Linen Quill Worsted should be hand washed because of the animal fiber content. So if you’re looking for a yarn that you can throw in the washer and drier instead, I’d recommend using a plant-based yarn, like Tulip Cotton or Sunshower Cotton.
I hope this helps!
All the best,
Lili
Hello friends at Purl Soho,
I’m knitting the size small and may have found a problem with the pattern. Within the short row section, SHORT ROW 3: it says [L2, P2] twice, however I only had 4 stitches instead of 8 so the twice should be removed. For SHORT ROW 4: it has K2, P2, K2, purl to wrapped stitch, for this section I only had 4 stitches instead of 6 so I believe the 2nd K2 is extra. I state this with… I COULD BE WRONG! But I ignored these two errors and my stitch count and ribs look great. Love the pattern, love the fit. Its quite impressive when dogs are so many different sizes that you’ve created a pattern to satisfy so many animals and according to Ravelry, even a hamster! Thanks, from Johanna & Shiloh
Hi Johanna,
Thanks for reaching out! I’ve checked over this part of the pattern, and I can confirm that it’s correct. When you begin the Yoke section, you’ll have 12 stitches of ribbing before the stockinette portion of the back (2 of these stitches come from the 2 stitches you cable cast on during Joining Round 1). Over the course of Decrease Round, Short Row 1, and Short Row 3, you will decrease a total of 3 stitches at this location, leaving you with 9 stitches in the ribbing pattern at the start of Short Row 3. These 9 stitches are [k2, p2] twice (the first 8) and k1 (the 9th).
Since you were missing 2 stitches at this point, I believe that you may have missed the cable cast on in the Joining Round. But I’m so glad to hear that everything worked out in the end, and that it fits so well!
All the best,
Lili
So a lovely dog sweater
Please recommend a substitute yarn in deep purple that is smooth without any lint. Thank you.
Hi Fran,
Thanks for writing in! I would recommend Plenty in either Fresh Fig, Gray Pearl, or Red Plum. Hope this gives you some ideas!
All the best,
Lili
Thank you. That was very helpful.
Hello,
I bought this pattern and made it for my granddog which is a golden doodle. My sister wants one for her dog – an english bulldog( very large). neck is 23″ and chest is 32.5. would the XL size fit this dog? I love this pattern and would love to make it for her. i’m not that confident in adjusting the pattern unless you think it wouldn’t be that hard?
Thank you!
Hi Sue!
Thank you for writing in. I think a size XL would still fit your sister’s dog with one easy modification! All you would need to do is measure your gauge over 2×2 ribbing, and then use that to determine how many stitches you will need for a 23″ collar. You can knit the rest of the dog sweater as written, but then when it comes time to decrease right before the Collar (under “All Sizes”), you will decrease less times than the pattern instructs, leaving more stitches for a wider neckline.
I hope this helps, and happy knitting!
All the best,
Margaret
Like so many others, I am confused by the Yoke section. Is there an errata sheet for these directions? Are you sure they are correct? I’ve done it twice & I’m still not clear. Are the short rows, along with the decreases, all being incorporated into the ribbing section or are the decreases in the ribbing section, and the short rows incorporated into the back (stockingnette) stitches? It seems the pattern indicates one and then the other.
Hi Bonnie,
We’re so sorry to hear you’re having trouble with the yoke section! I am happy to help clarify this part of the pattern. While we do have some errata listed for this pattern, any version purchased after May 17, 2021 is up to date with these adjustments.
When working the yoke, the short rows and decreases will happen simultaneously to grow the chest fabric while also decreasing the back and front fabric for a perfect fit! The short rows are worked within the ribbing for the chest only, and the decreases occur at the very edges of the back section, one right after the first marker, and one right before the marker on the other side. The decreases will occur within the ribbing pattern at first, and then continue along the edge of the stockinette section, right where it joins up with the ribbing! In the pattern, you will follow the instructions under YOKE to establish the chest ribbing short rows and decreases, then proceed to follow the size-specific instructions to continue this shaping, before following the “All Sizes” instructions to finish decreasing in the yoke.
I hope this helps clarify this section, and please don’t hesitate to let us know if you have any other questions!
All the best,
Margaret
Hi, I love this sweater and would like to make it for my dog. I’m somewhat of a beginner… do you think this patter is too complicated for a beginner? How would you rate it? beginner, intermediate, advanced… Thanks!
Hi Cris,
Thanks for reaching out. I think that this pattern would be an exciting challenge for a relative beginner! To give you a sense of what techniques you’ll encounter in the pattern, I’ll link some tutorials we have for them below:
Long Tail Cast-On
Wrap + Turn Short Rows
Cable Cast-On
Purl 2 Together
I hope that these tutorials are useful, and as always, we’re here to help! If you run into anything tricky or confusing as you work through the pattern, please don’t hesitate to reach out to us either here, or at customerservice@purlsoho.com.
All the best,
Lili
I have gotten to the part right before the yolk when you cable cast on stitches I am clearly confused on how to go from here. When I start and it says to start with Pearl too it seems to me that I should be starting with Knit to. Also are we going around at this point or are we going still right side and right wrong side. Once I pick up the stitches from the back am I going to go and join in the round or am I supposed to go back-and-forth? I am stuck so near the end of the project. So far it has been fabulous but I feel like maybe I picked up the incorrectly from the back although I did pick up the other side of where the yarn was as was instructed
Hi Abby,
Thanks for reaching out, though I’m sorry to hear that you’ve hit a stopping point in your project! In the Join Chest + Back section you will resume working in the round. After you cable cast on 2 stitches, you will be in position to work the stitches across the back. Although it may not seem exactly right yet, these first 2 stitches are meant to be purled! By purling them, you will re-establish the 2 x 2 ribbing pattern at each edge of the Back stitches.
I hope this helps clarify things, but if you’re still stuck, then I’d recommend sending a photo of your work to customerservice@purlsoho.com. That way, we’ll be able to take a closer look!
All the best,
Lili
I was confused by this as well. The only way the pattern made sense to me at this point is if I faced the wrong side and then did the cable cast on, and then flipped to face the right side to start knitting across the back, as the pattern says. Did I do this wrong?
Hi Deborah,
Sounds like you did everything correctly! The first step of any cable cast-on is to turn your work so that the opposite side is facing you. Then, you cast on the stitches, and once you’re done, you turn the work back around and continue knitting! Since all of these steps are part of the instruction “cable cast on 2 stitches,” they don’t need to be specified elsewhere in that line of the pattern. Hope this helps clarify things!
All the best,
Lili
Thank you, and makes sense!!
I’m confused about what comes next…I just finished the beginning 2×2 ribbing….I’m knitting for male…so do I go to section labeled
“Join underside + work belly”?
Or
Do I go to …” Shirt tail + belly” ?
Thank you
Hi Jacqueline,
Thanks for reaching out. At this point in the pattern, you’ll proceed to the JOIN UNDERSIDE + WORK BELLY subsection within the Shirt Tail + Belly: Male Dogs section! This begins near the top of page 4 of the pattern. Hope this helps!
All the best,
Lili
Under the section CHEST, after placing stitches from holder onto needles, Row 1 says to M1R as first stitch. I have always made one right or left between stitches….How do you do this with the first stitch?
thanks for your help
Patty
Hi Patty,
Thanks for writing in! While you are working the make-one increase at the beginning of the first row of the Chest, it is actually still worked between two stitches. It’s positioned between the last stitch of the Back and the first stitch of the Chest! I hope this helps you visualize where the increase is created!
All the best,
Lili
yes Thank You
was reading ahead and figured this might be the case
I really appreciate the support and quick response
makes trying a complicated pattern more appealing knowing you are there
Hi – me again! Making steady progress but at a point of uncertainty now, in yoke section short row 3. I think I can identify the wrapped stitch – at least, on the third knit stitch following rib pattern the stitch looks different from the others!! So if I am correct and this is the wrapped one, what does it mean to “knit wrapped stitch with its wrap”???
Hi Deborah,
Glad to hear that you’re making good progress! Knitting a wrapped stitch with its wrap means that you’ll pick up both the loop that’s the “wrap” from the previous wrp-t as well as the loop of the stitch, and then knit them as one stitch. We demonstrate this technique in our Short Rows: Wrap + Turn tutorial, so I’d recommend checking that out to see it in action!
All the best,
Lili
I’m having a lot of fun with this pattern and the part I’ve knitted so far is cute! I’m a new knitter and I’m at the very end of the “Back” section where it says to cut the yarn and I’m a bit confused. Should I leave a tail to weave in at the end or do I need to put a knot in it or something? Then, in the “Join Chest + Back” section there is a reference to the side with the yarn attached in the first statement, but isn’t it supposed to be cut? I just want to make sure I understand what I’m supposed to do before cutting the yarn. Thanks!
Hi Megan,
Thanks for reaching out! Yes, you can just leave a tail to weave in later when you cut the yarn at this point. However, the yarn that the instruction “where yarn is attached” is referring to is actually your current working yarn! This is the yarn that you have just completed knitting the Chest with. Hope this helps clarify things!
All the best,
Lili
Thanks for clarifying! I went for it and it’s looking really good! Now I’m ready to bind off and start the sleeves. Is the 2×2 bind off the same as a tubular bind off? Are there any videos demonstrating this technique that you recommend? I also started reading ahead about the sleeves and I’m confused about how to start. Are there any videos? Thanks!
Hi Megan,
That’s so great to hear! Binding off in 2 x 2 ribbing is actually very different from the tubular bind-off. All you’ll need to do is bind off essentially as normal, except instead of knitting each stitch, knit the knit stitches only and purl the purl stitches. The rest is the same as usual!
I’m afraid that we don’t have any videos specifically about these sleeves, but since they begin with picking up stitches, I’d recommend taking a look at our tutorial on that technique! And please don’t hesitate to reach out to us with any specific questions you have along the way!
All the best,
Lili
Hello! I am starting on the Divide Chest + Back section and am confused about the first m1L. Is this supposed to be a purl stitch? When I turn my work the following stitch is a knit but the instructions say to purl. Also, how do I turn my work without doing a wrap? Ugh!
Thank you!
Hi Norma,
Since you’re working the m1L on the right side of the work, this should appear as a knit stitch on the right side and a purl stitch on the wrong side. But honestly, it doesn’t really matter if it looks a bit off, since it will actually get completely covered up once you pick up stitches for the sleeves along this edge! Overall though, you should have 2 stitches of 1 x 1 ribbing at the edges of both the Back and Chest sections, followed by the 2 x 2 ribbing.
When you turn your work, you will not need to work a wrap + turn, since you’ll actually want to create a gap between stitches, rather than keeping them joined together like when you work short rows. The easiest way to think about this step is to pretend you’re just working flat and ignore the other stitches altogether! You can turn your work exactly as you would at the end of a normal row when knitting flat, and everything will turn out correctly.
I hope this helps clarify things!
All the best,
Lili
I am making the medium size for a male dog and am on the section Shirt-tail & Belly: Male Dog. I am confused about the increase rows. I have completed rows 1-6. The instructions say to make an increase row every 10th row, 3 more times. Is the first increase row, row 7? Or do I begin counting the 10 rows after the first increase row?
Hi Debbie,
Thanks for reaching out! The first Increase Row you work will be the 7th row, and then you’ll begin counting the 10 rows after this. You’ll work 9 rows in stockinette (starting on a wrong side row and ending on a wrong side row) and work the next repeat of the Increase Row on the following, 10th, row. You’ll then repeat those 10 rows until you’ve worked a total of 4 Increase Rows (the first one, plus the “3 more times”). Hope this helps clarify things!
All the best,
Lili
I am making a size XL and made a mistake when I was working on the yoke. Can you tell me where the stitch marker placement should be on size XL after completing the row of joining the chest and back in the round? Thank you!
Hi Krisann,
Thanks for reaching out, and absolutely! There should be 3 stitch markers in total after the Joining Round: 1 beginning/end-of-round marker at the edge of the chest, before you cable cast on 2 stitches, and then 1 marker on each side of the stockinette portion of the back. Then, on Round 1 of the Yoke, you’ll place a 4th marker, after the first 12 stitches of ribbing after the stockinette. Hope this helps clarify things!
All the best,
Lili
Hello! I’m completely stuck on the Join Chest + Back section. I just can’t work it out, no matter how I try to do it I end up working in the round on the wrong side (so purling the back, instead of knitting. I noticed the back portion ended on the right side and the chest ended on the wrong side (looking at the pattern it has one more row than the back), is this right? Part of me just wants to remove one row on the chest so that the starting yarn is to the left (when looking at the chest portion on the right side) instead of on the right. I hope that made sense and you’re able to guide me along.
Hi Caroline,
Thanks for reaching out! It sounds like you may be turning your work at the end of the final repeat of Row 3 for the Chest. This is actually a right side row, so you’ll need to stay on the same side as you continue. Once you finish the final Row 3 (right side), do not turn your work, but rather proceed immediately to Joining Round 1 by placing a stitch marker, working the cable cast-on, and then working across the back. Hope this helps get you back on track!
All the best,
Lili