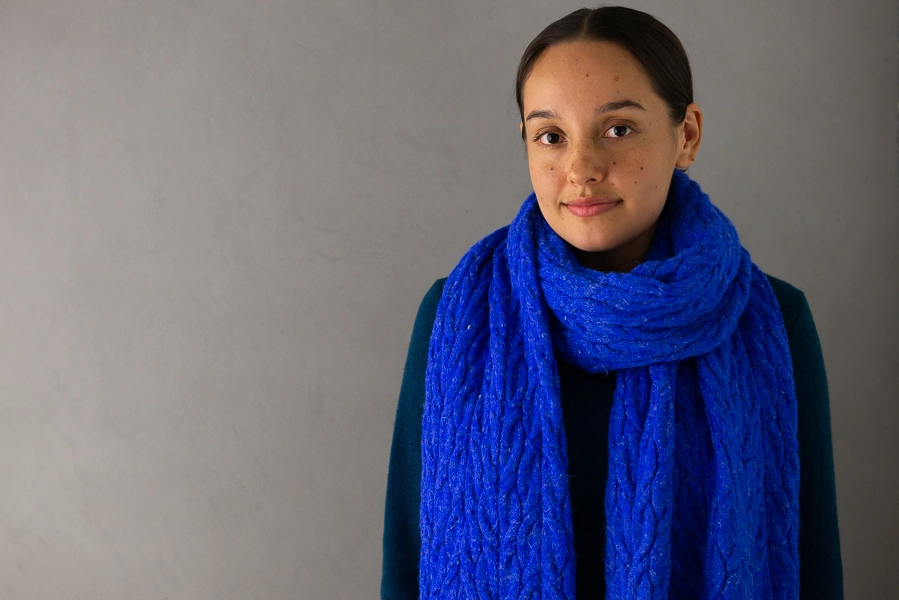
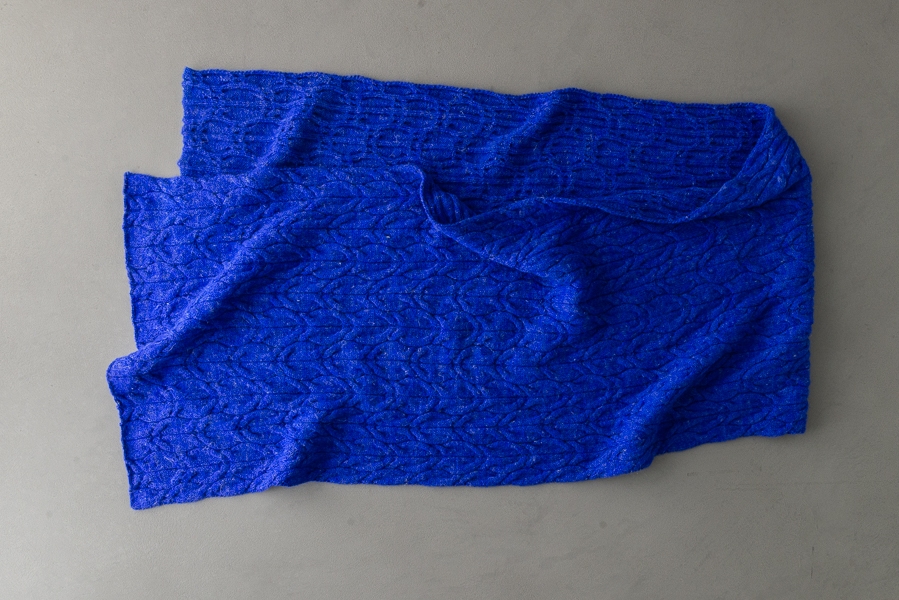
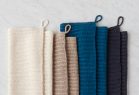
Estuary Wrap
Like a bird’s eye view of a river delta, our Estuary Wrap branches and weaves, merges and strays in natural waves and pure flow!
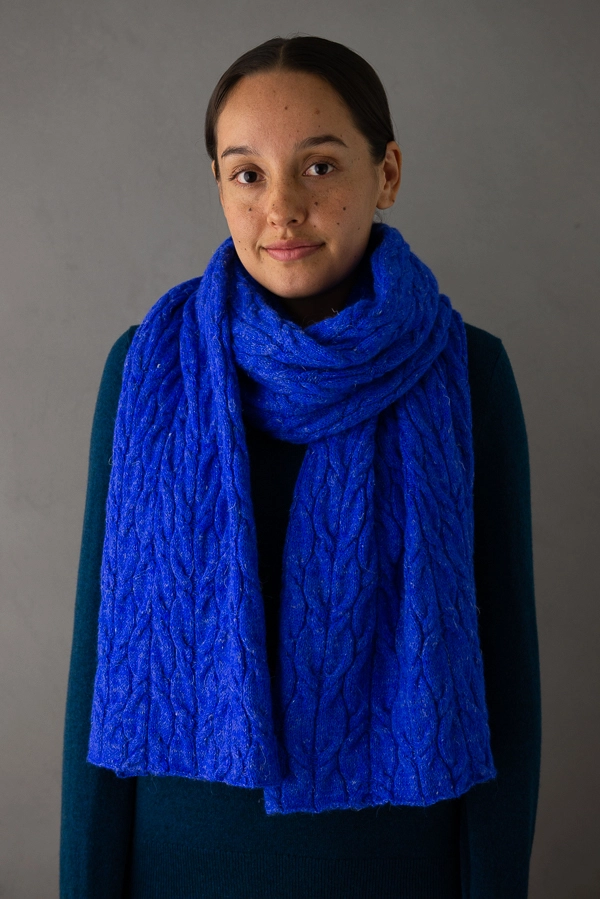
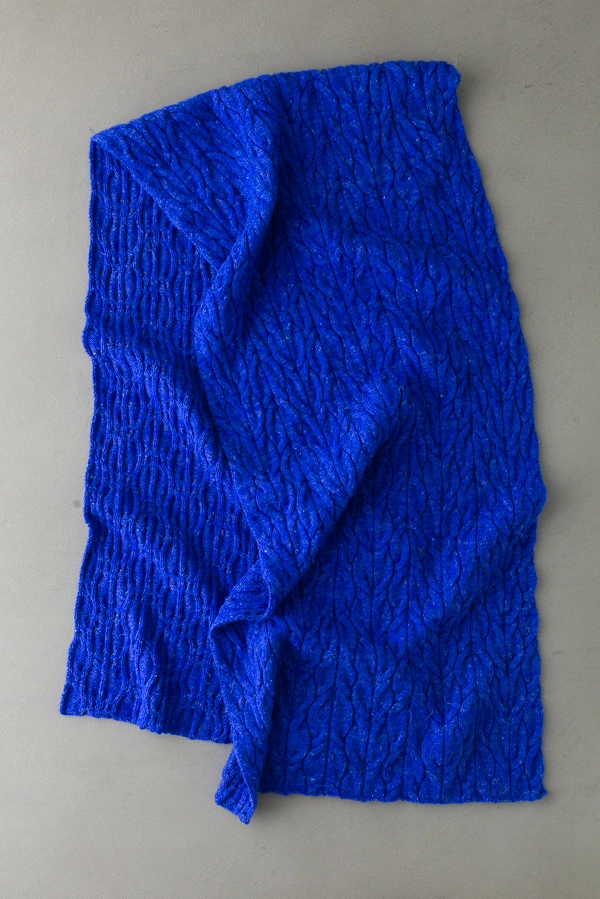
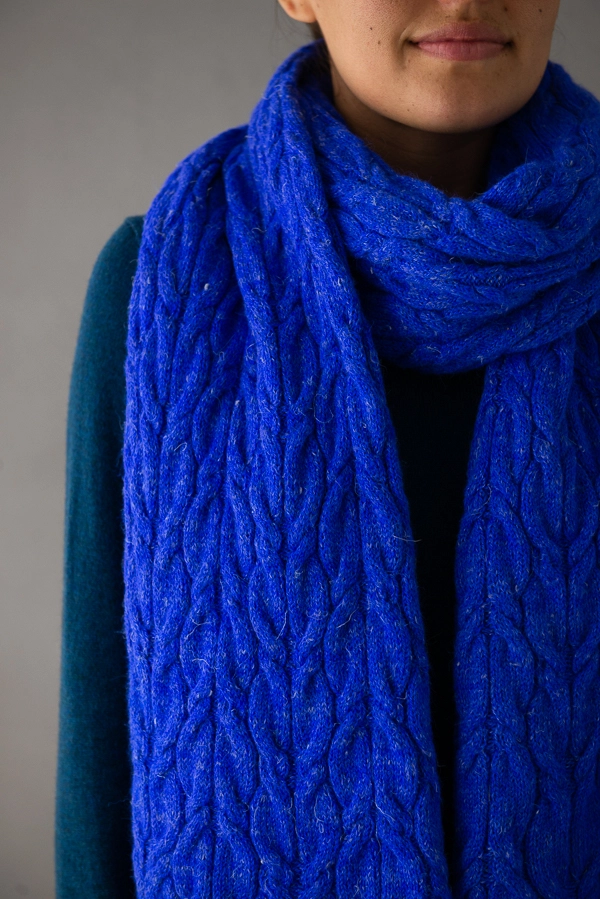
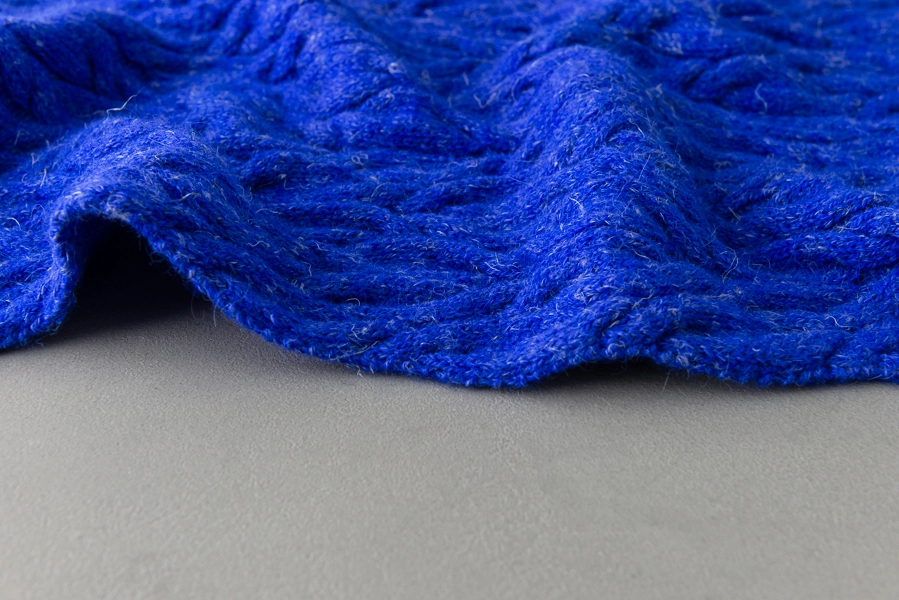
In one of our new Linen Quill colors, this punchy treat is Blue Blue, an intensely saturated color that sucks you in like a whirlpool! We just added eight new eye-poppers to the collection, including grassy greens and very vocal violets.
You’ll need three skeins to make the scarf version of this pattern, and five for this super generous wrap.
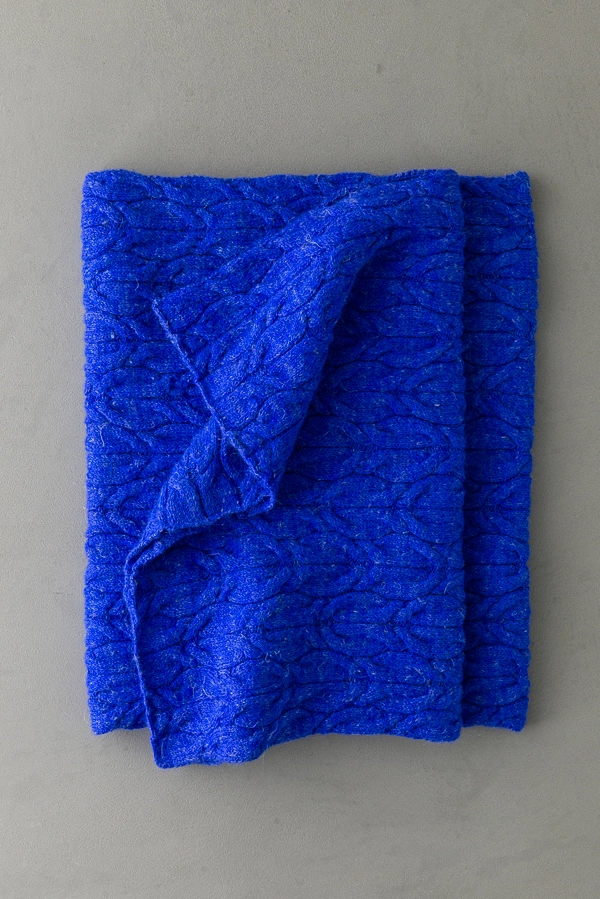
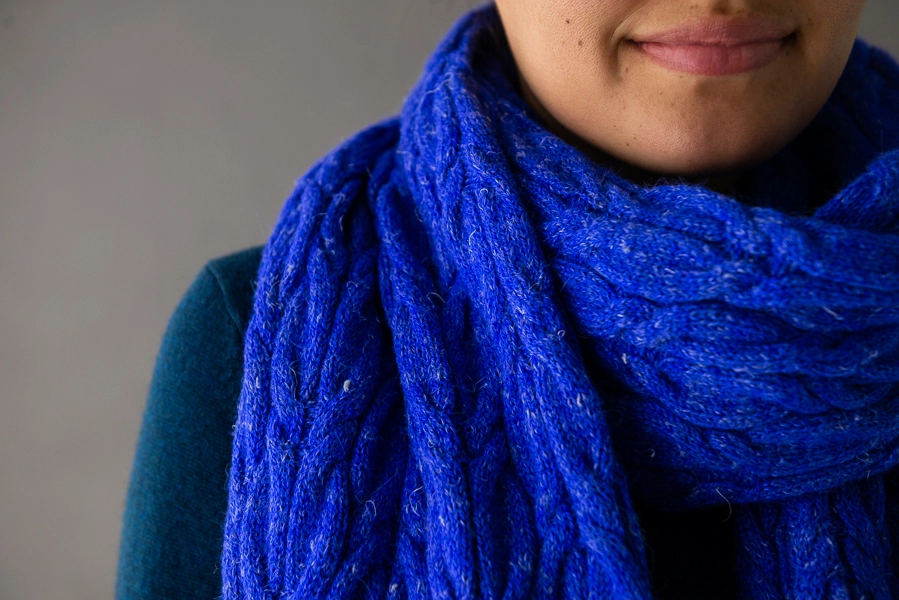
The stitch pattern is a simple ebb and flow cable, not too much to wrap your brain around but enough to keep you engaged. We love its soft tidal edges and densely packed ripples, a true beauty!
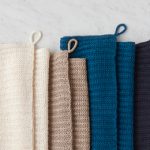
UPDATE: NOW IN BRUME
OCTOBER 2022
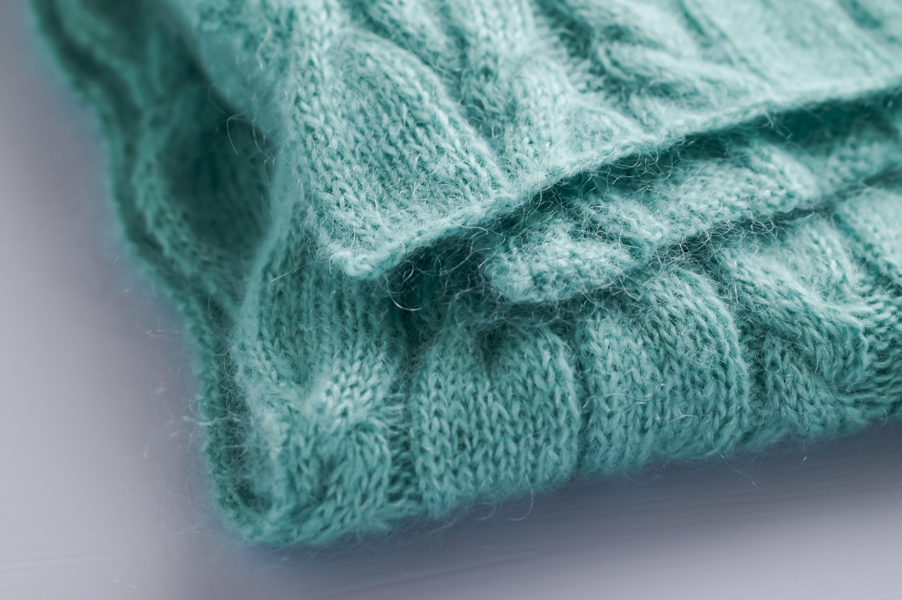
Fifty-eight percent mohair, 25% wool, and 17% silk, our gorgeous Brume is cozy warm, wonderfully light, and has a beautiful glisten. We knit up our Estuary Wrap in Bright Verdigris, which swirls between blue and green, reminiscent of the sea’s crystal waters. It only takes three skeins to knit a scarf and six to knit this sumptuous wrap!
Designed by Purl Soho designer, Laura Ferguson.
Share your progress + connect with the community by tagging your pics with #PurlSoho, #PurlSohoBusyHands, #PurlSohoEstuaryWrap, and #PurlSohoLinenQuill. We can’t wait to see what you make!
Materials
- 3 (5) skeins of Purl Soho’s Linen Quill, 50% fine highland wool, 35% alpaca, and 15% linen. Each skein is approximately 439 yards/100 grams; approximately 1300 (2170) total yards required. We used Blue Blue.
- US 2 (3 mm), straight or 20- or 24-inch circular needles
- US 3 (3.25 mm), straight or 20- or 24-inch circular needles
- A cable stitch holder
Gauge
48 stitches and 39 rows = 4 inches in pattern on larger needles
Size
Scarf (Wrap)
Finished Dimensions: 10 (17) inches wide x 71 (71) inches long
SAMPLE: The piece shown here is the Wrap.
NOTES
NEEDLES
To prevent the cast-on edge from flaring out, you will use smaller needles to cast on and work the first few rows, then switch to larger needles for the body of the piece. You will switch back to smaller needles for the final few rows and bind off.
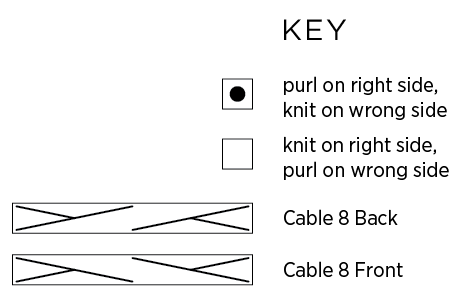
C8B (CABLE 8 BACK)
Slip 4 stitches to cable stitch holder and hold in back of work, k4, then k4 from cable stitch holder.
C8F (CABLE 8 FRONT)
Slip 4 stitches to cable stitch holder and hold in front of work, k4, then k4 from cable stitch holder.
Our Cable Tutorial shows you the basic steps of working a cable. The cable in the tutorial requires you to slip 3 stitches instead of 4, but the concept is the same!
STITCH MULTIPLE
This pattern is worked over a multiple of 40 plus 2 stitches.
PATTERN
Using smaller needles and a basic Long Tail Cast On, cast on 122 (202) stitches.
Now follow either the Written Instructions or Chart, below.
WRITTEN INSTRUCTIONS
Set-Up Row (wrong side): K1, *k1, p8, k1, repeat from * to last stitch, k1.
Row 1 (right side): K1, *p1, k8, p1, repeat from * to last stitch, k1.
Row 2 (wrong side): K1, *k1, p8, k1, repeat from * to last stitch, k1.
Rows 3 and 4: Repeat Rows 1 and 2.
Change to larger needles.
Row 5: K1, *p1, C8B (see Notes), p2, k8, p2, k8, p2, C8F (see Notes), p1, repeat from * to last stitch, k1.
Row 6: Repeat Row 2.
Rows 7-12: Repeat Rows 1-6.
Rows 13-16: Repeat Rows 1 and 2 two times.
Row 17: K1, *p1, k8, p2, C8B, p2, C8F, p2, k8, p1, repeat from * to last stitch, k1.
Row 18: Repeat Row 2.
Rows 19-24: Repeat Rows 13-18.
Repeat Rows 1-24 until piece measures approximately 71 inches from cast-on edge.
Change to smaller needles.
Repeat Rows 1 and 2.
Repeat Row 1.
Bind off in pattern with wrong side facing you.
CHART
NOTE Begin this chart in the bottom right corner. Right-side rows are odd numbered and read right to left. Wrong-side rows are even numbered and read left to right.
Use smaller needles for Set-Up Row and Rows 1-4. Change to larger needles and continuing with Row 5, repeat Rows 1-24 on larger needles until piece measures 71 inches.
Change to smaller needles and work Rows 25-27. Bind off in pattern with wrong side facing you.
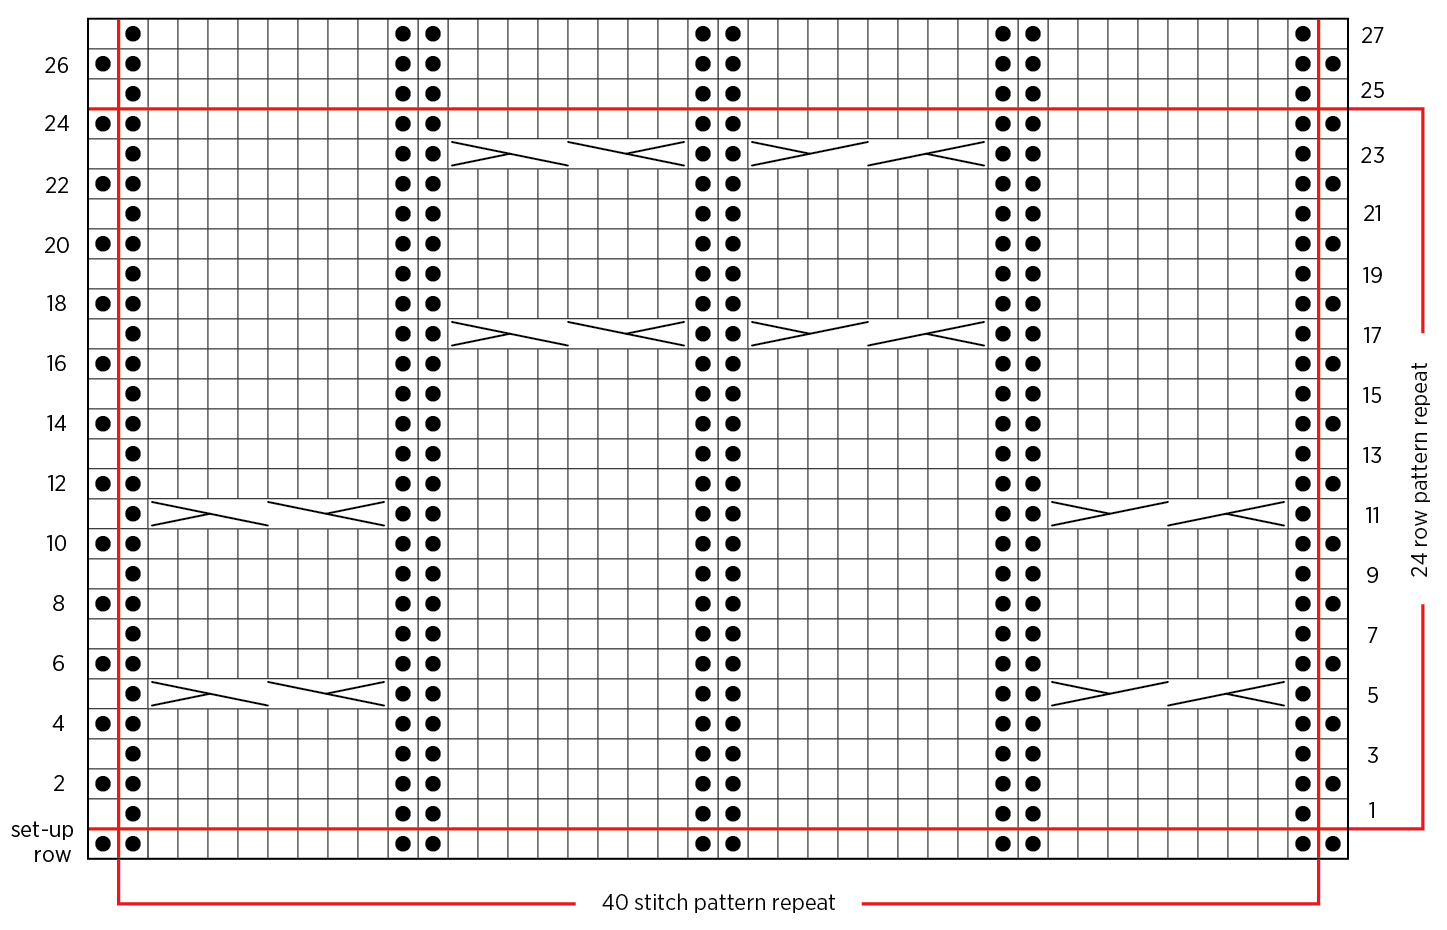
(Want to see it bigger? Click here and view the chart as a PDF!)
FINISHING
Weave in ends and block as desired.


Hi
Can this be made in the linen quill worsted for a more wintry wrap? How many skeins would I need for the scarf and the wrap please?
Hi Allison,
Thanks for writing in! At present, this pattern is only available in the gauge that it was originally written in! If you are up for a bit of a challenge, you can certainly give re-gauging it a go since working in the worsted weight would be a much different gauge than the original linen quill. Re-working it based on a larger gauge will take a bit of trial and error but could result in a lovely finished piece! I can assure you though that the original linen quill is a beautifully hearty yarn, perfect for the upcoming winter season!
Happy knitting!
Gianna
I wish I could learn how to read those pattern charts. I am a very good knitter and crocheter but never got the hang of those charts – is there a class for that?
Hi Tracy,
Thanks for writing in! We don’t currently have a tutorial for reading charts, but that is an excellent suggestion. I will certainly pass it along to our design team, but in the meantime, I’ll try to explain it for you! Each square of the chart represents one stitch, and you will each row from right to left for the right side rows and from left to right for the wrong side rows. You can tell what to do with each stitch by looking at the chart key. For instance, an empty white square means to knit on the right side and purl on the wrong side, and a square with a dot in the center means to purl on the right side and knit on the wrong side. So, the first few stitches of Row 1, which is a right side row, are an empty square, a square with a dot, and eight empty squares, meaning you will knit 1, purl 1, then knit 8. This chart also includes cables which can be found in the chart key. It’s very helpful to print the chart and then use sticky notes or highlighter tape to cover up all of the chart except the row you are working on so you don’t get lost! Once you get going with charts, you will probably find that you can memorize most of the basic symbols, which makes it go much faster!
I hope that helps, and happy knitting!
Julianna
From my own experiences, it’s always easier to do what is familiar and already learned. How I got a bit better at reading charts is to find a pattern with a written instruction as well as a chart.
I took one row of written – and then below the words, put the coinciding chart block/st.
It started to make sense to me – and, even though I still prefer the written, when I’m stumped, I go to the chart for clarity! I imagine the reverse can be done, too. If working from a chart and get lost, check the written word.
Ahhh, oral word compared to the written word. Sounds biblical to me. 😉
TY to Purlsoho!!!
love the estuary wrap.. what softer yarn would you recommend. ?
Hi Marcy,
Thanks for reaching out! You can use almost any fingering weight yarn for this pattern. I would suggest either Posy or Manos del Uruguay Fino!
Happy knitting!
Julianna
I am interested in knitting the scarf. Tks
Hi Pamela,
Thanks for writing in, and we certainly hope you give it a try! You can find our free pattern above, and order Linen Quill by clicking right here!
All the best,
Julianna
I am wondering if it might be possible to make a cowl using this pattern. I was thinking of a provisional cast on using the scarf cast on numbers and then knitting enough length for a double wrap. At the end maybe doing a three needle cast off. If I did that do you think I should still use the smaller needle for the cast on and first few rows and then the end section and cast off? Is the cable pattern one that would be easily matched for the cast off? I don’t know if I can tackle this but just thinking it might be nice to make as a gift for my granddaughter when she gets a bit older. By then I might get it done. Thanks
Hi Susan,
Thanks for reaching out and sharing this wonderful sounding modification! I think you are on the right track with joining the two ends with a three needle bind off! You won’t have to use the smaller needle in this case and can also omit the set-up row. I would also make sure you end on row 24 of the chart, as this should make the cable pattern continue more or less seamlessly across the join, preventing the first and last few rows from flaring out. It would also be helpful to work the three-needle bind off with the right sides together and work it in pattern by knitting your knits and purling your purls as you join the two ends and cast off.
I hope that helps, and please let us know how it turns out!
Julianna
Can this be made with a heavier yarn?
Hi HS,
Thank you for reaching out! Currently, this pattern is only available in the gauge that it was originally written in! If you are up for a bit of a challenge, you can certainly give re-gauging it a go. Re-working it based on a larger gauge will take some trial and error but could result in a beautiful finished piece!
Happy knitting!
Gianna
Is anyone else having trouble saving this pattern (and others) to Favorites? I’ve tried a few times, with different patterns and on different devices, and the addition is not committing to my Favorites.
Hi Tiffany,
Thanks for reaching out! We’re noticing some issues on our website because of a recent update and are still working to iron out some residual kinks. We’re aware of this problem now and are urgently looking into it, so thank you for bringing this to our attention! I’m sure this is frustrating, so we appreciate your patience as we troubleshoot in the meantime.
Best,
Gianna
Hi, am I doing something wrong when I am trying to print your pattern to PDF. In this case almost every single picture is sized so that it takes up an entire page all by itself so if you delete the first picture which is a cropped version of the second picture you end up with a blank page and the pattern ends up being HUGE because each picutre is an entire page. Can you shrink the pictures down somehow so you can have the pictures AND some text on them? Would love to print off the pattern and get it on my needles! Thanks for your continued generosity with such great patterns
Hi Erin,
Thank you for reaching out! You can follow the easy on-screen instructions to delete whichever parts of the pattern you don’t want to print or save, to remove images, click the drop down next to the image icon and change from 100% to 0%.
I hope this helps, happy knitting!
Gianna
Hi there
I absolutely love this pattern but as I live in Europe and can’t access the linen quill yarn very easily I was going to knit this wrap with a fingering weight 100% merino yarn – do you think this would be ok? I will obviously check my gauge but I was just querying the look and cosiness of the wrap. Do you think I could achieve a similar effect?
Many thanks
Charlotte
Hi Charlotte,
Thanks for reaching out! Any fingering weight would work for this pattern! Linen Quill is very unique yarn so a 100% merino yarn will have a different feel and texture but could still be a beautiful option for this pattern! Currently we are offering discounted shipping rates and it is $12 to ship internationally!
Happy knitting!
Gianna
HI Gianna
Thanks so much for your help and apologies for the delay in getting back to you – would a 100% alpaca fingering yarn work equally well do you think?! 🙂
Thanks again
Charlotte
Hi Charlotte,
No problem, I am happy to help! I think a fingering weight 100% alpaca would be beautiful! Just be sure to do a gauge swatch before beginning to insure that your gauge with the new yarn is consistent with the pattern!
All the best,
Gianna
Hello,
Love this pattern. I would love to make this scarf but as a much bigger wrap, do you think it would work to just double the width and continue on with the length for a little longer in the pattern?
Thanks for your help,
Ryan
sorry, just to add that I was hoping to do something about 25″ wide and 90″ long. Thanks.
Hi Ryan,
Thanks for writing in! The pattern for the wrap size comes out to 17 x 71″ so you you can certainly double the pattern, that would get you to about 34″ wide. This pattern is worked over a multiple of 40 plus 2 stitches (make sure to keep that multiple in mind when casting on!) and the gauge is 48 stitches and 39 rows = 4 inches so you can also calculate it that way to get the cast on amount you desire (since you would like 25″ rather than 34″). You can then just keep working the pattern repeats until you get to your desired 90″!
I hope this helps and please feel free to reach out with any more questions!
All the best,
Gianna
Happy New Year, Purl Soho!!!
I am a beginner/intermediate knitter and I originally purchased 4 skeins of Linen Quill to make the Lightweight Raglan Pullover. However I’ve never made a sweater before and am feeling overwhelmed while reviewing the pattern on your site. Any advise on making the sweater?
I am also thinking about making the Estuary Wrap with the 4 skeins. I know it will probably shorter, but by how much?
Any help and suggestions will be greatly appreciated.
Hi June,
Thanks for reaching out! For the Estuary Wrap We recommend 3 skeins for the scarf version and 5 for the wrap version, both come out to be 71″ long, just with different widths. For the wrap size we used approximately 2170 yards and 4 skeins would give you about 1756 yards. This would leave you about 1/4 shorter than 71″ which would be quite a bit. So if you plan on using 4 skeins I would recommend casting on a number in between the scarf and wrap size and then you will come out to a similar length! Keep in mind the stitch pattern works over a multiple of 40 + 2 stitched so I suggest casting on 162 (approximately 14″ wide)
As for the Lightweight Raglan Pullover, although it may seem intimidating I think this would actually be a great project for a first time sweater! The construction is very straight forward and although there are a few more complex techniques, we offer some amazing tutorials to assist you! You can also reach out to us here with questions any time!
I hope this helps, happy knitting!
Gianna
Hi. Love the pattern! Any yarn suggestions for a non-wool alternative? Thank you! Lisa
Hi Lisa,
Thanks for reaching out! This wrap would look absolutely beautiful in our Cattail Silk, Spectrum Silk or Burnish! These 3 are all non-wool, fingering weight yarns, but I do recommend working a gauge swatch to insure you are consistent with the pattern prior to beginning!
Please let us know which yarn you end up working with and how it turns out!
Warmly,
Gianna
I certainly will! Thanks for the suggestions. Lisa
I’m just working on this pattern and am worried that the first cable row end doesn’t match the beginning.
Is 122 cast on correct? I don’t want to continue until I’m sure it’s right.
Thanks,
Hi Cathy,
Thanks for reaching out! If you’re knitting the scarf size, then yes 122 stitches is correct! In that initial cable row (Row 5), the first cable you work will be a back cable and the last one will be a front cable. The direction of the cables will be different for each, so you are correct that the first cable won’t be the same as the last one you work.
I hope this helps clear things up, but please let me know if you have any other questions!
All the best,
Kelsey
I have a DK weight yarn (22-24 stitches per 4 inches on US 5 or 6 needles)that I’d really like to use for this pattern. Unfortunately for me, I seem to be incompetent at knitting math! Can you help with the conversion?
Hi Guy,
Thanks for writing in. I can absolutely help you out with the knitting math! The first thing you’ll want to do is knit a gauge swatch in pattern (not just in stockinette) with the needles you plan on using for the project. Once you know how many stitches per inch you’re getting (the stitch gauge divided by 4), then you can multiply that number by the width you’d like and round to the nearest multiple of 40 + 2. I hope this helps you get started!
All the best,
Lili
Just an FYI that there is an issue with the pdf file in that when you try to print the pattern the only option given is to delete the image. This is the same for all images in the pdf file. You can only delete the images. So, one can’t enlarge the pattern as the pdf file trashes it. Bummer!
Hi Sally,
Oh no, I’m sorry to hear that you haven’t been able to enlarge the text when you’re downloading this pattern as a PDF! It should be possible to enlarge the text up to 130% by clicking on the “T” icon and selecting a larger percentage. If you’re still having trouble doing this, Id recommend reaching out to customerservice@purlsoho.com, and we’d be happy to send you an enlarged PDF!
All the best,
Lili