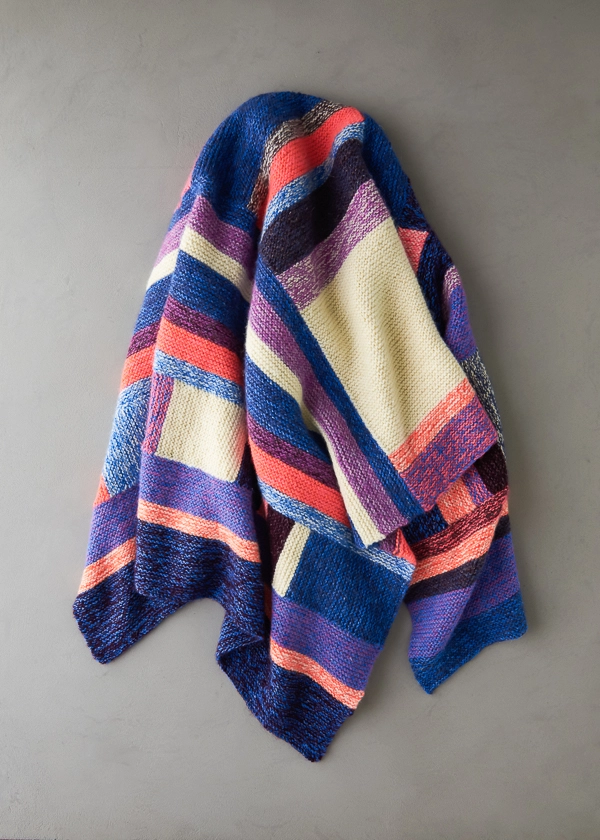
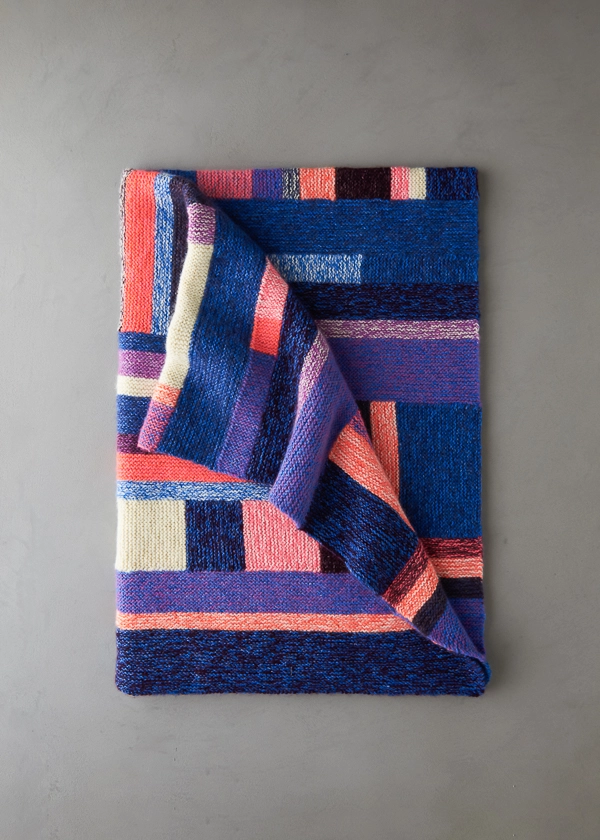
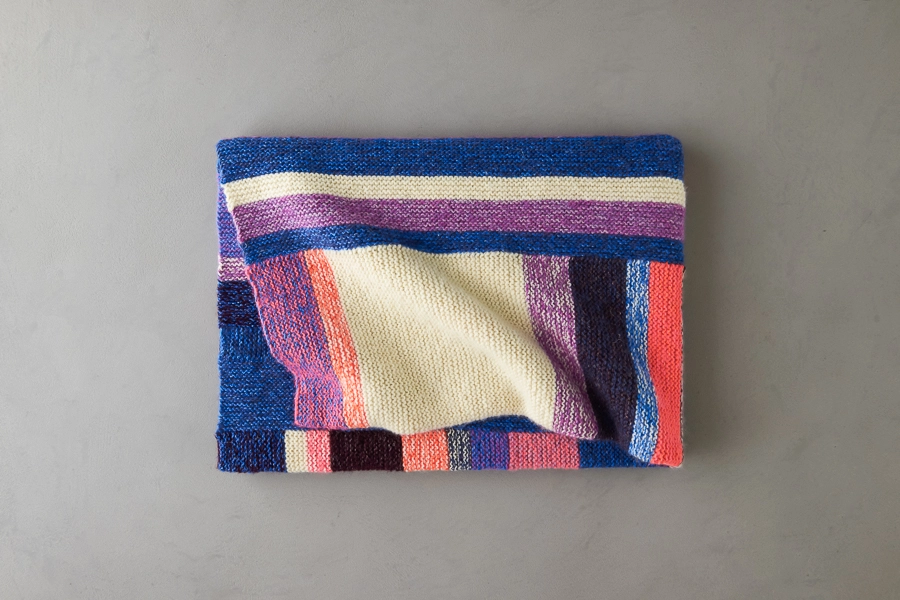
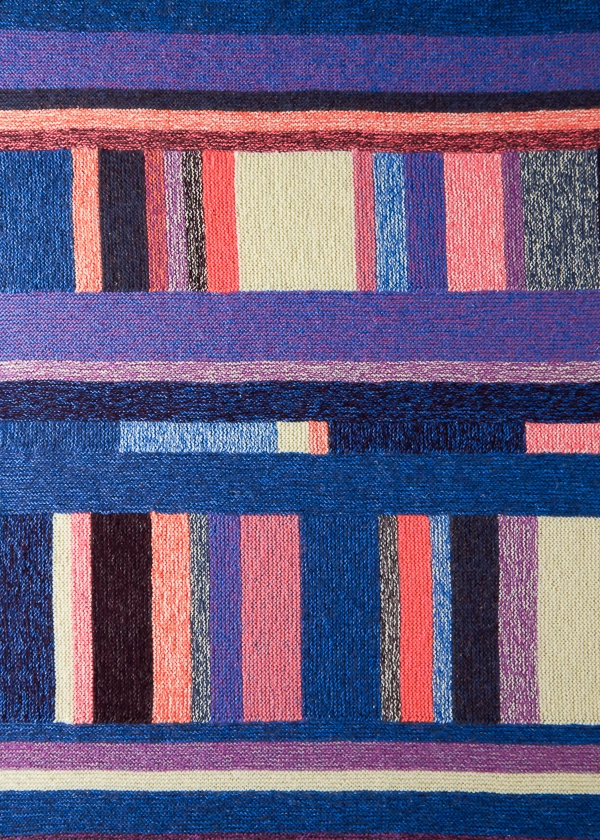
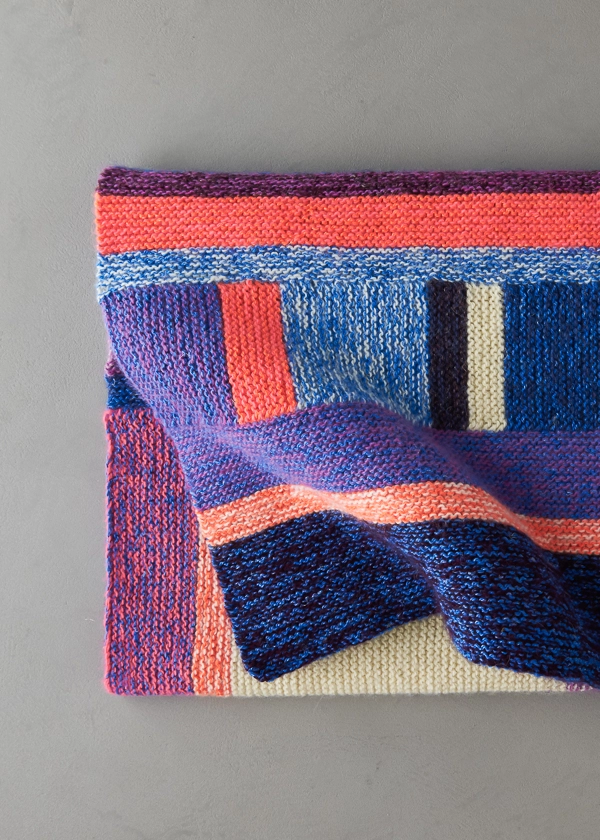
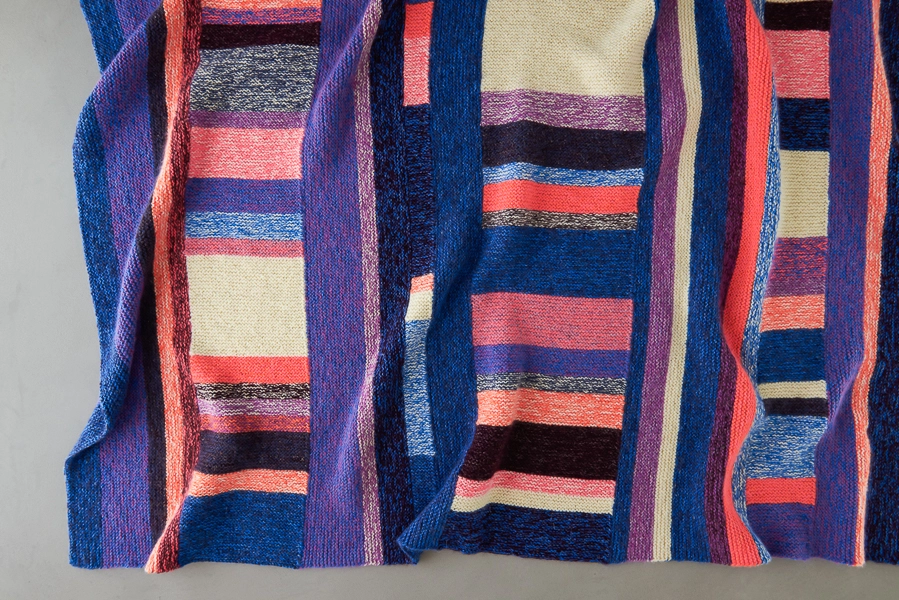
Library Blanket
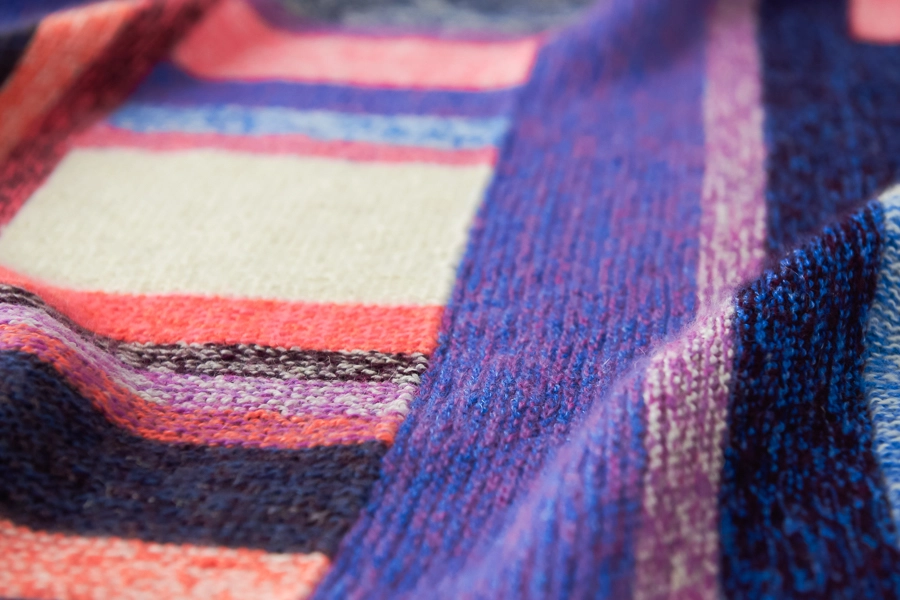
Book lovers meet knitters! The design for our Library Blanket takes a page from a brimming bookshelf filled with fanciful books, dreamed up in a world where blues and purples meet pinks and oranges… A pretty wild tale!
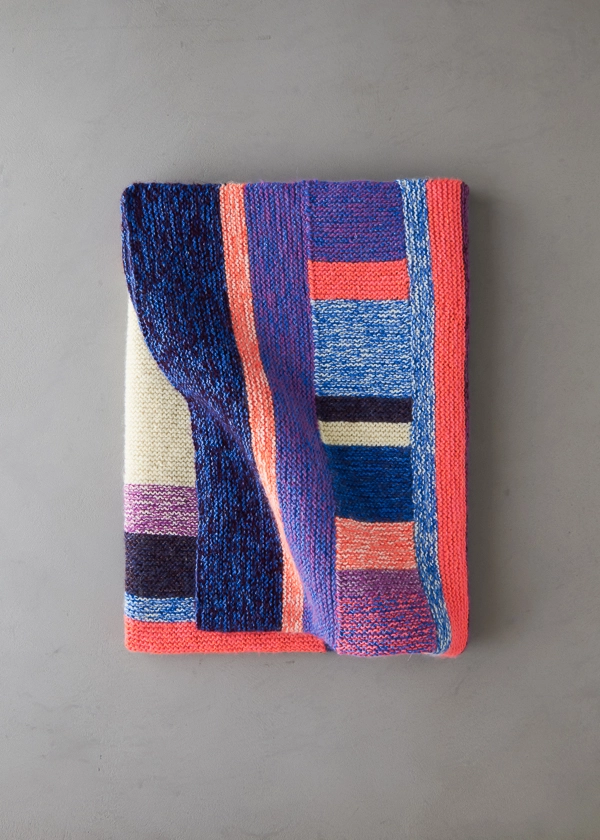
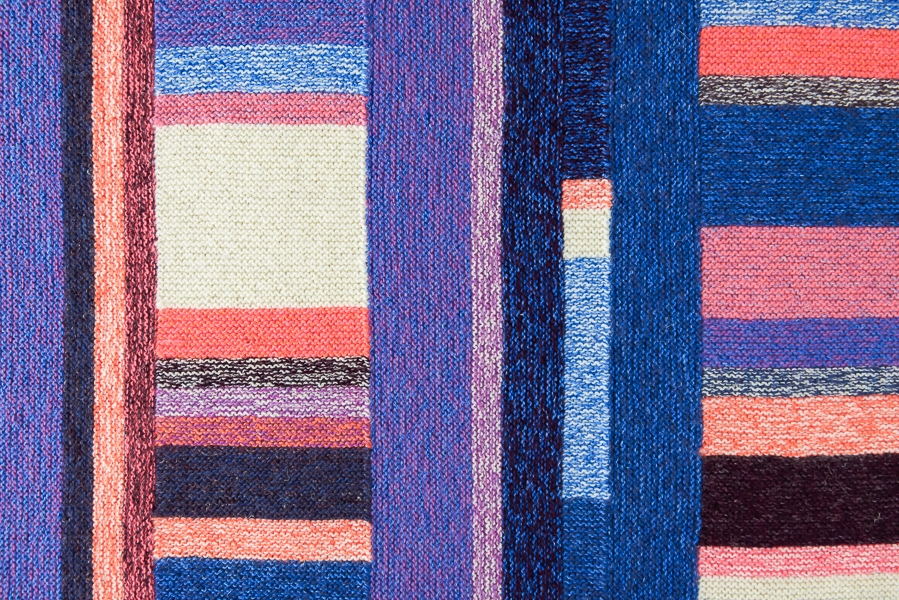
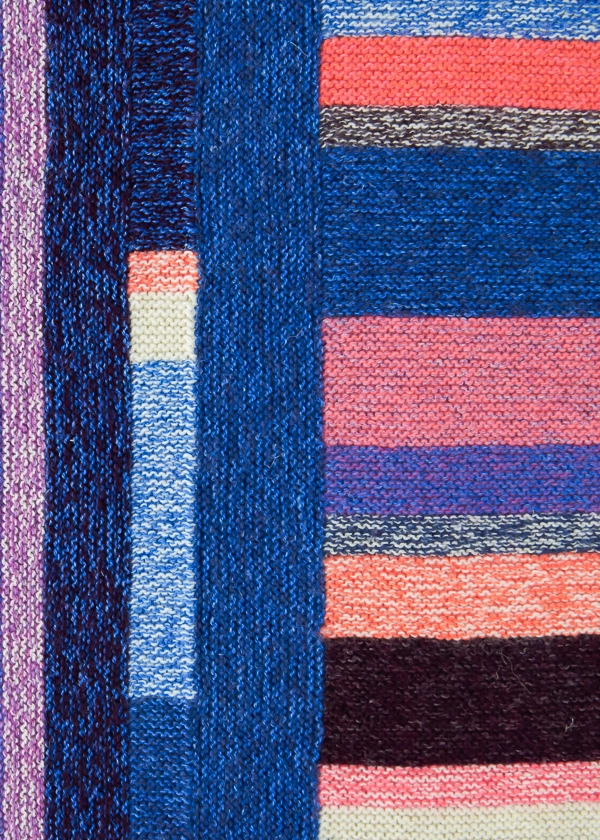
As much as stories, we love color. By pulling two yarns together, we grew our palette exponentially and were able to create all these glorious marles that blend and contrast, blur and delineate, whisper and shout!
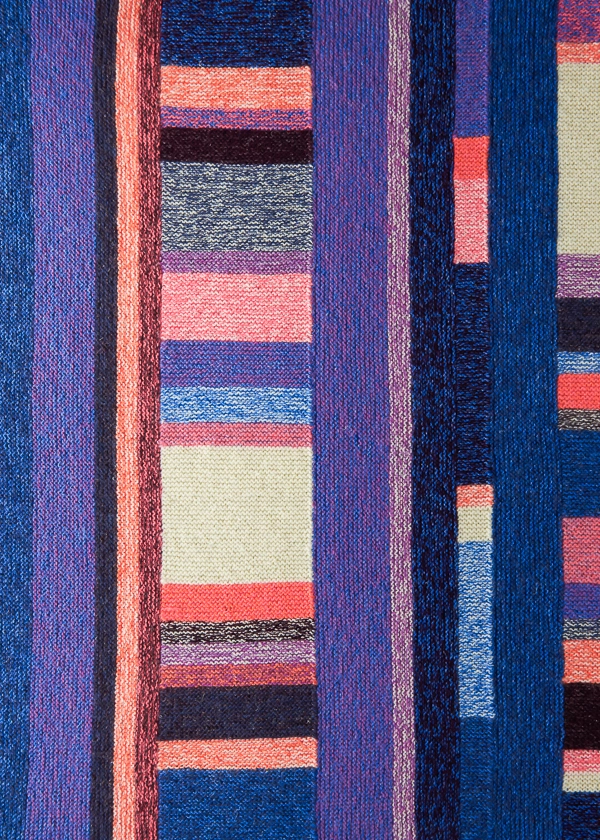
One strand is our single-ply Line Weight merino wool, a soft and cozy little filament that adds a downy glow. And the other is Linen Quill, a fine highland wool, alpaca, and linen blend that brings down-to-earth texture and stunning color.

Making this blanket is just as absorbing as a juicy novel. All in simple garter stitch, you work the horizontal stripes as you’d imagine, but for the “books” (aka the vertical stripes), you work the stripes while picking up from the top edge of the last horizontal stripe. Easier done than said, but the long and short is no sewing!
A full cast of colors and an epic knitting adventure, curl up with this good knit! Our Library Blanket Bundle writes the book on beauty with its selection of absolutely gorgeous yarn… Pick one up and cast on!

UPDATE: SAME CONSTRUCTION, NEW DESIGN
FEBRUARY 2022
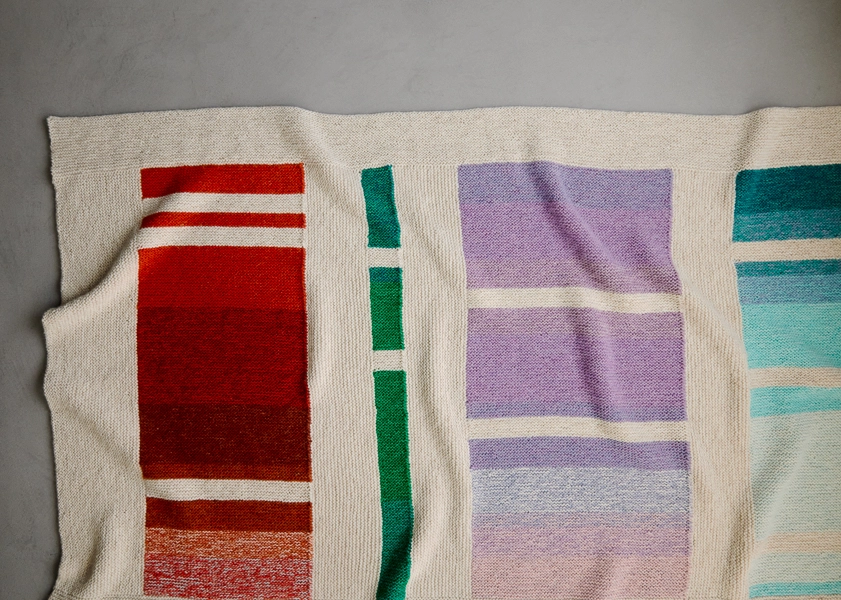
Borrowing a page from the Library Blanket’s clever construction, our Side Street Blanket moves from the library to the streets with its beautiful bird’s-eye view of a city neighborhood. We used the same combination of Linen Quill and Line Weight to create an entirely new map of gloriously marled colors! You can find the Side Street Blanket here!
Designed by Purl Soho founder and co-owner, Joelle Hoverson.
Share your progress + connect with the community by tagging your pics with #PurlSoho, #PurlSohoBusyHands, #PurlSohoLibraryBlanket, #PurlSohoLineWeight, and #PurlSohoLinenQuill. We can’t wait to see what you make!
Materials
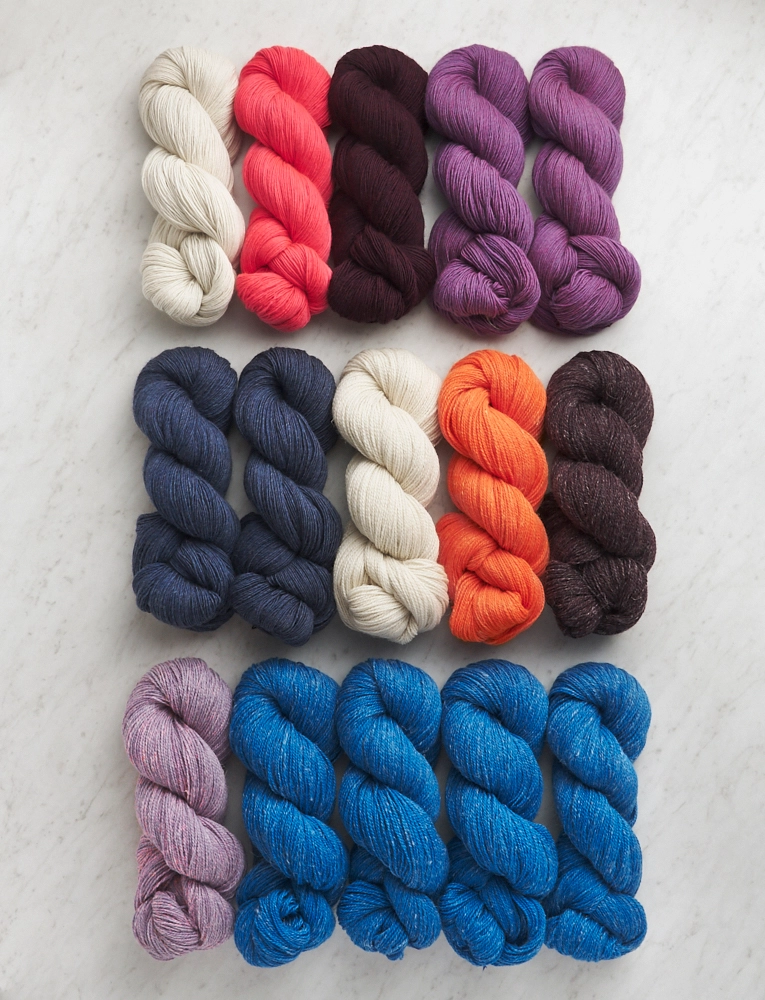
Our Library Blanket Bundle makes one Throw-size blanket and includes (shown above, top to bottom and left to right)…
- 1 skein of Purl Soho’s Line Weight, 100% merino wool, in Heirloom White. Each skein is 494 yards; approximately 484 yards required. (We used almost an entire skein. Make sure you knit on gauge, or pick up an extra skein of Heirloom White if you’re nervous about running out. If you don’t wind it into a ball and don’t use it, you can return it for store credit!)
- 1 skein of Line Weight in Bright Flamingo, approximately 267 yards required.
- 1 skein of Line Weight in Red Plum, approximately 385 yards required.
- 2 skeins of Line Weight in Lotus Flower, approximately 588 yards required.
- 2 skeins of Line Weight in Blue Jeans, approximately 558 yards required.
- 1 skein of Purl Soho’s Linen Quill, 50% fine highland wool, 35% alpaca, and 15% linen, in Pale Oats. Each skein is 439 yards; approximately 404 yards required.
- 1 skein of Linen Quill in Super Orange, approximately 259 yards required.
- 1 skein of Linen Quill in Dark Iris, approximately 237 yards required.
- 1 skein of Linen Quill in Crocus Bud, approximately 119 yards required.
- 4 skeins of Linen Quill in Cobalt Blue, approximately 1378 yards required.
NOTE: For a Crib-size blanket, you’ll need just one skein of each color, except Linen Quill in Cobalt Blue. For that color, you’ll need two skeins!
You’ll also need…
- A free Library Blanket Template available here.
- US 7 (4.5 mm), 40-inch circular needles
NOTE: Want to try out your own color combinations? One of our wonderful customers designed this Color Preview Tool to help visualize your own creative color mixing. Thank you Liz!
Gauge
20 stitches and 40 rows (or 20 ridges) = 4 inches in garter stitch, holding one strand of Line Weight and one strand of Linen Quill together
Note: We recommend swatching in a Color Combo that doesn’t require much yarn for the blanket, like Color L: Super Orange LQ + Bright Flamingo LW.
Sizes
Crib (Throw)
Finished Dimensions: 40 inches wide x 33½ inches long (40 inches wide x 58 inches long)
Sample: The blanket pictured here is Throw size.
Notes
Yarn Doubled
You will double the yarn throughout this pattern, pulling one strand of Linen Quill and one strand of Line Weight together.
Cutting Yarn
When you switch to a new color and the pattern says “cut yarn,” cut both strands of the colors you are dropping, unless the following color combination uses one of the same colors. In that case, you should just cut the one color you won’t be using.
Color Combo List
A: Cobalt Blue Linen Quill (LQ) + Red Plum Line Weight (LW)
B: Super Orange LQ + Heirloom White LW
C: Cobalt Blue LQ + Lotus Flower LW
D: Cobalt Blue LQ + Blue Jeans LW
E: Pale Oats LQ + Heirloom White LW
F: Dark Iris LQ + Red Plum LW
G: Pale Oats LQ + Bright Flamingo LW
H: Cobalt Blue LQ + Bright Flamingo LW
I: Crocus Bud LQ + Lotus Flower LW
J: Dark Iris LQ + Blue Jeans LW
K: Cobalt Blue LQ + Heirloom White LW
L: Super Orange LQ + Bright Flamingo LW
M: Dark Iris LQ + Lotus Flower LW
N: Pale Oats LQ + Lotus Flower LW
O: Dark Iris LQ + Heirloom White LW
P: Crocus Bud LQ + Bright Flamingo LW
Q: Pale Oats LQ + Blue Jeans LW
R: Pale Oats LQ + Red Plum LW
S: Super Orange LQ + Lotus Flower LW
T: Dark Iris LQ + Bright Flamingo LW
Horizontal Stripe Section
Knit every row.
Vertical Stripe Section
Row 1 (right side): Knit to marker, slip marker, slip last stitch of Vertical Stripe Section, knit next stitch of Horizontal Stripe Section, pass slipped stitch over to join Vertical Stripe Section to Horizontal Stripe Section, turn work.
Row 2 (wrong side): Move working yarn between needles to back of work, knit to end of row, slipping marker when you come to it.
Repeat Rows 1 and 2.
Pick Up For Horizontal Stripe Section
Orient blanket with cast-on edge at the bottom and Vertical Stripe Section across the top. With right side facing you and with specified color, pick up and knit one stitch between each garter ridge along selvage edge, starting with upper right hand corner of blanket. Be sure to start picking up between cable-cast-on row of Vertical Stripe Section and first garter ridge, and finish picking up between last garter ridge and bind-off row from the Vertical Stripe Section. [200 stitches on the needle]
NOTE: For help with picking up stitches, please visit our tutorial and scroll down the page to the Along A Vertical Edge: Garter Stitch video.
Schematic
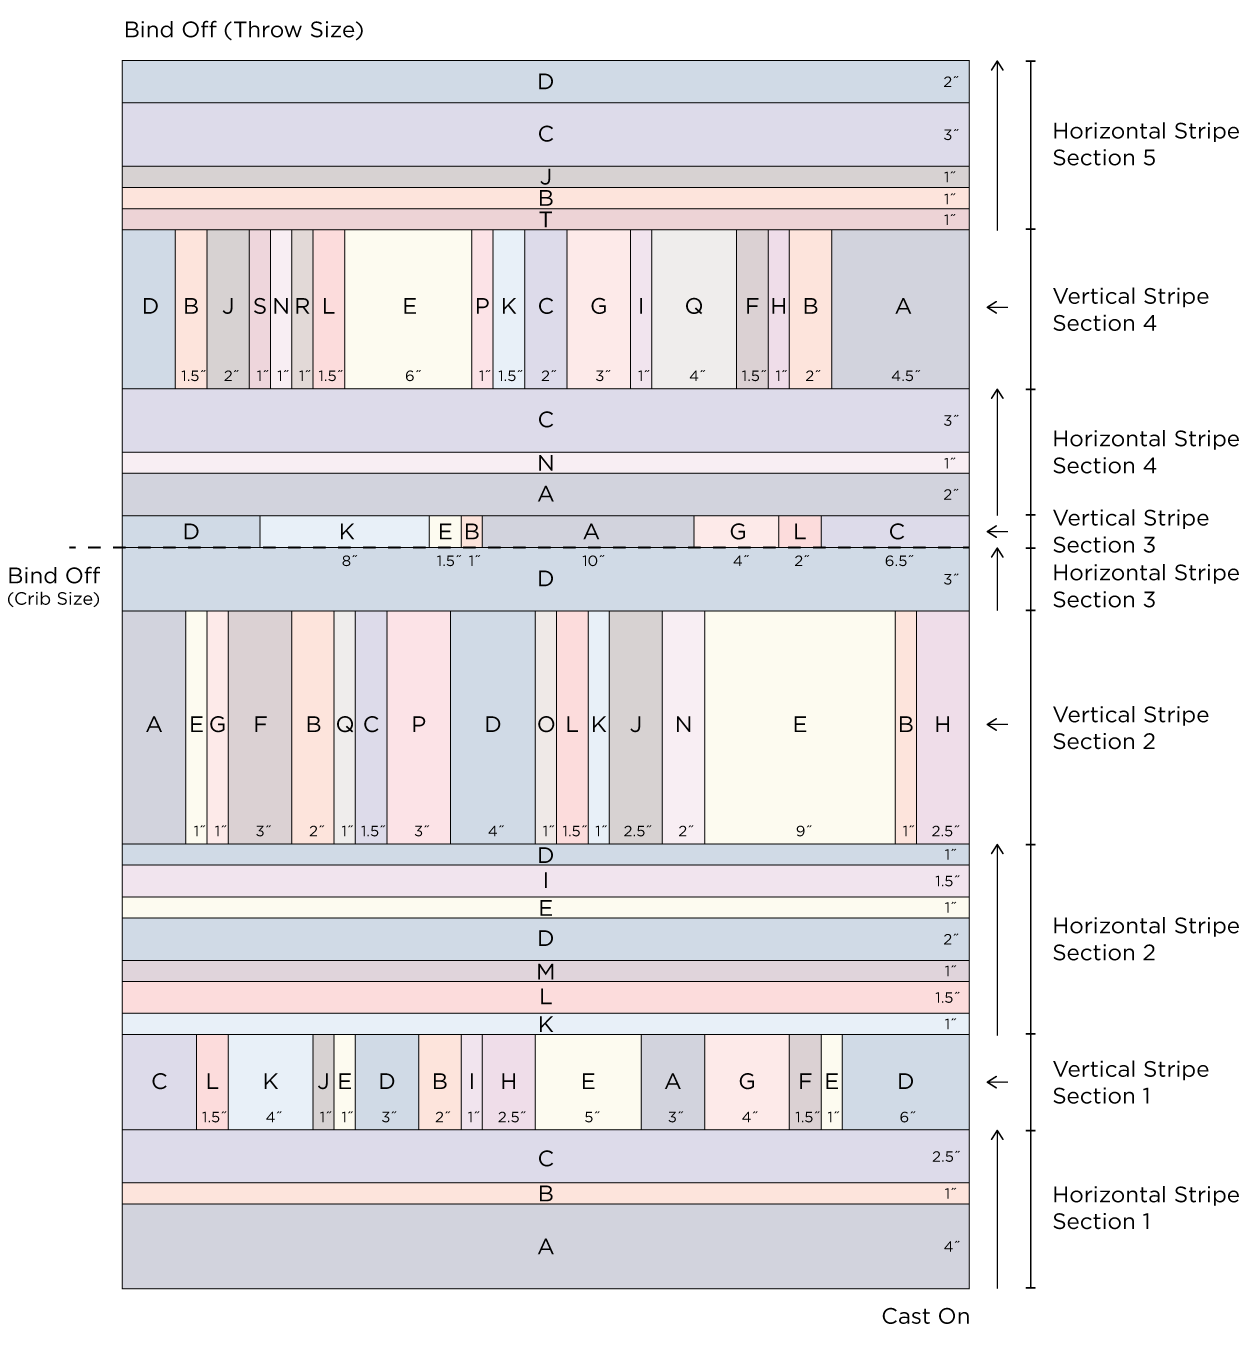
Want to see it bigger? Click here and view the schematic as a PDF!
Pattern
NOTE: As you work, always hold together one strand of Linen Quill and one strand of Line Weight (see Notes, Yarn Doubled). The Color Combo List (see Notes) tells you which two colors to hold.
With Combo A, cast on 200 stitches.
Horizontal Stripe Section 1
With Combo A, work Horizontal Stripe Section (see Notes) for 4 inches, ending with a wrong-side row. Cut yarn (see Notes).
With Combo B, work Horizontal Stripe Section for 1 inch, ending with a wrong-side row. Cut yarn.
With Combo C, work Horizontal Stripe Section for 2½ inches, ending with a wrong-side row. Cut yarn.
Vertical Stripe Section 1
At the beginning of next row, with right side facing you and Combo D, use a cable cast on to loosely cast on 1 stitch, place marker (pm), loosely cast on 19 stitches. [220 stitches]
Work Vertical Stripe Section (see Notes) until Combo D measures 6 inches, ending with a wrong-side row. Cut yarn.
With Combo E, work Vertical Stripe Section for 1 inch, ending with a wrong-side row. Cut yarn.
With Combo F, work Vertical Stripe Section for 1½ inches, ending with a wrong-side row. Cut yarn.
With Combo G, work Vertical Stripe Section for 4 inches, ending with a wrong-side row. Cut yarn.
With Combo A, work Vertical Stripe Section for 3 inches, ending with a wrong-side row. Cut yarn.
With Combo E, work Vertical Stripe Section for 5 inches, ending with a wrong-side row. Cut yarn.
With Combo H, work Vertical Stripe Section for 2½ inches, ending with a wrong-side row. Cut yarn.
With Combo I, work Vertical Stripe Section for 1 inch, ending with a wrong-side row. Cut yarn.
With Combo B, work Vertical Stripe Section for 2 inches, ending with a wrong-side row. Cut yarn.
With Combo D, work Vertical Stripe Section for 3 inches, ending with a wrong-side row. Cut yarn.
With Combo E, work Vertical Stripe Section for 1 inch, ending with a wrong-side row. Cut yarn.
With Combo J, work Vertical Stripe Section for 1 inch, ending with a wrong-side row. Cut yarn.
With Combo K, work Vertical Stripe Section for 4 inches, ending with a wrong-side row. Cut yarn.
With Combo L, work Vertical Stripe Section for 1½ inches, ending with a wrong-side row. Cut yarn.
With Combo C, work Vertical Stripe Section until all stitches from previous Horizontal Stripe Section have been worked, removing marker on last row and ending with a right-side row.
Next Row (wrong side): Bind off knitwise and cut yarn.
Horizontal Stripe Section 2
With Combo K, work Pick Up For Horizontal Stripe Section (see Notes). [200 stitches]
With Combo K, work Horizontal Stripe Section for 1 inch, ending with a wrong-side row. Cut yarn.
With Combo L, work Horizontal Stripe Section for 1½ inches, ending with a wrong-side row. Cut yarn.
With Combo M, work Horizontal Stripe Section for 1 inch, ending with a wrong-side row. Cut yarn.
With Combo D, work Horizontal Stripe Section for 2 inches, ending with a wrong-side row. Cut yarn.
With Combo E, work Horizontal Stripe Section for 1 inch, ending with a wrong-side row. Cut yarn.
With Combo I, work Horizontal Stripe Section for 1½ inches, ending with a wrong-side row. Cut yarn.
With Combo D, work Horizontal Stripe Section for 1 inch, ending with a wrong-side row. Cut yarn.
Vertical Stripe Section 2
At the beginning of next row, with right side facing you and Combo H, use a cable cast on to loosely cast on 1 stitch, place marker, loosely cast on 49 stitches. [250 stitches]
Work Vertical Stripe Section until Combo H measures 2½ inches, ending with a wrong-side row. Cut yarn.
With Combo B, work Vertical Stripe Section for 1 inch, ending with a wrong-side row. Cut yarn.
With Combo E, work Vertical Stripe Section for 9 inches, ending with a wrong-side row. Cut yarn.
With Combo N, work Vertical Stripe Section for 2 inches, ending with a wrong-side row. Cut yarn.
With Combo J, work Vertical Stripe Section for 2½ inches, ending with a wrong-side row. Cut yarn.
With Combo K, work Vertical Stripe Section for 1 inch, ending with a wrong-side row. Cut yarn.
With Combo L, work Vertical Stripe Section for 1½ inches, ending with a wrong side row. Cut yarn.
With Combo O, work Vertical Stripe Section for 1 inch, ending with a wrong-side row. Cut yarn.
With Combo D, work Vertical Stripe Section for 4 inches, ending with a wrong-side row. Cut yarn.
With Combo P, work Vertical Stripe Section for 3 inches, ending with a wrong-side row. Cut yarn.
With Combo C, work Vertical Stripe Section for 1½ inches, ending with a wrong-side row. Cut yarn.
With Combo Q, work Vertical Stripe Section for 1 inch, ending with a wrong-side row. Cut yarn.
With Combo B, work Vertical Stripe Section for 2 inches, ending with a wrong-side row. Cut yarn.
With Combo F, work Vertical Stripe Section for 3 inches, ending with a wrong-side row. Cut yarn.
With Combo G, work Vertical Stripe Section for 1 inch, ending with a wrong-side row. Cut yarn.
With Combo E, work Vertical Stripe Section for 1 inch, ending with a wrong-side row. Cut yarn.
With Combo A, work Vertical Stripe Section until all stitches from previous Horizontal Stripe Section have been worked, removing marker on last row and ending with a right-side row.
Next Row (wrong side): Bind off knitwise and cut yarn.
Horizontal Stripe Section 3
With Combo D, work Pick Up For Horizontal Stripe Section. [200 stitches]
With Combo D, work Horizontal Stripe Section for 3 inches, ending with a wrong-side row.
If you’re making the Crib size, bind off and weave in ends. If you’re making the Throw size, leave stitches on needles and cut yarn.
Vertical Stripe Section 3
At the beginning of next row, with right side facing you and Combo C, use a cable cast on to loosely cast on 1 stitch, place marker, loosely cast on 7 stitches. [208 stitches]
Work Vertical Stripe Section until Combo C measures 6½ inches, ending with a wrong-side row. Cut yarn.
With Combo L, work Vertical Stripe Section for 2 inches, ending with a wrong-side row. Cut yarn.
With Combo G, work Vertical Stripe Section for 4 inches, ending with a wrong-side row. Cut yarn.
With Combo A, work Vertical Stripe Section for 10 inches, ending with a wrong-side row. Cut yarn.
With Combo B, work Vertical Stripe Section for 1 inch, ending with a wrong-side row. Cut yarn.
With Combo E, work Vertical Stripe Section for 1½ inches, ending with a wrong side row. Cut yarn.
With Combo K, work Vertical Stripe Section for 8 inches, ending with a wrong-side row. Cut yarn.
With Combo D, work Vertical Stripe Section until all stitches from previous Horizontal Stripe Section have been worked, removing marker on last row and ending with a right-side row.
Next Row (wrong side): Bind off knitwise and cut yarn.
Horizontal Stripe Section 4
With Combo A, work Pick Up For Horizontal Stripe Section. [200 stitches]
With Combo A, work Horizontal Stripe Section for 2 inches, ending with a wrong-side row.
With Combo N, work Horizontal Stripe Section for 1 inch, ending with a wrong-side row. Cut yarn.
With Combo C, work Horizontal Stripe Section for 3 inches, ending with a wrong-side row. Cut yarn.
Vertical Stripe Section 4
At the beginning of next row, with right side facing you and Combo A, use a cable cast on to loosely cast on 1 stitch, place marker, loosely cast on 34 stitches. [235 stitches]
Work Vertical Stripe Section until Combo A measures 4½ inches, ending with a wrong-side row. Cut yarn.
With Combo B, work Vertical Stripe Section for 2 inches, ending with a wrong-side row. Cut yarn.
With Combo H, work Vertical Stripe Section for 1 inch, ending with a wrong-side row. Cut yarn.
With Combo F, work Vertical Stripe Section for 1½ inches, ending with a wrong-side row. Cut yarn.
With Combo Q, work Vertical Stripe Section for 4 inches, ending with a wrong-side row. Cut yarn.
With Combo I, work Vertical Stripe Section for 1 inch, ending with a wrong-side row. Cut yarn.
With Combo G, work Vertical Stripe Section for 3 inches, ending with a wrong-side row. Cut yarn.
With Combo C, work Vertical Stripe Section for 2 inches, ending with a wrong-side row. Cut yarn.
With Combo K, work Vertical Stripe Section for 1½ inches, ending with a wrong-side row. Cut yarn.
With Combo P, work Vertical Stripe Section for 1 inch, ending with a wrong-side row. Cut yarn.
With Combo E, work Vertical Stripe Section for 6 inches, ending with a wrong-side row. Cut yarn.
With Combo L, work Vertical Stripe Section for 1½ inches, ending with a wrong-side row. Cut yarn.
With Combo R, work Vertical Stripe Section for 1 inch, ending with a wrong-side row. Cut yarn.
With Combo N, work Vertical Stripe Section for 1 inch, ending with a wrong-side row. Cut yarn.
With Combo S, work Vertical Stripe Section for 1 inch, ending with a wrong-side row. Cut yarn.
With Combo J, work Vertical Stripe Section for 2 inches, ending with a wrong-side row. Cut yarn.
With Combo B, work Vertical Stripe Section for 1½ inches, ending with a wrong-side row. Cut yarn.
With Combo D, work Vertical Stripe Section until all stitches from previous Horizontal Stripe Section have been worked, removing marker on last row and ending with a right-side row.
Next Row (wrong side): Bind off knitwise and cut yarn.
Horizontal Stripe Section 5
With Combo T, work Pick Up For Horizontal Stripe Section. [200 stitches]
With Combo T, work Horizontal Stripe Section for 1 inch, ending with a wrong-side row.
With Combo B, work Horizontal Stripe Section for 1 inch, ending with a wrong-side row.
With Combo J, work Horizontal Stripe Section for 1 inch, ending with a wrong-side row.
With Combo C, work Horizontal Stripe Section for 3 inches, ending with a wrong-side row.
With Combo D, work Horizontal Stripe Section for 2 inches, ending with a wrong-side row.
Bind off loosely and cut yarn.
Weave in the ends and you’re done!


Thank you Gianna, it makes sense now!
Hi folks, and Happy Holidays to all!
I’m having a wonderful time knitting my library blanket! I am near the end of the first vertical stripe section, and I have a question about weaving in the ends. Did you weave in the ends of the vertical stripe before picking up for the horizontal stripe, or did you pick up for the horizontal stripe with the vertical ends hanging and just weave in all the ends when the blanket was finished?
Thanks so much!
Hi Peg,
Thanks for reaching out! We did all of the finishings once the blanket was finished! You can weave in the ends as you go, but since you are picking up stitches and working each section I would recommend weaving all the ends once you finish knitting! I also suggest checking out our Weaving in Your Ends tutorial for some great technique options! Happy Holidays!
Warmly,
Gianna
Why does color A look so much do different online than it does in person? It looks very blue online but is very purple in person?
Hi Kristine,
Thanks for reaching out! Which color are you referring too? Please feel free to send us a photo of the skein to our email customerservice@purlsoho.com to confirm it is the correct skein.
Warmly,
Gianna
Hello is there a way to have invisible seams on the wrong side of the blanket? In other words, eliminate the line of bumps from the new color?
Thank you!
Hi Sue,
Thanks for reaching out! Unfortunately when switching colors, especially in garter stitch, there will always be a line of bumps present on the wrong side of the fabric indicating the color change.
I hope this helps, happy knitting!
Gianna
Hello!
I completed the throw size blanket and still have quite a bit of yarn left over. Any pattern suggestions for the leftovers?
Thanks!
Hi Tracy,
Thanks for reaching out! Depending on how much yarn you have left over, I would recommend checking out our Best Friend Hat and Boyfriend hat! You can use Line Weight + Linen Quill together for either of these!
I hope this helps and please let me know if you have any more questions!
Warmly,
Gianna
I’d like to make this with a worsted weight.
Please advise
Hi Cathy,
Thanks for reaching out! Since this pattern uses 2 fingering weight yarns held double on a US 7 you should certainly be able to use a single strand of worsted weight yarn with a similar effect! I do recommend working a gauge swatch first to insure that you are consistent with the gauge of the pattern prior to beginning.
As for making the throw bigger, what dimensions did you have in mind?
Warmly,
Gianna
Any tips on making this throw even bigger?
Hi! Do you know when this blanket bundle will be back in stock? Thanks!
Hi Jennifer,
Thanks for reaching out! Although I don’t have a firm estimate on when this bundle will be back in stock, we should be getting Line Weight and Linen Quill in within the next month or so! The best way to stay notified is to add your email on the Library Blanket Bundle product page and we will send you an email as soon as it is available on our site!
Warmly,
Gianna
Thank you! Yes, I am on the email list for the Library Blanket bundle. 🙂
Are there any other color recommendations? I love the pattern, but the purples don’t work well for me. Thank you.
Hi Candace,
Thanks for reaching out! I am happy to suggest another color palette for you, do you have colors in mind you would prefer over the purples? We also have a great tool one of our wonderful customers made called the Color Preview Tool, you can experiment with different color combinations to see the overall outcome of the blanket! You can find that here: Color Preview Tool
Warmly,
Gianna
I LOVE this design! Think there could be a crochet option????
Hi Ali,
Thanks for reaching out! We currently only offer this as a knit pattern but thank you for expressing your interest! I will be sure to pass this along to the rest of the team!
Warmly,
Gianna
I was happy someone else asked this question! I just had hand surgery so can’t knit but am able to crochet and I LOVE LOVE LOVE this pattern …
Hello: the blanket is beautiful. I am considering knitting this pattern using lots of worsted weight from my big stash. I will not be doubling my strands and therefore would appreciate your advice on what size needle would work best. I think #8, but please advise.
Hi Paula,
Thanks for reaching out! I think the Library Blanket is a great project for stash-busting! Since you’re going to be using a worsted weight yarn held alone, I think you could either stick with the US7’s called for in the pattern or go up to a US8. I’d suggest you knit up a little swatch before you begin, just to ensure that you like the gauge and adjust from there if need be!
I hope this helps, and happy knitting!
Warmly,
Kelsey
Thank you, Kelsey. Will make a swatch. All the best, Paula
Is the gauge made using both colors.
Hi Cathleen,
Thanks for reaching out! Yes that is correct, the gauge is based off of knitting with the 2 strands together as one!
I hope this helps!
Gianna
Thanks
Hi, I am panicking. I accidentally used crocus bud LQ instead of Lotus Flower LW for combo C. Should I take out the 2 inches I have knotted already and start over or should I just leave that combo in for the first combo C section? Will it ruin the blanket if I leave it in? Help!
Hi Cyndi,
Thanks for reaching out! No worries, this should be totally fine! As long as you are happy with this color combination you can certainly finish this section with Crocus Bud instead of Lotus Flower and it won’t cause any problems. I would just be sure going forward to use the correct color combinations to insure you have enough yarn to complete each section!
Please let me know if you have any more questions, happy knitting!
Gianna
I am about to start my first VERTICAL set of stripes. I don’t really understand how to do this. Do I pick up 1 stitch from the horizontal section, then cable cast on the 20, knit back down, and then pick up the next horizontal-section stitch? Please explain! thanks, Paula
Hi Paula,
Thanks for reaching out! After you complete the Horizontal section you wont start by picking up a stitch but you will actually begin with the right side facing you and using your color Combo D to Cable Cast On to loosely cast on 1 stitch, then place marker, then you will loosely cast on an addiction 19 stitches, so you should have 20 new stitches total and one stitch marker placed. You will then begin working the Vertical Section starting by knitting down to the marker (across the stitches you just cast on) slip marker, slip last stitch of Vertical Stripe Section (the first stitch you cast on) the you will knit the next stitch of the previous Horizontal Stripe Section, and then pass the stitch you just slipped over that stitch to join Vertical Stripe Section to Horizontal Stripe Section!
I hope this clears things up!
Warmly,
Gianna
Thanks! I’m almost there – I’ll let you know if I’m still confused!
Hi Gianna,
I just got my yarn (I’m making the side street blanket) and swatching away. I suggest doing a knit cast on for the first stitch then cable cast on the rest of the way. It prevents the bump. I am having trouble getting my subsequent rows to be as tight as those in your pictures. Do you sl as if to p or k? sl to k seems a little bit better but it still looks a bit awkward. I’ll try tightening up when I turn and knit on the wrong side (the first st). thanks for any ideas.
Hi Sandy,
Thanks for reaching out! I responded to your comment on the Side Street Blanket pattern page but wanted to add it here as well since it may be helpful for other customers!
That is an excellent question, this same thing came up last year (since we don’t specify in the pattern) so I worked up swatches slipping both ways. Pulrwise would be the go-to way to slip the stitches, but I actually found that slipping them knitwise looked just as good and I actually preferred that method. One other tip I have is to be extra careful when slipping/working the slipped stitches not to overstretch them, this can make things look a little uneven and messy. However, if you block the blanket when finished that will also help make your stitches look more uniform and even.
Warmly,
Gianna
I read that there will quite a bit of leftover yarn. I would like to make this blanket a little longer. if I can know which yarn will have the most left, I can make those horizontal rows a little thicker.
Hi Tabrell,
Thanks for reaching out! You can find this information under the MATERIALS section of the pattern, we break down each yarn, color, and the yardage used for each one. Line Weight in Bright Flamingo, Linen Quill in Super Orange, Dark Iris, and Crocus Bud are the colors that use the least amount of yarn, about half of the skein will be leftover.
I hope this helps, happy knitting!
Gianna
I am working the first Vertical Stripe section, AGAIN. The first time I slipped the last stitch of the Verticle Stripe PURL-WISE. But the wrong side looks smoother & more like the garter stitch pattern than the right side which has a raised edge. So I ripped it out & started over slipping the last stitch KNIT-WISE. It looks better, but still looks more like the garter stitch pattern on the wrong side than the right side. I feel like I am doing something wrong Do you have any recommendations?
Hi Cynthia,
Thanks for reaching out! If you would like, please send our customer service team a photo of your work to customerservice@purlsoho.com and we can troubleshoot what may be going on from there!
Warmly,
Gianna
I’d just like to say thank you for this pattern! I’m in the UK so buying the kit wasn’t really an option because of postage and duty. I made my version using a lot of colours in Aran weight yarn, and I’m really proud of it. Like others I found the edges a bit uneven when I moved between the horizontal and vertical sections. I tried an i-cord edging which came up too bulky so I did a simple crochet edge.
Hi Sue,
Thanks for writing in! We would love to see your finished blanket! You can email us a photo of your blanket to customerservice@purlsoho.com or if you are on Instagram you can share your photo and tag us at @purlsohobusyhands or use the hashtag #purlsohobusyhands
Warmly,
Gianna
I love this library blanket pattern. Although, I don’t knit, I imagine it in a crochet version. The book lover in me thinks this is absolutely amazing. Thank you Joelle!
Thank you for designing the pattern. I retired as a WA State Public Librarian. A big title for a great career. I am also a knitter and have been accepted on five juried shows. I usually make hats and add vintage collected I purchased while in Paris and Amsterdam.
I am considering making the blanket with author’s names and book titles.
Sincerely,
Laura Luppino
I love the blanket and have finished Horizontal Section 1 and Vertical Section 1 and just added 200 stitches knit wise to the Section 1 vertical in order to begin Horizontal Section 2. What has been created is a very narrow seam. Did I add the stitches correctly? Is there a way to avoid the seam on the wrong side? Thanks!
Hi Nancy,
Thanks for reaching out! It sounds like you are all set and on the right track! Unfortunately, when working garter stitch like this, having a seam on the wrong side is inevitable and can’t be avoided.
I hope this helps, happy knitting!
Gianna
Hi there,
I am about to start my Library blanket with DK yarn. I have done a gauge swatch. I will be using 4.5 mm. My question is about the switch from the first horizontal section to the first vertical section. (I am not going to make as many yarn colour changes as your suggestion.)
The instructions say cast on 1 stitch and then 19 stitches. I understand this but you have not included instructions on how to anchor the stitches to the top of the horizontal section. My guess is that at the end of each row you are to pick up one stitch of the last row of the horizontal. Can you please let me know if this is correct? The tutorial that you have sent me to does not explain this explicitly.
Hi Sharon,
Thanks for reaching out! When you go to cast on the stitches, you use the Cable Cast On method, when working this cast on you use the previous rows final stitch to begin the cast on, this anchors it in place! Also when you work the first row it will furthermore anchor the cast new cast on in place:
Row 1 (right side): Knit to marker, slip marker, slip last stitch of Vertical Stripe Section, knit next stitch of Horizontal Stripe Section, pass slipped stitch over to join Vertical Stripe Section to Horizontal Stripe Section, turn work.
I hope this clears things up!
Gianna
Thanks for this. Is it possible to do a drawing?
I think I understand your instructions. I am still on the first 4 inch horizontal and think I have got it, but not 100%.
Hi Sharon,
Thanks for your response! Certainly! Please email our customer service team at customerservice@purlsoho.com and they can help you further from there!
Warmly,
Gianna
Any chance the Colour Preview Tool could be updated to include all the yummy new colours?
Hi Fran,
Thanks for reaching out! I believe the Colour Preview Tool does currently include all the colors available in Linen Quill and Line Weight! Was there a particular color you were looking for and couldn’t find?
Warmly,
Kelsey
Hi Fran, if there’s any yarn you want to preview that isn’t in the list, you can specify the name and color fields directly instead of picking a named yarn from the drop down list. Most updated browsers just show a little colored rectangle for the color field, but you can click to change it.
Hi again Fran – I just updated tool for the new colors!
As far as the vertical stripes go, I use longer dpns or shorter circulars of the same size to knit the first row after casting on 19sts. (Put a needle keeper or a rubber band on the end to stop the stitches slipping off, if necessary.) That way you always knit back onto the longer main blanket on a wrong side row and don’t have to wrestle so much with the growing blanket. Unless you’ve perfected reverse knitting that is…..
No blocking needed?
Hi Elizabeth!
Thank you for your comment! Blocking your blanket is up to you, however we usually suggest gently wet blocking as desired. One tip that might help if you do choose to hand wash your blanket is to fold it and put it in a large pillowcase to prevent stretching the stitches too much while soaking! We also have a full tutorial for how to block a hand knit item, if you’re interested!
I hope this helps!
All the best,
Margaret
Hi! I’m considering knitting this as a baby blanket – I was wondering if you had any recommandations for machine-washable yarn substitution? Love the yarn combination but I’m afraid the “hand wash” part of the care instructions will deter the recipient… Thank you!
Hello,
Thanks for reaching out! I’d be happy to help you select yarn for your project!
First, I would recommend checking out Buttercup Cotton as a substitute for Linen Quill and Line Wight. Buttercup Cotton is spun from 100% organic cotton, and it can be washed and dried by machine on a low setting.
Another option would be using Santolina. Its super soft with a fiber content of 70% organically grown cotton, 20% rayon from bamboo, and 10% hemp. The care instructions for this yarn are also to machine wash and dry on a low setting.
The yarn in this project is held doubled, so you can use both of these yarns to knit your blanket. You will need 10 colors total, so it might also help to select colors from both Santolina and Buttercup Cotton.
I hope this helps! Please let us know if you have any questions.
All the best,
Carly
It would be cool if you could provide instructions for sampler-sized versions of your patterns. Mini projects would make it less daunting than a full project to gain the required skill set while creating something pretty.
Hi Barbara,
I think that’s a great idea! I’ll pass along your interest in seeing something like this to the design team. Thanks for sharing!
All the best,
Lili
I finished the Library blanket in time to gift it for Christmas. Unfortuatley, they have no experience with anything that is not wash and wear.
What directions should I provide for care of the blanket? I am particularly concerned with washing/drying and preventing color bleed.
Thanks.
Jane
Hi Jane,
What a lovely gift! We are so happy to hear that you finished the blanket! We recommend giving the blanket a good blocking before giving to the receiver. We also recommend giving some hand-washing directions along with the blanket and just letting them know they can lay it out to dry. You could also check out our sweater washing tutorial to gather some information to share in your gift directions.
All the best,
Gavriella
To clarify, when you start the vertical sections, you cast on extra stitches to the row you have just worked. You then knit back along that row and pick up the bottom of the last horizontal row? This would sort of bend the extended end of the horizontal row 90 degrees. I’m only a beginner and sometimes find it hard to visualise!
Hi Alice,
Thanks for writing in! You are correct! I like to think of this technique like a capital ‘L’ with the finished stripe being the long leg of the ‘L’ and the new stitches being the little horizontal leg at the bottom! I hope this helps but please let me know if you have any other questions!
Happy knitting,
Gavriella
I’d like to purchase the library bundle on sale – though I’ve a few questions. 1) what are the measurements? 2) is there another yarn that is machine washable with similar bright colors that would work with the library pattern (my husband is a library lover!) 3) with the bright yarns, do they need to be washed prior to being knitted to avoid bleeding into one another afterwards
Thank you
Hi Joan,
That’s a great question! I think our Cattail Silk could make a wonderful alternative and you can also see all of our machine-washable fingering-weight yarns here. I hope this helps but please let me know if you have any other questions!
Happy knitting,
Gavriella