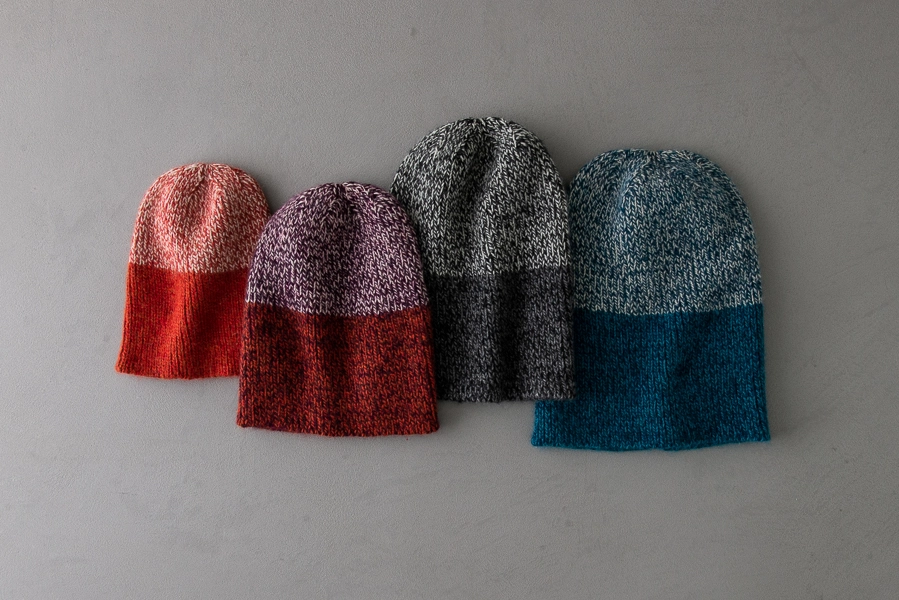

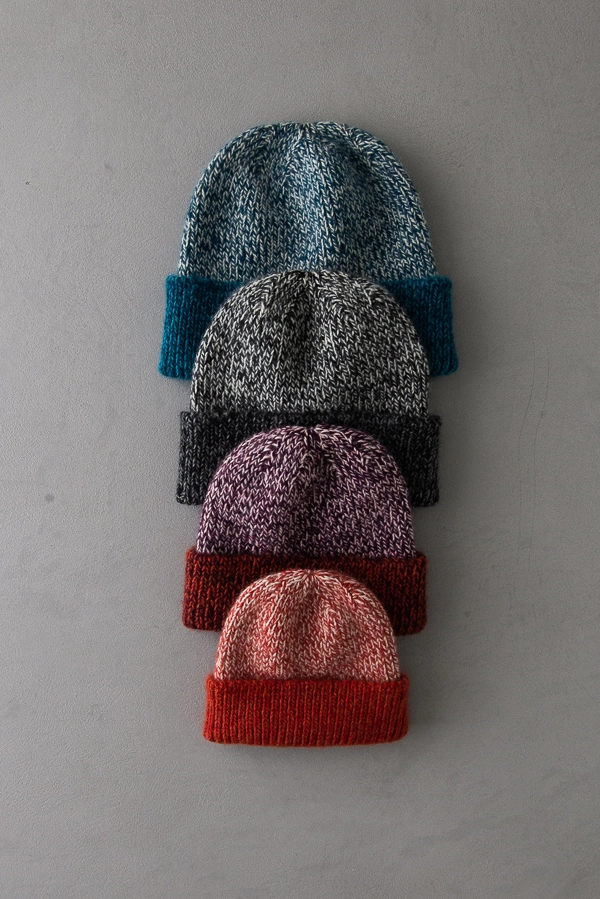
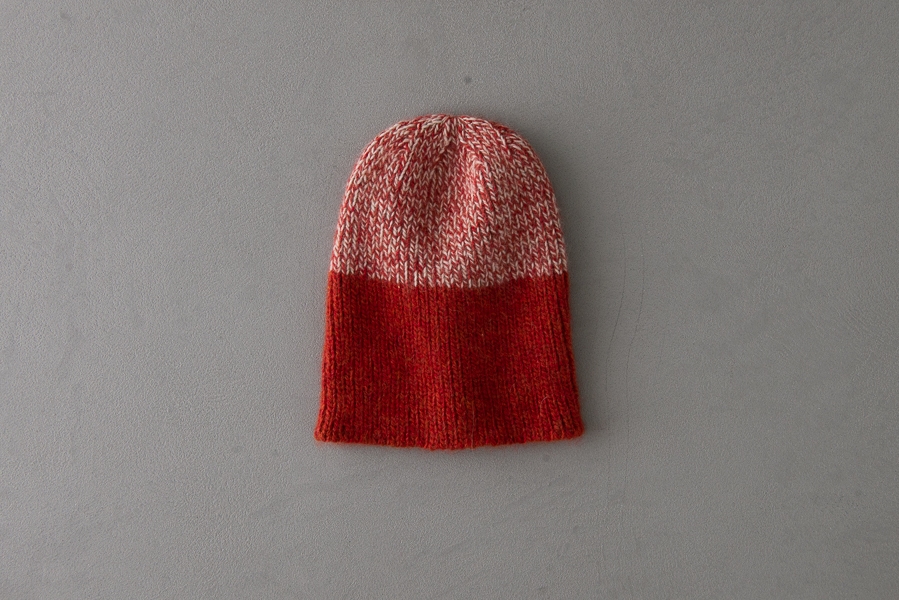
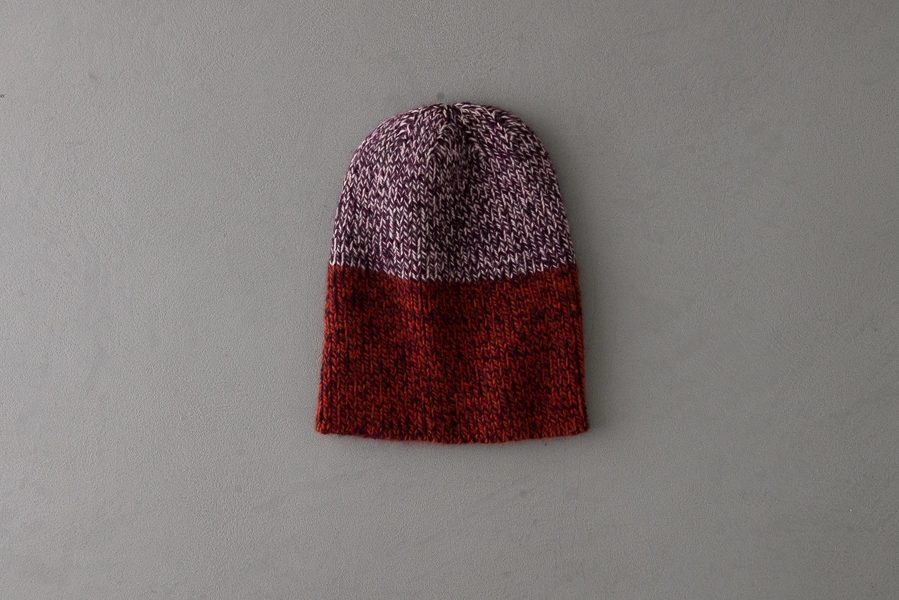
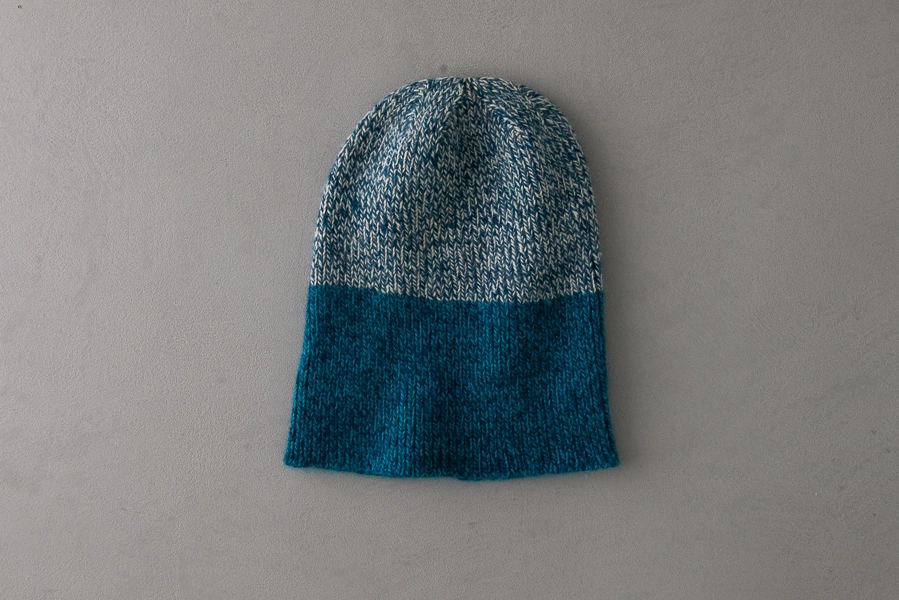
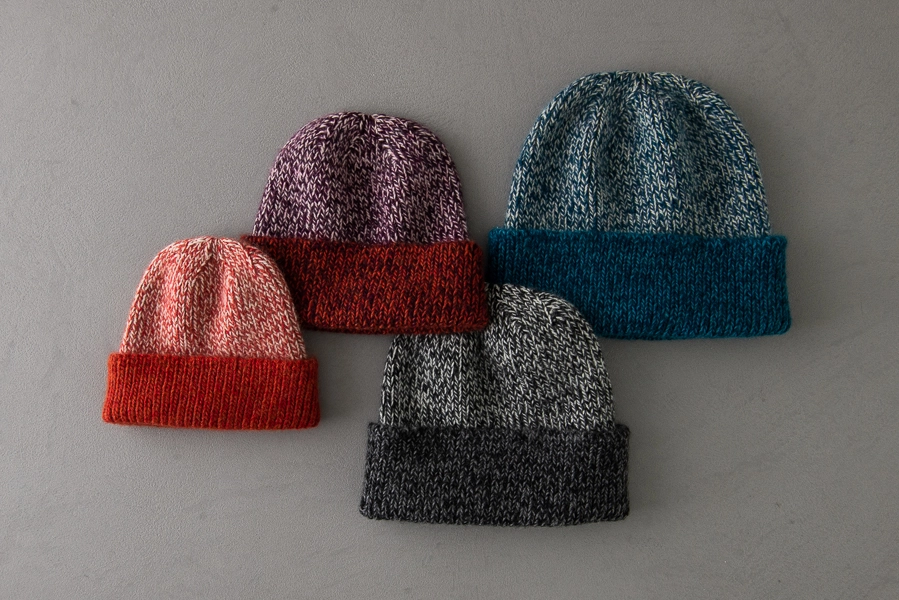
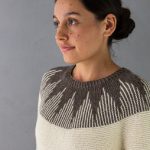
Best Friend Hat
Childhood friend or work buddy, sister or brother, pen pal or neighbor, no matter who gets the best friend title in your life, our Best Friend Hat seals the deal!
A simple 1×1 rib makes a stretchy fabric that hugs the head, while two strands of wonderfully soft Line Weight make a pretty marle with lots of room to play! If it all looks a little familiar, that’s because the Best Friend Hat is an update to our classic Boyfriend Hat, now for all genders and in more sizes.

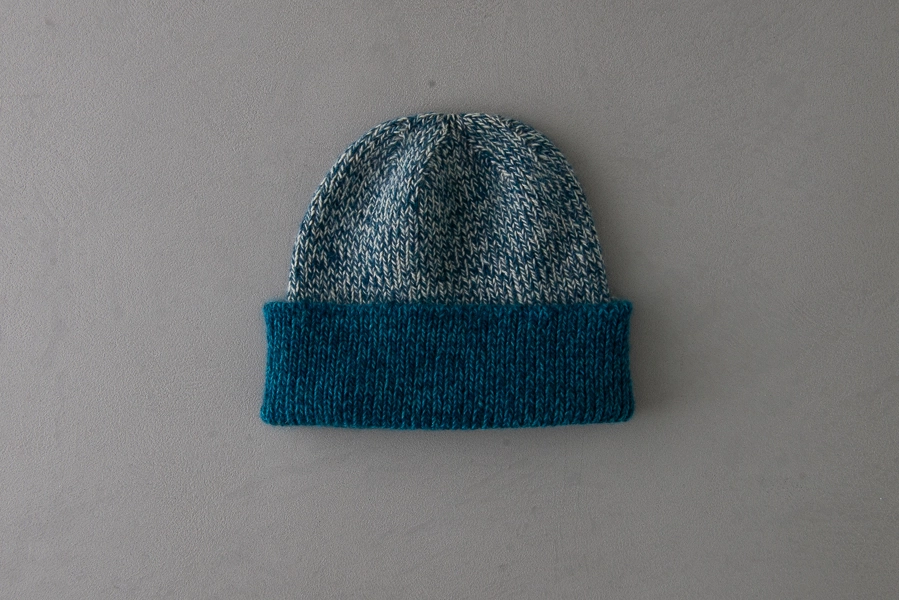
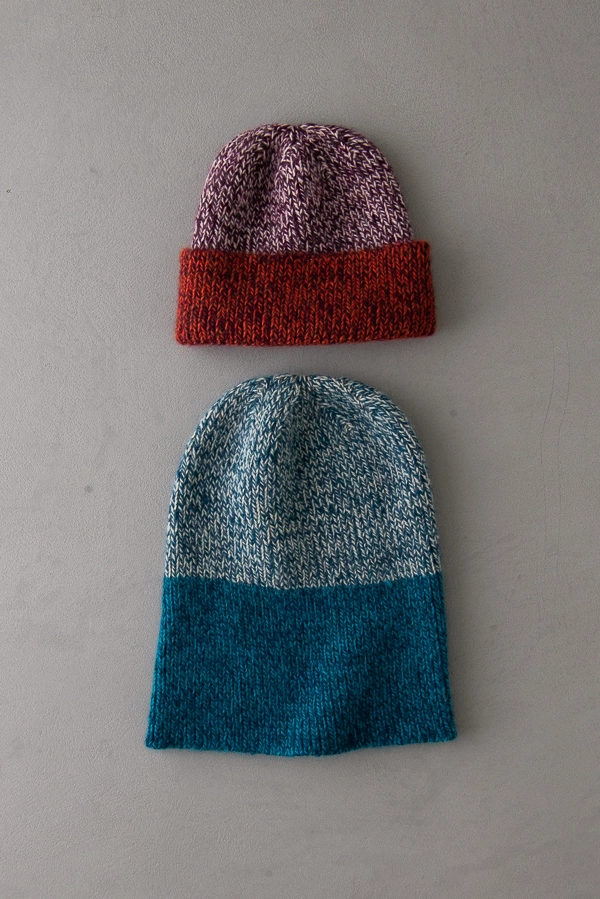
We’ve also added a color switcheroo so that one color remains the same while one changes partway through, a contrast cuff if you wear it folded up or just a neat colorblock if you wear it slouchy… Also a good opportunity to make one for your best friend and reverse the colors for yours, not too matchy match but definitely best friends!
Originally designed by Purl Soho designer, Laura Ferguson.
Share your progress + connect with the community by tagging your pics with #PurlSoho, #PurlSohoBusyHands, #PurlSohoBestFreindHat, and #PurlSohoLineWeight. We can’t wait to see what you make!
Materials

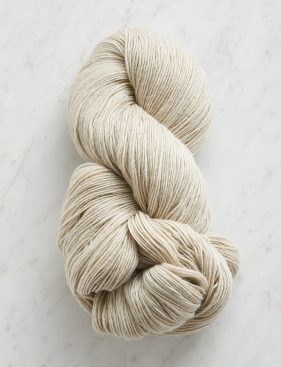
- Color A: 1 skein of Purl Soho’s Line Weight, 100% merino wool. Each skein is 494 yards/ 100 grams; approximately 135 (190, 235, 265, 305, 355) yards required.
- Color B: 1 skein of Line Weight; approximately 60 (85, 100, 115, 130, 150) yards required.
- Color C: 1 skein of Line Weight; approximately 75 (110, 135, 155, 175, 205) yards required.
- US 3 (3.25 mm), 16-inch circular needles
- A set of US 3 double pointed needles
- 4 stitch markers, including 1 unique
Here are the color combinations we used…
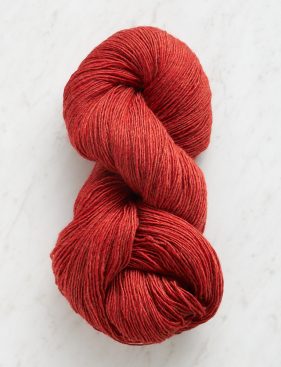
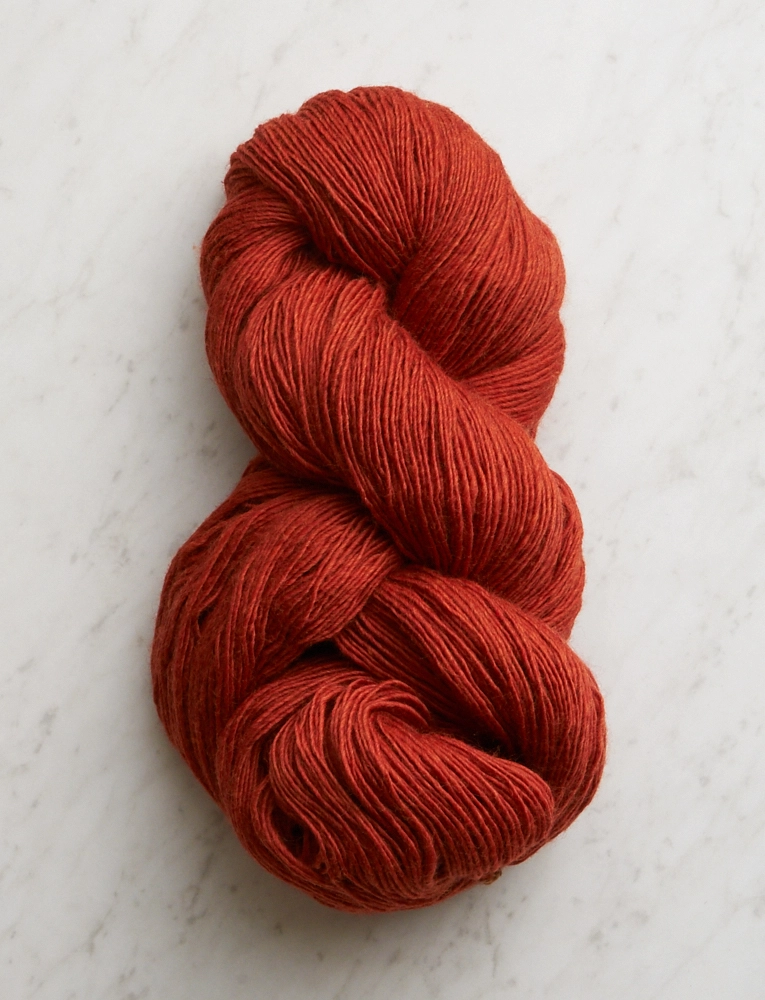
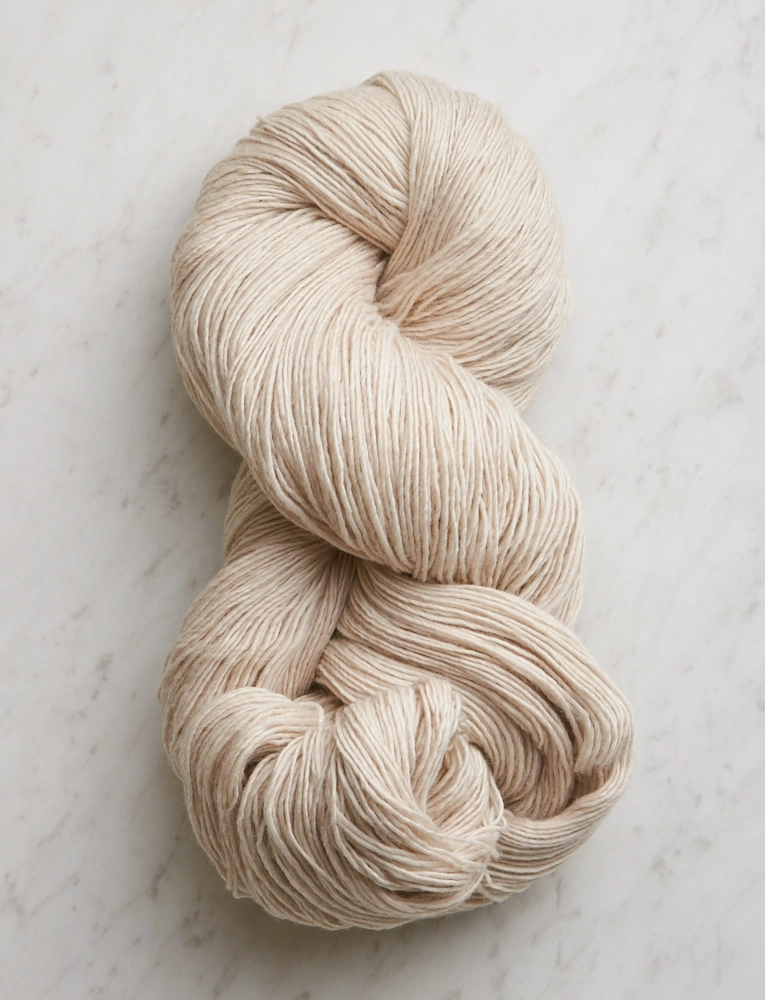
Baby size: Color A: Red Pine; Color B: Kiln Red; Color C: Wheat Flour
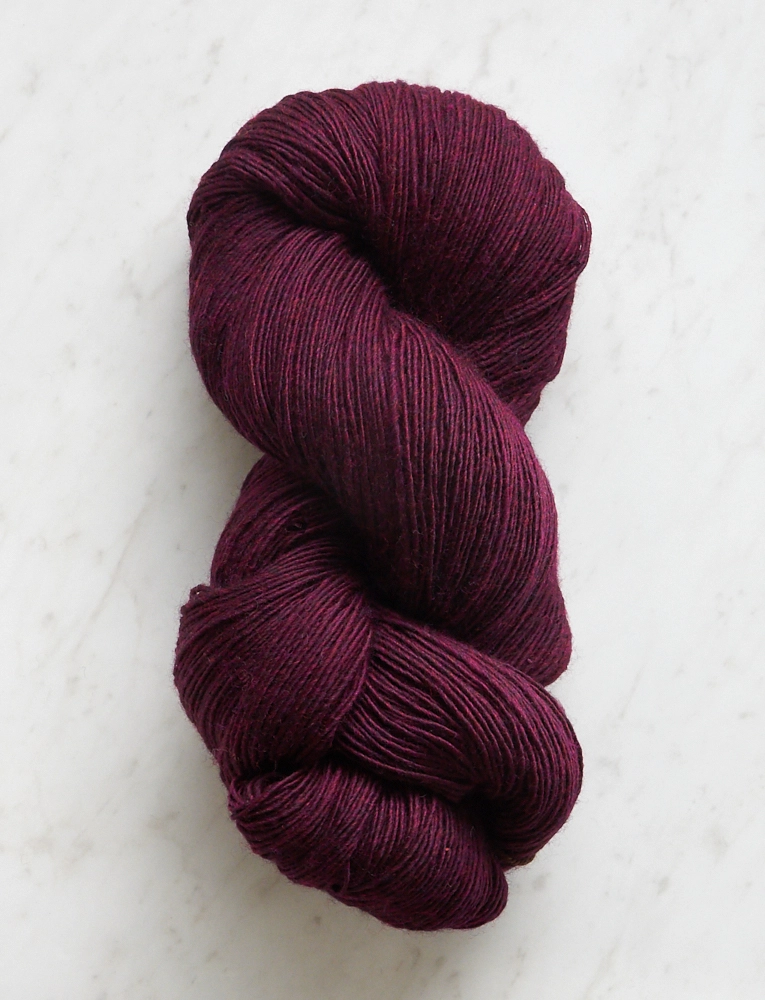
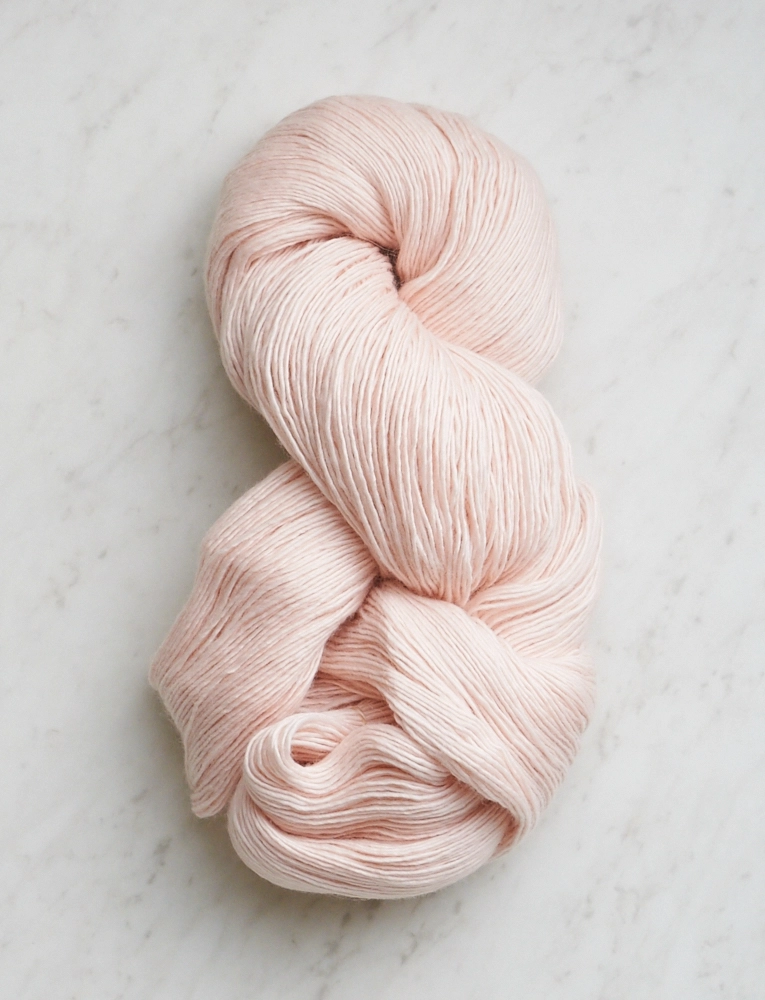
Toddler size: Color A: Red Plum; Color B: Kiln Red; Color C: Ballet Pink
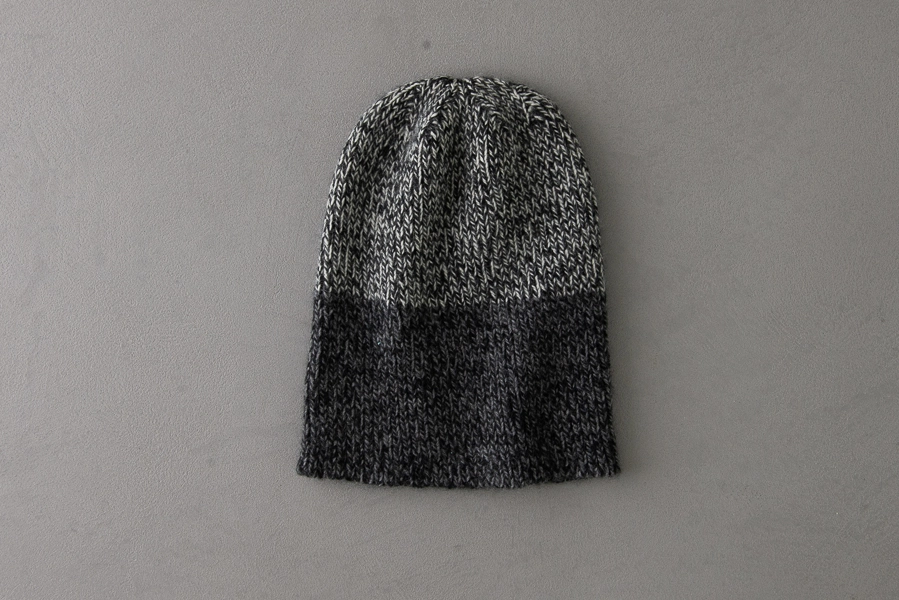
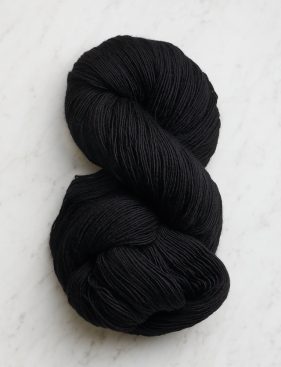
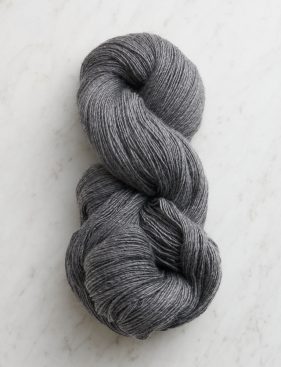
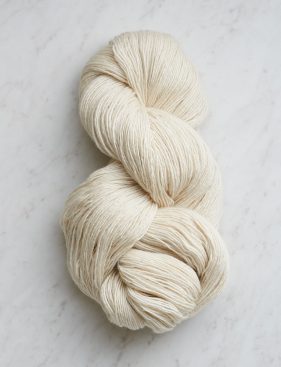
Junior/ Adult Small size: Color A: Soft Black; Color B: Fieldstone Gray; Color C: Heirloom White

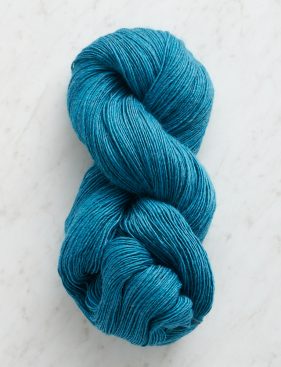
Adult Medium size: Color A: High Tide; Color B: True Turquoise; Color C: Reed Gray
Gauge
39 stitches and 34 rows = 4 inches in 1 x 1 rib, unstretched, holding together a strand of Yarn A and a strand of Yarn B
Sizes
Baby (Toddler, Junior/Adult Small, Adult Medium, Adult Large, Adult X-Large)
To fit actual head size of approximately 15-16 (17-18, 19-20, 21-22, 23-24, 24-25) inches
- Finished Circumference: 11 ½ (13, 14 ¾, 16 ½, 18, 19 ¾) inches, un-stretched
- Finished Height (uncuffed): 7 ¾ (9, 10 ¼, 11, 11 ¾, 12 ¾)
Pattern
Begin
With one strand of Color A and one strand of Color B, cast 112 (128, 144, 160, 176, 192) stitches onto circular needles. We used a basic Long Tail Cast On.
Place marker and join for working in the round, being careful not to twist the stitches.
Round 1: *K1, p1, repeat from * to end of round.
Repeat Round 1 until piece measures 3½ (4, 4¼, 4½, 4¾, 5) inches from cast-on edge.
Cut Color B and join Color C.
Repeat Round 1 until piece measures 6¼ (7½, 8¼, 9, 9½, 10¼) inches from cast-on edge.
Shape Crown
NOTE: Switch to double pointed needles when necessary.
Set-Up Round: [Work 28 (32, 36, 40, 44, 48) stitches in established 1 x 1 rib pattern, place marker] 3 times, work in established pattern to end of round.
Round 1: *[K1, p1] four times, k1, knit 2 together (k2tog), work in established pattern to 2 stitches before next marker, slip slip knit (ssk), repeat from * to end of round. [8 stitches decreased]
Round 2: *[K1, p1] four times, k1, purl 2 together (p2tog), work in established pattern to 2 stitches before next marker, p2tog through the back loop (tbl), repeat from * to end of round. [8 stitches decreased]
Repeat Rounds 1 and 2 three (4, 5, 6, 7, 8) more times. [48 stitches]
Next Round: *Ssk, [k1, p1] 2 times, k1, k2tog, p1, k1, p1, repeat from * to end of round. [40 stitches]
Next Round: *Ssk, p1, k1, p1, k2tog, p1, k1, p1, repeat from * to end of round. [32 stitches]
Next Round: *Ssk, k1, k2tog, p1, k1, p1, repeat from * to end of round. [24 stitches]
Finish
Cut yarns and thread them onto a tapestry needle. Draw the needle through the remaining stitches. Pull tight and bring tails to inside of hat to weave in.
Weave in remaining tails and block as desired.


Love this!! Can you explain how the second hat colorway would work
So hat 1: darkest yarn + medium yarn for coff and then medium yarn + lightest yarn for body
Hat 2: ?
I am mainly asking because in the description it says “ Also a good opportunity to make one for your best friend and reverse the colors for yours, not too matchy match”
Would love to learn how to accomplish this
Thanks!
Hi Stephanie,
Thanks for writing in! For all of the hats, you will be using Color A throughout the hat, and then using Color B, which is a medium or dark color, along with Color A for the cuff, and Color C, which is a light color, along with Color A for the body and top of the hat. To switch things up for the second hat, you could use Colors A and C for the cuff, and Colors A and B for the top! If you are making the Baby, Toddler, and Junior/Adult Small sizes, one skein of each color will be plenty of yarn for two hats, but for the larger sizes, you will need two skeins of Color A.
I hope that helps!
Julianna
That does help, thank you!
I would love to make a green one; what color combo would look good since you don’t carry a darker green in the line weight?
Thanks
Hi Stephanie,
By combing Frond Green, which is a medium green, with darker contrast colors, you should end up with an overall dark green effect! I think it would be lovely to use Frond Green as Color A, River Rock as Color B, and Dove Gray as Color C.
Happy knitting!
Julianna
Hi, thanks for the pattern. It looks fantastic and most do-able. However, it is not clear to me whether you knit both strands of yarn at the same time, or one color per stitch. Would you please specify? Again, many thanks!!
Hi Pearl,
Thanks for writing in! You will be holding two strands of yarn together throughout the hat!
I hope that clears things up!
Julianna
Just getting materials together – when you change colours you just “cut colour B and Join colour c”? Am I missing something – like spit splice or something along those lines?
Hi Jen,
Thanks for reaching out! We just mean for you to cut Color B, leaving about a 6-inch tail, and then starting using Color C on the next stitch by simply looping it over your needle, leaving another 6-inch tail to weave in later. Usually, I wouldn’t recommend a wet splice when joining a new color since it makes it difficult to control exactly where the new color starts, but for this particular hat, the marled effect will cover up the join a bit, so a wet splice would be fine!
Happy knitting!
Julianna
Lovely pattern! Would it be possible to use Linen Quill instead? I have just finished a Nature’s Palette blanket and have some Linen Quill left over from the project.
Thank you, Deb
Hi Deb,
Great question! Linen Quill is just a tiny bit thicker than Line Weight, so you might be able to use your blanket leftovers, but I would recommend knitting a gauge swatch to make sure you are able to match our gauge and to see if you are happy with how Linen Quill turns out held double on a small needle. Another option would be our Tiny Stripes Hat, which can definitely be made with two colors of Linen Quill!
I hope that helps!
Julianna
Thank you, Julianna! That’s a lovely suggestion. So many possibilities!
Deb
Could you post a photo of the crown shaping please?
Hi Cindy,
Thanks for writing in! I’m afraid we don’t have a picture of just the crown shaping available, but if you take a look at our original Boyfriend Hat which this pattern is based on, some of the pictures do give a better idea of the crown decreases! This hat is shaped with four columns or lines of decreases in the crown.
I hope that helps!
Julianna
How many adult hats can you get out of the 3 skeins
Hi Pamela,
Great question! If you are following our color block pattern exactly, you can knit two Junior/Adult Small hats, but won’t have enough of Color A for more than one of the larger adult sizes. However, if you want to do some creative mixing and matching of color combinations and blocks, you have a bit more wiggle room! Based on the total yardage, you will have enough yarn to knit three Junior/Adult Small hats and two of any of the larger sizes as long as you don’t mind working some sections in Colors B and C only.
Happy knitting!
Julianna
Since you need three different colors for this hat, at $22 per skein, that makes it a pretty expensive hat. I’m wondering how much of each is actually used for one hat. If another variation could be made with these that would make it much more appealing to me.
Hi Maralyn,
Thanks for reaching out! If you take a look at our materials list above, you can see exactly how much yardage of each color we used for each size of the hat, which should help you plan out how many hats you can make from three skeins! When following our color block pattern exactly, you can knit three Baby hats, two Toddler or Junior/Adult Small hats, but won’t have enough of Color A for more than one of the larger adult sizes. However, if you want to do some creative mixing and matching of color combinations and blocks, you have a bit more wiggle room! Based on the total yardage, you will have enough yarn to knit five Baby hats, almost four Toddler hats, three Junior/Adult Small hats and two of any of the larger sizes as long as you don’t mind working some sections in Colors B and C only.
I hope that helps!
Julianna
Could you possibly let me know which size would work best for an average size adult man. Making this as a surprise gift for dear friend so can’t ask.
Hi Gail,
Thanks for writing in! Fortunately, the ribbed fabric of this hat is very stretchy and forgiving, so you have a bit of wiggle room! The average adult man’s head measure 22 to 24 inches, so I would probably recommend the Adult Large. It should still be able to stretch to fit even if his head is a little bigger!
Happy knitting!
Julianna
Which size would you recommend for adult women? I’m thinking this will run big so Adult medium for average woman? Making for holiday gifts.
Hi Mimi,
Great question! Ribbing is super stretchy and forgiving, so the Adult Medium should fit a wide range of head sizes and be a great choice for gifts!
Happy knitting!
Julianna
How can yarn getting a gauge of 7 – 8.5 stitches per inch, fingering weight be used double stranded fora pattern where the gauge is 39st per four inch)
Hi Peri,
Great question! For all our yarns, the recommended gauge which is listed on our site and on the yarn label is in stockinette stitch. This hat, and the gauge swatch, are knit in 1×1 ribbing, which contracts or pulls in significantly, resulting in many more stitches per four inches than there would be in stockinette stitch!
I hope that clears things up!
Julianna
Hi,
I would like to make a hat with blue jean heather, heirloom white
and could you suggest the third color?
Thank-you,
Sally
Hi Sally,
Thanks for writing in! I think either Night Blue or Fieldstone Gray would be gorgeous with your chosen colors!
All the best,
Julianna
suggest using 20″ circular needles to start for the large sizes- even then the stitches are crowded. Otherwise the yarn combo is gorgeous.
Hello!
I knitted 2 strands together of the line weight to gauge, using US # 3 needles. The 39 stitches
came out to 5 1/2 ” on the working side using K1, P1. The pattern says it should be 4″. How do I make this work??
Help!
Hi Sigrid,
I would be happy to help with this! It seems your gauge is slightly off, I would suggest going down a needle size and trying out the gauge swatch again!
Hope this helps, happy knitting!
Gianna
I’m confused about the cast on.
“With one strand of Color A and one strand of Color B, cast 112 (128, 144, 160, 176, 192) stitches”
Do you alternate the colors on the cast on or do you cast them on together and then knit with 2 strands for each doubled stitch?
Hi and thanks for reaching out! For this hat, you will always be knitting with two strands of yarn held together, and will also work the cast on with the two strands held together, treating them as if they were one strand of yarn. There’s no need to separate the two strands while casting on!
I hope that clears things up!
Julianna
in the “shaping” section:
Next Round: *Ssk, [k1, p1] 2 times, k1, k2tog, p1, k1, p1, repeat from * to end of round. [40 stitches]
I want to confirm that the instruction “ssk, (k1,p1) 2 times” INCLUDES the ssk, that is :
ssk, k1, p1
ssk, k1,p1
NOT ssk, k1, p1, k1, p1
It is unclear to me.
Hi Jennifer,
Thanks for reaching out! 2 times refers only to what is written in the brackets, so for that row you would ssk then repeat the [k1, p1] 2 times (ssk, k1, p1, k1, p1.)
I hope this clears things up, happy knitting!
Gianna
I am having trouble understanding thsi “Next round”.
I am doing adult M, although I think it should not matter. But I can’t repeat this “next round” until the end of tound, I am left with only 4 stitches.
And it completely messes up the 4 parts where you decrease? What am I doing wrong.
To be honest I did not understand the first decrease either, the “(K1,P1)four times” I left it out. I started with K1 en the decrease after the marker…
Been knitting a lot, but having problems reading this pattern.
Hope anyone can help….
Hi Nele,
Thanks for reaching out! It sounds like your stitch count may have gotten off-track during the decrease rounds for the CROWN. On those rounds (Rounds 1 and 2), you are essentially working in pattern (1 x 1 ribbing) and working decreases where stated in the instructions. One of these decrease stitches will take place in the middle of a section between markers, and the other will take place over the 2 stitches right before the next marker (not after it).
Can you let me know how many stitches in total are on your needles currently? We can figure out the best steps froward from there!
All the best,
Lili
Same, I had to pull out half that row once I figured out it wasn’t adding up and went back to look more closely at that instruction. I also ended up needing an extra ssk at the very end of the round to end up with 40 stitches – idk if anyone else had that happen, or if I just miscounted.
Either way, the great thing about this pattern having texture from the yarn combinations + ribbing is it’s pretty forgiving, no one will be the wiser once finished.
Hi
I overbought some worsted twist yarns and have knit four basic hats using this pattern. I still have five more yarns and would like to try another hat pattern, like Boy Friend Hat or a ribbed hat pattern using Worsted Twist. Do you have another free hat pattern I can knit please. It’s for my two daughters in NYC.
Many thanks and keep safe and well.
Irene
Hi Irene,
Thanks for reaching out! Our Lovely Ribbed Hat In Linen Quill Worsted sounds like it would be the perfect fir for what you are doing! You can easily substitute the Linen Quill Worsted for the Worsted twist! Just be sure to work up a quick gauge swatch to insure your gauge is consistent with the pattern before beginning!
All the best,
Gianna
Hello,
I’d like to do this as a single strand in sport weight (Mulberry Merino), one solid color. How many skeins/yards would I need for a Men’s medium? And how many for a toddler?
Thanks
Hi Abby,
Thanks for reaching out! That sounds like a great idea! For this pattern we used approximately 190 yards for the Toddler size and 265 for the Adult Medium size! I would recommend 1 skein of Mulberry Merino for the Toddler Size and 2 skeins for the Adult Medium.
All the best,
Gianna
Hi there
I have a question about the pattern. I am making an Adult Medium.
After indicating what is to be done on rounds 1 and 2 for the beginning of the decrease,(8 stitches per round) it says:
Repeat rounds 1 and 2 three (4, 5, 6, 7, 8) more times [48 stitches].
When I read that I see two rounds x 6 repeats = 12 rounds; 12 rounds x 8 stitches = 96 decreased stitches. But this didn’t work mathematically.
So I am assuming you meant, repeat rounds one and two three times each — which would result in 48 stitches being decreased — is that right?
Thanks for your help.
Hi Cynthia,
Thanks for reaching out! For the adult medium size, you follow the amount of repeats within the parentheses! So for your size you will repeat round 1 + 2 6 times. The stitch count at the end is for the smallest size and will go up from there based on what size you are working. For example the baby size you would repeat rounds 1 + 2 three times leaving you with 48 stitches.
I hope this clarifies thing!
Happy knitting!
Gianna
Could I perhaps try Brooklyn Tweed Peerie?
I really like the Marigold color, and I am trying to find a hat pattern to use with it.
Hi Natalie,
Thanks for reaching out! Brooklyn Tweed Peerie could be a great option for this pattern, I would still recommend using two strands like we did here with Line Weight to achieve the same gauge.
All the best,
Gianna
Hello, I have started knitting this hat in Adult Large (176 stitches) on 3.25mm needles for my dad. However, instead of the unstretched circumference being 18 inches, I realise that (having knitted 3 inches of the hat already) my circumference is about 21 inches. I’m guessing that after a few wears this will stretch out to be too big for the average man, because the ribbing is so stretchy? If so, can you recommend what needle size I might downsize to, in order to achieve the 18 inch circumference. I have ordered 2.5mm, 2.75mm and 3.00mm, but I am not sure which to go with.
Would you also recommend casting on less stitches, for example going with Adult Medium instead? Or could I achieve the right circumference just by a smaller needle width?
Thanks so much in advance! Love the hat and the colours.
Hi Seona,
Thanks for reaching out! For the pattern we used a US 3 (3.25mm) so if you’re getting a bigger gauge I would recommend going down a needle size, starting with a 3.0mm and then going down to a 2.75mm if its still coming out to big! This should help adjust the gauge so you don’t need to worry about adjusting the cast on. For future reference we always recommend working up a gauge swatch prior to starting the project to insure that your gauge is consistent with the pattern!
I hope this helps!
Gianna
Hi Gianna, thanks so much for your help. Yes, I now realise my mistake of not knitting up a gauge swatch, which I wish I had done! Thanks for the advice, I’ll try on the 3.00mm or 2.75mm and see what works to get the right gauge.
Thanks again 🙂
Hi, can you please clarify the first round of stitch decreases for a size large hat? I have segmented to 44 stitches between markers, but I am decreasing by four stitches within each segment, which I believe is too many. Thank you!
Hi Jane,
Thanks for reaching out! Once you set up the row with the markers you should in Round 1: *[K1, p1] four times, k1, knit 2 together , work in established pattern to 2 stitches before next marker, slip slip knit, repeat from * to end of round. So you should be decreasing 8 stitches total in the 1st row!
I hope this clarifies things for you!
All the best,
Gianna
Thanks! Unfortunately, I’m still struggling And getting a total decrease of 16 stitches (The first three groups of 11 stitches I knit 2 together And the final 11 stitches I ssk at the end- this decreases by 4 and I have a size large hat, so in the total row I do that 4x=16 stitches). …What is “established pattern”, maybe I’m getting that wrong. Thank you!
Hi Jane,
Thanks for writing in again! When we say work in established pattern it means to work in the stitch pattern (for this hat the stitch pattern is a k1 p1 1×1 rib stitch!) So for row 1 *[K1, p1] four times, k1, knit 2 together (k2tog), then work in “established pattern” (k1,p1) to 2 stitches before next marker, slip slip knit (ssk), repeat from * to end of round. [8 stitches decreased.] I think the best solution is to make sure you are using your stitch markers as guides, you can even place more stitch markers to help keep track of the repeats in the row so that you are only decrease 8 stitched per round and not more stitches than you should be!
I hope this helps but if you have any more problems you can email us at customerservice@purlsoho.com!
All the best,
Gianna
That clarifies it! Thank you so much. Really appreciate the help.
Thank you! I misinterpreted the ‘established pattern’ reference and wound up with a bit of a wonky— yet symmetrical— crown design. I’ll try to get it as intended on the next hat. It was fun to figure out ssk and p2togtbl. And… a little painful— but very constructive— to finally learn how to interpret the pattern! Plus… there was the lesson about why you might need needle caps on dpns…. And… how to catch little stitches from this pattern after you rip out about ten rows…. 🙂
Hi Rebecca,
Thanks for writing in! So happy that I could help, and glad to hear that you have learned so many techniques along this journey!
We are always happy to assist, so please feel free to reach out at any time!
Warmly,
Gianna
Hello!
Would this pattern be successful using one strand of a heavier weight such as DK or light Worsted?
Thanks,
Hannah
Hi Hannah,
Thanks for reaching out! Yes I think a single stranded dk weight would work! I would recommend working up a gauge swatch prior to beginning to double check it is consistent with the pattern before you begin!
All the best,
Gianna
Hi Gianna,
I just knitted a gauge swatch in the rib pattern for the Best Friends Hat. I used a Size 3 needle as the pattern states, but I am getting 34 stitches per 4 inches – pattern says I should get 39 stitches. Rather than go down to a size 2 needle, is there any way I can adjust the pattern to get the correct size hat? I plan on making the Adult/Medium. Thank you.
Hi Kathy,
Thanks for reaching out. You can absolutely adjust the number of stitches you cast on to make this hat work with the gauge you’re getting! To figure out your cast-on number, you will want to first knit a gauge swatch in pattern (which you’ve already done). Once you know how many stitches you are getting per inch (in your case, 8.5 stitches per inch), you can multiply that number by the finished circumference that you would like (16.5 inches for the Adult Medium size) and cast on the nearest multiple of 16. This would come to 144, in your case. Then you can follow the pattern as written! I hope this helps.
All the best,
Lili
Hello,
I’m just wondering if when measuring the length of my hat before I begin the decrease, should allow for the hat becoming slightly longer once blocking? I’m knitting size adult large, so should begin decrease once the piece measure 9.5inches from cast on edge. But should I really make it a little shorter, to allow for blocking?
Thank you,
Seona
Hi Seona,
Thanks for reaching out! If you plan on heavily wet blocking the hat and really stretching the stitches I would consider making it slightly shorter, but if you plan on doing a light blocking it should be perfectly fine as written! Also since this is a cuffed hat you can kind of customize how much you roll the cuff to get the hight/fit of the hat you desire, so I wouldn’t be too worries about cutting down the length before going into the decreases.
All the best,
Gianna
Thanks so much for your help Gianna. What would you recommend as a light blocking – could I still submerge in lukewarm water, and then lay flat to dry with no pins? Or would you recommend I don’t submerge the hat in water, but only spray it?
Thanks in advance!
Seona
Hi Seona,
Thanks for writing in again! Submerging in water would be fine or spraying it, I definitely wouldn’t use pins for this hat!
Warmly,
Gianna
How would you recommend making a scarf to match this hat using the same line weight yarn in a solid color? How much yarn would you recommend I purchase?
Hi Carol,
Thanks for reaching out! We have a great scarf pattern in Line Weight using the same US 3 needle called the No-Purl Ribbed Wrap! This would be a great pattern to follow to match your Best Friend Hat! It uses 4 skeins of Line Weight and uses a stitch called the no-purl rib (which is very fun to do and looks great!) but you could easily alter the pattern to be a 1×1 rib like the hat!
I hope this helps!
Warmly,
Gianna
Can I knit this hat in linen quill yarn?
Hi Barbara,
Thanks for reaching out! Linen Quill would be a great option for this pattern! Just keep in mind that we used 2 strands of Line Weight so you would also need 2 strands of Linen Quill! I also recommend double checking that your gauge is consistent with the pattern prior to beginning!
Warmly,
Gianna
Thanks Gianna, now I have 2 hats I can knit with my leftover yarn! Yippee! 💕
I love this hat! I also really like the colors of the Brooklyn Peerie, and based on a previous comment, it seems like this yarn will work. In particular, I really like the Calluna color. I have some leftover Line weight yarn (heirloom white) from the boyfriend hat that I made for my husband. So I’d love something that goes with both the Calluna and the heirloom white. Thank you so much!
Hi Emily,
Thanks for reaching out! I love the color Calluna it is such a stunning shade! You could go a couple different ways with this combination depending on if you want something more monochromatic or something with more contrast! With Calluna and Heirloom White I would recommend Peerie in Cobbler, Arabesque, Hickory, Henge or Humpback!
I hope this helps, happy knitting!
Gianna
Question on Set-Up Round in Shape Crown: Do I work the 1×1 rib pattern three times (for a total of six) stitches and then place the markers? I’m guessing it’s not after every 1×1 rib.
Hi Dee,
Thanks for reaching out! The set up round is actually a bit different:
Set-Up Round: [Work 28 (32, 36, 40, 44, 48) stitches in established 1 x 1 rib pattern, place marker] 3 times, work in established pattern to end of round.
So for example if you were making the smallest size you would work 28 stitches in the rib pattern and then place a marker, and repeat that 3 times.
I hope this clears things up!
Warmly,
Gianna
Yes, thank you.
Hi!! I love this pattern as well as the Boyfriend Hat pattern. I noticed that the size for the Adult XL Best Friend Hat is the same as the Men’s Large Boyfriend Hat. Why the difference? Thanks
Hi Jody,
Thanks for reaching out! There is actually no difference between the actual dimensions of the sizes, the only difference is the Boyfriend Hat is broken up into only men’s and women’s sizes, while the Best Freind Hat is unisex sizing with options for babies and toddlers all the way to the Adult XL size! So even though the Adult XL and the Men’s Large have different names, they happen to be the same size.
I hope this clears things up!
Gianna
Hello, I’m in the process of making the boyfriend hat and had a question on shaping the hat. The instructions said to [k1,p1],4 times, k1 , k2 tog. then work in established pattern of k1,p1. After the k1, k2 tog I would be starting with a p1 instead of k1, p1. Is that correct? I have 160 stitches and have 40 stitches between my marker.
Hi Marsha,
Thanks for writing in. Yes, after the k1, k2tog, your next stitch will be a purl stitch! Hope this helps.
All the best,
Lili
Hi Lili! I am having a similar issue understanding and wanted to clarify. Why would you p1 instead of k1 in this situation? Also when you work the first two decrease rounds, do you restart the pattern after you ssk to the marker? Or do you continue the pattern from before the ssk? In other words for round 1 decrease, would I interrupt the pattern to do the ssk and then after ssk would I restart from the * ? I’m struggling with how to repeat after the first marker.
Hi Jenn,
Thanks for writing in! Your SSK will interrupt the pattern on just those two stitches but once you go back to the *, you will be back in pattern knitting the knits and purling the purls. The only time you will work knits outside of the established pattern is on those two stitches you are making into one(decreasing). I hope that helps but please let me know if you have any other questions!
Happy knitting,
Gavriella
Hi! Thank so much for your response! I’m not sure I quite understand. In order to keep to the pattern, after the first round of k1,p1 x 4 and k1,k2tog, you p1? Then do you continue with 8 stitches of p1, k1, or would you skip the first k1 and do 7 stitches and then k1, k2tog? I cast on 144 stitches with 36 stitches between markers. Thank you so much again!
Hi Jenn,
In the decrease section, when the instructions say to work ‘in pattern’, it is indicating to knit the stitches that are knits and to purl the stitches that are purls. So when you get to the following row, you will do the same unless the pattern indicates to k2tog, or SSK at the decrease points. I hope this helps but if you need additional help, please feel free to write back and we are also always happy to go over things more in depth over a free 1-on-1 session!
Happy knitting,
Gavriella
Thank you again! I have one last q, and if this doesn’t get me there I will schedule that session for sure! When I ssk and start with a p1, do I do 8 stitches and end with a k1 or would I do 7 stitches since I skipped the first k1. Thank you for your patience with me! I’m self taught so I really struggle with reading patterns.
No problem at all! I totally understand! After your SSK, the instructions indicate to repeat what is in between the asterisks. So in this case, it says “repeat from * to end of round.” so your next stitch will be a K1! This is because the first instruction at the asterisk here is *[K1, p1] four times! I hope this helps!
Hi,
I am looking for a pattern to knit a hat for my adult nephew. He has many allergies and can’t tolerate animal fiber. Is there a pattern and plant based yarn you can recommend ?
Thank you so much.
Hi Donna,
Thanks for reaching out! For the most part, you can use any of our hat patterns and instead of using the recommended yarn, you can substitute for a plant-based yarn! For example, you could use out lovely Santolina (70% organically grown cotton, 20% rayon from bamboo, 10% hemp) for this hat, and follow the pattern as written and use one skein of Santolina for each color (3 skeins total.) I do recommend starting off by working a gauge swatch prior to beginning to ensure you are consistent with the pattern prior to beginning!
I hope this helps, and if there are other hat patterns you are interested in please let me know and I can recommend other yarn substitutions!
Warmly,
Gianna