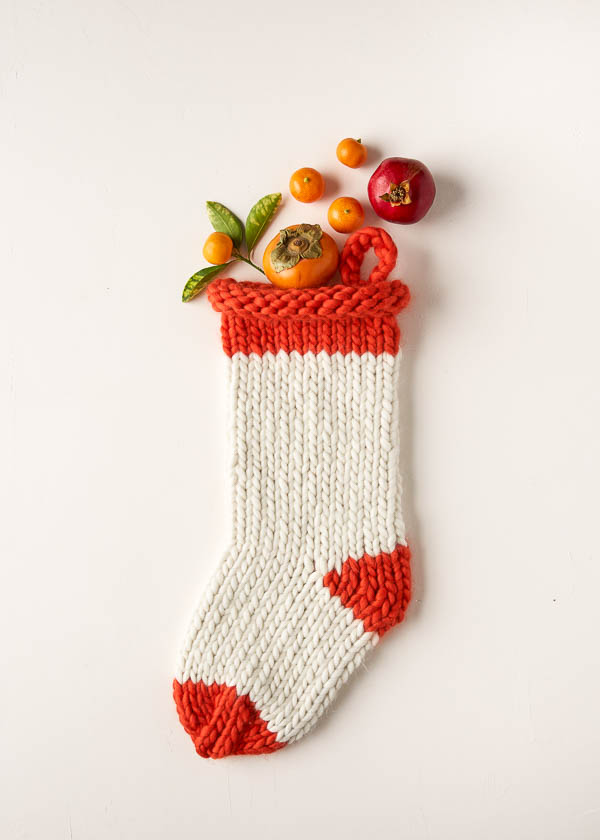
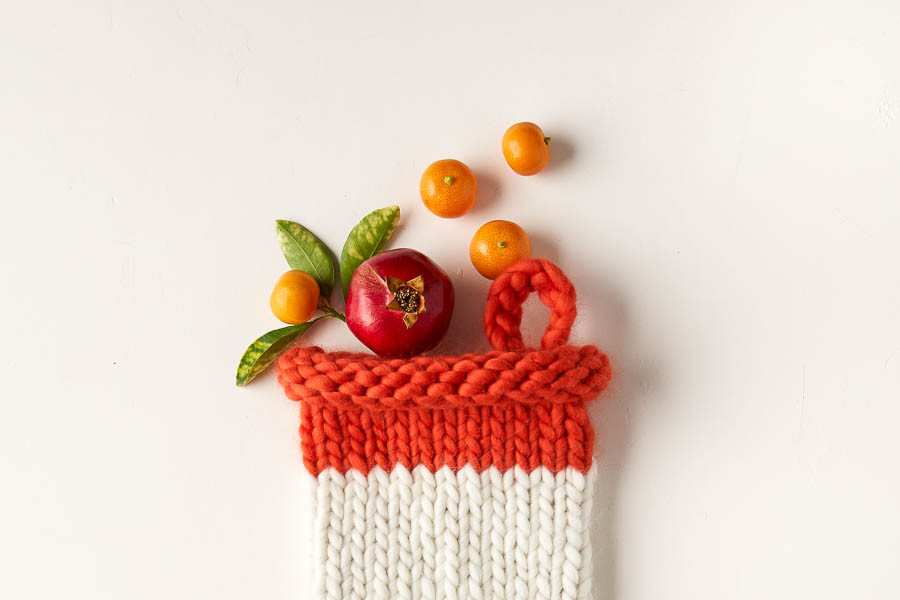

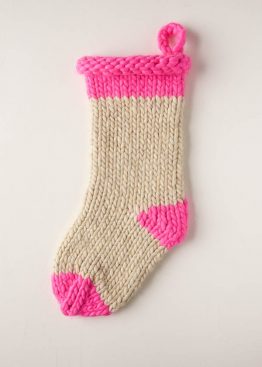
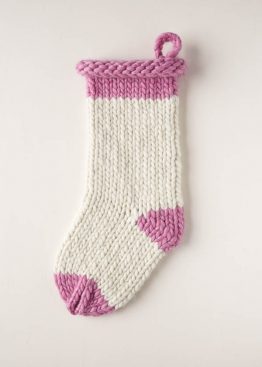
Knit Before Christmas Stocking
The children are nestled all snug in their beds, the sugar plums are dancing, the hand-knit stockings are hung by the chimney with care, and congratulations, you’ve created a beautiful Christmas tradition without a whole lot of stress and fuss. Our Knit Before Christmas Stocking contains all the love that goes into the making without taking the twelve days of Christmas to do it!
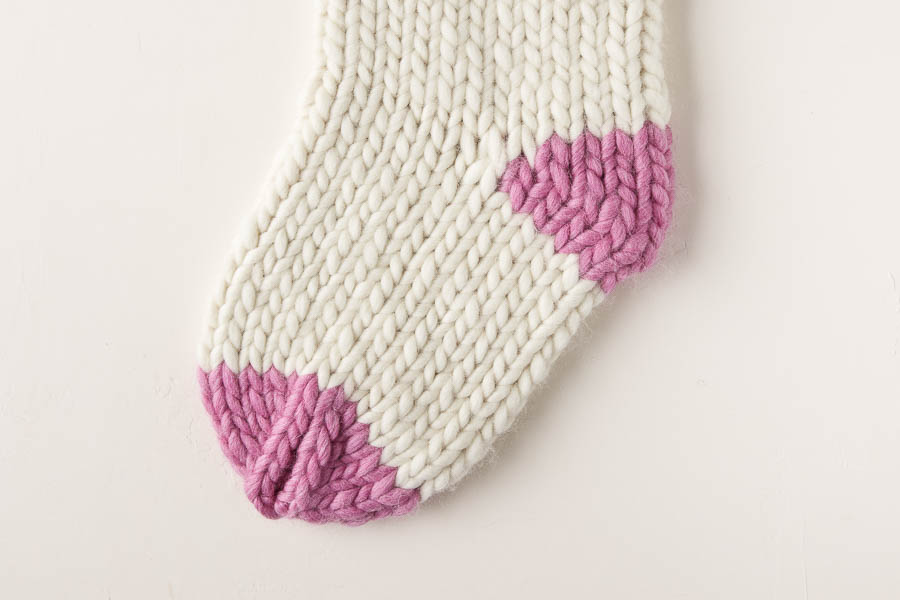
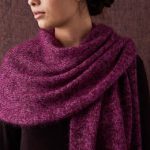
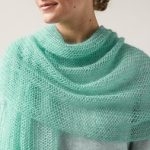
But a swift knit isn’t any less special, especially considering this stocking’s considerable charms, starting with its festive scale. Using just two skeins of our Gentle Giant, big stitches work up into a big stocking with a right jolly old spirit. Its splashes of bright color, how they twinkle, its toes how merry, its heels like roses, its hanging loop like a cherry!
Even if you sleep right through St. Nick’s visit, you never do forget a hand-knit Christmas stocking. It’s what sugar-plum dreams are made of!
Designed by Purl Soho designer, Jake Canton. Click here to see even more of Jake’s designs!
Share your progress and connect with the community by tagging your pics with #PurlSoho, #PurlSohoBusyHands, #PurlSohoKnitBeforeCristmasStocking, and #PurlSohoGentleGiant. We can’t wait to see what you make!
Materials
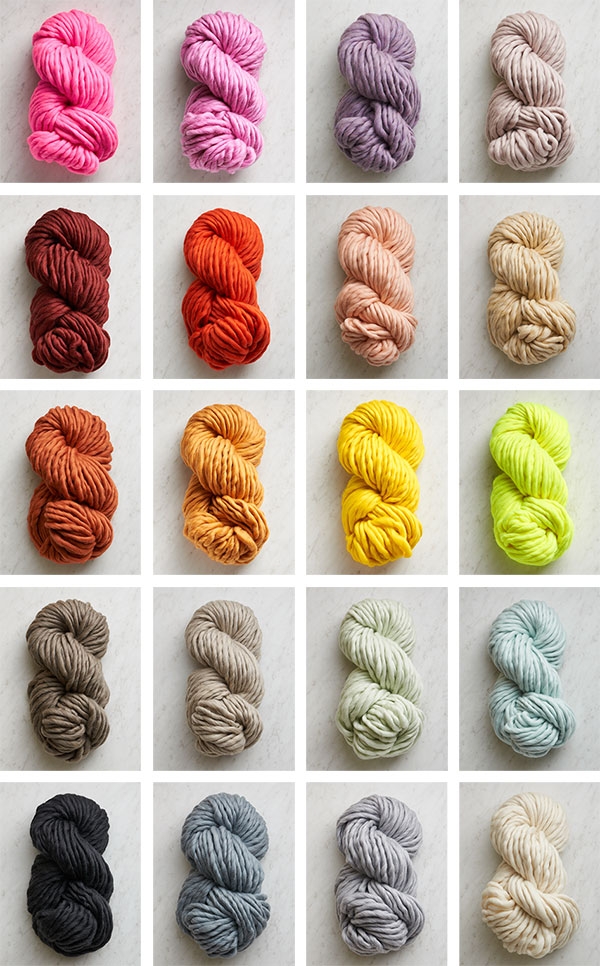
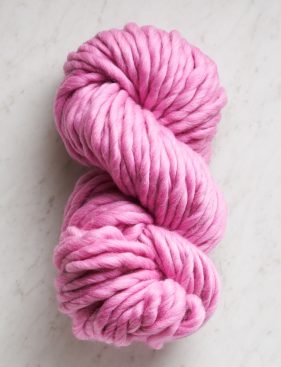
- 2 skeins of Purl Soho’s Gentle Giant, 100% merino wool. Each skein is 48 yards/ 125 grams.
- Main Color (MC): 1 skein; approximately 48 yards required.
- Contrast Color (CC): 1 skein; approximately 34 yards required.
- US 17 (12 mm), 16-inch circular needles
- A set of US 17 double pointed needles
- A size P (12 mm) crochet hook
- A jumbo stitch marker or scrap yarn
We knit up samples in 3 color combinations…
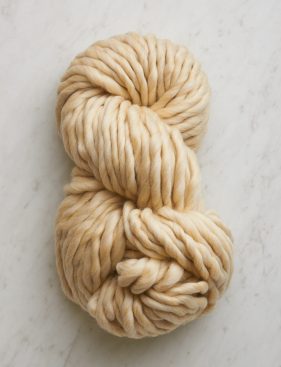
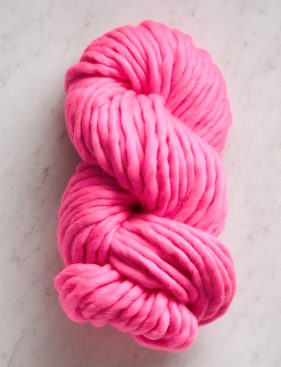
Main Color: White Peppercorn + Contrast Color: Super Pink
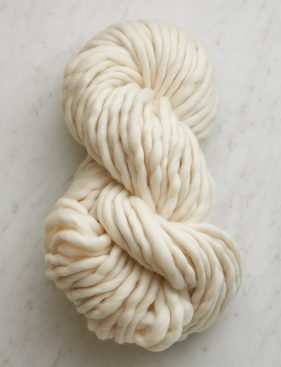
Main Color: Heirloom White + Contrast Color: Rose Violet
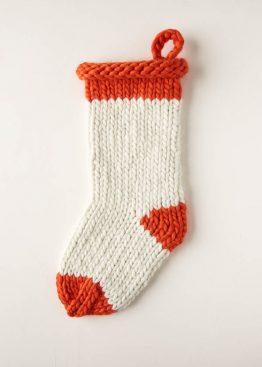
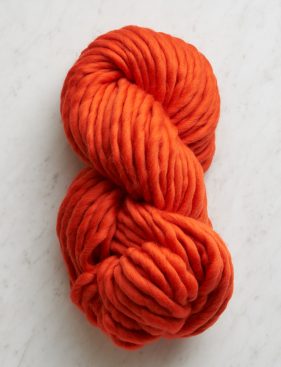
Main Color: Heirloom White + Contrast Color: Orange Koi
Gauge
8 stitches and 11 rounds = 4 inches in stockinette stitch
Size
- Finished Circumference: 13¼ inches
- Finished Length From Top Of Heel To Top Of Leg (rolled): 10 inches
- Finished Length From Top Of Heel To Tip Of Toe: 10½ inches
Note
Short-Row Shaping: Wrap + Turn (wrp-t)
- On the right side: Keeping yarn in back, slip next stitch purlwise from left needle to right needle. Bring yarn to front. Return slipped stitch to left needle. Bring yarn to back. Turn work so wrong side is facing you.
- On the wrong side: Keeping yarn in front, slip next stitch purlwise from left needle to right needle. Bring yarn to back. Return slipped stitch to left needle. Bring yarn to front. Turn work so right side is facing you.
For a step-by-step video and photo tutorial of how to work this technique, please visit our Short Row tutorial.
Pattern
Cuff
With Contrast Color (CC), loosely cast 24 stitches onto circular needles, leaving a 36-inch tail to use later for the Hanging Loop. We used a basic Long Tail Cast On.
Place a marker and join for working in the round, being careful to not twist the stitches.
Knit every round until piece measure 4 inches from cast-on edge, unrolled.
Cut CC.
Leg
With Main Color (MC), knit every round until piece measures 11½ inches from cast-on edge, unrolled.
Cut MC.
Heel
Note: In this section you will work back and forth in short rows to shape the heel.
Short Row 1 (right side): With CC, k4, wrap and turn (wrp-t, see Note).
Short Row 2 (wrong side): P8, wrp-t.
Short Row 3: K7, wrp-t.
Short Row 4: P6, wrp-t.
Short Row 5: K5, wrp-t.
Short Row 6: P4, wrp-t.
Short Row 7: K3, wrp-t.
Short Row 8: P2, wrp-t.
Short Row 9: K2, [knit wrapped stitch with its wrap] 4 times, wrp-t.
Short Row 10: P6, [purl wrapped stitch with its wrap] 4 times, wrp-t.
Short Row 11: K5.
Cut CC.
Foot
With MC and resuming working in the round…
Set-Up Round (right side): Knit to end of round, knitting wrapped stitches with their wraps as you come to them.
Knit every round until piece measures 5 inches from Set-Up Round.
Cut MC.
Toe
With CC, knit 2 rounds even.
Distribute stitches evenly over 4 double pointed needles. [6 stitches on each needle]
Decrease Round: For Needle A, knit to last 2 stitches, knit 2 together (k2tog); for Needle B, slip slip knit (ssk), knit to end of needle; for Needle C, knit to last 2 stitches, k2tog; for Needle D, ssk, knit to end of round. [4 stitches decreased]
Repeat Decrease Round until 8 stitches remain. [2 stitches on each needle]
Next Round: For Needle A, k2tog; for Needle B, ssk; for Needle C, k2tog; for Needle D, ssk. [4 stitches]
Cut CC, leaving an 8-inch tail.
Thread tail onto tapestry needle and thread needle through remaining 4 stitches. Pull tight and bring tail to inside of stocking to weave in.
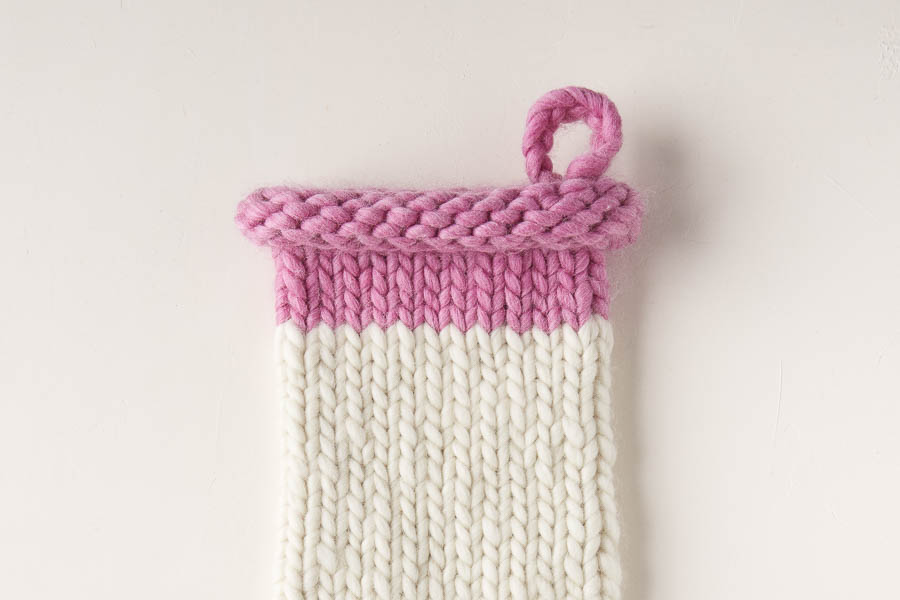
Hanging Loop
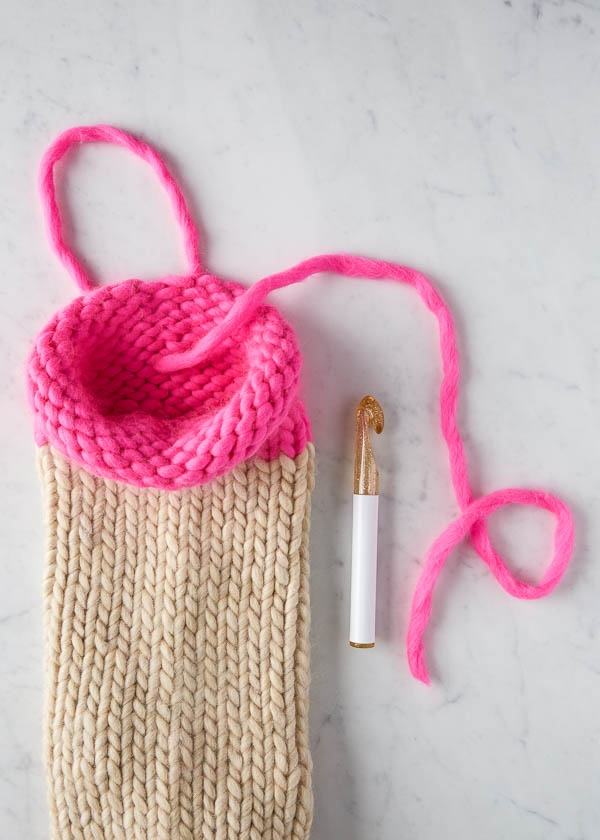
With wrong side facing you, use crochet hook to bring cast-on tail to wrong side of piece 6 rounds below cast-on edge, through first column in the round.

Insert crochet hook into stitch below where cast-on tail exits and draw tail through to create a loop on the crochet hook.

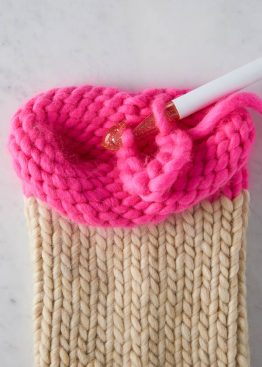
Chain 10.
Insert crochet hook from back to front into first chain stitch and pull tail through to secure Hanging Loop to itself.
Weave in ends and lightly steam, if desired!


please mail all the materials to me.
Hi Marina,
Thanks for writing in! All of the materials for these lovely stocking can be purchased on our site and mailed to you! Just click on the links in the materials section above and add the items to your basket! You will soon be on your way to making some lovely heirlooms for the holiday!
Best,
Cassy
Can I get 2 stockings out of 3 skeins using the same contrast on both socks?
Hi Susie,
Great question! For these lovely stockings, we used all of the skein of the main color and about 80% of the contrast skein. With that in mind, you would need 1 skein of the main color and 1 skein of the contrast for each stocking!
Best,
Cassy
Can you tell me how many yards of the main color of Gentle Giant are needed to make one stocking? Is the entire skein?
Hi Gayle,
Great question! You will be using the whole of the main color skein or 48 yards of Gentle Giant to make this lovely stocking!
Best,
Cassy
I love the cristmas sock ,what is the sice of needles in mm?
Marijke
Hi Marijke,
Thanks for reaching out! The US 17 needles that we used here are 12mm needles! We do have a handy chart for needle conversion that can be found here: https://www.purlsoho.com/create/2017/02/01/knitting-needles-conversion-chart/
Happy knitting!
Cassy
Adorable, simple pattern. As a beginner a few years ago, struggling to knit several stockings with cute Christmas designs, requiring many many changes of yarn (!!) I am delighted to see this simpler version. Quick question: What are the dimensions of the finished stocking? Thank you! Margaret
Hi Margaret,
Thanks for writing in and for your kind words! The measurements for these lovely stocking can be found above under the Size heading! I am also happy to include them here for you as well!
Finished Circumference: 13¼ inches
Finished Length From Top Of Heel To Top Of Leg (rolled): 10 inches
Finished Length From Top Of Heel To Tip Of Toe: 10½ inches
Best,
Cassy
Love this pattern so much! I’m a bit confused by this instruction: [knit wrap together with next stitch]
Am I picking up a wrapped stitch then knitting it together with the current stitch?
Thanks!
Hi Stephanie,
Thanks so much for the kind words and for writing in! When you are working this part of the heel, the next stitch will be a stitch that you worked a wrap and turn on previously, and you will knit the stitch together with its wrap. You can see this demonstrated in our Short Rows tutorial in the sections titled Picking up The Wrapped Stitch on the Knit Side and Picking up the Wrapped Stitch on the Purl Side.
I hope that helps!
Julianna
Perfect, thanks! Made it last night!
I would love to make these in an ornament size. Do you have the pattern scaled down, by chance?
Hi Rise,
Great question and great idea! While we do not have a scaled down version, you could follow the exact pattern while using smaller yarn and smaller needles to get a smaller version. For instance, if you used a fingering weight yarn with US 2 or 3 needles and got a gauge of 8 stitches per inch, the circumference would be 3 inches rather than the 13 1/4 inches that we got here! You could then make the leg length between 2 and 3 inches depending your preference and the foot length around an inch before making the toe.
I hope that this helps!
Cassy
This is sort of a follow up to Margaret’s question. I see the dimensions but the picture makes it seem that these are small stockings. Could you post a picture of next to something of a common size (like a ruler or pencil or 16in knitting needles)? Maybe then I could really grasp how big or small they are. Thanks!
Hi Pennie,
Thanks for reaching out! I am afraid that we do not have an image like the one that you requested. However, these stockings are quite generous in size! If it helps, the picture of the stocking under the heading “Hanging Loop” is right next to a crochet hook that is 6 inches long! Additionally, the clementine at the top of the pink stocking is right around 2 inches wide!
I hope that this helps!
Cassy
After I work the heel and the set up round for the foot, I don’t have the original number of stitches. But when I work the toe I should. What have I missed?
Hi D,
Thanks for reaching out! You should always have the same number of stitches on your needle throughout the heel turn and when you are finished with the heel. Is it possible that you are accidentally knitting two stitches together instead of knitting a stitch together with its wrap when resolving the wrap and turns? You can see this demonstrated in our Short Rows tutorial in the sections titled Picking up The Wrapped Stitch on the Knit Side and Picking up the Wrapped Stitch on the Purl Side.
I hope that helps!
Julianna
I have the same issue. I’ve made 3 thus far but they all end up slightly different after the heel for some reason. Not a big deal (they’re made by hand, part of the beauty is that they’re all a bit different), but the last one looks a bit wonky. Do we keep the marker in the same spot?
Hi Michela,
Thanks for reaching out! Hmm, I’m not sure why that is happening! The marker does stay in the same spot, and it should be centered in the middle of the CC heel stitches. I’m glad you’re still happy with your stockings, but I hope that helps for future versions!
Best,
Julianna
Hi Purl Soho,
I’ve knitted many of your patterns, but I’m new to socks and am totally mystified by the last two short rows. You indicate for row 9: K2, [knit wrap together with next stitch] 4 times, wrp-t. How do I pick up four wraps if I’m only knitting four stitches? Or am I reading the directions wrong? Ditto for short row 10. Could you explain a little further for beginner (but very enthusiastic) knitter? Many thanks,
Jenny
Hi Jenny,
Thanks for reaching out! When you are working this part of the heel, the next stitch will be a stitch that you worked a wrap and turn on previously, and you will knit the stitch together with its wrap, and then repeat that step for each of the next 3 stitches. You can see this demonstrated in our Short Rows tutorial in the sections titled Picking up The Wrapped Stitch on the Knit Side and Picking up the Wrapped Stitch on the Purl Side.
I hope that clears things up!
Julianna
Good Morning!
Wondering if you can increase the length of the stocking to make it larger? so perhaps the overall size is more like 15″.
I suspect i would need one more skein of the main color to do that…or perhaps half?
Thanks!
Hello Wendy,
This is a great question! This should be easy to do, all you need to do is extend the leg by 5″. I suspect that this should only take half a skein, though you might need a bit more than half.
Let us know how it goes and happy knitting!
-Marilla
Hi! I just got everything to knit this but the 16” circular needle seems like a big problem, the 24 stitches do not reach point to point making knitting in the round difficult. Would it be better to just knit with DPN the whole time? Or use two circulars?
Hello Jenna,
Thank you for reaching out! Yes, I would reccomend using DPNs or two circular needles, whichever you feel more comfortable with.
I hope this helps and happy knitting!
-Marilla
I just started this, but I’m doing magic loop with a single, much longer circular needle and it seems to be working so far!
Hello! I have started to make this stocking, but wanted it a little bigger so have cast on 32 stitches. I’d be grateful to know what adjustments should I make to the heel and toe? I’m a beginner, so a general formula would be very helpful!
Many thanks in advance!
Hello Kim,
Thank you for reaching out! Unfortunately there isn’t a simple formula to redesign this pattern, but you can certainly do it! For the heal I would reccomend adding may be 6 stitches, from your added 10, into the wrap and turn portion. This means that you you will have additional rows added. The first four stitches would look like this;
-Short Row 1 (right side): With CC, k7, wrap and turn (wrp-t, see Note).
-Short Row 2 (wrong side): P11, wrp-t
-Short Row 3: K10, wrp-t.
-Short Row 4: P9, wrp-t
You will continue in this way until you are down to K2 and P2.
The Toe portion will be much more straightforward. You can just repeat the decrease portion until you have 4 stitches remain.
This is all an estimate and There might be a bit of trial and error as you go, I hope this sets you up to move forward and let us know if you have any further questions!
Happy knitting!
-Marilla
I’m glad I scrolled through the comments! I’m knitting this stocking and I cast on 28 stitches instead of 24 to make up for my slightly tighter gauge. Does that mean I would add 2 stitches to my wrap and turns? Or would 4 be better? Thank you!
Hi Allison,
Thanks for reaching out! Your heal should be worked over a little less than half your stitches – in our 24 stitch stocking, the heal is done over 10 stitches. For a 28 stitch stocking, I think a 12 stitch heel would be plenty! On the first short row, you will knit 5 stitches in the CC, wrap and turn, and then for the second short row, purl 10 and wrap and turn. After that, just make sure you are always working one fewer stitch before the wrap and turn in each row until all the heel stitches except the center two have been wrapped.
I hope that helps!
Julianna
Can this pattern be knitted using the magic loop method?
Hi Sandra,
Thanks for writing in! Yes, definitely! Although we don’t have instructions for adapting this pattern to the magic loop method, if you are already familiar with it, it should be quite straightforward.
Happy knitting!
Julianna
Hi, I’m
I’m having trouble understanding the short rows. I watched the video, but to me it’s not clear if I am to go back and forth on just the short rows directions and not continuing to knit around? What I’m doing doesn’t look right. Thanks so much PS: I bought yarn to make two !
Hi Baxie,
Thanks for writing in! When working the short rows, you will be turning back and forth and only working on half of the stitches, not knitting all the way around the stocking. If you haven’t done short rows or a sock heel before, it does feel a bit odd at first, but if you follow the pattern row by row I’m sure it will turn out correctly!
Best,
Julianna
I would really like to make this for my son to be an heirloom for him (this year will be his first Christmas!), and I’m thinking about adding in a couple strands of the Mineral Silk mini-skeins to add some flair. Would two of those strands (one in each different color section) be sufficient?
Hi Candice,
Thanks for reaching out – all the holidays in a baby’s first year are so exciting! The mini skeins of Mineral Silk each have 79 yards, and the stocking only requires about 50 yards of your main color and 35 of the contrast color, so you will have plenty of yardage to add a bit of sparkle and pop to the stocking!
Happy knitting!
Julianna
D.ear Julianna, I need help! I’ve watched the short rows video several times, I even watched other videos, but I have frogged the heel part of the stocking at least 15 times, maybe more. I have done the wrapping part successfully, my problem is understanding how to perform instructions on Rows 9 and 10. Does it mean to knit the wrapped part of the stitch with the stitch that is wrapped and then K2 and doing the above then after that another wrap stitch, then similar, doing Row 10 to “P6 then purl wrap together with next stitch, 4 times, and then at the end make another wrap stitch? At the end I don’t wind up with 5 stitches to knit. I read Stephanie’s question and the reply, but that is not helping me. Am I not to make another wrp-t, as it appears at the end of Rows 9 and 10? I’ve done the just knitting/purling of the wrap part of stitch with the stitch that is wrapped to no avail, and have also knitting/purling the wrap and the stitch with the following wrap and stitch, but that still it has not come out correct. So confused and the yarn is getting overworked with all the frogging. I’m just not understanding how to work Row 9 and 10 🙁 Thanking you in advance. Best, Baxie
Hi Baxie,
Thanks for writing back! I am happy to help! For row 9, you will k2, then knit each wrap with its wrapped stitch (this will be 4 wrapped stitches) and then wrap and turn. For row 10, you will p6 and then purl each wrap with its wrapped stitch (this will be 4 wrapped stitches) and then wrap and turn.
Then on the next row, you will knit 5 with the contrast color that you have been working with and then cut this color. This will bring you to the middle of the heel, leaving a few stitches unworked in the contrast color. You will then work the set-up round for the foot which will work the last stitches that remain of the contrast color that are unworked with the main color and you will also work the wrapped stitches with their wraps that remain. This can be a little confusing but I find that saying the steps out loud as I work them can be a real help in getting through challenging sections.
Best,
Cassy
Ohhhhh so glad I read these comments! I was completely baffled by these rows too and this is EXACTLY the explanation I needed. Thank you thank you thank you! This is my first sock and first encounter with the wrap and turn and subsequent knit togethers. Back on track now!
Can I double this pattern ie make it bigger?
instead of 24 stitches cast on 48? and so on?
Hi Nancy,
Thanks for reaching out! Unfortunately casting on a different amount of stitches would require quite a few changes to the heel section of the stocking, which we are unable to do in the comments section. I’m so sorry about that!
Best,
Julianna
Hi! I really want to make this pattern, but I only have Drops Andes yarn, which I usually use 9mm needles with. Would it be possible for me to adjust the pattern? If so, by how much? Or could I just knit this pattern with 9mm needles and hope for the best?
Thanks in advance!
Hello Shivan,
Thank you for reaching out! Unfortunately 9mm is a much smaller needle than 12mm required for this pattern so it would come out much smaller. If you want to adjust the pattern the first thing I would do is knit up a gauge swatch to see how many stitches per in you are getting. You can then multiply this number by the circumference of the leg to get your cast on number. Once you get to the short row heel, you will likely need to add some short rows so that the heel is proportional.
I hope this can get you started and let us know if you have any further questions!
Happy knitting,
Marilla
Hello! I wanted to knit a total of 3 of these in just 1 color (no accents), but I noticed in another comment you said that you use up the entire skein of the main color. Would I have to purchase 4 skeins to make all 3 stockings?
Hello Tricia,
Thank you for reaching out! If you are knitting this stocking with one color you will need a total of 78 yards. Each skein of Gentle Giant has 48 yards of yarn so you will need 5 skeins to knit up 3 stockings.
I hope this helps and happy knitting!
-Marilla
This pattern is exactly what I was looking for. Having a really hard time with the heal turn 🙁
I’m unclear from the start- short row 1- do you wrap a MC stitch or one of your first 4 knit stitches? Same questions for the next short row. I’ve done it both ways and neither comes out right.
Also either way I try when I get to row 9 I never have 4 stitches to knit wrap.
So appreciate any help you can give 🙂
Hi and thanks for reaching out! On Short Row 1, you will be wrapping a MC stitch with your CC before turning. It may look odd at first, but when you resolve the wrap and turns, it will look much tidier. It’s hard to say why you aren’t ending up with 4 wrap and turns available on Row 9, but if you haven’t already, I would suggest watching our Short Row Tutorial to see if that helps!
Best,
Julianna
Hi! I would like to make several of these for grandchildren but have 15 dpns and 15 circs. It should work up ok, don’t you think? It may be abit smaller overall but I don’t want to change the pattern numbers. Before I place an order I want to get a general idea if you think it will work out ok. I’m not too particular about the size…just want it to be cute and to perhaps hold a very small gift. Thanks! Susan
Hi Susan,
Thanks for reaching out! Yes, you could certainly knit this pattern using US 15 needles if you don’t mind a smaller stocking! Your fabric will turn out a little tighter and denser than ours, and you may have to make the leg and foot a little shorter to keep everything proportional, but otherwise the instructions will still work out just fine.
Best,
Julianna
Hello! I am in the same boat and curious how this worked out for you, using 15s? Thanks!
Hello! I would like to add a cable to two to the stocking to add some flair, could I add this in without messing the pattern up too much?
Hi Kate,
Thanks for reaching out! I believe you could easily add in cables without changing the pattern! Just be sure the amount of stitches is plenty for a cable treatment!
All the best,
Gianna
Hi there – Excited to make these this year! Two questions for you. I don’t crochet, only know how to knit. Any recommendations on how to adapt the pattern for knitting? Also I prefer the colors in your Super Soft Merino yarn. What adjustments should I make for this yarn weight? Thanks so much!
Hi Sarah,
Thanks for reaching out! This is a knit pattern not crochet, so no need to make any changes! If you would like to keep the same gauge and needle size (US 17) for this pattern you could hold Super Soft Merino doubled and should achieve the same gauge like we did in our Snow Day Stocking! If you don’t want to work it doubled you can work a gauge swatch in the super soft merino on an appropriate sized needle and adjust the gauge from there!
All the best,
Gianna
Hello love this pattern and your yarn;however, I am in despair I am struggling to understand this I do not know how. To knit this part. Short Row 9: K2, [knit wrap together with next stitch] 4 times, wrp-t.
Please help sorry to be so stupid! My son who lives in Brooklyn has gone to your shop for me and all he can say is “WoW” Ihave dragged him into many a Yarn Stores but he told me Purl Soho is the Best Ever!
Hi Monica,
Thanks for reaching out and for your kind words! I am happy to help! For this part you are working the wrap with the stitch, knitting it together as 1! Our Short Rows: Wrap + Turn tutorial will show you exactly how this works!
I hope this helps, happy knitting!
Gianna
Thank you Gianna! Hello again, wth the toe how do I knit around with SSK and I have 3 stitches
Then one left do I take a stitch from the next needle? So excited almost finished ! Best wishes
Hi Monica,
Thanks for reaching out! I am so happy to help! After repeating the decrease rows you should end up with 4 stitches total, one on each needle and that is when you will weave the tail through!
I hope this helps, happy knitting!
Gianna
Is there a tutorial on crocheting the loop? I figured out how to do the chain from YouTube, but using the hook to move the yarn, I’m just not there yet and I ended up having to reinforce my loop at the bottom. Any pointers?
Hi Laura,
Thanks for reaching out! We show photos at the bottom of the pattern with the written instructions to help assist with loop! You will be using the yarn from the cast on slo it will already be secured in the work, you will then work a normal chain stitch for 10 chains and then insert crochet hook from back to front into first chain stitch and pull tail through to secure Hanging Loop to itself.
I hope this helps!
Gianna
Hello,
I’m knitting this stocking in magic loop. I am very confused about how to begin the wrap and turn section, as it crosses back and forth over the start of the round. For example, I understand the first row (k4, wrap and turn) and then I’m to Purl 8 which is not intuitive in magic loop. Not even sure how I’d orient the needles. Any advice would be appreciated. Thanks!
Hi Jana,
Thanks for reaching out! Unfortunately, working the wrap and turns may be a bit tricky to navigate with Magic Loop, but certainly not impossible! Since you are only working over a portion of the stitches in each row, you will work for example the K4, wrap and turn the work and then pull the cord and re-orient the needles so that you then can work back across the row.
I hope this makes sense and please feel free to reach out with any more questions going forward!
Warmly,
Gianna
Can you suggest some substitute yarns for this? I always find the color selection wanting.
Hi Jessica,
Thanks for reaching out. While we don’t have another yarn that’s similar enough to Gentle Giant, you could certainly hold two strands of a thinner yarn and knit with them together! Super Soft Merino would work in this way. What sorts of colors are you looking for? I’ll be able to give you a more helpful suggestion if I have an idea of the colors you want.
All the best,
Lili
Hi!
I’ve loved this stocking for a couple of years now but worry it’s too small. Could I double the needle size and hold the yarn doubled to increase it’s size?
Hi Carol,
Thanks for reaching out. You can definitely increase the needle size and hold the yarn doubled to make a larger stocking! However, since Gentle Giant is already such a heavy yarn, the fabric will turn out very thick, which may not be your intention for this project.
So another way you can modify the pattern to make a larger stocking is to increase the number of stitches you cast on! This will make the circumference larger, and you can also knit for more rounds until the leg and foot are as long as you want them to be. You’ll also need to work a few more short rows to make the heel proportional, and you’ll need to work a few more decrease rounds to finish up the toe.
I hope this helps!
All the best,
Lili
Hi! Any estimate as to how long it would take to knit one of these?
Hi Lindsey,
Thanks for reaching out. Because every knitter knits at a different speed, it’s unfortunately difficult for us to give a good estimate of how long this project would take you to make! I think that many knitters could finish this within a few hours, but it might take others longer.
All the best,
Lili
Hi! I am confused by the needle a, b, c, d part for the toe.
I assume needle A is the needle to the left of the one with the working yarn attached, and you just keep knitting the instructions for each needle after that, following the toe around. to completion.
But once you knit through all those instructions and are left with all your stitches on one needle, how are you supposed to “repeat round 3”? Do you then separate all the stitches onto the double points again? If so, how many stitches are supposed to be on each needle when you repeat round 3?
Also is the stitch marker still supposed to be kept on one of the needles in the original spot through this part? Help.
Hi C,
Thanks for reaching out! Yes, needle A is the one next to the needle with the working yarn attached. If you’re working with double pointed needles, you should also have a 5th additional needle that you’re using to knit with so you would still be keeping all live stitches on the 4 DPNs during the toe decreasing. If all your stitches are on one needle, it sounds like you might be knitting with the 4 DPNs and setting down the needles you’ve finished with rather than using the 5th needle.
You’re on the right track, though! If all your stitches are on one needle, just divide them on the 4 needles again. If you’ve just finished round 3, you should have 5 stitches on each needle for a total of 20 stitches. You would continue decreasing until at the very end there is only 1 stitch on each of the 4 DPNS. Here’s our guide on working with DPNs in case you’d like more information (https://www.purlsoho.com/create/double-pointed-needles/)! Hope this helps!
All the best,
Cat
Hi there! I wanted to make this in christmas-y colors, but noticed you don’t have any red or green in the Gentle Giant yarn. Is there another yarn of your’s you’d recommend for this pattern that has different color options?
Hi Nicole,
Thanks for your question! I’d recommend using two strands of our Super Soft Merino (https://www.purlsoho.com/super-soft-merino.html) held together instead! Super Soft Merino has some lovely red and green shades, like Red Gingham, Alizarin Crimson, Clover Green, and Frond Green. Super Soft Merino is thinner than Gentle Giant so you would just need to double up the yarn. I hope this helps!
All the best,
Cat
How many stitches do I use for the heel? 12 or 10?
Hi Megan,
Thanks for writing in! The heel of this stocking is a short row heel. All of your stitches will be on your needles at once, but you work back and forth along a smaller section of stitches. Each short row in this section will tell you exactly how many stitches to knit!
All the best,
Lili
Hi there, first I love this pattern and I’m hoping to make 12 stockings, but I’m a novice. When I first looked and watched the tutorial about knitting short rows, it seemed straightforward but as I look more carefully at the rest of the instructions, I have a couple of (probably silly) questions.
The first question is about the leg. Do I knit this, joining the needles to work in the round, like the cuff? I’m asking because the next step (heel) seems confusing about where to start if I’m knitting in the round. For the heel, am I starting with the leg piece and knitting short row 1 using the CC.
I guess my main question at this point is how can you knit from the wrong side on a joined round (short row 2)? Isn’t the wrong side inside the round?
I would really appreciate some much needed advice! Thank you.
Hi Stephanie,
Thanks for writing in, and I’m happy to help answer your questions!
Yes, the LEG section is worked in the round, just like the cuff! However, once you reach the HEEL, that section is full of short rows, so you’ll be working back and forth flat. To work the wrong side short rows, all you need to do is turn your work just like you would when knitting flat regularly. An easy way to think about this step is that it’s just switching which hand is holding which needle. If you do that, then you will have turned your work and will be ready to knit a wrong side short row!
I hope this helps clarify things, and please let me know if you have any other questions!
All the best,
Lili
Yes. Thank you!!
Thank you very much!
Hello
Stuck at these directions. I do not understand what to do here. Where on my circular needles do I start knitting the heel?
There are 24 stitches in the Round? I switched to the middle and transferred 8-10 stitches to DB pointed for flat knitting? Is that ok?
Aslo what do I do here? Short Row 9: K2, [knit wrap together with next stitch] 4 times, wrp-t. How do I K2 togethes 4Xs? I am at this row and totally stuck. Am I knitting the same stitch 4X’s or am I picking up the same stitch, or knitting wrapped stitches on the same knitted row. I wish I could attache a picture for you. Can I email a picture? thanks so much
Hi Monica!
I believe I replied to your email with the same questions a few days ago. Can you please let me know if you’ve received that yet?
All the best,
Lili