

Clean + Simple Baby Dress
Few things prompt knitters into action more than the arrival of a new baby. The opportunity to express our love and excitement with something that we’ve made by hand is just too tempting!

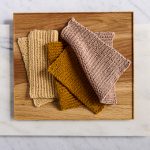
Equally tempting is our newest yarn, our soft and supple Cotton Pure. One hundred percent cotton in an impressive array of 43 inspiring colors, I knew that it was time to think babies!

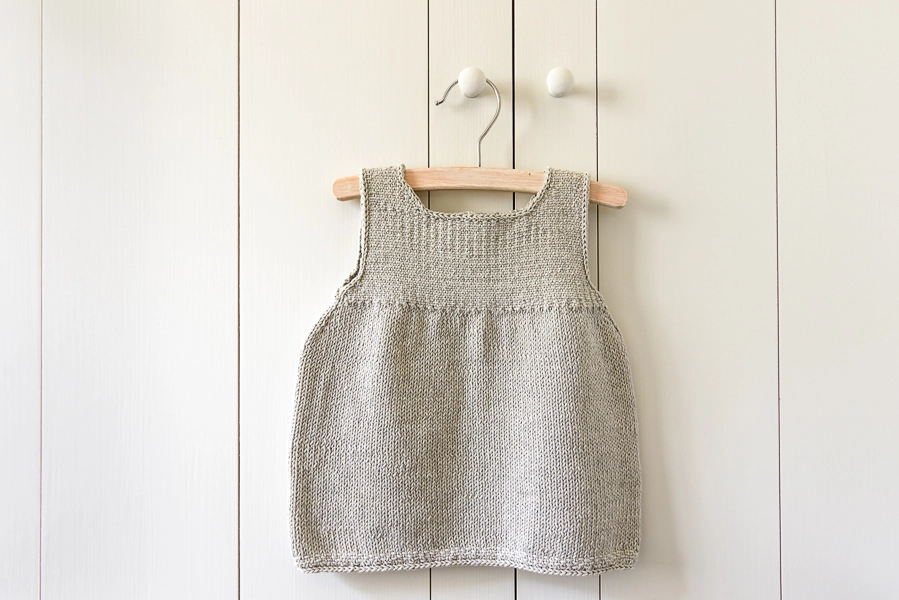
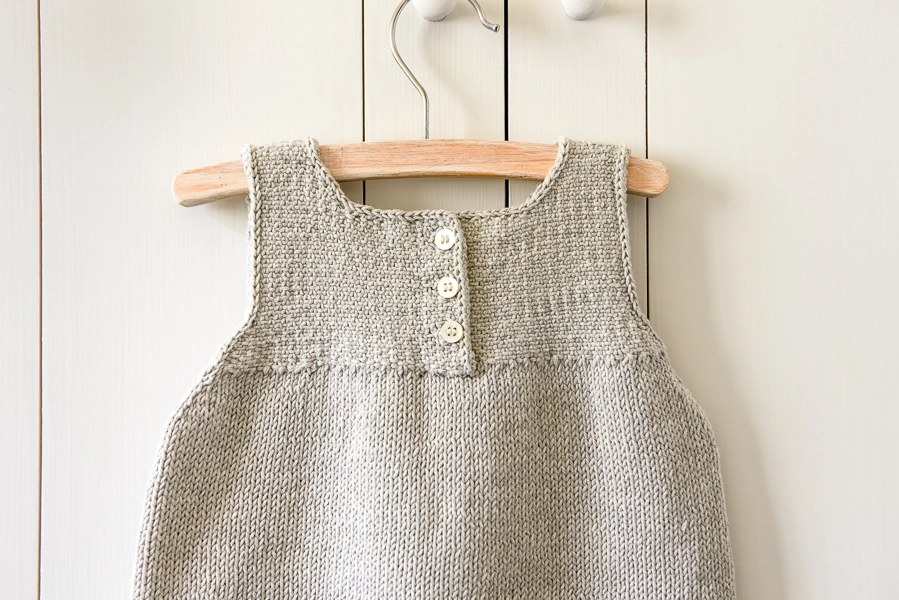
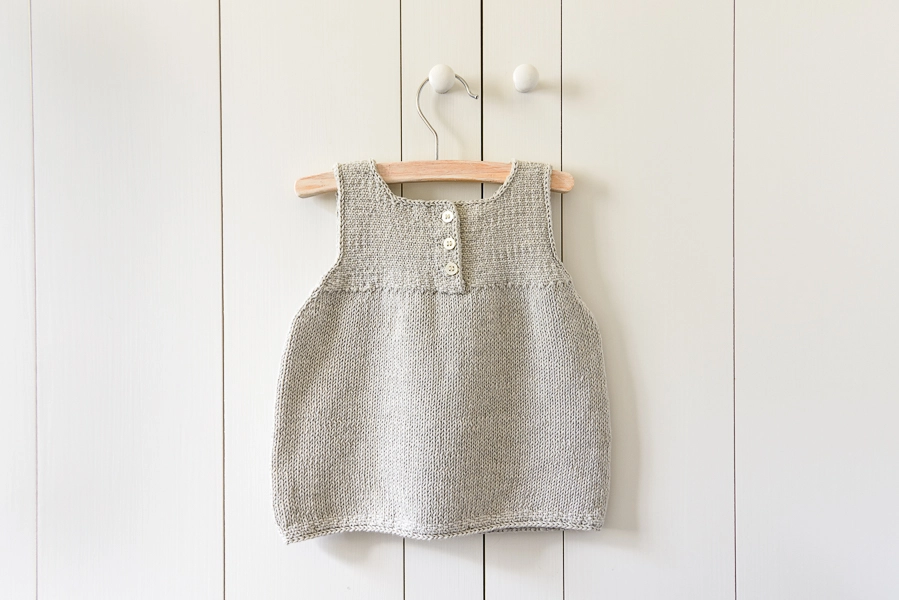
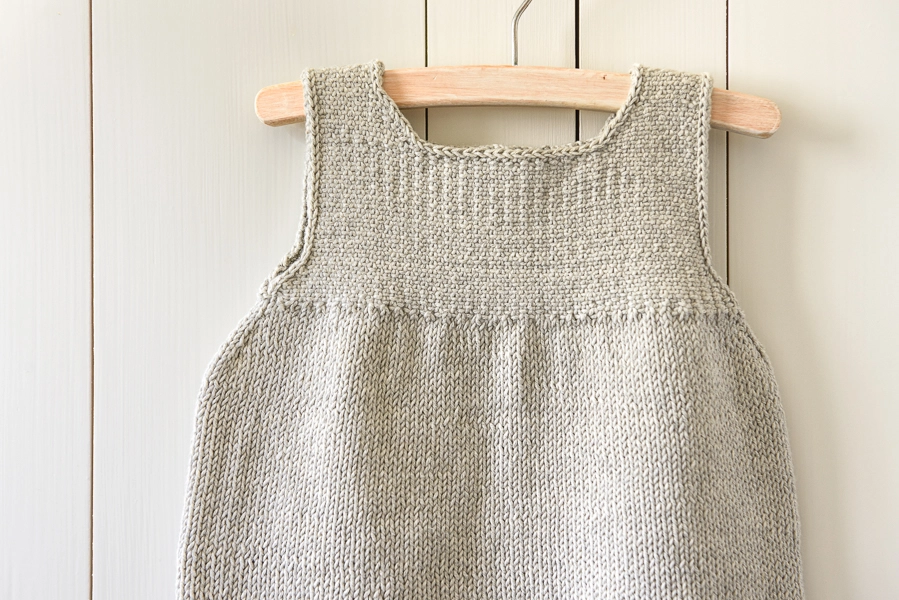
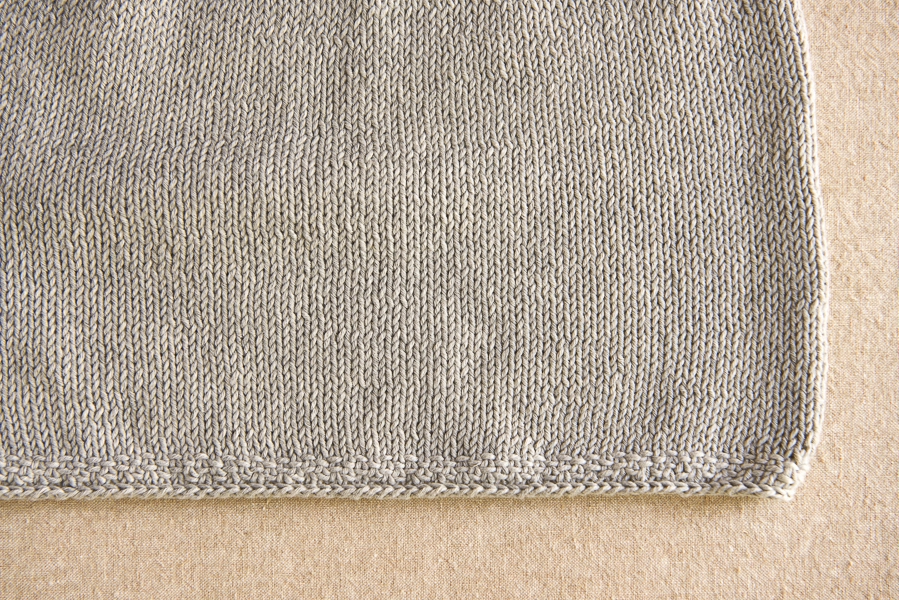
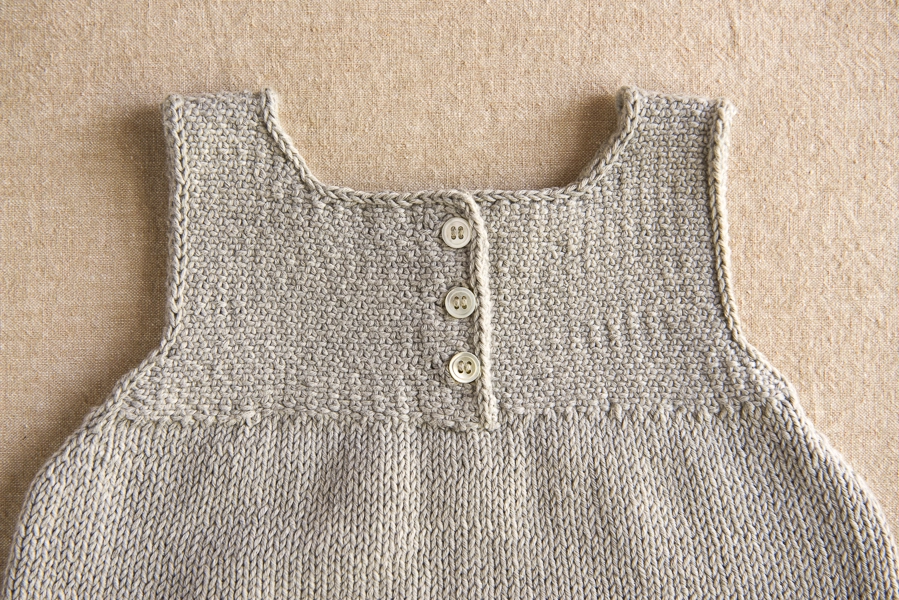
Using the homespun, woven look of Linen Stitch to craft the bodice, I designed our Clean + Simple Baby Dress with ease and comfort in mind. Constructed from the top down, this Dress knits up with little fuss, including a long stretch of satisfying stockinette for the skirt. It also opens in the back with three of Purl Soho’s delicate mother-of-pearl buttons, the perfect finishing touch!

Soft, cozy, and a breeze to launder, our Clean + Simple Baby dress is truly just that! -Kristy
Designed by Purl Soho designer, Kristina McGowan. Click here to see even more of Kristina’s designs!
Share your progress and connect with the community by tagging your pics with #PurlSoho, #PurlSohoBusyHands, #PurlSohoCleanAndSimpleBabyDress, and #PurlSohoCottonPure. We can’t wait to see what you make!
Materials

- 1 (2, 2) skein(s) of Purl Soho’s Cotton Pure, 100% organic cotton. Each skein is 279 yards/ 100 grams; approximately 279 (400, 445) yards required. We used the color Freshwater Pearl.
- US 5 (3.75 mm), 24-inch circular needles
- US 5, spare circular needles, any length
- 2 different-color stitch markers
- Three 3/8-inch buttons. We used 4 Hole Ecru Small Mother of Pearl buttons
Note: For our size 0-6 month sample, we used almost all of 1 skein, so if you want to be sure you have enough, consider ordering an extra skein. If you don’t end up needing it, you can return unwound yarn for a refund within 30 days of purchase, or within 6 months, for store credit. Our Return Policy has all the details!
Gauge
24 stitches and 28 rows = 4 inches in stockinette stitch
28 stitches and 40 rows = 4 inches in Linen Stitch
Sizes
0-6 (6-12, 12-18) months
- Finished Chest Circumference: 18 (20 ¼, 22 ½) inches
- Finished Length from Bottom Edge to Underarm: 8 ½ (11, 12) inches
- Finished Length from Bottom Edge to Shoulder: 13 (15 ¾, 17) inches

SAMPLE: Size 0-6 months is pictured here.
Notes
Linen Stitch Flat
Worked over an odd number of stitches…
Row 1 (right side): *K1, slip 1 (purlwise) with yarn in front (wyif), repeat from * to last stitch, k1.
Row 2 (wrong side): P1, *p1, slip 1 (purlwise) with yarn in back (wyib), repeat from * to last 2 stitches, p2.
Repeat Rows 1 and 2 for pattern.
Linen Stitch in the Round
Worked over an odd number of stitches…
Round 1: *K1, slip 1 with yarn in front (wyif), repeat from * to last stitch, k1.
Round 2: *Slip 1 wyif, k1, repeat from * to last stitch, slip 1 wyif.
Repeat Rounds 1 and 2 for pattern.
K1fbf (Knit one front, back, and front): Knit into the front of the stitch, but do not take the stitch off the left needle; knit into the back of the same stitch, still without taking the stitch off the left needle; then knit into the front of the same stitch and take it off the left needle. [2 stitches increased]
Pattern
Front
Right Front Shoulder
Cast 11 (11, 13) stitches onto 24-inch circular needles. We used a basic Long Tail Cast On.
Do not join to work in the round. Work 8 rows in Linen Stitch Flat (see Notes), ending with a wrong side row.
Right Front Neck
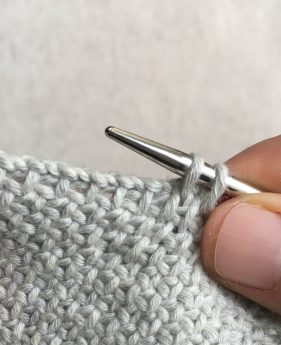
Increase Row (right side): *K1, slip 1 wyif, repeat from * to last stitch, k1fbf (see Notes). [2 stitches increased]
Continue in Linen Stitch Flat, while working an Increase Row every 4th row one (2, 2) more time(s) and while incorporating the new stitches into the pattern. [15 (17, 19) stitches]
Beginning and ending with a wrong side row, work 3 rows even in Linen Stitch Flat.
Next Row (right side): Work in Linen Stitch Flat to end, turn the work so the wrong side is facing you, cable cast on 25 stitches. [40 (42, 44) stitches]
Cut yarn.
Left Front Shoulder
With wrong side still facing you and Right Front Shoulder stitches on left needle, cast 11 (11, 13) stitches onto right side of same needles.
Slide Right Front Shoulder stitches off left needles and onto the cable. Turn work.
Note: As you work the Left Shoulder, the Right Shoulder stitches will cohabitate on the cable of the circular needles. Just ignore those stitches for now!
Work 8 rows in Linen Stitch Flat, ending with a wrong side row.
Left Front Neck
Increase Row (right side): K1fbf, *slip 1 wyif, k1, repeat from * to end. [2 stitches increased]
Continue in Linen Stitch Flat, while working an Increase Row every 4th row one (2, 2) more time(s) and while incorporating the new stitches into the pattern. [15 (17, 19) stitches]
Beginning with a wrong side row, work 4 rows even in Linen Stitch Flat, ending with a right side row.
Do not cut yarn.
Front Yoke

Row 1 (wrong side): Work in Linen Stitch Flat across all stitches, thus joining the Left and Right Shoulders. [55 (59, 63) stitches]
Work even in Linen Stitch Flat until piece measures 3¾ (3½, 3½) inches from shoulder cast-on edges, ending with a wrong side row.
Shape Armholes
Increase Row (right side): K1fbf, *slip 1 wyif, k1, repeat from * to last 2 stitches, sl 1 wyif, k1fbf. [4 stitches increased]
Continue in Linen Stitch Flat, while working an Increase Row every 4th row one (2, 3) more time(s) and while incorporating the new stitches into the pattern. [63 (71, 79) stitches]
Beginning and ending with a wrong side row, work 3 rows even in Linen Stitch Flat.

Cut yarn and place stitches on a piece of scrap yarn.
Back Right
Back Right Shoulder

With 24-inch circular needles and right side of Front Right Shoulder facing you, pick up and knit 11 (11, 13) stitches from cast-on edge.
Beginning and ending with a wrong side row, work 7 rows in Linen Stitch Flat.
Back Right Neck
Increase Row (right side): K1fbf, *slip 1 wyif, k1, repeat from * to end. [2 stitches increased]
Continue in Linen Stitch Flat, while working an Increase Row every 4th row one (2, 2) more time(s) and while incorporating the new stitches into the pattern. [15 (17, 19) stitches]
Beginning and ending with a wrong side row, work 3 rows in Linen Stitch Flat.
Next Row (right side): Cable cast on 16 stitches, and then starting with the new stitches, *k1, slip 1 wyif, repeat from * to last stitch, k1. [31 (33, 35) stitches]
Work even in Linen Stitch Flat until piece measures 3¾ (3½, 3½) inches from beginning of Back Right Shoulder, ending with a wrong side row.
Back Right Armhole
Increase Row (right side): *K1, slip 1 wyif, repeat from * to last stitch, k1fbf. [2 stitches increased]
Continue in Linen Stitch Flat, while working an Increase Row every 4th row one (2, 3) more time(s) and while incorporating the new stitches into the pattern. [35 (39, 43) stitches]
Beginning and ending with a wrong side row, work 3 rows in Linen Stitch Flat.

Cut yarn and place stitches on spare needle.
Back Left
Back Left Shoulder
With 24-inch circular needles and right side of Front Left Shoulder facing you, pick up and knit 11 (11, 13) stitches from cast-on edge.
Beginning and ending with a wrong side row, work 7 rows in Linen Stitch Flat.
Back Left Neck and Back Left Armhole
Increase Row (right side): *K1, slip 1 wyif, repeat from * to last stitch, k1fbf. [2 stitches increased]
Continue in Linen Stitch Flat, while working an Increase Row every 4th row one (2, 2) more time(s) and while incorporating the new stitches into the pattern. [15 (17, 19) stitches]
Beginning and ending with a wrong side row, work 3 rows in Linen Stitch Flat.
Next Row (right side): Work Linen Stitch Flat to end, turn so wrong side is facing you, cable cast on 16 stitches. [31 (33, 35) stitches].
Beginning with a wrong side row, work even in Linen Stitch Flat for 4 (2, 4) rows, ending with a right side row.
**Buttonhole Row 1 (wrong side): P4, pass second stitch on right needle over first stitch, p1, pass second stitch on right needle over first stitch, *p1, slip 1 wyib, repeat from * to last 2 stitches, p2. [2 stitches bound off]
Buttonhole Row 2 (right side): Work in pattern to buttonhole gap (2 stitches remain in row), turn so wrong side of work is facing you, cable cast on 2 stitches, turn so right side is facing you, slip 1 wyif, k1. [2 stitches cast on]
Beginning with a wrong side row, work 8 rows even in Linen Stitch Flat, ending with a right side row.
Repeat from ** once more, then work Buttonhole Rows 1 and 2 again (three total buttonholes made). AT THE SAME TIME, when armhole measures 3¾ (3½, 3½) inches from beginning of Back Left Shoulder, shape Back Left Armhole as follows:
Increase Row (right side): K1fbf, *slip 1 wyif, k1, repeat from * to end. [2 stitches increased]
Continue in Linen Stitch Flat, while working an Increase Row every 4th row one (2, 3) more time(s) and while incorporating the new stitches into the pattern. [35 (39, 43) stitches]
Beginning and ending with a wrong side row, work 3 rows in Linen Stitch Flat.

Join Left and Right Backs

Next Row (right side): Knit to last 7 stitches of Left Back. With right side facing you, hold spare needle with 35 (39, 43) Right Back stitches behind last 7 stitches of Left Back. [K 1 stitch from Left Back together with 1 stitch from Right Back] 7 times, knit to end of Right Back stitches. [63 (71, 79) stitches]
Slip on-hold 63 (71, 79) Front stitches from waste yarn to spare needle.
Place marker for beginning of round, and with the Front’s right side facing you, join to Back by continuing with yarn attached to Back and knitting across 63 (71, 79) Front stitches, place marker for side, knit to end.
Skirt
Increase Round: [K1, m1r, knit to 1 stitch before next marker, m1l, k1, slip marker] 2 times. [4 stitches increased]
Next Round: Knit.
Repeat the last 2 rounds three more times, removing side marker on the last round. [142 (158, 174) stitches: 71 (79, 87) stitches for each Front and Back]
Continue in stockinette stitch, knitting every round, until piece measures 8 (10½, 11½) inches from Front and Backs join
Next Round: K2tog, knit to end. [141 (157, 173) stitches]
Work Linen Stitch in the Round (see Notes) for ½ inch.
Bind off all stitches.
Finish
Armhole Edgings

With right side of armhole facing and beginning at center of underarm, pick up 2 stitches using working yarn, *pass the second stitch on right needle over the first stitch, pick up 1 more stitch, repeat from * until you return to the center of underarm.
Repeat for other armhole.
Back and Neck Edging
With right side of Left Back facing you and beginning where Left and Right Backs were joined, work Back and Neck Edging as for Armhole Edging, working first up Left Back edge, then around Neck opening, and then down Right Back edge, ending where Backs were joined.
Last Touches
Sew on a button opposite each buttonhole. Weave in ends and block as desired.


ADORABLE! Love the homespun look and super simple design/pattern!
Ahhh this is perfect! Just yesterday a close friend requested something knit for her new boss’s soon to arrive twin baby girls. Now to pick a color! I love love love your color choice, but think I’ll go with something “pinker” from what I know of the recipient. Can’t wait to try this yarn and the pattern looks simple but fun. Thanks!
So sweet! Thank you.
OH MY SWEET LORD! This little dress is DARLING… a snap to knit, and I know exactly the little girls to knit them for.
Love the Linen Stitch details. Hmmm… I want one, too!
Thank you for this sweet pattern and perfect timing on its arrival. Time to purchase yarn, lots of it!
MJ, the SKEINdinavian
Any suggestions on how this could be enlarged to fit a size 2 Toddler? I love it, but my little granddaughter is 22 mos.! Thanks!
Hi Val, Maggie, Maria, Marge, Christine & Janine,
We regrettably don’t have this pattern available in sizes other than those we list here, but your interest for more sizes is very helpful to us in planning items going forward, and we greatly appreciate your writing in!
Kristy
I, too, love this sweater and yarn! I would do it in a heartbeat if I could do a size toddler 3/4.
I would also like to knit this dress in sizes 2-4! Sounds like a fun pattern.
Hi Pam,
Unfortunately we do not offer sizes 2-4 for this pattern, but we do appreciate the request and will keep it in mind for future projects like this. Thank you!
-Adam
I would like to make the Clean and Simple baby dress in a preemie size for our nicu unit. Can you advise on alternate sizing and adjustments. Thank you ! Love the yarn!
Love the little dress and colors of the yarn. My question concerns whether the yarn quickly fades or not. Have used other yarns which have faded and looked used very quickly. Follow your site regularly. Thanks for reading my question.
Hi Sharon,
Thanks for writing! We haven’t noticed any issues of the Cotton Pure colors fading very quickly. Projects can be laundered in a washing machine and we recommend washing with cold water and drying on the low cycle — nothing too hot. I hope this that helps and we welcome any further questions you may have!
Kristy
could I do this for my 3 yo grand by adding two stitches up to 19 for her age and transpose the same for the rest?
Maria
please see above regarding how to make it for a 3 yo.
thank you,
Maria
Can you give direction to size this for a preemie? I love the yarn and pattern, just perfect!
Such a sweet patter! Could you please clarify if the slipped stitch is knit- or purlwise? Thank you!
Hi Melissa,
The stitches can be slipped purlwise! Thanks for writing in and we’ll be adding a note to pattern!
Kristy
I can never leave well enough alone. Does it really need to be buttoned? Can it be slipped over the head, if you knit the back and front the same? Trying to simplify!
Hi Barbara,
The buttons are usually a good idea to make sure that the dress will fit over the baby’s head. Without them, the opening many not be big enough! I hope this helps — thanks for writing in!
Kristy
Any chance of purl soho drafting a pattern for young girls also. I’m sure they too would love this simple, classy dress.
A lovely simple dress pattern. Perfect for a gift. Thank you for making it available.
Cette petite robe comme les autres modèles de crochet ou de tricot sont magnifiques, mais je ne comprends pas du tout les explications en anglais.
Quelle frustration !
Any chance of getting this pattern in a 2T or 3T size?
Hello. The two stitch increase at the yoke – this seems to leave a very lumpy bobble! Is this correct??
Hi Ciara,
The increases used to shape the Front and Back are noticeable but they shouldn’t be in the bobble realm. If you scroll down in the pattern, the first image under “Right Front Neck,” provides of useful image of how they should work up if that helps! The increases are not as subtle in Linen Stitch as they can be with other stitch patterns but things should become much smoother after you work the edgings. I hope this helps and please let us know if you have any further questions! Good luck!
Kristy
Thank you! Almost there now…
This is a beautiful little dress. Like the others I would love a larger pattern, but this one will do just fine at the moment.
I started writing this to ask for instructions on the cable cast on; then I checked your website and found a very good description. Perhaps this should be added to the pattern for those of us who maybe don’t know this method.
Sarah
Hi Sarah,
Thanks for writing in and for your helpful suggestion. We’ve now added a link to our cable cast on tutorial in the pattern. Best of luck with the dress and thanks again!
Kristy
Sooooo cute! Like others, larger sizes, please. Maybe a top for us ladies?
Hi there
Lovely pattern!
I’m knitting the linen stitch front yoke and notice it says to knit 3 3/4″ (for size 0-6m) but then knit only 3 1/2″ for the other two larger sizes. Is this correct?
Thanks for your help!
Hi Stephanie,
Thanks for writing! That’s correct! For the Front Yoke, you’ll work even in Linen Stitch Flat until the piece measures 3 3/4 (3 1/2, 3 1/2) inches from cast-on edges. Please let us know if you have any further questions along the way!
Kristy
Hello!
Which cast on edge do you measure from? The top of the shoulders or the front neck cable cast on edge?? Thank you!!
Hi Catie,
You’ll measure from the top of the shoulders (and not the front neck cable cast-on edge). I hope this helps clarify! Please let us know if you have any further questions!
Kristy
Thank you for your speedy reply, Kristy!!
Gladly, Catie! Best of luck with the dress!
I recommend adding a clarifying note on where to measure from! I knitted the front and half the back. When I got to the button holes I realized I measured from the lower neck cable cast-on edge and had to tear out the other pieces 🙁 I should have read through the comments before starting the project! Love the project and the yarn.
Hello Michelle,
Thank you for your helpful feedback! I’m so happy to hear how much you love the project and yarn, but sorry to hear you had to rip back – always frustrating! I will pass along your suggestion.
Happy Knitting!
-Marilla
By “cast-on edges” do you mean the original cast-on for the shoulders or the cable cast-on?
Thank you!
Hi Katie,
Thanks for writing in! Please measure from the original cast ons at the shoulders. Thanks!
-Adam
I’ve completed the entire front and back yoke of this little dress, but the buttonholes have proved to be my nemesis They don’t lie flat, the stitches surrounding the buttonhole increase row are lumpy, and the entire back left yoke is about 1/8 longer than the back right. Any suggestions for flat buttonholes in this linen stitch?
Also, in your photo of completed front, the area below yoke is much deeper than actually occurs. In my knitting, it measures 2 1/4 inches at the front yoke increase. So if you ask for 3 1/2 inches to armhole shaping, the area below the yoke is only 1 1/4 inches. In your photo, it looks to be about 4 inches.
Hi Janet,
Thanks for writing and very sorry to hear that the buttonholes for the dress have been giving you trouble! Although I didn’t experience the lumpiness you describe, it may be an issue easily fixed in blocking. When the piece is finished and you’re able to block it (either by lightly steaming it or getting it completely wet and laying it flat to dry), often your stitches will smooth out considerably. Linen Stitch itself can have a more homespun, rougher look, but blocking should definitely help to smooth things out!
The length of completed yoke should be 4 1/2 (4 3/4, 5) inches for sizes 0-6 (6-12, 12-18) months — best illustrated in our schematic if that helps. The sample we made is 0-6 months, so the complete length of the yoke for the sample is 4 1/2 inches. I hope this helps clarify and please do let know if you have any further questions — we’re here to help!
Thanks,
Kristy
Using the pictures as my guide, I went 3 and 1/2 inches from the cable cast on, rather than the left and right side cast ons. But this was not clear in the written directions.
Love, love, love this sweet pattern!
Ugh … I just did the same and have to rip out . NOT clear at all in the directions. Sorry I have to wade through many comments to find this out!
Hi Martha,
We’re so sorry to hear that you had to rip out a portion of your knitting! We took another look over the pattern instructions and agree that they could be more clear at this spot. We’ve gone ahead and updated them to directly specify that you’ll need to measure from the shoulder cast-on edges. Thank you again for bringing this to our attention, and please don’t hesitate to reach out to us in the future if you have any other questions, or if you’d like help with any of our patterns. We’re always happy to provide assistance!
All the best,
Lili
Thank you!!
adorable! just what I needed and when I need it ! Thanks for being an angel 😉
bonjour
Pourrait- on avoir les explications en français ?
merci
Hi Dore,
Thanks for writing in! Sadly, we do not have the ability to help in a language other than English.
Best,
Cassy
In need of some clarification on the front yolk part of the pattern… I saw in the comments that you’re supposed to measure from the shoulder cast on, but in your photo it looks like the armhole increases start 3 3/4″ from the center cable cast on… (I have two little ones under 2 and any minute I get to spend knitting is a real gift, would hate to have to frog this!)
For some clarification, I’m making the 6-12 months size, am already on the second round of armhole increases and there is only 1.5″ of knitted linen stitch pattern underneath my cable cast on… So different then in the photo.
Hi Francesca,
Thanks for writing! For the 6-12 month size, you’ll measure 3 1/2” from the shoulder cast on (and not from the neck cast on). The underarm increases then take 12 rows or 1 1/4” to complete, making the total length of the armhole (for the 6-12 month size) 4 3/4”. Have you been able to match the pattern’s row gauge? Please let us know if this helps clarify, and if not we’ll find another way to figure out what might be going on!
Best,
Kristy
I’m ready to do the edging for the armholes and neck and was wanting to clarify … I pick up but don’t knit those edge stitches before passing the first over the second stitch? And what do I do with the final stitch?
Hi Lou Ann,
That’s absolutely right, you’ll work the edging by picking up 2 stitches, and then passing the second stitch on right needle over the first stitch, then picking up 1 more stitch and repeating the process to the end. You’ll then cut the yarn and simply pull the end through the final stitch to finish. I hope this helps clarify! Please let us know if you have any further questions and thanks for writing with this one!
Kristy
I’m sorry to be so confused … I can pick up the stitches and pass them over without attaching any new yarn since I don’t need to knit the picked up stitches so … which yarn do I cut at the end to pull through the final stitch?
Hi Lou Ann,
In working the edging, when you get to the final stitch, you will cut the yarn that you have been using to pick up the stitches, and will pull the end of that yarn through the final stitch. Please let us know if this helps clarify! Thanks for writing!
Kristy
There is no yarn being used to pick up stitches, so how will there be a yarn to cut? So confused, Jessica
Hi there,
Thanks for your question. When picking up stitches you are using yarn to knit into a selvedge or a top edge, etc. Please click here for a tutorial. Let me know if you are still confused and I’d be glad to clear anything up!
-Adam
Thank you. I was also quite confused the tutorial helped!!
I am finding the skirt instructions baffling. Some thoughts:
1. You might add to the instructions to make sure not to twist the knitting when joining the front and backs. It’s easy to inadvertently twist them, if you don’t know to look out for that.
2. The complete joining in the round is never stated. so to be clear: under SKIRT, where you ask for Increase round (K1, m1r etc) are we simultaneously joining in the round?
3. The increase round (singular) instructs two increases (m1r and m1l) then says 4 stitches increased. Is this two rows? Then you write Next Round: Knit. Then your write repeat the last 2 rounds three more times. Two rounds or Three rounds? It’s unclear.
Thanks for your help.
Hi Janet,
Thanks for taking the time to write and for your comments. The instructions for joining in the round can be found just above the “Skirt” heading in the pattern. You’ll place a marker for the beginning of the round, and with the Front’s right side facing you, will join your work to the Back by continuing with the yarn attached to the Back and knitting across the Front stitches. You’ll then place another marker for the side and will knit to the end.
For the following increase round under the “Skirt” heading, you’ll repeat the instructions provided in the brackets twice. Sometimes it’s easy to read and think that it’s only once, but it will be twice. So it’s [K1, m1r, knit to 1 stitch before next marker, m1l, k1, slip marker] 2 times, which will be 4 stitches increased.
I hope this helps clarify! We’re here to help, so please let us know if you have any further questions and best of luck with the dress!
Kristy
Sorry-I’m so stuck on the Skirt section. The very first instruction under “Increase round:” is my trouble. So I know I have to do this twice however how can you do it twice in one round? If I m1r at the first market then I m1l at the next, then I have only done half the round. At that point do I knit to the next marker and then start all over again? Isn’t that two rounds? I’m a bit lost-thanks for some clarity in this!
Hi Mercedes,
Thanks for writing in! I think that I can clarify. You can complete the repeat twice in one round. I think that it helps to write out the whole row. I am bolding the 2 markers to help make them more evident.
You will k1, m1r, knit to 1 stitch before next marker, m1l, k1, slip marker and then k1, m1r, knit to 1 stitch before next marker, m1l, k1, slip marker (this marker is the beginning of the row marker).
I hope that this clears things up!
Cassy
Thanks so much! Totally makes more sense now!
When we do our gauge swatch, should we block it to the dimension specified? Or is the recommended gauge for unblocked knitting?
Hi Jill,
Although we did not notice a difference between the dress’s pre and post blocked measurements (i.e. our gauge didn’t change), you could definitely block your swatch and work from those measurements just to be sure. Good luck with the dress and please let us know if you have any further questions along the way!
Kristy
I need clarification on the following instruction:
“Work even in Linen Stitch Flat until piece measures 3 3/4 (3 1/2, 3 1/2) inches from cast-on edges, ending with a wrong side row.”
Do I measure beginning with the initial cast-on’s or does my measurement begin with the cable cast-on?
Hi Bonnye! Thanks for writing in – your measurements should be taken from the initial cast on. Great question!
Thank you!
Keith
I’m expecting a baby in October and I’d like to make this in time for her three-month celebration in January, when it will be very cold. If you had to choose a wool yarn, which would you choose that would be most like the Cotton Pure, keeping in mind that it is for a small infant?
Thank you!
Su
Hi Su,
Congratulations! How very exciting! Our Cotton Pure is roughly sport weight yarn. Mulberry Merino would make an excellent substitution and it is quite a bit warmer than cotton. If a washable wool is what you are after, Anzula Cricket would also make a great substitution. Just be sure to check the yardages that you will need as all three of these yarns have slightly different amounts per skein.
Happy knitting!
Cassy
Hi, I love this dress and am starting to finish the armhole edges. When I get around to the end how will I fasten the last stitch ? Please help.
Thank you, Jessica
Hi Jessica,
I’m glad you love the dress! Like any bind off you will cut the yarn and then pull it through the last loop. This end will get woven in and won’t be visible from the outside. I hope this helps!
-Adam
I also have a question about binding off. I did add a final round of knit stitches as suggested. Now do I bind off knit-wise or purl-wise? Thanks for your advice.
Hi Angela,
Thanks for writing in! The hem is bound off knitwise!
I hope that this helps!
Cassy
Lovely pattern! Quick question. I am on the Back Left:
Repeat from ** once more, then work Buttonhole Rows 1 and 2 again (three total buttonholes made). AT THE SAME TIME, when armhole measures 3 3/4 (3 1/2, 3 1/2) inches from beginning of Back Left Shoulder, shape Back Left Armhole as follows…
My confusion is here:
When it says to repeat from ** once more, then work Buttonhole Rows 1 and 2…
the ** is at the beginning of the Buttonhole row, so am I just supposed to repeat the two Buttonhole rows or am I supposed to do a row before that? and if so, which row?
Sorry for the confusion! The other question I have is, I was reading the directions much too fast when working this up and I did not pick up and knit so as to combine the shoulder seams together so right now all my pieces are seperate. Do you have any recommendations for which stitch to use to sew them together (ie mattress stitch, back stitch?) or does it not really matter?
Thank you for your help!!
Katie
Hi Katie,
Thanks for your questions! Please note that you complete 8 rows of linen stitch in between the buttonhole rows. So, this would mean that you do the buttonhole rows, then 8 rows of linen stitch and then repeat the process, ending on your 8th row of linen stitch. Next you’ll do the two buttonhole rows again, making your third buttonhole. This is all happening while you are increasing for your armhole.
In terms of closing up your shoulder seams, I would do a mattress stitch for this area. Mattress stitch is my go-to for all seaming. It’s very clean!
Best of luck and happy knitting!
-Adam
Thanks so much for your help!
My question is when starting the right front neck do I begin with the increase row or is it just there to show us what the increase row is? It seems to throw off the right and wrong side of the fabric. Thanks!!
Hi Caryn,
Thanks for writing in! After knitting the 8 rows Linen Stitch Flat, ending with a wrong side row, you will start on the right front neck with the increase row as a right side row. This should make an even right and wrong side.
I hope that this helps and happy knitting!
Cassy
Thanks so much for such a quick and helpful response!
Hi! Congratulations on your pattern, it´s lovely. But please i need some help!! I´m having trouble with joining right before the Skirt part. It should be joined by both sides? I don`t have very clear if after placing the second marker I should purl or knit because the yarn is in the purl side, so i dont know hoy to join the second part. Please help!
Hi Antonella,
Thanks for the kind words! The last 7 stitches of the left back will be joined to the first 7 stitches of the right back by knitting together the left back and right back stitches. This creates the placket. When joining the front, it doesn’t matter where your yarn is because you are just sliding the on hold stitches on to your working circular needle. Just make sure that when joining the front you are knitting the right side as it faces you. I hope this helps! Let me know if you have any other questions!
All the best,
Adam
Hi Adam,
To follow-up on that question, do we just knit stitches or knit in pattern when joining?
Thanks!
Shu
Hi Sarah,
Thanks for writing us! You will just knit for the skirt portion upon joining in the round. The skirt is in stockinette, so no need to do the linen stitch.
All the best,
Adam
Hello,
I’m kind of confused with how to proceed with making the buttonholes identified in the pattern.
First row is purl 4 stitches, then pass second stitch on right needle over first.
Are we picking second stitch on the left needle over the right as if to bind off, then purl that same stitch? Thank you!
**Buttonhole Row 1 (wrong side): P4, pass second stitch on right needle over first stitch, p1, pass second stitch on right needle over first stitch, *p1, slip 1 wyib, repeat from * to last 2 stitches, p2. [2 stitches bound off]
Buttonhole Row 2 (right side): Work in pattern to buttonhole gap (2 stitches remain in row), turn so wrong side of work is facing you, cable cast on 2 stitches, turn so right side is facing you, slip 1 wyif, k1. [2 stitches cast on]
Hi Sarah,
Thanks for writing in! Hopefully I can clear this up for you. You are binding off on the wrong side as a normal bind off. You will pass the second stitch on the right needle over the first, p1 and then pass the second stitch on the right needle over the first. All of this takes place on the right-hand needle. I hope this helps!
All the best,
Adam
Thank you for the lovely pattern! I have just completed the linen stitch in the round and the dress is seriously curling at the bottom. Is this normal? Did you have to press it?
Hello, Holly!
Thank you for writing in! Have you blocked the dress? Blocking the dress will help relax much of the curling you are experiencing. Please let us know if you have further questions!
Best wishes,
Kumeko
I agree with Janet (August 13, 2016) the skirt instructions are indeed baffling.
I understand how to join left back to the right back.
After knitting to the end of the right back I placed a marker and then knitted the 79 stitches from the front and placed second marker.
What do you mean by “knit to end” ?
Where is the end?
Do you mean knit across the back again to the first marker?
Also in the Increase Round after knitting to 1 stitch before marker do you make one right (m1r) and then immediately make one left (m1l) therefore 2 stitches increased before knitting to next marker?
Do hope you can understand this and help!
Thank you.
Hi Elizabeth,
Hopefully I can clear this up for you! After replacing the 79 front stitches on to a spare needle, you’ll be joining in the round by knitting these stitches. From here on out you are knitting in the round. Your beginning of round marker is placed right before your front stitches and when it says knit to end, you’ll be knitting to this marker. As for the increases, there are four stitches increased per round (two on the front section, two on the back). The increases happen on either side of the markers so the skirt can flare out in a bell shape. I hope this helps! Feel free to write back if you still have questions!
-Adam
Could you please give the increase row in detail e.g. are you starting the increase row at the side of the dress?
Then is it K1, m1r, then m1l and then knit to the second marker?
Are there two increases together?
Please help me.
Thanks
Hi Elizabeth,
Thanks for writing us. The increase round goes as follows: k1, m1R, k to 1 stitch before marker, m1L, k1, sm, k1, m1R, k to 1 stitch before marker, m1L. You’ll be at the beginning of the round after completing all of this. The increases happen on either side of the markers with one stitch in between the increases. Thanks!
-Adam
Many thanks, Adam.
Am up to the final bind off of stitches. Do I bind off with knit stitches?
Thank you.
Hi Elizabeth,
The pattern states to continue in linen stitch and then bind off, but it’s my opinion that linen stitch looks better when you do a round of knit before the bind off. This leaves a very nice even looking bind off edge. Best of luck!
-Adam
This is really good advice that I think should be added to the pattern. I knitted this dress last year and read this comment and my dress had a lovely neat edge. This time round I didn’t read through the comments so missed this advice (and had sadly forgotten) so my lovely dress has a ‘loopy’ bind off from the linen stitch in the round. I couldn’t figure out why until I re-read this advice. PLEASE edit pattern to add this as it made such a difference.
Hello,
Thank you for writing and sharing your experience! I will certainly pass along your insightful suggestion and Happy knitting!
-Marilla
Do you know how one could divide up the necessary yarn for skirt vs top? I have two colors I would like to use.
Hi Lisa,
Thank you for writing us. I can’t give you an exact answer but I would guess that the top portion takes a little less than half because linen stitch takes up more yarn than stockinette.
-Adam
Hello! I absolutely love this pattern. I am relatively new to knitting. I started about 6 months ago, but have done quite a bit. Is this pattern something that an advanced beginner or newly intermediate would be able to handle? I have a friend who is due in may and I would love to make this for her!
Hi Karley,
Thanks for the question. It’s hard to say without knowing exactly what you’ve done in the past. This pattern is relatively simple if you are comfortable with increasing and minor seaming. The most difficult part of this pattern is joining the right and left back pieces to form the placket. I’d read through the pattern and see if you can understand most of what’s going on before starting. I always support trying a pattern with techniques you don’t know. It’s the only way you’ll learn. I hope you’ll give it a shot!
-Adam
On the right front neck do I do an increase row then 4 rows of linen stitch then another increase row? Or three rows of linen stitch and then an increase row? Also when it says slip one is this knitwise? or purlwise?
Hi Karley,
Thanks for writing us! You’ll want to work three rows of linen stitch and then on the fourth row you do the increase. When doing linen stitch all slipped stitches are slipped purlwise. I hope this helps!
-Adam
Love the little dress! I’ve just finished and am about to finish the edges. Are you picking up two existing stitches and passing the first over the second without additional yarn, or are you picking up stitches by knitting into existing stitches and then passing the first stitch over the second. Seems like a silly question but asking first may save me a rip. Thanks!
Hi Maja,
Thanks for writing in! Congratulations on almost finishing this lovely dress! For the edging, you will be using new yarn to pick up the stitches along the edges but you will not be knitting those new stitches.
I hope that this clears things up!
Cassy
When starting the left front shoulder I’m struggling with which needle to cast onto so that the right sides line up when I join them later. Any tips on sorting this out?
Hi Rebecca,
Thanks for writing in to us. You can cast on to the right hand needle right after your cable cast on. It might be helpful to add a removable marker to the right side of each shoulder so you know you are on track. Hope this helps!
-Adam
Hello,
Can you help to clarify the button holes and explain the process for me… I am going to Purl 4 first? This doesn’t make sense when you have 4 stitches on the right needles after purling…
**Buttonhole Row 1 (wrong side): P4, pass second stitch on right needle over first stitch, p1, pass second stitch on right needle over first stitch, *p1, slip 1 wyib, repeat from * to last 2 stitches, p2. [2 stitches bound off]
Buttonhole Row 2 (right side): Work in pattern to buttonhole gap (2 stitches remain in row), turn so wrong side of work is facing you, cable cast on 2 stitches, turn so right side is facing you, slip 1 wyif, k1. [2 stitches cast on]
Thanks for your help.
Dana
Hi Dana,
Thanks for writing in! I think that I can help clarify and I see where the confusion may be. You will purl the first 4 stitches of the row. Then you will pass the 3rd stitch that you knit over the 4th stitch that you knit. The directions are written as if you are looking at the last stitch that you knit as the first stitch on your needle as it is the first stitch available to you to work with.
I hope that this helps clarify things!
Cassy
Hello,
For the button row 2, it says to work in pattern to buttonhole gap with 2 stitches remain. What pattern are you referring to? You mean linen stitch flat row 1 ( right side)? Thanks in advance!
Tina
Hi Tina,
Great question! You are correct, you will be working Linen Stitch Flat Row 1 for this row. Whenever you a knitting pattern indicates to “work in pattern,” it means to continue working the same stitch pattern you would normally while performing another action – in this case, working a buttonhole!
Best of luck and happy knitting!
Julianna
At the right front neck I have to cable cast on 25 stitches [40(42.44)] so for size 12 to 18 months increase 44 stitches ? Now I have 2 times 19 stitches for the shoulders and 44 makes 82 stitches! Thats not an odd number, can you explane please.
Hi Ellen,
Thanks for writing in! When you finish the right front neck for the 12-18 month size, you will have 44 stitches on the needle. You will then move onto the left front neck and end up with 19 stitches for that piece. When you join them, you will be knitting across the 44 stitches from the right front and the 19 stitches from the left front for a total of 63 stitches all together.
I hope that this helps clear things up!
Cassy
Adorable dress! I just finished knitting it up but am having a lot of trouble with the edging details. The linen stitch is pretty tight, I’m not sure which stitches I’m supposed to be picking up? I can’t tell from the image. I’ve tried several times but I just can’t get enough slack to cross a stitch over. Also, what happens when you get back to the center to keep the whole edging from unraveling? Am I supposed to be tying something off? Thanks,
Hi Jane,
Thanks for writing us! I’m glad you like the dress. Please refer to our tutorial on picking up stitches to make sure you are doing it correctly. Since you are picking up and binding off for this pattern you should be able to control however much slack you need to bind off. Hope this helps!
Adam
Hi,
Love this pattern. Quick question though. When I am knitting the front yoke, do I measure from 3 3/4″ from the neck edge or shoulder edges. The pattern doesn’t specify accept to say measure from cast on edges and I have 3 cast on edges.
Thanks for the help!
Hello Sarah,
Thanks for reaching out. I’m happy you are enjoying this pattern! The “cast on edges” is in reference to the cast on shoulder edges. I hope this helps. Let us know if you have anymore questions.
Warmly,
Marilla
I knitted this dress in cotton in the largest size. Although it was very easy to knit and looked lovely on a coat hanger – exactly as the Purl Soho picture, it looked a bit strange on the child I knitted it for. The increases from under the arms where the bodice finishes aren’t gradual enough. If I knitted it again – which I won’t as the cotton makes a rather heavy summer garment, certainly for a New Zealand summer – I’d change the shaping.
Hi Fiona,
Thank you for writing us, your feedback is so valuable. I will be sure to pass this information along!
warmly,
Marilla
I have tried to start this pattern a dozen times and have issues each time. I cast on 11 stitches and knit 8 rows linen stitch, but my increase and cable cast on ends up on the opposite side than is shown in the first picture. Help!
Hello Jennifer,
Thanks for writing in! For the right front shoulder as long as your increases and cable cast on are at the end of your right side row you are correct.
Please let me know if you have any more questions!
-Marilla
I’m starting the back right shoulder, and I’m having trouble identifying the stitches from the cast on edge to pick up. What should I be looking for? I watched your tutorial, but the videos didn’t seem applicable for this type of stitch.
Hi Aimee,
Thanks for writing us. You’ll want to insert your needle into the stitch below the cast on ridge. In the picture in the pattern this is the first row below the cast on that has “knit V’s” and “purl bumps”. I hope this helps!
Adam
Is there a difference between the total number of rows for the back right shoulder and the left back shoulders. I count 42 rows for the right one and 48 rows for the left one.
Hello Marie,
Thanks for reaching out! Are you including the rows in the “Back Left/Right Neck and Back Left/Right Armhole” sections in your row count? Both the “Back Left Shoulder” and the “Back Right Shoulder” have 7 rows in Linen Stitch. Your left side and right side should measure the same so that the buttons line up correctly. I hope this is helpful and please let me know if you have any further questions.
Warmly,
Marilla
Is the finishing basically just a crocheted edge done with knitting needles? Any reason to not just do a half crochet instead?
Hello Shayna,
For the finishing edge on the dress, if you wanted to substitute it for a crochet edge you could do a a crochet slip stitch and you would get a similar effect.
Have a great weekend,
Melissa
Thanks!
Hi Shayna,
I am glad I could help.
Melissa