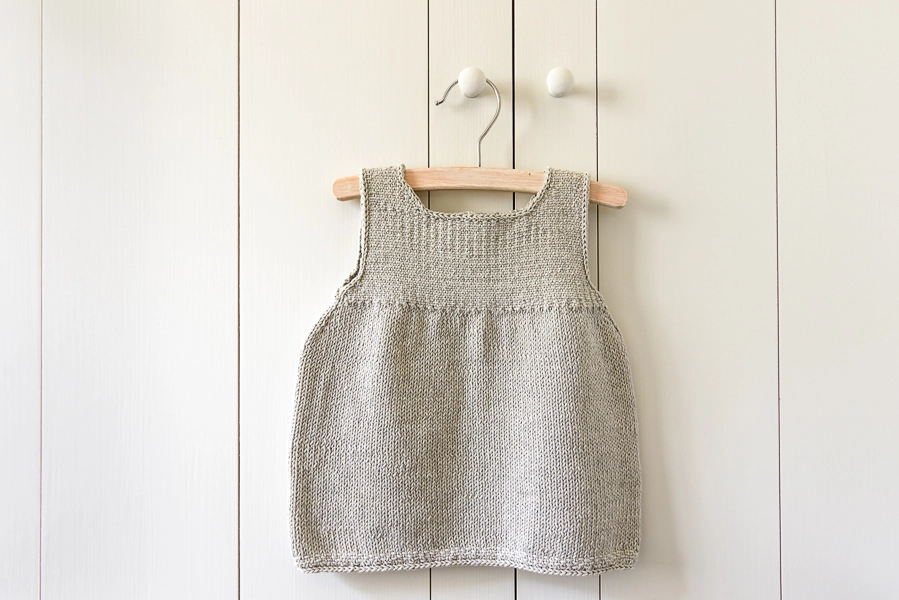


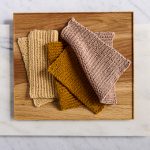
Clean + Simple Baby Dress
Few things prompt knitters into action more than the arrival of a new baby. The opportunity to express our love and excitement with something that we’ve made by hand is just too tempting!

Equally tempting is our newest yarn, our soft and supple Cotton Pure. One hundred percent cotton in an impressive array of 43 inspiring colors, I knew that it was time to think babies!

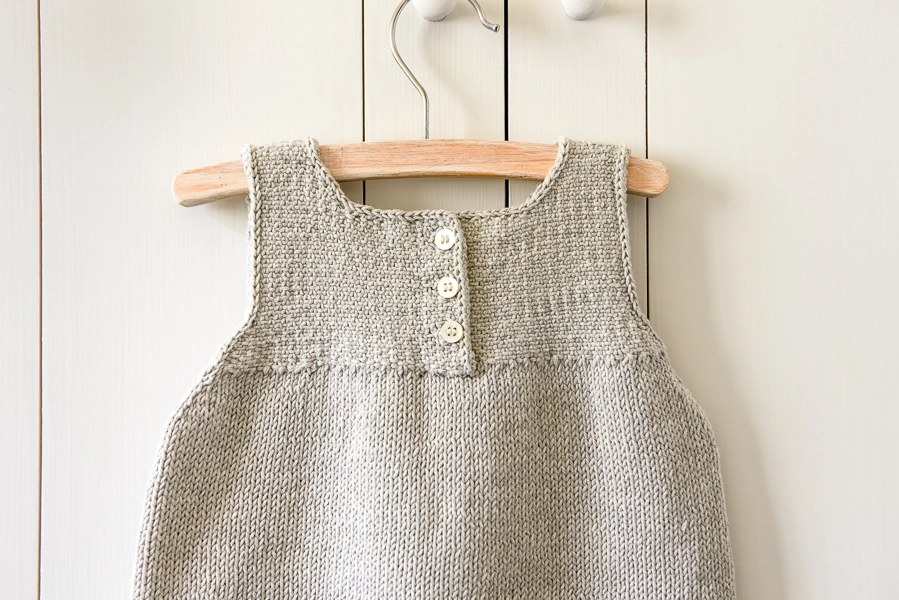
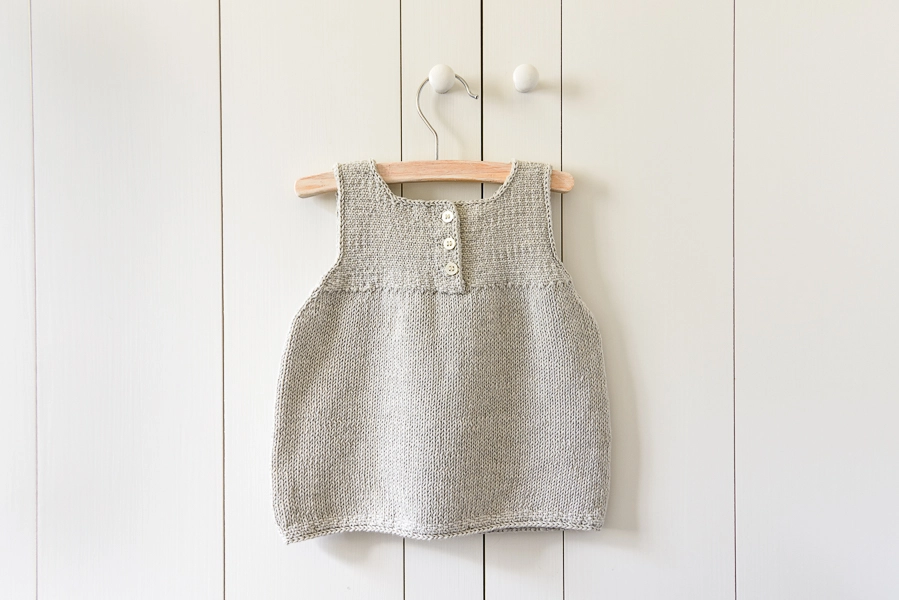
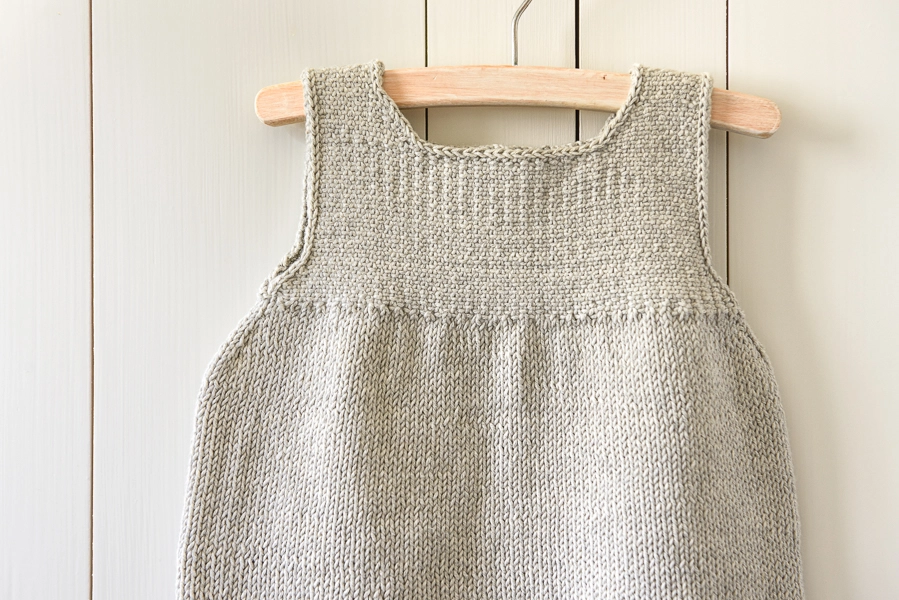
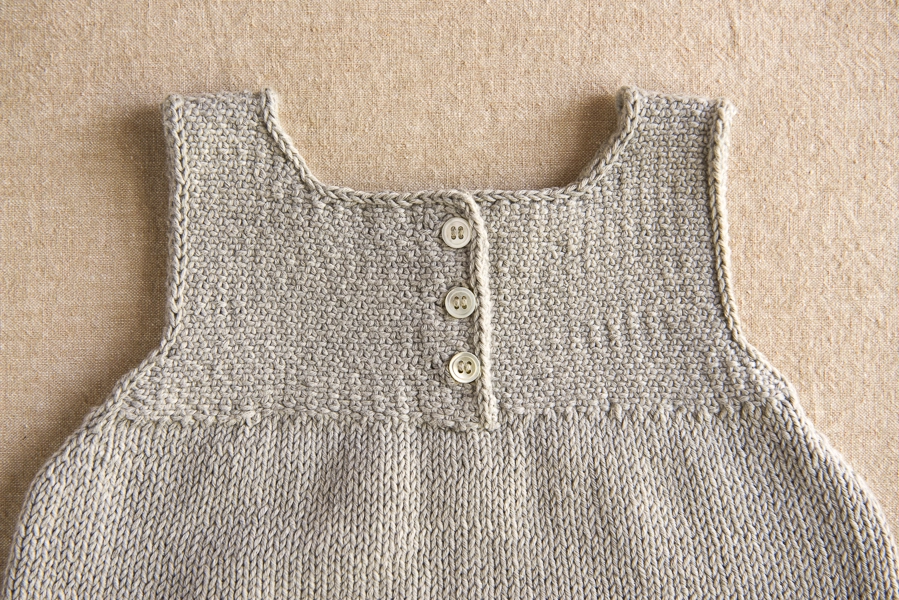
Using the homespun, woven look of Linen Stitch to craft the bodice, I designed our Clean + Simple Baby Dress with ease and comfort in mind. Constructed from the top down, this Dress knits up with little fuss, including a long stretch of satisfying stockinette for the skirt. It also opens in the back with three of Purl Soho’s delicate mother-of-pearl buttons, the perfect finishing touch!

Soft, cozy, and a breeze to launder, our Clean + Simple Baby dress is truly just that! -Kristy
Designed by Purl Soho designer, Kristina McGowan. Click here to see even more of Kristina’s designs!
Share your progress and connect with the community by tagging your pics with #PurlSoho, #PurlSohoBusyHands, #PurlSohoCleanAndSimpleBabyDress, and #PurlSohoCottonPure. We can’t wait to see what you make!
Materials

- 1 (2, 2) skein(s) of Purl Soho’s Cotton Pure, 100% organic cotton. Each skein is 279 yards/ 100 grams; approximately 279 (400, 445) yards required. We used the color Freshwater Pearl.
- US 5 (3.75 mm), 24-inch circular needles
- US 5, spare circular needles, any length
- 2 different-color stitch markers
- Three 3/8-inch buttons. We used 4 Hole Ecru Small Mother of Pearl buttons
Note: For our size 0-6 month sample, we used almost all of 1 skein, so if you want to be sure you have enough, consider ordering an extra skein. If you don’t end up needing it, you can return unwound yarn for a refund within 30 days of purchase, or within 6 months, for store credit. Our Return Policy has all the details!
Gauge
24 stitches and 28 rows = 4 inches in stockinette stitch
28 stitches and 40 rows = 4 inches in Linen Stitch
Sizes
0-6 (6-12, 12-18) months
- Finished Chest Circumference: 18 (20 ¼, 22 ½) inches
- Finished Length from Bottom Edge to Underarm: 8 ½ (11, 12) inches
- Finished Length from Bottom Edge to Shoulder: 13 (15 ¾, 17) inches

SAMPLE: Size 0-6 months is pictured here.
Notes
Linen Stitch Flat
Worked over an odd number of stitches…
Row 1 (right side): *K1, slip 1 (purlwise) with yarn in front (wyif), repeat from * to last stitch, k1.
Row 2 (wrong side): P1, *p1, slip 1 (purlwise) with yarn in back (wyib), repeat from * to last 2 stitches, p2.
Repeat Rows 1 and 2 for pattern.
Linen Stitch in the Round
Worked over an odd number of stitches…
Round 1: *K1, slip 1 with yarn in front (wyif), repeat from * to last stitch, k1.
Round 2: *Slip 1 wyif, k1, repeat from * to last stitch, slip 1 wyif.
Repeat Rounds 1 and 2 for pattern.
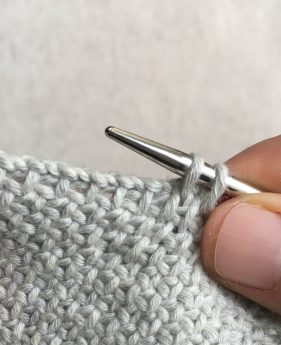
K1fbf (Knit one front, back, and front): Knit into the front of the stitch, but do not take the stitch off the left needle; knit into the back of the same stitch, still without taking the stitch off the left needle; then knit into the front of the same stitch and take it off the left needle. [2 stitches increased]
Pattern
Front
Right Front Shoulder
Cast 11 (11, 13) stitches onto 24-inch circular needles. We used a basic Long Tail Cast On.
Do not join to work in the round. Work 8 rows in Linen Stitch Flat (see Notes), ending with a wrong side row.
Right Front Neck
Increase Row (right side): *K1, slip 1 wyif, repeat from * to last stitch, k1fbf (see Notes). [2 stitches increased]
Continue in Linen Stitch Flat, while working an Increase Row every 4th row one (2, 2) more time(s) and while incorporating the new stitches into the pattern. [15 (17, 19) stitches]
Beginning and ending with a wrong side row, work 3 rows even in Linen Stitch Flat.
Next Row (right side): Work in Linen Stitch Flat to end, turn the work so the wrong side is facing you, cable cast on 25 stitches. [40 (42, 44) stitches]
Cut yarn.
Left Front Shoulder
With wrong side still facing you and Right Front Shoulder stitches on left needle, cast 11 (11, 13) stitches onto right side of same needles.
Slide Right Front Shoulder stitches off left needles and onto the cable. Turn work.
Note: As you work the Left Shoulder, the Right Shoulder stitches will cohabitate on the cable of the circular needles. Just ignore those stitches for now!
Work 8 rows in Linen Stitch Flat, ending with a wrong side row.
Left Front Neck
Increase Row (right side): K1fbf, *slip 1 wyif, k1, repeat from * to end. [2 stitches increased]
Continue in Linen Stitch Flat, while working an Increase Row every 4th row one (2, 2) more time(s) and while incorporating the new stitches into the pattern. [15 (17, 19) stitches]
Beginning with a wrong side row, work 4 rows even in Linen Stitch Flat, ending with a right side row.
Do not cut yarn.
Front Yoke

Row 1 (wrong side): Work in Linen Stitch Flat across all stitches, thus joining the Left and Right Shoulders. [55 (59, 63) stitches]
Work even in Linen Stitch Flat until piece measures 3¾ (3½, 3½) inches from shoulder cast-on edges, ending with a wrong side row.
Shape Armholes
Increase Row (right side): K1fbf, *slip 1 wyif, k1, repeat from * to last 2 stitches, sl 1 wyif, k1fbf. [4 stitches increased]
Continue in Linen Stitch Flat, while working an Increase Row every 4th row one (2, 3) more time(s) and while incorporating the new stitches into the pattern. [63 (71, 79) stitches]
Beginning and ending with a wrong side row, work 3 rows even in Linen Stitch Flat.

Cut yarn and place stitches on a piece of scrap yarn.
Back Right
Back Right Shoulder

With 24-inch circular needles and right side of Front Right Shoulder facing you, pick up and knit 11 (11, 13) stitches from cast-on edge.
Beginning and ending with a wrong side row, work 7 rows in Linen Stitch Flat.
Back Right Neck
Increase Row (right side): K1fbf, *slip 1 wyif, k1, repeat from * to end. [2 stitches increased]
Continue in Linen Stitch Flat, while working an Increase Row every 4th row one (2, 2) more time(s) and while incorporating the new stitches into the pattern. [15 (17, 19) stitches]
Beginning and ending with a wrong side row, work 3 rows in Linen Stitch Flat.
Next Row (right side): Cable cast on 16 stitches, and then starting with the new stitches, *k1, slip 1 wyif, repeat from * to last stitch, k1. [31 (33, 35) stitches]
Work even in Linen Stitch Flat until piece measures 3¾ (3½, 3½) inches from beginning of Back Right Shoulder, ending with a wrong side row.
Back Right Armhole
Increase Row (right side): *K1, slip 1 wyif, repeat from * to last stitch, k1fbf. [2 stitches increased]
Continue in Linen Stitch Flat, while working an Increase Row every 4th row one (2, 3) more time(s) and while incorporating the new stitches into the pattern. [35 (39, 43) stitches]
Beginning and ending with a wrong side row, work 3 rows in Linen Stitch Flat.

Cut yarn and place stitches on spare needle.
Back Left
Back Left Shoulder
With 24-inch circular needles and right side of Front Left Shoulder facing you, pick up and knit 11 (11, 13) stitches from cast-on edge.
Beginning and ending with a wrong side row, work 7 rows in Linen Stitch Flat.
Back Left Neck and Back Left Armhole
Increase Row (right side): *K1, slip 1 wyif, repeat from * to last stitch, k1fbf. [2 stitches increased]
Continue in Linen Stitch Flat, while working an Increase Row every 4th row one (2, 2) more time(s) and while incorporating the new stitches into the pattern. [15 (17, 19) stitches]
Beginning and ending with a wrong side row, work 3 rows in Linen Stitch Flat.
Next Row (right side): Work Linen Stitch Flat to end, turn so wrong side is facing you, cable cast on 16 stitches. [31 (33, 35) stitches].
Beginning with a wrong side row, work even in Linen Stitch Flat for 4 (2, 4) rows, ending with a right side row.
**Buttonhole Row 1 (wrong side): P4, pass second stitch on right needle over first stitch, p1, pass second stitch on right needle over first stitch, *p1, slip 1 wyib, repeat from * to last 2 stitches, p2. [2 stitches bound off]
Buttonhole Row 2 (right side): Work in pattern to buttonhole gap (2 stitches remain in row), turn so wrong side of work is facing you, cable cast on 2 stitches, turn so right side is facing you, slip 1 wyif, k1. [2 stitches cast on]
Beginning with a wrong side row, work 8 rows even in Linen Stitch Flat, ending with a right side row.
Repeat from ** once more, then work Buttonhole Rows 1 and 2 again (three total buttonholes made). AT THE SAME TIME, when armhole measures 3¾ (3½, 3½) inches from beginning of Back Left Shoulder, shape Back Left Armhole as follows:
Increase Row (right side): K1fbf, *slip 1 wyif, k1, repeat from * to end. [2 stitches increased]
Continue in Linen Stitch Flat, while working an Increase Row every 4th row one (2, 3) more time(s) and while incorporating the new stitches into the pattern. [35 (39, 43) stitches]
Beginning and ending with a wrong side row, work 3 rows in Linen Stitch Flat.

Join Left and Right Backs

Next Row (right side): Knit to last 7 stitches of Left Back. With right side facing you, hold spare needle with 35 (39, 43) Right Back stitches behind last 7 stitches of Left Back. [K 1 stitch from Left Back together with 1 stitch from Right Back] 7 times, knit to end of Right Back stitches. [63 (71, 79) stitches]
Slip on-hold 63 (71, 79) Front stitches from waste yarn to spare needle.
Place marker for beginning of round, and with the Front’s right side facing you, join to Back by continuing with yarn attached to Back and knitting across 63 (71, 79) Front stitches, place marker for side, knit to end.
Skirt
Increase Round: [K1, m1r, knit to 1 stitch before next marker, m1l, k1, slip marker] 2 times. [4 stitches increased]
Next Round: Knit.
Repeat the last 2 rounds three more times, removing side marker on the last round. [142 (158, 174) stitches: 71 (79, 87) stitches for each Front and Back]
Continue in stockinette stitch, knitting every round, until piece measures 8 (10½, 11½) inches from Front and Backs join
Next Round: K2tog, knit to end. [141 (157, 173) stitches]
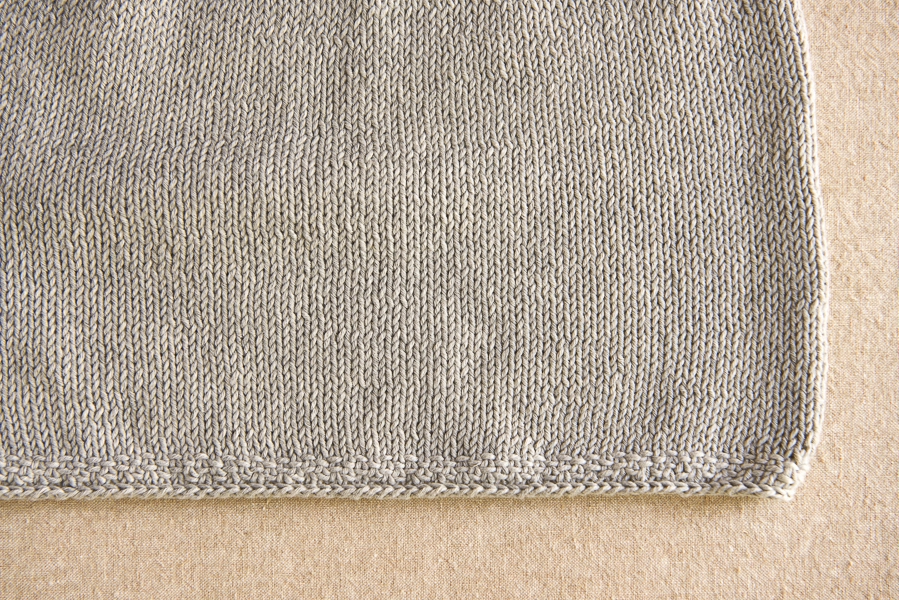
Work Linen Stitch in the Round (see Notes) for ½ inch.
Bind off all stitches.
Finish
Armhole Edgings

With right side of armhole facing and beginning at center of underarm, pick up 2 stitches using working yarn, *pass the second stitch on right needle over the first stitch, pick up 1 more stitch, repeat from * until you return to the center of underarm.
Repeat for other armhole.
Back and Neck Edging
With right side of Left Back facing you and beginning where Left and Right Backs were joined, work Back and Neck Edging as for Armhole Edging, working first up Left Back edge, then around Neck opening, and then down Right Back edge, ending where Backs were joined.
Last Touches
Sew on a button opposite each buttonhole. Weave in ends and block as desired.


Is the gauge written to accommodate washing? If I knit to gauge without pre laundering, will it still be the size intended after laundering? In other words, should I wash the yarn first and then knit to gauge?
Hi Katherine,
Thanks for reaching out! Our patterns are always written to the listed gauge, so to avoid surprises after you launder your garment the first time, it is always best practice to wash and block your gauge swatch the same way you intend to wash and block the finished garment. Washing the yarn before knitting a gauge swatch isn’t necessary, because even if you do wash your yarn and then knit and block a swatch, the yarn could still change in the final swatch, so I would instead recommend washing your swatch. In the case of Cotton Pure, we recommend machine washing and drying, so you can just toss it in the wash with your next load of clothes!
Happy knitting!
Julianna
I love this dress
I am a pretty knew to knitting but I want the challenge. I’m wondering if you have a video showing how to do the top part of the patter. Written instructions are a bit confusing but with some visuals I think I could figure it out. I have a gorgeous DK weight super wash Marino wool I want to use.
Hi Lallie,
Thanks for reaching out. I’m afraid we don’t have a video of this pattern though! If you’re hoping to find a demonstration of linen stitch (that’s what’s used for the top part of the dress), I’d recommend searching for that in your favorite search engine, and lots of videos will come up, if you want to see it in action!
All the best,
Lili
I’m on the back left neck and portion of the patten with the button holes and I don’t understand the portion of the instructions that say [2 stitches bound off] and [2 stitches cast on]? I’m I suppose to do something with 2 stitches? I also don’t understand how the side with the buttonholes will overlap on the other side without pulling from the left side over. Both the right and the left sides are the same amount of stitches so they meet in the middle . How do you get the left side to overlap the right side for buttons without throwing off one side. What am I doing wrong?
Hi Linda,
Thanks for reaching out! These notes are simply clarifying what you accomplished in that row. For instance, in Buttonhole Row 1, which reads, “P4, pass second stitch on right needle over first stitch, p1, pass second stitch on right needle over first stitch, *p1, slip 1 wyib, repeat from * to last 2 stitches, p2,” the end result is that you have bound off two stitches for the buttonhole. You don’t need to do anything extra when you read this note at the end of the row!
Although the two back pieces are the same number of stitches, when added up they have more stitches than the front to account for the button band overlap. The front piece before the armhole increases had 55 (59, 63) stitches, while the two backs added together are 62 (66, 70) stitches.
I hope that clears things up!
Julianna
I’ve just started the skirt increases but am a bit puzzled. I have two markers on my needles. The instructions say to increase one stitch before each marker. That yields 2 stitches increased per round, not the 4 stated in the pattern. Have I missed something?
Thanks for clarifying.
Hi Madeline,
Thanks for reaching out! You should actually be increasing before and after each marker, for a total of four increases per row. The skirt increase round reads, “[K1, m1r, knit to 1 stitch before next marker, m1l, k1, slip marker] 2 times,” so you will be working a m1r after each marker and a m1l before each marker.
I hope that clears things up!
Julianna
Hi-
I have a question about my increases on the right front shoulder.
After I knit the first increase row that ends in F1fbf I count the next row which is the wrong side row as 1 so on the 4th row I’m back on the right side for F1fbf at the end of the row . So there are 3 rows between increases. When I finished the increase the shaping look like steps, but in your pictures it looks like a nice curve. What am I doing wrong that I get steps and not a curve? Thanks for you help
Hi Linda,
Thanks for reaching out! It sounds like you are working the increases correctly! If you look at the pictures immediately below this section, you can see that the neck edge does look a bit uneven and ragged before adding the neck edging and blocking, which we have done in the finished pictures at the beginning of the pattern. I think you will be happy with how the neck looks once you have done all the finishing!
I hope that helps, and happy knitting!
Julianna
Hi there, thanks for this beautiful pattern! I’m really enjoying it so far. One thing i’m struggling with is whenever I do the increase rows (k1fbf), the edges end up looking jagged, like little step ladders, instead of the more smooth edges your images seem to have. Any advice on how to keep the increase rows looking smooth? Thanks!
Hi Hillary,
Thanks for writing in! It is quite normal for the edges of this dress to look as you describe immediately after working the increases. If you look at the pictures immediately below this section, you can see that the neck edge does look a bit uneven and ragged before adding the neck edging and blocking, which we have done in the finished pictures at the beginning of the pattern. I think you will be happy with how the neck looks once you have done all the finishing!
Best,
Julianna
How do you cast off the last stitch on the edging? It just says to continue to the end but you’re left with one last stitch.
Thanks!
Maureen
Hi Maureen,
Thanks for reaching out! I am happy to help! You will cut the working yarn and pull it through the last stitch. You can then weave that end in to create a neat little finished edge!
Best,
Cassy
Blargh, pregnancy brain, of course. Thanks for the reply!
Oh, actually I meant on the edging stitch, I was under the understanding that I was supposed to use the edge stitch itself rather than a new working yarn. Should I have used new yarn instead? If not, how do I cast off the very last stitch?
In the instructions:
With right side of armhole facing and beginning at center of underarm, pick up 2 stitches using working yarn, *pass the second stitch on right needle over the first stitch, pick up 1 more stitch, repeat from * until you return to the center of underarm.
Hi Maureen,
Thanks for reaching out! You can use the existing working yarn that is already attached instead of joining a new strand, but it sounds like you might have just picked up loops from the edge of the work without using the working yarn. I would suggest taking a look at our Picking Up Stitches tutorial to make sure you are picking them up correctly!
Best,
Julianna
I have the same issue! I wove in my ends already. Should I use a new working yarn to edge it? What is this type of edging called? I’d love to find a separate tutorial on it! Thank you!!!
Hi Megan,
Thanks for writing in. Yes, you can absolutely join in a new strand to begin the edge! There unfortunately isn’t a specific name for this type of edge, but to give you a sense of how it works, it’s just comprised of picking up stitches and binding off those stitches immediately. Hope this helps!
All the best,
Lili
I would love to make this as a top or dress for an adult but is too much of a beginner to know how to adapt the pattern. Any thoughts of doing this and posting it on your site?
Hi Winnie,
Thank for reaching out! We don’t currently have plans to add adult sizes to this pattern, but I will be sure to pass your suggestion along to the design team!
Best,
Julianna
Would you recommend this pattern for someone who is between beginner and intermediate?
Hi Michelle,
Thanks for reaching out! This pattern is fairly straightforward and includes basic stitches and increases, as well as a special increase which is explained in the pattern. The vast majority of the knitting is plain stockinette stitch in the round! I would suggest reading through the pattern to see if you think it’s something you’d like to try, and remember we are always here to help if you have any questions!
Best,
Julianna
Thank you for such a stress free, simple garment. These are trying times and an easy, straightforward project is just the thing!!
Under Front Yoke:
Work even in Linen Stitch Flat until piece measures 3 3/4 (3 1/2, 3 1/2)
Do you mean 3 1/4 “(rather than 3 3/4”)for 1st size?
Thanks,
Missy
Hi Missy,
Thanks for reaching out! This is correct! Because you will be working fewer increase rows for the smallest size, you do need to knit a longer piece than you do for the other sizes before beginning the increase rows.
Happy knitting!
Julianna
Also, am I measuring from the cast on shoulder or yolk?
Many thanks for answers.
So appreciate being able to knit while having to isolate.
Wishing everyone well.
Hi Missy,
You will be measuring from the cast on edge!
Best,
Julianna
I am wondering the same question and was hoping for some clarification, do we measure the 3 3/4 inches from the shoulder or the neckline? I see in the instructions it says from the cast on edge, so I was assuming from the shoulder, but the picture (and thickness of baby arms) would suggest we measure from the neckline.
Hi Katie,
Thanks for writing in! You are correct that you should measure from the shoulder cast-on edges for this part of the yoke. For the smallest size, the left and right front shoulders should measure 1.75 inches before casting on for the front neck, and you will then continue for a further 2 inches so the full piece measures 3.75 inches from the shoulder. You will then work the 8 rows of armhole shaping, which should add about .75 more inches, for a total yoke length of 4.5 inches. There aren’t any side seams in the armholes up to this point, so the total armhole will measure 4.5 inches in length, which should be plenty for even the squishiest of baby arms!
I hope that clears things up!
Julianna
This will be my first try at any kind of garment. I’ve had some history with choosing the wrong yarn for a project before (an acrylic for the Elementary Wrap) that rolled terribly. Then couldn’t be blocked flat because of the yarn choice a big box store suggested.
I went to a local yarn store this time and asked for help with this project. They suggested, and I bought, Comfort DK. While I was knitting the swatch to check gauge it seemed to want to roll already. Then I looked at the yarn and it’s 50% nylon and 50% acrylic.
Should I not start it with that yarn and get 100% cotton instead? I do not want to put the time into this and be disappointed again.
Hi Karen,
Thanks for reaching out! For this dress, because it is a three dimensional piece, it is much less critical that your knitted fabric be less prone to rolling; however, we used a sport weight yarn, which is somewhat thinner than a DK weight yarn. I would suggest paying careful attention to your gauge swatch, as you may find that you have to adjust your needle size to get the correct gauge, and the fabric may be thick or dense at that gauge because your yarn is heavier. As long as you are happy with the drape and feel of your swatch, you don’t need to be concerned if it is rolling up!
Best,
Julianna
Thank you. Here I go!!
I am planning on knitting this pattern using your line weight merino which I already have. How will that affect the sizing and how should I adjust my needle sizes?
Hi Chelsea,
Thanks for reaching out! Unfortunately Line Weight on its own is too thin for this pattern, as it is a light fingering weight and this dress is written for a sport weight. I would recommend knitting a gauge swatch using Line Weight held double to see if you are able to match our gauge, although it might be too thick held double. However, the best way to find out is to knit a swatch!
I hope that helps, and happy knitting!
Julianna
I’m knitting the dress and have a question about the instructions under “Right Front Neck.” After I cable cast on 25 sts, the instructions say “slide all stitches off the needles’ ends and onto the cable.” What does that mean?
Thank you!
Hi Michelle,
Thanks for reaching out! This means that, on a pair of circular needles, you will slide all the stitches onto the flexible cable of the needles to wait for later. If you are using straight needles, I would suggest moving these stitches to a stitch holder instead!
Best,
Julianna
I have a problem with the part: “ Slide Right Front Shoulder stitches off left needles and onto the cable. Turn work.“
After casting on 11 stitches the working yarn is on the right side of the stitches but I am still on the wrong side of the work.
How can I turn my work without knitting those cast-on stitches first?
Hi Judith,
Thank you for writing in! We are sorry you are having trouble with this pattern. If you don’t mind, could you please send in a photo of your work so we could have a closer look? You can email our team at customerservice@purlsoho.com! Sometimes seeing the project visually can help us better assess the issue.
All the best,
Gavriella
thank you so much.i am searching for this pattern for very long term.thanks agan its very helpful.
Can I use 29″ needles instead of 24″?
Hi Debbie,
Thanks for asking! We’ve called for a 24″ needle to allow even the smallest size to be knit in the round – the yoke is knit flat but then the skirt is knit in the round to finish the dress. If you were to knit the largest, 12-18 month size, a 29″ needle would work!
Happy Knitting!
Cassandra
Hi – I’m having difficulty understanding the process for the armhole edging. Is there another way to explain it?
Michelle
Hi Michelle,
Thanks for writing in about this! I’d suggest taking a look at our tutorial for picking up stitches and see if that helps – . If that doesn’t help clear up your question, please let me know and I’ll see if I can help to rephrase things in a way that works for you! The link I referenced goes a bit more into depth and I hope that will help.
Best,
Cassandra
Hi Cassandra! Thank you for directing me to the tutorial. I’m able to follow all four methods but still confused by the instructions in the pattern: “pick up 2 stitches using working yarn, *pass the second stitch on the right needle over the first stitch, pick up 1 more stitch, repeat from *….
Thank you in advance.
Michelle
Hi Michelle,
Thanks for writing in! Starting at the center of the underarm, after you have picked up the two stitches, tutorial here, you will essentially be binding off one. Picking up another stitch and binding off one. Repeating this process all the way around the armhole. This leaves a nice tidy edge. I hope this helps!
Happy Knitting
Jessica
Hi, I’m loving knitting this sweet little dress.
Question: row 1 of button hole Why am I Purling and s1wyb , instead of my regular linen stitch of K1 s1wyf? I just want to make sure that is what I am to do every time I work a buttonhole.
Thanks
Hi Lisa,
Thank you so much for the kind words and for reaching out! Buttonhole Row 1 should be worked on a wrong side row, which requires slipping with the yarn in the back. If you take a look at our instructions for Linen Stitch Flat at the beginning of the pattern, you will see that the wrong side rows should always be P1, *p1, slip 1 (purlwise) with yarn in back (wyib), repeat from * to last 2 stitches, p2.
I hope that clears things up!
Julianna
Hello Julianna
When I found this pattern I was very excited to get going, it’s such a sweet design. I am a very new knitter, but I have managed to get as far as joining the two back pieces and now I am stuck . I am ashamed to admit that I can’t understand how to knit the seven stitches from two needles to close the two sides of the dress. Please would you take the time to explain this to me please? I have nobody to help me. Thank you,
Kind regards
Maria
Hi Maria,
Thanks for writing in! I hope I can help clear up this step for you! At this point, you should have the needle with the last 7 stitches of the Left Back and the needle with all of the Right Back stitches held together parallel in your left hand, as shown in our picture in this section of the pattern. To join them together, you will insert your right hand needle as you normally would into the first stitch on the front needle (which is holding the Left Back stitches) and then into the first stitch on the back needle (which is holding the Right Back stitches), and then knit them together as usual. This is exactly the same as the beginning of our 3-Needle Bind Off Tutorial – the only difference is you will leave the stitches on the needle instead of binding them off after knitting them together!
I hope that helps, and happy knitting!
Julianna
Dear Julianna
Thank you very much for your advice with regards to my question. I did work out the technique before reading your reply. I hadn’t seen that I should use an extra needle. Once I saw realised this it was plain sailing. I’m sorry that I wasted your time.
Take care. Stay well.
Kind Regards
Maria
I love this pretty dress but I’m looking for another sweet cotton baby dress you once had. It was knitted from the bottom up and had a pretty seed or moss stitch bottom edge. Have I imagined it? Is the pattern still available?
Hi Julie,
Thanks for writing in! I’m afraid we don’t have any patterns that match what you describe! The only other child’s dress pattern we have is our Baby Jumper, which is knit from the bottom up but has a garter stitch edging. I’m sorry I can’t be of more help, but I hope you are able to find the pattern you are looking for!
Best,
Julianna
Hi,
really want to knit this dress and I am not new to knitting, so felt confident that I could get through this quite easily.
I’m embarrassed to ask this question but i don’t know what to do. I’ve restarted the left front 5 times! I don’t understand why my left front is the exact same as my right – meaning, my increases face the same way so I would never be able to get them to match when picking up the cabled cast on 25 stitches.
I’m sure it’s a simple (no pun intended) answer, but i can’t seem to figure it out.
Any help would be most appreciated.
Hi Anne,
Thanks for writing in! For the left front, you will be increasing in the first stitch of the right side rows, and while working the right front, you should have increased in the last stitch of the right side rows. If you are sure you are increasing in the first stitch for the left front, is it possible that you worked the right front incorrectly? When worked correctly the two pieces should mirror each other, as you can see in the picture under “Front Yoke.”
I hope that helps!
Julianna
Hello! I’m struggling with the second row of the button hole 🙁 I’m following the instructions but somehow the cable cast on is leaving a hole in my work and when i turn it over to the right side and slip one with yarn in front then knit the two stitches left on my working needle, it creates a loose yarn piece which gets in the way of the button hole
Hi Liyun,
Thanks for reaching out! It is normal for there to be a small hole or gap right where you have started a cable cast on, but this should become much less noticeable when you knit the next row and disappear completely when you block the dress. Although it sounds like you are describing the process correctly, usually if there is a loose or extra strand of yarn after working a cable cast on in the middle of a row, it means that you worked the cast on with the wrong side facing. If you are sure that you are turning to the wrong side when starting the cable cast on and then turning back to the right side after it is complete, I would try giving the yarn an extra tug when slipping the next stitch to see if that tightens things up!
I hope that helps!
Julianna
Hi Julianna,
I love this beautiful baby dress pattern but I’m having some issues understanding how to continue the linen stitch seamlessly after joining the 2 shoulders straps with the 25 cast on stitches. (The wrong side there are 2 purl stitches at the beginning and At the end of the straps) . It works beautifully until I joined the 25 stitchesFor some reason the stitch looks similar but courser than the straps.
I have had to unravel that part a few times. Do you know what I’m doing wrong. Thank you so much. I’m determined to get it right😊
Hi Martine,
Thanks for reaching out! I think I can better help you if you send us a photo of your work to our email customerservice@purlsoho.com and we can trouble shoot further from there!
All the best,
Gianna
Hi – I’m about to start this lovely dress for my sister in law, and I was wondering what the best cast on method is for this project. Is there a suggested or recommended method so I can kickstart this project?
Hi Tracey,
Thanks for reaching out! A basic Long Tail Cast On should be fine for this project!
Warmly,
Gianna
Hello,
I’m going to knit this dress for my baby due in May, but I would like to add sleeves. Would it be similar to making a cardigan and knitting in sleeves in the round. Should I use linen or stockinette stitch?
Hi Karen,
Thanks for reaching out! Yes you can easily add sleeves to this dress as you would with a cardigan! You can pick up the stitches along the edge and then work the sleeves in the round. I would recommend using stockinette stitch to insure that you have a clean pattern all the way down!
I hope this helps and please let us know how this turns out!
Warmly,
Gianna
Hello!
I had a question about the section for the buttonholes. Let’s hope I can explain this the best I can.
When it says this, “Repeat from ** once more, then work Buttonhole Rows 1 and 2 again (three total buttonholes made). AT THE SAME TIME, when armhole measures 3 3/4 (3 1/2, 3 1/2) inches from beginning of Back Left Shoulder,” am I knitting 8 rows in between buttonholes?
If so, that throws my measurement of 3 3/4 ” off for the back left piece. I completed the first buttonhole and the 8 rows even. Can someone explain to me what exactly this section means?
I’ve only been knitting for 2 years so I’m still learning on how to interpret patterns.
Thank you!
Hi KK,
Thanks for reaching out! I am happy to help with this! After you maker your first buttonhole, you will work 8 rows even in the linen stitch and then repeat from the **, meaning you will repeat Buttonhole rows 1 and 2 until you have made 3 button holes, working 8 rows of the established linen stitch between! At this point your armhole should measure 3 3/4 (3 1/2, 3 1/2) inches, you will then begin to shape the Back Left Armhole!
I hope this helps clear things up, but if you have still having issues please send a photo of your work to our email customerservice@purlsoho.com and we can troubleshoot further from there!
Warmly,
Gianna
Oh dear, I just found this pattern and I love it! However, I have two two-year-old granddaughters and so I’d need a 24 month size. Please share if this pattern can be easily expanded to 24 months. Thank you!
I am working on the buttonhole section but when I look at what I’ve knitted so far it is a bit bumpy and doesn’t look right. I’m wondering what I’m doing wrong. I think it is when I am on the buttonhole 2 with the cable cast on 2 stitches. Am I casting on 2 stitches on the left or right needle?
Hi Hannah,
Thanks for reaching out! When you cable cast on the 2 stitches you will be casting them on to the right needle and then turning the work! If you would like you can send us some photos of your work to our email customerservice@purlsoho.com and we can troubleshoot further!
Warmly,
Gianna
Thanks for this lovely pattern. I’m almost finished and just want to check about the Linen Stitch in the Round. Do I slip the stitches knit wise? Thanks for your help.
Hi Kathy,
Thanks for reaching out! You will continue to slip all stitches purlwise unless otherwise noted!
Warmly,
Gianna
Hi Gianna,
Thanks for your quick response. I’m looking forward to finishing this up and sending it to a relative who is expecting her first baby shortly.
Kathy
Hello
I’m perplexed about the skirt increase section. Do I make 1 before and after each marker to reach 4 stitches in total? Can you please clarify.
Hi Monica,
Thanks for reaching out! Yes, you are correct; you will be increasing by 4 stitches each time you work an increase round, with the increases happening on either side of the two markers (and one knit stitch between the increase and the marker). I hope this helps clear up any confusion!
All the best,
Kelsey
Absolutely love this pattern 😍 I was able to get a larger size, 4T, by using a heavier weight cotton and larger needle. I used my gauge swatch to match up the stitches for the increasing etc. It turned out FABULOUS! Thank you so much for creating and sharing this amazing pattern!
Thank you for your kind words! We’re so glad to hear that you’re enjoying the pattern and that you were able to create this sweet little dress in a larger size. We’d love to see photos of your completed Baby Dress if you wanted to email photos to us at customerservice@purlsoho.com, or if you’re on Instagram you can use the hashtags #purlsoho and #purlsohobusyhands to share!
Thank you again, and happy knitting!
Warmly,
Kelsey
A delight to knit, wear and keep for future generations!
Hello:
I have a crazy ?. Can this dress be done in a moss stitch?
I’m in the midst of finishing a cardigan w/moss stitch edging and this dress would look so darling w/it along w/booties and a hat.
It would make a really great ensemble.
Thank you.
Concetta
Hi Concetta,
Thanks for reaching out! That is a great question, it may be a bit tricky since seed stitch is a much different gauge from stockinette stitch and linen stitch so it may require quite a bit of adjustment to work with the pattern. So if you are up for a bit of a challenge then you could try this out, I would then recommend starting off by working a gauge swatch.
I hope this helps, happy knitting!
Gianna
Would it be possible to get instructions for this darling dress in a 3T?
Hi Linda,
Thanks for reaching out! At this time we only offer this pattern for up to 12-18 months, but thank you for expressing your interest! I will be sure to pass this along to the rest of the team!
Happy knitting!
Gianna
In front yoke section,
((Work even in Linen Stitch Flat until piece measures 3 3/4 (3 1/2, 3 1/2) inches from cast-on edges, ending with a wrong side row.))
Does cast on edges refer to the shoulders or the middle of the yoke ie neck?
Hi AM,
Thanks for writing in! The cast-on edges for this part of the pattern refers to the shoulders.
I hope this helps! Have a great day!
All the best,
Cat
Back right shoulder in the biggest size, I assumed that I was knitting 3.5” from the neckline, not from the 13 stitches at the shoulder, and the front and back panel would be symmetrical. Am I wrong and the back panel in linen stitch is shorter? Thanks.
Hi Sara,
Thanks for reaching out. The 3.5 inches in both parts of this pattern should be measured from the cast-on edges at the shoulder, and not at the neckline! The front and back of the dress should definitely be symmetrical in this regard. I hope this helps clarify things!
All the best,
Lili
Now I’m very confused, because in the post before this, Catherine says it is from the yoke/neckline (at least for the front). Seems like you confirmed they should be symmetrical, so I will just go with that.
Hi Sara,
Oh no, apologies for the conflicting information! I can confirm that measuring this distance from the shoulder cast-on edges is the correct way, and in the meantime, we’ll edit the earlier comment so that no one else gets confused in the future!
All the best,
Lili
Hi — US 5 needles are 3.75mm (not 4mm as the pattern indicates). Could you clarify the needle size?
Thanks — s
Hi Sinduja,
Thanks for letting us know about this! You’re right–US 5 needles are not 4mm, so we will update that on this post as soon as possible. Thanks again for pointing that out!
All the best,
Lili
Hi, are all slipped stitches to be slipped purlwise, even when not specified? Or are unspecified slips to be slipped knitwise?
Hi Kelsey,
Thanks for reaching out. You’re absolutely correct! When not noted otherwise, all stitches should be slipped purlwise. Hope this helps!
All the best,
Lili
Hi all
I would love to knit this dress but I have a grudge with linen stitch and I know from experience that one goof and you’re done for. Hard to correct. I would rather do the bodice in stockinette! Can I? Thank you!
Kath
Hi Kath,
Thanks for writing in! I’m afraid that stockinette stitch won’t quite work for the top of this pattern. That’s because linen stitch has a significantly shorter row gauge than stockinette does, because of all the slipped stitches. The top of the dress would come out way too long in stockinette!
If you’d like to give the linen stitch a go however, I’d recommend putting a lifeline in so if you make a mistake, you don’t have to undo everything! You can do this by using a tapestry needle to thread a piece of scrap yarn through one leg of each stitch on one row. Then if you need to undo a large chunk of knitting, you can rip back without fear of losing any stitches! Once you’ve unraveled to the point of the lifeline, you can slip those stitches back onto your needles and remove the scrap yarn.
All the best,
Lili
Thank you Lili — yowee! I’m intrigued. It’s the kind of a “fix” that could have all kindsa applications going forward. Might just make me braver…
: ))
I just finished working the top section in stockinette, and the result is a yoke with measurements equal to those indicated in the pattern for the smallest size. So I would encourage anyone who wants to knit a stockinette dress that it may work well for you.
For the left shoulder, the instructions state to cast on the required number of stitches and turn the work. What cast on is used and what does “turn work” mean?
Hi Emily,
Thanks for reaching out! We used a basic Long Tail Cast On. “Turn work” means to turn your your needles around so that the other side of the knitting is facing you. When you knit flat (not in the round), you will generally turn your work after each row, so that you can knit back and forth.
I hope this helps clarify things!
All the best,
Lili
Hi! I’m absolutely loving how this is knitting up! However, I am having a hell of a time joining the front and back pieces without a huge gap. Turns out that all of my tricks for a seamless/invisible join only work when joining from a cast on row. Without that tail to tighten up the gap I’m at a bit of a loss. Would appreciate any tips to prevent the gap!!
Hi Martha,
Thanks for reaching out! I would recommend taking a short pice of yarn and weaving it into the knit fabric across the gap, just like you’d do with a tail. This will close up the gap very securely!
All the best,
Lili
Help please!
I am at the point where you knit to the last 7 stitches then knit right back and left back together but every time I do it it is twisted. I am doing something worng but not sure what😭😭
Hi Greta,
Thanks for reaching out! Would you be able to send a photo of your work to customerservice@purlsoho.com? That way, we can better visualize what’s going on and be able to give you advice!
All the best,
Lili
Hi Lili,
I got discouraged and put it down for a while. Came back to it and ripped out the yarn and started over and I’m happy to report I figured out the error and it is now coming together quite nicely. I’m excited to see it finished☺️
Hi,
This is a beautiful pattern!
I am knitting the 6-12 month size. I am wondering on the back why there are only 2 rows from the neck to the first buttonhole while in the 6 mos and 12-18 mos sizes there are four rows? Two rows seems as though the button hole will be too close to the edge.
Thanks!
Lexy
Hi Lexy,
Thanks for reaching out! The difference in rows is due to how the pattern was graded for multiple sizes. But don’t worry! You’ll work an edging around the neckline and armholes after you’re finished with the main sections, and that will add some more fabric to the edge before the first buttonhole. Hope this helps!
All the best,
Lili
Dear Lili,
Got it! Thanks so much for your reply.
Best,
Lexy
Hi, if I don’t want to make the back with buttons, would I do the same pattern as the front?
Hi Vivianne,
Thanks for reaching out, and yes! You can make the back identical to the front if you don’t want to use buttons.
All the best,
Lili
Hello! So far I’ve done just the first two sections (Right Front Shoulder and Right Front Neck), but when I look at it with the right side facing me… it looks like I made the left shoulder/neck to me. Do you know how I could’ve possibly produced the left instead of the right? If I continue will it be okay? Thanks so much in advance for the help!!
Hi Sara,
Thanks for writing in! Would you mind sending some photos of your projects to customerservice@purlsoho.com? We’d love to have a look to see if we can get you back on track!
All the best,
Gavriella
Hello –
I am on the finishing touches of this dress but struggling with the edging. Once you have completed the armhole edging and are back to where you started – how do you secure the chain? It seems like there is one loop left open which can unravel? Thanks!
Hi Allison,
Thanks for writing in! You can pull the yarn through the last stitch and weave in the end to the inside of the dress to secure it. I hope this helps!
Happy knitting,
Gavriella