


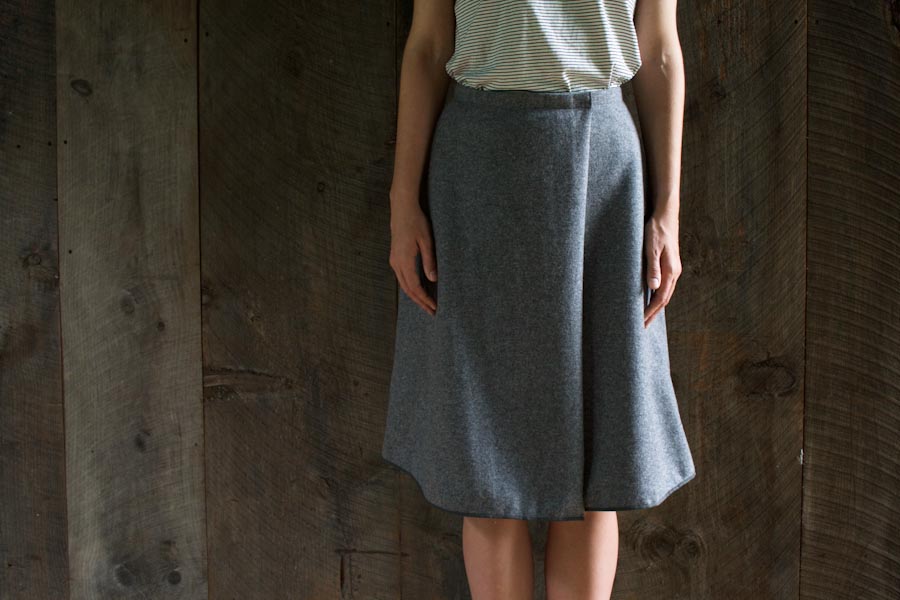

Wool Wrap Skirt
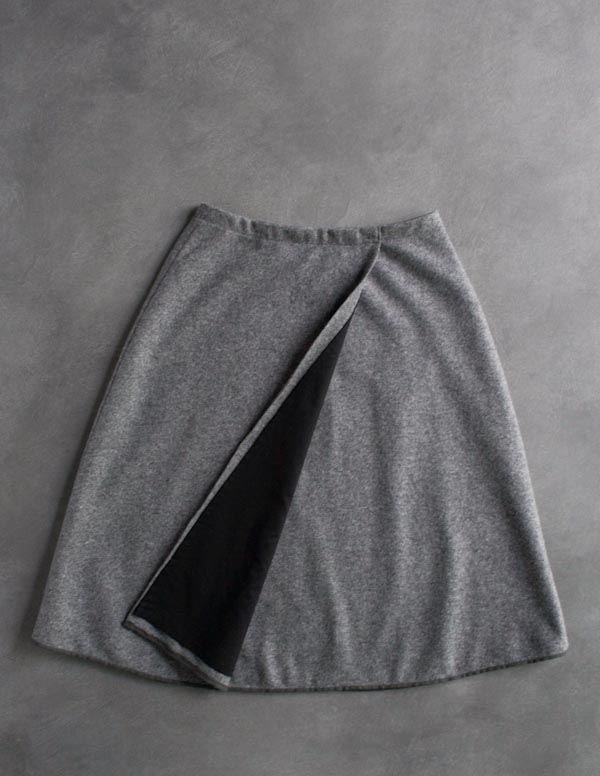
Simplicity can be deceiving, and it is sometimes the most straightforward garments that hide the most exquisite details! Our Wool Wrap Skirt is as classic as they come, but its simple, timeless shape masks tons of refined and polished details.

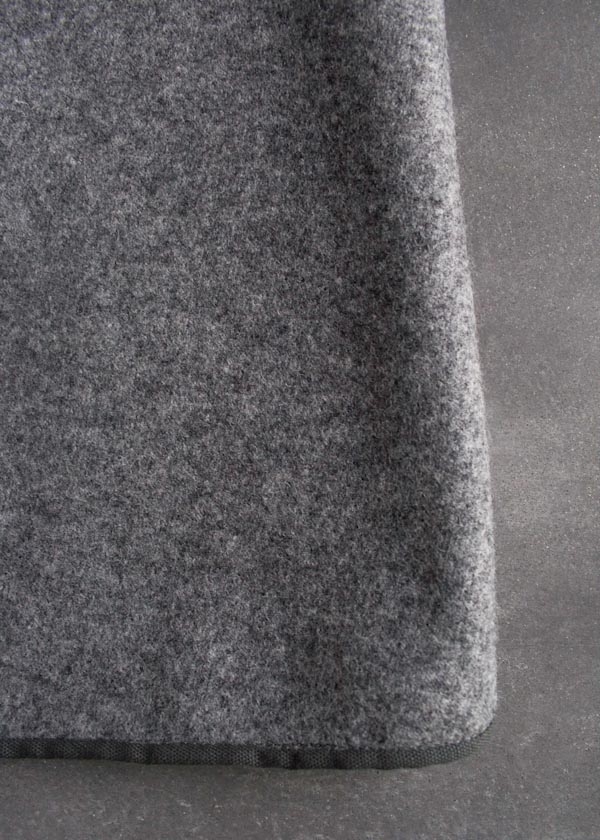
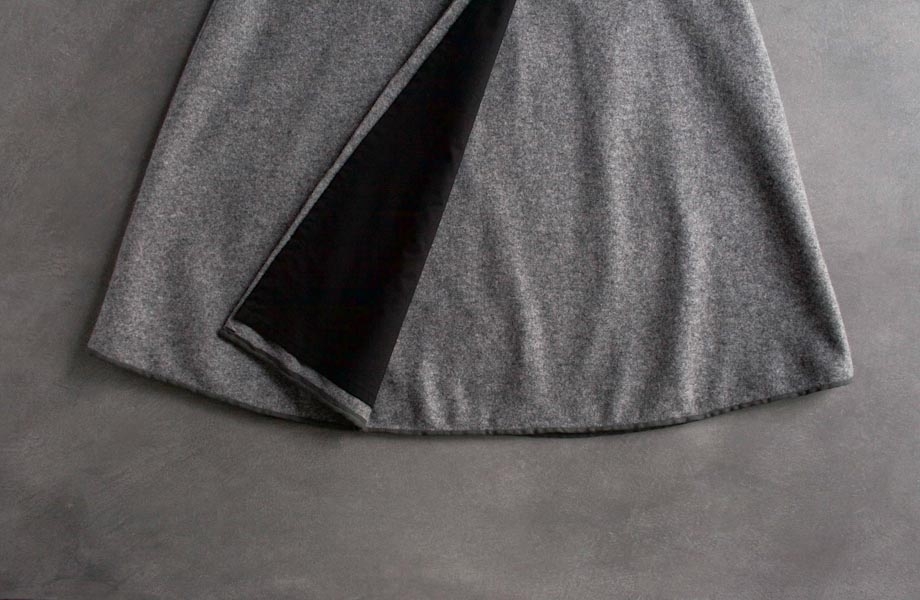
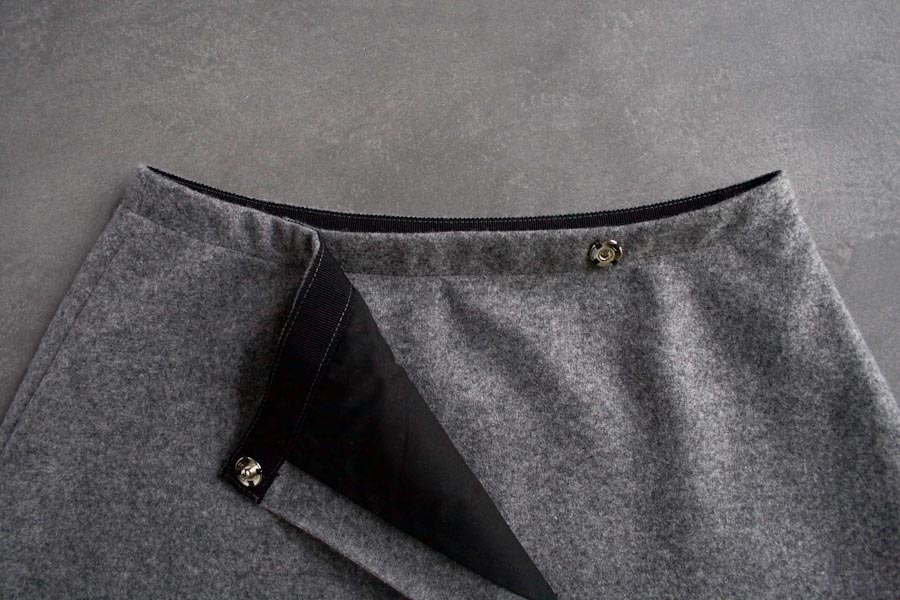
First, the outer fabric is impeccable in Lanecardate’s Lana Cotta Canberra felted wool, but then, ah ha! It is fully lined with Robert Kaufman’s super soft and smooth Cambridge Lawn. Look closely also at the sturdy (and elegant) grosgrain waistband and the delicate ribbon trim along the bottom edge that adds a clean, light finish. Hidden snaps hold the whole thing in place. The end result is a seriously handsome Skirt with a lasting construction. Simply beautiful! -Corinne

Materials

- Outer Fabric: 1 ¾ yards of Lanecardate’s Lana Cotta Canberra. We used color Grigio 3 (Medium Gray).
- Lining Fabric: 1 ¾ (1 ¾, 2 ½, 2 ½, 2 ½) yards of Robert Kaufman’s Cambridge Lawn. We used Black.
- Thread A: 1 spool of Gutermann’s Cotton Sewing Thread in a color to coordinate with the Outer Fabric. We used color 9500.
- Thread B: 1 spool of Gutermann’s Cotton Sewing Thread in a color to coordinate with the Lining Fabric. We used color 1001.
- 2 yards of Purl Soho’s 25mm Grosgrain Ribbon. We used Black 014.
- 3 yards of Carta Inc.’s Fettuccia Ribbon, 5/8 inch. We used Iron.
- 2 snaps in size 4
- 1 spool of Gutermann’s Hand Quilting Thread for sewing on the snaps. We used color 5201
- A free Wool Wrap Skirt Template, printed, prepared and cut out in the appropriate size
Sizes
To fit hips 34-35 (36-37, 38-39, 40-42, 43-44) inches in circumference
Notes
- Prewash and press the Lining Fabric before starting.
- For this pattern, the right side of the fabric is depicted in gray and the wrong side is white.
- Our Lining Fabric, Cambridge Lawn, does not have a right or wrong side, but the pattern indicates right and wrong sides in case you decide to use a different fabric.
- The right side of the Lana Cotta Canberra wool is the side with the small “V” pattern (as opposed to the side with the ridges).
- The recommended care of Lanecardate’s Lana Cotta Canberra is dry clean only.
Pattern
Cut
From both the Lining and Outer Fabrics, use the pattern pieces to pin and cut …
One Back (on the fold)
One Right Front
One Left Front
The grain line of all the pieces should run parallel to the selvage edge of the fabrics.
If your Lining Fabric has a right and wrong side (the Cambridge Lawn does not), cut the Left and Right Front pieces with the wrong side of the Lining Fabric facing up.
Cut the Left and Right Front pieces with the right side of the Outer Fabric facing up.
Prepare the Lining
Piece
Using the pieces you cut out of the Lining Fabric…

Lay the Back flat, right side up. With its wrong side facing up, lay the Right Front on top. Line up the Right Front’s left side edge (marked with a small notch) with the left side edge of the Back. Pin the two pieces together along the side edge.
Thread your machine with Thread B and sew along the pinned edge with a 5/8-inch seam allowance.
Sew along each raw edge of the seam allowance with a zigzag stitch and press the seam open.

Now, lay the Left Front on top of the Back, right sides together. Line up the Left Front’s right side edge with the right side edge of the Back. Pin the two pieces together along this edge and sew along the pinned edge with a 5/8-inch seam allowance.
Sew along each raw edge of the seam allowance with a zigzag stitch and press the seam open.
This is now the Lining.
Hem

Fold the bottom edge of the Lining ¼ inch towards the wrong side twice, press and pin. Sew the hem down with an edgestitch.

Now, fold one raw side edge ¼ inch towards the wrong side twice, press and pin. Sew the hem down with an edgestitch.

Repeat on the other raw side edge.
Prepare the Outer Skirt
Piece
Using the pieces you cut out of the Outer Fabric…

Lay the Back flat with the right side facing up. With its wrong side facing up, lay the Right Front on top. Line up its right side edge (marked with a small notch) with the right side edge of the Back. Pin the two pieces together along the side edge.
Thread your machine with Thread A and sew along the pinned edge with a 5/8-inch seam allowance.
Press the seam open.

Now, lay the Left Front on top of the Back, right sides together. Line up the Left Front’s left side edge with the left side edge of the Back. Pin the two pieces together along this edge and sew along the pinned edge with a 5/8-inch seam allowance.
Press the seam open.
This is now the Outer Skirt.
Hem
Sew along the bottom edge of the Outer Skirt using a basting stitch and a 1/8-inch seam allowance. (This is a “stay stitch” and will help keep the hem of the Skirt from stretching or flaring out.)

With the right side of the Outer Skirt facing up, starting at one corner and leaving a 1-inch overhang, pin the 5/8-inch Ribbon to the bottom edge of the Skirt, lining up the bottom long edge of the Ribbon with the bottom raw edge of the Skirt. When you reach the other bottom corner, trim the Ribbon so that there is a 1-inch overhang there as well.
Sew the Ribbon to the Skirt with a 1/8-inch seam allowance. This is Seam A.

Fold the long edge of the Ribbon toward the Outer Skirt’s wrong side. The Ribbon will wrap around the Skirt’s bottom raw edge and come up just past Seam A on the wrong side. Press and pin in place.
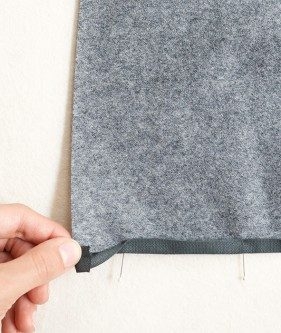
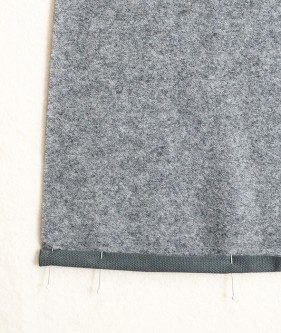
At one overhang, open the fold of the Ribbon. Fold the short edge of the Ribbon around the Skirt’s side edge, towards the wrong side of the Skirt. Refold the Ribbon around it, encasing the short raw edge in the fold. Pin in place.
Repeat at the other end.

With the right side of the Outer Skirt facing up, sew the Ribbon in place by stitching in the ditch of Seam A, here’s how …
Place your needle in the “ditch” between the Skirt and the Ribbon and sew along this line. The seam will pick up the Ribbon on the wrong side of the Skirt and secure it in place.
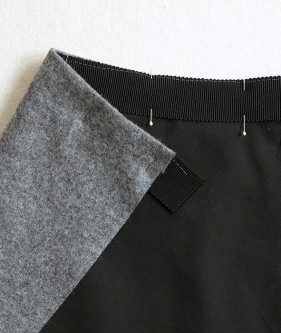
Attach the Lining to the Outer Skirt

With wrong sides together, stack the Outer Skirt and the Lining on top of each other, matching up their raw waist edges. Line up the side seams of the two Skirts and pin together at the seam lines. Continue to pin the two pieces together along the waist edge.

The Front pieces of the Outer Skirt extend past the Lining on both sides.
Use a basting stitch and a ½-inch seam allowance to sew the Outer Skirt and Lining together along the top pinned edge.
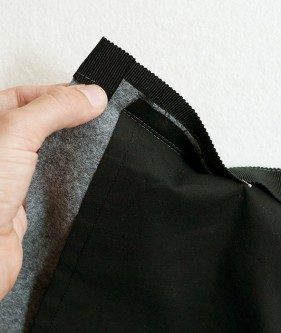
Attach the Waistband

Turn the garment so that the right side of the Outer Skirt is facing up. Starting at one side and leaving a 1-inch overhang, pin the Grosgrain Ribbon to the waistline edge so that the bottom long edge of the Ribbon runs flush with the basting seam from the previous step. Trim the Ribbon at the opposite corner so that there is a 1-inch overhang there as well.

Sew the Ribbon down with an edgestitch, sewing through the Ribbon, Outer Skirt and Lining.
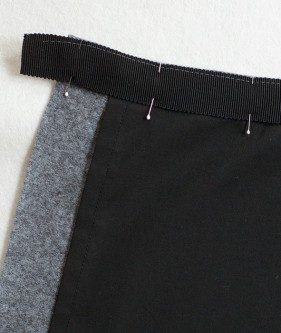
Along the last seam line, fold the Grosgrain (and the top ½ inch of the Skirt) towards the Lining. The sewn edge of the Ribbon runs flush along the waistline on the Lining side, and the Outer Skirt has a clean finish. Press and pin the Ribbon in place.

At one overhang, open the fold of the Ribbon. Fold the short edge of the Ribbon around the side edge towards the Lining side of the Skirt. Refold the Ribbon around it, encasing the short raw edge in the fold. Pin in place.
Repeat at the other end.

Sew the long edge of the Ribbon down with an edgestitch, then sew a line perpendicular to this seam at the two short ends.
This is the Waistband.
Attach the Snaps

Place a pin through the Waistband on the Lining side of the Right Front flap, about ¾ inch from the side edge. Now, place a pin through the Waistband on the Outer Skirt of the Left Front flap, about ¾ inch from the side edge.

Lay the Skirt out flat with the right side facing out and the Right Front flap on top, folded at its side seam. Mark with new pins the spots where the original pins meet the opposite flap.
All these pins mark the placement of the snaps.
Alternatively, for a more accurate fit, you can try the skirt on and mark the spots while the Skirt is contoured to your body.
Use the Hand Quilting Thread to sew the ball sides of the snaps to the Right Front flap and the socket sides of the snaps to the Left Front Flap.
Your Wool Wrap Skirt is finished and ready to wear!


This is really gorgeous! It’s so timeless & classic. I’ll have to order some of your wool felt to make it. Thank you so much.
This is really gorgeous! It’s so timeless & classic. I’ll have to order some of your wool felt to make it. Thank you so much.
Lovely design. I don’t see the usefulness of lining it with lawn, however – it will grip leggings, tights, stockings, whatever, just as much as the wool would alone, Might be easier to handle than a trad slippery lining fabric, but won’t function well.
Hi francescar –
You are right, the cotton lining doesn’t replace the need for a slip for this Skirt, but we wanted to include it to eliminate any wool-on-wool static at the overlap of the wrap in the front. It can easily be replaced with a more traditional, slippery lining and that will solve both problems!
I hope this helps!
-Corinne
Very beautifull !! Simple but very chic !! Thank you so much !
Very beautifull !! Simple but very chic !! Thank you so much !
Love this skirt, although I think I would make the cut a little less flared. Beautiful!
Love this skirt, although I think I would make the cut a little less flared. Beautiful!
Thank you for the tutorial.
Thank you for the tutorial.
I have never printed a pattern from you guys or any site before – is there a paper size you recommend for printing this to scale?
Hi Sarah –
I am so glad this Skirt has inspired you to work on your first printed pattern from our site! Welcome!
You can print our pattern PDF on standard letter sized paper. Just be sure to print at 100% (actual size). Once printed, cut out and assemble the pattern pieces as instructed on the template.
Please let me know if you have any questions along the way!
-Corinne
The lining fabric is easy to work with, but if you wear the skirt with tights it will ride up.
Hi ParkerL,
You are right, the cotton lining doesn’t replace the need for a slip for this Skirt, but we wanted to include it to eliminate any wool-on-wool static at the overlap of the wrap in the front. It can easily be replaced with a more traditional, slippery lining and that will solve both problems!
I hope this helps!
-Corinne
Thank you so much for this pattern, I’m new to needlecraft and your site is giving me clear tutorials, I think I may be able to make this beautiful classic skirt. The only problem I have will be sourcing the fabric and materials I need, I live in England, so I’m unable to purchase everything I need for this new and exciting hobby. I love all the fabrics, wools and tools you show, you make it so easy for your clients, I only wish I lived nearer to you.
Hi Rachel –
Thank you for your kind comment! It is so great to hear from you.
We offer international shipping for all of our products, so even though we are half a world away, you can get any supplies you see here delivered to your doorstep! For more detailed information about our international shipping options, please email customerservice (AT) purlsoho (DOT) com and they will be happy to assist you with your order!
Best,
Corinne
You give the hip sizes — what are the waist measurements?
I’d love to make this but my waist is the issue…
Thanks.
Hi Katherine –
This is a great question. The waist measurements for the finished garment are 26 1/2 (27 1/2, 29 1/2, 31 1/2, 33 1/2) inches, with some flexibility with the placement of snaps. For example, I have a 29-inch waist, but can wear the 27 1/2-inch waist size comfortably (this is the size that most accurately matches my hip measurement).
If you are concerned with how the Skirt will fit you at the waist, I recommend making a muslin first to test the fit. You may find that a small shift in the placement of snaps works, or that you want to do a slight re-draw of the hip curve to fit your individual body shape. Either of these are easy fixes, and you can always get in touch here if you have any questions along the way!
I hope this helps!
-Corinne
Gorgeous skirt… exactly right!
Can you help me extrapolate for a plus size?
Tracey
Hi Tracey –
Thank you for your kind words! I am so glad you like the pattern! The Skirt should be fairly easy to size up or down.
Once you print out and assemble the pattern, you will see that each size is a pretty straightforward 1/4-inch to 1/2-inch larger along the side edges than the size before it. To adjust the skirt to your size, first take a hip measurement. Divide this number in half. Add 1 1/4 inch to this number (for seam allowance), and divide in half again. This number gives you the width of the Skirt Back pattern piece at the hip (about 4 3/4 inches down from the waist edge). Let’s say this point is 1 inch out from the largest size on the pattern. Continue to draw a line that is 1 inch away from the cut line all the way down the length of the Skirt. Extend the waistline and bottom edge to meet this new cut edge. You do not need to make any change to the folded edge of the pattern piece.
Repeat for the Left And Right Front pieces, drawing a line that is 1 inch away from the cutting lines of the two side edges of the largest size.
Once you have made these changes to the pattern pieces, I recommend making a muslin as you may find that you want some alterations in the hip curve as well to fit your individual body shape.
I hope this helps get you started! Please let me know if you have any questions along the way!
-Corinne
Regarding the side view, is that seam supposed to flare out to the back instead of hanging straight down? Looks wonky.
Hi Jayne –
Thank you for writing in! The side seam of the Skirt runs straight down the side with a curve for the hip and a slight A-line. I think what you’re noticing in the photo is just a small shift in the fall of the seam from the fluidity of the bottom hem. I hope this clears up any confusion!
Best,
Corinne
Lovely skirt!
However, are the outer edges of the outer skirt left unfinished? If so, is this due to the characteristics of the fabric you stipulate?
Hello Nicola!
Yes, this fabric is boiled wool, so the felted texture will not fray or look unfinished. We love the simple contours of this skirt also! Enjoy! -Alyson
I really like all the details in this skirt, and the approach to the hem and waist. However, after just pin-fitting the wool layer (possibly a thinner fabric than you used), I’m noticing a possible grain problem that I had once before with a one-piece skirt back. When the grain runs straight down the center of the skirt, all the excess ends up at the side seams. On the previous project (a dress with a fuller skirt than this), I found Sandra Betzina’s method really effective. She has you convert it to a four-gore, fold the front and back pieces in half lengthwise, and use the fold line for the grain. Obviously I couldn’t do that for the front pieces, but I’m wondering if doing that on the back would help it hang better. What do you think?
Your skirt’s narrower than the one I had problems with it, but the approach to the grain is the same. Even at the pin-fit stage, I can see some pooling of fabric at the sides. Thoughts on this? I haven’t cut the lining yet, so could save myself some work yet …
Hi Christi –
Thank you for such a thoughtful and informative comment! I’m not familiar with Sandra Betzina’s method that you describe, but it sounds interesting. I will definitely take a look. In the samples I made, I didn’t notice the fabric pooling issue you describe, but if you are I can’t see that you would have any issue cutting in the method you describe. Sounds like a very helpful tip!
Thanks for sharing!
-Corinne
Thanks, Corinne. It took a while, but I’m nearly done with it, using a suiting-weight wool I had. I’ll post a picture when I’m done, but I definitely had grain issues and had to bring the sides in about 3″ at the hem line for all pieces. It hangs beautifully now, though, if I can just fix some wonkiness along the hip line (probably an issue with my shape).
Beautiful design. Is this wool really almost $100/yd? #askingforafriend
Hi Lucy –
Thank you for writing in! I’m so glad you like the pattern!
Lanecardate’s Lana Cotta is a fine Italian wool and is a truly exceptional, and yes, expensive fabric. We understand that it is not in everyone’s budget!
This Skirt could absolutely be made in a range of other fabrics, including linen, flannel or cotton. You will just want to keep in mind that since the Lana Cotta is a felted wool, we were able to keep the outer edges of the front flaps of the Skirt unfinished. If you make this pattern with a traditional woven fabric, you will want to add a seam allowance to this edge to accommodate a hem.
I hope this helps!
-Corinne
Since I can’t wear wool, can you makea comparable fabric recommendation?
Hello Angelika –
Thank you for writing in! This is a great question!
This Skirt could absolutely be made in a range of other fabrics, including linen, flannel or cotton. You will just want to keep in mind that since the Lana Cotta is a felted wool, we were able to keep the outer edges of the front flaps of the Skirt unfinished. If you make this pattern with a traditional woven fabric, you will want to add a seam allowance to this edge to accommodate a hem.
I hope this helps!
-Corinne
Hi there if I wanted to make this skirt but less flared what would be the best way to amend the pattern?
Hello Anita –
The flare of the skirt comes from the A-line shape along the side edges. You should be able to reduce the flare by adjusting this line. However, adjusting this line may also affect the fall of the wrapped edges in front. I recommend making a sample skirt with your adjustments and then making final changes from your sample to ensure the best fit.
I hope this helps! Please let me know if you have any other questions as you work!
-Corinne
Anita, I made an adjust that like that. To get the line right, I used a more fitted skirt as a guide (see related comment above).
Cute skirt! One tip I would recommend is using bias tape instead of ribbon for the hem as it curls better with a rounded hem as is created with an A-line hem. It could also be great to make your own bias tape with the same fabric as the lining, especially if it’s a contrasting lining.
A classic skirt, which I ended up making with wool suiting and poplin from my stash. Felted the wool first but it’s still going to need finishing on the front edge. I also wanted less flare and did as Corinne suggested – made a sample from some “scrap” cotton from my stash and then pinned the sides to reduce the flare, to a more subdued A-line. I traced my mock up onto the pattern pieces (only the side seams changed) and redrew the cutting line accordingly, so I can sew this up again in another fabric.
I did *not* end up with the front fabric extending over the lining on both sides, just on one. On the right side, the lining extended beyond the front fabric – the difference measured the same on both sides. Maybe an error that slipped in when I redrew the side seams? But no mind, that will be easily adjusted.
Most definitely make this skirt in chambray or linen for summer, and thinking of doing what Adele says – bias tape edging from the lining fabric. Thank you for a lovely pattern!
Hello Jane –
Thank you so much for writing in with this update! It sounds like you ended up with a really lovely skirt, and I am so glad that you are inspired to make even more! I know that other readers will find your comments and experience very helpful.
Happy sewing!
-Corinne
Thank you for providing this pattern! I have printed the pattern, however, I could not find anywhere whether the pattern includes the seam allowance or whether I am supposed to add seam allowance before cutting. Perhaps I’ve missed it but appreciate if you would advise.
U.S. patterns typically include the seam allowance (5/8″) but for Japanese pattern books I have used, a 3/8″ seam allowance must be added to the pattern outline before cutting.
I have enjoyed the wonderful sensibility of the patterns and fabrics on your site! Plan to make this skirt in both wool and in a beautiful indigo linen that I have on hand.
Aloha.
Hello Taryn –
Thank you for writing in. This is a great question!
All seam allowances are included in the pattern, and should be followed as described in the pattern (mostly 5/8 inch).
I hope this helps!
-Corinne
Thank you Corinne! Appreciate the prompt response.
Taryn
Thank you for this beautiful pattern and tutorial! A friend recently gave me three large tubs of gorgeous wools which her seamstress grandmother would not be able to use. I don’t have a lot of experience working with wools so I’ve been looking for patterns that will help to develop my sewing skills but still take full advantage of the high quality wool. This is perfect!
Hi, I am so excited to sew this skirt! I have two questions though. One, I am vegan and therefore do not use wool, is there a good alternative that I can use in place of it? I know wool is kind of a wonder material, so something that will at least give a similar drape.
Second, I was wondering if the skirt is roomy enough in the rip/rear area that I could use a smaller size in order to accommodate my waist which is fairly small in comparison. The second should work well in my hip area, but my waist is only about 25″.
Again, love the skirt and look forward to making it!
Hi Sarah,
Thanks for writing in! This Skirt could absolutely be made in a range of other fabrics, flannel would probably work as a closest approximation. You will just want to keep in mind that since the Lana Cotta is a felted wool, we were able to keep the outer edges of the front flaps of the Skirt unfinished. If you make this pattern with a traditional woven fabric, you will want to add a seam allowance to this edge to accommodate a hem.
Because our sizing is based on hip measurements and not waist, I would recommend selecting the size that fits your hips. To accommodate a smaller waist, you can move the placement of the closure. I would hold the completed skirt on your body and mark where to put the closures base on how you would like the skirt to fit.
I hope that this helps!
Cassy
I’m sorry, I don’t like your design. No young person in the USA wears a slip. Most probably don’t know what it is. The felt is beautiful, but what beginner sewist can pay $100 per yard for fabric? To m mind, the cotton lining makes it too bulky. Your model isn’t standing up straight so the hem is higher in the back. Sorry to be so negative.
Hello JK Weigle!
Thank you so much for writing in! We hear you! We totally understand that sometimes our patterns don’t appeal to everyone and sometimes our fabric suggestions are more of an inspiration than a reality for many people. We are always happy to recommend less expensive (but still beautiful!) alternatives. In this case, we suggest that you try Robert Kaufman’s Tahoe Flannel or Shetland Flannel.
Again, thank you so much for writing in. We’re sure that lots of other readers will thank you, too!
Best,
Kumeko
Don’t you think it’s about time you at least offered measurements designed to fit plus size women. I love your designs but am always a little shot down when I read the measurements included in the pattern.
Not sure if you got the memo but plus size women want to dress in stylish clothing too.
Hello Sia,
Thank you for this feedback- we hear you. We are very sorry that our patterns aren’t currently in your size range. We really do appreciate that bodies come in all shapes and sizes and share your concern that patterns be as inclusive as possible. As a small company, we haven’t yet had the resources to offer the scope of sizes we would like to, but as our company grows, we have been steadily expanding that range and plan to continue to do so!
Warmly,
Marilla
I can’t find the pattern?
Hi Sarah,
Thanks for writing in! The template for this lovely skirt is linked in the Materials section above! I am also including the direct link here for you!
https://www.purlsoho.com/create/wp-content/uploads/2015/09/purl_soho_wool_wrap_skirt_v1.pdf
Happy sewing!
Cassy
Hi! Long-time knitter/Purl customer (since the Sullivan Street days!) and want to learn to sew. How do you feel about this pattern for a beginner? (Yes, I bought a used sewing machine in lockdown.) I bought some cotton canvas fabric and I’d like to make a wrap skirt with it. Questions: can I use this pattern if I don’t line the skirt? Can I make it shorter? Would you come to my apartment and teach me to sew?
Thanks!
Hi Rebecca,
Thanks for writing in! If only we could make house calls! However, I think I can help you get started on your new sewing journey! If you haven’t done any sewing at all yet, I would suggest getting started with something even easier, like our Easy, Easier, Easiest Totes or Railroad Totes. A simple project like this will give you plenty of opportunities to get acquainted with your machine without having to stress over proper fit or perfect seams!
Once you’re feeling comfortable and ready to try a garment, while this skirt is very simple to sew, it might not work in a heavyweight canvas. If your canvas is very lightweight and drapey it should be okay, but in a thicker canvas the skirt will end up very stiff and won’t have the same look as ours. You might be happier with something like Essex or Shetland Flannel, which are a thick enough fabric that you won’t need to line it, but still have lovely drape and are very comfortable to wear. As long as your fabric isn’t sheer or irritating, no, you don’t have to line it! Making it shorter might be tricky, as the hem of this skirt is curved. I would suggest making the skirt first without modifications and saving the hem step until last. You can then try it on to see how much shorter you would like to make it, and trim off as much as you need, making sure to preserve the curved edge.
I hope that helps, and if you run into any other questions, please don’t hesitate to reach out!
Julianna
Thank you so much for this pattern! I made it yesterday with some thick flannel shirting, and I did not use a lining. It turned out well! Thanks again,
S
This would be very elegant in a longer version.
Hi Susan,
We agree! That’s a great idea to make this skirt longer, so please let us know how it goes if you try this out!
All the best,
Lili
Hello there…could you tell me what width for the fabric? I might make an unlined linen version, and the wool used for this skirt is no longer listed on your site, so I’m not sure of width. Thanks!
Hi Robin,
Thanks for reaching out! The width of Lana Cotta Canberra is 54-56 inches. Hope this helps!
All the best,
Lili