
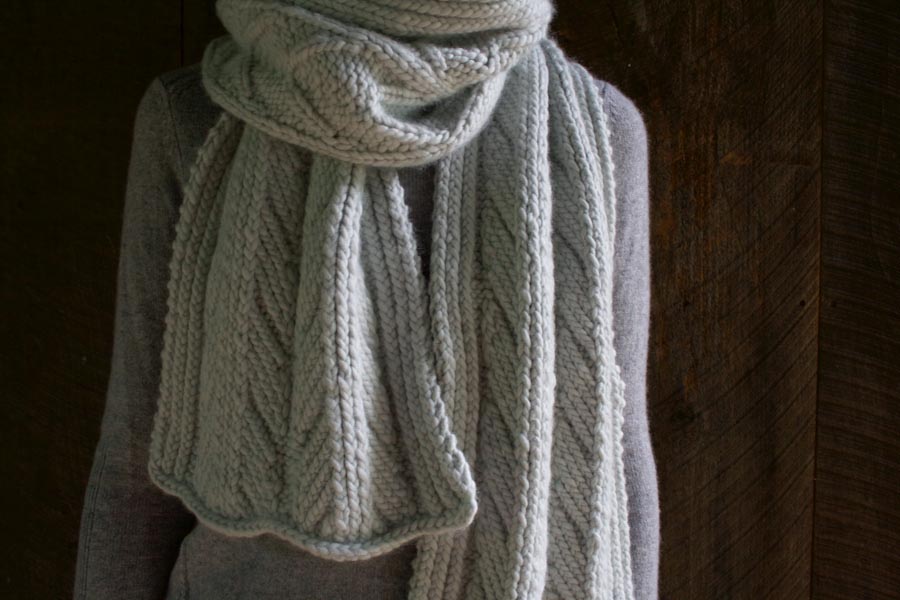
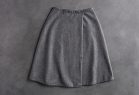
Ancient Stitch Scarf
As far as stitch patterns go, I’ve never encountered one with a more interesting backstory than this. Named Dura-Europos after an ancient Syrian town on the banks of the Euphrates river, a swatch of it is the oldest known piece of knitting in existence. Two thousand years later, the Dura-Europos stitch pattern is the source of inspiration for our big, cozy, and very modern Ancient Stitch Scarf!

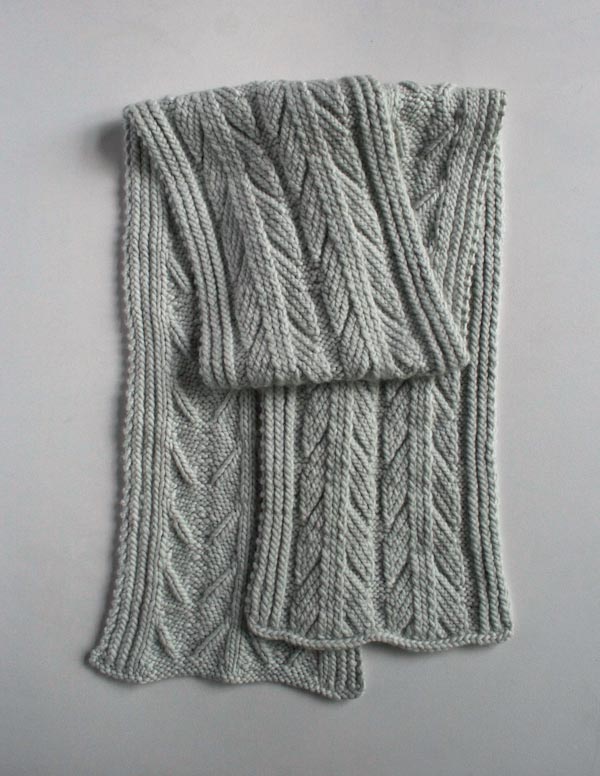
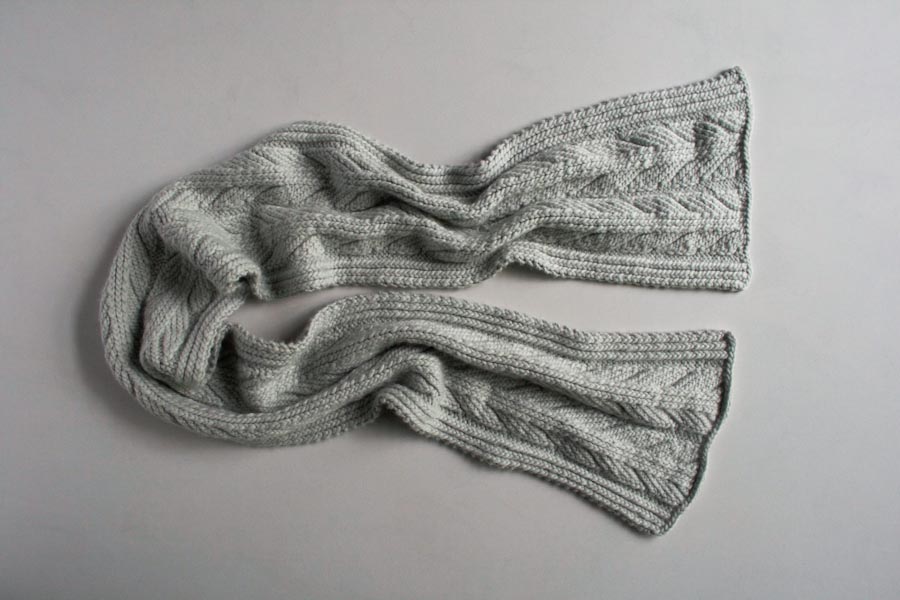
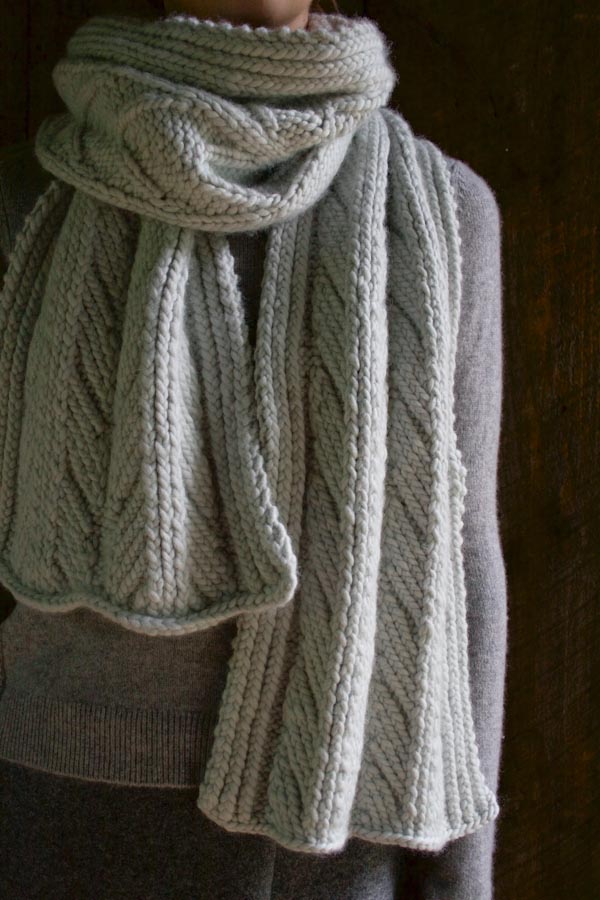
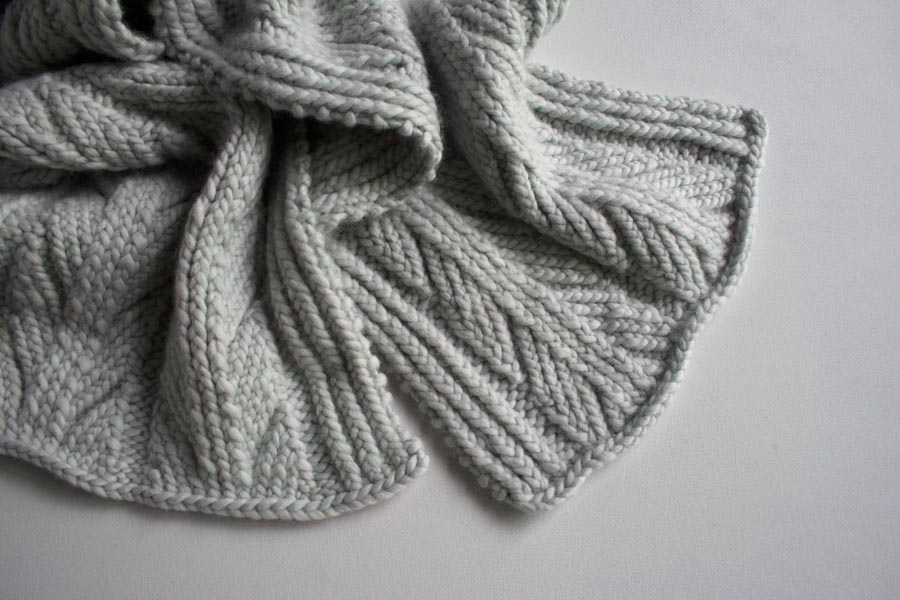
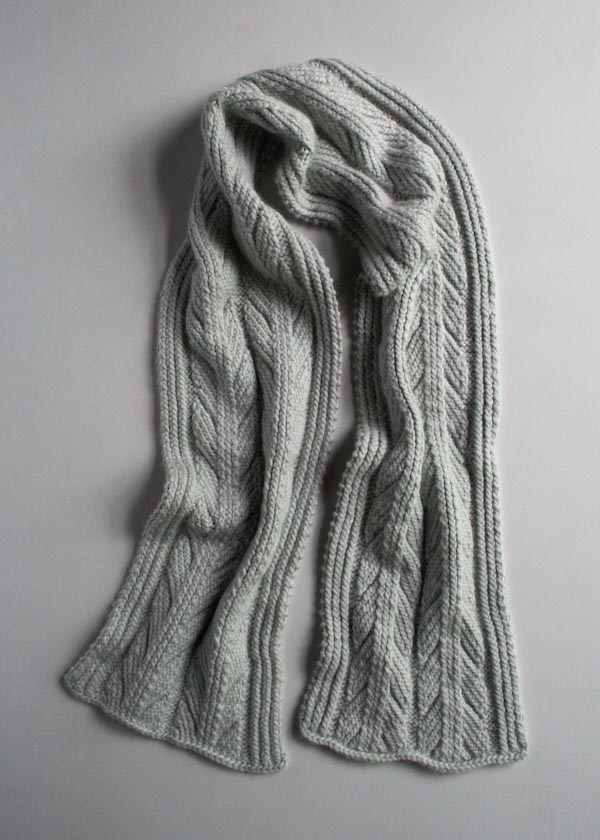
This delicate, embossed-looking motif, achieved primarily by knitting and purling into the backs of the stitches, is beautifully articulated in Purl Soho’s Super Soft Merino. We used icy-green Artemisia, evocative of pale river stones and antique jade treasures, perfect for ancient stitches!
Replicating this vital piece of knitting history was a real time travel experience: bringing the past into the present, connecting to all the knitters in the river of time, and adding my voice to the ancient chorus. First century stitch patterns make gorgeous 21st century scarves! –Kristy

Designed by Purl Soho designer, Kristina McGowan. Click here to see even more of Kristina’s designs!
Share your progress and connect with the community by tagging your pics with #PurlSoho, #PurlSohoBusyHands, #PurlSohoAncientStitchScarf, and #PurlSohoSuperSoftMerino. We can’t wait to see what you make!
Materials
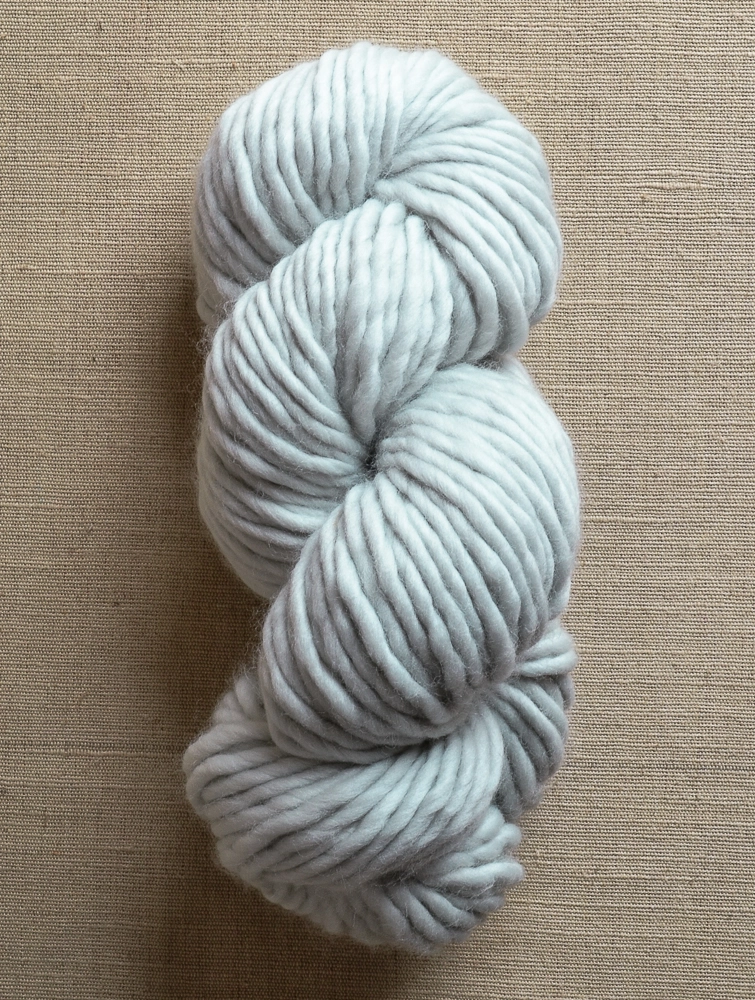
- 5 skeins of Purl Soho’s Super Soft Merino, 100% merino wool. Each skein is 87 yards/ 100 grams; approximately 435 yards required. This is the color Artemisia Green.
- US 11 (8 mm) knitting needles, circular or straight
Gauge
15 stitches = 4 inches in the stitch pattern
Size
11¾ inches wide x 70 inches long
Notes
Techniques
p tbl (purl through the back loop):
Bringing the working needle toward you (in a usual purl motion), purl through the back leg of the stitch, rather than the front. This twists the stitch.
inc (increase into purl bump):
Knit into the purl bump of the next stitch, leave the stitch on the needle, then knit into the back of the next stitch. This is a 1-stitch increase.
pfb (purl front and back):
Purl as usual into the front of the next stitch, leave the stitch on the needle, then purl into the back of the stitch. This is a 1-stitch increase.
Border Stitches
This scarf has a 7-stitch border on either side of two repeats of the pattern. Here’s how to work the border stitches…
Right Border (right side): K1, [k1 through the back loop (tbl), p1 tbl)] three times.
Left Border (right side): [P1 tbl, k1 tbl] three times, k1.
Right Border (wrong side): K1, [p1 tbl, k1 tbl] three times.
Left Border (wrong side): [K1 tbl, p1 tbl] three times, k1.
Pattern
Cast on 44 stitches. We used a basic Long Tail Cast On.
Row 1 (wrong side): Right Border (see Notes, above), [k1, p2 tbl, k1, p7 tbl, k1, p2 tbl, k1] twice, Left Border. Double-checking that, on the wrong side you really do work the right border, then the left border.
Row 2 (right side): Right Border, [p1, inc (see Notes, above), k1 tbl, p1, k1 tbl, k2 tog, k1 tbl, k2 tog tbl, k1 tbl, p1, k1 tbl, inc, p1] twice, Left Border.
Row 3: Right Border, (k1, p3 tbl, k1, p5 tbl, k1, p3 tbl, k1) twice, Left Border.
Row 4: Right Border, [p1, inc, k2 tbl, p1, k2 tog, k1 tbl, k2 tog tbl, p1, k2 tbl, inc, p1] twice, Left Border.
Row 5: Right Border, [k1, p4 tbl, k1, p3 tbl, k1, p4 tbl, k1] twice, Left Border.
Rows 6 and 8: Right Border, [p1, pfb (see Notes, above), k3 tbl, k2 tog, k1 tbl, k2 tog tbl, k3 tbl, pfb, p1] twice, Left Border.
Row 7: Right Border, [k2, p11 tbl, k2] twice, Left Border.
Row 9: Right Border, [k1, p1 tbl, k1, p9 tbl, k1, p1 tbl, k1] twice, Left Border.
Row 10: Right Border, [p1, inc, p1, k2 tbl, k2 tog, k1 tbl, k2 tog tbl, k2 tbl, p1, inc, p1] twice, Left Border.
Repeat Rows 1-10 until piece is just shy of 70 inches (or desired finished length), ending with Row 1.
Bind off all stitches. Cut yarn and pull it through the remaining stitch.
Finish
Pick up 44 stitches along the cast on edge, binding off as you go.
Weave in the ends and block as desired.


This is a beautiful scarf! Do you think it’s too chunky to gift to a man?
Hi Rebecca,
Thanks, a lot! I personally don’t think that the scarf is too chunky for a man, and think it would work well for both men and women!
Thanks for writing!
Kristy
This is a beautiful scarf! Do you think it’s too chunky to gift to a man?
Hi Rebecca,
Thanks, a lot! I personally don’t think that the scarf is too chunky for a man, and think it would work well for both men and women!
Thanks for writing!
Kristy
Wonderful scarf idea! Would the Blue Sky Tecno work for this pattern?
Thanks for sharing this!
LLAWEN
Hi Llawen,
The Blue Sky Techno would definitely work for the pattern and with its 10.5 suggested needle size, would likely allow you to get very close to the gauge. Good luck!
Kristy
Wonderful scarf idea! Would the Blue Sky Tecno work for this pattern?
Thanks for sharing this!
LLAWEN
Hi Llawen,
The Blue Sky Techno would definitely work for the pattern and with its 10.5 suggested needle size, would likely allow you to get very close to the gauge. Good luck!
Kristy
On the knitty.com link (to the fragment) there’s a photo of socks from the 300s using nailbinding. I cannot figure out the bizarre shape…does NOT look like a foot. Any ideas?
Hi Lynne,
I thought that same thing and wondered why, if it was a sock, it was segmented into those two parts! So interesting!
Kristy
I am hoping that you can help me calculate how much yarn I will need for this pattern if I use an Aran weight yarn:
crystal palace nocturne aran
4-4.5 stitches to the inch
7-9 inch needles.
Thanks!
Hi Lisa,
It’s difficult to know for sure, that yarn has 93 yards, 50g per ball and I would say that an estimate of balls needed for the scarf would be about 8. Good luck!
Kristy
I’ve cast on twice, and have had trouble with Row 2 both times. I can’t seem to get the stitches to work out to the 15 I have on my needle for the pattern repeat. I don’t see any earlier comments having issues with it, so I suspect it’s a case of user-error. Any suggestions?
Hi Meg,
I’m sorry you’ve been having trouble! That row can be a bit tricky with the variety of different stitches worked. The stitch pattern is a panel of 15 stitches and for the scarf, is worked after working 7 border stitches. So you’ll work 7 border stitches to start the row, work 2 repeats of the stitch pattern (for a total of 30 stitches) and end the row with 7 border stitches. Is there a specific stitch you may be having trouble working?
Kristy
Hi Kristina,
I, too, have cast on twice and hit a bump (pun intended ) with row two. If you read the instructions for row one, the second repeat of the pattern ends with K1, then the boarder. Then in row two, after the boarder, the first stitch of the pattern is inc (in purl bump), except since row one pattern ended with K1, the purl bump is in front and I’m stumped on how to proceed. Any advice? Am I reading it correctly?
Also, if this pattern proves too difficult, can I use this yarn (5 skeins of Artimis Green) for the fisherman’s scarf?
Thank you!
Marci
Hi Marci,
I’m very sorry that you’ve been having trouble! In Row 2, after you work the border, the first stitch is actually P1 and not inc. Please let me know if this helps clarify things and if you have any additional questions! Thanks for writing and absolutely yes, the Seafaring Scarf would also be beautiful in the Super Soft Merino!
Kristy
I’m a little stumped with a few of the rows. After the borders, row 2 only has 11 stitches in each repeat, row 4 has 12 and row 10 has 13. What am I missing? Thanks!
Hi Christina,
Thanks for writing in! I know that these rows can be a little confusing but the stitch repeat is 15 stitches across. I find that it helps to write them out with the stitch numbers so that things are a little clearer!
Row 2:
p1 (stitch 1)
inc (stitch 2)
k1 tbl (stitch 3)
p1 (stitch 4)
k1 tbl (stitch 5)
k2 tog (stitches 6 and 7)
k1 tbl (stitch 8)
k2 tog tbl (stitches 9 and 10)
k1 tbl (stitch 11)
p1 (stitch 12)
k1 tbl (stitch 13)
inc (stitch 14)
p1 (stitch 15)
Row 4:
p1 (stitch 1)
inc (stitch 2)
k2 tbl (stitches 3 and 4)
p1 (stitch 5)
k2 tog (stitches 6 and 7)
k1 tbl (stitch 8)
k2 tog tbl (stitches 9 and 10)
p1 (stitch 11)
k2 tbl (stitch 12 and 13)
inc (stitch 14)
p1 (stitch 15)
I hope that this helps clear things up!
Cassy
Thank you so much for this scarf pattern – it’s beautiful.
I also have BW2 but ‘missed’ this one. Not just the History – it’s also quite evocative – like travelling down a long road, not to mention ‘arrow heads’ and ‘hunting’ ! Or maybe just going for a walk on a cold Winter’s day.
I can’t wait to swatch this in different weights, though I guess your chunkier yarn will show up the texture best of all.
jane
Thanks, Jane! I love your images of arrowheads and hunting! I think the pattern would also be lovely in a finer weight — you’ll have to let us know how your swatches turn out!
Kristy
I just finished making this scarf in a fingering weight. I used size #4 knitting needles and it turned out to be 6″ wide after I blocked it. I did 30 pattern repeats and it ended up being 48″ long which was perfect for the cowl I made it into. It was a gift and my friend was very pleased.
It sounds beautiful, Patricia! Thanks for sharing!
Kristy
Thank you so much for this scarf pattern – it’s beautiful.
I also have BW2 but ‘missed’ this one. Not just the History – it’s also quite evocative – like travelling down a long road, not to mention ‘arrow heads’ and ‘hunting’ ! Or maybe just going for a walk on a cold Winter’s day.
I can’t wait to swatch this in different weights, though I guess your chunkier yarn will show up the texture best of all.
jane
Thanks, Jane! I love your images of arrowheads and hunting! I think the pattern would also be lovely in a finer weight — you’ll have to let us know how your swatches turn out!
Kristy
I’ve just started the scarf, but am a bit confused by the border stitches. Is the Right Border always the first border when beginning to knit each row, right or wrong side? So the Right border, right side, was just the Left border, wrong side when finishing the previous row?
I need enlightening, as I love this design and am anxious to produce it with love!
Hi Doris,
The border stitches are just worked slightly differently depending on if you’re on the right or wrong side. The pattern starts on the wrong side, Row 1, and then alternates between right and wrong. When you’re on a right side row, you’ll work:
Right Border (right side): K1, [k1 through the back loop (tbl), p1 tbl)] three times.
Left Border (right side): [P1 tbl, k1 tbl] three times, k1.
And when you’re on a wrong side, you’ll work:
Right Border (wrong side): K1, [p1 tbl, k1 tbl] three times.
Left Border (wrong side): [K1 tbl, p1 tbl] three times, k1.
I hope this helps to clarify and send my best,
Kristy
Scrolling down through the comments, I see that a couple of other people had the same idea I had. There is at least one group on Ravelry now knitting for the Syrian refugees, who are going to end up, we hope, in a safe place but one that will likely be colder than their homeland. I think it would be lovely if knitters so inclined used this ancient Syrian pattern to make scarves for this project. The central motif could even be adapted to sweaters.
Scrolling down through the comments, I see that a couple of other people had the same idea I had. There is at least one group on Ravelry now knitting for the Syrian refugees, who are going to end up, we hope, in a safe place but one that will likely be colder than their homeland. I think it would be lovely if knitters so inclined used this ancient Syrian pattern to make scarves for this project. The central motif could even be adapted to sweaters.
Hi Pam,
Thank you so much for writing and sharing these thoughts with us!
Kristy
Really a lovely design. Thank you for coming up with it.
The Dura-Europos fragment which this is based on is actually nalbinded, not knitted. It was misidentified as knitting, because it looks like twisted stitch knitting.
You’ve done a great job in translating this ancient motif into our modern craft.
Hi Jill,
Thank you so much! The credit of creating a written knitted pattern from the ancient fragment goes to Barbara Walker, who included it in her Second Treasury of Knitting Patterns, and is how I first discovered it. Interestingly, Walker explains that the term nalbinding was introduced only in the 70s, and wasn’t yet current when she wrote the Second Treasury, and you’re exactly right, it looked so much like knitting that without being able to examine the swatch itself it was impossible for her to tell the difference at the time. I agree that we’re very lucky she did! 🙂 Thanks for writing!
Kristy
tis pattern was forwarded to me by a dear friend and I knew right away that I had to make it…however, I think there is a error in row two. No matter how many times I try the pattern stitch, I only get 11 sts, not the 15 sts I should have. Am I right or am I reading/following the pattern wrong? Help, I have the perfect person to make this scarf for…Sandee
Hi Sandee,
I thought breaking Row 2 down into the stitches as they are worked might help:
p1 (1 stitch)
inc (increase 1 stitch into 2), inc = “Increase into Purl Bump” and is a 1-stitch increase. After you work it, you will have the stitch it was worked in, as well as one additional stitch for a total of two stitches
k1 tbl (1 stitch)
p1 (1 stitch)
k1 tbl (1 stitch)
k2 tog (dec 2 into 1): knit 2 stitches together, you will have one stitch on your needle
k1 tbl (1 stitch)
k2 tog tbl (decrease 2 into 1): knit 2 stitches together through the back loop, you will have one stitch on your needle
k1 tbl (1 stitch)
p1 (1 stitch)
k1 tbl (1 stitch)
inc (increase 1 stitch into 2), same as above
p1 (1 stitch)
You will be working 2 repeats of this 15 stitch sequence in the center of the scarf, for a total of 30 stitches. I hope this helps! Please let us know if you’re still stuck!
Kristy
When you say: Pick up 44 stitches along the cast on edge, binding off as you go. That finishing was done at the ends? You could also provisional cast on startup?
Thanke you
Hi Teresa,
You absolutely could! I just added that extra reinforcement in an effort to straighten out the ends a bit more, which can tend to scallop. Binding off from a provisional cast on would give you the same look and effect.
Thanks for writing!
Kristy
This is such a beautiful piece. Once I actually have time to make something for myself (so many babies born this year have kept me busy knitting for them!) I think this will be it.
This would also make a beautiful throw, I think. Maybe I’ll attempt that for my parents’ 40th coming up in 2017.
Hi Kellie!
Thank you for your kind comment! I’m really glad that you like the scarf, and agree that the motif would make a lovely throw!
I send good thoughts and thanks again for writing in!
Kristy
I think it would be good if knitters knit this scarf to sell and use the proceeds to help the refugees from Syria. Is that possible? Would Purl Bee be willing to help with this?
Blessings,
Ruth
Hi Ruth,
Thanks for writing! Although we have a policy and ask that people not sell the items that they create using our patterns, your instinct to help in this way is inspiring and we appreciate that you shared it with us!
Kristy
So Kristina, could I buy a copy of the pattern to distribute this if I give proper credit? Or could Purl Bee organize something like this?
Thanks
Hi Ruth,
The pattern for the scarf is free, and we are so glad for your interest in it! We just have a policy and ask that people do not sell the items that they make from our patterns, and would not be able to organize fund raising.
I hope this helps clarify, and thank you again for writing in,
Kristy
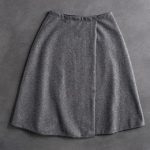
If added tassels to this piece, would the edges still curve? I’m assuming that in the photograph of the finished scarf the knitter has already tried blocking the piece…
Thanks!
Hi Allie!
The edges of the scarf do tend to scallop slightly, even with blocking (The sample was wet-blocked).
Thanks for writing,
Kristy
counted the stitches on the second row,a few times, i still only get 13 stitches
Hi Manuela,
I’m sorry that you’re having trouble! Are you getting 13 stitches after you are done working the row or are you starting the row with 13? I thought it might help to go through the row and show what the count should be for each stitch worked, and compare and see if that’s what you’re getting. Let me know if this helps clarify!
Kristy
p1 (1 stitch)
inc (1 stitch becomes 2 stitches)
k1 tbl (1 stitch)
p1 (1 stitch)
k1 tbl (1 stitch)
k2 tog (2 stitches become 1 stitch)
k1 tbl (1 stitch)
k2 tog tbl (2 stitches become 1 stitch)
k1 tbl (1 stitch)
p1 (1 stitch)
k1 tbl (1 stitch)
inc (1 stitch becomes 2 stitches)
p1 (1 stitch)
Hi,
Sorry, I know you posted this several times already. But counting the stitches above, when doing Row 2, it is still 13 stitches; ergo I have 4 stitches left before the border (7 stitches). It only becomes 15 stitches after the increases or after Row 2. How do I solve this?
Thanks
Hi Marybelle,
Thanks for writing in! I’ll try my best to help. For Row 2, the middle panels are 15 stitches a piece. I find that it sometimes helps to write out the stitches for that section. This does not include the border.
Stitch 1: p1,
Stitch 2: inc
Stitch 3: k1 tbl
Stitch 4: p1
Stitch 5: k1 tbl
Stitch 6 and 7: k2 tog,
Stitch 8: k1 tbl
Stitch 9 and 10: k2 tog tbl
Stitch 11: k1 tbl
Stitch 12: p1
Stitch 13: k1 tbl
Stitch 14: inc
Stitch 15: p1
I hope that this clears things up!
Cassy
There’s no way I get 70″ from 5 skeins of your super soft merino. My scarf is the same width as your measurements but 30″ too short. I ordered 5 skeins of 3020 terra green a couple of weeks ago, and using size 11 needles I get about 8″ per skein. What gives???
Hi Nancy!
I’m so sorry to hear that you’ve run short of yarn and it has us a bit stumped. For the sample, which we weighed again today to make sure, I used 487 grams of yarn, which is just shy of 5 skeins. My only thought is that your gauge may be different than the pattern’s? Just to make sure, are you getting just shy of 12″ for your width, 11 3/4 inches? Please let us know and we will try to get to the bottom of this mystery!
Kristy
I am wanting to try this great pattern and I like the idea of using the artemisia green yarn however can you describe what shade it is before I order. Would you say it’s mint green? This I would not like. If so, I would tend to order the off white yarn.
Please advise so I can order and get started on this inspiring project!
Thank you,
Brends
Hi Brenda,
The best way I can think to describe Artemisia Green would be to share an image of the plant with you after which the yarn was named (http://www.agreengarden.com/plants/artemisia-stelleriana.asp). It is a beautiful, icy shade with the slightest hint of green, but I would not call it minty. I hope that this helps and we welcome any further questions you may have!
Kristy
I am working my way through this one now and I love it…but I have something weird going on in rows 6 and 7, it creates an odd row of purl bumps in the middle of the pattern. What on earth an I doing wrong?? Help!
Hi Lucy!
Are you seeing a few stitches that look like purl bumps in those two rows or are all of your stitches that way? I ask only because if it is only a few, that is perfectly normal! The tips in the arrow motif in the stitch pattern do in fact look like purl bumps and when I first started working the pattern, I too thought it might be a mistake. As you work further up however, you’ll see that those stitches do in fact form the points and are purposeful and not made in error. Let us know if this is what might be happening and if not, we’ll get to the bottom of what is another way!
Kristy
Just figured it out! The pattern I printed off a few weeks ago has a mistake – it has a repeat that says Row 6 & 7 but the version online now says Row 6 & 8 – which makes a whole lot more sense…now just have to unravel everything done so far!
Hi Lucy! I’m glad to hear and yes! Those rows were transposed in the initial post. Best of luck with the scarf!
Kristy
I am back on track and it is beautiful – I am using bright pink but yesterday I also bought enough to make the mittens and also 7 skeins of beautiful pale blue in your gorgeous yarn. Thank you for being so fabulous, for sharing these fantastic patterns and for being so innovative. My goal is to get to your store one day!
Hi Lucy! That’s wonderful to hear! And it would be great to have you visit the store in person one day! Thanks a lot for your kind comment and good luck with your projects!
Kristy
Hello! I am currently knitting this for my mother-n-law for her birthday and as I’ve worked up I’ve noticed that the edge is scalloped. I have ripped it apart about 10 times trying to fix it but it keeps happening ( insert a cry face:)) Any suggestions? I’ve decided to just go with it but what happens when I bind off? Will that end be straight?
Patricia
Hi Patricia,
The cast on edge of the scarf will indeed have a slight wave to it (you’re not doing a thing wrong, it’s just the nature of the stitch pattern used), but it shouldn’t be too pronounced, especially after blocking. The bind off edge should also be quite straight when you’re done (or if anything, have a slight wave as shown in the images). Finishing with an edging as we did on either end also helps decrease the wave and again, blocking straightened the sample out a considerable amount. I hope this helps! Thanks for writing in.
Kristy
I made this scarf and it came out wonderfully!
I would like to know how to do it in your Mulberry Merino?
Hi Amanda!
We’re so glad that your scarf turned out well! To make it in the Mulberry Merino, you would just need try using a smaller afghan hook (a size G (4mm) should work well) and work up a small swatch to see how many stitches you were getting per inch. You would then multiply that number by the width (in inches) of what you would want the scarf to be. Please feel free to write back if you need help with these calculations! Good luck and thanks for writing!
Kristy
Afghan hook? Not sure what that is…
and yes I do need help with the calculations and how the pattern would repeat…thanks,Amanda
Hi Amanda!
Sorry for momentarily thinking that you had asked about using Mulberry Merino for our Tunisian Crochet Scarf! Please disregard all talk of afghan hooks! The stitch pattern for the Ancient Stitch Scarf is a multiple of 15 stitches. Our sample in Super Soft Merino has two repeats, with 7 border stitches on each side. It would be most useful if you knit up a small swatch of the pattern and marked off the seven border stitches on each side to see how wide the center 30 stitches are. From there, we can calculate how many additional stitches you would need to cast on in order to get the width you’d like. The suggested needle size for the Mulberry Merino is between 4-6. It will be a finer knit, and very beautiful in this stitch.
Kristy
ok I will try this thank you, Amanda
This may sound elementary, but I am confused as to the beginning of each row being the right border. Should I rotate my needles to continually work right to left, or are we just using the above pattern even if my right needle has the stitches needing to be worked left to right. It seems so simple maybe I am overthinking it.
Hi Madelin,
Thanks for writing in! I think you may be confusing the right side and wrong side of the scarf’s fabric with the right and left side of the border itself. When it says “Right Border (right side),” the text in parenthesis simply means the fabric itself, and the right side of your fabric will be facing you as you work your stitches. Is this where you might be getting stuck? You will knit each row through to completion without having to rotate your needles in any way. Does this help clarify? Please let us know, and if not, we’ll find another way together to figure it out!
Kristy
I love this scarf and all the help you give in making it.
I do have one complaint though, when I print out the pattern, the print is so small that though I wear glasses, I think a magnifying glass would be better!! LOL.
Could be age too, no it cannot be that, has to be the print.
Linda
Hi, Linda!
Thank you so much for writing in! I am sorry to hear that the print size was too small, that can be very frustrating! When you clicked the “Print” button a window with the pattern should have popped up and at the very top of that window (near the middle of the window) is a “Text Size” drop down box. You can adjust the text size that way. Maybe it was pre-set to a small text size?
I am delighted that you love this scarf and I hope that you’ll keep us updated on your progress! Again, thank you for your question.
Best,
Kumeko
Hey there! Love this pattern but I would really love love love to have a chart for it. Is that something you lovelies could create for us chart lovers?
Hi Monica,
Thanks for writing and for your suggestion to create a chart for the pattern. Although we don’t have one available for the scarf, it is definitely something for us to keep in mind going forward and we appreciate that you wrote in!
Kristy
I’ve been eager to try this pattern, especially because I’ve been to Syria. However I’m having trouble purling in the left side of the loop. From watching the video I’m wondering if this stitch only works for knitters who hold their yarn in a way to have their loops always hang from the needle with the right side of the loop in the back. I’m one of those knitters with loops hanging from the needle according to whether the stitch on the previous line was a knit or purl stitch. I’m finding purling on the left side of the loop pretty impossible on those stitches in which the stitch on the row below was a purl, which is the majority in this pattern. Is there an alternative? Or do you have a tutorial for learning the other way to hold my yarn? Thanks.
Hi Kate,
We’re sorry that you’ve been having trouble purling through the back loop. It can be tricky, and one thing that might help to keep in mind is that the purpose of knitting through the back loop is just to twist the stitch slightly. If you’re having trouble gaining access to the back of the stitch at the outset (purling it from back to front), it may help to just make sure that the stitch you’re working is not twisted on your needle just before you start. This may be what is making it difficult for you to gain access and work the stitch. You will hold your yarn to the front (just as you would with regular purling). I hope this helps clarify and please do write back if you have any further questions. Thanks for writing!
Kristy
Which do you think is more challenging – the Ancient Stitch scarf or the Reversible Rivulets? They are both SO beautiful and so I need help deciding which to make!
Hi, Nancy!
Thank you very much for your question! To be honest, I think both the Ancient Stitch scarf and the Reversible Rivulets scarf are equally challenging. Personally, I adore the Reversible Rivulets scarf – it’s fun and has a modern feel to it and the fact that it is reversible is a big plus! Let us know which one you decide upon!
Please let us know if you have further questions and again, thank you for writing in!
Best,
Kumeko
Love the cast on/bind off edge at the end. What a great idea!! Can’t wait to try it.
the 3 st. rows remind me of the trinity / Father in heaven , Holy Spirit and Yeshua , Jesus – i like this very much!! thx
Thank you for this. I love this pattern so much, I made a blanket out of it! http://i.imgur.com/aQxTqjNh.jpg
can you use Cashmere merino bloom yarn for this scarf?
Hi Karen,
Thanks for writing in. Cashmere Merino Bloom’s gauge has more stitches per inch, so if you followed the pattern exactly, you’d get a very narrow scarf. I’d try knitting a swatch with two repeats and seeing if you like that width for a scarf. Best of luck!
-Adam
I am almost finished with this beautiful scarf! I just want to be clear how to bind off. Do I bind off in pattern somehow? (that is tbl, etc.) or just bind as though all stitches are the same? Thank you and can’t wait to finish!
Hi Diane,
Thanks for writing in! There is no need to bind off in pattern for this lovely scarf. You will bind off as normal and then pick up 44 stitches along the cast on edge, binding off as you go.
I hope that this helps!
Cassy
Dear Cassy,
Thank you so much for the reply! Can’t wait to finish and start another one for my friend.
Diane
Hello, This is a beautiful scarf! I’m hoping to make it for my mom for Christmas. She really loves cowls. Do you think this patten would work as a cowl? Should any modifications be made if doing that?
Thank you!
Hi Brittany,
Thanks for writing in! To make a cowl using this pattern, you could try following the basic steps in our Cable Cloud Cowl, and simply switch out the stitch patterns. The Cable Cloud Cowl is 12 1/2 inches tall, and the scarf is just shy of 12 inches wide, which would be close enough to work well. You could cast on 44 stitches (just as you would for the scarf) but use a provisional cast on as instructed in the Cowl pattern, work 30″ of the pattern and then use kitchener stitch to join the ends together, as outlined in the Cowl pattern. Let me know if this makes sense and if you have any further questions!
Happy knitting!
Cassy
Hi,
I’m tempted by this pattern but intimidated by all of the purl through the back loop stitches. when the pattern says p5tbl, is it purling 5 together through the back loop or purling through the back loop 5x (on individual stitches)?
Hello Lauren,
Thank you for reaching out! When the pattern says p5tbl it means purl 5 individual stitches through the back loop.
Happy knitting!
-Marilla
Hi,
For some reason I am not getting an embossed look on this scarf. I believe I am following the pattern properly and am doing all the stitches correctly, but am ending up with what looks like just a bunch of slightly raised and mashed together vertical and diagonal lines, not defined arrow feathers. My gauge is accurate and I’m using your Super Soft Merino. I have tried knitting more tightly and more loosely, but neither seems to make a difference. Any idea what I’m doing wrong?
Thanks!
Hi Susie,
Thanks for writing in! I am not sure what could be causing your work to look a bit flat. Sometimes this can happen when you do not knit into the back of the stitch when noted. I would be happy to look at a picture to see if I can better help out! You can send an image to customerservice@purlsoho.com and I will do my best to help!
Best,
Cassy
Hi! If I want to knit this in fingering weight do I cast on the same number of stitches? Thanks!
Hi Rebecca,
Thanks for writing in! You can certainly regauge this pattern if you like! As fingering weight yarn is so much thinner than what we used here, were you to cast on the same number of stitches, you would get a much thinner scarf! I imagine that it would be a few inches wide. You can add on additional repeats of the pattern to yield a wider scarf. This scarf is has a 7 stitch border on each side and each repeat of the middle stitch pattern uses 15 stitches. That is to say that a multiple of 15 stitches plus 14 stitches should work. You will just want to note where we say “twice” in the pattern, you will be working the number of times that is equal to the number of repeats that you have opted to work.
To determine a cast on number, you will want to knit a gauge swatch in pattern and see how many stitches you are getting per inch. You will then multiply that by the width you like and select the closest number that is a multiple of 15 plus 14 stitches.
I hope that this helps!
Cassy
Happy New Year everyone. I’m hoping you can help me with a gauge swatch. Do I do the 15 stitches of the pattern for how many rows to know my gauge? Thank you!
Hi Brooke,
Great question! To knit a gauge swatch, you will actually cast on more stitches than what is measured, since the edge stitches tend to be a bit distorted, and then measure the center four inches to compare to our given gauge. To do so for this pattern, since the repeat of the pattern is 15 stitches, I would cast on 19 stitches and work the center 15 stitches in the pattern which is indicated by brackets in the written pattern below, and work the first two and last two stitches in stockinette stitch, and continue until your swatch measures about four or five inches long. Next, count how many stitches you have over 4 inches in the middle of your swatch and compare to our gauge of 15 stitches per 4 inches. If you have too many, that means your gauge is too tight and you need to go up a needle size or two until you have achieved the correct gauge, or if you have too few, you need to go up a needle size or two.
I hope that helps!
Julianna
I’d love to try this with a cotton yarn, as I love cotton’s weight and drape (plus it’s more practical in New Orleans than wool). What would you suggest?
Hello Nina,
Thank you for reaching out! We don’t have any cotton yarns that are this thick, but you could knit it up with a thinner yarn and smaller needles. This would mean that you would have a smaller gauge so if you follow the pattern as written your scarf will come out much smaller. I would reccomend checking out our Cotton Pure or Blue Sky Worsted which would both be beautiful options. Once you decide on a yarn and a corresponding needle you can knit up a gauge swatch to figure out how many stitches per inch you are getting. Once you have this number you can use it to figure out a cast on number.
I hope this helps and let us know if you have any further questions!
Happy knitting,
Marilla
I cant even make it pass the first row, but this is driving me nuts.
when it says P7tbl, are we P1tbl x7 times or are we p7 together tbl? I hope this makes sense…
Hi Emily,
Thanks for writing in! For this step you should be purling 7 stitches individually to the back loop. If you were supposed to purl them together, the pattern would indicate that by saying something like “p7tog tbl.”
I hope that clears things up!
Julianna
I just discovered this pattern. What is it about the Ancient Stitch wish grabs me and won’t let go?!!! It just moved to the front of my queue.