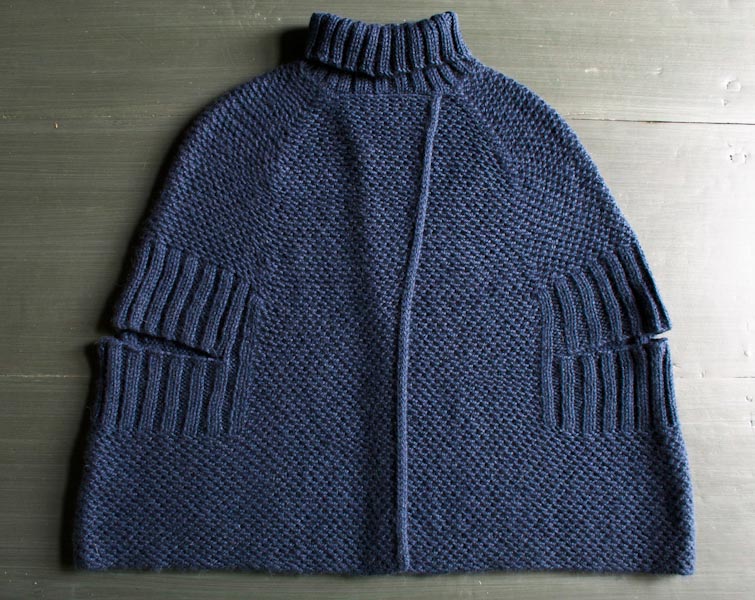
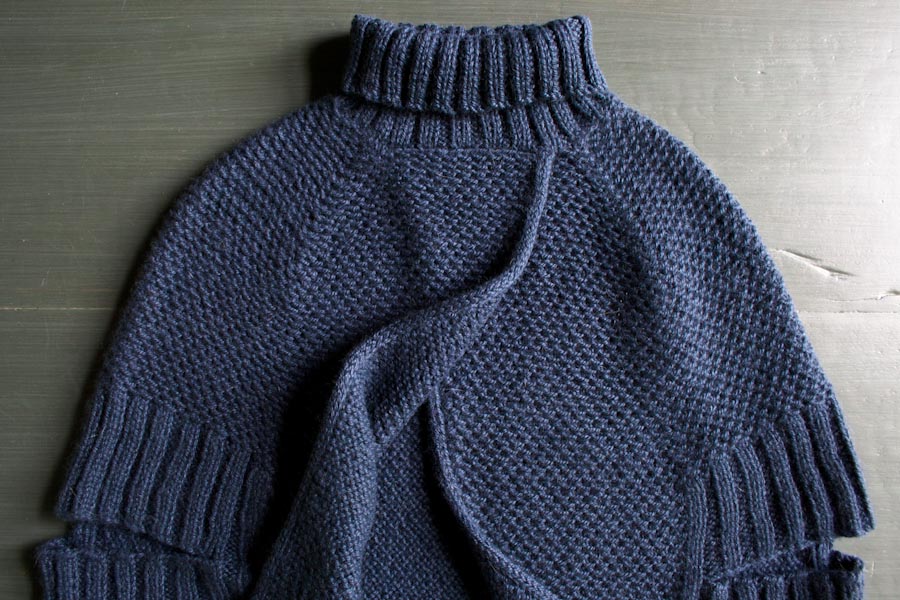
City Cape
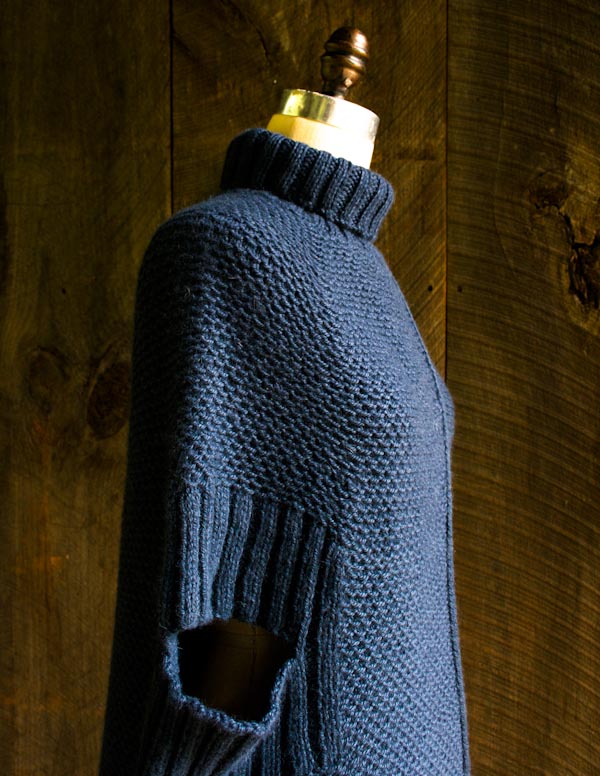
The moment Honeycrisp apples make their seasonal debut at the Union Square Farmer’s Market, I start thinking about what I want to knit for my cold weather wardrobe. First on my list this year was a cape but not a fussy Little Red Riding Hood affair. Instead, I envisioned something more modern, something for layering over leggings on weekends and also for running errands in the city on weekdays.

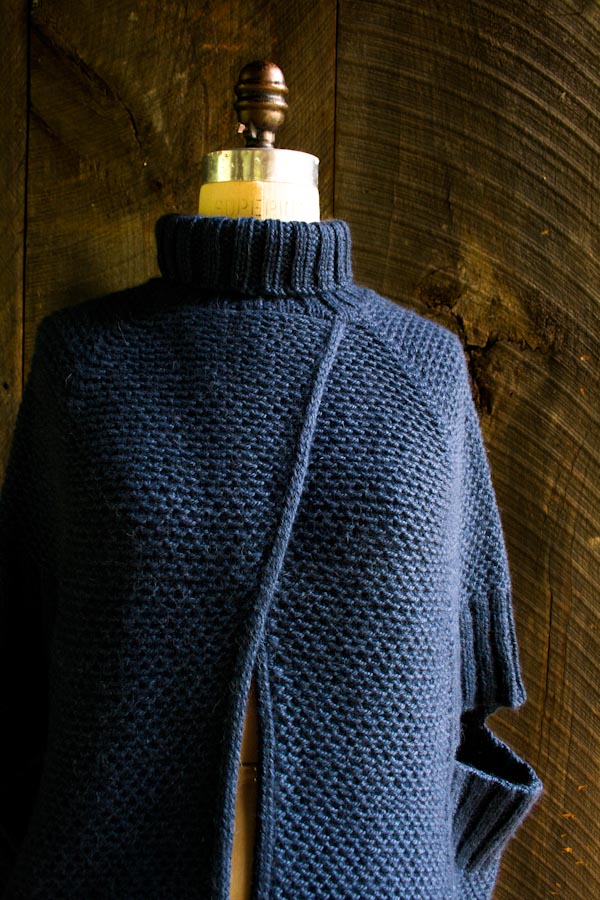
Our own Purl Soho Alpaca Pure ensures that my City Cape is seriously cozy and soft. It pops right over your head but has a pretty open front for a breath of fresh air. And precisely positioned armholes at elbow height leave my hands free at the market to pick all the Honeycrisp apples I want! -Gina
Yarn lovers, if you adore the yarn used in this project, you’ll love exploring all of our other yarn collections! Discover over 45 thoughtfully designed yarns in nearly every natural fiber and in every spectacular color you can imagine. Only available here at Purl Soho’s online yarn store, where every skein is created with care and your creativity in mind!
Designed by Purl Soho designer, Gina Rockenwagner.
Share your progress and connect with the community by tagging your pics with #PurlSoho, #PurlSohoBusyHands, and #PurlSohoCityCape. We can’t wait to see what you make!
Materials
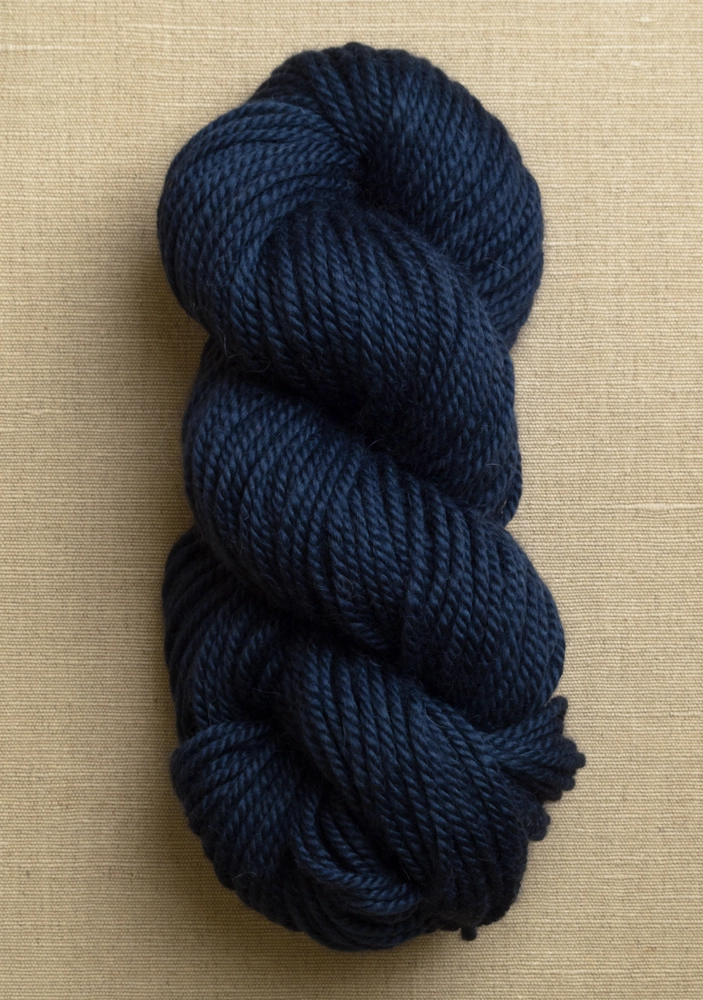
- 9 (11) skeins of Purl Soho’s Alpaca Pure, 100% alpaca; approximately 980 (1165) yards required.
- US 9 (5.5 mm), 32-inch or longer circular needles
- US 8 (5 mm), 16- or 20-inch circular needles
- A set of US 6 (4 mm) double pointed needles
- 4 stitch markers
Shop our wonderful collection of aran + worsted-weight yarn to find a suitable substitute for this project, and remember that it’s always a good idea to check your gauge before you cast on… Our All About Gauge Tutorial shows you how!
Gauge
16 stitches and 36 rows = 4 inches with larger circular needles in Woven Slip Stitch pattern (blocked)
20 stitches and 24 rows = 4 inches with smaller circular needles in 2×2 rib (relaxed)
Sizes
NOTE For help picking a size, please check out our Understanding Ease + Selecting Size Tutorial!
To fit chest circumference: 30–38 inches (38–46 inches)
- Finished circumference at bottom edge: 60 (66) inches
- Finished length from high point of shoulder to bottom edge: 22¼ (24) inches
- Finished neck circumference: 17 (19½) inches
Notes
Sl1 (slip 1): Slip the first stitch of every row by slipping purlwise with the yarn in front, then bring the yarn to the back in order to work the next stitch. This makes a nice edge and will make the Attached I-cord simpler.
Sl1 wyib (slip 1 with yarn in back): Slip 1 purlwise with yarn in back.
Woven Slip Stitch Pattern
Row 1 (wrong side): Sl1, *k1, sl1wyib, repeat from * to last stitch, k1.
Row 2 (right side): Sl1, knit to end of row.
Row 3: Sl1, *sl1wyib, k1, repeat from * to last stitch, k1.
Row 4: Repeat Row 2.
Repeat Rows 1–4.
(The Woven Slip Stitch is worked over an even number of stitches.)
Pattern
NOTE: This pattern is available as a printable PDF. Just click here.
Using larger circular needle, cast on 240 (264) stitches. We used a basic Long Tail Cast On. Do not join for working in the round.
Begin
Work Woven Slip Stitch pattern (see Notes, above) until piece measures 7 (8) inches from cast on edge, ending with a wrong side row.
Armholes
Row 1 (right side): Sl1, k31 (35), [k2, p2] 9 (10) times, k2, k100 (108), [k2, p2] 9 (10) times, k2, k32 (36).
Row 2 (wrong side): Sl1, work 31 (35) stitches in Woven Slip Stitch pattern, [p2, k2] 9 (10) times, p2, work 100 (108) stitches in Woven Slip Stitch pattern, [p2, k2] 9 (10) times, p2, work 32 (36) stitches in Woven Slip Stitch Pattern.
Repeat Rows 1 and 2 until piece measures 10 (11) inches from cast on edge, ending with a Row 2. (Because the ribbing portion of the Armhole has a different row gauge than the Woven Slip Stitch pattern, please measure the length over a section of only Woven Slip Stitch pattern).
Next Row (right side): Sl1, k31 (35), k2, p2, bind off 30 (34) stitches, p2 (first purl stitch is last stitch from bind off), k2, k100 (108), k2, p2, bind off 30 (34) stitches, p2, k2, k32 (36). [180 (196) stitches]
Next Row (wrong side): Sl1, work 31 (35) stitches in Woven Slip Stitch pattern, p2, k2, turn and Cable Cast On 29 (33) stitches, turn, pick up and knit 1 stitch from row below (where bound off stitches began), k2, p2, work 100 (108) stitches in Woven Slip Stitch pattern, p2, k2, turn and cable cast on 29 (33) stitches, turn, pick up and knit 1 stitch from row below (where bound off stitches began), k2, p2, work 32 (36) stitches in Woven Slip Stitch pattern. [240 (264) stitches]
Repeat Rows 1 and 2 until piece measures 13 (14) inches from cast-on edge, ending with a Row 2.
Decrease for Yoke + Increase for Front Overlap
Row 1 (right side): Sl1, k31 (35), place marker (pm), k58 (62), pm, k60 (68), pm, k58 (62), pm, k32 (36).
Row 2 (wrong side): Work in Woven Slip Stitch pattern to end, slipping the markers as you come to them.
Yoke Decrease Row (right side): Sl1, [knit to 2 stitches before marker, Knit Two Together (k2tog), slip marker (sm), ssk] 4 times, knit to end. [8 stitches decreased]
Work 3 rows even in Woven Slip Stitch pattern.
Repeat the last 4 rows two more times, then repeat the Yoke Decrease Row once more. [208 (232) stitches: 28 (32) stitches before first marker and after fourth marker, 50 (54) stitches between first and second markers and third and fourth markers, 52 (60) stitches between second and third markers]
Work 1 row even in pattern.
Front Increase Row (right side): Sl1, knit into front and back (kfb), knit to last 2 stitches, kfb, k1. [2 stitches increased]
Work 1 row even in pattern, working new stitches into pattern.
Repeat the last 2 rows three more times, then repeat the Front Increase Row once more. [218 (242) stitches]
Work 3 rows even in pattern.
Next Row (right side): Repeat the Front Increase Row. [2 stitches increased]
Repeat the last 4 rows two more times. [224 (248) stitches]
Work 1 row even in pattern.
Next Row (right side): Repeat the Front Increase Row. [226 (250) stitches]
Work 3 rows even in pattern.
Next Row (right side): Repeat the Front Increase Row. [228 (252) stitches: 38 (42) stitches before first marker and after fourth marker, 50 (54) stitches between first and second markers and third and fourth markers, 52 (60) stitches between second and third markers]
Work 1 row even in pattern.
Piece should now measure approximately 18 (19) inches from cast on edge.
Yoke Decrease Row (right side): Sl1, [knit to 2 stitches before marker, k2tog, sm, ssk] 4 times, knit to end. [8 stitches decreased]
Work 3 rows even in pattern.
Repeat the last 4 rows two (three) more times, then repeat the Yoke Decrease Row once more. [196 (212) stitches]
Work 1 row even in pattern.
Next Row (right side): Repeat the Yoke Decrease Row. [8 stitches decreased]
Work 1 row even in pattern.
Repeat the last 2 rows eight (nine) more times. [124 (132) stitches: 25 (27) stitches before first marker and after fourth marker, 24 stitches between first and second markers and third and fourth markers, 26 (30) stitches between second and third markers]
Shape Neckline
Row 1 (right side): Bind off 20 stitches, (1 stitch remains on right needle from bind off), k2 (4), k2tog, sm, Slip Slip Knit (ssk), k20, k2tog, sm, ssk, k22 (26), k2tog, sm, ssk, k20, k2tog, sm, ssk, knit 23 (25). [96 (104) stitches]
Row 2 (wrong side): Bind off 20 stitches, work in Woven Slip Stitch pattern to end. [76 (84) stitches]
Row 3: Sl1, k1 (3), k2tog, sm, ssk, k18, k2tog, sm, ssk, k20 (24), k2tog, sm, ssk, k18, k2tog, sm, ssk, k2 (4). [68 (76) stitches]
Row 4: Sl1, k2tog, work in Woven Slip Stitch pattern to last 3 stitches, k2tog, k1. [66 (74) stitches]
Row 5: Sl1, k1, [ssk] 0 (1) time, remove marker, k2tog, k16, k2tog, remove marker, ssk, k18 (22), k2tog, remove marker, ssk, k16, k2tog, remove marker, [ssk] 0 (1) time, k2. [60 (66) stitches]
Row 6: Sl1, k2tog, work in Woven Slip Stitch pattern to last 3 stitches, k2tog, k1. [58 (64) stitches]
Row 7: Bind off all stitches.
Finish Front Opening Edge
With right side facing and using the double pointed needles, work a 4-stitch Attached I-cord along both front opening edges, picking up one stitch for every slipped front edge stitch, beginning at the neck edge for the left front and at the bottom edge for the right front. Overlapping the right side over the left side, align the two 20-stitch bound off neck edges and pin them together.
Collar
Using the smaller circular needle and with the right side facing you, rejoin yarn at center back neck edge. Pick up and knit 32 (36) stitches from center back neck to front left neck, just before overlapped edges begin. Continue to pick up and knit 20 stitches across overlapped bound off edges, making sure to insert the needle through both bound off edges as you pick up each stitch, thus joining the two layers together. Pick up and knit another 32 (36) stitches along right neck edge, stopping when you reach the first stitch you picked up. [84 (92) stitches]
Place a marker and join to work in the round.
Round 1: *K2, p2, repeat from * to end of round.
Repeat Round 1 until Collar measures 6 inches from picked up edge.
Bind off loosely in pattern.
Weave in ends and block as desired. Enjoy your City Cape!
Looking for more inspiration? Explore all of our free knitting patterns and knitting tutorials, buy one of our many knitting kits and yarn bundles, and shop for beautiful yarn. We have over 35 gorgeous natural fiber yarns in 100’s of magnificent colors, designed to bring integrity, beauty, and joy to your next knitting project and only available at Purl Soho!


love this concept! Any photos on a person? I would like to see how it drapes over arms.
Thanks, Joy! We will post a picture of the cape on a person on our Instagram account later this week, probably sometime tomorrow. I hope you’ll check it out there! -Gina
I must start by saying that this is gorgeous!
Now for my question. I’m one of those people that constantly pull on the neck if I wear a turtleneck. So would it be possible to make the neckline into a cowl? if yes, do you have any suggestions as to how to go about doing so?
Thank you!
So agree with your comment!
This Capelet is classic! Thank you!
Love it and can’t wait to finish the sweater I am knitting!
If I wanted to use a Manos del Uruguay yarn, which would you suggest for gauge? Thank you!
Hi Diane,
Thank you so much for your comment.
Which Manos del Uruguay yarn were you thinking of using? Maxima or Classica would be fabulous knit up in the same gauge as the pattern, but I’m afraid Silk Blend and Fino are too fine for this project. I hope that helps!
Gina
Gorgeous – any chance we can see on a person?
lovely! i’ve been waiting for a sophisticated cape pattern to emerge, and this is it. i can also imagine it using the lofty brioche stitch (a la Sweater Shawl). must put this on my to-knit list.
Wonderful to have a downloadable pdf as an option – thanks for simplifying life!
I, too, would love to see this on a person. Please post that picture if possible. Love the pattern and look.
Hi Mari,
Thank you for your kind words! We will post a picture of the cape on a person on our instagram later this week. Make sure you check it out!
Gina
Beautiful! My Gram who taught me to knit loves cape coats. This will be a wonderful gift to her. Would the Brooklyn Tweed be a good alternate yarn choice? Thanks!
Thank you, Megan! Yes, I think Brooklyn Tweed Shelter would be a great choice.
You guys always make me happy! I am coming to visit this weekend
can not answer the 7+ nine = the answer block only allows one digit!
If i wanted to use a lighter weight yarn for this how would i adjust the pattern to fit ?
Hi Debbi,
Sorry you were having some problems with the comment moderator. I did receive both your comments, so it did work after all! Thanks for writing in!
Gina
I love the pattern, but live in a less chilly climate. How could I adjust the pattern to work with a lighter weight yarn, (sock/dk maybe?
Hi Debbi,
Thanks for your comment! Adjusting the pattern for a lighter weight yarn is not a simple fix. We don’t currently have plans to make the same pattern for a lighter weight yarn, but we will certainly keep it in mind! Thanks for the suggestion!
Gina
It is beautiful and just what I’ve been looking for! Love the way the front overlaps. Would you happen to have a picture of someone wearing it that you could post?
I’d love to knit this, but would really like to see a picture of someone wearing it first. It looks gorgeous — I am thinking Madelinetosh Pashmina would also be a gorgeous yarn choice….
Hi Robin,
Thanks so much for your comment. Tosh Pashmina Worsted would make a great choice! We will post a picture of the cape on our Instagram later this week!
Gina
This is great! I have actually been plotting Christmas knitting in September (i KNOW!!) and I think this might be just the thing for a friend. Thanks for the pattern.
Gorgeous cape!
I tend to pull at turtleneck type necklines. Is it possible to do a cowl neck? If yes, any suggestions as to how to go about doing so? And of course, do you think a cowl neck will look nice on this cape?
Thank you!
Hi Liz,
Thank you for writing in! An easy way to transform the collar into a cowl: After you pick up and knit the stitches for the collar, instead of going directly into the ribbing, work the first round as (kfb) into every stitch. You will have double the number of stitches for the collar as the patter indicates. Now continue in K2, P2 ribbing until the cowl is as long as you’d like. Bind off in pattern. Let me know if you have any additional questions on this!
Gina
Ok my husband helped me pick out the yarn for this. He’s so supportive:) We decided on Madelinetosh Tosh Merino instead of the Brooklyn Tweed. That will work well, correct? Thank you again for such a lovely pattern. Great to start my fall knitting with this.
Hi Megan,
Sounds like you have a great husband! Madelinetosh Tosh Merino is a wonderful choice. I’d love to see a picture of your cape in Tosh! Thanks for writing in and happy knitting. – Gina
Hi! Thank you for the pattern i love it!
Do you think i can use jade sapphire cashmere? 6 or 8 ply?
G
Thanks
Ciao
Francesca
Hi Francesca,
The cape would be absolutely lovely in cashmere! I recommend the 8 ply for this project. Thank you! – Gina
https://www.purlsoho.com/purl/free-pattern/1b6MTM0NDA3fA~~384
this address whith the new letter doesn’t work. Too bad !
Hi Marie-
I’m so sorry you’re having trouble with our newsletter. Please email customerservice AT purlsoho DOT com and they will sort this out for you.
Thank you!
Molly
I love this so much! Can you suggest any other yarns, for more color options? Alpaca pure seems to be a heavy worsted, am I right?
Hi Alexis,
You are correct, Alpaca Pure is a heavy worsted weight. Some other good options for the cape are Purl Soho Worsted Twist, Manos del Uruguay Maxima, or Tosh Merino. You can also search yarns by gauge on our site, which is really handy for choosing yarns! Just click here to browse all Worsted/Aran yarns. Thanks for your question! -Gina
Awesome, thanks! I love you guys!
Ooh, contemplating knitting this to wear while babywearing this fall and winter. Any of you purl bees own an Ergo or similar? I’m hoping the cape would fit over a soft-structured carrier worn in front.
Hi Kate-
I think this could work well with an Ergo. My daughter is too big for her Ergo now but I did use one and I can see that this would work! But it wouldn’t go over the baby very much unless you added a closure or button at the bottom- does that make sense?
Let us know if you have any more questions!
Best-
Molly
Posting additional pictures on Instagram is nice but I don’t have an Instagram account and I do not want one. Seeing a garment on a person – especially a garment that will require as much effort as this one – is really important. Do you have another alternative?
Hi Jane-
You don’t need your own account on Instagram to see our photos. You can see our entire Instagram photostream here: http://instagram.com/purlsoho
And the specific photo of the cape can be found here: http://instagram.com/p/tnLmZsjhXe/?modal=true
Thank you!
Molly
any suggestions for making it a bit bigger, for a 50″ to 55″ chest?
Hi Katherine,
We don’t have plans to offer the pattern in additional sizes, but we will definitely keep it in mind. You could add additional stitches to the back and front portions of the cape, then work more “yoke decrease” rows in the later part of the pattern. Thanks for writing in! – Gina
Can you recommend a wool yarn (non-alpaca ) for this pattern? Thanks!
Hi Im,
Purl Soho Worsted Twist or Manos del Uruguay Maxima would be great wool yarn choices for the City Cape! Thank you for your question. – Gina
My chest circumference measures at 37.5″. Would you recommend the smaller size, or sizing up to the bigger size. I took the measurement while wearing a lightweight sweatshirt. I love your input!
Hi Janelle,
Great question. Unless you have particularly broad shoulders, I would recommend the smaller size for you. I have a 40 inch bust line myself and moderately broad shoulders and the S/M size is slightly too small for me. Thanks for writing in! Let me know if I can help with any other questions. – Gina
My chest circumference measures at 37.5″. Would you recommend the smaller size, or sizing up to the bigger size. I took the measurement while wearing a lightweight sweatshirt. I love your input!
(No sure if this went through the first time.)
Vintage, yet Modern, Outstanding blend.
Thank you.
This is simply beautiful, thank you!
I am wondering how the worsted twist would work for this and how it would be different from the result of the alpaca?
Also, approximately how long does this pattern take to knit up (for a relatively experienced knitter, with not much free time!)
Thanks again 🙂
Hi Pastille,
Thank you so much for your question and kind compliments! The cape took me about 2 weeks to knit, working about 8 hours per day. Assuming you could knit 4 hours per day, I would guess it would take you about 4 weeks to knit.
To answer your first question about the Worsted Twist, I think the result would be lovely! It may drape less than the alpaca, because it is slightly lighter, but for this project that is fine! Does that make sense? – Gina
This is gorgeous! Is there a way to transform this into a crochet pattern? Is this even possible? Thank you!
Hi Ellie,
I’m not a crochet expert, I will admit. We don’t have a crochet version of this pattern in the works currently, but I will keep it in mind. Do you know any crochet patterns that mimic ribbing? The arm holes would be the most important detail to duplicate, so it would be important to find a crochet stitch that acts like a rib knit stitch. Thanks for your question! – Gina
I bought the yarn to make this today! But, would it (pretty please!) be possible to see the larger size modeled. I am thinking I need to make the larger size, but I’m afraid I will be swimming in it.
Thanks! Love your designs!
xoxo
Beth
This might be a stupid question, but should I measure around the largest part of my bust, or under the bust? I am right smack in the middle of the 2 sizes and I can’t decide if I should size up or not!
Hi Shelley! Great question, I’m glad you asked. You should measure around the fullest part of the bust. Regarding the sizing, I’ll say it’s mostly a matter of preference. If you want a looser, longer cape, make the larger size. If you want more of a capelet, make the smaller size. I hope that’s helpful! Please don’t hesitate to ask anymore questions. Thanks! -Gina
Hi,
This cape is so pretty! I’m wondering if I can just buy it as I know nothing about knitting. Thanks!
Dear Joline-
Thanks so much for getting in touch about this and for your kind words about this project. Unfortunately we don’t sell any of our finished projects but if you’d like to find a knitter to make it for you you can contact our store at 212-420-8796.
We also have classes in case you want to learn to knit!
Best-
Molly
Do you think Blue Sky Extra would be suitable for this and have a similar drape?
Hi Kate,
Yes, I think Blue Sky Extra would be a suitable yarn for this project. Blue Sky Extra, however, will not drape as heavily as Purl Soho Alpaca Pure, so I would advise getting an extra skein in case you need more yardage to get the length you want. Thanks for writing in and let me know if you have any more questions! – Gina
Lovely cape….just in time for a new project.
Thank you
I am 18 inches into my cape and I am in LOVE! I am not sure if I will do the cowl or the turtle neck as designed. I am afraid of the edging..but hope to figure it out. I am racing towards the finish line. This yarn…this Alpaca Pure..is heaven in my hands! thank you, thank you THANK YOU!
Hi GG! Thank you so much for your kind words. Let me know if you can’t figure out the edging. I’d be happy to suggest an easier way to do it if you can’t get the hang of it. Make sure you refer to the tutorial for attached i-cord! All my best, Gina
Hi! I am 2 inches in using the suggested yarn, what a lovely knit. This is the first thing I am making for myself…so excited. I have never knit anything this large before, and notice the bottom looks to be ‘curling/wavey’ (not rolling up though). I am wondering if this is temporary…or…should I start over (but don’t know what I would change). Thoughts? Many thanks…
Hi Becky,
Thanks for your question! I’m wondering, in what way is the bottom curling? When I knit the cape, the front edge (not the bottom edge, but the opening edge) did curl slightly towards the right side of the garment. The curling when away completely once I stabilized the edge with the attached i-cord. Blocking or steaming helps tremendously as well. If what you are experiencing is different, let me know! I want to help you trouble shoot. Thanks again! – Gina
I’m about halfway, and realizing that I’m contemplating no large collar. Besides a roll collar or attached icord, can you think of any other suggestions? I saw GG wear it with a different cowl for rheinbeck, and I love the option to pair with scarves or cowls to complement instead of being built in. Thank you, you guys rock!! (@cheriwan ravelry @yarnologie IG)
Hi Jillian,
Great question, thank you for asking! In lieu of the large collar, a roll collar, or attached i-cord around the neckline, you could follow the same instructions to pick up and knit the collar, but only knit the ribbing for 1 inch or 2 inches. This will make a crew neck. I hope my suggestion is helpful! Let me know if you’d like other suggestions, I can keep them coming! All my best! – Gina
Wow I love this cape, and this is a pattern I have been looking for – you really have an eye for design. Sadly I live in Scotland but hoping a friend who is visiting NY can pick up some yarn for me. In the meantime can you recommend any yarn in the UK – I was wondering about drops alpaca silk?
Hi Frances-
I’m afraid we don’t have any experience with that yarn, or yarn in the UK in general. But if you find something warm with a similar gauge you should be fine!
Thanks for writing in!
Molly
hi Gina – it had been getting wave-y along the bottom edge, but now that I’ve got a few inches knit, it seems to be settling out. Thanks, it’s knitting up beautifully!
Hello. My question is concerning the gauge of 16 stitches x 36 rows = 4 inches with size 9 needles in woven slip stitch pattern. Is there a possibility that gauge might should read 16 stitches x 32 rows?
Hi Michelle,
Great question. Row gauge can vary a lot, even if you are hitting the stitch gauge exactly on the nose! The cape has a lot of drape to it, meaning it gives in the length when it is worn, so if you are getting a slightly different row gauge, the over all shape of the cape will not be affected much. I hope this helps! If I can answer any further questions, please do not hesitate to ask! Thanks for writing in! – Gina
hi,
could you give specific instructions on knitting a rolled collar, not a cowl?
also, has there been any pattern corrections or errata?
thanks
Hi Mary,
To knit a rolled collar:
Follow the instructions in the pattern to pick up and knit the stitches for the collar. Instead of working a rib stitch over these stitches, simply knit every stitch for 5 or 6 rounds (longer if you want a bigger roll). Loosely bind off these stitches.
There have been no pattern corrections so far, but I will be sure to respond to this comment again if there are any in the future!
Thanks for your questions! All my best, Gina
Great pattern- I’m enjoying knitting this one up! I do have a question though. I just finished the first decrease for Yoke section and I didn’t end up with the same stitches on my needle as shown in the pattern. The decrease (K2tog, SSKx4) only occurs on the front right side, correct or am I not reading the pattern properly? I end up with 28 stitches to the first marker, but still have 32 after the last marker, and I also have more stitches between the middle markers. Since its not a tight fitting garment, maybe its not a big deal, but I am wondering if I should skip some of the increase stitches to try to maintain the total number of stitches for the next section.
Hi Brenda,
Thanks for your question! You should work the Yoke decreases on every section, not just the front right. This should explain why you had some stitch discrepancies after working the first Yoke decrease round. Please do let me know if you have any more questions. Thanks again! – Gina
I’m sorry if I am asking a question with an obvious answer but I’m a little stuck. I knit the cape, which is beautiful, but once I got through the neck shaping and tried it on there was something off, the back was big and boxy and the front panels did not meet until the very top. In the pictures it seems the panels meet from the bottom up. I frogged and was about to start again but first decided I should analyze the numbers. I am working on the large. If the cast on is 264 sts, and 36 is the each side panel, then 42 the ribbing for the sleeve, and 108 for the back panel, then the 36 plus 21 for half of a sleeve will be one front half, giving 57 each side. Doubled is 114. The back is then the other half of each sleeve 21 x2 plus 108, so 150. Can you explain how the panels in the front are meeting? I had a large gap, which would be the 36 stitch difference. I know I must be missing something, but I would rather ask, than do it wrong a second time. I love the Cape and definitely want to give it another go. Thanks for the lovely pattern
Hi Gina,
Thank you for this awesome pattern! I am either being very thick or I am not getting something, but is there an easy way to tell which row of the woven slip stitch pattern I should knit and whether to start with a knit stitch or a slipped stitch when knitting around the armholes. Do you know what I mean? 🙂
Hi Irina,
Thank you for your kind words and question!
You are right, sometimes it is tricky to tell what row of the woven slip stitch pattern you are on! Luckily, this stitch pattern is very forgiving, meaning it hides little stitch errors well.
What I did, as I was knitting the cape, I used markers to mark where the armhole ribbing stitches begin and end. In addition, on right side rows, I placed a marker through the first and last stitch I came to before and after each armhole section. If it’s a purl stitch, I place the marker directly through the purl bump. If it’s a slip stitch, I place the marker directly through the little slip stitch that hangs down from the row before. Then when I’m working the wrong side row, I can easily glance over my needles, to the right side of the work, and the marker tells me which stitch I worked on the last pattern row. If I see a purl bump, I know in this row I need to make a slipped stitch on the same stitch, and vice versa. Let me know if that makes sense! – Gina
I’m sorry if I am asking a question with an obvious answer but I’m a little stuck. I knit the cape, which is beautiful, but once I got through the neck shaping and tried it on there was something off, it didnt lat propefly, the back was too big and boxy and the front panels did not meet until the very top. In the pictures it seems the panels meet from the bottom up. I frogged and was about to start again but first decided I should analyze the numbers. I am working on the large. If the cast on is 264 sts, and 36 is the each side panel, then 42 the ribbing for the sleeve, and 108 for the back panel, then the 36 plus 21 for half of a sleeve will be one front half, giving 57 each side. Doubled is 114. The back is then the other half of each sleeve 21 x2 plus 108, so 150. Can you explain how the panels in the front are meeting? I had a large gap, which I think would be the 36 stitch difference. I know I must be missing something, but I would rather ask, than do it wrong a second time. I love the Cape and definitely want to give it another go. Thanks for the lovely pattern
Hi Sharon,
Thanks for your message. When you tried on the cape, did you overlap the two parts of the front neck that were bound off at the beginning of the neck shaping? The overlap swings some of the back fullness towards the front body, eliminating the back being boxy, as you described.
To help the front panels meet sooner, you can gently block the front edge into the shape you like, when you block the cape. Blocking also helps the fabric to drape more, which gives the garment a better fit. Let me know if this is helpful. Please don’t hesitate to ask if I can clarify more! – Gina
I have finally gotten around to starting this cape. I have been knitting a swatch but I am feeling pretty slow. I am not sure how I should be counting the stitches. Am I counting the slipped (looking stitch) as one stitch? I keep getting confused. Thanks.
Hi LaLa,
Thanks so much for writing in! The stitch took me a little while to get the hang of, but once I got into the rhythm of it, knitting became much faster.
To count the stitches, each purl bump is one stitch and each slip stitch is one stitch. To count the rows, similar to garter stitch, each “ridge” is 2 rows.
Please let me know if I can help with any other questions! Have a great day. – Gina
Hi Gina
Great pattern but am wondering if this would work work with stocking stitch or seed stitch?
Hi Lynn – Thank you so much for writing in! Unfortunately I wouldn’t recommend doing this cape in a stocking stitch or a seed stitch. The slip stitch pattern helps to keep the structure of the knit fabric intact and prevent it from sagging. You are totally welcome to try it in another stitch, but the cape may turn out different than anticipated. I hope that helps to answer your question. Please don’t hesitate to ask if I can clarify more! – Gina
Hi, I was just wondering if you could substitute the yarn for a doubled dk weight yarn? How would that affect the look of the stitches?
Thanks,
Shelley
Hi Shelley! You could definitely substitute a doubled DK weight yarn. That may take away a bit of the stitch definition, but over all I think the stitch pattern will still look great. Thanks for writing in! – Gina
hi – I’m at the armholes, and am confused. When it says work for 31 stitches in woven slip pattern, do I slip one, then start the knit/slip, or do I skip the slipping?
Sorry if the answer is obvious, but i want to get it right!
Thanks so much,
Becky
Hi Becky,
Thanks for writing in with your question! Yes, you do continue to slip the first stitch of every row throughout the whole pattern. After you slip the first stitch, then you go into the woven slip stitch pattern. I hope that helps ease your confusion. If you have any more questions, please do not hesitate to ask! All my best, Gina
I’m contemplating making this with a contrasting color for the armhole ribbing, i-cord, and collar. Anyone who’s knitted this, do you know how many skeins of yarn you used for those parts of the garment? I’d be making the larger size. Thank you!
Hi Stacie,
Thanks for writing in with your question! I don’t have an exact answer for you but would estimate I used about 4 skeins for all the parts of the cape you mentioned. I hope others will weigh in as well! All my best, Gina
I have a stupid question about gauge, because I struggle and struggle with gauge…. (Forgive me Elizabeth Zimmerman!) I’ve promised myself to knit from my stash and I have some cascade duchess yarn (discontinued) that gets 3.5 st/in. I have about a 35-36″ bust (depending on the week;)) but kind of broad shoulders. Could I just knit the smaller size and it would come out a little on the larger size (assuming I’m on gauge)? Thank you for your help! (I just love this pattern.)
Hi Robin,
Thanks for writing in! And we are always happy to answer any question – this is a no judgement zone!
I think you are exactly right – knit the smaller size and it will accommodate your shoulders with a little room for layering, if that’s how you choose to wear it. I’m not familiar with that yarn. What is the fiber content? I would be careful with the gauge – The cape may stretch (length wise) if it is knit too loose, especially if the yarn contains cotton, silk, or alpaca. If my answer raises more questions, please don’t hesitate to ask! Enjoy!
-Gina
This is really helpful. The yarn itself doesn’t seem to want a drapey garment, so I think it’ll be ok — worth a shot, anyway. Thanks, Gina!
wohh is wonderful, but my english is bad, You have this patter in Spanish?
Hi Espe-
Unfortunately we don’t have any Spanish translations. Sorry we can’t be of more help!
Best-
Molly
Hola, Espe!
La chica del blog “thingstoknit.com” ofreció este patrón en español en su post del 22 de diciembre de 2014. Muy bien explicado y hasta con consejos y tips para las más novatas.
Yo también lo agregué a mi lista de pendientes.
Saludos!
Pamela
Hi there! I’m an intermediate knitter and I’m going to attempt this cape! As I was looking through, I noticed there aren’t any instructions for how to bind off the i-cord edges. How should I do that? I know how to do the attached i-cord but bind offs tend to be different for each piece. Thanks!!
Hi Emy, Thanks for writing in with your question! When you get to the ends of the attached i-cord, just bind off with a regular bind off. Since you’ll later pick up from the bind off of the i-cord, that edge will be completely hidden. I hope that helps to answer your question! Please let me know if I can clarify more. -Gina
Hi! I have been at my cape all winter, nearing the end! I love it. I am working on the icord, but I am ending up with a visible line of knit stitches alongside the icord, which I don’t see on your cape photos. Am I supposed to see that? I have followed the tutorial provided. Do I knit into both sides of the slip stick that I pick up? Or only one side? If only one side, which side, the one closest to the right side of the garment, or the one closest to the wrong side of the garment?
Hi Becky! You are so close to finishing the cape! You should not see a line of knit stitches next to the i-cord. I think you have figured out the issue already! When I knit my i-cord edge, I picked up through both sides of the slipped stitch at the same time. To put it how you put it, yes, you will knit into both sides of the slipped stitch. I hope that makes sense! Please let me know if that’s unclear. I really want you to finish the cape soon so you can wear it a couple times before it gets too hot! I’m not sure what the weather is like where you live, but it’s snowing in New York right now so clearly I’m being very optimistic about the weather. The one bright side of this long winter is getting to wear all my favorite hand knits. Thanks for writing in. I hope you have a great spring! – Gina
I just found your city cape and like it very much but don’t tolerate anything close around my throat. Would it work to not stitch the two layers together and taper the collar rounding it off where the two front sections cross and adding a button and loop to fasten the top front “corner”? I love capes and ponchos for spring and fall. This has such a great length.
Hi Sue, I think that sounds like a great idea! You’ll need a second, smaller button to fasten the inside corner of the cape, at the neck, similar to how a double breasted coat has buttons on the inside. Let me know if that makes sense! Thanks so much for writing us. -Gina
Hi Sue, I love your idea. did you end up doing it? If so, how did it look? Would it be possible to post a picture?
Hi! I’m getting ready to start this lovely cape. I’m wondering about the alpaca yarn…will the cape stretch (elongate) over time or does the woven stitch give it stability? Should I go down a needle size just in case?
Hi Nancy, Thanks for your question! The alpaca yarn does grow a little bit with wear. The the slipped stitches in the woven stitch pattern do help with this, but it doesn’t prevent the cape from stretching entirely. Going down a needle size would be a good solution, just make sure the gauge doesn’t stray too far. You could also knit the bottom section slightly shorter. Please let me know if I can help with any other questions! -Gina
Hello! I really want to knit this, but am looking for a slightly less expensive yarn (someday I will be able to buy all the yarn I want – hopefully). Do you think Malabrigo Twist would work? Thank you so much!
Hi Eleanor, Thanks for writing us! I think Malabrigo Twist would be a great substitution. Just make sure you knit a swatch before you begin the project, to ensure you’re getting the same gauge. Happy knitting! -Gina
I am in LOVE with this pattern. I have never wanted to knit something so badly before! I was wondering if anyone had any suggestions for sizing the cape up somewhat. I would be so sad to finish the cape and end up with it being too small.
Hi Andrea – An easy way to size it up would be to knit the bottom section longer. The fabric has a lot of give width wise, meaning, it will stretch in width, but then you will lose some length. So you can compensate by making the cape longer. Let me know if that helps! Thanks for writing us! -Gina
Hi, Andrea…
I recently finished knitting this one for my mother, who wears a size XXL and has a large bust. I added approximately 14″ to the length, and it fits her really nicely.
Hello Liz!
Thank you so much for sharing your tips! -Alyson
Hi, can someone help with the yoke decrease row? There are only 4 pm, so knit to each, then K2tog x 4 only decreases 4, not 8 per row. Confused???…thanks
Hi Nicole, There’s an SSK after the marker as well, so that’s 2 stitches decreased per marker. Does that help? Please let me know if I can clarify further! Thanks for writing us! -Gina
Love love love so many things on this site! Thank you for your amazing patterns.
I really want to make this Cape, however, living in Australia wool of this weight is hard to come by (and mostly unnecessary!) I have found a wool that will give the gauge I need, but is a 50/50 wool/bamboo – is this likely to stretch in length too much over time? I am planning to make the larger size but at the smaller length as I am fairly short.
Also I am thinking of making it with a large shawl collar rather than the turtleneck as I want to be able to put it on without going over my head, adding a couple of buttons for fastening. If I don’t bind off the 20 stitches at the overlap, knitting those in rib while completing the shaping, and then increase as though I am doing the cowl neck (just continuing rather than binding off and then picking up), do you think that should work?
Thanks so much – as I said, I adore your site, have 100 projects on the go almost exclusively from here!!
Hi Carol!
About the yarn – Sounds like you’ve found a good replacement! Bamboo will stretch a little bit, but so does Alpaca, which we used for this piece, so the results should be similar.
About the collar – I think you can do exactly what you are describing. It will probably look really cool! When you finish, though, you might want to do something to keep the neck from stretching out too much. I know it seems odd to bind off the neckline, only to pick up again later, but the point of the bind off is to keep the neck from stretching too much. If you want to eliminate this step, perhaps when you do the finishing you could crochet a chain inside the neckline to give it a little bit of support. Let me know if that makes sense! Thanks so much for writing us, and for your kind words. We really appreciate it! All my best, Gina
Thanks Gina, for your helpful and lightning fast response! The chain stitch sounds like a great idea, and your description makes perfect sense. Excited to get going on this one!
Thanks Carol! Let me know how it goes! -Gina
I also altered the cape I knit for my mother to fasten with buttons rather than making it a pullover. I did exactly what Gina’s suggested, but I lined the neckline/collar with jersey knit for both stability and for a drawstring. I just sewed a simple tube, then hand-stitched to where the neckline would have finished off in the original pattern, and inserted the drawstring.
Next up is one for myself, but I’ll be stitching the given pattern, although possibly adding length and belt loops in case I want to cinch the waist. I have a feeling this is one of those patterns I’ll be knitting several of, with all kinds of fun modifications here and there!
Hello Liz!
Thanks so much for sharing your lovely additions! We’re so happy you enjoyed our pattern! Happy knitting! -Alyson
I would love to see a picture of the cape with the altered shawl collar/button construction. I am planning to knit this and would prefer a non-turtleneck option, but am having trouble visualizing it!
This pattern (like all of your patterns) is AMAZING! I would like to make it in the Worsted Twist. Since Worsted Twist is lighter and has more yards/100 grams, do you think I could buy fewer skeins of the Worsted Twist? (e.g., 6 skeins of Worsted = 984 yds and 9 skeins of Alpaca = 981 yds). Thanks!
Hi Yee,
Thanks for writing us. Yes, you are exactly right. You can buy fewer skeins of the Worsted Twist because it has more yardage. So long as you have as many yards as stated in the pattern, you are good to go. I would advise you to get an extra skein or two, just in case. The alpaca grows a bit because it is such a heavy fiber. The Merino wool will not grow in the same way. So it’s a good idea to get some extra yarn in case you decide to make the cape longer. You can return unwound skeins for store credit. Let me know if you have any other questions! All my best, Gina
Hello,
I really want to make this! I have a question about sizing, I’m 5 9, bra size 36 B, broad shouldered. I worried the smaller size might be too small but the larger size might swim on me, suggestions?
Hi Rosemary,
Thanks for writing us! I’m more on the petite side, but also have broad shoulders and I’m in the 34D, 36C range. I would make the large size for myself. The smaller size was a little more open in the front than I want, on me at least. Let me know if that helps! -Gina
Many thanks! will let you know how I get on!
Can this be made using Worsted Weight wool ?
Maureen
Hi Maureen,
There are often many different possible yarn substitutions for projects and it’s a great question to ask. Unfortunately, changing the weight of the yarn for the cape won’t allow you to get the gauge you’d need to follow the pattern. The numbers and measurements would all change and would not allow you to use the pattern (as it is currently written). Unfortunately we don’t have the pattern available in a different yarn weight, but it’s definitely something for us to keep in mind down the line. Thanks for writing in!
Would it be possible to modify this to have vertical arm holes rather than the horizontal? I want to make this for my grandmother, who is a lifelong knitter, and know she would prefer vertical, but don’t want to make a mess of it since she’d be able to spot any problems.
My thoughts are to knit the front 31 stitches, put them on waste yarn, and then carry on the rest in the woven stitch pattern till I got to the next front 31 stitches, and put them on waste yarn, knitting the back until the opening would be tall enough. Then pick up the front stitches that had been on waste yarn and knit them until they were the same height, then join them back together. Does this sound about right?
Hello Kelly!
Creating the armholes horizontally is of course easier since they would be going in the same direction as the progression of the rows. However, your plan sounds very thoughtful and like it would definitely work!
Best of luck and let us know how it turns out! -Alyson
I am a fairly new knitter and I was wondering how long this would take to knit as it is almost fall. I tend to go slow and am a perfectionist, could I have this ready by October?
Hello Sarah!
This pattern is done with Worsted Weight yarn, so its not made in an incredibly small scale, but it does have sort of an intricate stitch pattern. I’d say take a whack at it and feel free to come into the NY store if you’re in the area for some troubleshooting!
Happy knitting! -Alyson
Hi,
Just wanted to know if I can knit this with a chunkier yarn and/or straight needles?
Hello Brenda,
The changes that would be necessary to knit this project with chunkier yarn would be quite extensive! You would essentially need to completely re-write the pattern. Since the ‘wingspan’ of the cape is so large, it would be almost impossible to fit it on any straight needles without piecing things together.
What size yarn were you thinking of using? We could help you search for a poncho pattern in that gauge if you’d like! Thanks for writing in! -Alyson
I’ve started my cape! I think it’ll be lovely. I chose madelinetosh tosh merino in tart. I do have a quick question. If I’d like my cape to be longer, like a little below hip length, could I just knit the first section for more like 11-12 inches and then move into the arm hole section? I just wanted to make sure I wasn’t going to mess any other part of the pattern up by doing that. Thanks!
Hello Megan,
That would definitely work! That color sounds so lovely for that pattern! Have fun knitting! -Alyson
So beautiful: Do you have a french translation of your explanations with the corresponding european sizes?
Hello Andree,
Unfortunately we don’t have any translations of our blog patterns at the moment. If you need help converting a specific size into centimeters, let me know and I can do my best to help you out.
Best of luck! -Alyson
Hello I am super excited to knit this pattern. City cape. However, after reading through the pattern sizes I’m rather worried that the larger size will not be efficient in the chest area for me. I’m hoping you can help me. I am a 46DD bra. My chest measures without the bra 52″. Do you have any suggestions on enlarging the chest of the cape. Other than a large chest I am a size 14. Thank you
Hello Tami!
Thank you so much for writing in! I have a large chest also, so I understand your plight with knitting patterns. The sizes are 24 stitches apart, so I would add 24 stitches more to the cast on edge to give you an additional 8 inches of cape to accommodate chest sizes of 46 to 54″.
Unfortunately, our design team doesn’t have the resources to create as many sizes as we might like. Keep in mind the ratios, and the final piece measurements that you would like to end up with. Let us know how it goes and best of luck adapting this versitile pattern! -Alyson
Hello!
Thank you so much for all you guys offer via Purl Bee – I am a huge fan and have made a number of projects following your patterns!
I can’t afford the yarn you suggest for this pattern so must look for more affordable yarn! That being said, I read through all the comments and it seems you suggest to keep it to the same weight so as to maintain the guage (and not re-write the pattern). Correct?
In addition, what content (acrylic, cotton, wool, etc.) should I be looking for in my yarn? I read in one response that wool wouldn’t drape as much. Any other suggestions you can give me so I can make an educated choice for a substitute yarn? If you could be open-minded toward man-made materials as well I would appreciate it!
Thank you in advance for your help!
christina*
Hello Christina!
You are correct about substituting a different yarn. Its always best to find yarn that is the same gauge so that you don’t have to change the pattern’s sizing.
As far as fiber content, the great thing about alpaca is that its very heavy and drape-y. Some people find it to be too heavy though, so in that case acrylic or wool or a blend would be a great alternative! The gauge is the most important factor when choosing yarn.
Happy knitting! -Alyson
Hello again!
I decided on Barraco Ultra Alpca for this project. I sat down to knit the swatch and realized it says (after blocking). What does that mean? How close to the written gauge should my swatch be before blocking? I don’t usually block my pieces so I am a bit confused.
Thank you so much!
Christina*
Hello Christina!
Purl Soho’s Alpaca Pure is a dense and heavy alpaca that responds pretty significantly to blocking. That’s why we gave the gauge after we blocked the swatch. When we refer to blocking, we’re really just saying when hand washed or made damp in any way. If you plan on washing your finished product, its a really good idea to block the swatch so that you can anticipate how your item will respond to the water and any agitation that the washing may cause. For all alpaca yarns, its recommended just to spot clean very gently. If you want to clean the entire item I would soak the item in some delicate wool wash for only about 10 minutes and then lay it flat to dry.
Hope this helps! Happy knitting! -Alyson
Thanks for sharing this wonderful pattern. I plan on making this poncho for my mom’s birthday in November. Since I plan on using a variegated yarn for the poncho, I thought it would look well with solid color for the sleeves. I am a relatively new knitter but do I just use the solid color on rows 1 and 2 of your pattern in the sleeve section? I have made my gauge but don’t want to cast on until I know how (or if) I can adjust the sleeves.
Thanks,
D
Hi Darlene!
That’s great that you’d like to make the cape for your Mom! Working a solid color for the armhole ribbing shouldn’t be hard to do! And you’re exactly right, you will just work Rows 1 and 2 in the Armhole section, making sure that you work the 2 x 2 rib in a solid color, and switching to your variegated color in the Woven Slip Stitch sections. I hope this helps and send good luck!
Kristy
Thanks! I visited Purl for the first time this weekend for my first crawl and the staff was friendly and helpful. Looking forward to the cape.
Darlene
We’re so happy that you had a good experience at our shop! Happy knitting! -Alyson
My daughter-in-law says she really likes this pattern and could I knit it for my grand-daughter who is 9yrs old? I don’t know how to convert it to a smaller size, say 24-30inches chest. She isn’t very big, and perhaps would grow into it. Is there any chance you could convert it for me?
Hi Carol-
I’m sorry but we don’t have this pattern available in a smaller size and unfortunately we don’t have the time or resources to rewrite it in another size. I’m so so sorry we can’t be of more help. You may want to try Ravelry to see if they have any cute cape patterns for kids.
Thanks for getting in touch and please let us know if you have any more questions!
Molly
I am a little confused-Maureen Jones asked if she could us worsted weight wool + you said it would change the gauge; later you said it was made with worsted weight (alpaca).
Is the Alpaca Pure a worsted weight?
Thank you
Hello Pam!
Thanks for writing in! Since Alpaca Pure is slightly thicker than a “normal” worsted weight yarn, we just want to make sure still that the yarn you choose will be comparable in gauge. While “worsted” does refer to a size of yarn, its still a vague category and very important to check gauge even between yarns that call themselves worsted. You don’t want the cape to come out too small or too large!
Best of luck! -Alyson
I am using Owool local yarn it’s 50% alpaca and 50% marino at 100g would this be a good sub. it was cheaper.
Also I wasn’t sure what size to make this in. I started with the larger size but I’m still in the beginning stage and can start over. I do want to make it longer. I am 5.5 and 132 lbs
chest size 34B. can you advise what size I should make this cape in.
thank you,
Alla
Hello Alla!
It looks like O-Wool’s Local yarn should be able to yield the same gauge as our Alpaca Pure! Make sure to make a little swatch, or measure what you’ve already started in order to make sure the sizing comes out as written.
Since you’re exactly in the middle of the chest measurement range of the first size, I would recommend making the first size. The pattern is written to be quite over-sized already. Best of luck and happy knitting! -Alyson
Hi,
I’m finishing my cape but I have a question on the neck section: when I finish to bind off the stitches from the body I end up with 58 (in smaller size) stitches to bind off. But then you say that I should pick up 32 + 32 from the neck line ( + the overlapping 20). How can I pick up 32 + 32 (64) if I bounded off 58? I hope I explained myself…
Anyway thank you for your wonderful patterns!
Hello Irene!
When picking up stitches in general, occasionally you won’t have the exact same number of rows or previous stitches as you need to pick up. The most important part in picking up stitches is to make sure they’re distributed evenly. The extra 6 stitches that the pattern is asking you to pick up are to accommodate the curves and neck circumference needed for the collar.
As long as you space them out evenly, you should be on the right track! I hope this helps, please don’t hesitate to write if you’re still confused! -Alyson
I LOVE LOVE LOVE this pattern! Quick couple of questions if anyone has a minute to answer…..
1) rather than doing the i cord afterward would it work to incorporate an iced edging as I go?? Just learned that technique and love it
2) I am hoping to put the pure alpaca on my Christmas list…..but in meantime I have bergere de France Alaska yarn that seems to have about same stitch gauge but diff row gauge….do you have any thought on if this yarn would work?
Thanks
Hello Lynn!
We’re so happy you love this pattern! Its such a chic and fun design!
1) I would totally go for the new technique if you feel comfortable! That would save you a lot of time and help you see the finished edge appear as you go along! Give it a shot!
2) The yarn you have seems to recommend a gauge of about 3.75 stitches per inch, while the pattern calls for a slightly denser gauge. I would be worried to use this yarn since the pattern would require you to knit it tightly, which might make the final project unnecessarily heavy. It never hurts to make a small gauge swatch of the stitch pattern and see how you like the texture of the fabric!
Best of luck and let us know how it turns out! -Alyson
Thank you thank you….I broke down and ordered your pure alpaca….it just came (Thx for fast shipping) and I’m ready to cast on!!
Love this pattern and can’t wait to get started! Has anyone used the attached Icord edge as they knit rather than after completed?? Also, since I am tall I am hoping to add some length to the cape……anyone have suggestions on what they have added in length and how it worked out?
Thanks
Hello Lynn!
I definitely think other people have had the same idea as you! Others have written in saying they were planning on trying the attached I cord edge built into the pattern instead of adding it after.
Adding length shouldn’t be too difficult, simply add a few more inches to the bottom of the cape before you start the armholes. Best of luck and happy knitting! -Alyson
Help! I’m having so much trouble with the attached i-cord. I’m picking this back up after months of not working on it and my memory is playing tricks on me — is the wrong side the inside or outside of the fabric?? I started knitting the i-cord onto the left side of the garment (well, the left side that would be on me), started from the top as directed, but had to work from what I thought was actually the wrong side of the fabric (the outside) rather than what I thought was the right side (the inside), and it just doesn’t look right!
Also, do I cast on 4 stitches or 3? I did 4, maybe that’s part of the problem?? This is driving me crazy! Help!
Hello, Sarah!
Thank you so much for writing in with such great questions! The right side of the fabric is what is seen, so for this project, the right side is the outside of the cape and the wrong side is the inside. You started knitting the i-cord on the correct side, so I think it might look off because of the right-side/wrong-side mix up.
Also, the cast on for the i-cord should have been 3 rather than 4. We’ve got a great i-cord tutorial here: https://www.purlsoho.com/create/2006/09/29/i-cord/ if that helps!
Again, thank you so much writing in and if you have further questions, please write back!
Happy knitting,
Kumeko
Is there ant errata for this pattern? Armhole Rows 1 and 2 ?
Hi, Eileen!
Thank you so much for writing in! There is not any errata for this pattern. What are you having trouble with in the Armhole rows?
Best,
Kumeko
Nearly finished the cape! Just wondering about the I-cord. I had endless trouble having cast on 4 stitches (I had a row of visible knot stitches alongside the cord, which another commenter also had) and the extra row went away when I cast on 3 stitches as you suggest in the above comment. Is the 4 stitch I-cord instruction in the pattern an error or have I misunderstood the term? I found that part confusing but otherwise the instructions have been a breeze. Loving the cape, now just for the collar. Thanks so much for the fabulous pattern! Happy Christmas to you all.
Hi, Beth!
Thank you so much for writing in! I am sorry to hear that you had trouble with the 4 stitch i-cord. I am not certain I know exactly why it wasn’t working for you. When you were working it did you pick up through both sides of the slipped stitch at the same time. In other words, did you knit into both sides of the slipped stitch? If not, that might have contributed to that row of visible stitches along the cord. I am glad that the 3 stitch i-cord worked better for you!
I am delighted that you’ve enjoyed the pattern and it looks like you’re finishing it just in time for the cooler weather!
Best,
Kumeko
Muito obrigada, é muito giro,
I love this cape and even though I am not an advanced knitter, I would like to get started but I am having trouble understanding a part of the pattern. After the first decrease it says: work 3 rows even in pattern. What does that mean? then it says repeat the last 4 rows 2 more times etc… then work 1 row even in pattern. what does work rows in pattern means? there are 4 rows to work this pattern so how can I work 3 rows or 1 in even pattern? this is so confusing. Please help me.
Hello Celine,
Thank you so much for your comment. We are going to take a closer look at the pattern and clarify a few things. We are so sorry about any vague information. I will be sure to e-mail you when we have updated the pattern. Thank you again, we are always looking for ways to improve the knitters experience.
All the best,
Allison
I too am confused with this exact section of the pattern could you clear
this up for me Help
Hi Nicole,
Thanks for writing in! We’d be happy yo try to help out. Can you tell us where exactly you are having difficulties?
Best,
Cassy
Annnnnnd nevermind! I just figured it out (just to knit the Woven Stitch as I have with no changes) – wahoo 😀 back to clicking I go!
I’m running into the same questions that Celine has. What are the last 4 rows to repeat when the prior 3 were working in even pattern?
Thanks in advance!
Hi Joanne,
Thanks so much for writing in! Sorry you have had trouble with this! You are to complete the decrease row and then knit three rows in woven slip stitch pattern. You will then start on the decrease row again and repeat the aforementioned four row repeat twice more, three times total. I hope this helps! Happy knitting!
Best,
Adam
Looks like something I can wear here – any suggestions as to type of yarn for southern California weather?
Thank you for sharing so much of yourself.
Marny,
Thanks for the kind words! You could certainly do this pattern in Worsted Cotton by Blue Sky. This very soft cotton comes in some stunning colors. You might need to do a gauge swatch to start, but it’s well worth it. Good luck!
Best,
Adam
Hello!
I am starting the armholes and am running into a problem…
I completed Row 1 of the armholes and noticed when I start Row 2 that the ribbing doesn’t match up. When I [k2, p2] 10 times in row one and [p2, k2] 10 times in row two, the knits and purls are opposite. Shouldn’t they be together for ribbing?
Should I switch the purls and knits in row 2 (as well as the p2 that comes before 108 stitches in WSS pattern and again after the second [p2, k2] 10 times)?
Is the pattern correct or am I doing something incorrectly?
Thank you!
Maggie
Hi Maggie,
Thanks for writing in. I am looking in to this, as I also see how the pattern might be written incorrectly. I will discuss with our designers and we can hopefully resolve this. I know, however, that you should definitely knit the knit and purl the purls when knitting the armhole because you will be knitting a 2×2 rib. For the time being, do this and continue in the woven slip stitch pattern. Best of luck to you.
Thanks,
Adam
Hi – I’ve just reached the armholes and want to make sure I understand what to do for the next few inches. I am making the smaller size. For row 1 of the armholes after I k2, p2 9 times the patter says k2, k100(108)…curious why the pattern wouldn’t say K102(110) and same question goes for the last part of that row and then row 2. Just want to make sure I’m not missing anything.
Thanks.
Dawn
Hi Dawn,
Thanks for writing in! You are correct! You can simply K102(110) in both cases!
Happy knitting!
Cassy
Thanks Cassy. I just realized I have one more question related to this section. In the second row where it says work in woven slip stitch is it safe to assume I start with the next row of the pattern from where I left off before row 1 of the armhole?
Hi Dawn,
No worries! You are correct! You will pick up where you left off below the armhole to continue the pattern correctly!
Happy knitting!
Cassy
Hi Cassy,
Sorry for asking so many questions. I started on the second row of the armhole and the pattern doesn’t seem to be lining up. Here is what I did.
I ended on Row 1 before starting no the armhole which means the next woven slip stitch row would be 2. I completed row 1 of the armhole (which appears to have been similar to row 2 of the woven slip stitch patter). So when I started row 2 of the armhole I assumed where the pattern says work in woven slip stitch pattern this corresponds to row 3 of the woven slip stitch pattern.
For row 2 of the armhole I Sl1 and then for my next stitch I sl1wyib and then K1, sl1wyib for 31 stitches, etc. However it seems my pattern is off a stitch and I can’t tell why other than perhaps I did the woven slip stitch pattern wrong.
Any thoughts? I’d hate to keep going and then need to rip it all out.
Thanks.
Dawn
Hi Dawn,
Thanks for getting back in touch and apologies for the delayed response! I think that I see what the problem might be. You are correct that to make the stitches lines up correctly, you will treat row 2 of the armhole as row 3 of the woven slip stitch pattern. So for that row instead of Sl1 and then for your next stitch you sl1wyib and then K1, sl1wyib for 31 stitches as you stated, you should Sl1, sl1wyib, k1, for 31 stitches. Based on this, it seems like you are off by 1 stitch.
I hope that this helps and that you won’t have to rip it all out!!
Cassy
This pattern is SO beutiful! I’ve been waiting since forever for a chance to knit it! I would love to make one in wool, but here in Brazil I would never have a chance to wear something so warm. Would I have any problems with shape if I knit it with acrylic yarn?
Hi Noemi,
Thanks for the wonderful comment! I think you can certainly knit this in acrylic yarn. The fact that it’s acrylic won’t affect anything, as long as your gauge is correct. Best of luck!
Happy knitting!
-Adam
Hi – I am just about up to shaping the neckline and fear I am going to run out of yarn. I ordered the 9 skeins per the pattern. Do you know how much yarn should be left over when complete with the smaller size? It feels like I am a skein short. Also do you have any skeins left of the timeless navy from lot 173394? I checked the website but didn’t see any. If not any ideas on what to do with the neck if I don’t have enough yarn? I am so bummed. I’ve spent so much time on this project.
Thanks.
Dawn
Hi Dawn,
Thanks for the question. The original sample was knit as per the small size and it definitely used no more than nine skeins. Are you getting the correct gauge? This can affect whether you run out of yarn or not. As long as you get to the neckline you can substitute a different yarn for the turtleneck and i-cord edging. It’s not an ideal recommendation but it will help. Good luck and happy knitting!
-Adam
Thank you for this gorgeous pattern! This is my most ambitious pattern to date. I’m having some difficulty with the armhole section where you cable cast-on. Any advice on how to prevent sagging at the point where I pick up and knit after that cast-on? Had to frog that section because it looked rather sloppy and saggy. Any help would be greatly appreciated.
Thanks!
Hi Audrey,
Thanks for writing us and for the lovely compliment! I suggest, after cable casting on, picking up the stitch below the stitch on your right-hand needle and knitting it through the back loop. This will twist the stitch and make the fabric tighter. Hope this advice helps!
-Adam
Thanks Adam!
Hi there! Can you please tell me the spacing of the markers in the row just before the final Yoke Decrease Row? One of my stitch markers came off so now I’m winging it. Thanks!
Hello Audrey,
Great question! Before you start the final yoke decrease row your markers should be placed as follows; 29 (33) stitches before first marker and after fourth marker, 52 (56) stitches between first and second markers and third and fourth markers, 54 (62) stitches between second and third markers.
Hope this helps!
Warmly,
Marilla
Thank you so much Marilla! I had set it aside as I couldn’t figure out stitch count. Now I can start up again!
thanks again!
So Happy to hear you have started again fresh. I’m happy to help!
-Marilla
Is there any good way to make this cape longer, as in covering the hips? I’d love to make this, but would like a few inches more length. I don’t want to mess up the spacing for the armholes, and I’m not experienced enough to suss out the spacing, decreases, and such. Please and thank you!
Hello Alice,
Great question! Making the City Cape longer is actually a simple modification. The first thing you will want to do is figure out how much length you would like to add. After you have this number you will just add it to the 7 0r 8 inches before you begin the armholes.
Let me know if you have any further questions!
-Marilla
Thank you so much !! Will do. any idea how much extra yarn I will need (to lengthen maybe 7″ or so) ?
Hello Alice,
Thanks for your question! I would guesstimate 3 – 4 skeins of Alpaca pure which is about 327 yards to 436 yards.
Let us know how it goes!
Happy knitting,
Marilla
I have knit the bottom part of the cape and am at the armhole stage. I noticed that once you get to the archives, every 2nd row is in woven slip stitch pattern. My question is do I repeat row 2 exactly as it is or do I do row 1 row 2 row 1 then row3 from the woven stitch pattern?
Hello Tanya,
Thank you for reaching out! For the armhole portion of this pattern you repeat rows 1 and 2 as written out in the Armhole portion, until you get to the ribbing and then you will resume knitting rows 1 and 2 as written out in the armhole section.
I hope this helps and please let us know if you have any further questions!
Warmly,
Marilla
Is this basically knit in eye of the partridge worn on the purl side? Thanks!
Hi Veronica,
Thanks for writing in! This stitch pattern is similar but different to the eye of partridge. The eye of partridge pattern uses purl stitches on one side and this woven stitch pattern has no purl stitches!
Best,
Cassy
Will you be getting any more colors in Alpaca Pure soon? And if not, what is another yarn you would reccomend for this project?
Hi Ines,
Thanks for writing in! At present, the colors that we currently have of Alpaca Pure can be found here: https://www.purlsoho.com/alpaca-pure.html I do not believe that there will be a release of new colors in the very near future. In the meantime, you can use any other Worsted to Aran weight yarn with a gauge of 4 – 4.5 stitches per inch. Our Worsted Twist would make a nice alternative as would Manos Maxima!
I hope that this helps!
Cassy
I love this garment. I come back to it often. But I see that the length (and circumference) were difficult for knitters to get right. Almost all of these problems would be solved if it were a TOP-DOWN pattern. I keep hoping such a pattern will appear. I’m short, and length is often very difficult for me to get right in bottom-up.
Especially knit with alpaca, which stretches so much more easily than wool, getting the garment the right length is paramount.
But it’s a lovely gorgeous gift-worthy garment.
Please please please you brilliant designers
Hello Kitty,
Thank you for your kind words and your thoughtful insights- I will certainly pass along your suggestions!
Happy knitting,
Marilla
I’m really enjoying this pattern. One question for clarification: in the section after the armhole, where you decrease for the yoke and increase for the front flap, can you clarify what you mean to
Work 3 rows or work one row even in woven stitch pattern?
Hello Eve,
Thank you for reaching out! For these three rows you will return to the Woven Slip Stitch Pattern so you will knit-
“Row 1 (wrong side): Sl1, *k1, sl1wyib, repeat from * to last stitch, k1.
Row 2 (right side): Sl1, knit to end of row.
Row 3: Sl1, *sl1wyib, k1, repeat from * to last stitch, k1.”
You will continue to return to this stitch pattern incorporating your increased stitches.
I hope this helps clear things up for you and let me know if you have any further questions!
Happy knitting,
Marilla
Can I use the season alpaca yarn instead?
Hi Dawn!
Alpaca pure is a thicker yarn than our Season Alpaca. I would recommend a worsted weight yarn instead!
I hope this helps!
Carly
Please help! i’m ready to start this pattern so I was reading over the directions. The armhole instructions (Row 2) says to work xx(xx) stitches in Woven Slip Stitch pattern. But the way i read it, that stitch pattern consists of 4 rows. What row of the pattern am i supposed to work for these stitches? i’m sorry If this is a stupid question but I’m trying to figure it out Thanks in advance.
Hello BJ,
Thank you for your question! In this portion of the pattern you will be working the 4 rows of stitch pattern within the Armhole portion. This means that Row 1 will always be the same, but Row 2 will alternate between Rows 1 and 3 from the stitch pattern.
I hope this clears things up and let us know if you have any further questions!
Happy knitting!
-Marilla
Hi there, I was going to ask this same question, as I’m interested in attempting this beauty in the future. I’m still a little confused, though.
So, when you say that Row 2 of the armholes will alternate between Rows 1 & 3 of the stitch pattern, do you mean that it would go:
First time knitting Row 2 would be worked as Row 1 of stitch pattern,
Second time knitting Row 2 would be worked as Row 3 of stitch pattern,
And so on?
I was also wondering if, when I start the Woven Stitch in the armholes, do I slip the stitch as I would normally in Rows 1 & 3 of the stitch pattern, or do I begin from the star?
Thanks so much!
Hello Stephanie,
Thank you for reaching out- these are great questions! Yes, you will continue to slip your first stitch in this portion of the pattern. It sounds like you have a clear understanding of the stitch pattern. The only thing I would be careful of is that the stitch pattern row (row 1 & row3) That you begin with in the armhole section corresponds with the row you ended with when knitting the beginning section. For example if you ended with row 3 your armhole “row 2” would be a stitch pattern row 1.
I hope this makes sense and let us know if you have any further questions!
Happy knitting!
-Marilla
Hi,
I am planning to knit this gorgeous cape as a gift to a dear friend. However, she is vegan, so what yarn would you recommend to achieve gauge?
Thank you so much!
Hi Cristiane,
What a lovely, thoughtful present! The City Cape would be beautiful and vegan-friendly in Blue Sky Worsted Cotton.
Best of luck and happy knitting!
Julianna
How dense is the fabric supposed to be? I’m not sure if I am accurately counting the slip-stitch for my gauge. I like the denser fabric I get with US 9 but then I have too many stitches per inch. Also, how important is row gauge with this pattern? Thank you for your help.
Hello Stefani,
Thanks for reaching out! If you want to change the gauge of the pattern the finished project will come out smaller. If you are ok with this than go for it, but it will be tricky to know how much smaller. The row gauge will be a bit easier to figure out, because you can just knit extra rows, but you will need more yarn if your fabric is denser.
I hope this helps and happy knitting!
-Marilla
This is such a gorgeous cape! I have two questions- will this navy color ever come back? And if I wanted to make it longer, would I just knit a few extra inches before the armholes start?
Hello Michaela,
Thank you for reaching out! You are exactly right- you would just add length to the cape before the armholes. Unfortunately the Navy is discontinued, but Anzula’s For Better or Worsted comes in a lovely Navy that has a similar gauge.
I hope this helps and happy knitting!
-Marilla
I am at the point where I need to decrease for the neck. my decrease neck opening is not straight like pictured in the photo. What am I doing wrong?
Hello Julie,
Thank you for reaching out! Are you at the “DECREASE FOR YOKE + INCREASE FOR FRONT OVERLAP”portion of the pattern? Which row are you on? What exactly isn’t “straight” and what is it coming out as instead? I hope I can help!
-Marilla
am knitting the city cape pattern
I am now in the decrease for yoke and increase for front overlap portion and row three row right side yoke decrease and I see one k2tog and ssk 4 times (total of 5 stitches) and you say 8 sts decreased. Can you please explain my ignorance? I shall really appreciate your valuable guidance. Thanks kappu
Hello Kappu,
Thank you for reaching out! Because your k2tog and ssk are both within brackets you are repeating each one 4 times. “Sl1, [knit to 2 stitches before marker, k2tog, sm, ssk] 4 times, knit to end. [8 stitches decreased]”
I hope this makes sense and let us know if you have any further questions!
Happy knitting!
-Marilla
This looks like a lovely cape for cool weather, and i see the Alpaca Pure is on sale.
What is the difficulty level of this pattern? Is there a size measurement?
thank you
Hi Nancy,
Thank you for your kind words! We don’t rate the difficulty of our patterns because we want people to feel free to try things that are “too hard” for them; we want to encourage people to discover that learning new techniques enriches the process of making; and we don’t want to put people in a box that says, “You can make this but not this.” We do try to describe the skills involved with a pattern so that customers know what they’re getting into, but ultimately, we hope that you will take little leaps into the unknown and find that the satisfaction was worth the challenge! Remember, we’re always here to help!
For this pattern, you will be working in a textured stitch pattern, work an i-cord edging and pick up stitches. If you are comfortable witha ll of these techniques, you should be good to go!
Best,
Cassy
This looks like a lovely pattern, and I am planning to make it for a 14-year-old. Would I have to modify this pattern to fit her size? If so, how? Thank you in advance.
when you say (work 1 row even in pattern) you mean that knitting Row2 in woven slip stitch?
Hi and thanks for reaching out! This means to work one row in the established stitch pattern without working any increases or decreases. If Row 2 of the Woven Slip Stitch pattern is up next for your project, yes, you will work Row 2!
I hope that clears things up!
Julianna
City Cape: Hello – I’m wanting to make this for my neighbour. She is a short stout woman – 49″ across chest. Would you please recommend ways to make this pattern wider? My swatch’s gauge with 5.5 mm needles was as it should be (16 stitches = 4″ across), so am making a swatch using 6.0mm but even that might not make up the needed difference. Really like this pattern, but not the gape on larger women. Really appreciate your suggestions. Cheers.
Hi Ella,
Thanks for reaching out! Unfortunately we do not have a larger size written for this pattern; however, the current large size is meant to fit up to a 46″ bust, so you do not have to make it too much larger! Often moving up a needle size or two will be enough to add a few inches to a garment.
We really do appreciate that bodies come in all shapes and sizes and share your concern that patterns be as inclusive as possible. As a small company, we haven’t yet had the resources to offer the scope of sizes we would like to, but as our company grows, we have been steadily expanding that range and plan to continue to do so!
Best,
Julianna
What is the total yardage of yarn needed for the larger size to knit according to gauge on the size 9 needle? I can’t find any info on the discontinued yarn used for this pattern that would have this listed.
Thanks – Sioux
Hi Susan,
Thanks for reaching out! Alpaca Pure was an aran weight yarn that had 109 yards per skein, and we used 980 yards for the small size and 1,165 yards for the larger size.
Best,
Julianna
I see that the Alpaca Pure yarn is not available on your website. Do you sell a substitute yarn that will work well for this pattern? Thank you.
Hi Simone,
Thanks for reaching out! Unfortunately, Alpaca Pure has been discontinued – I’m so sorry about that! I would recommend using either Worsted Twist or Cashmere Tend for this pattern. Both knit up to the same gauge as Alpaca Pure and would create lovely, cozy capes!
Best,
Julianna
Hello! I am so close to being finished and am running into a problem with the I-cord: I watched a tutorial and read through the instructions in the provided link, but it seems once I start to repeat the pattern, I continue to knit the same last three stitches, with only the slip stitch and SSK stick moving up the edge. I am doing something incorrectly, but I’m not sure what. Can you please help!
Also, when I am finished with the two I-Cords, the instructions say to align the two 20-stitch bound off neck edges and pin them together. Can you please provide more detail here? What does that mean?
Maggie
Hi Maggie
Thanks for writing in! It sounds like you are doing the i-cord correctly. You will continue to repeatedly knit the 3 edge stitches, slip the fourth, pick up a slipped stitch from the edge and decrease these together. It should look like a round cord connected and moving up the side of your work, until you have no slipped side stitches remaining. After this is complete, you will lay the 20 stitch bound off edge (where you shaped the neckline) directly on top of the other 20 stitch bound off edge, right sides facing you. This will create a flap closure, and you will go through both layers of your knitting while you pick up stitches for the collar to permanently join them. If you look at the last picture in the pattern you can see this a little more clearly. I really hope this helps!
Best
Jessica
On the armhole section, after you sl 1, work 31 stitches in Woven Slip Stitch pattern, p2, k2, and turn, there is one stitch left on the right needle. What do you do with this stitch when you cable cast on the 29 stitches? That part is confusing to me.
Hi Clara,
Thanks for reaching out! You should be right at the gap after working the P2, K2, so I think you may have gotten off by one stitch when casting off on the previous row. After binding off on the right side row, the next four stitches should be P2, K2; however, the stitch remaining on the right hand needle after casting off counts as the first purl stitch. I think you may have thought this stitch didn’t count and stopped casting off one stitch early! If you have done both armholes the same, you should be able to knit one more stitch and then turn and cable cast on 28 stitches so that the stitch pattern works out correctly on the next row. One stitch difference in the armhole shouldn’t be a problem!
I hope that helps!
Julianna
I’m trying to finish up the capelet for my sister for Christmas, but I’m having some issues. The concern is that the front yoke increase section really curves out a lot. Will the i-cord fix this? Also, the capelet doesn’t fall straight down but flares out from the neckline so far. Will washing this afterwards fix that?
Hi Emily,
Thanks for reaching out! The I-Cord will help fix the curve but most importantly blocking the Cape when you are finished knitting will make the biggest difference and will help get the best result! I recommend checking out our Blocking tutorial, it is an excellent resource to use!
Warmly,
Gianna
I love this cape but am not keen on a turtle neck. Is there a way to knit this and have a “split” neck and then instead of an over lap of the body, use a pin or button to close?
Hi Kathy,
Thanks for reaching out! I think you could certainly make the turtleneck with a split! When you get to the COLLAR section you can work a few rows in the round and then I would recommend stop working in the round (where you want the split to be) and work back and forth in rows instead of in the round until you reach your desired length, and then bind off loosely in pattern!
I hope this helps and please let us know how this turns out!
Warmly,
Gianna
Hi!
I’m at this part of the pattern and am not sure what “Work 3 rows even in the Woven Slip Stitch Pattern” means.
DECREASE FOR YOKE + INCREASE FOR FRONT OVERLAP
Row 1 (right side): Sl1, k31 (35), place marker (pm), k58 (62), pm, k60 (68), pm, k58 (62), pm, k32 (36).
Row 2 (wrong side): Work in Woven Slip Stitch pattern to end, slipping the markers as you come to them.
Yoke Decrease Row (right side): Sl1, [knit to 2 stitches before marker, k2tog, slip marker (sm), ssk] 4 times, knit to end. [8 stitches decreased]
Work 3 rows even in Woven Slip Stitch pattern.
Hi Erynn,
Thanks for reaching out! “Work 3 rows even in Woven Slip Stitch pattern” simply means you will work 3 rows in the Woven Slip Stitch, without any decreases.
I hope this clears things up!
Gianna
I love this pattern but I’m a novice when it comes to knitting. Would you recommend I attempt this pattern, or could you suggest another Cape style pattern that may be better suited to my knitting skills?
Hi Georgia,
Thanks for reaching! For a beginner knitter, this pattern may be a bit more on the complicated side but it would all depend on the skills you have already as a novice knitter! If you would like to tackle it I think it could certainly be possible and we are happy to help you along the way if needed, or if you would like to start off with a more simple design I would suggest our Mountain Caplete instead, it is a very easy a straight forward pattern!
I hope this helps and please let me know if you have any more questions!
Gianna
I am absolutely in LOVE with this pattern and want to give it a go (I’m an OK knitter, I think this is definitely going to be a learning for me). Could I use the Good Wool that is on sale as a yarn choice? I’m nervous to get a more expensive yarn and fail at the project. Will Good Wool be too scratchy?
Also, given what I was reading about yardage, would only 3 skeins be enough to knit a size small? (Each skein of Good Wool is 383 yards and I read that 980 yards is needed for a small.)
Hi Deb,
Thanks for your questions! We’re so happy to hear that you’re a fan of the City Cape pattern!
For this pattern in particular, I’m afraid Good Wool would be too thin of a yarn. Good Wool is a sport weight yarn and the yarn that was used for the City Cape, Alpaca Pure (now unfortunately out of production), is an aran or heavy worsted weight. As an alternative, Plenty, Campo, or Woolfolk’s Tov all would work well for this pattern! For the smaller size, you would need 8 skeins of Plenty, 9 skeins of Campo, or 6 skeins of Tov. With any yarn substitutions, it’s always a great idea to do a gauge swatch to make sure you’re consistent with the pattern. Here’s a guide on it in case you’d like more information: All About Gauge. Unfortunately, at the moment, we currently don’t offer a more budget-friendly aran weight yarn. We’re very sorry about that!
While the City Cape isn’t the most beginner friendly pattern, if you’ve already got some knitting experience under your belt, it could be an excellent pattern to expand your boundaries and add some more skills to your toolkit! We’re all for people being adventurous and trying new patterns and we’re always here to help every step of the way. If you begin the pattern and you find you need some more guidance, feel free to sign up for a 1-On-1 Project Help session with us where we can troubleshoot any problems you might be having over video chat!
I hope this was helpful! Have a great day!
All the best,
Cat
Hello I’ve just done the decrease for yoke section. All the decrease is on one side. There are different numbers of stitches between the markers. I have 28 stitches before the first marks it still 32 after the final marker. The count between the other markers is wrong too. The pattern has the decrease on the knit row and says to knit to 2 stitches before marker before k2tog etc. Which marker? What have I done wrong? Thank you
Hi Helen,
Thanks for reaching out. This section of the pattern is quite tricky, since there’s a lot going on at once! You’re decreasing on the repeats of the Yoke Decrease Row, while also increasing on the repeats of the Front Increase Row, so it can be tough to keep track of the decreases and increases you’ve worked. What likely happened in your project is that you either missed some decreases or increases, or worked extra decreases or increases. Unfortunately, I can’t say for sure exactly where this happened though! But I’d be happy to clarify the Yoke Decrease Row, since it sounds like you have questions about that in particular.
On the Yoke Decrease Row, you will make a total of 8 decrease stitches. You have 4 stitch markers at this point, and each stitch marker is surrounded by 2 decrease stitches: a k2tog directly before it, and an ssk directly after it. On the Decrease Row, you will knit up to 2 stitches before the very first marker, work the k2tog, slip the marker, and then immediately work an ssk. Then, you will repeat these steps for each of the other 3 markers! At the end of the row, you will have worked a total of 8 decreases, one on each side of the 4 markers.
I hope this helps clear things up!
All the best,
Lili
hi purl soho. sorry if this question is very basic but how do you count woven slip stitch? it appears there are longer stitches and shorter stitches. do I just count the longer ones? thanks
Hi Leilani,
Not a basic question at all! I’d actually recommend counting the stitches with the wrong side of the knit fabric facing up. The stitches are more regular on that side, so they should be easier to count accurately!
All the best,
Lili
Thanks Lili. Sorry to be a pest but it looks like my stitches count on the wrong side is correct but there are far too many stitches on the wrong side.
Hi Leilani,
Hmmmm, would you be able to send a photo of your work to [email protected]? That way, we can better visualize what’s going on!
All the best,
Lili
hi again lili.
So I’ve sorted that gauge issue. I now have a question on this part of the pattern.
vRepeat Rows 1 and 2 until piece measures 10 (11) inches from cast on edge, ending with a Row 2. (Because the ribbing portion of the Armhole has a different row gauge than the Woven Slip Stitch pattern, please measure the length over a section of only Woven Slip Stitch pattern).
Next Row (right side): Sl1, k31 (35), k2, p2, bind off 30 (34) stitches, p2 (first purl stitch is last stitch from bind off), k2, k100 (108), k2, p2, bind off 30 (34) stitches, p2, k2, k32 (36). [180 (196) stitches]
it says end with a row two and the next row is the right side but in the woven stitch pattern the next row (3) is the wrong side. pls enlighten.
thanks a mil!
Hi Lei,
Thanks for writing in with your question! Once you begin the pattern, Row 1 is now the right side and Row 2 is the wrong side. Occasionally the STITCH PATTERN differs from the actual pattern instructions depending on which side of the fabric the designer intends to face out. So in this case, it sounds like you are right on track. I hope this helps!
Happy knitting,
Gavriella
Hello
I was looking for a similar cape as this one except l would like longer sleeves. Could l make this with a longer sleeve? How would l do this and is it possible?
Hi Ellie,
Thank you for your question! Although we love your idea, I’m afraid these kinds of modifications would be outside the scope of support we can offer at this time. One thing you could try is finding a circular yoke sweater (or cardigan) pattern that has a similar look and then knitting additional length on the yoke before separating for sleeves! Please let us know if you have any other questions!
Warmly,
Gavriella
Q: for the woven stitch pattern, since we are working with an even number of stitches, does it mean that the last 2 stitches would be knit 1 and knit 1? sorry for the question, I am new to knitting but I wanted to try this pattern out because it is so lovely 🙂
Hi Christine,
Thank you for reaching out! For the stitch pattern, you will end with ‘sl1wyib, k1’ on row 1 and k2 (2 knit stitches) on row 3! I hope this helps but feel free to write back should you have any other questions!
Happy knitting,
Gavriella
Do you know the measurement around the bust area? And around shoulders or shoulder width? I’d like to make the smaller one but my bust size puts me in the larger range. However, I do like more form fitting drapes so the smaller may work out. Thank you!
Hi Nadia,
I’m sorry to say we won’t have those specific measurements for this design but the measurements for this pattern include:
Finished circumference at bottom edge: 60 (66) inches
Finished length from high point of shoulder to bottom edge: 22¼ (24) inches
Finished neck circumference: 17 (19½) inches
All the best,
Gavriella
This is hard to explain, but I’m going to give it a go…In the Front Increase Row section where you only work 1 row even in pattern between the front increase rows, should I use the same wrong side woven stitch pattern every time rather than alternate the wrong side woven stitch patterns? I think since the Front Increase Row only adds two stitches per row the pattern isn’t looking correct if I alternate between them. The slip stitches look stacked rather than offset, if that makes sense.
Hi Kathleen,
That’s a great question! What you’ll be doing in this section is incorporating the newly added stitches into the stitch pattern. Since you’ll essentially be starting the stitch pattern one stitch earlier after every Front Increase Row, you will end up repeating the same Woven Slip Stitch Pattern row twice in a row!
All the best,
Lili