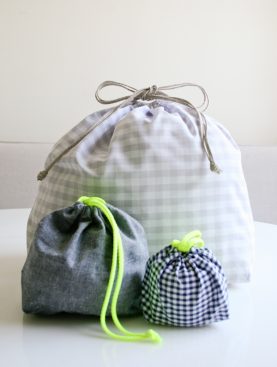
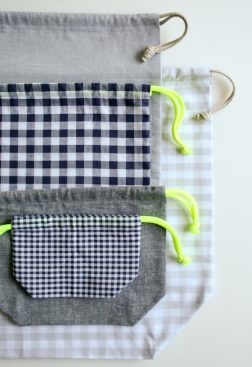
Easy Drawstring Bag

We made this simple drawstring bag to hold colorful felt jelly bean bags, but it can be used for a wide range of things. A custom gift wrap alternative, a travel bag, a knitting project bag and the list goes on and on. It sews up in less than an hour and works with any kind of fabric. A perfect use for those fabric scraps you’ve been wondering what to do with.
If you’d like to make some of the cute felt “jelly beans” pictured above you can find the Wool Felt Jelly Bean pattern right here!
Update: New Fabric
December 2019
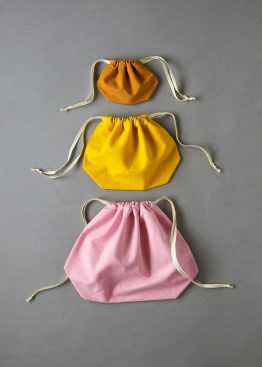
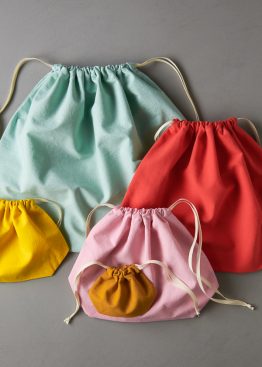
We revisit our Easy Drawstring Bags whenever a fabric strikes our fancy, and this newest incarnation in our garment-dyed Spectrum Cotton may be our most joyful yet. There are so many beautiful colors that picking the palette is like growing a fairy forest of toadstools! View the updated versions here!
Update: New Fabric
APRIL 2016
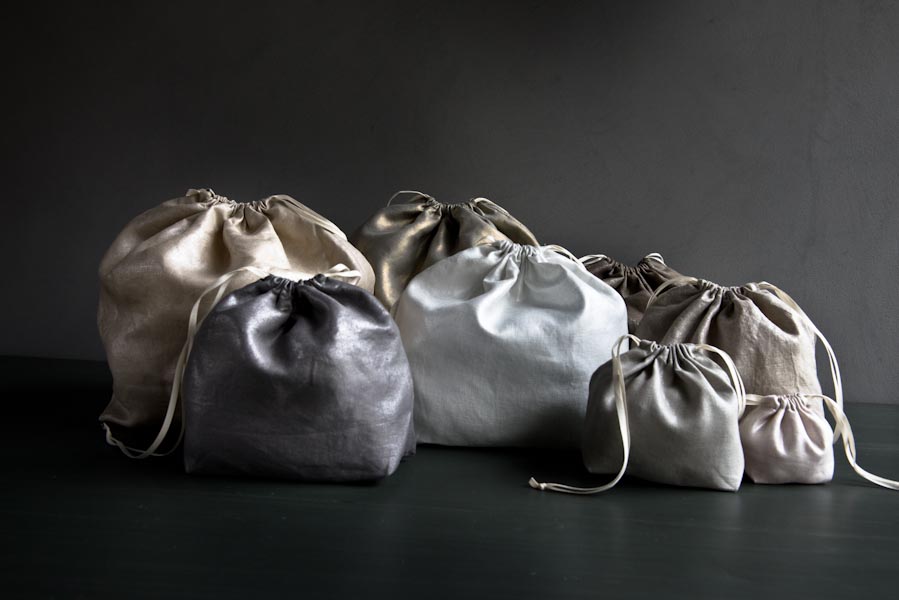
For a pretty new version of our Easy Drawstring Bags, we used Purl Soho Mineral Linen. In this shimmering fabric they are transformed into mysteriously gorgeous little treasures! To see the materials go to our Easy Drawstring Bags in Mineral Linen story here!
Update: New Fabric
JUNE 2015

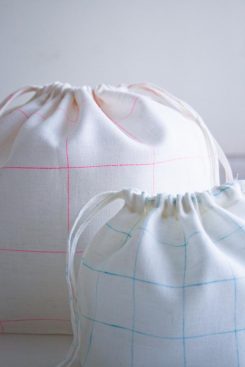
For a new version of our Easy Drawstring Bags, we used our Linen Grid fabric for the bag itself and also to create the drawstrings that pull the whole thing together. In Linen Grid, the finished look is crisp and modern!
Update: New Sizes
JULY 2012
We updated this pattern with 4 additional sizes and stitched it up in some of our very favorite fabrics. To see more photos and a full list of materials, visit our Easy Drawstring Bag: Four New Sizes post. The pattern here reflects these changes!
Materials
To make a X-Small (Small, Medium, Large, X-Large) drawstring bag:
- 1/4 (1/4, 1/2, 1/2, 1/2) yard of fabric.
- 2 (2, 2, 3, 3) yards of trim.
- 100% Cotton Thread that blends with chosen fabric
- Non-slip Ruler
- Rotary Cutter
For our original Easy Drawstring Bag, pictured here in this post, we used…
- 1/2-yard of Seven Islands Tulip damask upholstery weight fabric
- 2 yards of Carta Inc. alphabet brocaded ribbon in two letters
Sizes
X-Small (Small, Medium, Large, X-Large)
- X-Small: 5 1/2 inches wide x 3 3/4 inches tall x 2 1/2 inches deep
- Small: 8 1/2 x 6 1/4 x 2 1/2 inches
- Medium: 11 1/2 x 9 x 4 inches
- Large: 14 1/2 x 11 1/4 x 5 inches
- X-Large: 17 1/2 x 13 3/4 x 6 inches
Pattern
Cut
The Trim
Cut two 20 (26, 34, 42, 48) inch pieces of trim for each drawstring bag. Place these to the side for now.
The Fabric
Using your rotary cutter and non-slip rulers, cut a rectangle of fabric measuring:
- 6-inch wide by 12-inch long
- 9-inch wide by 18-inch long
- 12-inch wide by 24-inch long
- 15-inch wide by 30-inch long
- 18-inch wide by 36-inch long
For more help with this step, please see our Rotary Cutting tutorial.
Fold the rectangle of fabric in half the long way with right sides together to make a 6 (9, 12, 15, 18) inch square.
Sew
Starting at the fold, sew up the left and right side of the bag with a 1/4-inch seam allowance. Stop 2-inches from the top on each side.
Drawstring Channel

Working on only one half of the bag at a time, *fold and iron a 1/4-inch hem on the 2-inch portion of the fabric where you did not sew the seam (on the left and right sides).

Fold and iron a 1/4-inch hem along the top of the bag.

Fold it over another 3/4-inch as if to make a hem and iron (this will be the drawstring channel).

Sew along the bottom edge of the hem with a 1/6-inch seam allowance.
Repeat from * for the other half of the bag.
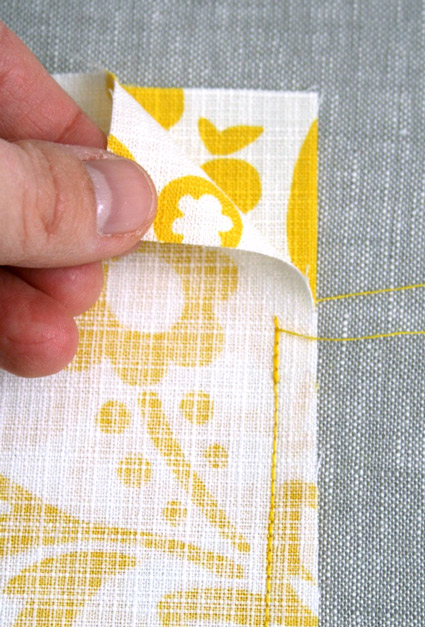
Make Gusset


Fold both corners of the bag so that the side seam of the bag is running exactly down the middle of the corner point. (Note: You will be sewing your gusset seam exactly perpendicular to the side seam.) You will want both gussets seams to be sewn at the exact same angle so that the gusset isn’t askew.

Line up one side of your non-slip ruler with the drawstring channel edge. Using your water soluble marker, draw a line approximately 1 (1 1/2, 2, 2 1/2, 3) inches down from the point of the corner. Repeat on other corner making sure your marks line up with the first corner.
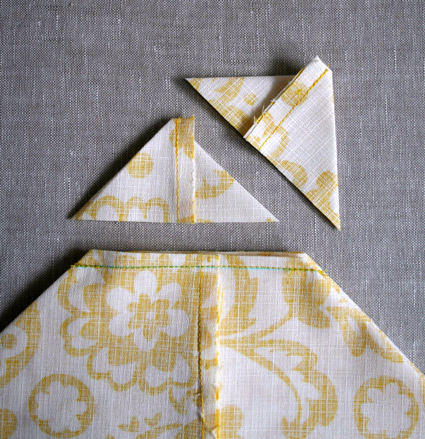
Sew along the marker lines. Cut off the fabric corners below the seam to reduce bulk. Turn the bag right side out.
Thread Ribbon Through Channel

Attach a large safety pin to the end of one of your alphabet ribbons.

Thread it through the drawstring channel on one side of the bag and then back around the other side so that you have both ends of the ribbon on one side. Repeat with the other ribbon starting on the opposite side of the bag. Leaving approximately 4 1/2 (4 1/2, 5, 5 1/2, 5 1/2) inches of the ribbon on either side, tie the ends in a knot and cut off excess.

The bag will cinch when you hold the knots on either side of the bag and pull outwards.
Enjoy!
Update 2024: You can explore our current collection of beautiful fabrics and supplies on our page of Sewing Tools + Notions!


Great tutorial. My bag looks awesome and works great!
Just wanted to offer a variation to this GREAT little bag. Instead of gusseted corners, keep the corners square and top stitch the bottom corners diagonally about 1.5″ from the point and put eyelets in the corners. Then you can bring the drawstrings down to the eyelets, thread them through and knot them to make a great little backpack. I made two in this style for my niece and nephew – a great, super easy gift. Thanks for the tutorial Page!
just made three of these bags in about an hour and a half. nice tutorial and adorable bag. i also skipped the gussets and made french seams to keep the inside of the bag nice and neat and clean. they’re lovely and i’ll definitely make more.
thank you so much for this great project!
I’m a beginner so it was a wonderful help to see the whole process step by step.
Greetings from Croatia!
i couldn’t agree with Maja more! i’m a beginner too and started teaching myself with cute bag/tote ideas. i made a few draw string bags to use at the grocery store for my produce items. making them out of muslin to keep the weight minimal so it doesn’t affect the scales. i couldn’t find any instructions that allowed me to easily sew a good channel for the draw string so i taught myself button holes – i call mine frankenstein button holes cuz that’s what they look like. LOVE your instructions here and can’t wait to create a new vegetable bag with this much easier process. i’m adding your site to my sewing RSS feeds. thanks!
Thank you for the wonderful tutorial! I just made one of these for my husband’s role playing dice so he can transport them more easily for his games. It’s perfect, turned out wonderfully and I haven’t sewn with a machine in ages! Thank you again, I’ll be posting on my own blog and telling the world how wonderful you are!
Rosemamie
http://www.in-a-galaxy.blogspot.com
Thank you so much for this excellent pattern! I too needed a bag for my RPG dice and this is perfect!
I have been looking and looking for a yellow upholstery and I love this! do you have more? or know where I can get some more? I need enough to make a couple large pillows. I would really appreciate it. thank you!
Thank you very much, this is a wonderful bag!
Hi! I was just wondering if you minded me using using these instructionals to add to my own website. I’m not a professional, but I thought this idea was amazing. If you do mind me using this EXACT instructional, then would it be okay with you for me to only use the main picture (not the instructional pictures), and completely revise your entire instructions for me to post on my own website. Please reply in the comments section. I will not use ANYTHING from your websites until you reply to this message. Thanks!
The Crafty Girl:)
Hi Crafty Girl,
You may not copy our instructions or photos on your website. If you would like to use one photo of the completed bag and provide a link for your readers to direct them to our website for the instructions that would be fine.
Please let us know if you have any questions.
thanks
Just wanted to thank you for these instructions…I am a non-sewer but just made a very nice drawstring bag for my daughter to use as a gym bag this school year. I skipped the gussets and added some zigzag stitch on the seam to make it a bit more hardy, but did everything else as instructed and it turned out fantastic! Thanks for the very clear instructions and pictures.
I am not a sewer and could not wrap my head around what seemed to be such an easy feat….making a draw string bag! The lady at the fabric store actually laughed in my face when I asked to buy a pattern for a drawstring bag (basically implying that I was a moron) This tutorial was so easy to follow and I want to thank you so much!
I have now made about six of these bags for anything and everything. The instructions are perfect and now every birthday gift and loaf of bread goes into one of these! Thanks.
I loved this bag and as a beginner I felt very proud to accomplish my first project. To do a lining, would you just make the bottom part of the bag and then just sew it in at the top?… or is it much more complicated than that?
HI Katie-
You definitely have the right idea. Adding a lining in a bag like this is often just a matter of making another bag and laying it inside the first, wrong sides together, In this case you might want to make the lining separately and then hand sew it in at the very end. That way it won't get confusing with the drawstring channel of the outer bag.
Please let us know how it goes!
Love the bag – as it is a copyright pattern, could you please tell me if I can sell the bags that I make – I sometimes sell my hand made bits and pieces at a car bootsale. (I don't run a business.)
Thanks
Hello Handy Maid-
Thank you so much for the nice question and comment. All of our patterns are intended for personal use only and cannot be sold. Thank you for asking.
Best Wishes- The Purl Bee
Your tutorial is just perfect! Thanks for sharing, especially for those not as “seasoned” as ones who have sewn a long time. This is such a great little bag, and I hope to help my grandsons make some this summer! After all, boys can learn to sew, too!! What a fun project, and not too difficult for children.
Thanks again! Have a great week! 😀
Hi! This looks perfect! What would the dimensions of the finished be, please?
Hi Tanya-
The finished bag should be about 12.5 inches wide by 12 inches tall.
Thank you for your question!
I just made my first bag – thanks for the detailed tutorial!! Your site is addictive and encouraging to a new sewer like myself. Thank you for the good ideas and instructions.
Hi, I made this bag today in less than 1/2 an hour. Thanks so much for the tutorial!!
What a great little bag! I, too, have just made one in less than 1/2 an hour. Could you please let me know how many yards of ribbon you used for the tie? I've made mine in purple and black giraffe spots for my daughter's friend's birthday present. I just have to get some ribbon now for the drawstring. I hope she likes it as much as I do! Thanks for the wonderful ideas. I plan to make logcabin washcloths for Christmas presents and I think I'll make some more of these bags to put them in.
Hi Agapanthus-
3 yards of ribbon will be enough for the ties.
Thanks for your nice comments and your question!
I just made a larger version of this to hold a throw I knit, a wedding gift for a dear friend. Thank you for creating and generously sharing this pattern. It was easy and exactly what I needed to make a gift bag. Gratitude!
I love, love, love this bag!!! I made 5 of these out of the most adorable owl fabric as “favor bags” for my daughter's birthday party and they were a huge hit. Thanks so much for sharing such a nifty and easy to make project!
Thank you so much for this tutorial! I'm a complete beginner and found this so easy to follow. I think the bag is fantastic just as you show – especially the gussets.
I will definitely make more of these 🙂
I made a few of these as part of the bridesmaids' gifts for my wedding. Among other things, each girl got a shoe-size drawstring bag stuffed with a pair of flip flops.
Thank you so much for this, they are delightful!
Have just made a couple of the smallest size to put bead necklaces in as little extra birthday gifts for my daughter.
Hello, thank you for the pattern. I don’t understand how to thread the ribbons through – when I put the second one in is it meant to sit on top of or underneath the first one? Thanks
Hi Jordan,
Thanks for reaching out! When you pull the 2nd ribbon through it actually doesn’t matter if it is above or below the 1st ribbon as long as both ends are coming out the opposite side as the 1st ribbon!
Happy crafting!
Gianna
excellent tutorial! i just made one of these bags this morning for a gift, and it came out perfectly. i am by no means a proficient, so thank you for the assistance!!
Love these instructions and the idea – I can think of all kinds of uses. I am not a professional sewer but this looks like it is going to be easy to follow.
I'm a first-time sewer. I was wondering what you use the cotton frabric for? It's never mentioned in the instructions but listed in the supplies.
Hi Arielle-
We sell all the fabrics we use in our projects and they are linked in the materials section. The yellow fabric used here is an older print that we no longer carry but you can see all of our cotton fabric here: https://www.purlsoho.com/purl/products/12-sewing-patchwork-fabric
Thank you!
Molly
Where are the links to the free patterns? Please help!
Molly
Hi Molly,
Thank you for the comment! All the instructions you need for this project can be viewed here; https://www.purlsoho.com/create/2009/03/15/easy-drawstring-bag/
If you’d like a printer friendly version click the print icon on the right hand side of the page and you can either print it or download the PDF there. There is no template for this pattern since it’s all done with various sized rectangle pieces!
I hope this clarifies and feel free to let us know if you have anymore questions!
Happy Crafting!
Jake
Can you making this using one way print fabric?
Hi Julia-
Yes you can but you’ll have to cut two pieces initially instead of one. Here’s how…
Cut two pieces that are the same width as the piece listed under the “Cut” section but half as long plus 1/2-inch. So, for an example, if you are making the smallest one instead of cutting one piece 6-inch wide by 12-inch long you would cut two pieces (with the print going the correct direction) that are 6-inches wide by 6 1/2-inches long. Then, sew the two pieces right sides together along their bottom edge with a 1/2-inch seam allowance. This will result in a 6 X 12-inch panel with the print going the correct direction on each side. You can follow the pattern as written from this point on.
I hope this helps. Thanks so much for getting in touch!
Best-
Molly
Thank you for the tutorial; it’s great having so many pictures. I can’t seem to find anywhere in the pattern where the trim fabric was used. We were supposed to cut and put it aside to use later. I’m new at this so perhaps it’s something I should know.
Hi Rita-
The trim referred to here is the ribbon that was used as the ties. But if you are making the version with the bias tape ties click on the June 2015 version and you can find the instructions there. Thanks for getting in touch!
Molly
Very clear for a beginner like me, thanks.
I use the edge of a piece of thin card ruled off and marked at 1/4 to press the edges over when using my steam iron. It’s a trick which saves my inexperienced fingers 🙂
I have several birthday friends in January. After Christmas I never know what to get for them, all their preferences have been exhausted. This year all are going to get one of your lovely and wonderful bags from your tutorial. I have a big stash of wonderful printed cottons, so they will be put to good use. Thank You, Thank you.
I had made a few drawstring bags a few years ago, but forgot how the drawstring channel worked. Yours is way better than the one I used before, so I’m glad I forgot and had to look it up! Thanks!
Great step by step instructions. I used this to transform old net curtains into reusable produce bags for the supermarket…. lightweight, with a simple design. 🙂
The “trim” directions are very confusing. Under “Materials” at the beginning you say you need 2(2,2,3,3) yards of trim (depending on size of bag). You then go on to say “For our original Easy Drawstring Bag, pictured here in this post, we used…
1/2-yard of Seven Islands Tulip damask upholstery weight fabric
2 yards of Carta Inc. alphabet brocaded ribbon in two letters.)
But that bag is the X-large size so why didn’t you use 3 yards? I bought 2 yards and it was too short.
Hello Jane,
Thank you for writing us! I believe that the bag that is pictured is the size medium, rather than the x-large, which takes 2 yards of trim and not 3. To make the x-large you will need 1/2 a yard of fabric and 3 yards of trim.
apologies for this mix up and I hope this clears things up for you!
Warmly,
Marilla
Hi, I wanted to try and sew this bag, but I don´t know if I´m blind but I can´t see a link to the pattern?
Hello Lina,
Thank you for reaching out! There is no pattern link because the pattern is on the actual page. If you scroll past the updated posts there will be a section headed “Pattern – Cut”.
I hope this helps and happy sewing!
-Marilla
Thank you for this great pattern! I just made the X-large bag for a baby shower gift and instead of trimming the gusseted corners I decided to sew them down which gives the inside corners some reinforcement. I also made a bottom insert from a folded packing envelope and covered it in the same fabric. I’m very pleased so far, now I just have to figure out a cute drawstring 🙂
I make the large size with durable fabric, fill them with a sewing kit, girlie things, and donate to Operation Christmas Child for the older girls on their list. The sewing kit is a Mentos gum bottle, a packet of hand needles, a spool of thread and some scraps of fabric (2-1/2 inch charm pack).
Where to get your baby lock sewing machine?
Hi Joanne,
Thanks for reaching out! Unfortunately we do not carry or have a recommended source for sewing machines; however, I’m sure if you reach out to a local sewing machine store, they would be able to help you!
Best,
Julianna
I’ve been looking for an easy drawstring bag to sew and came across your site. Your instructions were very easy to follow! Now I’m making small bags for spent rifle shells that is given to families at a military funeral. Before, the guys used a ziplock bag, now they get one that is made with fabric with small flags on it and is sewn with love….
Thanks for posting this, I’ve made a lot of drawstrings in the past, but haven’t been able to concentrate lately (ended up having my partner measure and cut the fabric for me) and could not for the life of me remember how to sew the channel while also having the edges folded in (avoiding a raw edge where the string comes through) without just sewing the channel shut. Skipped the gussets for this project and used liquid stitch [fabric glue] to really keep the hem I was worried about from turning out.
Is the pattern for these bags still available?
Hi Gail,
I am happy to help! The free pattern for this lovely bag can be found above on this page!
Best,
Cassy
I cannot find the pattern for the drawstring bags even though I have tried all of the links. Is the pattern still available?
Hi Gail,
Thanks for writing in! You can find the free pattern in the post above, under the header “Pattern.” Because this bag is so easy to make, there isn’t a template or pattern piece to print. Instead, under the heading “The Fabric,” you can find the dimensions for the rectangels to cut for each size of the bag!
I hope that helps!
Julianna
Schöne Idee. Werde ich gerne ausprobieren. Die Stoffauswahl ist besonders gelungen.
hi. i am confuse how to get the free patterns.
Hi Kathy,
Thanks for reaching out! This pattern doesn’t require any templates or pattern pieces, as each bag is sewn from simple rectangles. You can find the dimensions of the rectangles above under the heading “Pattern” and “Cut,” and the sewing instructions are immediately below that!
Happy knitting!
Julianna
Awesome tutorial. Very easy to understand and follow. Thanks very much!
Thank you for this nice easy pattern. I needed a bag for my daughter to keep the bits for her new puppy in and this fitted the bill perfectly and was easy to make.
I HAVE CLICKED ON SEVERAL LINKS AND THERE IS NO PATTERN FOR THIS.
Hi Deavan,
Thanks for reaching out! The pattern can be found just above, under the heading “Pattern.” If you’re looking for a cutting template or printable pattern pieces, it isn’t necessary since the bag is so simple to make! Under the heading “The Fabric,” you will find dimensions of the rectangle to cut for each size of the bag.
I hope that clears things up!
Julianna
There’s no mention of how you use the trim that gets set aside at the beginning?
Hi Katie,
Thanks for writing in! This trim will be used as the drawstrings of the bag, and you can find instructions on how to insert them in the section titled “Thread Ribbon Through Channel.”
I hope that helps!
Julianna
Hi, Thank you for the tutorial. Do you have the explanation for the same bag but with double layer? I mean, with an inside layer?
Hi Maider,
Thanks for reaching out! We don’t currently have a version of the bag with a lining, but thank you for expressing your interest! I will be sure to pass this along to the rest of the team!
All the best,
Gianna
Obrigada, eu nunca achei um tutorial tão simples para o acabamento com passa-cordao. E vou praticar Abraços!
Thanks for this pattern! It’s so easy to sew and as a beginning sewist it’s a great way to become more familiar with my sewing machine and some basic techniques, but it’s odd that the seams are raw. Which seam finishes would work for this bag?
Hi Becky,
Thanks for reaching out about that. I’d recommend doing French seams, which will also work for this pattern!
All the best,
Lili