Tunisian Crochet Basics
Tunisian (also known as Afghan) Crochet makes a dense and squishy fabric with a beautiful texture. It’s very easy to learn and very satisfying to hook up!
This type of crochet is distinguished by the tool you use to work it, namely a long “Afghan” hook. You should choose a size that is at least two sizes bigger then the hook you would normally use with the same yarn. Our Afghan Crochet Hooks are available right here.

Another characteristic of Tunisian Crochet is that the front side of the fabric is always facing you. Generally, you create Tunisian Crochet fabric by alternating “Forward” and “Return” rows. The Forward row moves from right to left as you pick up stitches, leaving them on the shaft of the hook. And the Return row moves from left to right as you remove the stitches from the hook.
Here you’ll learn how to make a Tunisian Crochet fabric using the basic Tunisian Simple Stitch. Let’s get started!
Foundation Chain
Make a foundation chain just as you would for regular crochet. (Your pattern will tell you how many chains to make.) Don’t know how to make a foundation chain? Check out our tutorial right here.
Preparation Row

A crocheted chain has a front side characterized by interlocking “v”‘s and a back side characterized by small bumps. In the above photo the front side is on the left, and the back side is on the right.

You will work the Preparation Row into the bumps of the back side of the chain, starting with the second bump from the hook.
Insert the hook into the back bump, yarn over and pull a loop through, leaving it on the Afghan hook. Continue with each chain bump..

…all the way to the end of the Foundation Chain.

Return Row

Chain 1.

Yarn over and pull a loop through the next two stitches on the hook.

Repeat this last step until one stitch remains on the hook.
Forward Row
Remember that you don’t turn the work; just keep the same side facing you!
For the Forward Row you will insert the hook through vertical strands, created by the previous row. The first three vertical strands are shown here in pink:

So, insert the hook from right to left through the first vertical strand. Yarn over and pull a loop through, leaving it on the hook.

Continue to pull a loop through each vertical strand until you reach the end of the row.
Finish by inserting the hook into the chain one from the previous row…

…and pulling a loop through.

(If you’d like a very sturdy edge, make this final stitch through both strands of the chain one.)
Changing Colors
When two stitches remain at the end of the Return Row…

…use the new color to draw through both loops.

Work the Forward Row as usual.

Finishing
Finish off on a Forward Row. Insert the hook into the first vertical strand, yarn over and draw the loop through both the vertical strand and the stitch on the hook.

Repeat this step of drawing a loop through both the vertical stitch and the stitch on the hook until the end of the row.

Then cut the yarn and pull it through the last loop. Done!

Tunisian Crochet fabric does have a tendency to curl a bit. Using a hook that is at least two sizes bigger than you normally would is one way to help prevent the curling. Another way is to make sure you block your finished piece!
What to do with all this new knowledge? Check out our free Tunisian Crochet projects!
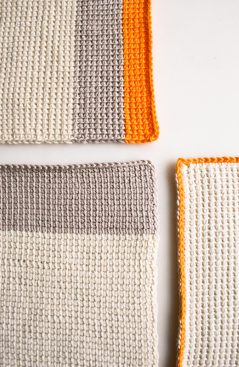
- Left: Tunisian Crochet Washcloths
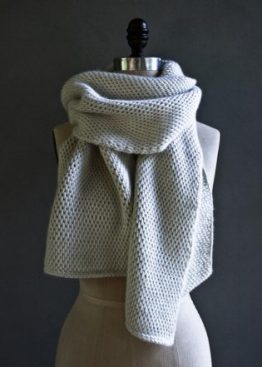
- Middle: Tunisian Crochet Scarf
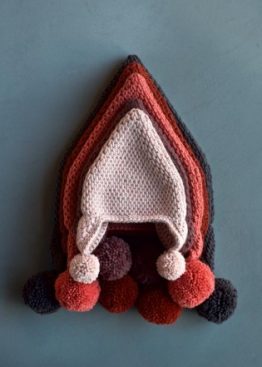
- Right: Tunisian Crochet Pointy Pom Pom Hat


Hello! I’m looking forward to starting my first tunisian project….I’m hoping to make a large blanket in one continual piece. Is it possible to make an 84″x72″ blanket as one piece? Thank you!
Hi Lacey,
Thanks for reaching out! This is certainly doable, though you will need a long hook to accommodate all those stitches! I would suggest using an Addi Click Crochet Hook, paired with a 30 or 40 inch Addi Click Cord. The cords are out of stock at the moment, but we are hoping that they will arrive soon. You can sign up to be notified when we get them back in stock by entering your email on the product page.
Happy crocheting!
Julianna
Do you carry the addi click crochet kit? The link you provided does not work?
Hi Czarina,
Thanks for reaching out. I’m afraid that we’ve stopped carrying those hooks! However, since they came from a third-party brand (Skacel), you should still be able to find them elsewhere. I’d recommend checking out the website I linked to as a starting place!
All the best,
Lili
Thank you so much for the pictures. I have been working on a patterned piece and it was not looking right. Your instructions and pictures helped me realize the book instructions and pictures were misleading, therefore creating the wrong stitch and look.
love tunesian but it seems like it takes more yarn than regular crochet. is there any way to know if you have enough yarn to do a project like a scarf pattern,but you want to change it to do a throw??
Hi Kris
Thanks for reaching out! Take a look at the a Tunisian Crochet Scarf or the Tunisian Crochet Washcloths both of these would work for enlarging to a throw size. The amount of yarn you will use will depend on the weight of your yarn and the size of your throw, but if your using the weight of the yarn listed, you could multiply the size, and then get a closer yarn estimate. I hope this helps!
Best
Jessica
Years ago I made a hooded cape using the Afghan stitch (I am 75 and that is what we called it). Would you happen to know of a pattern for a long cape, not a poncho
Hi Susan,
Thanks for writing in! Although it is more commonly referred to as Tunisian crochet now, this is exactly the same as the afghan stitch! Unfortunately, we don’t have any patterns for crocheted capes – I’m so sorry about that! However, if you search either Ravelry or your preferred search engine for “tunisian crochet cape pattern” you should be able to find one or two!
All the best,
Julianna
I have been doing this stitch for a very long time. It is a fabulous stitch for dish clothes. I made a huge blanket in the Entrelac Diamond Tunisian stitch by Lion Brand. It is so warm and acts like a weighted blanket. It is very quick to make up as well..
Hi Harlean
We are so glad you enjoy this stitch! We also find that’s its very versatile and quick too!
Happy crocheting
Jessica
I’m a bit confused about the return row. Do you chain 1, loop, and pull through 2 loops all the way across? Or just at the beginning of the return row? Thanks for clarifying.
Hi Carol,
Thanks for writing in! It sounds like you’ve got it! After you chain one at the beginning of the return row, you will yarn over the hook and pull through two loops, repeating that stitch all the way across the row until you have just one loop remaining on your hook.
Happy stitching!
Julianna
I am working on a hanging towel. I am almost to the end and cannot figure out how to chain in the middle of the row to create the buttonhole. I’m supposed to end up with 5 loops on my hook, but I only have 4.
Do you have any helpful hints?
Thank you.
Cindy Cullen
Hi Cindy,
Thanks for reaching out! We don’t have any tutorials or patterns for this particular technique, but if you search your preferred search engine for “Tunisian Crochet Buttonhole you should find several videos and tutorials demonstrating how to do this!
Best,
Julianna
I’ve had that same question, if it could be done in one piece.
Are you saying all those stitches could fit with several extensions attached to each other ?
Every project I’ve ever done in Tunisian crochet was curling up from the bottom. Is there a way to avoid that? How do you make it lie flat?
Hi Naomi,
Thanks for reaching out! I recommend blocking your finished project, this is how we get our pieces to lay so flat! I suggest checking out our Blocking tutorial, it is an excellent resource to use.
Warmly,
Gianna
Just want to say THANKS for your tutorials. I’ve used a number of them and greatly appreciate having a tutorial that is printable. Video’s are fine, but I find the still photos and words more helpful, Great job, Purl Soho!
Grazie per le chiarissime spiegazioni… ho iniziato una maglia, ma ora che ho finito i 4 “pezzi” non so come unirli…si cuce dal rovescio o dal diritto? Aiutooooo!
Hi Maria,
Thanks for reaching out! Which project are you working on so I can help you further? This is the page for the Tunisian Crochet tutorial, so if there is a specific project you are making, I am happy to help!
Warmly,
Gianna
I have looked everywhere and can’t find the best way to weave in the ends after a color change. Do you have any advice?
Thanks!
Hi Michelle,
Thanks for reaching out! Unfortunately, we don’t have a tutorial for weaving in your ends on Tunisian Crochet, but I think the best method would be to weave in the ends on the reverse, using a needle, and duplicating the stitches with the tail! Even though we don’t demonstrate weaving in your ends for crochet in this, I would recommend checking out our Weaving in Your Ends tutorial, I would look at the duplicate stitch options, it may help you and give you a better idea of how to proceed!
I hope this helps!
Gianna
Am a beginner and have tried 4 different hats with the same undesirable result. The ribbing part fits fine, but after completion, the body of the hat is so dense it wont fit on my head comfortably. Its too small and too solid. Any suggestions.
Hi Peg,
Thanks for reaching out. Tunisian crochet produces quite a thick fabric, so I would recommend going up a hook size or two. This will make the fabric a little looser as well as make the entire hat slightly larger! Hope this helps.
All the best,
Lili
I have a pattern which requires crocheting four stitches together on the return. It says two stitches together 3times then chain 1 then 4 stitches together then chain 1. How do I do the next row?
.
Hi Nicola!
Thank you for your question! We would love to help you with the next row in your pattern, however we are interested in learning a little more about your pattern for context. Please feel free to send us an email at customerservice@purlsoho.com with your pattern so we can help you move forward with confidence in your project!
All the best,
Margaret
This is enormously helpful — I knew nothing about Tunisian crochet, but was able to pick up the basics using this tutorial and make a quickie washcloth as a starter. Thank you!
Any tips on making the edges straight? My right edge is straight as an arrow, my left edge looks wonky.
Hi Amanda,
Thanks for reaching out, although I’m sorry to hear that the left edge of your washcloth isn’t coming out as expected! The reason that it’s uneven is likely because you’re inserting the hook into a different loop at the end of some of the forward rows. I’d recommend taking a moment at the end of each forward row to make sure that you’re going through the same leg of the chain 1 from the previous row each time.
If you’re still having trouble making the left edge look neater, I’d suggest sending a photo of your work to customerservice@purlsoho.com! That way, we’ll be able to take a closer look into what might be going on.
All the best,
Lili
Thank you! My left edge is wonky, too! I’m going to try to figure it out as well. Great instructions as always 🙂