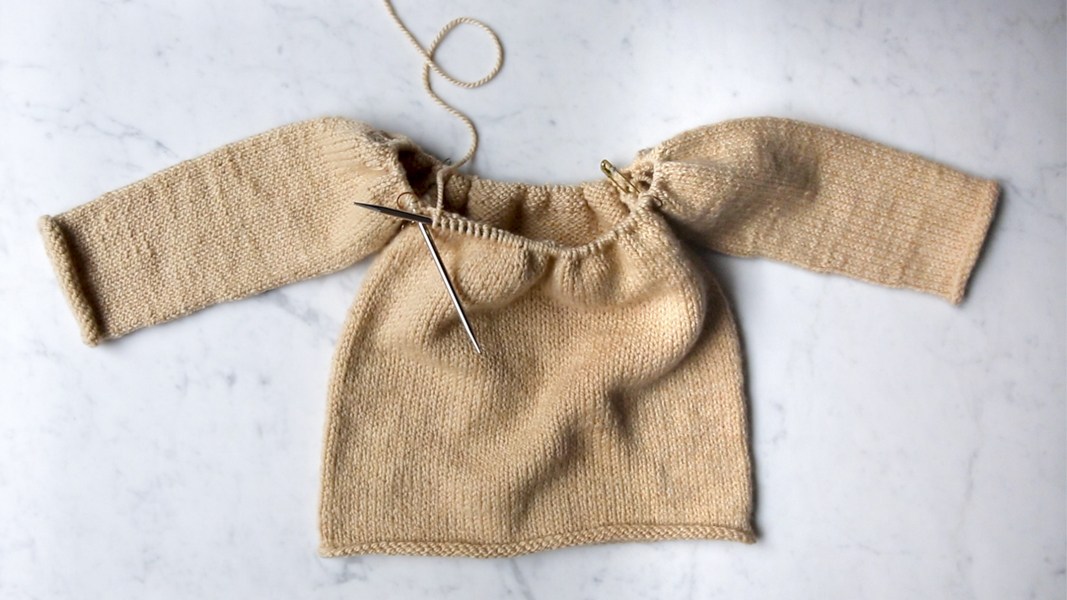
Joining Sleeves to Body
Whenever you make a “bottom-up” sweater “in the round” there will come a moment where you have to add the sleeves to the body. For first-time in-the-round sweater knitters, this moment is always daunting! “You want me to put what stitches where and knit them with which needles?”
This video is here to help you wrap your brain around the magic. It shows you how to join the sleeves to the body of our Purl Soho Pullover, a bottom-up sweater. The process is quite similar for a top-down sweater and also for a cardigan, so hopefully this video will help with your situation, whatever it is! Follow along…
Joining the sleeves to the body happens in one single round (or row if you’re making a cardigan). These steps apply to nearly all bottom-up sweaters, except that, for your sweater, the beginning of the round may be in a different place. This means that, instead of starting at the end of the Front stitches, as we do here, you may start at some other place, like the beginning of the Front stitches. Regardless, the steps are the same, just apply these concepts to your specific sweater situation!
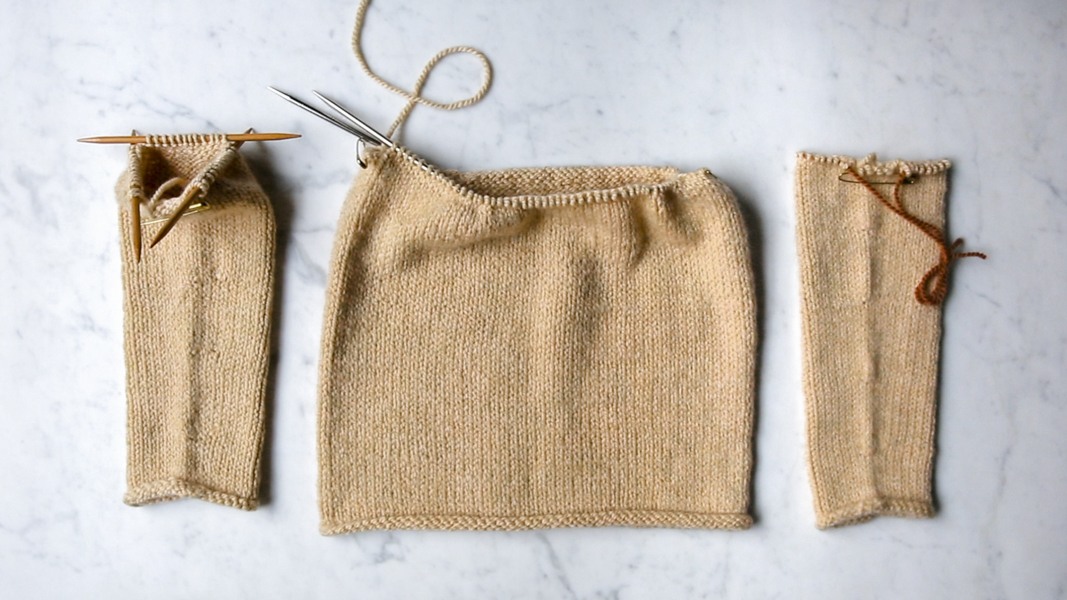
Once you have finished the body of your sweater up to the underarms, as well as both sleeves, and all four sets of underarm stitches are on holders or scrap yarn or bound off (depending on your pattern), you’re reading to join the sleeves and body.
You will be working with the body needle and working yarn.
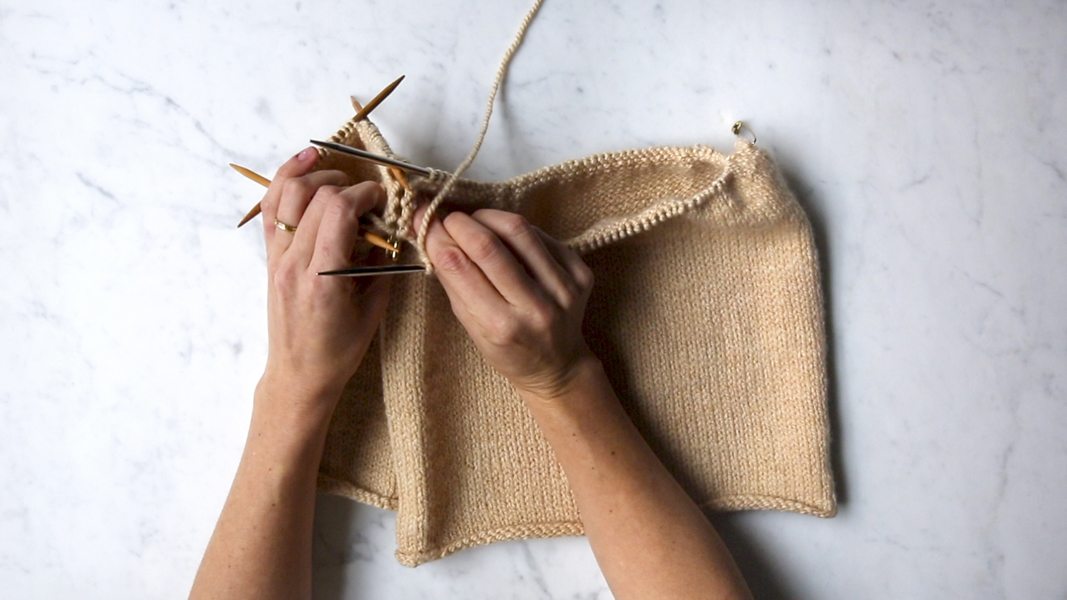
The first step is orient the body and the first sleeve you will be joining. Line up the underarm stitches of the sleeve with the body’s underarm stitches that are right there at the working yarn. Positioning the underarms parallel to each other like this leaves the first stitch of the sleeve in position to knit it. Take the right-hand needle that is holding the body stitches and insert it into the first sleeve stitch. Take the working yarn from the last body stitch and use it to knit the sleeve stitch nice and firmly. Continue around the sleeve stitches, knitting each one off the sleeve needles with the right-hand body needle.
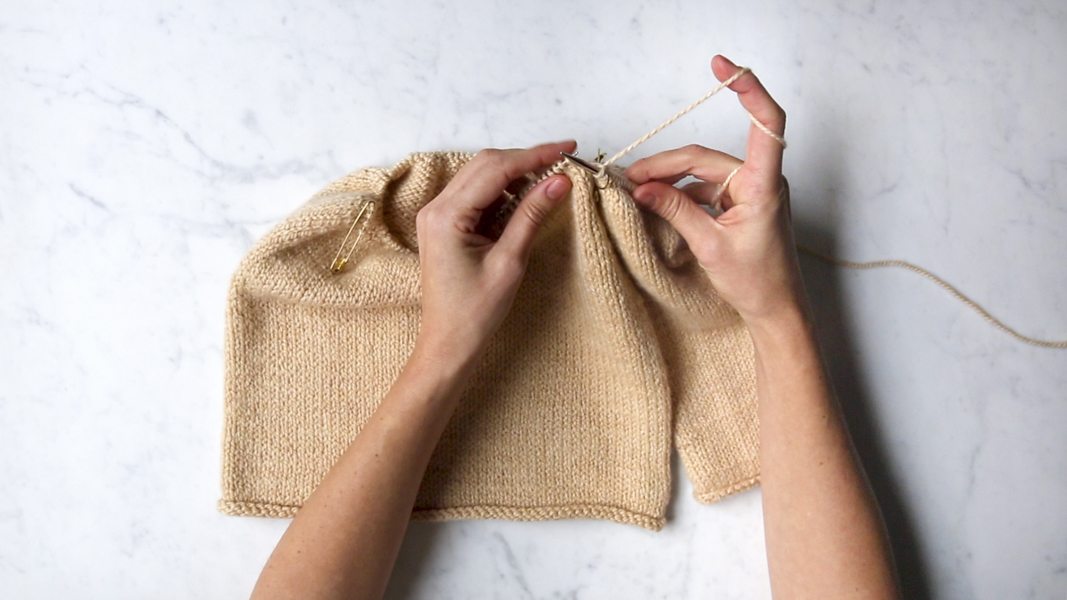
Once you’ve knit the first sleeve’s stitches, you’ll return to the body and firmly knit the stitch right after the on-hold underarm stitches. Continue, knitting across the Body stitches, all the way to the next underarm stitches.
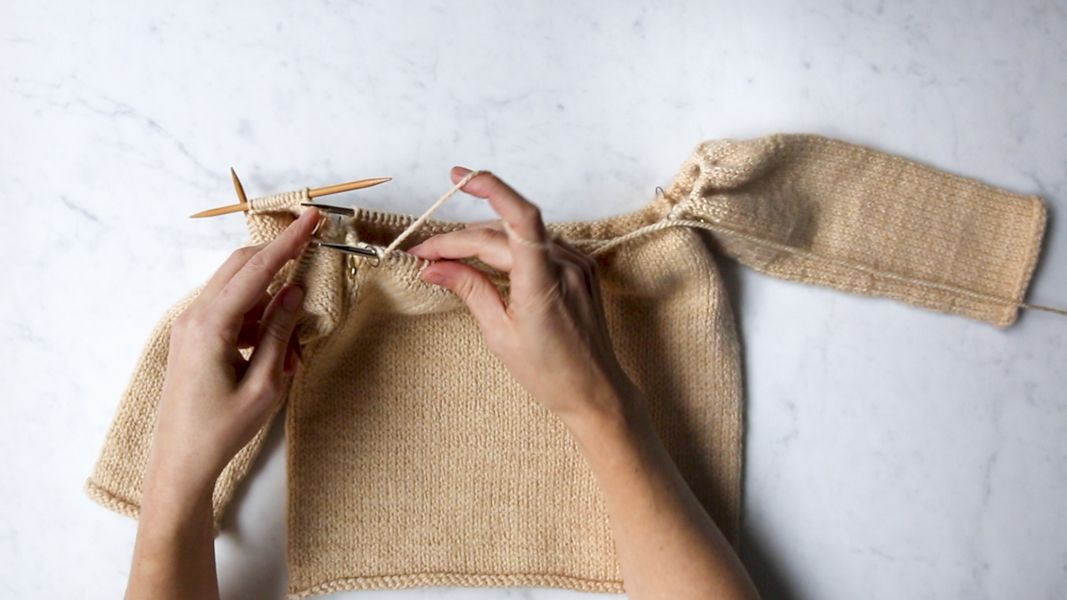
Prepare to join the second sleeve. Slip the on-hold stitches of the remaining sleeve onto some needles, either circular or double pointed, and do exactly what you did for the first sleeve: knit it on! Line up the underarm stitches and insert the right-hand body needle into the first sleeve stitch. Knit it, giving it a little extra tug to bring the body and sleeve together as much as possible. Then knit around the sleeve stitches, using the body needle, until you reach the end of the sleeve stitches, at the other side of the underarm.
Insert the right-hand needle into the first body stitch after the underarms, and to knit it good and tight. Continue to knit across the remaining body stitches.


What do you do with the underarm stitches that are on the safety pins?
Hi Toni,
Thanks for writing in! The underarm stitches on hold will later be grated together using the kitchener stitch! This will generally be once all of the rest of the knitting of the sweater is completed!
Best,
Cassy
Grafting in an extra row results in holes at the ends. I haven’t figured out a way to resolve this.
Hello,
Thanks for reaching out. Getting holes at either end of the kitchener stitch is completely normal! I like to get rid of these holes by weaving over them using duplicate stitch on the wrong side of the garment. You can use your yarn ends to do this! Hope this helps clear things up.
All the best,
Lili
Thank you for this tutorial which has come at just the right time.
I am in the midst of making the Botanical Yoke Pullover I have got to the joining body and sleeves point. I am having great trouble keeping the ribbing straight. After counting the number of stitches etc and checking the pattern many times I am confused and have a question.
Having lined everything up and knit round the left sleeve p2,[k2,p2] 21 times, surely the first stitches across the front should be k2 but the pattern says p2. Is this an error or am I being incredibly thick?? I hope you can enlighten me.
Many thanks for your help
Angela
Hi Angela,
Thanks for writing in! I think that I can help! For the underarms, you will have put the stitches for the underarms on hold to work later. For the Left sleeve, these stitches will begin and end with k2 and you will put the corresponding stitches on the body oh hold as well. That would leave p2 as the stitches that you will work before and after attaching the arms to the body.
I hope that this helps!
Cassy
I hope that this clears things up!
Cassy
Hi Cassy, Finishing the underarms by using the kitchener stitch leaves holes on either side of the grafted seam. what are your suggestions please? thank you, Sandra
Hi Sandra,
Thanks for writing in! This certainly can happen with kitchener! Generally, I use the tails of my yarn to sew up the little holes at the edges and they pretty much disappear!
I hope that this helps!
Cassy
Hello – I am knitting the Purl Soho pullover attempting to join the body and sleeves together. I found the tutorial which is excellent but am confused about the difference with pattern instructions: tutorial says use right body needle/pattern says left, tutorial says knit with yarn from body/ pattern says knit with yarn from right sleeve. I cannot figure out how to proceed as my interpretation of the pattern instructions has me knitting back along the sleeve stitches therefore the sleeve will not be joined to the body until the next round! Also the separate pieces seem not to be facing the same way. Many thanks for rescuing me!!
Hello Anne,
Thank you for reaching out! I would follow what your pattern says to do as the instructions after joining your sleeve will assume that you have joined your sleeve at the beginning of the next round. When you say that the separate pieces do not seem to be facing the same way do you mean the sleeves in relation to the body, or do you mean in terms of the two ways of attaching the sleeves?
I hope I can help further!
Warmly,
Marilla
now that the sweater is together after the 9 rows are done how many sts. come off each row?
Hi Mikala,
Thanks for reaching out! Can you let me know which of our patterns you are knitting so I can help you with this step?
Best,
Julianna
Hi!
I’ve been knitting the Purl Soho Classic Hemmed Crewneck, and was nearly to the neckline when I realized I had way more sleeve stitches than I should. The step I forgot was setting aside stitches from the sleeves for the underarms — I only did it for the body! Devastated to have to rip out half of a nearly completed sweater, but eager to reset and start anew — any tips on how to safely rip out that much work? I usually just “knit backwards” until the stitches are undone to where I need, but that’d take ages for this situation. The last thing I want is to try a rash solution that ends up losing my place and making it impossible to restart again from the sleeve-joining.
Hi Colleen,
Thank you for reaching out! What a shame to have to rip back that much knitting- it happens to the best of us! Luckily, creating a “lifeline” for yourself in your knitting won’t be too tricky and will allow you to unravel with confidence.
To create a lifeline, thread a tapestry needle with a piece of scrap yarn a foot or two longer than the circumference of your sweater and locate the row that you want to rip back to. Starting at your Beginning of Round marker, slip your tapestry needle through every stitch on that row, threading under the right bar of every knit stitch from back to front. Once you’re back at your BOR marker, secure the ends of your lifeline (I like to tie a bow because they’re easy to undo) and you’re ready to rip! The lifeline will hold the entire row of stitches so they’re ready for you to pick back up with your needle when you reach them.
I hope this was helpful!
Gaby
Hi there – Please help. I am attempting the Incline/Decline Cardigan for my daughter while we are lockdown in NZ and I’m stuck on joining the body and sleeve. I am unsure and very confused about which is the underarm edge on the sleeve. Is the longer end of the sleeve actually the underarm? Also unsure of which ends I take off the 3 stitches. I’m really hoping you have a tutorial on this! Or if you can name the edges on the diagram would help me – I think!
Hi Diane,
Thanks for reaching out! Unfortunately we don’t have a tutorial for this pattern, but I hope I can clear this up for you! The underarm of the sleeve is indeed the longer edge of the sleeve, and after they are joined, the longer edge of the sleeve will be right next to the longer edge of the Left Front, and the stitches that you place on hold will be the three stitches from each piece right where they join – in other words, when you have the right side of both pieces facing you, it will be the three stitches on the left edge of the sleeve and the three stitches on the right edge of the body that are placed on hold. If you aren’t already, I think it would be very helpful to use removable stitch markers or scraps of yarn in a contrasting color to mark the right side of each piece once you have the first few rows done. You will always know that the various pieces are coming together correctly if all the right sides are on the same side of the work!
I hope that helps, and happy knitting!
Julianna
Botanical yoke pullover. I have joined the body and sleeves and have ended up with 4 markers. The Shape Yoke instructions tell you to decrease 8 stitches but if I follow the instructions I will only decrease 4. What have I done wrong?
Hi Barbara,
Thanks for writing in! It sounds like you might be missing one of the decreases in the repeat! The first decrease row after joining the sleeves to the body reads:
Decrease Round: [P2tog, work in established rib to 2 stitches before next marker, p2tog, remove marker] 4 times
For this row, you will be repeating the entire bracketed section, which begins and ends with a p2tog, between each set of markers. The result will be that you decrease before and after each of the four markers for a total of eight decreases!
I hope that clears things up!
Julianna
The challenge I have is never addressed in any video, I am hoping you can help me. I am a seasoned knitter so this really troubles me. When you have the small amount of stitches and add the sleeve I find it really tight knitting. I am unsure if I have done something wrong? The pattern I have is a cardigan. I have knit fronts and back together on straight needles. Then I was/am to cast off 8 stitches for arm hole. Then knit 64 stitches 6 rows of garter and then put the 64 stitches in place of the 8 stitches cast off. The circular needles hold it all however the stretch of the 8 stitches cast off is not enough to make way for the 64 of the sleeve added in. Does this make sense at all? I would give a picture however I can’t upload it. Any suggestions or help or even support that others have this problem would be helpful. Thank you so much!
Hi Cynthia,
Thanks for reaching out! What you are describing is completely normal for this step – although it can certainly be annoying! Depending on how many stitches your pattern has you set aside for the underarm, the join between the sleeves and body can be very tight and awkward to knit for a few rows and there isn’t really a fix for it, unfortunately. It is temporary, however, and after a few rows, this issue will go away on its own!
I hope that helps!
Julianna
I am knitting the baby fair isle cardigan. I am at the divide for armholes. When you say place “previous stitches” on holder…I interrupt that means the next 10 stitches on the needle.
After putting those 10 stitches on a holder do I continue to pearl the 59 stitches pulling the yarn tight up to the previous 30 stitches. There is very little space to attach arm. The next knitting row I start joining the arm. Tx.
Hi Beth,
Thanks for reaching out! When we say previous stitches, we don’t mean the next 10 stitches we quite literally mean the previously worked 10 stitches! So when you are dividing for the armholes you will K1, [p1, k1] 2 times, you will then purl 30 (33, 37, 41), then from the previous stitches you just purled, you will place 10 (10, 10, 12) stitches on stitch holder or scrap yarn! You will then continue purling 59 (67, 73, 81), and the again will place the previous purled 10 (10, 10, 12) stitches on stitch holder or scrap yarn! You will then finish off by purling to the last 5 stitches, [k1, p1] 2 times, k1. You should then have 99 (113, 127, 137) total stitches remaining: 25 (28, 32, 34) stitches for each Front; 49 (57, 63, 69) stitches for Back!
I hope this clears things up!
Warmly,
Gianna
I am knitting a baby pullover. When I move the stitches on hold onto the needles and begin to knit the knit stitches are going the opposite direction to the body stitches. It is quite noticeable. Is this because I am left handed? Is there a way to correct this?
Many thanks,
Sue
Hi Sue,
Thanks for writing in! I’d be concerned too if my stitches were suddenly going in the reverse order! Unfortunately it’s difficult to know how best to help without knowing more about the pattern and what it currently looks like. Would you be able to send in any pictures and more details about the instructions leading up to where you are? We’ll keep an eye out at our customerservice@purlsoho.com address.
All the best,
Zha Zha
Hi,
I am knitting the Botanical Yoke Pullover pattern. I have joined the sleeves and am now working up the 10 rounds before the decrease round for size 34 1/2. I have 360 stitches but have four purl stitches in between the body and the start and end of the sleeve. Is this correct or have I done something wrong? (I have already pulled out this section once, to redo the Shape Yoke section—having missed one of the two p2tog’s in each section) Thanks for your help!
Hi Ann,
Thanks for reaching out! If you can please send the information above along with some clear photos of your work to our team at customerservice@purlsoho.com they can help investigate further from there!
Happy knitting!
Gianna
Help! I am working on the Lap Shoulder Pullover and am ready to join the body and the sleeves, I just can’t seem to figure it out. I’ve watched the video and I understand what I should do but….my working yarn from the body is at the beginning of the on hold stitches. Do I just carry the working yarn behind/across the on hold stitches to get to the sleeve stitches or have I done something terribly wrong (totally possible!)
Many thanks for your help!
Hi Anne,
Thanks for reaching out. Before beginning to knit with your working yarn, you’ll need to align your sleeve stitches so that the on-hold stitches on the body are touching the on-hold stitches on the sleeve! They should essentially be mirroring each other. Once your sleeve is in this position, your working yarn will automatically end up directly next to the first sleeve stitch, so you can start knitting that right away without moving it anywhere else. I hope this helps clarify things more!
All the best,
Lili
Thank you, Lili,
I think I “got it”. The on hold stitches face each other, right sides together and that does, indeed, get my working yarn where it needs to be. Looks a little awkward… just checking, don’t want to unknit it again!
I appreciate your help!
All best,
Anne
Hi Anne,
Glad to hear that it makes more sense now! It sounds like you’re on the right track. It will definitely feel a bit awkward, especially through the underarm stitches, but it will even out a lot more as you continue knitting the yoke!
All the best,
Lili
I’m knitting the Gentle Cardigan and can’t understand how to do the sleeves, since the example given is for a pullover. My working yarn is connected to the right front of the cardigan (therefore the left needle when the right side of the knitting is facing me.) So, how do I do this? The pattern says to refer to this video but it just isn’t enough help. Thanks.
Hi Sam,
I’d be happy to help clarify the instructions in the video! First, you will begin knitting the body of the cardigan by beginning that right-side row and knitting the Right Front stitches all the way up to the on-hold underarm stitches. Then, you will pick up one of the sleeves and use the working yarn (attached to the body) to knit across all the live stitches. Next, you will knit across the stitches on the Back of the body all the way up to the other set of on-hold stitches. Finally, pick up the other sleeve, knit across those live stitches, and then finish up the row by knitting the Left Front stitches of the body. Hope this helps clarify things!
All the best,
Lili
Thanks so much. This was exactly the information I needed and I’ve successfully joined the sleeves. Appreciate the help!
Hi Sam,
We’re so glad that Lili was able to help you! Thank you again for reaching out and have a wonderful rest of your day!
All the best,
The CS Team
What if the pattern I am using doesn’t make any mention of held underarm stitches? I tried just knitting but it doesn’t work. Is there a bottom up sleeve attachment style that has no held stitches in the underarm or am I missing something? making olive wrap for what it’s worth. Thanks!!!
Hi Madleine,
Would you be able to send us a photo of that part of the pattern you’re following so we can take a look? Just send us an email at customerservice@purlsoho.com, and we’ll look into your question as soon as we can!
All the best,
Lili