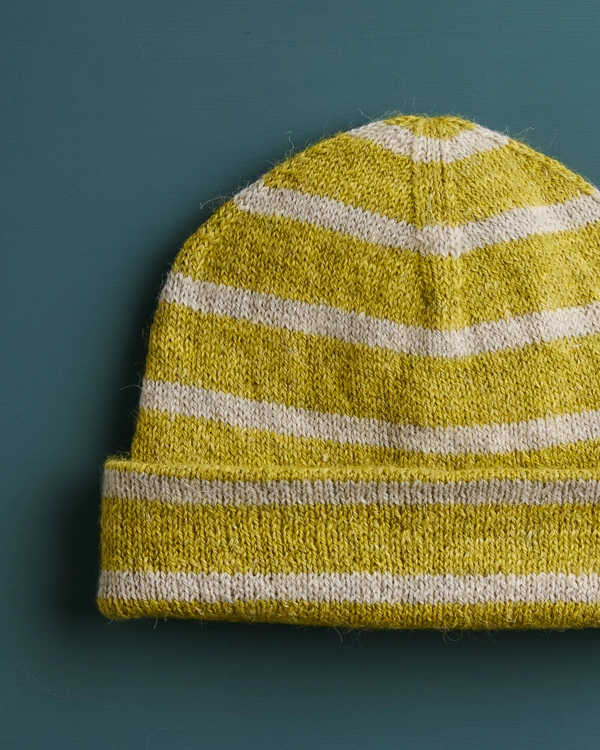
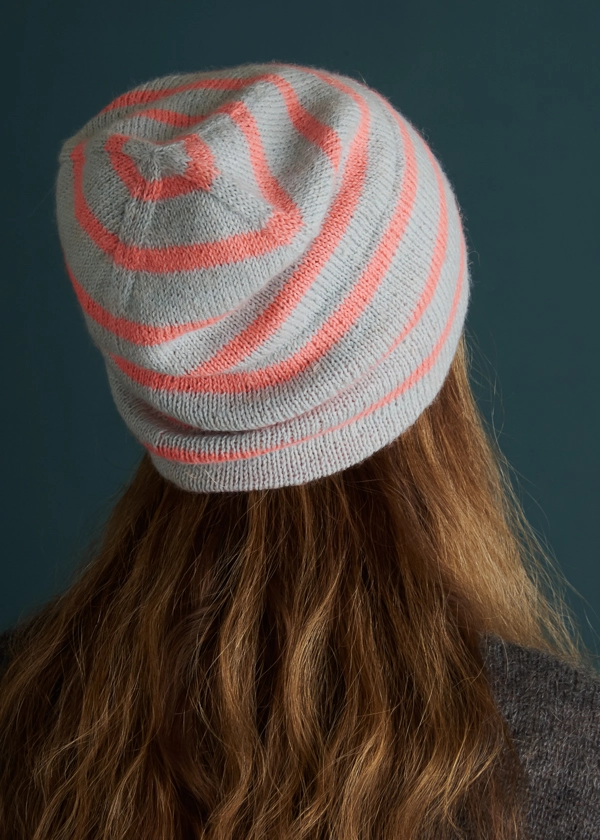
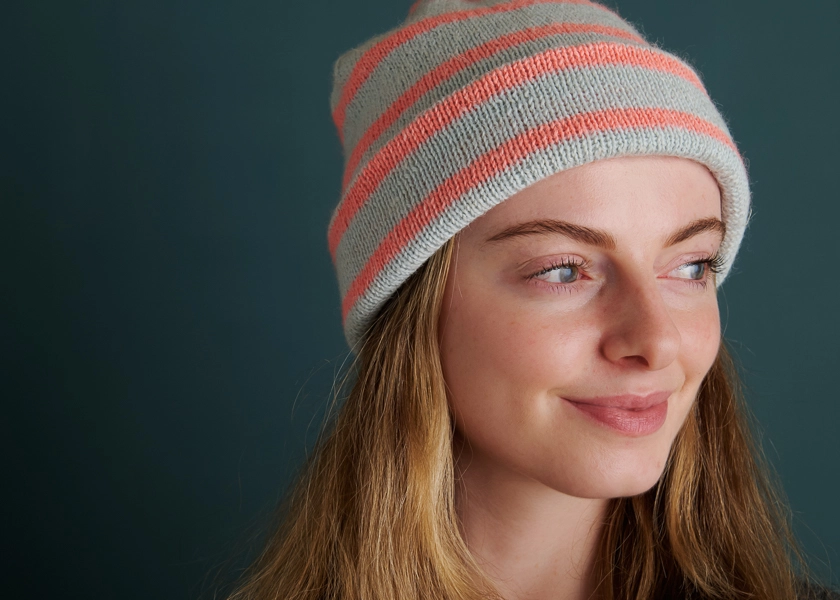
Far + Wide Hat
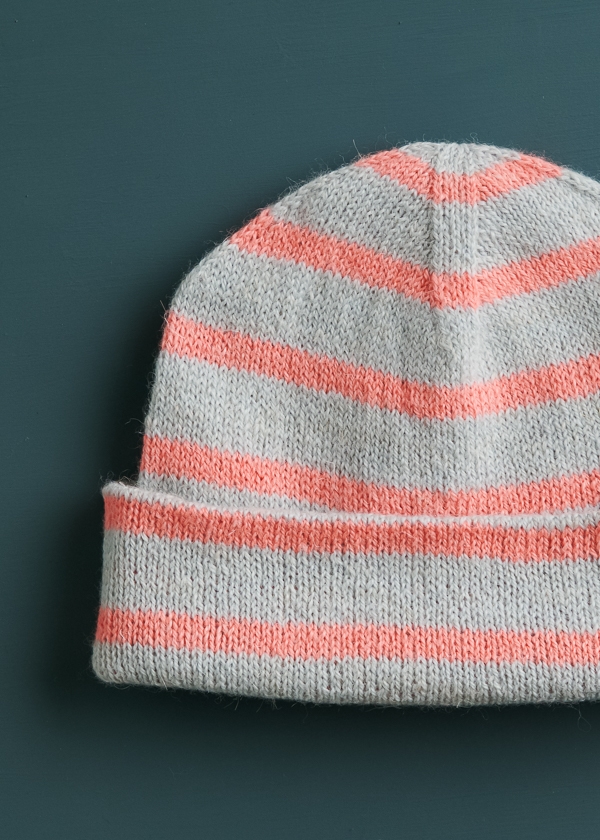
Very cute with its thick and thin stripes, and fun to make with its boundless potential for colorplay, Tayler Harris’s Far + Wide Hat is a happy head topper you’ll wear here, there, and everywhere!

Tayler begins this hat with a provisional cast on, eventually joining the working and cast-on stitches to create a double-thick cozy cuff you can fold up or leave flat… wearer’s choice! Beyond that, it’s perfect travel or TV knitting, stockinette in the round from cast on to crown decreases.
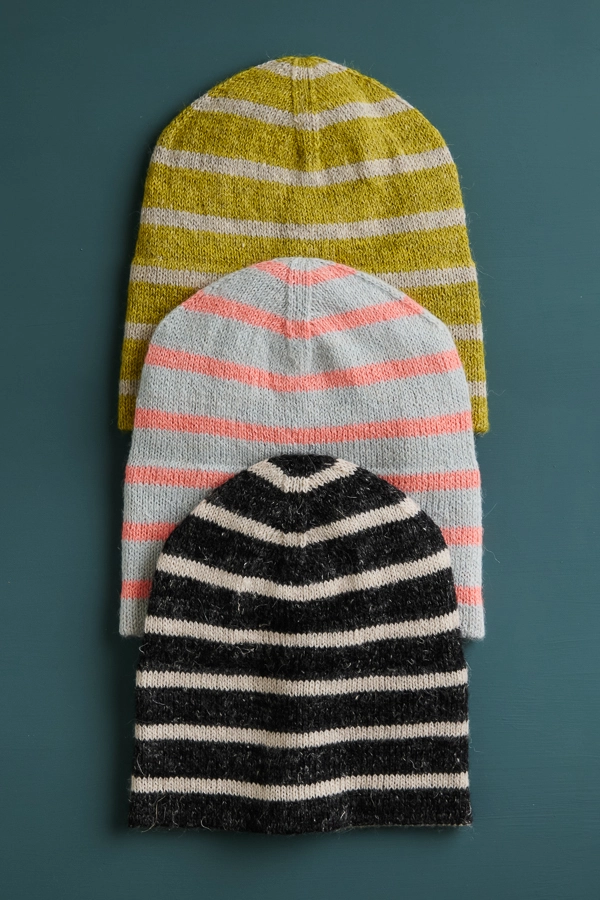
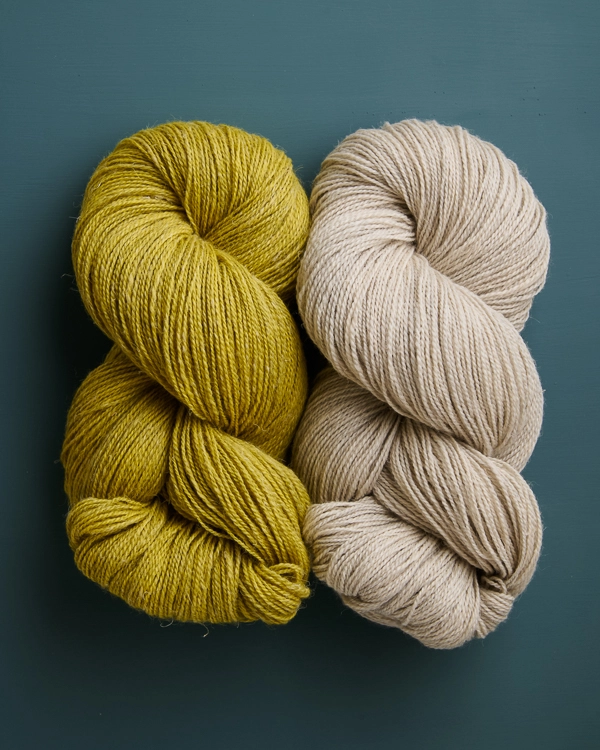
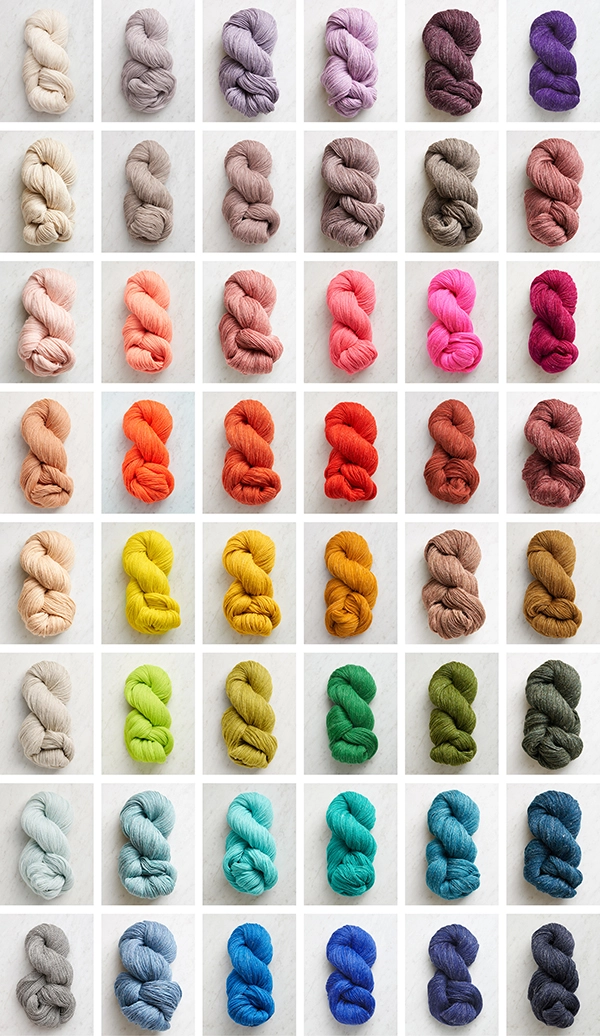
Tayler chose to knit her Far + Wide Hat in Linen Quill, knowing that its spectacular palette would give knitters tons of choices when it came to picking colors.
Linen Quill, with its beautiful mix of 50% fine highland wool, 35% alpaca, and 15% linen, has all the wonderful qualities of these various fibers: springy durability from the wool, long-fiber softness from the alpaca, and breathable strength from the linen.
Plus, the way linen takes dye differently adds to this yarn’s unique depth and texture, bringing even more character to this very charming knit!
You only need one skein of each color for your Far + Wide Hat, and if you swap the stripes, you can even get a second hat from those same two skeins!
Sized for babies, adults, and anyone in between, cast on with your favorite color combo and you’ll go far!
Designed for Purl Soho by Tayler Harris. Based in Utah, Tayler finds inspiration for her designs from the unique landscapes of her home state. From the beautiful mountains and canyons to the national parks and natural landscapes, she loves to incorporate the colors, textures, and shapes of her favorite places.
Share your progress and connect with the community by tagging your pics with #PurlSoho, #PurlSohoBusyHands, #PurlSohoFarAndWideHat, and #PurlSohoLinenQuill. We can’t wait to see what you make!
Materials
- Purl Soho’s Linen Quill, 50% fine highland wool, 35% alpaca and 15% linen. Each skein is approximately 439 yards/ 100 grams.
- Main Color (MC): 1 skein; approximately 110 (135, 225, 240, 275) total yards required.
- Contrast Color (CC): 1 skein; approximately 40 (50, 80, 95, 100) total yards required.
- US 3 (3.25 mm), 16-inch circular needles, for Kid and Adult Sizes
- A set of US 3 double pointed needles
- Stitch markers, including one unique
- Scrap yarn and crochet hook for Provisional Cast On
- Spare 16-inch circular needles or double pointed needles, US 3 or smaller
NOTE: This is enough yarn to make 4 (3, 1, 1, 1) hat(s) using the same MC and CC, or enough for 5 (4, 2, 2, 2) hats if you alternate colors!
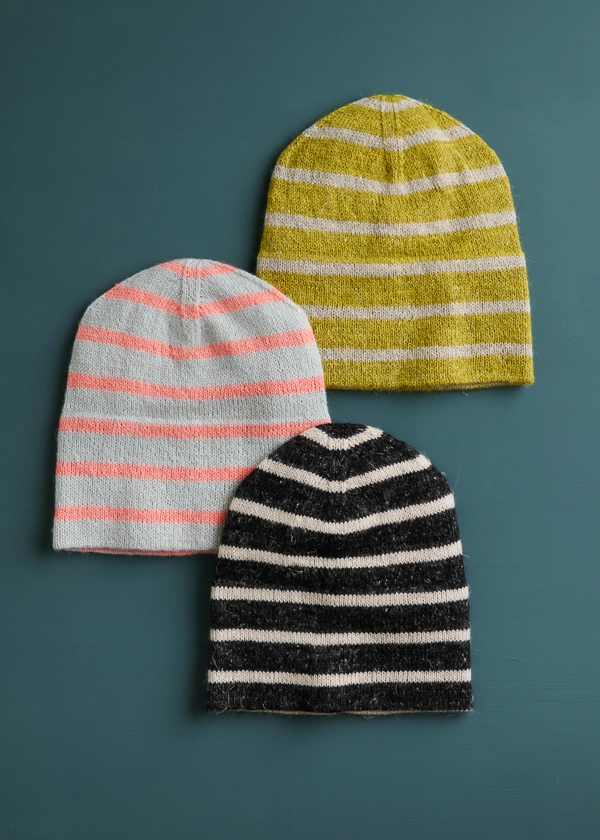
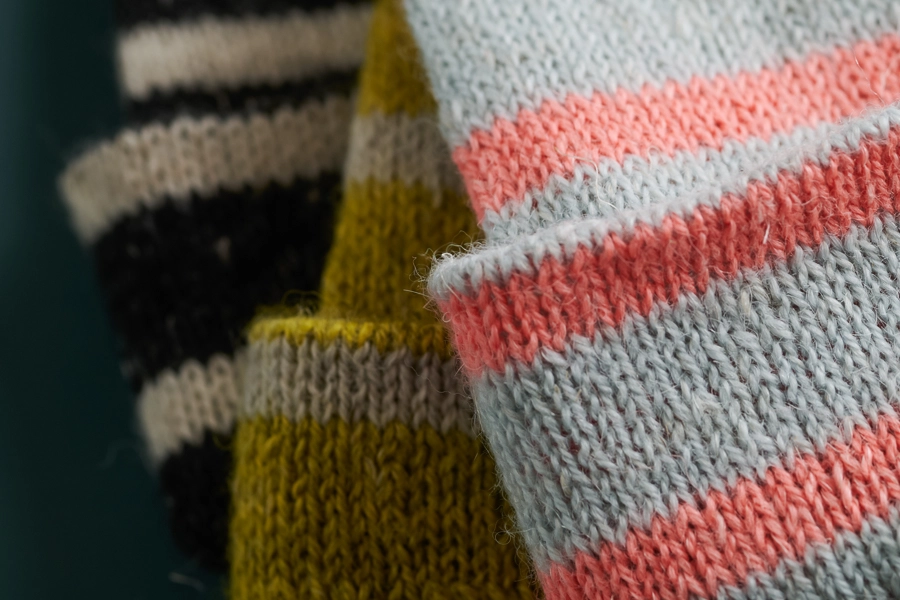
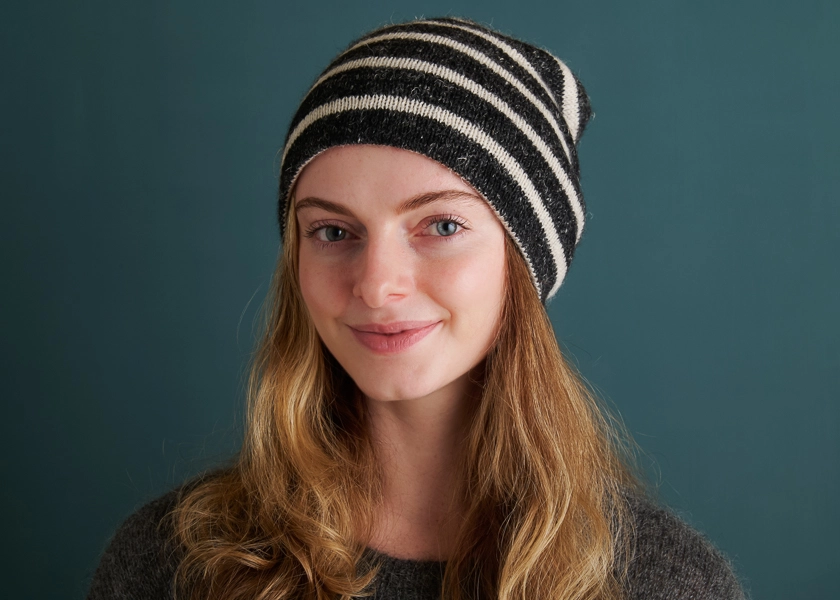
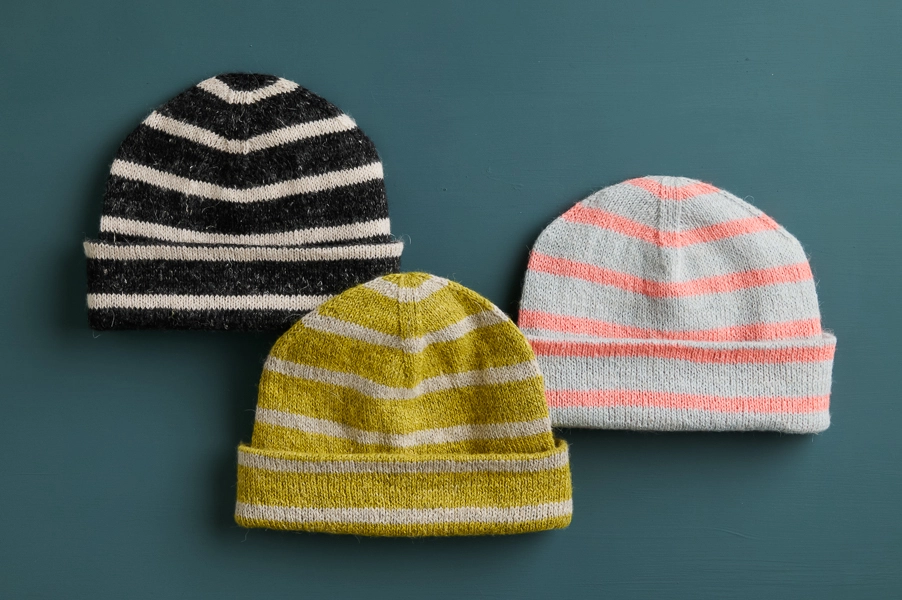
We used these colorful combos for our samples…
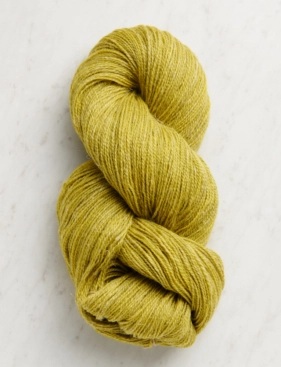
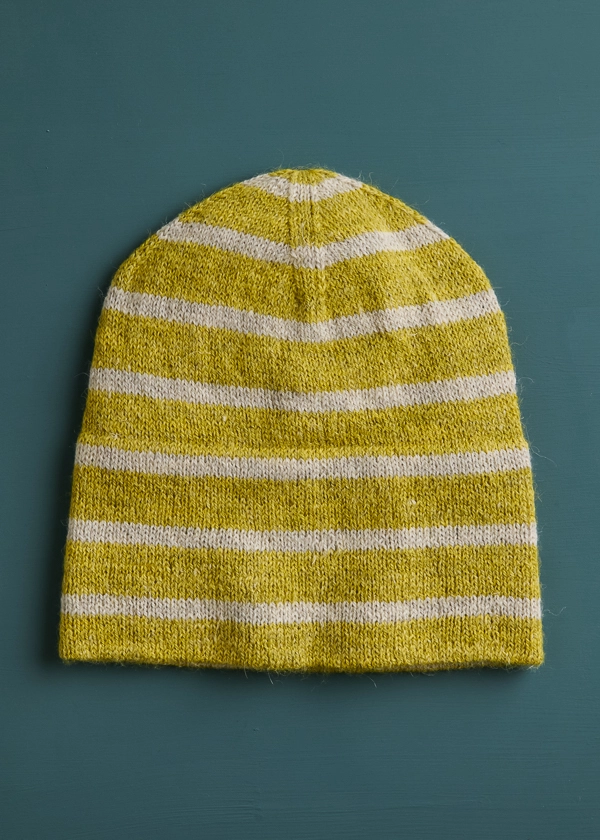
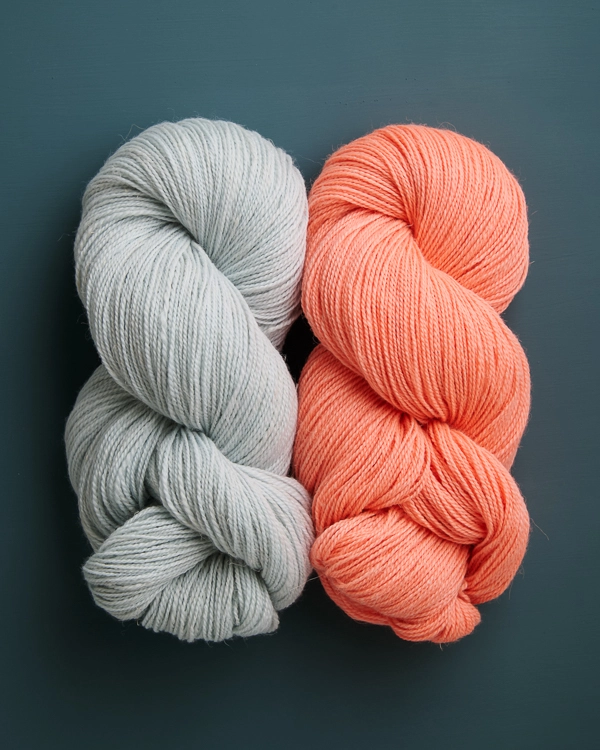
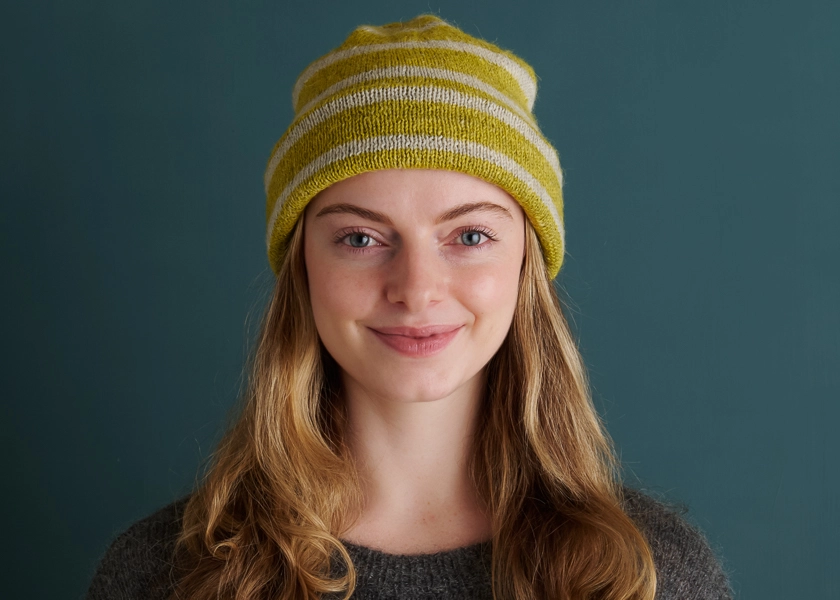
Main Color: Golden Green; Contrast Color: Reed Gray

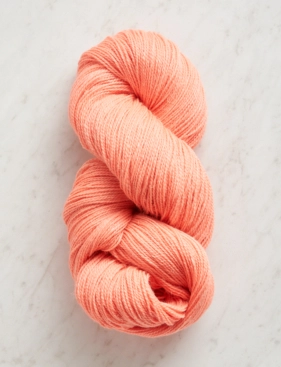
Main Color: Birds Egg Blue; Contrast Color: Peachy Pink
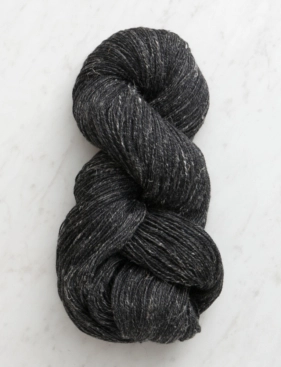
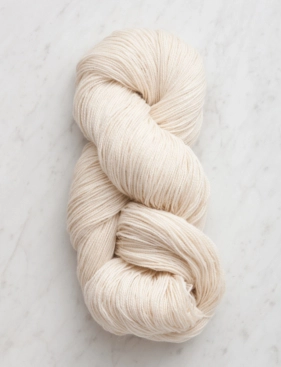
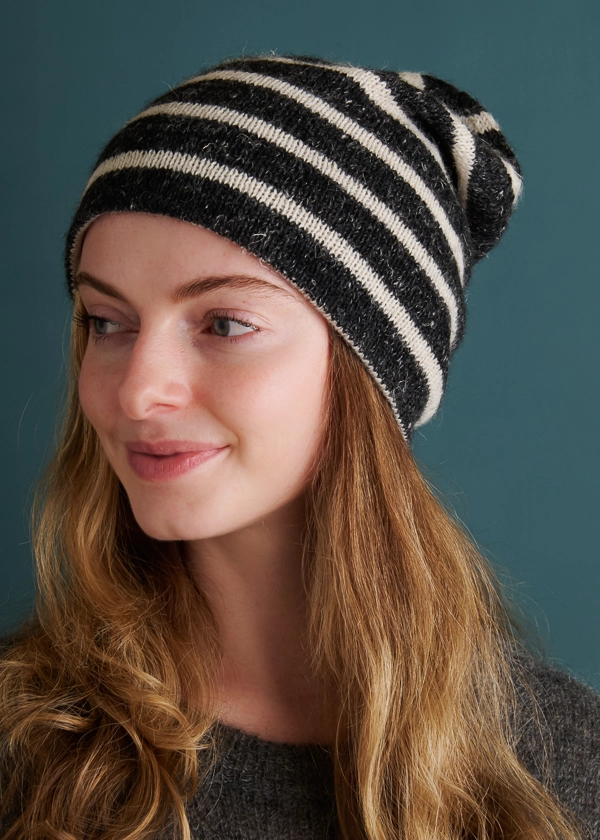
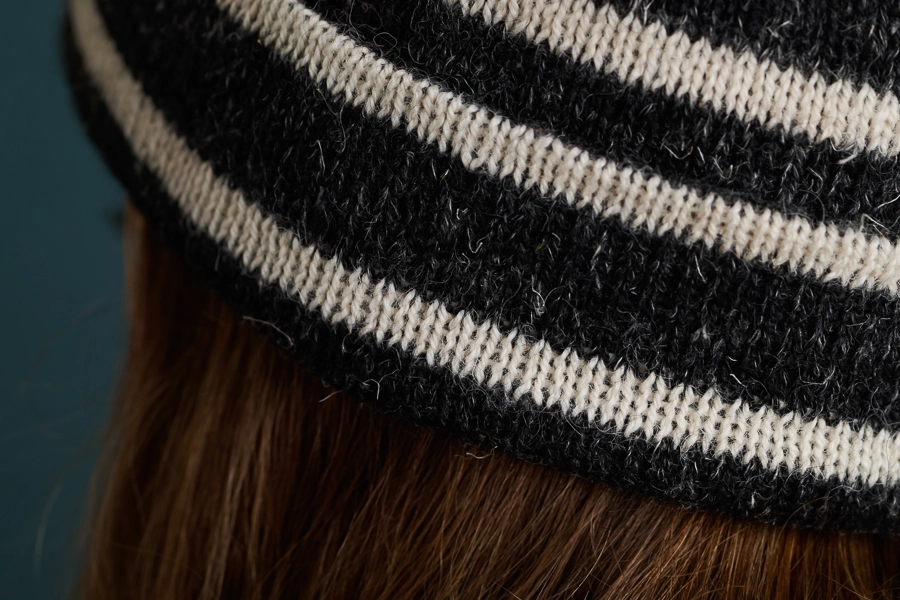
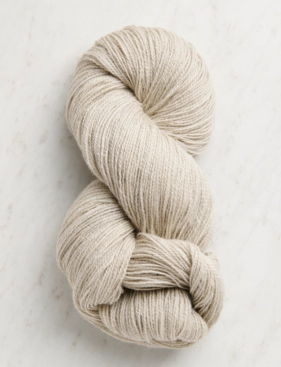
Main Color: Kettle Black; Contrast Color: Pale Oats
GAUGE
27 stitches and 39 rounds = 4 inches in stockinette stitch
SIZES
Baby (Toddler, Kid, Adult Small, Adult Large)
- Finished Circumference: 13 (15½, 17¾, 19, 21¼) inches, comfortably stretching 1-3 inches
- Finished Height: 7 (8¼, 9½, 10¾, 12) inches
SAMPLES: We knit all of our hats in the Adult Small size.
NOTES
CONSTRUCTION
You will knit this hat in the round from the bottom edge to the crown. You will start with a Provisional Cast On to keep the bottom stitches live, and you will later join the working stitches with the cast-on stitches in order to create a cuff.
PROVISIONAL CAST ON
We used the Provisional Cast-On: One-Step Method to cast on our stitches, but for assistance putting live stitches back onto needles please visit our Provisional Cast-On: A Two-Step Method Tutorial.
WORKING STRIPES IN THE ROUND
You will carry the non-working yarn up the wrong-side of the work in order to avoid cutting yarns at the end of each stripe. For help with knitting stripes in the round, please visit our Stripes In The Round Tutorial.
STITCH PATTERN
THICK STRIPES
NOTE: Do not cut yarn at color changes. Carry the non-working yarn up the wrong side of the work (see above).
Rounds 1–10: With Main Color (MC), knit 10 rounds even.
Rounds 11–14: With Contrast Color (CC), knit 4 rounds even.
Repeat Rounds 1–14 for pattern.
PATTERN
CAST ON
With crochet hook and scrap yarn, use a Provisional Cast-On to cast 88 (104, 120, 128, 144) stitches onto circular or double-pointed needles.
Place unique marker and join for working in the round, being careful not to twist the stitches.
CUFF
NOTE: For step-by-step photos of this Cuff technique, check out our Knit Hem Tutorial!
Work Rounds 1–14 of Thick Stripes (see Stitch Pattern) 4 (4, 5, 6, 6) times, then work Rounds 1 and 2 one more time.
With right side facing you, carefully remove scrap yarn from Provisional Cast On, slipping the 88 (104, 120, 128, 144) stitches onto spare needles as you go (our tutorial explains how to do this at minute 4:00).
Fold piece in half with wrong sides together and needles parallel, then with working needles in front and spare needles in back…
Next Round: Continuing with Main Color (MC) and right working needle, *knit first stitch on left working needle together with first stitch on left spare needle, repeat from * to end of round.
BODY
Beginning with Round 4, continue working Thick Stripes as established, until piece measures approximately 5 (6, 6¾, 7¾, 9) inches from folded edge of Cuff.
SHAPE CROWN
NOTE: Change to double pointed needles when necessary.
Set-Up Round: Continuing in Thick Stripes pattern, [k22 (26, 30, 32, 36), place marker] 3 times, knit to end of round.
Decrease Round: Continuing in Thick Stripes pattern, k1, slip slip knit (ssk), [knit to 3 stitches before next marker, knit two together (k2tog), k1, slip marker, k1, ssk] 3 times, knit to 3 stitches before next marker, k2tog, k1. [8 stitches decreased]
Continuing in Thick Stripes pattern as established, repeat Decrease Round every other round 8 (10, 12, 13, 15) more times. [16 stitches remain]
Cut yarns, leaving 8-inch tails. Thread tails onto tapestry needle and thread needle through remaining 16 stitches two times. Pull taut. Bring tail to inside of hat and weave in.
Weave in remaining ends and gently wet block.


I think to remember that Linen Quill expands a bit after wet blocking. Are the finished sizes provided before or after blocking? This is to help me decide which size I should knit. Thank you!
Hi Catherine,
The gauge and dimensions for all of our patterns are indeed taken after blocking! When you swatch for this project, I’d recommend taking your gauge measurements after blocking as well. Hope this helps!
All the best,
Lili
I am going to knit this in just one color. How many inches should I knit, before folding and making the cuff?
Hi Maureen,
That would depend on what size you’re making, since the cuff is a slightly different length for each size! If you let me know which size you’re planning to make, I can absolutely let you know how long to knit for before completing the cuff.
All the best,
Lili
Hi! I’m interested in knitting it in a single color too, in size adult medium. Could you tell me how many inches should I knit, before folding and making the cuff?
Also could i knit this hat without the cuff?
Thank you!
Hi Jackie,
There actually isn’t an Adult Medium size for this hat–it’s either Adult Small or Adult Large! It looks like I answered this question for the Adult Small though, but for an Adult Large hat, you would also need to knit about 8.8 inches before folding the cuff. That’s because the pattern also has you knit 86 rounds in this section.
In case anyone wants to figure this out for the other three sizes though, here’s how I did the calculations! First, determine how many rows are knit in the CUFF section. This would be 14 (the number of rounds in the THICK STRIPES pattern) multiplied by the number of times the THICK STRIPES pattern is repeated (either 4, 5, or 6), plus the 2 additional rounds you work after the repeated section. Then, you multiply the resulting number by 4 and divide by 39 (the round gauge) to find the length in inches of this number of rounds.
In answer to your other question, I would not recommend knitting this hat without the cuff! Because this hat is entirely stockinette stitch, the edge will roll significantly without being secured by the knit hem. It will also be less warm around the ears and forehead without the double layer (quadruple layer when folded!), since Linen Quill is a pretty thin yarn.
All the best,
Lili
Thank you for getting back so quickly. I should have thought to include the size! I’m knitting the Far + Wide hat following directions for the adult small.
Thanks so much for letting me know! For the Adult Small size, the total number of rows in the CUFF is 86. So according to the row gauge of the pattern, that would be approximately 8.8 inches.
All the best,
Lili
Thank you again Lilli!
Maureen
I am making this cute hat! My question is the pattern says to carry yarn up the side when switching colors. The thick stripe is 10 rows. That is a lot to carry up and not sure how to do it. I understand the skinny stripe of 4 rows carrying but not 10. Any help would be appreciated. Thank you.
Hi Marlene,
Thanks for reaching out! Based on the gauge of the pattern, each wide stripe is only about an inch long, which we find to be a reasonable length to carry up the other color. (It is certainly on the long side of things though!)
However, I also wanted to let you know that I’ve made this hat and ended up cutting each color with every stripe. It worked out great that way as well, although I did spend a very long time weaving in ends! If you choose to do it this way, I also want to give you a heads up that you will need to weave in all the ends you have so far before doing the knit hem, since you won’t be able to access them after joining the cuff.
I hope this helps, and please let me know if you have any other questions!
All the best,
Lili
Thank you, Lili, for the quick response! I think I will just carry it up the 1″. Least favorite is weaving in ends. Good point on weaving before the hem if you do it that way. By the way, all of your instructional videos are so helpful!
Marlene.
You’re very welcome, Marlene! Happy knitting!
All the best,
Lili
I’m doing the provisional cast on for the first time. I’ve moved live stitches to an extra circular needle, and I’m now ready to knit the cuff. I’m curious what I should do with the loose ends from the cast on end of the cuff. Should I weave those in before I knit the two edges together?
Hi Michelle,
Thanks for reaching out! I would recommend weaving in all loose ends before beginning the cuff. That way, they won’t get in the way as you’re knitting the cuff together!
All the best,
Lili
In what order is the hat worked? The parts are listed in the following order: Cast-on , cuff, body, and shape crown. I thought the cuff was last. Thanks in advance for responding. It’s making my head hurt.
Hi Jennifer,
Thanks for reaching out! You knit this hat from the bottom up, starting with the cuff, then the body, and then the crown. Most hats are knit this way, since it’s easier to do, but the occasional hat is worked from the top down!
All the best,
Lili
What defines a round in this pattern?
I’m making the kid size hat and confused about the cuff rounds. Do I count each color stripe individually as 1 round or do I count the 14 rows containing both colors as 1 round?
Hi Dolores,
Thanks for reaching out! One round is one row of knit stitches going all the way around the circumference of the hat. That means that each MC stripe counts as 10 rounds and each CC stripe is 4 rounds. You can count the number of rounds in any column of stitches by counting each individual knit V stitch. Hope this helps!
All the best,
Lili
Thank you Lili,
I thought that was the case but the length of my rows seem much too long for the cuff. What should the length of rows 1 thru 14 be? I will have to back off my rows to prevent the cuff from being too long.
Hi Dolores,
Based on the gauge of the pattern, which is 27 stitches and 39 rounds = 4 inches in stockinette stitch, 14 rounds would be about 1.4 inches. I’d recommend double checking your gauge to make sure it’s accurate, but if it’s not, then you can always just knit a different amount of rounds before folding the cuff!
All the best,
Lili
Hi Lili,
I just saw your prior comment to Jackie and worked out the formula you gave her. I came up with 7” for the kid size cuff before folding it.
Hi Dolores,
That’s very close! The length of the Kid size cuff should be about 7.4 inches before folding.
All the best,
Lili
Thank you Lili,
You’ve been a great help!
Sincerely,
Dolores
Could Cashmere Merino Bloom be used instead of Linen Quill?
Hi Liz,
Thanks for writing in! You could definitely use Cashmere Merino Bloom for this hat, but you’ll need to cast on fewer stitches since that yarn is much thicker than Linen Quill.
To figure out your cast-on number, you will want to first knit a gauge swatch in pattern (if this is daunting, we have a wonderful tutorial called All About Gauge). Once you know how many stitches you are getting per inch, you can multiply that number by the width that you would like and cast on the nearest multiple of 8 stitches. Then you can follow the pattern essentially as written!
The only place you’d need to do something differently is the beginning of the CROWN. Here’s how to work Set-Up Round of CROWN with any multiple of 8 stitch count:
Set-Up Round: Continuing in Thick Stripes pattern, [k(cast-on / 4), place marker] 3 times, knit to end of round.
Hope this helps!
All the best,
Lili
Hi, I ordered Quartz yarn to knit this up in a solid color and it’s knitting up huge.
I thought the two yarns were the same weight so it would work but it’s not looking right.
Any suggestions?
Hi Rae,
Oh no, so sorry that you’re running into roadblocks with gauge! It sounds like your gauge might be a bit larger than that of the pattern, so your hat is working up to be looser than expected. Though Linen Quill and Quartz are both fingering weight yarns, they still can work up differently depending on everyone’s unique knitting tension and the size of the needles.
I’d recommend knitting up a swatch and adjusting your needle size to see if you need to use a smaller needle to get gauge. Here’s our guide on swatching if you’d like more information (https://www.purlsoho.com/create/2020/08/20/all-about-gauge/)! Then, I would restart the pattern because unfortunately there isn’t really a way to make this hat smaller if it’s already knitting up bigger than expected. The good news, though, is that stockinette in the round works up quickly, so although restarting is never fun, you’ll soon be on your way to a hat with a more snug fit! I hope this helps!
All the best,
Cat
Hi, I have a question about knitting the cuff. I transferred the stitches from the provisional cast on edge to spare needles, so now there are needles at the top and bottom. Do I simply fold the piece in half (bringing both sets of needles to the top)? This way, the right side is facing me. Or do I need to turn it inside out so the wrong side is facing me? Thank you!
Hi Courtney,
Your first instinct is correct! You should fold it so that both needles are at the top edge and the right side is facing outwards on all sides. Hope this helps!
All the best,
Lili
Hello!
Do you know if one skein would be enough MC yarn to make 2 hats in toddler size if the same MC was used for both (and not swapped with the striped color?)
Thanks!!
Hi Hanako,
Yes! You’ll only need 1 skein of the MC for two Toddler size hats with the same MC.
All the best,
Lili
Hi! I already have a set of circular needles size 4 — do you think the pattern would transfer well on to this slightly larger gauge? Or is it necessary for me to get size 3? Thank you!
Hi Carson,
Thank you for your question! I would recommend doing a quick gauge swatch with the needles that you have. You might find that these needles work just fine. If your gauge is larger (more stitches per 4″) than the one in the pattern, I would recommend sizing down your needles. I hope this helps!
Happy knitting,
Gavriella