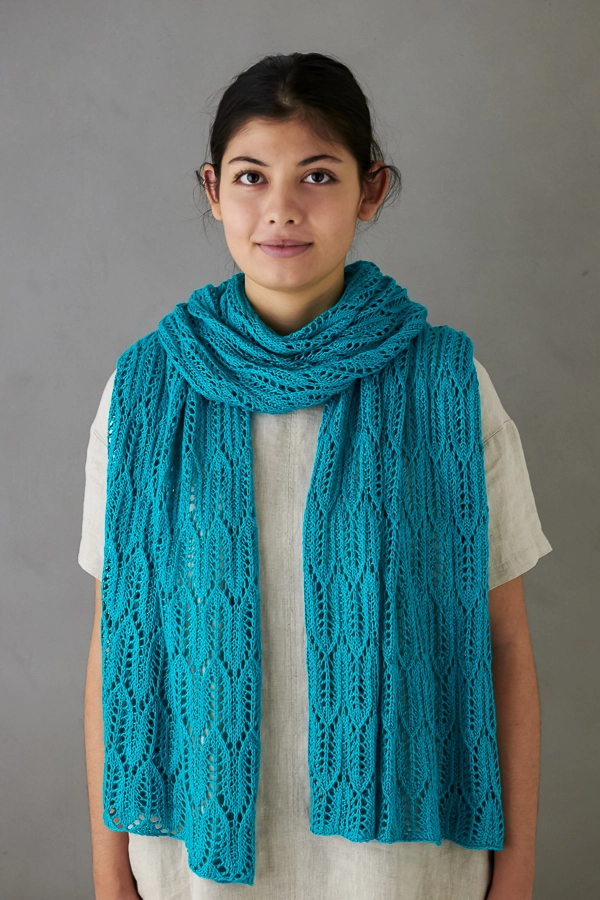
Archway Lace Wrap
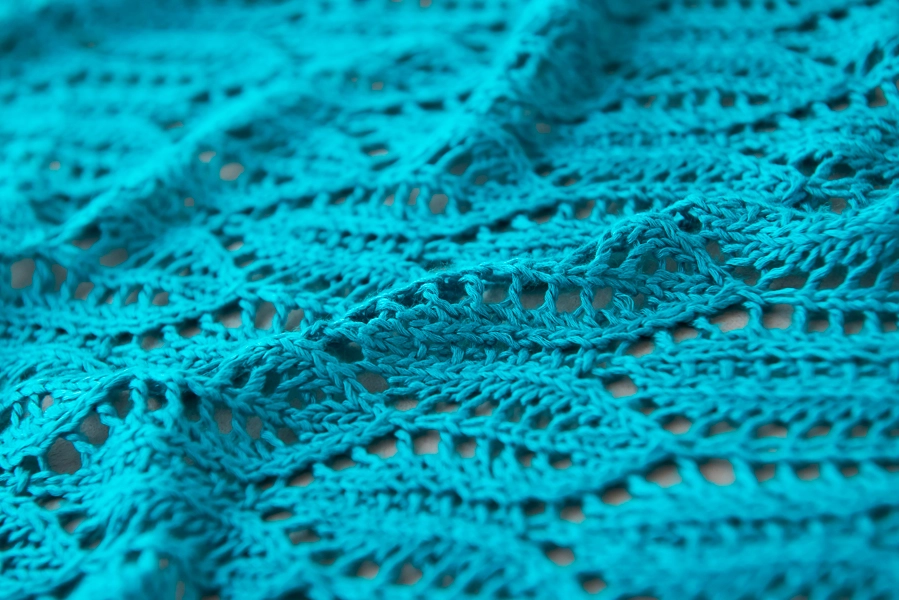
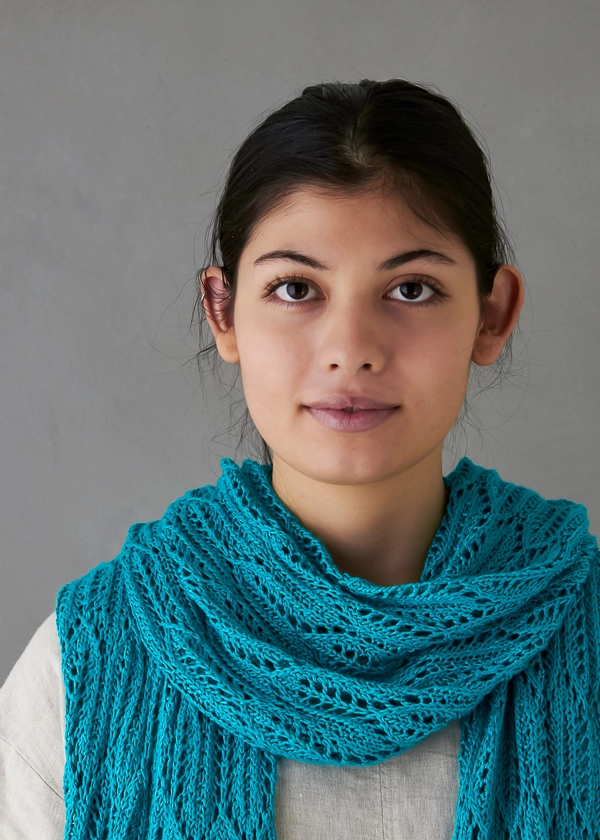
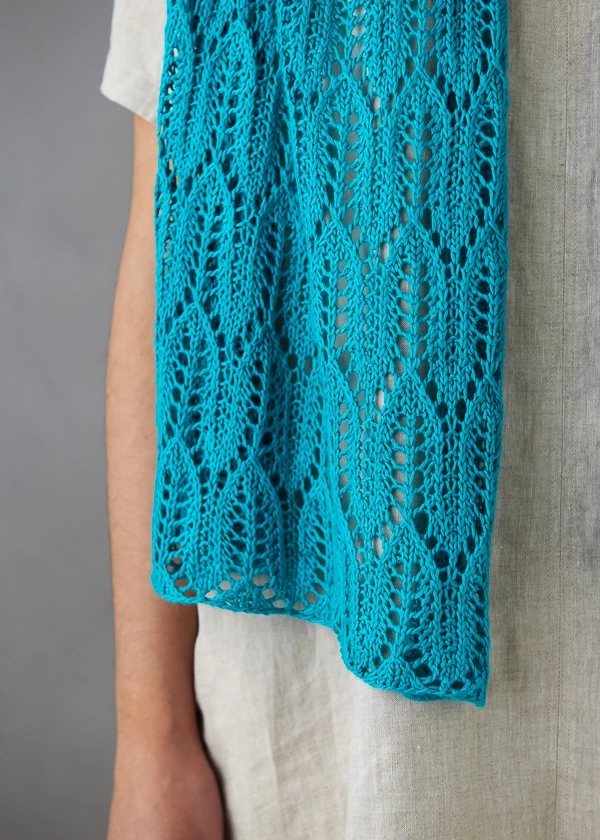
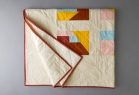
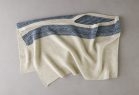
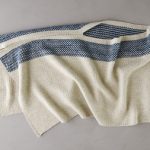
We love lacework because it’s like drawing with yarn! In all the shapes and spaces of our Archway Lace Wrap, we see sundown walks under colonnades, tower windows with views, a little chat under a portico.
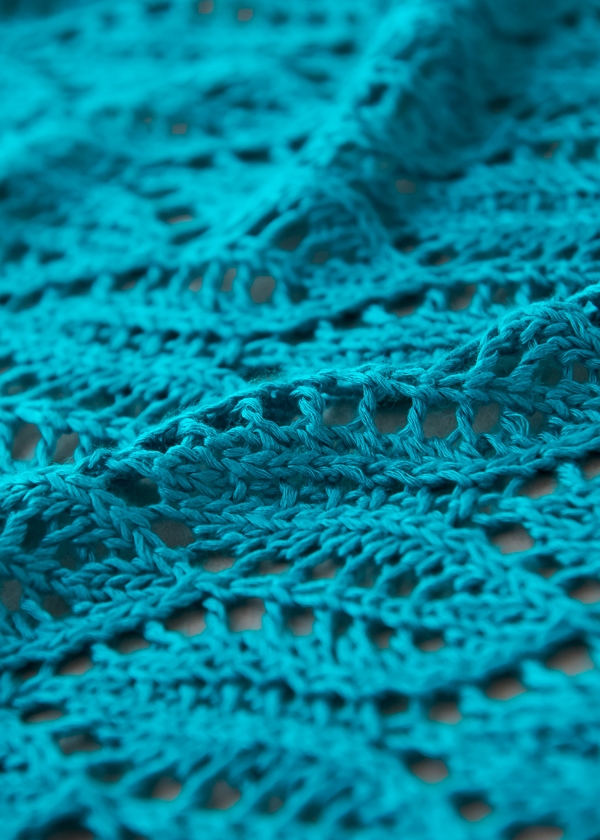
Wherever your imagination takes you with this pattern, the knitting is always engaging! A 16-row repeat is simplified with straight-up purling every other row and instructions in both written and chart forms.
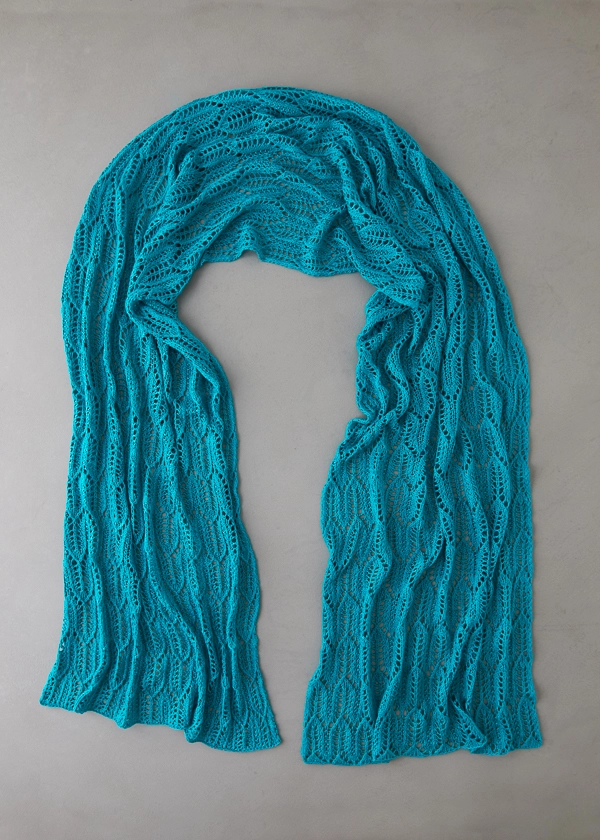
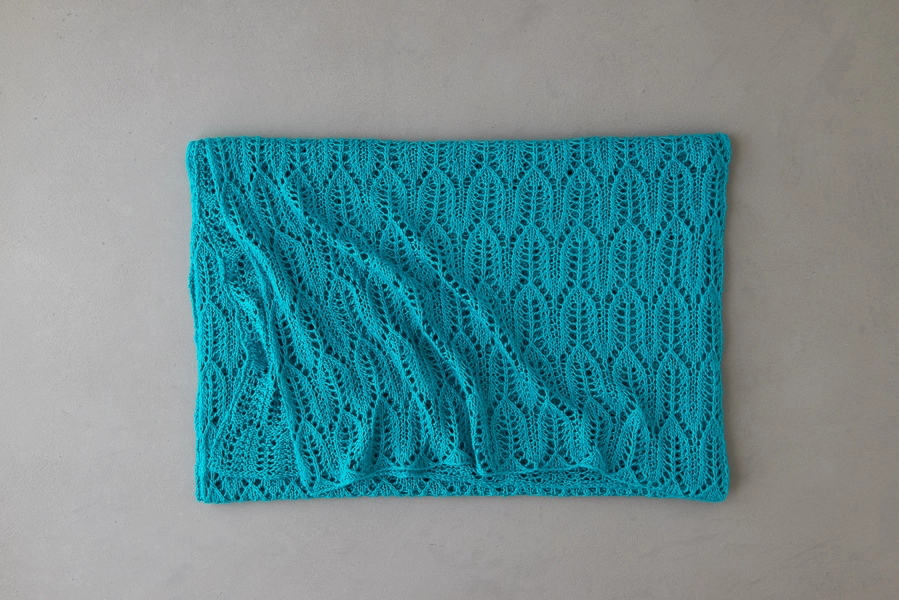
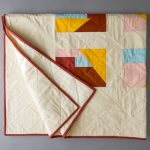
Color turns this picture into a painting, and with ten new colors of Burnish to choose from, there are lots of lovely ways to fill the canvas! Our version is rich in depth and beauty in the new color, Turquoise Sea… Stunning!
Explore the whole palette and cast on for knitting your own narrative!
Designed by Purl Soho designer, Jake Canton. Click here to see even more of Jake’s designs!
Share your progress + connect with the community by tagging your pics with #PurlSoho, #PurlSohoBusyHands, #PurlSohoArchwayLaceWrap, and #PurlSohoBurnish. We can’t wait to see what you make!
Materials
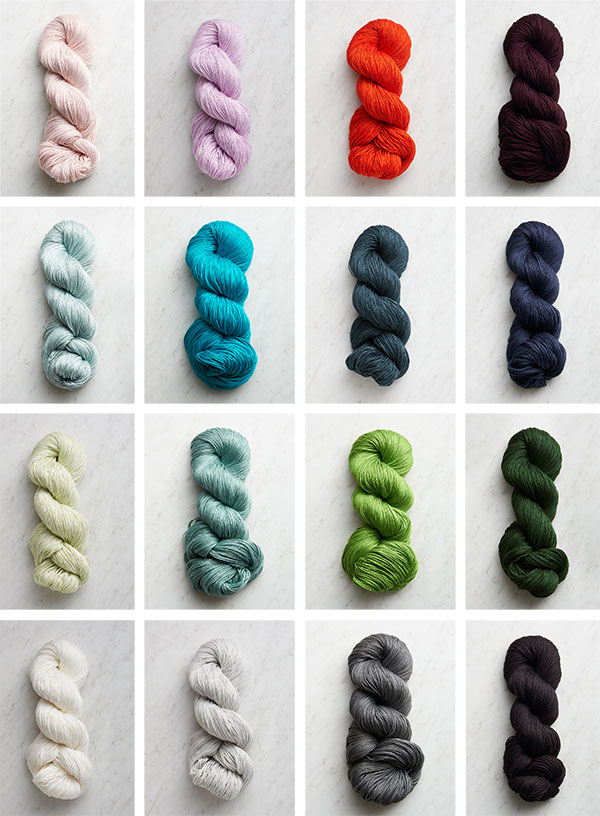
- 4 skeins of Purl Soho’s Burnish, 100% rayon from bamboo. Each skein is 339 yards/ 100 grams; approximately 1,172 yards required. We used the color Turquoise Sea. (NOTE: We no longer offer Burnish, but choose from one of our other fingering/sport weight yarns.)
- US 5 (3.75 mm) straight or circular needles
Gauge
22 stitches and 32 rows = 4 inches in stitch pattern
Size
Finished Dimensions: 18 inches wide x 72 inches long
Notes
Stitch Multiple
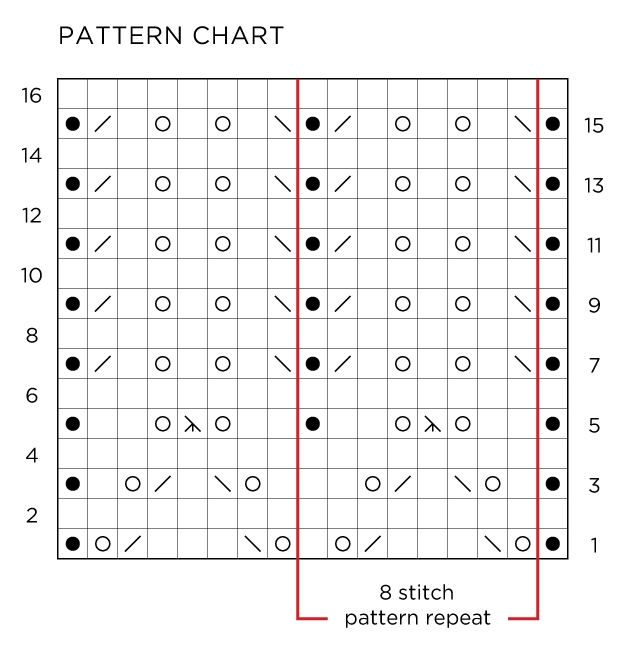
This pattern is worked over a multiple of 8 + 1 stitches.
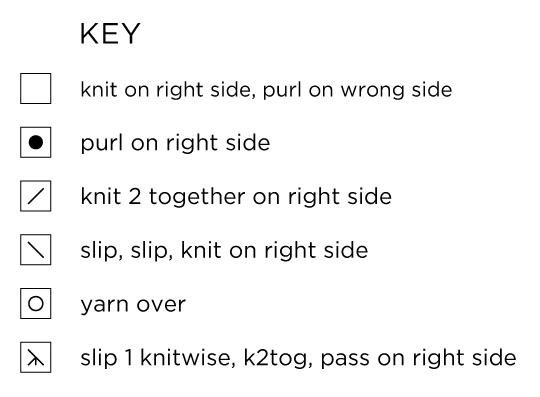
Slip 1 Knitwise, K2tog, Pass
Slip 1 stitch knitwise, knit next 2 stitches together, pass slipped stitch over k2tog and off needle. [2 stitches decreased]
Pattern
Begin
Cast on 97 stitches. We used a basic Long Tail Cast On.
Set-Up Row (wrong side): Purl to end of row.
Work Rows 1-16 of Stitch Pattern (either from Written Instructions or Chart below) until piece measures approximately 72 inches from cast-on edge, ending with Row 16.
Stitch Pattern: Written Instructions
Row 1 (right side): P1, *yarn over (yo), slip slip knit (ssk), k3, knit 2 together (k2tog), yo, k1, repeat from * to last 8 stitches, yo, ssk, k3, k2tog, yo, p1.
Row 2 and every even number row (wrong side): Purl to end of row.
Row 3: P1, *k1, yo, ssk, k1, k2tog, yo, k2, repeat from * to last 8 stitches, k1, yo, ssk, k1, k2tog, yo, k1, p1.
Row 5: P1, *k2, yo, slip 1 knitwise, k2tog, pass (see Notes), yo, k2, p1, repeat from * to end of row.
Row 7: P1, *ssk, [k1, yo] twice, k1, k2tog, p1, repeat from * to end of row.
Row 9: Repeat Row 7.
Row 11: Repeat Row 7.
Row 13: Repeat Row 7.
Row 15: Repeat Row 7.
Row 16: Purl to end of row.
UPDATE May 12, 2021: We’ve changed Row 3 of the written instructions so it now reads the same as the chart. Don’t worry, if you’ve been following the original written instructions, your knitting is still correct!
Chart
Start in the bottom right corner of the Chart and work right-side (odd number) rows from right to left, and wrong-side (even number) rows from left to right.
Finish
With right side facing you, bind off knitwise.
Weave in ends and wet block.


If I wanted this scarf to be less than 18 inches wide, what number of stitches would I need to CO to make this pattern work? I was thinking about 4-6 inches less. And would I need 3 or 4 skeins if I downside the width? LOVE THIS and the colors.
Hi Susan,
Thanks for reaching out and for your kind words! I am happy to help! The notes multiple for this lovely pattern is a multiple of 8 + 1 stitches. With a gauge of 22 stitches and 32 rows = 4 inches in stitch pattern, you will want to cast on 33 stitches for a 6 inch wide scarf and you would need 2 skeins of Burnish. For an even narrower version with a width of abut 4 1/2 inches, you could cast on 25 stitches and need just 1 skein.
Best,
Cassy
If you only cast on 25 stitches and use one skein of yarn do you still follow the pattern for the original pattern will that still work with less stitches
Hi Debbie,
It would indeed! This lovely pattern is worked over a multiple of 8 + 1 stitches and the pattern is written to modifiable to be thinner or wider!
Best,
Cassy
Hi Susan,
65 sts would be about 12 inches wide.
73 sts is about 13 1/2 inches wide
81 sts is about 15 inches wide.
Hope this helps you.
Hi Ellen,
You are correct! My apologies! I was seeing 4-6 inches wide not 4-6 inches less!
Best,
Cassy
Hi Susan,
My apologies! I misread your question! For a scarf that is 4 1/2 inches narrower, you would need 3 skeins and a cast on of 73 stitches!
Best,
Cassy
Love your patterns but don’t know how to knit , took me over 30 years on and off to learn how to crochet , I’m 64. YouTube here I come.
Hi Daisy,
Thanks so much for reaching out, and best of luck with your new endeavor! We have quite a few videos on our Knitting Tutorials page that should help get you on your way!
Best,
Julianna
Thank you so much for the chart!!! I can’t wait to start on this. Looks great for warm weather!!
Hi, thanks as always for the fantastic free patterns! I’m not a big fan of rayon, if I wanted to make this in a more natural yarn, what would you suggest?
thanks
Hi Jodee,
Thanks for reaching out! I think this wrap would be absolutely lovely in either our Field Linen or Linen Quill!
Happy knitting!
Julianna
dont you have this pattern on crochet ??
Hi Ileana,
Thanks for writing in! We do not have a crocheted version of this wrap but we will keep your request in mind for the future!
Best,
Julianna
Can’t wait to do this pattern Love it. Thanks.
Ellen
can you please let me know the ply of Burnish?
thank you, in advance for your help.
judy
Hi Judy,
Thanks for writing in! Burnish is somewhat in between a 4 ply and 5 ply yarn. As long as you knit a gauge swatch, I think you could choose either yarn weight for this pattern!
Best,
Julianna
I have contacted you about this problem previously, and you acknowledged that the issue had been reported by others … but it still exists. The problem is associated with accessing free patterns. Historically, the way we do this is to click on PRINT and we would be offered the options of printing or saving to a PDF file. Now, when I click on PRINT, the screen (and website) simply disappears. Sure, I can copy and paste the content from the newsletter to a document and save it in that manner … but I wonder if this “glitch” in your system will ever be repaired?
Hi Carel,
Thank you so much for reaching out! I am so sorry that you are still experiencing this issue, but I assure you that we are aware of this issue and our web team is working diligently to correct it. If you haven’t already, I would encourage you to reach out to customerservice@purlsoho.com with your report, as it’s quite helpful to know what operating systems and web browsers are involved in this bug. Hopefully this will be resolved soon, but in the mean time, you can always email our customer service department and we will be happy to send you a PDF!
Best,
Julianna
Hello again — I’m just following up on my previous “not so positive comment” with a very positive one. I have been reading, lately, about the detrimental impact of synthetic fibres, such as rayon, on our environment, particularly our oceans. I was so pleased, therefore to see this statement as part of the description of Burnish: “We are happy to say that this rayon meets all the eco-toxicological standards required by Europe’s Registration, Evaluation, Authorization and Restriction of Chemicals regulation”. I feel good now, about considering this yarn as an upcoming purchase. Thanks for being environmentally conscious, Purl Soho!
Wondering about the directions for row 14?
Thank you
Hi Doretta,
Thanks for reaching out! Starting with Row 2, all even numbered rows including Row 14 will be purling all stitches.
I hope that clears things up!
Julianna
Thank you for sharing this pattern! It’s gorgeous. I hope I can figure out how to knit it (I’m a beginner; just learned how to knit a few weeks ago).
Hi and thanks so much for the kind words! You might find our Knitting Tutorials page helpful, and if you have any questions, please don’t hesitate to reach out!
Best of luck and happy knitting!
Julianna
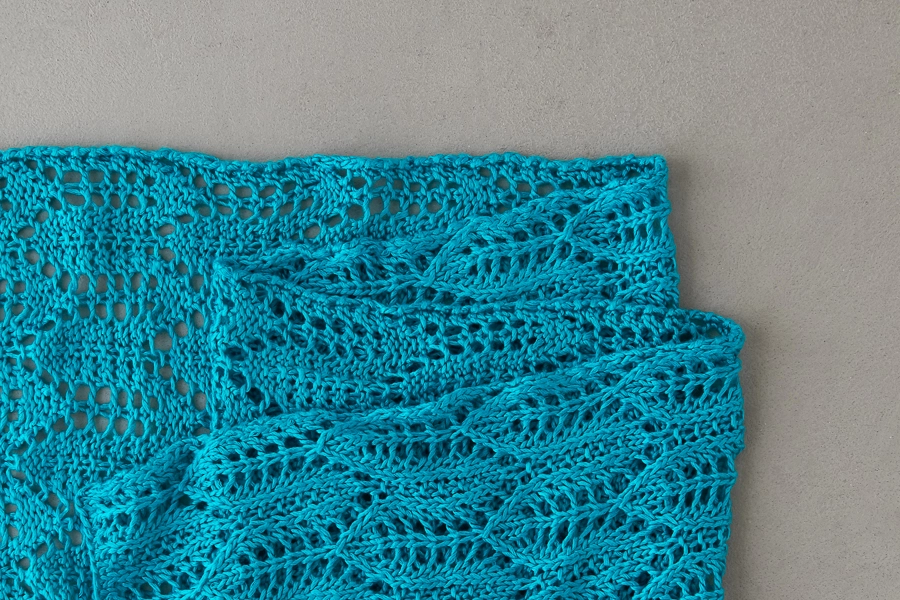
Would you show the reverse side of this scarf?
Hi Deena,
Thanks for reaching out! If you scroll through the pictures at the top of the page, you can see the wrong side in the 7th picture, which is a zoomed in view of the corner of the wrap. This stitch pattern has a definite right and wrong side.
I hope that helps!
Julianna
Can you alter the instructions to make this wider—More of a shawl than scarf?
Hi Meryl,
Great question, and yes, you certainly can! This pattern can be knit over any multiple of 8 plus 1 stitch. For instance, if you wanted to knit a 25 inch wide wrap, you would multiply the gauge of 5.5 stitches per inch by 25 inches, which comes out to 137.5. The nearest multiple of 8 is 136, plus one is 137, so you could cast on 137 stitches and knit the lace pattern as written.
I hope that helps, and happy knitting!
Julianna
What would I cast on to make this wider?
Hi Christine,
Thanks for reaching out! This pattern can be knit over any multiple of 8 plus 1, so if you know how wide you would like to make the wrap, you can multiply the gauge of 5.5 stitches by the desired width in inches, round to the nearest multiple of 8, and add one to determine how many stitches to cast on.
Happy knitting!
Julianna
This looks so beautiful but before I consider it committing to it – could you please let me know if it’s easily recoverable if I drop a stitch – I am not a beginning knitter but I had a problem with a similar pattern (Yarn Over Purls) in which I learned once I made a mistake I could not fix due to the lacy nature of the stitches. Thank you for your advice!
Hi Elizabeth,
Thanks for writing in! Like all lace patterns, a dropped stitch can be quite tricky to correct in this pattern, especially since Burnish is a slippery yarn so dropped stitches can start unraveling very quickly. Many knitters like to use life lines when knitting lace patterns so they always have a safe spot to return to if they make a mistake. To place a life line, once you are at a point in the pattern where you are confident everything is correct, you will simply use a tapestry needle to thread a piece of thin yarn or thread (some knitters prefer unwaxed dental floss!) through all of the stitches on the needle and then carry on knitting. If you make a mistake later on, you can easily take your needle out and unravel your knitting to the life line, slide your needle into all the stitches, and get back to knitting! You can place a life line as often as you need to, such as after every pattern repeat, so you don’t have to lose too much work if you make a mistake. Hopefully with that extra level of security in place, you feel encouraged to give this lovely stitch pattern a try!
Best of luck and happy knitting!
Julianna
This is the best knitting tip I’ve seen in 10+ years!!!! Thank you.
Hello. I love this pattern and would try knitting it.
If 65sts make it 12 inches wide, how many skeins do I need. I already bought 2 skeins in leek green. Do I need another one?
Thank you.
Hi Ceil,
Thanks for reaching out! For a 12 inch wide scarf, you will still need 3 skeins of Burnish, so I would recommend ordering one more!
Best,
Julianna
This is very pretty and I’m anxious to knit it. My question is are the yarn overs as to knit or to purl?
Thank you.
Hi Debbie,
Thanks for reaching out! I’m not quite sure what you mean by yarning over as if to knit or purl. All of the yarn overs in this wrap are worked between two knit stitches, so you will yarn over by bringing your yarn forward between the needles when indicated. You might find our Yarn Over tutorial helpful!
Best,
Julianna
The first yo is between a purl and a ssk. Do you leave the yarn in front, and then ssk?
Hi Judy,
I apologize that I missed that instruction! Yes, when working a yarn over after a purl and before a knit (or a ssk, in this case), you will simply leave your yarn in the front of the work after working the purl.
Best,
Julianna
Hi Debbie, I thought it might be helpful to you to hear of my experience. I am nearly halfway through knitting the Botanical Lace Wrap, and had not had much experience of lace knitting…..only a simple pair of socks. I had to rip out at least 16 times, and the main difficulty was that I didn’t properly understand the way yarn overs differ, so I found I had too many or too few stitches. I advise learning about this. The other thing is dropped stitches…be careful your needle doesn’t slip out. (I tried circular needles, but was happiest with a pair of needles, mainly because it is easier to count stitches on them, and I had to do a lot of counting!)
In spite of the agonies of learning to do this, I found it very exciting to see the pattern developing. I hope you will have great success and enjoyment.
On Row 5, after the slip 1 knitwise, do you bring the yarn to the back before doing the k2tog, or leave it in front from the yo you did prior to the slip 1 knitwise? Thanks
Hi Judy,
Thanks for reaching out! You will leave your yarn in the front after the slipped stitch, so that the yarn over is created when you work the k2tog.
Happy knitting!
Julianna
thank you for asking this! I had so much trouble trying to figure out why I was suddenly 10 stitches short!
Purl Soho–this is not really clear in the instructions.
Hi there,
Just started this project and was wondering if every row will have 97 stitches or if some rows vary. Thanks in advance,
Josh
Hi Josh!
Thanks for asking! The decreases and yarn overs in this lace pattern are balanced on every row, which means you’ll always have the same number of stitches per row throughout the pattern. I hope this helps!
Happy Knitting,
Cassandra
Just finished my scarf/wrap and I love it. The pattern is well written and easy to follow. I used Bamboo Pop for mine, since I needed to repurpose it from an abandoned project. My wrap measures 20 x 72, just a tiny bit wider than the pattern measurements. Thanks for always providing such great patterns and tutorials.
I began this project in mid-March, when I moved in with my son and his family during the pandemic. I’m an experienced knitter but have never done a lace pattern, and I made mistake after mistake at first and had to continually rip out the work. Once I added lifelines every 8 rows, and discovered that I could thread the lifeline through the small hole at the end of the circular needle so that the line just threaded itself, it’s going great! Burnish isn’t the easiest yarn to work with, but I love the texture, drape and bounce of the finished fabric. I’m back home now as NYC begins the slow process of opening up, and I’m almost finished with the wrap. It’s been a “lifeline” to have a moderately challenging but ultimately soothing project to calm my mind during this unsettling spring and summer. Thank you Purl Soho!
‘what is the abbreviation for “slip1 knitwise, k2tog, pass” in the pattern instructions? Your ssk tutorial is not this stitch.
Hi Cathy,
Thanks for reaching out! We didn’t use an abbreviation for the double decrease, so you you will find it fully written out wherever it appears in the pattern. Unfortunately we don’t have a tutorial for this stitch, but you will knit it just as it is written! First, slip the next stitch knitwise, then knit the next two stitches together. After that, you will pass the slipped stitch over the k2tog and off the needle, just like you would if you were casting off a stitch.
I hope that helps, and happy knitting!
Julianna
Thank you for updating the print version of the archway lace wrap! When i printed it earlier, it did not contain instructions for row 3.
Hello
This pattern looks great and I can’t wait to begin. One question. You say that this can be knit in any multiple of 8 + 1. Why is there this extra stitch? After you cast on an odd number of stitches do you drop the first stitch?
Hi Caren,
Thank you so much for the kind words! You will need this stitch throughout the pattern and will not be dropping it. If you take a look at the chart, you can see that the extra stitch is needed to create the right-hand selvage stitch to match the left-hand selvage stitch that is part of the 8-stitch pattern repeat.
I hope that clears things up!
Julianna
Thank you so much for the lovely pattern. I will be trying it for sure
There is an error in the written instructions on Row 3. They don’t match the chart. The written instructions read:
Row 3: P1, k1, *yo, ssk, k1, k2tog, yo, k3, repeat from * to last 7 stitches, yo, ssk, k1, k2tog, yo, k1, p1.
I believe it should read this to match the chart:
Row 3: P1, *k1, yo, ssk, k1, k2tog, yo, k2, repeat from * to last 8 stitches, k1, yo, ssk, k1, k2tog, yo, k1, p1.
I discovered this when I kept ending up with an extra stitch on the end of Row 3. I even used stitch markers to track the 8 stitch repeat, but there is definitely a pattern error.
Now I need to rip out my project. I’ve really invested a lot of time on this. Super disappointed.
Hi Kathryn,
Thanks for writing in! I am sorry to hear that you’re feeling disappointed and having trouble with this pattern! I double-checked the pattern and compared the written instructions to the chart and there is no error in row 3, the pattern is correct as written! So it’s a bit hard to say what exactly might be the issue. Keep in mind that some patterns will have slight differences between the chart and written instructions, even though they will have the same finished results! In this case, the placement of the repeat in Row 3 is not the same in the chart and written instructions. This can be confusing, especially if you like to switch back and forth between the chart and written instructions.
With row 3, the chart begins with one stitch followed by the 8 stitch repeat, ending with the final 8 stitches. While in the written instructions begin with 2 stitches then followed by the 8 stitch repeat, ending with the final 7 stitches. As you can see, both of the rows will add up to the same amount of stitches and the overall pattern repeat of 8 plus 1, the only difference is the repeat is shifted by one stitch.
Using stitch markers can be a bit tricky in this case and actually not be as helpful as you may think, especially if you are following the written instructions since the repeat will shift in Row 3. If you use stitch markers you will need to move your markers one stitch to the left for row 3 but then you will need to make sure to move the stitch markers back for Row 5! If you continue to have problems with this repeat, please feel free to reach out directly to our Customer Service team with photos of your work to customerservice@purlsoho.com and they can assist you further from there!
I hope this helps clear things up, happy knitting!
Gianna
I am so confused by the casting on instructions for this lovely wrap. You say that it’s an 8+1 pattern but it seems like it’s actually a 10+1 pattern. I’ve started over a number of times because I didn’t have enough stitches. I’m very much a self-taught knitter and may just not understand what I’m doing. Could you please clarify? It seems that if I cast on 91, I will actually be able to get going on this wrap. Thank you. I do love the pattern.
Hi Topaz,
Thanks for reaching out. I took a look over this pattern, and I can confirm that it’s correct as written! The stitch repeat is only 8 stitches, and the confusion may be coming from the decrease stitches (ask and k2tog). While they’re worked over 2 stitches, they result in just 1 stitch, so you’ll count them as 1 stitch within the repeat.
If you’re running out of stitches, it may be that you either cast on the incorrect number, or that you missed or did extra decreases or yarn overs along the first row. I hope this helps clarify things, but please let me know if you’re still running into trouble getting started!
All the best,
Lili