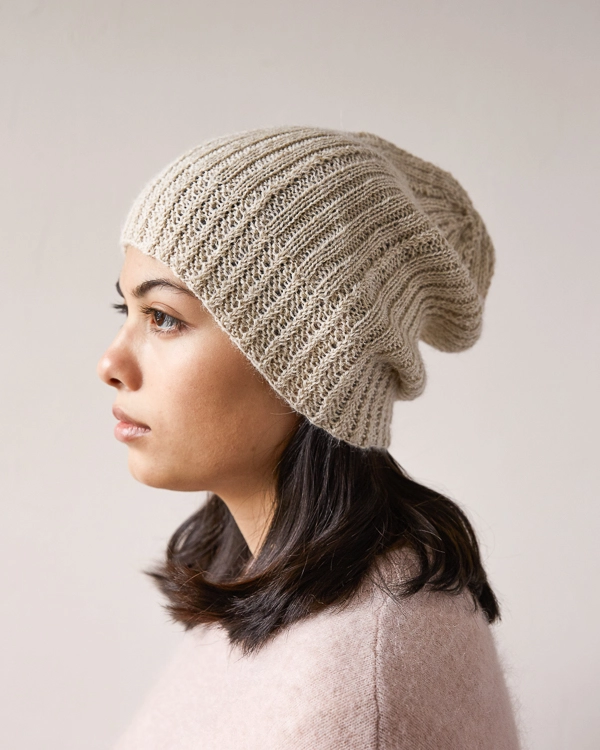
Mock Cable Columns Hat
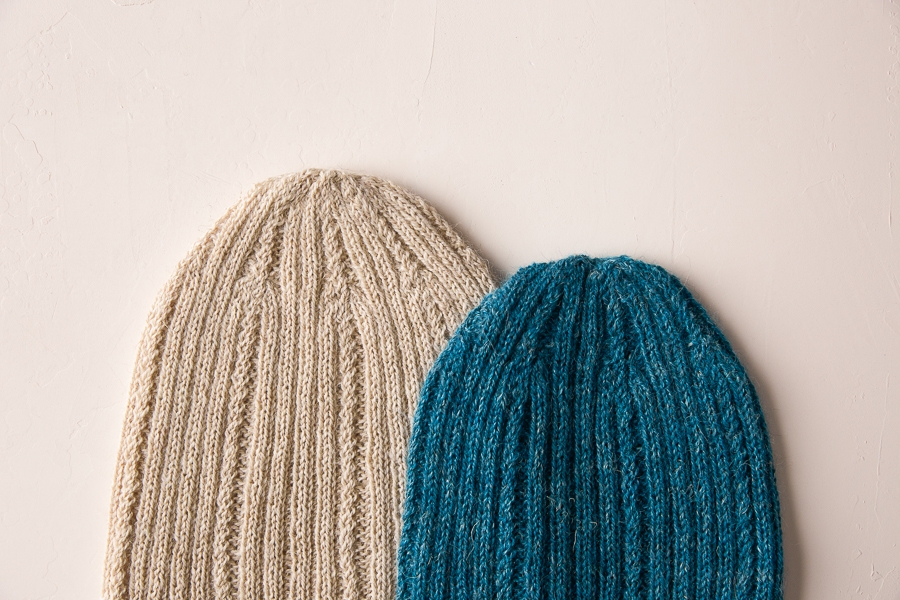
When asparagus shows up at the farmers market, you can also count on a morning chill that gives way to warm afternoons that then eases into crisp evenings. Unpredictable spring weather calls for our dependable Mock Cable Columns Hat… not too thick, not too thin, and just warm enough!
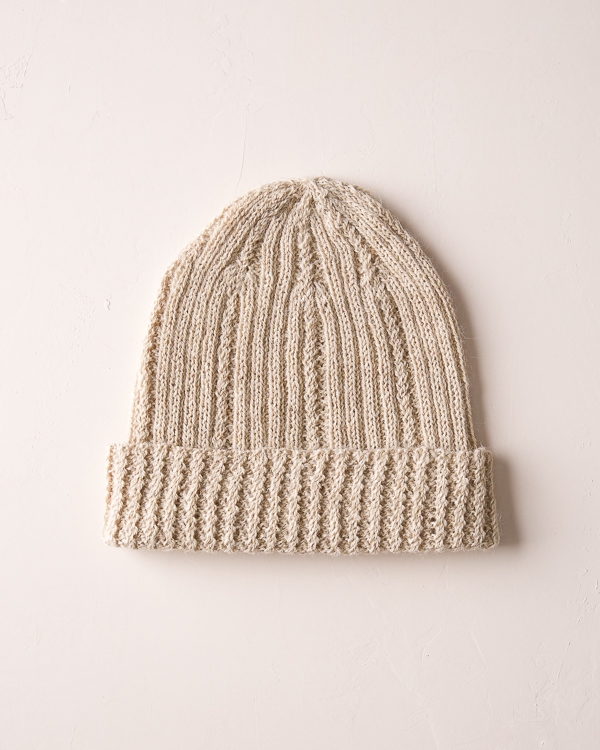
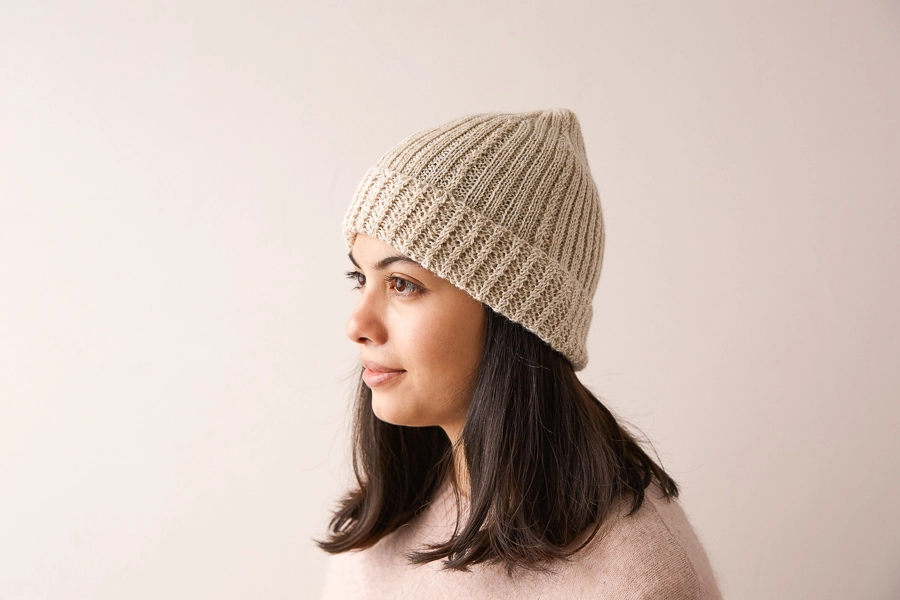
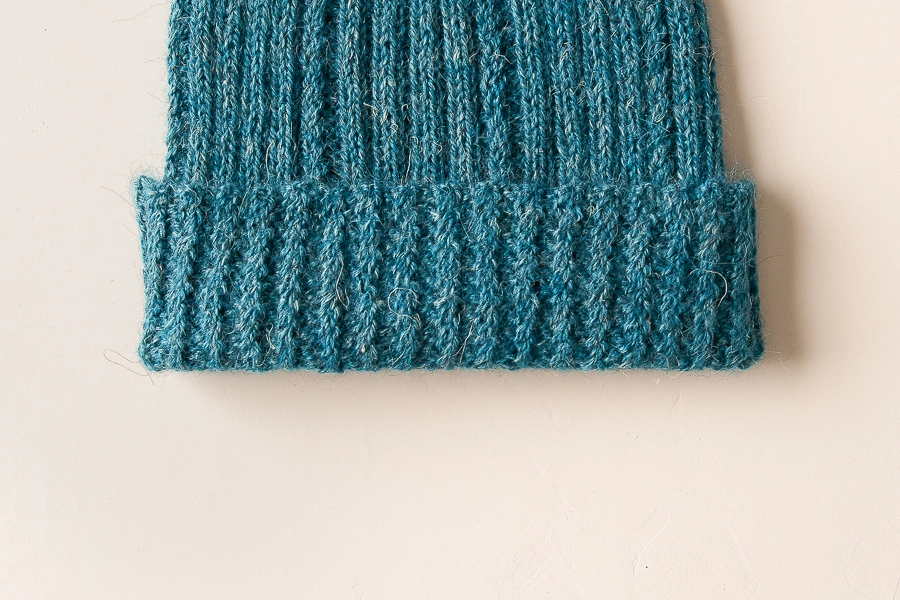
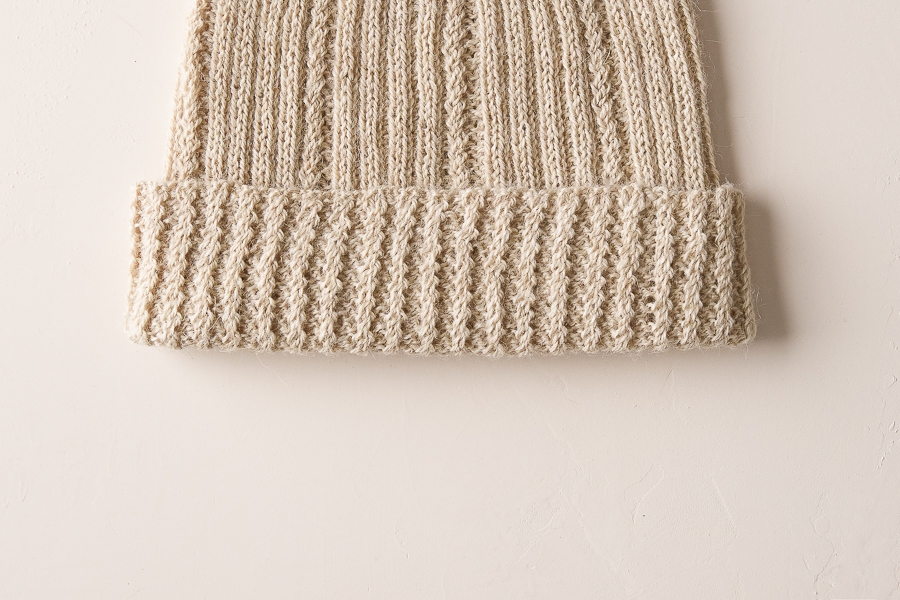
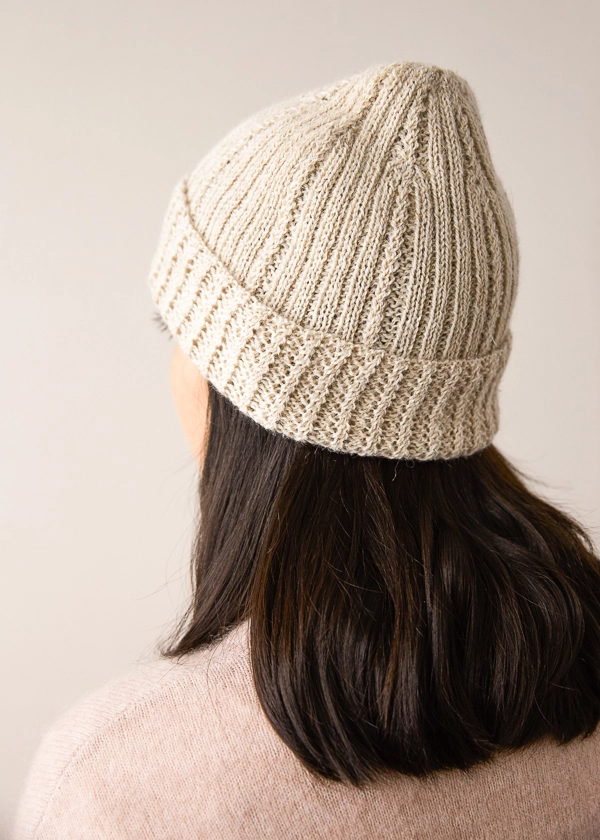
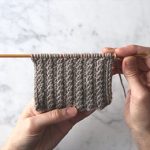
This pretty little hat includes columns of mock cables, spaced between a simple 2 x 2 rib, that spring from a mock cable rib cuff. And the cool thing is that the twisted stitches show up on both sides of the cuff, so, you can wear your hat unfolded and slouchy or cuffed and tailored.
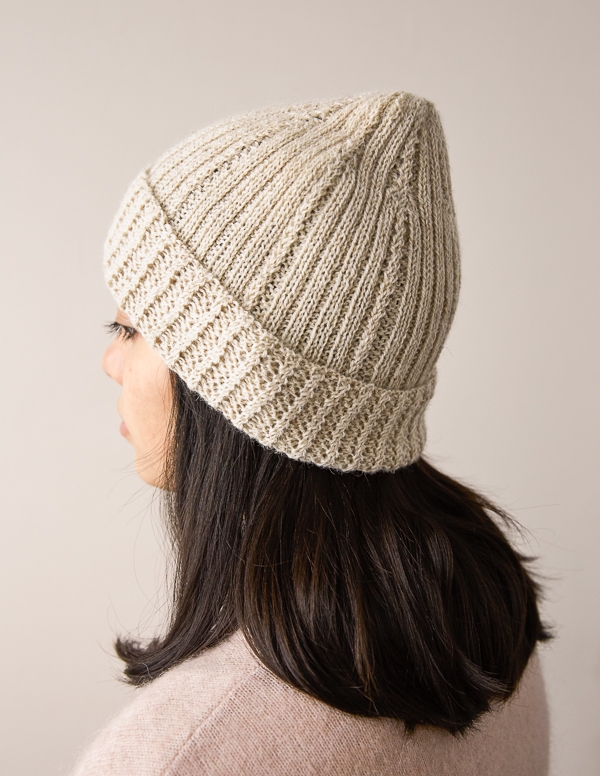
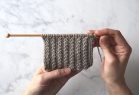
How does this Mock Cable Columns Hat so cunningly pull off the suggestion of cables? It has everything to do with twisting the stitches rather than putting them on a cable stitch holder. It’s an easy technique, and one that you will pick up instantly once you watch our new video tutorial!

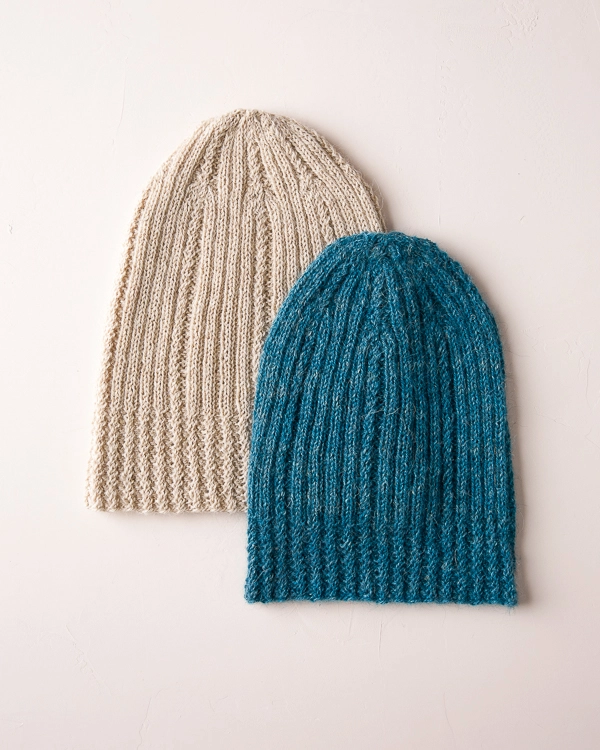
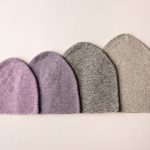
Knit up in our Linen Quill, the ideal yarn for a springtime piece, you have 31 gorgeous colors to choose from. Here, we opted for the soothing shade of Wheat Flour and the promise of azure skies in True Turquoise. With just a single skein, chase the chill away!
Designed by Purl Soho designer, Jake Canton. Click here to see even more of Jake’s designs!
Share your progress and connect with the community by tagging your pics with #PurlSoho, #PurlSohoBusyHands, #PurlSohoMockCableColumnsHat, and #PurlSohoLinenQuill. We can’t wait to see what you make!
Materials
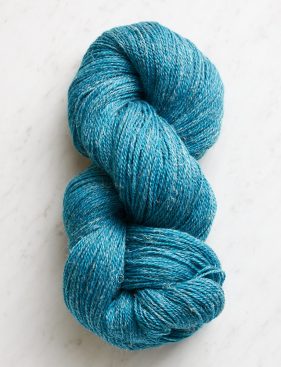
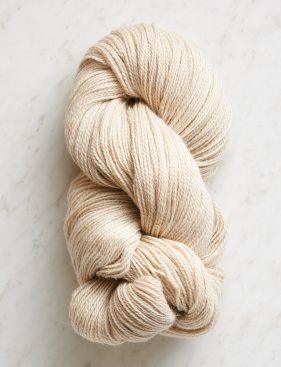
- 1 skein of Purl Soho’s Linen Quill, 50% fine highland wool, 35% alpaca, and 15% linen. Each skein is 439 yards/ 100 grams; approximately 127 (184, 265, 390) yards required. We used True Turquoise and Wheat Flour.
- US 4 (3.5 mm), 16-inch circular needles
- US 4 double pointed needles
- 5 (6, 7, 8) stitch markers and 1 unique stitch marker
NOTE: One skein is enough yarn to make two Baby or Kid hats and only one hat in the other sizes.
Gauge
34 stitches = 4 inches in stitch pattern
Size
Baby (Kid, Adult Small, Adult Large)
- Finished Circumference: 14 (16½, 18¾, 21¼) inches
- Finished Height (uncuffed): 8 (9¼, 10½ , 11½) inches
SAMPLES: The two samples shown here are Kid and Adult Small.
Notes
RT (right twist): Knit 2 stitches together, leaving both stitches on the left needle; knit into the first stitch again and let both stitches fall of the left needle. There are two new stitches on the right needle.
RT purlwise (right twist purlwise): Purl into the second stitch, leaving it on the left needle; purl the first and second stitches together and let both stitches fall of the left needle. There are two new stitches on the right needle.
Stitch Multiple: This pattern is worked over a multiple of 20 stitches.
For a step-by-step video tutorial of how to work this stitch pattern, please visit our Mock Cable Rib tutorial.
Pattern
Cuff
Cast 120 (140, 160, 180) stitches onto the circular needles. We used a basic Long Tail Cast On.
Place unique stitch marker and join for working in the round, being careful to not twist the stitches.
Set-Up Round: *K2, p2, repeat from * to end of round.
Round 1: *Right twist (RT, see Notes), p2, repeat from * to end of round.
Round 2: *K2, right twist purlwise (RT purlwise, see Notes), repeat from * to end of round.
Repeat Rounds 1 and 2 until piece measures 2 (2, 21/2, 21/2) inches from the cast-on edge.
Continue
Set-Up Round: *RT, p2, [k2, p2] 4 times, pm (place marker), repeat from * to end of round, omitting the final stitch marker, which is the unique end-of-round marker. [6 (7, 8, 9) stitch markers, including end-of-round marker]
Round 1: *K2, p2, repeat from * to end of round.
Round 2: *RT, p2, [k2, p2] 4 times, sm (slip marker), repeat from * to end of round.
Repeat Rounds 1 and 2 until piece measures 6 (7, 8, 9) inches from cast-on edge.
Shape Crown
NOTE: Change to double pointed needles when necessary.
Round 1: *K2, p2tog, [k2, p2] 3 times, k2, p2tog through back loop (tbl), sm repeat from * to end of round. [108, (126, 144, 162) stitches]
Round 2: *RT, p1, [k2, p2] 3 times, k2, p1, repeat from * to end of round.
Round 3: *K2, k2tog, k1, [p2, k2] 2 times, p2, k1, ssk, repeat from * to end of round. [96, (112, 128, 144) stitches]
Round 4: *RT, [k2, p2] 3 times, k2, repeat from * to end of round.
Round 5: *K2, k2tog, [p2, k2] 2 times, p2, ssk, repeat from * to end of round. [84, (98, 112, 126) stitches]
Round 6: *RT, k1, [p2, k2] 2 times, p2, k1, repeat from * to end of round.
Round 7: *K2, p2tog, p1, k2, p2, k2, p1, p2tog tbl, repeat from * to end of round. [72, (84, 96, 108) stitches]
Round 8: *RT, p2, [k2, p2] 2 times, repeat from * to end of round.
Round 9: *K2, p2, repeat from * to end of round.
Repeat Rounds 8 and 9 until piece measures 7 1/4 (8 3/4, 10, 11) inches from cast-on edge, ending with Round 8.
Next Round: *K2, p2tog, k2, p2, k2, p2tog tbl, repeat from * to end of round. [60, (70, 80, 90) stitches]
Next Round: *RT, p1, k2, p2, k2, p1, repeat from * to end of round.
Next Round: *K2, k2tog, k1, p2, k1, ssk, repeat from * to end of round. [48, (56, 64, 72) stitches]
Next Round: *RT, k2, p2, k2, repeat from * to end of round.
Next Round: *K2, k2tog, p2, ssk, repeat from * to end of round. [36, (42, 48, 54) stitches]
Next Round: *RT, k1, p2, k1, repeat from * to end of round.
Next Round: *K2, p2tog, p2tog tbl, repeat from * to end of round, removing all stitch markers, except end-of-round marker. [24 (28, 32, 36) stitches]
Next Round: K1, *ssk, k2tog, repeat from * to last 3 stitches, ssk, slip 1, remove marker, slip slipped stitch back to left needle, k2tog, replace marker. [12, (14, 16, 18) stitches]
Cut yarn and thread tail onto a tapestry needle. Thread tail through remaining stitches. Pull taught and bring tail to inside of hat to weave in.
Weave in the ends and block as desired!


I love your yarns and your patterns, but my english is not good enough to understand all the abbreviations. Could you maybe write me the full word of the most important, so I can try to read the pattern better? K, RT, K2tog tbl, p2tog tbl, ssk. Thank you. I cannot wait to visit the shop in New York end of june…
Kind regards, Winnie Gasser-Wernas from Switzerland
Hi Winnie,
Thanks for writing in and for the kind words! Fortunately we do have a full dictionary of the Knitting Terms and Abbreviations we use in our patterns, which you can refer to at any time! Most of the abbreviations you need will be there, but the RT (Right Twist) is specific to this pattern, and you will find the instructions for the stitch in the Notes section of the pattern. We also have a video tutorial on the Mock Cable Rib which shows how to do the Right Twist!
I hope that helps and that you enjoy your visit! We would love to see your finished hat when you come in!
Best,
Julianna
What does sm repeat mean in round one? Thank you.
Hi Debra,
Thanks for writing in! SM stands for Slip Marker and indicates to move your marker from the left needle to the right needle. You can find a full list of the abbreviations we use in our patterns here!
I hope that helps!
Julianna
This may seem obvious, but is there flipping of the work with this, or do we just work right side facing us the whole time?
Thanks!
Hello Abby,
Thank you for your question! You are correct, because this hat is knit in the round there is no need to turn your work. You will always be woking on the right side of the hat.
Happy knitting!
-Marilla
Can you give me this pattern in crochet terms?
Hello Gwendolyn,
Thank you for reaching out! While we don’t currently have the resources to write a crochet version of this hat, I will certainly pass along your request.
Happy Crafting!
-Marilla
Hi! I love this and am wondering if I can knit it using your Brooklyn Tweed Loft yarn — it looks like the weights are similar but I wanted to check if it would work to substitute. Thanks!
Hello Chris,
Thank you for writing! I think this hat would be beautiful in Brooklyn Tweed’s Loft.
Happy knitting!
-Marilla
Hello,
I’d like to knit this hat but need a larger circumference (23″). Can you tell me how many stitches to cast on; and amount of yarn?
Can I do this and keep the pattern?
I’m a bit new to hats.
thanks
Hi Joanne,
Thanks for reaching out! This hat can be worked over any multiple of 20 stitches, so for a larger hat I would cast on 200 stitches; however, keep in mind that hats should fit with two to four inches of negative ease, so if the person you are knitting for has a head that measures 23 inches, I would recommend knitting the Adult Large size as written. There is a fair bit of yarn left over from even the adult large, so you will still only need one skein of Linen Quill even for an extra large.
I hope that helps!
Julianna
Hi,
I am looking to get the Easy Puzzle Blanket kit and I’m just wondering if I’ll have enough wool from colour D of that blanket left to make a small adults hat in this pattern?
(I’m coming to you soon from London and already planning my makes haha!).
Thanks,
Maddie
Hi Maddie,
Great question! You will only use 130 yards of Color D in the Easy Puzzle Blanket, and the Adult Small Hat takes 265 yards, so you should have plenty of yarn for both – what a wonderful way to use up your leftovers!
I’ve been knitting the adult large (cast on 180 stitches), and twice when I’ve made it to the part where I add the stitch markers I end up using 11 instead of 9. I re-count my stitches each time and I still have 180 but I still end up with the wrong amount of stitch markers. Is the set up round where you place the stitch markers correct? (RT P2 4 times PM)
Hi Eleanor,
Thanks for reaching out! When working the repeat for placing the markers in the set-up round, you will need to repeat all the way back to the asterisk after placing each marker. In other words, you will RT, p2, [k2, p2] 4 times, pm, and then go all the way back to RT, p2, [k2, p2] 4 times before placing the next marker. You should end up with 20 stitches between each marker.
I hope that clears things up!
Julianna
With 20 stitches between each marker I have the correct amount of markers on the round, so I’m adding 4 after the first RT, p2? Instead of 4 all together? Will that same rule apply to any instruction of that nature?
Hi Eleanor,
In most knitting patterns, asterisks, brackets, and parentheses can all be used to indicate a repeat. In our patterns, we use brackets to show a within a repeat, so whenever you see a set of stitches in brackets, such as [k2, p2] in this row, you will be repeating the bracketed section the indicated number of times each time you work the larger repeat, which is shown using asterisks.
Best,
Julianna
Thanks for all your help so far!
So in that round the pattern is: RT, p2, [k2, p2], repeat 4 times, if I’m making the adult large I will RT, p2, p2 4 times then place a marker? Because when I did that there were too many stitches in between the markers and I didn’t use all the markers.
Hi Eleanor,
I think I would go back to placing your markers every 20 stitches, so you have 9 stitch markers placed – if you are using opening or removable stitch markers, you can do this before you knit the row so you only have to keep track of one thing at a time! Fully written out, the stitches between each set of markers should be RT, p2, k2, p2, k2, p2, k2, p2, k2, p2, for a total of 20 stitches. You will work this same pattern of 20 stitches between each set of markers.
Best,
Julianna
Hi, I am very excited to knit this hat. I want to knit it for my son – my adult son, I just had him measure his head circumference and it is 22”.
The adult size L for this hat says finished circumference is 21 1/4”
So my question is, will it fit him? I am going to use Linen Quill yarn but on a size 5 needle (to get the right gauge) instead of a size 4 needle. I haven’t knit up the gauge yet, but I knit tight and I usually have to go up one needle size. What do you think? Should I perhaps cast on more stitches? Thank you for your help.
Hi Barbara,
Thanks for reaching out! Knit hats fit best when they are sized with two to four inches of negative ease, so the adult large may actually be a bit too big for your son. The finished measurement of the adult small is 18 3/4 inches, which will result in 3 1/4 inches of negative ease. This should provide a snug yet comfortable fit, but I would still knit a gauge swatch to be sure before beginning the hat!
I hope that helps, and happy knitting!
Julianna
Hi Julianna, thank you for your quick response. I didn’t know that about Knit hats….having 2-4 inches of negative ease. Why do they use the word “negative”? Why not, “positive” ease? I will definitely knit a qauge swatch. So, you think I should knit the Adult small size instead of Adult large size to fit a 22” circumference head? Assuming of course that my gauge matches the pattern 34 stitches = 4 inches in stitch pattern.
Thank you for your help.
Hi Barbara,
Negative ease refers to a garment measuring smaller than the actual body measurement, such as in the case of hats that measure smaller than the wearer’s head. Positive ease, on the other hand, refers to a garment being larger than the wearer’s body measurement – this results in a loose or boxy fit, as you can see in our Goode sweater. I do think that the Adult Small will be the best choice, especially since the Mock Cable stitch is quite stretchy!
Best,
Julianna
Hi,
I was thinking about making this hat with two strands of Tussock held together, or perhaps one strand of Tussock and one of Mineral Silk. Could you advise on how many skeins I’d need, and if I’d need to make any adjustments to the needle size? Thank you!!
Best,
Jenny
Hello Jenny,
Thanks for reaching out! This would be lovely. I think either combinations should work for this hat. Though you should be close to the desired gauge, I would knit up a gauge swatch to see if any adjustments need to be made.
I hope this helps and happy knitting!
-Marilla
Hello! I’m new to making gauge swatches. How many stitches do you suggest casting on to measure gauge for this pattern? And how long do you recommend making it? I usually do about 5 inches with worsted weight but it seems like that’ll take forever with fingering weight. Also, should I use particular stitch for the gauge, or is stockinette ok? Thank you so much!
Hi Julia,
Great questions! When knitting a gauge swatch, for the best results, you should cast on more than the amount you will be measuring. Everyone’s selvage or edge stitches tend to turn out a bit distorted, so you should try not to include them in your gauge measurement. I know it sounds like quite a task for a fingering weight yarn, but I would recommend casting on 40 stitches and knitting your swatch until it is about 5 inches long. You can then measure the center 4 inch square, excluding the edge stitches and cast-on, for the most accurate gauge measurement possible! For this pattern, you will be knitting the gauge swatch in the Mock Cable Rib pattern – you can tell because our gauge has “in stitch pattern” printed after the measurement. Because this stitch pattern is written for knitting in the round, you might also be interested in our Swatching for Circular Gauge tutorial.
I hope that helps, and happy knitting!
Julianna
What does ssk mean? Slip slip knit or just slip knit?
Hi Hannah,
Thanks for reaching out! SSK is the abbreviation for the decrease slip slip knit!
All the best,
Gianna
I’m almost finished the knit four points baby blanket and I’m wondering if you think there could be enough leftover in any of those skeins to make the baby sized hat? thanks in advance!
Hi Lauren,
Thanks for reaching out! We use approximately 360 yards of each skein so you should have about 79 yards leftover of each color. This wouldn’t be enough to create a hat in one color but you would have plenty of yarn to make a baby hat if you color block or stripe with the different skeins you have!
All the best,
Gianna
Hello! Do you think I could knit the hat with 24” long circular needles?
Thank you!
Hi Michelle,
Thanks for reaching out! A 24″ circular needle would be too long for a hat and over stretch the stitches. I always recommend sticking with a 16″ circular needle when working hats in the round!
Warmly,
Gianna
Could you suggest adjustments to the pattern/needle size if I used two strands of linen quill? I was looking at making the adult large hat.
Thank you
Hi Alma,
Thanks for reaching out. To use two strands of Linen Quill to make this hat, you will need to start by casting on a different number of stitches, so that the hat will fit correctly!
To figure out your cast-on number, you will want to first knit a gauge swatch in pattern with your intended needles (if this is daunting, we have a wonderful tutorial called All About Gauge). I’d recommend using anywhere from size US 5 to US 8 needles holding Linen Quill doubled, but you can see what feels best for you!
Once you know how many stitches you are getting per inch, you can multiply that number by the finished circumference of the Adult Large size (21 1/4 inches) and cast on the nearest multiple of 20. Then you can follow the pattern as written!
All the best,
Lili