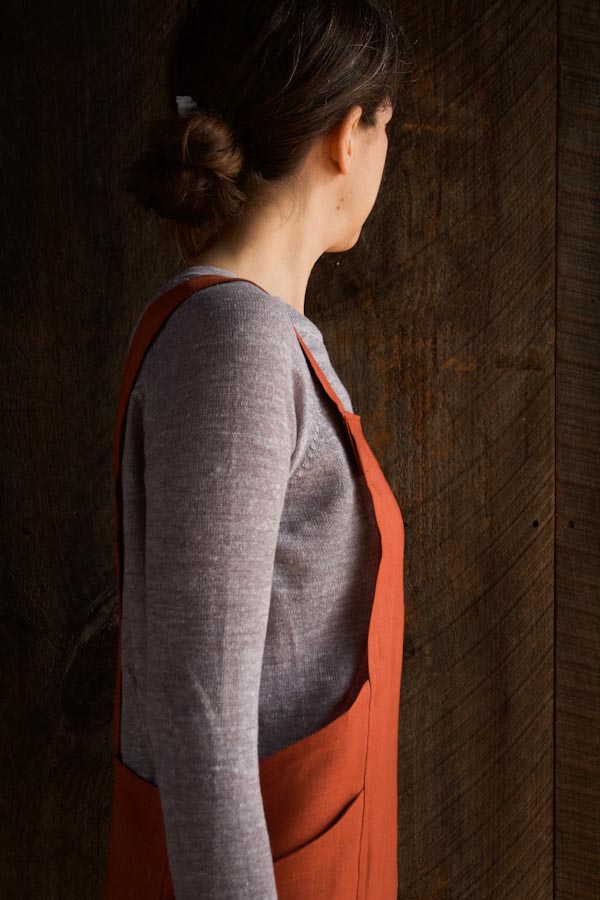


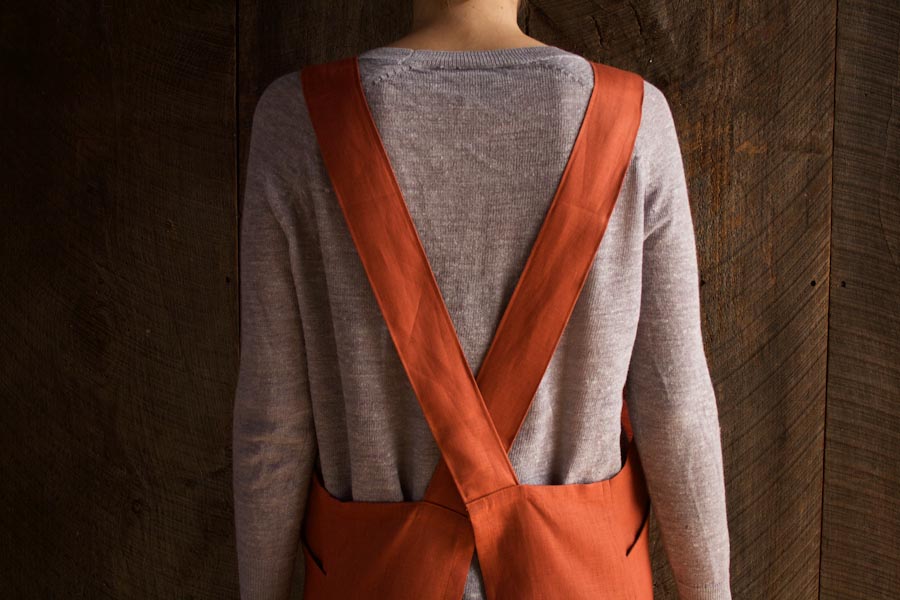
Cross Back Apron
This year, my husband’s Irish parents are coming to town for their first Thanksgiving ever (can you believe they’ve never tasted pumpkin pie?!). As the resident American in the family, I am nervous about everything from overcooked turkey to undercooked stuffing, so I’ve decided to focus on the one detail I know I can get right: the cooking attire!

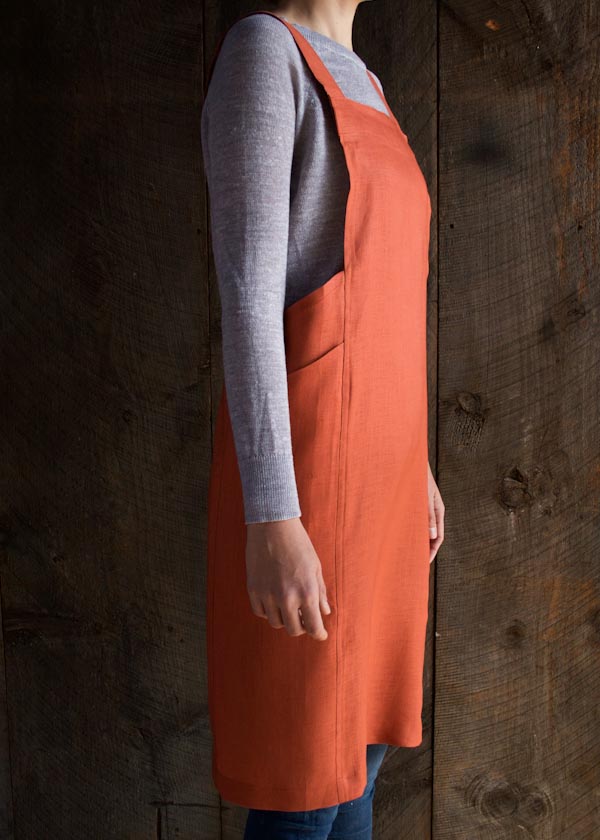
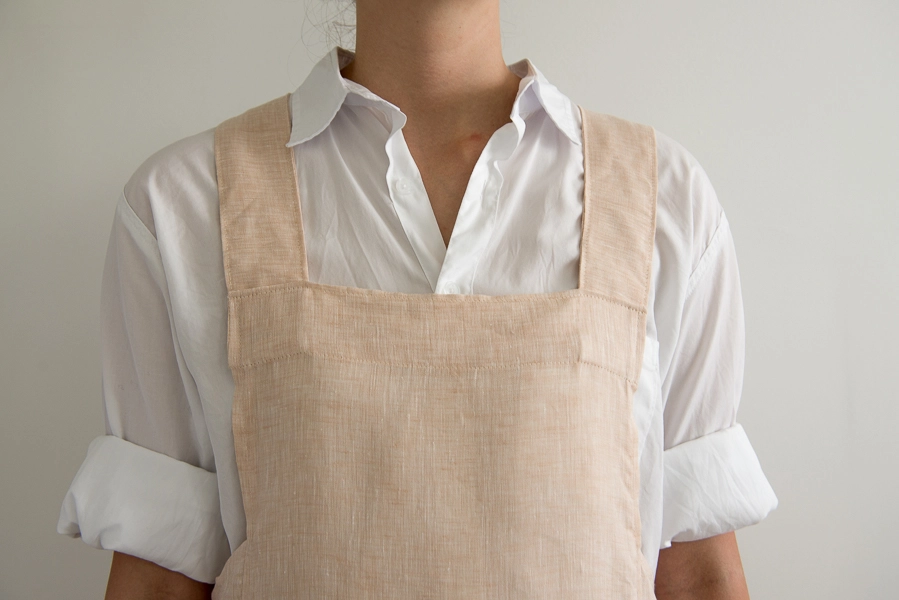
This lovely Cross Back Apron is so elegant that it feels almost like a new dress, but functional cover-up it is! I designed it to be loose and easy, so that when I bend over to baste the bird or reach up to grab the pie pan, I know I’ll feel comfortable. It also has durable French seams, generous side pockets, and full coverage (no gravy splatters on the holiday duds!).

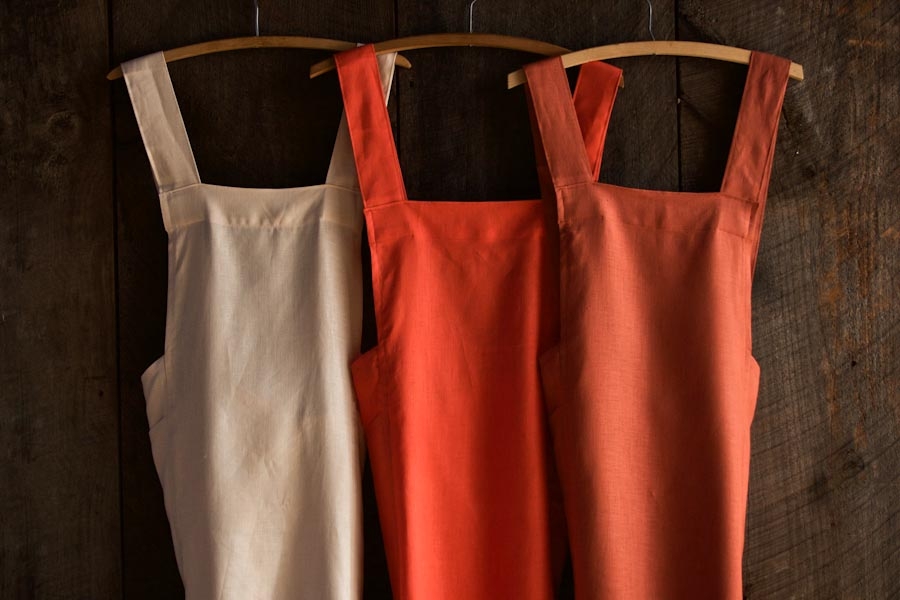
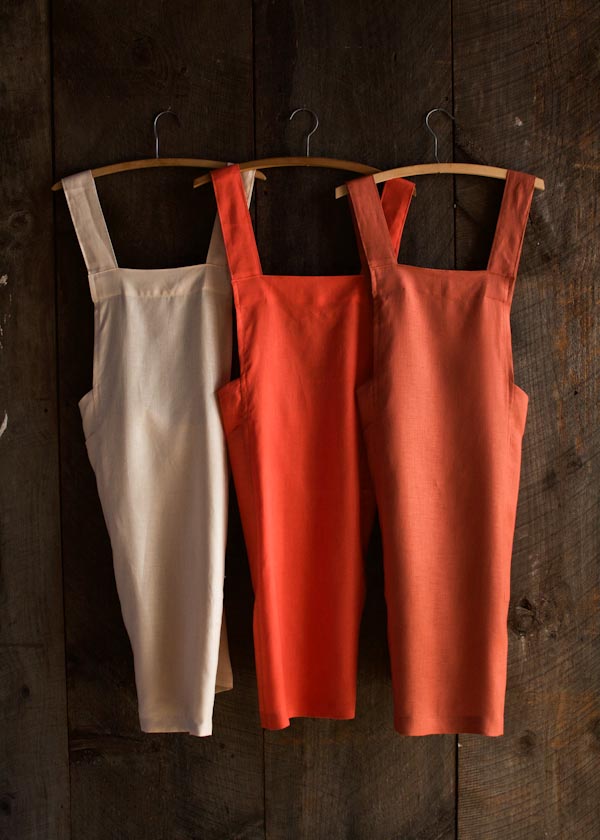
Sewn up in three pretty colors of Purl Soho’s Handkerchief Linen, our Cross Back Apron is sturdy, practical, and very beautiful. If nothing else, I know I’ll be dressed for a very successful mess! -Corinne

Update: New Fabric
July 16, 2016
We sewed a new version of this classic apron in our very own Watercolor Linen! To see the full list of materials please check out our Cross Back Apron in Watercolor Linen story here.
Update: Now in Spectrum Cotton
May 2021
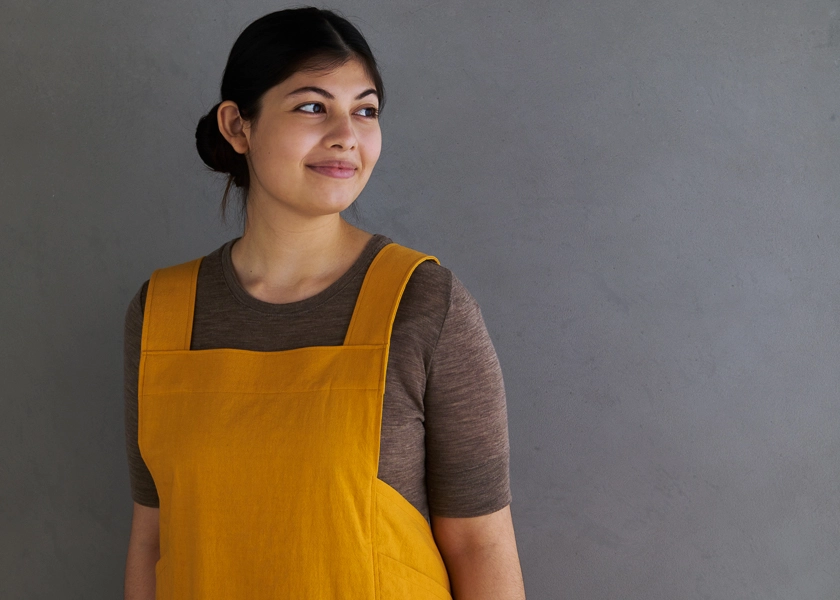
Soft and simple, our Spectrum Cotton makes the perfect apron. To see the full list of materials please check out our Cross Back Apron in Spectrum Cotton story here.
Materials
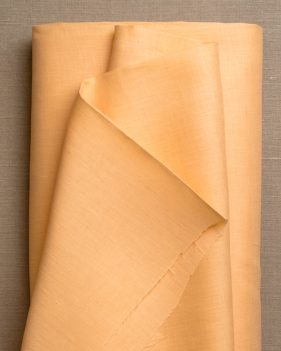
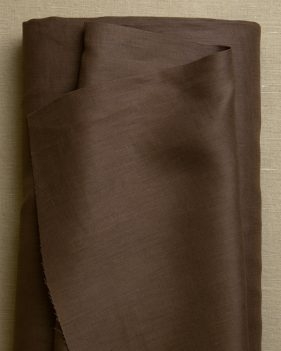
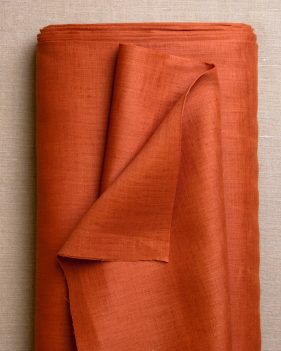
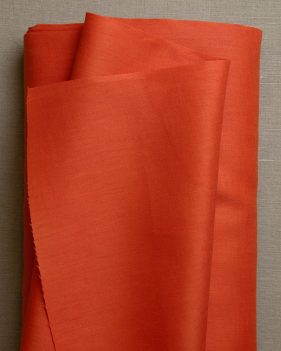
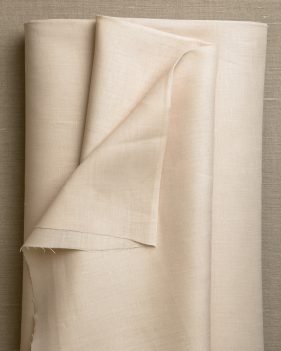
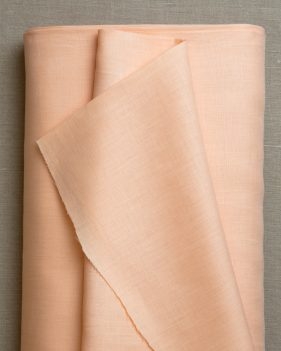
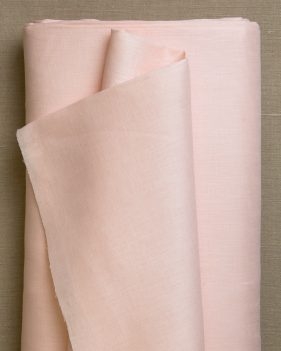
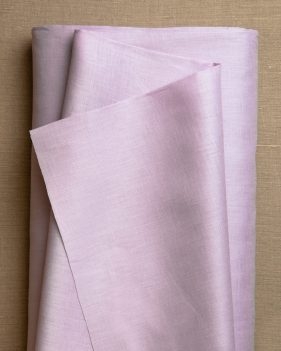
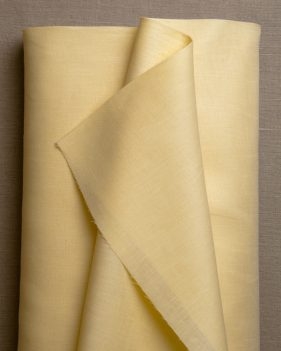
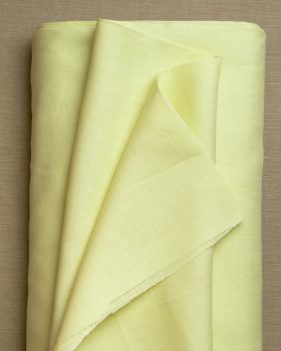
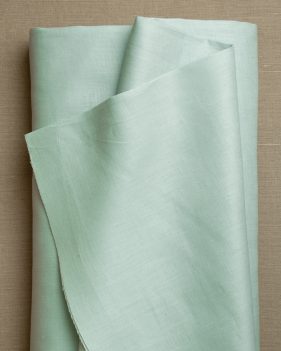
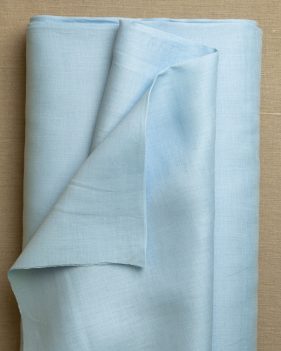
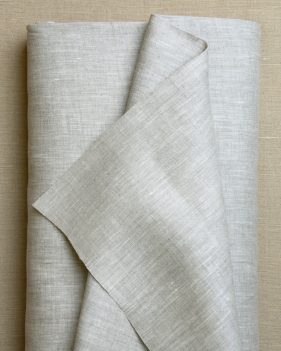
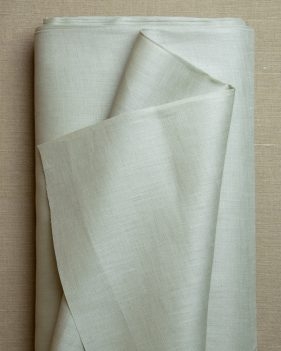
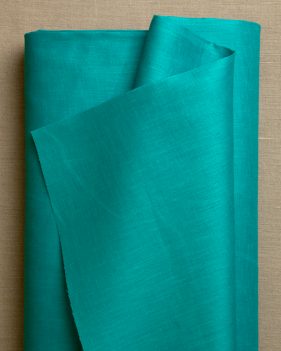
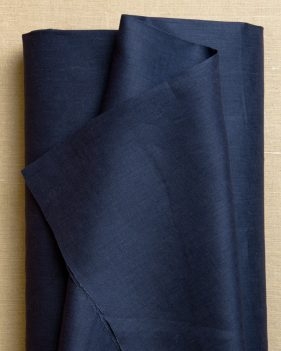
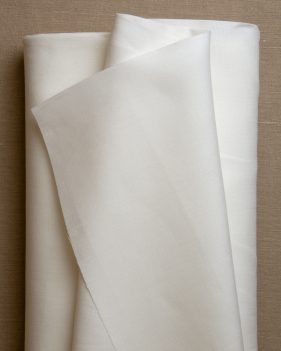
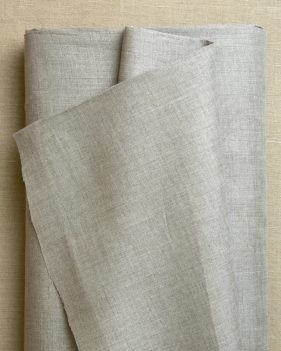
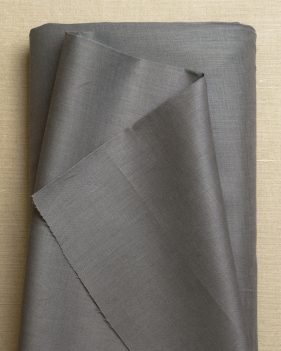
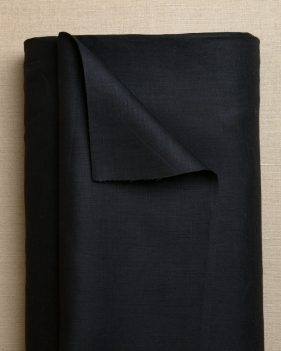
- 1 ¾ yards of Purl Soho’s Handkerchief Linen, 56-60 inches wide. We used the colors Redwood, Persimmon, and Desert.
- A 110-yard spool of Gutermann’s Cotton Sewing Thread to coordinate with the fabric. We used 4850 for Redwood, 4860 for Persimmon, and 1140 for Desert.
Or…
- 2¼ yards of Purl Soho’s Spectrum Cotton, 100% cotton, 45 inches wide. We used Yellow Ochre.
- A 110-yard spool of Gutermann’s Cotton Sewing Thread to coordinate with the fabric. We used color 1685.
Size
One size fits many.
Notes
Prewash, dry, and iron the fabric before starting.
For the sake of clarity our instructional photos use a fabric with a clear right and wrong side. When you are working with a fabric without a clear right or wrong side, choose either side as the right side for the first seam and follow this precedent for all subsequent steps.
Pattern
Cut
Use the cutting layout and measurements below to cut a total of 11 pattern pieces from the fabric.
Cutting Layout: 45 Inch Wide Fabric
Cutting Layout: 56-60 Inch Wide Fabric
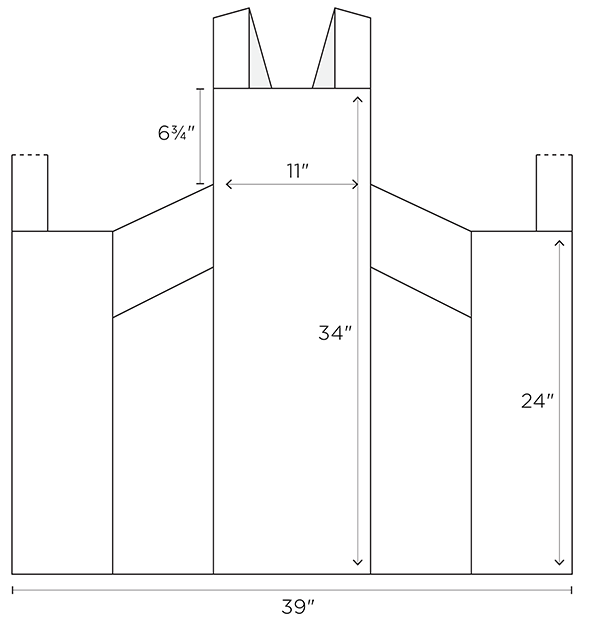
Measurements

Prepare the Straps

Fold one Strap in half lengthwise and press to create a crease. Open up the fold. Now, fold the two long, raw edges to meet the center crease and press. Fold the Strap in half lengthwise so that the raw edges are encased in the fold and press.
Sew along both long edges of the Strap with an edgestitch.
Repeat with the other Strap piece.
Prepare the Back

Fold one long edge of one Back piece ½ inch toward the wrong side twice, press and pin. Sew along the folded edge with an edgestitch.
Repeat with the other Back piece.

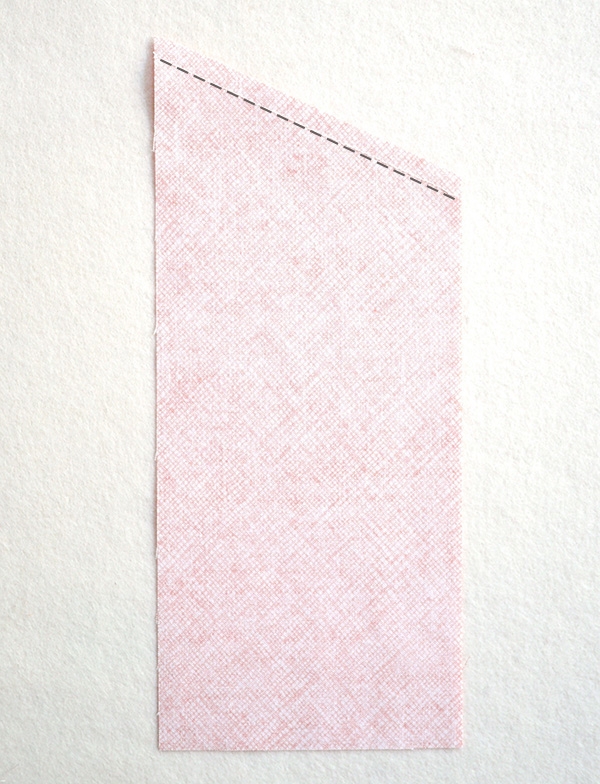
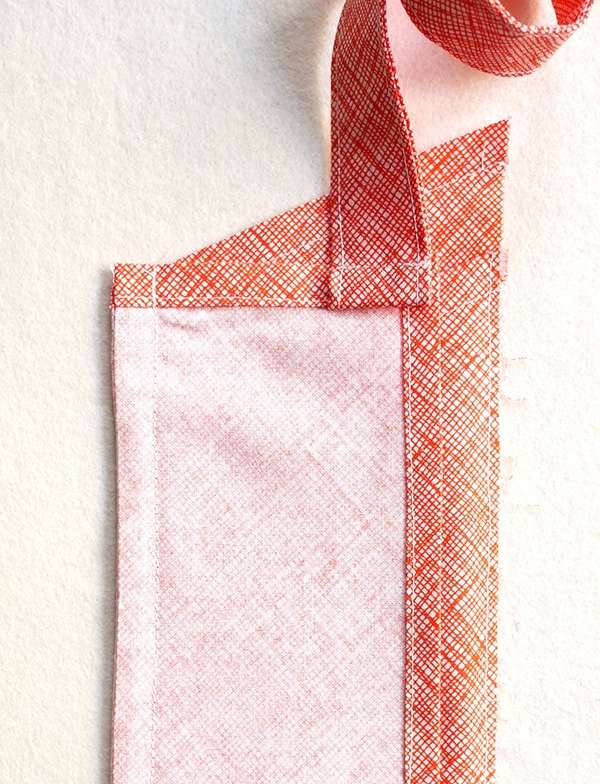
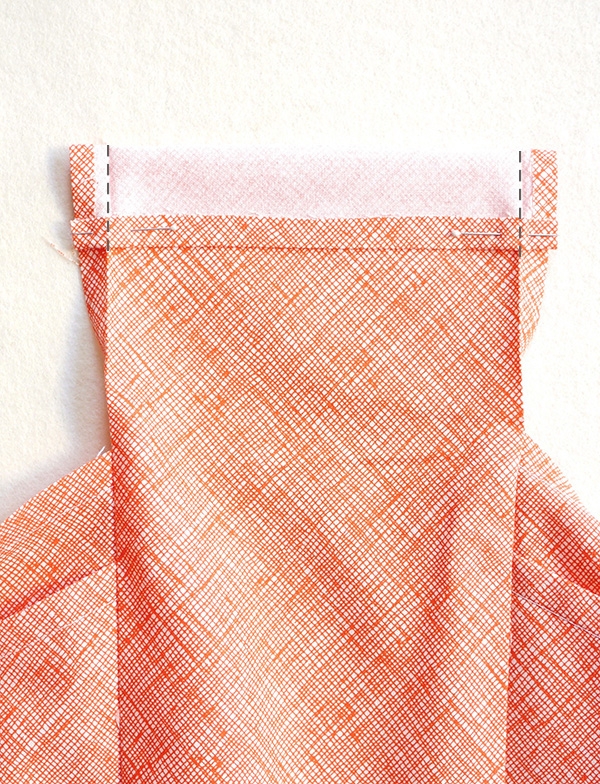
With the wrong side facing up and the long hemmed edge running along the right side, fold the top edge of the Back piece ½ inch toward the wrong side twice, press, and pin.
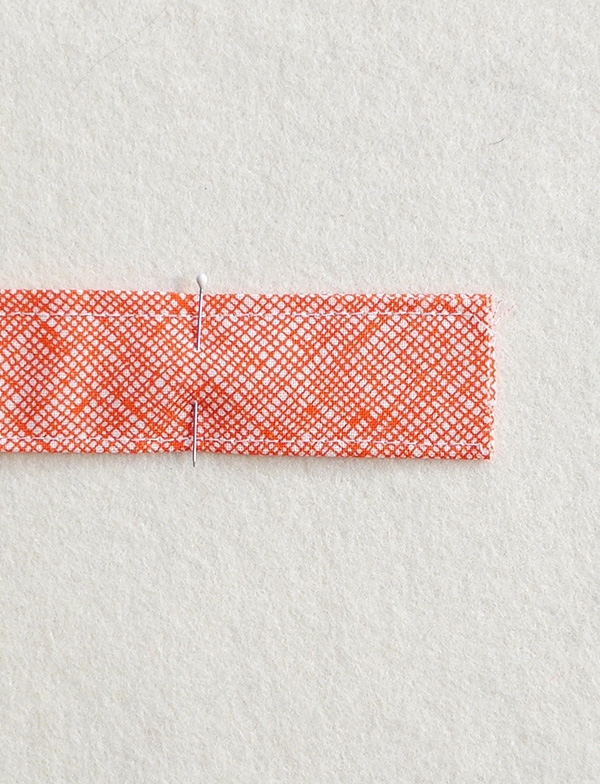
Tuck one short, raw edge of one Strap piece into the top hem of the Back, so that the long edge of the Strap runs along the long hemmed edge of the Back. Pin in place.
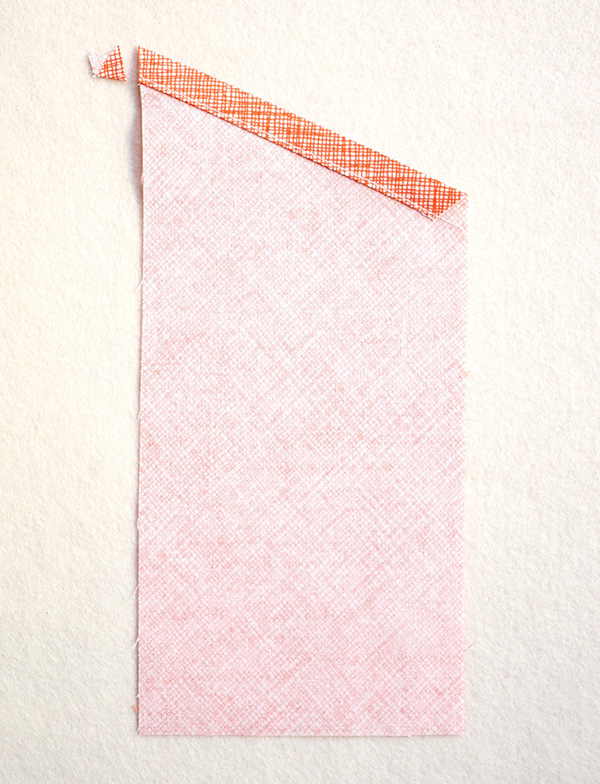
Sew along the top hem of the Back with an edgestitch, backstitching at the beginning and end of the seam.
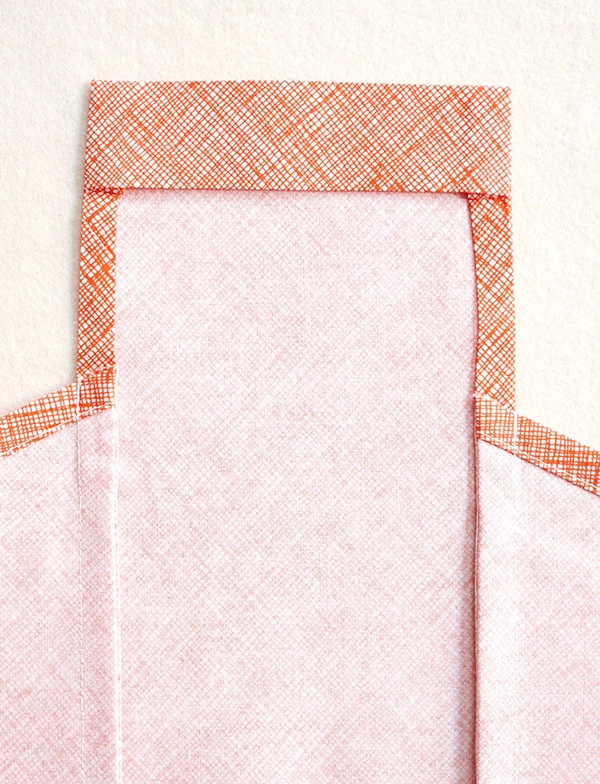
Fold the Strap up at the seam and press. Sew the Strap to the top edge of the Back piece’s top hem. Backstitch at the beginning and end of the seam.

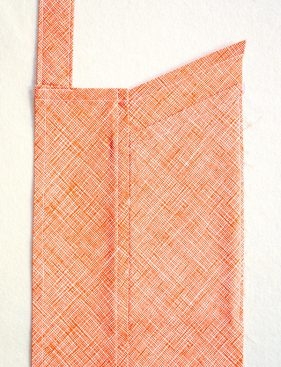
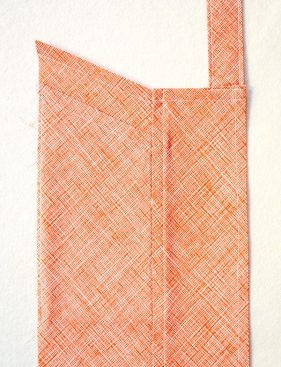
Repeat with the other Back piece and Strap, with one exception: When you start, the long hem of the Back piece should run along the left side. When you are finished, the two pieces should be mirror images of each other.
Prepare the Side Pockets
For each Side Pocket, you will need 3 Pocket Pieces: one each of Pocket A, Pocket B, and Pocket C.
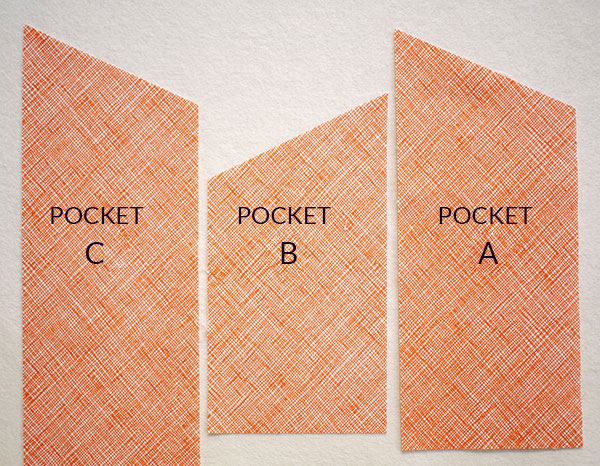
Right Side Pocket
The image above shows the shape of the Right Side Pocket pieces with their right sides facing up. The slope of Pocket B runs opposite the slopes of Pockets A and C.
Sew a line of stay stitching ½ inch from the top sloped edge of Pocket A. This will help prevent the bias-cut edge from stretching out in subsequent seams.
Fold the top edge of Pocket A ½ inch toward the wrong side twice, press and pin. Sew along the bottom folded edge with an edgestitch. Clip off any overhanging fabric so that the side edge runs straight.
Set Pocket A aside.
With right sides together, stack Pockets B and C on top of each other, lining up their top sloped edges. Pin in place. Sew along the pinned edge with a ¼-inch seam allowance.
Fold along the seam line so that the wrong sides of the two Pocket pieces are now facing each other, press, and pin. Sew along the top folded edge with a ½-inch seam allowance.
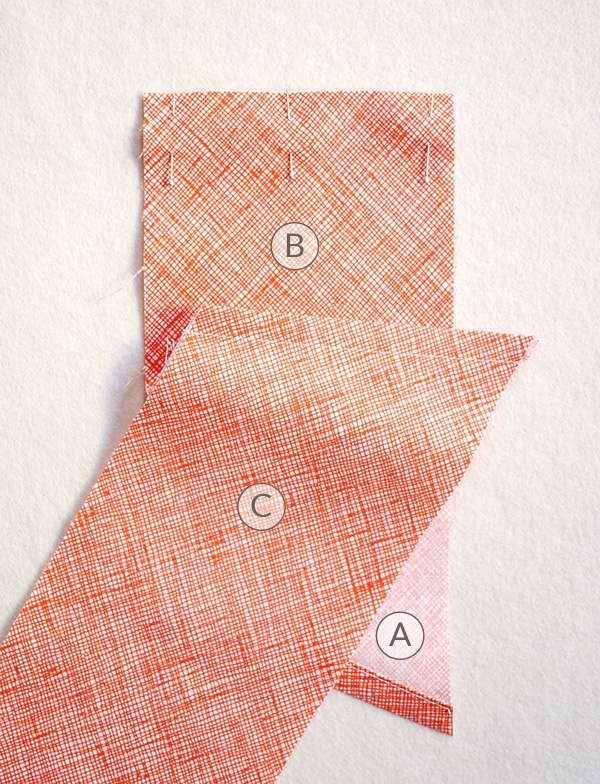
Now, with wrong sides facing, stack Pocket B on top of Pocket A so that their bottom raw edges are aligned. Pin in place. Sew along the pinned edge with a ¼-inch seam allowance.
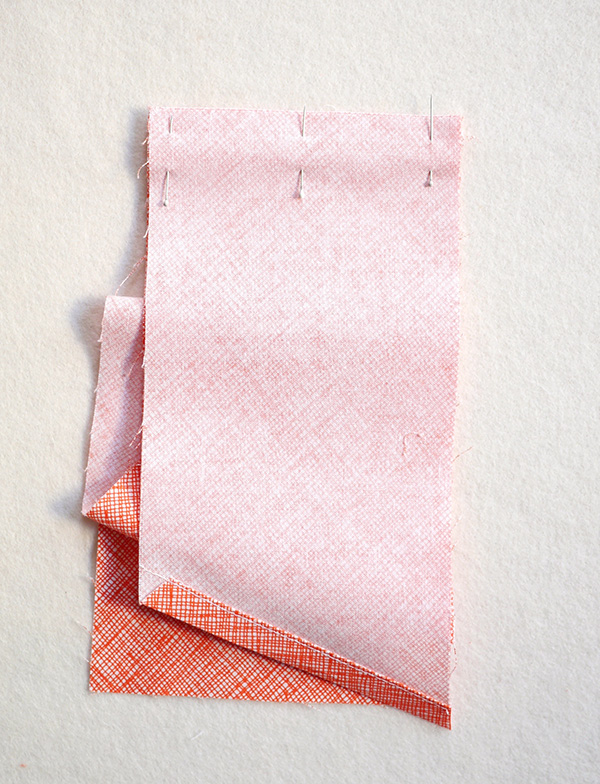
Fold along the seam line so that the right sides of Pockets A and B are facing each other and press. Pin Pockets A and B together along the folded edge. Sew along the pinned edge with a ½-inch seam allowance.
This is now the Side Pocket.
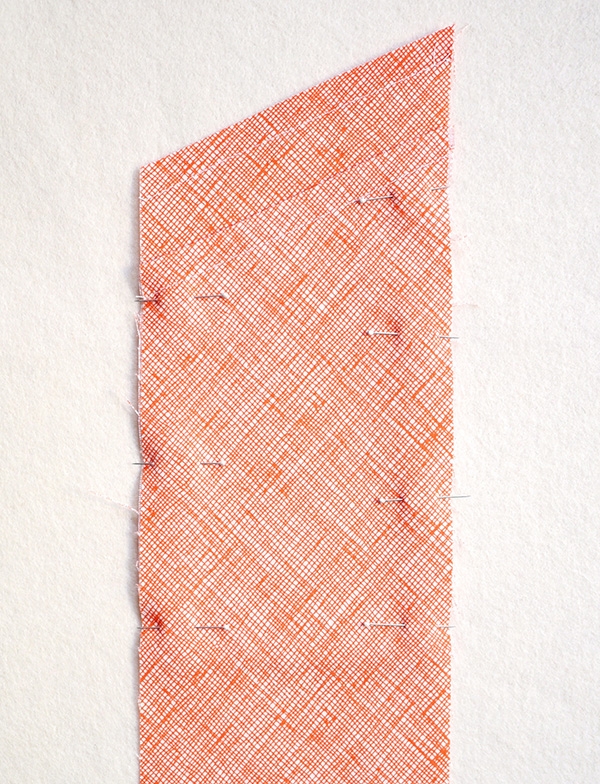
Lay the Side Pocket out flat with the right side facing up. Orient the Side Pocket so that A is at the top and C is at the bottom, then fold along the seam between pieces A and B so that B lies flat on A (right sides together). Next, fold C down so that its sloped edge runs parallel with the sloped edge of A. All the raw side edges should be aligned.
Pin along all layers of the side edges, and sew along the pinned edges with an 1/8-inch seam allowance.
Left Side Pocket
The image above shows the shape of the Left Side Pocket pieces with their right sides facing up. The slope of Pocket B runs opposite the slopes of Pockets A and C.
Repeat all the steps of the Right Side Pocket, using the Left Side Pocket pieces.
Attach the Side Pockets to the Back

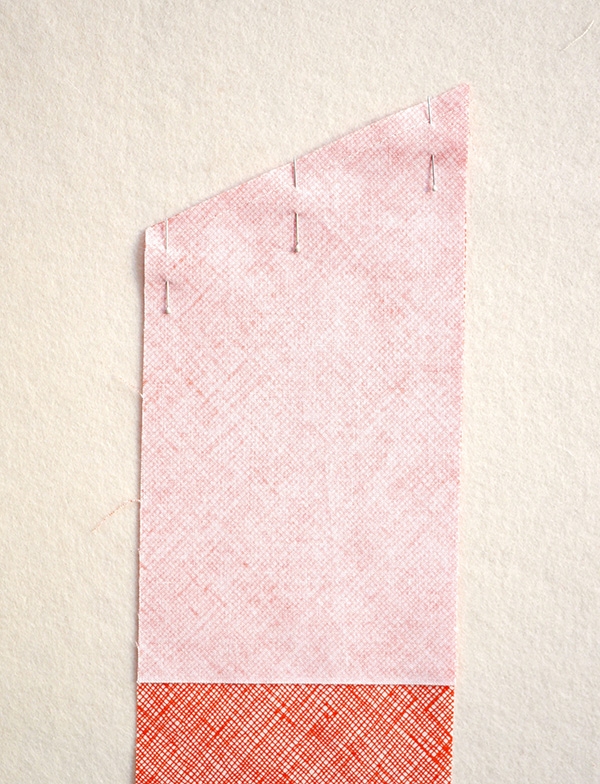
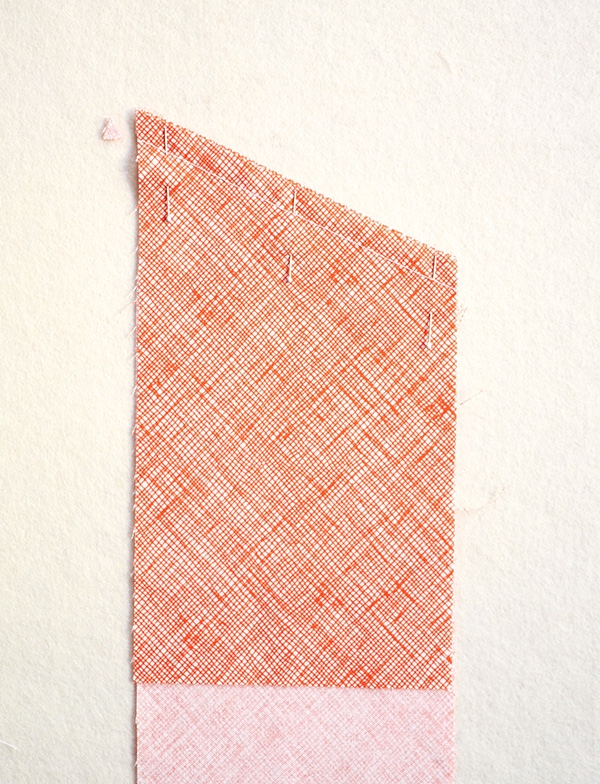
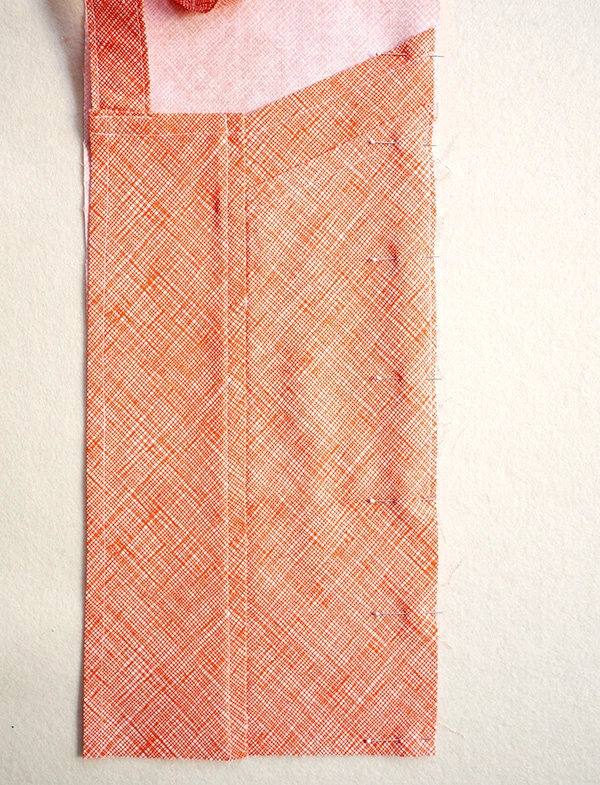
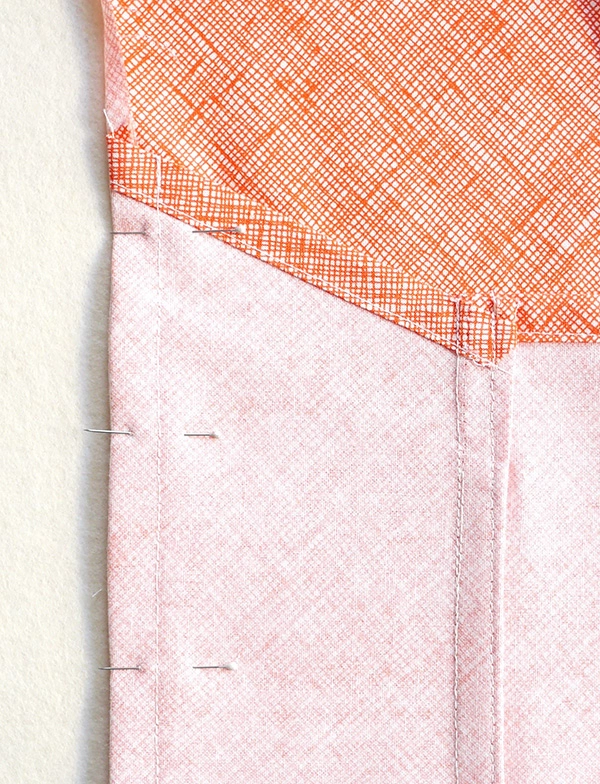
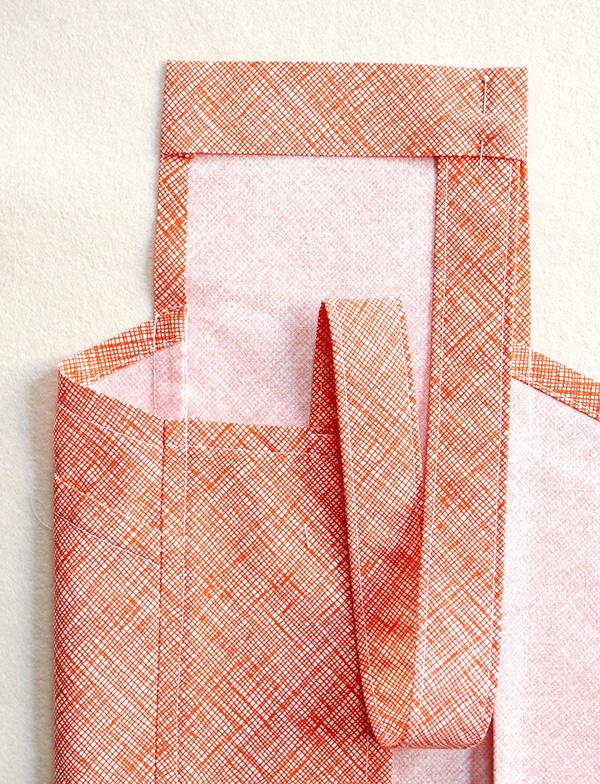
With their wrong sides together, stack one Side Pocket on top of one Back. Align the shorter side edge of the Side Pocket with the long raw edge of the Back piece.
Also align the bottom edges of the two pieces. When you do, you will notice that the Back is slightly taller than the Side Pocket. The top edge of the Side Pocket piece should hit the top edge of the Back about ¾ inch in from the raw edges (see above).
Pin the two pieces together along the aligned side edge. Start the French seam by sewing along the pinned edge with a ¼-inch seam allowance.
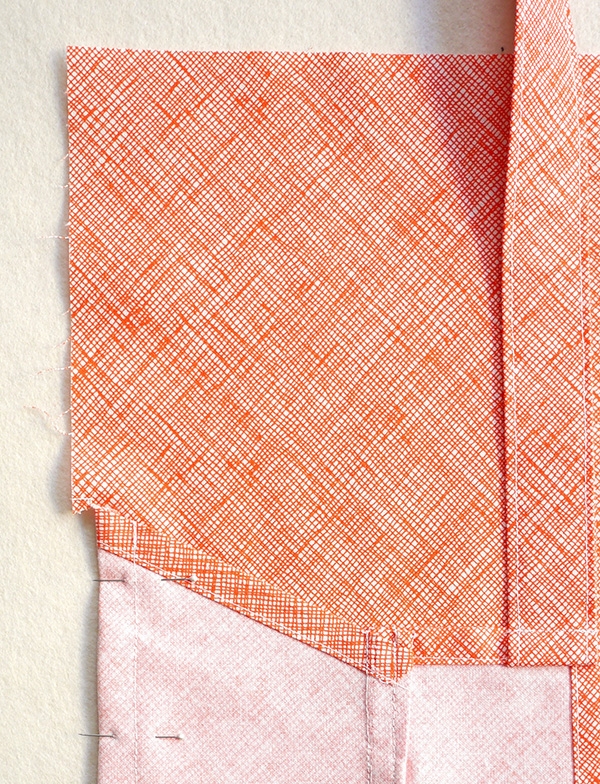
Fold along the seam line so that the right sides of the Side Pocket and Back are now facing. Press and pin. Sew along the pinned edge with a ½-inch seam allowance, backstitching at the beginning and end of the seam.
Press the seam toward the Back and finish the French seam by sewing it down ¼ inch from the seamline. Backstitch at the beginning and end of the seam.
This is now the Side.
Repeat with the other Side Pocket and Back. The two Side pieces should be mirror images of each other.
Attach the Sides to the Body
With their wrong sides together, stack one Side piece on top of the Body, so that the raw side edge of the Side aligns with one long edge of the Body. Also align the bottom edges of the two pieces. Pin in place along the long side edge.
Make another French seam, starting by sewing along the pinned edge with a ¼-inch seam allowance.
Fold along the seam line so that the right sides are now facing. Press and pin along the fold. Sew along the fold with a ½-inch seam allowance, backstitching at the beginning and end of the seam.
Make a small, ¼-inch clip into the seam allowance, following the slope of the Side piece so that the unsewn side edge of the Body can lie flat.
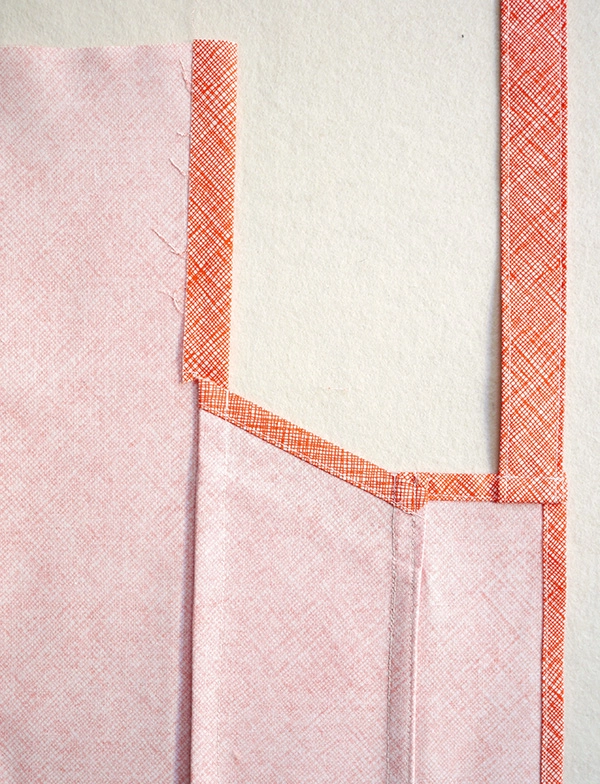
Press the seam allowance toward the Body. When you reach the unsewn side edge of the Body, press that raw edge toward the wrong side, following the seam line.
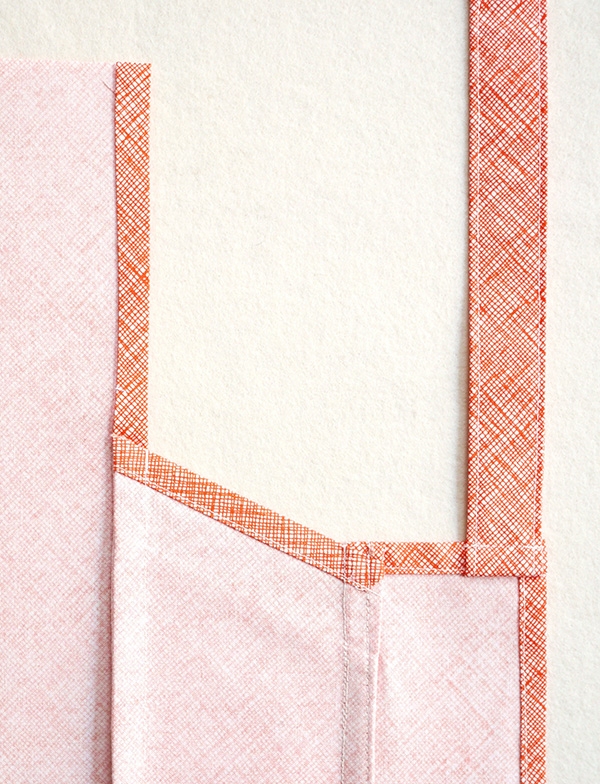
Tuck the raw edge of this seam allowance ¼ inch under the fold, following the line of the seam allowance below. Press.

Repeat with the other Side piece on the other side of the Body.
Fold the Top Hem

Fold the top edge of the Body ½ inch toward the wrong side and press. Now fold the top edge 2 inches toward the wrong side and press.
Open up the side ½-inch folds of the Body. Next, open the 2-inch fold along the top edge and refold it toward the right side along its crease. Keep the ¼-inch folds along the side edges and the ½-inch fold along the top in place.
Pin the last fold you made in place along the side edges.
Sew the fold down along the side edges with a ½-inch seam allowance (you can use the hem creases as a guide). Backstitch at the beginning and end of the seam.
Fold the top hem back toward the wrong side and press. Poke the corners out neatly.
Attach the Straps
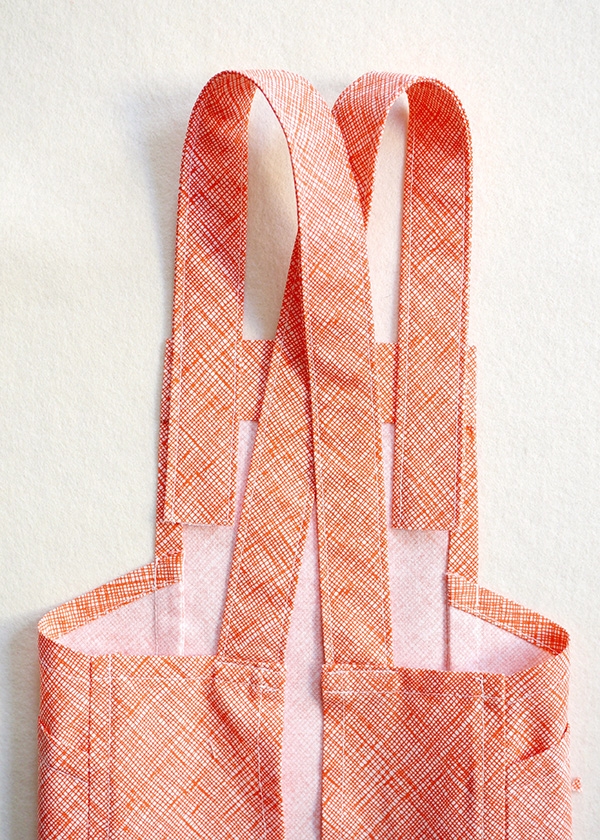
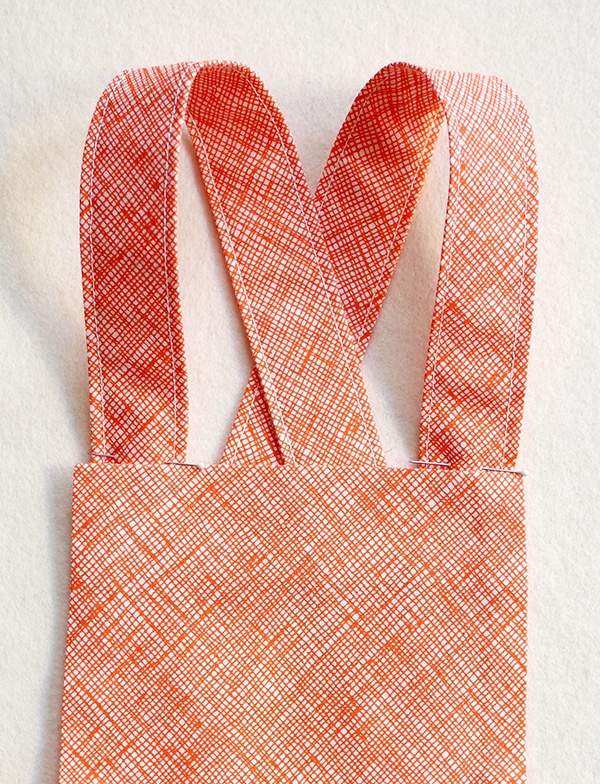
Bring the unsewn ends of the Straps to the front of the Apron. The Straps should cross in the back, but be careful that they do not get twisted.
For the most accurate fit, try the Apron on and play with the length of the Straps. Once you like the fit, place a pin through the Straps, right where they hit the top edge of the Apron. The pin only marks the Strap; it does not attach the Strap to the Apron.
Trim the raw edge of the marked Strap 2 ½ inches from the pin.
Cut the other Strap so that it is equal in length to the first.
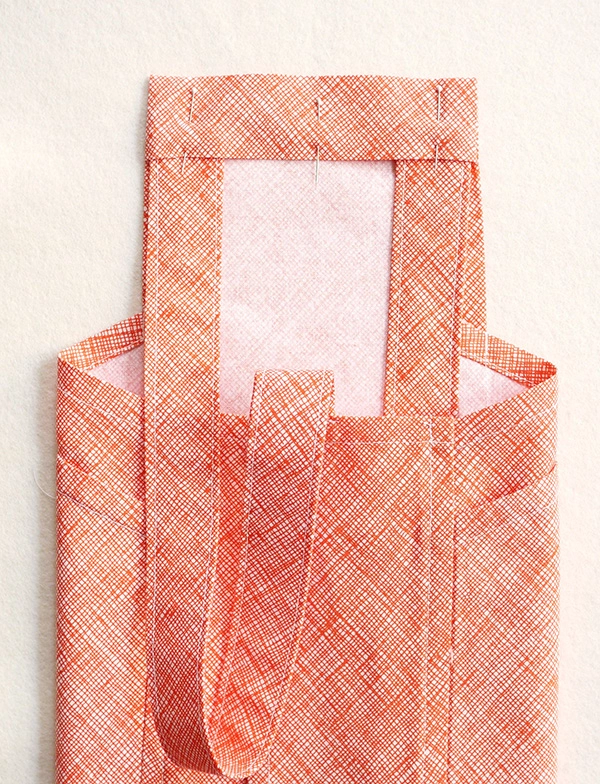
Tuck the raw edge of one Strap ½ inch into the top hem of the Apron. If you are pulling the Strap from the left side of the Apron, tuck it into the right corner of the hem (as shown here), or vice versa. Make sure that the Strap is not twisted. Pin in place.
Repeat with the other Strap.
Pin along the folds of the top hem. Sew along the pinned edge, backstitching at the beginning and end of the seam.

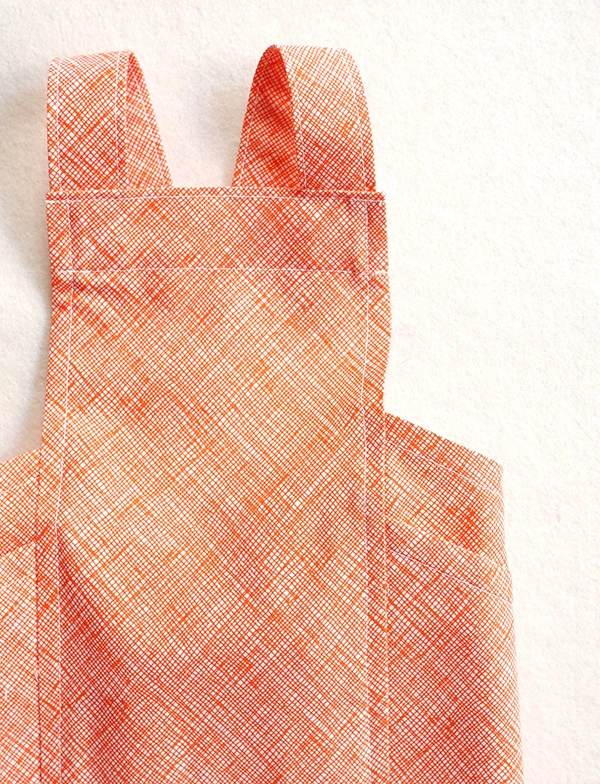
Fold the Straps up along the seam line and press. Pin in place.
Sew along the entire top edge of the Apron with an edgestitch. Backstitch at the beginning and end of the seam.
Finish the French seam you started by sewing along the side edges of the Body so that the seam runs ¼ inch in from the edge. Backstitch at the beginning and end of the seams.
Hem
Fold the bottom edge of the Apron ¼ inch toward the wrong side and press. Now fold the bottom edge 1 inch toward the wrong side, press and pin. Sew the hem down with an edgestitch, Backstitch at the beginning and end of the seam.


I made one of these when I was in what they called then Home Ech in High School and LOVED it. Needed less to say it went the way of all great aprons many years ago. But now at 71 I am going to attempt to make another one. Thank you for the pattern and the reminder.
I never wear an apron but this is such a beautiful pattern I’m going to make one and hopefully wear it too. I might decrease to the size of the pattern and make a few for the grandchildren.
How serendipitous!! I just spent over an hour looking for a cross-over apron pattern with little luck then I go into check my email and your pattern is there. Will make it in time for Thanksgiving!! Thanks
I so, so love this. Perfect!
Thank you.
Apologies in advance for ignorance…is the pattern meant to be printed and enlarged? Or is the intention to measure the size of each piece and cut them that way?
Hi Micheel –
Thank you for writing in. This is a great question!
There are no pattern pieces for this project. The Cutting Measurements and Cutting Guide are designed to help you cut the proper shapes and proportions from your fabric, but aren’t meant to be printed and cut out.
To make the cuts more manageable, I recommend using a rotary cutter with a clear quilting ruler on a self-healing cutting mat. This will make the long straight cuts much easier and more precise than with scissors. If you don’t have these supplies already, we’ve compiled everything you need in our Rotary Cutting Tool Kit! Also, I started by cutting the long strap pieces perpendicular to the selvage first, and then cut the strips that run parallel to the selvage next. This meant I was working with smaller pieces when going in to make my diagonal cuts.
I hope all of this helps! Please let me know if you have any other questions as you work on the project!
-Corinne
Thanks so much, Corinne!
I loved this pattern, however misread the front piece pattern width As it is on the fold, I measured 13″ from the fold as I didn’t realize the usual if that piece was the width when opened up. I should have halved that as the front is of course much too large. Am going to pleat on each side which should take care of the extra fabric. Straps seem very long as well – the whole project was a great learning experience and one I would do again.
I meant visual of that piece
🙂 Got it! Thanks!
Thanks for writing in Shawn! We are so happy to hear the project was a great learning experience!
Keith
I now believe that Purl Soho has the ability to read my mind! Not only do I love this apron, it is exactly what I envisioned a much needed new apron too be! Thank you and now for the color decision…..
Julie
This is a great tutorial for a lovely apron, thanks so much:). Much cuter and more flattering than the one I just made myself (darn it) from a tute I found thru interest for a version of a Japanese artisan apron. I wouldn’t mind another one so…. but isn’t handkerchief linen meant to be very light and soft? Wouldn’t a thick linen work better for this style? Re the straps, is the part that’s attached to the edges at the back waist cut at an angle, please?
Thanks again!
Hi Francesca –
Thank you so much for your kind words about this pattern! And, I agree, one can never have enough aprons!
The handkerchief linen is light and airy, but still a great, sturdy fabric. I love it for this project because it gives the Apron a lovely drape and is so light and easy to wear. You could certainly make the Apron out of a thicker fabric, like our Warsa Linen, but I wonder if it might end up being a little too stiff, particularly along the long French seams that run down the sides of the Pockets.
I hope this helps with your fabric choice! Please let us know if you have any other questions as you work on this project!
-Corinne
OK, just went thru the tute again and saw strap is straight – sorry!
Ha! No problem at all. Glad you found it!
-Corinne
Hello and thanks again for the beautiful and functional pattern! I have been wanting to make an apron for a long time friend who loves to cook for our Christmas exchange gift. She will love this apron. I am not a seasoned seamstress so I do have a pondering question. My friend is short and round. How can I go about getting the right measurements so this apron would fit properly for her. Also, I’m believing that cooking stains come out easily from this type of linen material(?)
Thank you so much!! Visited your awesome store in NY City last year. I live in Florida.
Happy Thanksgiving
Hello Wanda Smith –
Thank you for writing in, and for all your kind words about this project and our shop! This Apron will make a lovely and very thoughtful gift for your friend!
To adjust the sizing for the Apron to fit the body type you describe, I recommend adding 1 or 2 inches to the width of the Body piece, and subtracting 1 inch in length (so, cutting to 14 or 15 inches x 37 inches instead of the 13 x 38 inches recommended in the pattern) and adding an additional inch in width to each of the Back pieces (cutting to 9 1/2 instead of 8 1/2). This will add 3-4 inches to the overall circumference of the Apron (of course, you can add more width too, if you think you will need it) and shorten the length of the front bib. However, I recommend keeping the width of all Pocket pieces as they are.
To adjust the length, I recommend trimming the Apron to the desired length when you are folding up the final hem.
Please keep in mind that if you do make these adjustments to the width of the pattern pieces, you will need to adjust the Cutting Layout to accommodate the larger pieces, and will most likely need additional yardage.
I hope all of this helps! Please let me know if you have any other questions as you work on this project!
-Corinne
You have done it again, just beautiful. I am blind I can’t seem to find link for pattern pieces?
Hello Helen –
Thank you for your kind words about this pattern! I’m so glad you are inspired to make it!
You aren’t missing anything as there are no printable pattern pieces for this project! The Cutting Measurements and Cutting Guide are designed to help you cut the proper shapes and proportions from your fabric, but aren’t meant to be printed and cut out. I hope that these guides will make it easy for you to cut all the pieces you need. Please let me know if you have any questions along the way!
Happy sewing!
-Corinne
Do you have a kids’ or tweens’ sized pattern for this apron? Thanks.
Hi Lauren Kinter –
This is a great question, and a great idea! Unfortunately, we don’t have this pattern available in smaller sizes at the moment, but we do have a great Kid’s Ric Rac Apron that is designed to fit children ages 2-10!
I hope this helps!
-Corinne
I have been looking for this exact type of apron for what seems like eons! Thank you for the super pattern and fantastic instructions!
Love this! I would really like to make this for my mother-in-law for Christmas–she’s a big cook. However, she is TINY: like 5 feet tall and no more than 90 pounds. I’m concerned that the one-size-fits-most might not work. I’m wondering if you think it would be too big, and if so, if you had any suggestions for how I might alter the pattern to make a smaller version.
Thanks!
Hi Kirsten –
Thank you for writing in! This would make a lovely and very thoughtful gift for your mother-in-law!
To adjust the sizing for the Apron to fit the body type you describe, I recommend subtracting 1 or 2 inches in width and 2 inches in length from the Body piece (so, cutting to 11 or 12 inches x 36 inches instead of the 13 x 38 inches recommended in the pattern) and subtracting an inch in width from each of the Back pieces (cutting to 7 1/2 instead of 8 1/2). This will make the overall circumference of the Apron 3-4 inches smaller (of course, you can subtract more width too, if you think you will need it) and shorten the length of the front bib. However, I recommend keeping the width and length of all Pocket pieces as they are.
To adjust the length, I recommend trimming the Apron to the desired length when you are folding up the final hem.
I hope this helps! Please let me know if you have any other questions as you work on this project!
-Corinne
I was not able to download the pattern. I tried on my phone and when that didn’t work I tried to download on my iPad-a message said I had already gotten the download so I can’t download again. Can you help with this?
I love your email notices!
Hi Libby –
Thank you for writing in, and for your kind words about our projects and newsletter!
I’m not sure I completely understand your question, but let me try to help! This pattern is available as a free pattern on the Purl Soho / Create site. You can find it here whenever you are ready to work on the project, no downloads necessary! However, if you would like to download a PDF version of this project to your computer, you can do that too! If you’re on a desktop version of the site, you will find a “print” icon in the right column just below the date and tags. If you’re on a mobile version of the site, you will find a “print” icon below the pattern and above the comments. You can use this button to print the pattern, or save it as a PDF.
Follow the easy on-screen instructions to delete whichever parts of the pattern you don’t want to print or save. For example, you may decide to shorten the pattern by omitting certain images or the list of materials. Press the PDF icon at the top of the pop-up window when you are ready to save.
I hope this helps! Please let me know if you have any other questions!
-Corinne
Great design! Is there any chance you could make a more printable version of this? 24pp. is too much. How about drawing, pattern layout, and instructions only in black and white? Much appreciated. Thank you.
Hi Susan –
I completely understand – Twenty-four pages is a lot to print out! Luckily, we have a way to fix this!
If you’re on a desktop version of the site, you will find a “print” icon in the right column just below the date and tags. If you’re on a mobile version of the site, you will find a “print” icon below the pattern and above the comments.
Follow the easy on-screen instructions to delete whichever parts of the pattern you don’t want to print or save. For example, you may decide to shorten the pattern by omitting certain images or the list of materials.
I hope this helps!
Please let us know if you have any other questions as you work on this project!
-Corinne
Thank you for this pattern! I have always wanted a cross-back pattern. You have some wonderful colors of linen!
I too have been looking for the pattern for this style of apron for ever! I was trying to pluck up the courage to attempt the pattern myself, but I am not a confident pattern maker. So thank you so much for posting one for us! I can’t wait to make this! Fearless holiday cooking, here we come!
The apron pattern calls for 1-3/4 yards of Handkerchief linen (60″ wide). If I use the Robert Kaufman fabric (45″ wide), can you tell me how much fabric I’ll need?
Hi Patricia –
This is a great question!
To make this Apron from a more narrow fabric, you will want to get an additional 3/4 yards, so a total of 2 1/2 yards.
I hope this helps!
-Corinne
Make the straps only three layers of fabric rather than four and it will work easily from 2 yards of 44″. Across the width cut: 8.5″+8.5″ (pockets C, A and backs fit in 72″ length)+13″(front)+14″ (two straps width). Then you have enough for pockets B from the fabric below the front. Diagram is easier!
Wish I’d seen this before I cut. I only just now realize I didn’t order enough fabric at 42″ wide – ordered per materials list before looking at the layout. I’m making this as a gift for my mom who is 5′ so I figured the shorter strap length (42 vs 50″) would be ok, but now realize there isn’t enough width to cut the rest of the pieces, even if I shorten by 4″. Frustrating I didn’t look more closely at dimensions of the pieces first. I know better!
I’m making one of these for my sister who is about 5′-10″. Do you have an idea of how long the straps should be for someone her height? It’s a gift, so I don’t want her to try it on before hand to check the length.
Hello M Stack –
What a thoughtful and generous gift for your sister! She’ll love it!
As a starting point, our straps are cut to 32 inches long for a finished measurement of 28 1/2 inches for our model who is around 5’6″ and usually wears a size 2 or 4. The length of the straps varies mostly as actual garment size goes up, rather than height. So, if your sister generally wears a size 2 or 4, you can keep the strap length similar, otherwise I would add or subtract around 1/2 – 3/4 inch for each shift in garment size.
I hope this helps!
Please let me know if you have any other questions!
-Corinne
This is a wonderful pattern – such a great idea – thank you! I did find that 50″ was very long for the straps – I only needed about 36″ of strap for my 5’6″ height. I used the Essex material which is 44″ wide – 2 yards was plenty. I love the French seams and top-stitching.
Hello Hilary –
Thank you for writing in, for your kind words about the Apron details, and for your pattern tips! I know your experience will help other readers as well.
Best,
-Corinne
Hillary – how were you able to cut this out from 2 yards at 44″ when it needs 47″ width (plus selvidge)? Love to know as I don’t have time to get more fabric. Thanks
I love this apron and appreciate the clear instructions since I am new to sewing. I have follow-on question from M. Stack regarding adjusting for height. I am 5’2” and wear size 2-4. Should I shorten the straps and the hemline? Or would it be better to adjust where the side pieces attach to the body and shorten to the hem. Oh boy, does that question even make sense? Thanks for your help!
Hi Devon –
Thank you for writing in! Your question makes perfect sense! Since you are making this for yourself, you have the perfect opportunity to get the fit just right!
I recommend piecing the Apron exactly as described up to the “Fold the Top Hem” section. At this point, rather than folding the Top Hem as described, try the Apron on and fold the Top edge over so that it falls in the perfect place for you. This allows you to adjust the length of the front bib so that it is perfect for your body shape and type. Mark the fold line. Trim the fabric 2 1/2 inches from the fold and hem as described. Once you have attached the Straps, you can try the Apron on again and adjust the length as desired, remembering to account for the 1 1/4-inch hem.
I hope this helps! Please let me know if you have any other questions as you work on this project!
-Corinne
I am having a slight issue with the pockets and back pieces. I can get a back piece and the pocket attached like the pattern says but the 2nd pocket will not lay on the 2nd back piece the same way. The long edge of the pocket is on the raw edge instead. Hopefully there is a fix for this, still love the pattern! Thank you.
Hi Stefanie –
This is a great question! I think I ran into this same issue as I was working on the project. My problem was that I had accidentally sewn my pocket pieces so that they were exactly alike, rather than mirror images of each other (a very easy mistake if you’re working with a fabric with no clear right or wrong side). Lay your two Pocket pieces out flat and check that they are actually mirror images of each other. If they aren’t, you’ll just need to take out the Pocket seams on one of the Pockets and resew so that it has the proper orientation. You should be able to reuse all the same cut fabric pieces.
If this isn’t the issue, let me know and we can troubleshoot together!
-Corinne
I think it may be helpful to write that on the directions for the pockets. I just did the same thing and it’s exasperating. That being said, I love the pattern and I am very excited to finally have this apron. Than you so much.
I agree with Reba. It would be good to insert your direction about mirror image at the point where the first pocket is created. At the moment, the directions say “Repeat with the remaining Pocket pieces.” I made the same mistake (my fabric looks the same front and back) because the directions (at this point) don’t mention mirror image. Only when I read down quite a bit further did I see “mirror image” and realize what I had done wrong.
Otherwise, I love the pattern.
Thank you Pajes! We are sorry the “mirror image” note caused you trouble but are happy to hear you are still in love with the pattern!
Thanks for writing in!
Keith
I found some novelty fabric that is perfect for my sister-in-law and reflects her interests. DoI need to do any of the cutting differently for a fabric with a right/wrong side? If this turns out, I’ll get some of that lovely linen for my mother-in-law.
Hi Karen –
This is a great question! You shouldn’t need to make any adjustments to the cutting layout to accommodate a fabric with a right and wrong side, the mirrored slope of the Pocket pieces is already accounted for. However, if your fabric has a specific orientation (a clear top and bottom), you will want to be sure to cut all the Pocket pieces so that their slopes are at the top. You will probably need about 1/4 yard of extra fabric to accommodate the change.
I hope this helps! Please let me know if you have any other questions as you work on the project!
-Corinne
Corinne, I love this pattern, really do. I suggest that you add to the materials list the varying amounts of fabric required if using 44″ and 60″ as well as for accommodating directional fabric. After realizing my 44″ wide (42 excluding selvidge) I’m not where near the required width to fit the pieces – and now see that with a directional print, there’s now way to make this work with 2 yards, and no time to order more. Not the end of the world – just a suggestion. Thank you!
Hello Melissa –
Thank you for writing in, and for your kind words about the pattern! I’m sorry you’ve found yourself without enough fabric to finish. That sounds really frustrating!
Unfortunately, we don’t have the resources to provide yardages for multiple fabric types for all of our free patterns, but we are always happy to help figure it out if you’ve got specific questions! For the fabric you are using (44-inch directional print) I recommend using a total of 2 3/4 yards of fabric. If you would like help with a modified cutting guide, please let us know!
I hope this helps!
-Corinne
What a wonderful pattern! Thank you so much! I really like the fact that you have both French seams and stylish pockets in this design.
Hi, I really like this pattern.
Should I measure and draw them? or is there any way to print this pattern ?
Hi Donghee –
This is a great question!
There are no printable pattern pieces for this project. The Cutting Measurements and Cutting Guide are designed to help you cut the proper shapes and proportions from your fabric, but aren’t meant to be printed and cut out. I hope that these guides will make it easy for you to cut all the pieces you need. Please let me know if you have any questions along the way!
-Corinne
Very nice pattern. Well written and photographed. I have wanted to make an apron like this for a while, thank you for providing it.
These are beautiful and look so light and flowing. They bring back memories from my daughter’s “non-traditional” school – every teacher wore these and looked so comfortable. I am curious about the durability of this lovely linen – is it washable enough? Will it stain too easily as an apron?
Hi Lisa –
Thank you for writing in! The fabric that we used for this project is lightweight, but since it is 100% linen it is very durable, even after washing. If you are worried about stains, I suggest using a darker shade. We have 23 gorgeous colors to choose from!
I hope this all helps! Please let me know if you have any other questions as you work on the project.
-Corinne
Thank you for another wonderful pattern! My calendar is crazy the next few months so I’m being careful to only tackle projects that I can finish in an afternoon. How long do you think this project would take for an “advanced beginner”? I read through all the steps and it seems pretty straightforward, but I’m clearly not experienced enough to know how long it’ll take me, if that gives you a sense of my sewing level. Thanks in advance!
Hi Hannah –
This is a great question! All of the sewing and piecing for this project is pretty straightforward, but the seams are long, and there are a lot of them! I found that with all the cutting, pressing, and sewing, each Apron took me about 4 hours from start to finish.
I hope this helps!
-Corinne
I love this apron and am making it for a friend who was in a terrible dog fight and needs a pick me up.
I am struggling putting the pockets together. “Now with the wrong sides facing…” facing each other? facing the outside? I have taken it apart so many times. Please help! I will get this right and send a photo when I do!
Hi Lee –
I’m sorry you’re having a tough time putting the Pockets together for this Apron. All the of the French seams certainly make it a bit of a puzzle!
When we say, “with the wrong sides facing”, we mean wrong sides facing each other. When you’re finished with the Pocket, the right sides of pieces A and B will be facing each other (sewn together with a French seam), and the wrong sides of pieces B and C will be facing each other (sewn together with a standard seam).
I hope this helps clarify! Please let me know if you have any other questions as you work!
-Corinne
Hi,
I’m in the process of making this beautiful apron. Thank you so much for the pattern. I find that I am a visual person so to help with the pockets I layed the entire apron(minus the straps) out on the table and that gave me the visual help to ensure that I put the pieces together right. Hope that helps.
Hi,
I’m in the process of making this beautiful apron. Thank you so much for the pattern. I find that I am a visual person so to help with the pockets and construction after cutting out the pieces, I layed the entire apron(minus the straps) out on the table and that gave me the visual help to ensure that I put the pieces together right. Hope that helps.
Hi, Sue!
Thank you so much for your suggestion, I am certain there will be folks who will find this very helpful!
Best,
Kumeko
I understand from reading the comments that the apron is sized for someone 5 6 or so… and the comments gave adjustments to the pattern for shorter people, however I could not understand how to do so for someone taller. I am 5 10″, size 10-12 and I am not sure how the pattern should be adjusted, and therefore, how much fabric I should buy.
I am (obviously) not experienced enough to know this intuitively.
I really appreciate your response….
Hi Amy –
This is a great question!
The pattern for the Apron already has some basic sizing adjustments built into it. For example, the straps are cut extra long and are fit and sized once the Apron is close to finished, and according to your measurements. The rest of the Apron is designed to have a flexible fit, and should be comfortable for most sizes. However, if after taking a close look at the finished measurements given, you are unsure of how it will fit your particular frame, I think the easiest adjustments can be made to the Body piece. You should be able to add length or width to this piece without much issue. I would not add any length or width to the Pocket or Back pieces. If you do add width to the Body piece, you will want to order an additional 3/4 yard of fabric to accommodate all of the shapes.
If you make adjustments to the Body piece, follow the pattern as described up to the “Fold The Top Hem” section. At this point, you can make any adjustments you would like to the length of the front bib by adjusting the length of the folds in the top hem. Finish the Apron as described.
I hope all of this helps! Please let me know if you have another questions as you work!
-Corinne
I had been looking for a pattern for just this kind of apron for use in my studio. I made it from a not too stiff cotton canvas (actually a drop cloth) so it would be good protection from paint and dyes. As you can imagine, the front seams, with so many layers of fabric, are really thick and a little stiff. I should have anticipated that! Nevertheless, it is already my favorite studio apron ever. If I were to do it again using such a heavy fabric I would simply serge the fabric edges before assembling and use a regular seam instead of the French seam. Not as elegant, but workable for my kind of use. Thanks for the great design.
My daughter admired this apron but does not sew. I decided to make it as a surprise for her. Thank goodness I enlisted the help of my sister who is a much more talented seamstress than me. This is not for a beginner. Also, we did not have enough fabric. We were short the amount it would take to make one of pocket B. I did not want to pay another $10 for shipping or the additional cost of the pricey linen. We went to JoAnn Fabrics and found a beautiful contrasting fabric which we used to make the pocket panels. It looks great. The fit is very baggy, though. Not at all like the photograph. I hope she likes it!
Hi, Mary Nelson!
Thank you so much for writing in! We appreciate your comments and are so glad that you were able to make it work. I am very sorry that you encountered some trouble in sewing this apron, please know that we are more than happy to help to you with any questions you may have with our patterns. You can comment here on the blog or you always welcome to call our NY store at (212) 420-8796 or drop us an email at customerservice@purlsoho.com.
Again, I am glad the apron looks great, I am sure your daughter will adore the apron and the love you put into it.
Best wishes,
Kumeko
Thank you so much for this apron pattern. Very nice and great instructions included!!
I have several vintage linen table cloths and plan to make this apron from one (or two combined). Wish me luck in cutting the pieces!
Hi, Carolyn!
This sounds gorgeous! Best of luck!
Best wishes,
Kumeko
Thanks so much for this wonderful pattern! I’m pretty new to sewing, but would love to tackle this project! After pondering the pattern for a bit, I have a quick question about cutting/layout: Using the measurements you provided, would it be possible to cut the body, pocket C, and back of the apron out as one large piece? And maybe smooth out the line so it’s more of a curve? With my beginner’s eye, this would reduce the number of seams substantially (although I could use the practice), but almost certainly wouldn’t be as efficient from a yardage perspective. So, if you think this change is possible and not a terrible idea, I’d very much appreciate a little help figuring out how much fabric I’ll need. Thanks!
Hi Sarah –
I am so glad you’ve been inspired to work on this project!
Unfortunately, there is no easy way to adapt this pattern to use one solid piece for the Body, Pocket C and Back. The way the pattern is designed, the seams that connect these three pieces also hold the Pockets in place. The apron you describe sounds very cute, but I think you may need a different pattern to make it work!
Sorry I can’t help more.
-Corinne
Thank you so much for designing this patter and sharing it! I’ve been having neck problems and finally realized that it was caused by my traditional over-the-neck apron ;(. So, I’ve been looking for a well-designed cross back apron pattern and here it is!!
Thank you so much for this pattern. I made it in turquoise and it is so beautiful! Now I am going to make another in black.
One comment: when working with the linen (or any other fabric without a “right” side) you need to remember to make “mirror” pockets. Your instructions make a note about mirroring the backs, but didn’t mention doing the pockets similarly so the first time around I ended up with 2 identical pockets, which of course didn’t work and I had to take the second pocket apart.
It is a beautiful pattern though and makes a thoroughly elegant apron!
How do I get this free pattern please and save these instructions on-line, please? At 62, this will be my first apron.
Hello Rebecca –
Thank you for writing in! I am so honored that this pattern has inspired you to make your first apron!
You can always find this pattern here on our website. We keep our entire pattern collection available in our archives. Alternatively, if you would like to save the pattern as a pdf, you will find a “print” icon in the right column just below the date and tags.
Click this link and follow the easy on-screen instructions to delete whichever parts of the pattern you don’t want to print or save. For example, you may decide to shorten the pattern by omitting certain images or the list of materials. From here you can save as a PDF for access anytime.
I hope this helps! Please let us know if you have any other questions.
-Corinne
This is a stunningly beautiful pattern that I’m so excited to make for my friend as a wedding gift! I plan on purchasing some of your oh-so-special Liberty of London to use as the pocket pieces for a little pop of accent, but I’m having trouble matching with the handkerchief linen color choices. I noticed your Warsa Linen has several colors that would be exactly what I’m looking for to match the Liberty print I’ve chosen. However, after reading the comments I’m worried that the Warsa Linen will be too thick. Can you advise me on whether you feel I should stay away from the medium Warsa? Can you suggest another linen I might use that has more color options?
Thanks again for being my very favorite creative place to get lost. I’ve used dozens of patterns and tutorials from Purl Soho over the past few years and couldn’t be more grateful 🙂
Hello Stephanie –
Thank you for writing in, and for your very kind words! It means so much. This sounds like it will be a really lovely gift for your friend.
Unfortunately, I do think that the Warsa will be too thick for this pattern, primarily because of the French seams. However, if you feel comfortable adjusting the pattern to accommodate standard seams it could still be an option. If you would like to keep the pattern as is, I would be happy to suggest some additional fabric options. If you could send me the Liberty patterns and Warsa colors that you are looking at, I can recommend some alternatives from our collection.
Looking forward to hearing from you!
-Corinne
Corinne,
Thanks so much for the suggestion to stick with the handkerchief linen! I decided to find a different Liberty print (Phoebe Yellow) and matched it with your mint color handkerchief linen. I was thrilled when my package arrived yesterday and delighted that my choices look beautiful together 🙂
One question that will help me plan my project more smoothly: what piece(s) do I need to cut out of the Liberty for the exterior piece of the pocket? I’m hoping to be able to have the outermost pocket panel be the contrasting Liberty but the inside of the pocket be the mint linen. What do you suggest?
Thank you again for being such a wonderful resource and also for being available to ask questions! You are incredible and help me keep my creativity thriving!
Stephanie –
I am so glad you were able to find a fabric alternative that you are so pleased with. It sounds lovely!
The exterior pocket piece in this pattern is Pocket Piece C. You will want to cut this piece from your Liberty and all others from the Linen.
Thank you again for all of your kind words! It is our pleasure, and a real privilege, to help all of our creative and inspiring readers!
-Corinne
Question re: the cut list: Shouldn’t the back piece(s) be cut the same length as the SHORT side of pocket C, not the LONG side of pocket C? I thought the long side of pocket C (with And B stacked on) is sewn to the FRONT and then angles down to match the back length. However in the cut list, the back is given as 27″ which is 4 inches longer than the short side of “pocket C” to which it is supposed to be sewn. ( see page 27 of the instructions). Maybe I am not understanding something?
Hi Marla –
This is a great question, and very observant! However crazy it may seem, I assure you that all of the lengths given in the pattern are correct!
The Pocket is assembled using all three Pocket pieces. Once they are sewn together, they create a unified Pocket piece that is longer than any of the individual Pocket pieces, and whose short side aligns with the Back. This part of the pattern can be a little complicated, so please feel free to get back in touch if you any more questions as you work!
Happy sewing,
-Corinne
I’m glad I read the comment about the straps. They are very long but better than being too short, right? I made an apron with 45″ width fabric and needed a couple inches more than 2 yards, basically a 40″ x 78″ rectangle. I drafted out the layout in graph paper – can share if anyone is interested.
Hi, Gail!
Thank you for writing in and thank you for your offer to share your layout. I’m sure some folks in our crafting community may find it helpful. Again, thank you!
Best,
Kumeko
I would love to have the pattern layout in graph paper.
Hello Beth,
Thanks for your suggestion! We’ll keep it mind for the future!
-Adam
Hello and thank you for this great pattern. I want to make one without the pockets. Would you recommend add ing 4″ to the back piece or subtracting 4″ from the pocket piece?
Your creative sensibility is inspirational and refreshing.
Thank you again.
Hello Pam –
Thank you for writing in!
To make this Apron without the side pocket, I recommend cutting a side panel that measures 8 1/2 inches across, 31 inches on one side and 27 inches on the other (so that the short side lines up with the Back piece and the long side lines up with the Body).
I hope this helps (and makes sense!). Please let me know if you have any other questions while you work on the project!
-Corinne
Thanks for the beautiful project and instructions! I’m excited to try it out. I was planning on using the Handkerchief Linen, but I just saw your new Watercolor Linen… Am I right to think that I could substitute the Watercolor Linen with no problems? Are there any other fabrics that you sell (linen or otherwise) that would work well for this project as well? I thought it would be fun to make a smaller version for my daughter in a fun printed fabric! Any suggestions?
Hello Carina –
The Watercolor Linen would be a beautiful option for this apron! Other fabrics that would work well are Robert Kaufman’s Chambray Union, or Kokka Fabrics’ Lightweight Linen Canvas. And, for some playful options for your daughter, you could try Freespirit Fabrics’ Loominous Yarn Dyes collection, or Nani Iro’s Double Gauze.
I hope this helps!
Happy sewing!
-Corinne
Hello and thank you for clear pics of the process!
Have one math problem with first aprone scheme:
if
body is 34 1/2
back is 24 1/2
and bib part of body is 10
then pockets seems can’t have diagonal cuts! Short side of pocket is 24 1/2 as back, long part is (34 1/2-10) = 24 1/2, so they are equal.
I just finished to handstiching straps, now going to cut pockets, and that bothers my twisted mind)))
And another one thing, please, if I’m 165 cm, how I need to shorten the body part? Pockets and back parts can be the same length?
Hello Sasha –
Thank you for writing in! I agree that the math of this project can be a real mind twister! The pocket is actually sewn with three separate pieces, and none of the cuts of the individual pieces are equal to the full length of the pocket. You can follow the cutting chart with confidence, and all the pieces will fit together in the end!
To adjust the length to fit your frame, I suggest following the directions as given, with one exception. Do not hem the Apron as described. Instead, wait until you are completely finished and cut the hem as desired.
I hope this helps!
Please let us know if you have any other questions as you work!
-Corinne
I just love this apron. My problem is I keep trying to make the second pocket and now I have three right side pockets. I bought more fabric because I swore I was going to conquer this apron. Maybe I am missing something in the directions. Help.
Hi Nancy! We are so sorry to hear about the trouble the pockets seem to be making for you and some of our followers! Thanks for writing in!
If you take a look at the pieces laid out in the “Cutting Layout” graphic, you’ll see how the pockets are laid out in mirror image of one another. A helpful hint would be to place a pin on the “face side” of the fabric to prevent sewing the pieces incorrectly later on. With fabrics such as the Watercolor Linen and Handkerchief Linen, the reversibility of the fabric (while lovely!) can be very tricky!
When you get to step “Prepare Side Pockets” section of the pattern keep in mind the second set of pockets will be the mirror image of the first, so you’ll be sewing those same size pieces, but flipped!
We hope this helps you and others in your sewing adventures!
Thank you and happy sewing!
Keith
Hi to all! I made this pattern up in June for myself; I am 48″ in the hip region. I added to the back pieces only cutting each of them at 9-1/2″ wide because I did not need more space across my chest. Ta Da! I am thrilled with it and will do it again! Thank you, Purl Bee for all that you share and tempt us with!! pj stitches!
Thanks so much for the wonderful apron pattern! This is exactly what I’ve been looking for! I’m new to your site, but am finding so many things that I like. Thanks!
CAUTION: When using a rotary cutter CLOSE the cutter EVERY time a cut is finished.
NEVER leave a rotary cutter open for even a second.
Rotary Cutters are VERY VERY sharp.
1. Ready to cut: OPEN cutter.
2. Cut finished. CLOSE immediately.
Hi Marny-
Thanks for the reminder, it is SO important. Our Rotary Cutting Tutorial emphasizes safety as well and you can see it here: https://www.purlsoho.com/create/2014/05/08/rotary-cutting/
Best-
Molly
Help! I was going great until the step you say to lay side pocket out flat so right side of A and C are facing up and then you say to pin layers – what layers? I thought I did this ok, but next step just doesn’t make sense with how this ‘pocket’ looks. I’ve read and re-read and looked at other comments – just not getting it.
Thanks in advance.
Hi Rebecca – let’s see if I can help with this!
Once Piece B is sewn to Piece C, they effectively become the front piece of the pocket. Laying out piece A under the combined piece B and C and sewing the edges together is the final step in “closing off” the pocket.
Does this answer your question? Please let us know – we are eager to help!
Keith
I think I figured out the pocket after looking more at it and the finished picture. The next step (suggestion – perhaps number your steps on longer instructions) says to stitch the pocket and back together – but does not say how wide of a seam – I think it probably matters – but not sure and rather not do trial and error. Thanks in advance…..
Hi Rebecca! Thanks for writing in!
Unless otherwise indicated, aim for a 1/2 inch seam allowance. The pattern will instruct you when to use a 1/4 or 1/8 seam allowance.
And thank you so much for your suggestions! I will pass them along to our designers!
Happy Sewing!
Keith
Has anyone used a button for the strap attachment vs sewing them into the apron? Thought it might give a nice look and add flexibility (can pretty easily move a button)? Will need to do a little ‘un-sewing’ on the straps to finish the end, but think that would be a nice addition.
Hi Rebecca,
Great question! We have not seen this modification but I think that it would work great! Do let us know if you try it and it works out well!
Happy sewing!
Cassy