Tunic with Gathered Shoulders
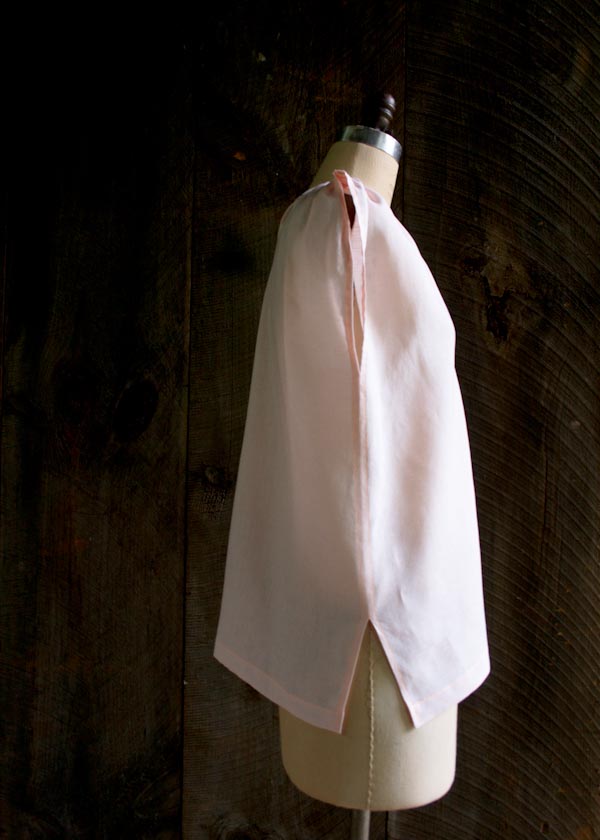
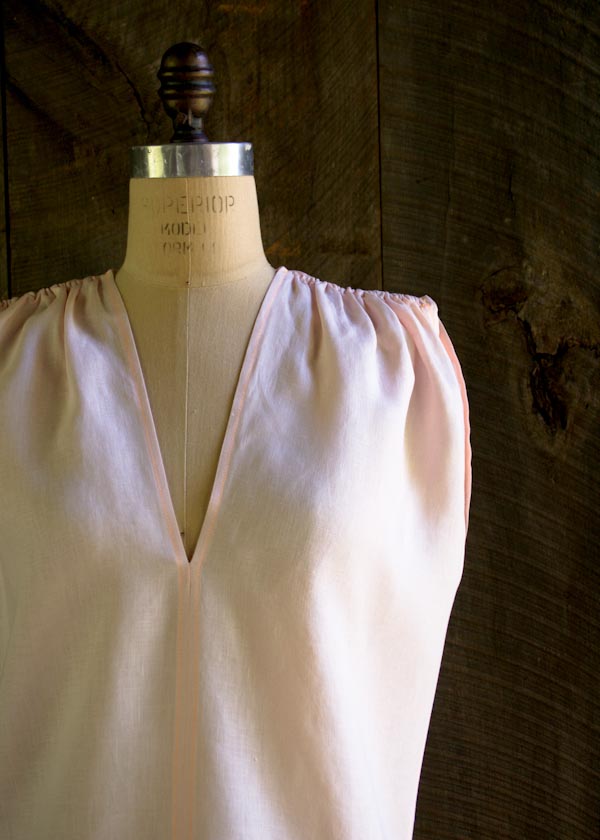
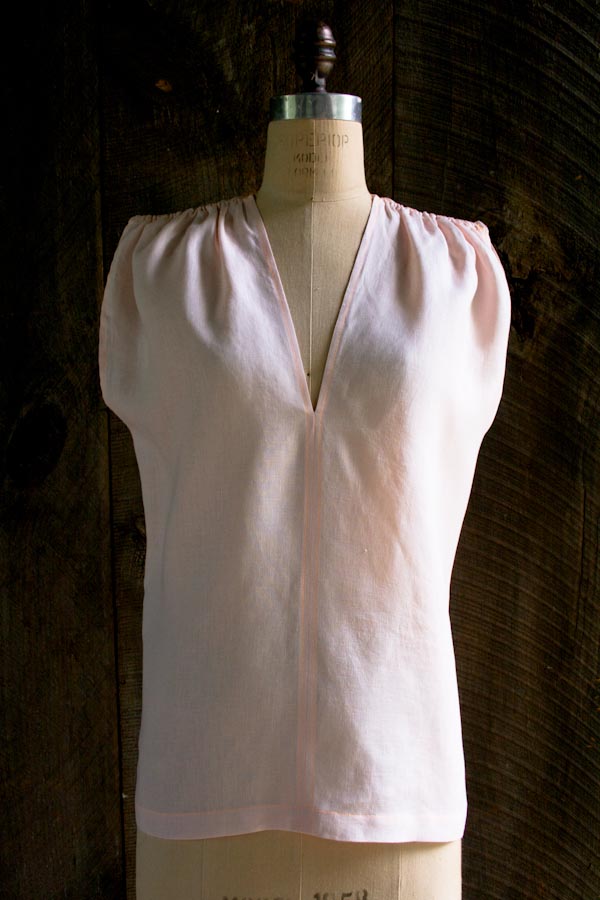
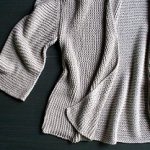
Loose, light, and breezy, we designed our linen Tunic with Gathered Shoulders for the dog days of summer. And with just four easy-to-cut rectangles and a handful of straight seams, you’ll be done sewing in time to enjoy these days!

We used Purl Soho’s new whisper-weight Handkerchief Linen, a 100% pure linen weave that comes in a palette of summery hues, including this lovely Pale Pink. We topstitched our Tunic in luminescent neon orange for a combination of light and bright that radiates a warm glow, just like summer itself! -Corinne
Update: New Fabric

JULY 20, 2016
We sewed a new version of this Tunic in Watercolor Linen! To see more photos and the materials list, check out our new Tunic with Gathered Shoulders in Watercolor Linen story.
Materials

- 1 (1, 1, 2, 2) yards of Purl Soho’s Handkerchief Linen. We used Pale Pink.
- 1 spool of Mettler’s Neon Thread. We used the color Sunset.
- 1 yard of Purl Soho’s Neon Lacing. We used White, but you don’t see the Lacing in the finished Tunic.
Sizes
To fit chest sizes 28-31 (32-35, 36-39, 40-43, 44-46) inches in circumference.
Sample: The Tunic shown here fits a chest size 32-35.
Note
Prewash, dry and iron your fabric before starting.
Pattern
Cut
From the Linen…
Cut four 11 x 27 (12 x 28, 13 x 29, 14 x 30, 15 x 31)-inch rectangles.
Piece the Front

With their wrong sides facing out, stack two of the cut rectangles on top of each other. Pin them together along one long edge for 15 ¾ (16, 16 ¼, 16 ½, 16 ¾) inches. Sew along this pinned edge with a 5/8-inch seam allowance, backstitching at the beginning and end of the seam.
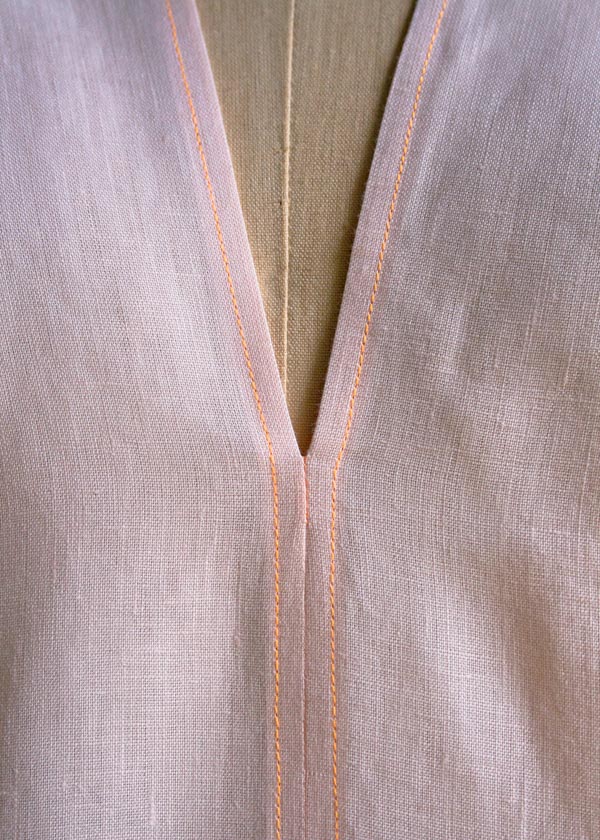
This seam is the center of the Front. The unsewn length at the top is the Neckline Edge.

Press the seam open. At the Neckline Edge, press the two flaps open following the line of the seam.

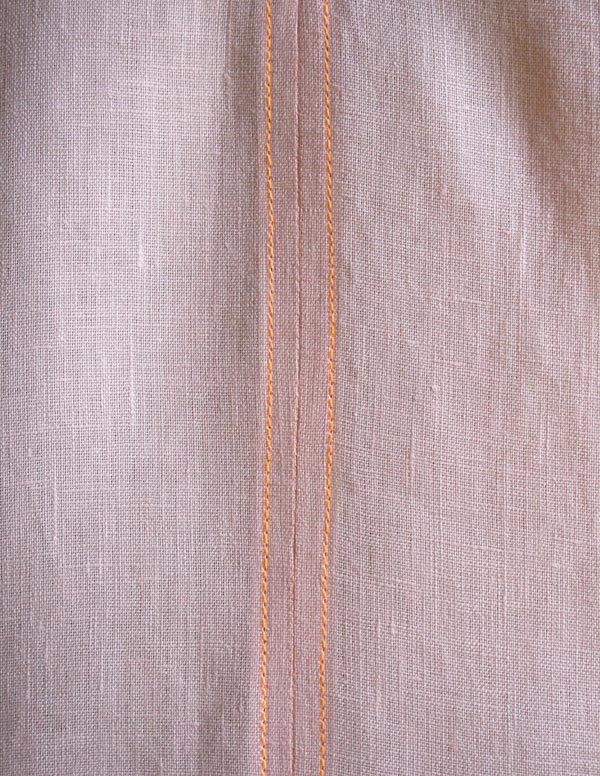
Fold the raw edges of the seam allowance under so that the raw edges meet the seam. Press flat.
Sew the folds down with an edgestitch.
Piece the Back

With their wrong sides facing out, stack the two remaining rectangles on top of each other. Pin them together along one long edge for 22 ¾ (23, 23 ¼, 23 ½, 23 ¾) inches. Sew along this pinned edge with a 5/8-inch seam allowance, backstitching at the beginning and end of the seam.
This seam is the center of the Back. The unsewn length at the top is the Neckline Edge.

Press the seam open.
At the Neckline Edge, press the two flaps open following the line of the seam.
Fold the raw edges of the seam allowance under so that the raw edges meet the seam. Press flat.
Sew the folds down with an edgestitch.
Hem

Fold the bottom raw edge of the Front ¼ inch towards the wrong side and press. Now, fold the bottom edge ¾ inch towards the wrong side, press and pin. Sew the hem down with an edgestitch.
Repeat at the bottom edge of the Back piece.
Sew the Side Seams
With their wrong sides facing out, stack the Front and Back pieces on top of each other, so that the raw side edges and hemmed bottom edges meet.

On one side, measure 5 inches up from the bottom edge and place a double pin.

Starting at the double pins, pin 10 ½ (11, 11 ½, 12, 12 ½) inches along the raw edge. Place a double pin at the top of the pinned section.
With a 5/8-inch seam allowance, sew between the double pin markings along the pinned edge. Backstitch at the beginning and end of the seam.
The unsewn space at the bottom is the Side Slit. The unsewn space at the top is the Armhole Edge. The short raw edges running perpendicular to the Armhole Edge are the Shoulders Edges.

Press one side seam open. At the Side Slit and Armhole Edges, press the flaps open, following the line of the seam.
Fold the raw edges of the seam allowance under so that the raw edges meet the seam. Press flat.
Sew the folds down with an edgestitch.
Repeat on the other side.
Sew the Shoulder Seams

With the right side facing out, lay the Tunic flat so that the Shoulder Edges are aligned.
Pin the Front Shoulder Edges to the corresponding Back Shoulder Edges.
With a ¼-inch seam allowance, sew each Shoulder together along the pinned edges, backstitching at the beginning and end of the seams.

Turn the Top so that the wrong side is facing out and press the Shoulder seams flat.
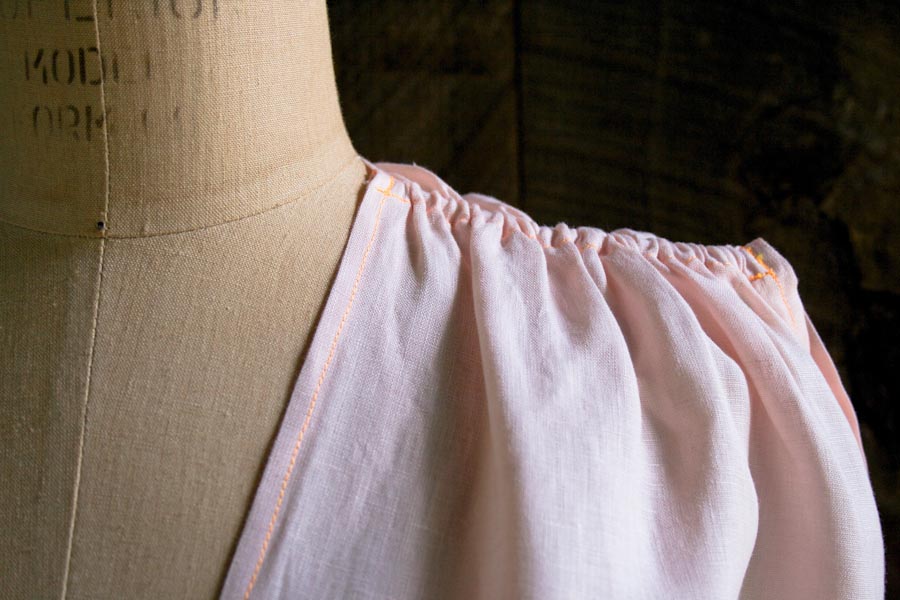
Sew along each Shoulder Edge with a ½-inch seam allowance.

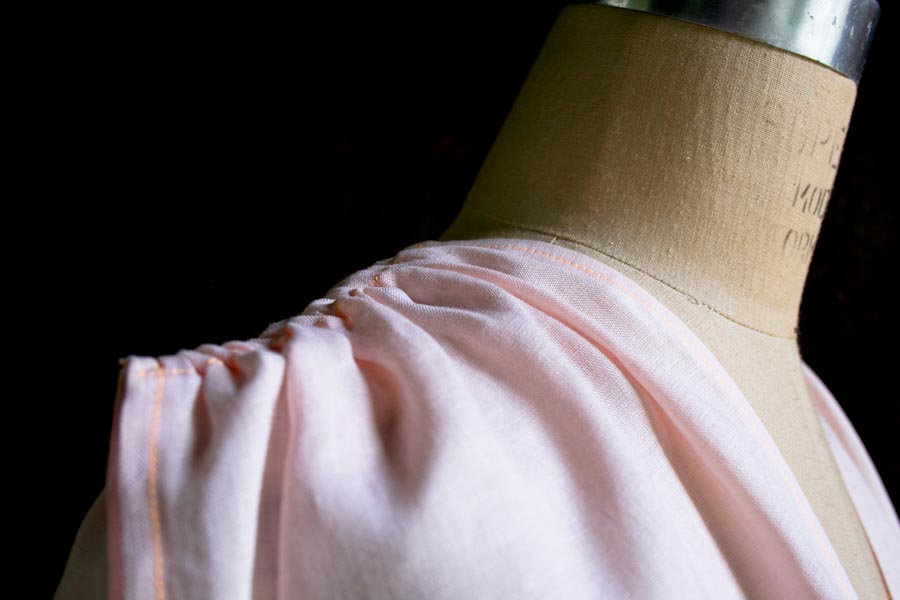
Press each Shoulder seam allowance towards the Front and sew it down with an edgestitch. These are the Shoulder Channels.
Finish
Cut two 8 (8, 8, 9, 9)-inch pieces from the Lacing. Tie an overhand knot at one end of each piece. At the other end, lightly singe the cut edge with the flame from a lighter or match. This seals the threads and prevents fraying.

Attach a safety pin to the singed end of one piece of the Lacing. Push the pinned edge of the Lacing into one Shoulder Channel.

Slowly pull the pin through the Channel, stopping right before you pull the knotted end of the Lacing into the Channel. Tack this knotted end of the Lacing to the Shoulder by sewing a short tacking stitch along the seam line of the Armhole Edge. To sew the tacking stitch, first sew forward ½ inch, then backstitch ½ inch, and then sew ½ inch forward again.

Continue to pull the Lacing through the Channel until you have pulled the pin out the other side. Gather the fabric until the Shoulder measures 4 ½ (5, 5 ¼, 5 ½, 6) inches across. Sew the Lacing to the other side of the Channel with a short tacking stitch, as described above.
Trim both ends of the Lacing close to the tacking stitches, and you’re done!






Lovely little tunic! Thanks for sharing the process for this – I would love to make something like this!
hey i love the design, i was just wondering is there a paper pattern print out for this, as i may need to make adjustments?
thank you
Hi Georgia –
This is a great question!
There are no printed pattern pieces for this garment as it’s made up of four simple rectangles. The dimensions for the rectangles are given in the “Cut” section if the pattern. If you are thinking about making adjustments, keep in mind that the short side of the rectangle is the shoulder width (minus 1 1/4 inch for seam allowance), the long side of the rectangle is the length (minus 2 inches for the hems), and the two short sides together make the width of the garment (minus 2 1/2 inches seam allowance).
I hope this helps!
-Corinne
Love this – so simple and easy! But I have the usual request to see it on a real person before I would make it. Thank you!
Hi Maggie –
We’ve posted a photo of Kelly wearing the tunic on our Instagram account! You can see it right here:
https://instagram.com/purlsoho/
Thanks!
-Corinne
Thank you – it looks beautiful on her!
Can you please start posting direct links whenever you link to instagram? It’s near impossible to find a specific picture once some time has passed. Thanks!
Hi Alison –
Thank you for writing in! You’re right, a more direct link would be very helpful!
Here is Kelly wearing the Linen Tunic With Gathered Shoulders (we will also include this link in the body of the post above):
https://instagram.com/p/5pILLpjhcI/
Thanks!
-Corinne
No, you can’t. All I got to was a screenful of images (Knitting, Sewing, etc.) and then a ‘sign up for an account’ screen.
It’s a really neat-looking top and the directions seem easy to follow (a real plus for me). I’d have loved to see it on a larger person, because I’m a 36F bust, and a lot of what looks great on a smaller bust size, e.g. the ‘industry standard’ 36B, doesn’t work so well for me.
Hi Catherine,
Thanks for reaching out! You can find a more direct link to a picture of the tunic on a model by clicking right here. We hear you – we are working to increase the size range of our older patterns and photograph our garments on more diverse models! Unfortunately, we haven’t gotten to this pattern yet, but I will certainly pass your suggestion along to the design team!
Best,
Julianna
This looks lovely. To confirm the above directions, one would need only 1 yard of fabric to complete this tunic? The “1 (1, 1, 2, 2) yards” leaves me a bit unsure.
Thank you in advance, Erin N
Hi Erin –
This is a great question. Sorry the pattern leaves this unclear.
To make the Tunic in sizes to fit a 28-31, 32-35 or 36-39- inch bust circumference, 1 yard of 56-inch wide fabric will suffice. To make the Tunic to fit a 40-43 or 44-46- inch bust circumference, you will need 2 yards of fabric.
I hope this helps!
Please let me know if you have any other questions as you work on the project.
-Corinne
Beautiful! This is inspiring me to sew something for myself this summer.
Your step-by-step photos show a different fabric than the pink linen specified, and I like the pattern on that fabric much better than the plain colors of linen. Where can I get some of that pretty cross-hatched fabric?
Hi LadyD –
We use Tangerine Hatches from Robert Kaufman’s Botanics + Architextures collection for many of our instructional photographs because it has a clear right and wrong side (and is super cute!). You can find it right here:
https://www.purlsoho.com/purl/products/item/9364-Robert-Kaufman-Botanics-Architextures
Keep in mind that this is a 44-inch wide fabric (rather than 56-inch, as the linen is) so the required yardage might change.
Please let me know if you have any other questions while you work on your project!
-Corinne
How do you scale it for 44″ inch fabric? because that is what I have. I have always purchased paper patterns before, so this is new to me.
Hi Linnea,
Thanks for writing in! Fortunately, the yardage requirements will be the same for 44″ fabric! By cutting the rectangles on the cross grain – in other words, the short side of each rectangle will run parallel to the selvage of the fabric – you will still be able to cut all the required rectangles from a narrower fabric.
Best of luck and happy sewing!
Julianna
I am not sure how you would be able to do this with 1 yard of 42-44 inch wide fabric. You would need four strips of at least 11 inches wide and the minimum would be 44 inches there. Am I wrong? i’m guessing you could make the smallest size if the fabric goes salvage to salvage but anything larger would not work right?
Hi Kelly,
Great catch! You are correct that you would only be able to get away with one yard for the smallest size, and only if your fabric is 44 inches wide. To be on the safe side, it would probably be wise to get 1.25 (1.5, 1.75, 1.75, 2) yards for each size when using 42 to 44 inch wide fabric. Thank you so much for pointing that out!
Best,
Julianna
Does the neckline have to be so low? I am concerned about cleavage. Lovely pattern.
Hi Suzi –
This is a great question, and a super easy fix!
In the Piece the Front section of the pattern, when you are pinning along the long edge, simply pin higher than we suggest, keeping in mind that the open space at the top (minus 1 inch for seam allowance) will be the neckline edge.
Please let me know if you have any other questions while you sew!
-Corinne
Excellent pattern! The blouse will be perfect for this hot/humid IL weather. Just need to find a shorts or skirt -design to go with it. Love all of the hard work that goes into the ‘Bee’!! <3
Kim –
Thanks for your kind words!
Have you seen our photo of the Tunic on Instagram? We paired it with our Gathered Skirt for All Ages, and it looks adorable!
https://instagram.com/purlsoho/
-Corinne
How do you think double gauze would work for this tunic?
Hi Liz n. –
I think this would be lovely in double gauze, and so perfect for summer!
-Corinne
Hello! Great pattern! I was wondering if this could be made in 2 pieces? I want to make it out of a print and don’t want to disrupt the print. Do you think it’s possible to make the front all one piece?
Thanks for all your great work!
Hi Ceileigh –
This is a great question. The seams down the front and back of the Tunic are what make the “v” shaped neckline edge. To make the Tunic with two pieces rather than four, you would want to cut out the neckline edge from the front and back pieces and finish with a small hem or bias tape edging. You could finish the side seams, shoulders and hem as they are described in the pattern.
Have you seen our Boxy Tee pattern? I think a combination of this Tunic with that neckline might be just what you’re looking for!
https://www.purlsoho.com/create/2014/05/04/corinnes-thread-boxy-tee-three-ways/
Please let me know if you need any additional help adapting the pattern!
-Corinne
Hope this isn’t too much of a silly question…what is the best way to cut 4 perfect rectangles? Make a paper pattern and use scissors or use a cutting board and cut material like you would for a quilt?
Hi Amy –
This isn’t a silly question at all!
The best way to cut large rectangles like this is using a rotary cutter with a non-slip ruler on a self-healing cutting mat. We’ve put together all the tools you need for this in our Rotary Cutting Tool Kit (available right here)! If you’re new to rotary cutting (or even if you’d just like some new tips!), I also recommend our Rotary Cutting Tutorial. It gives detailed instructions on how to get clean, straight cuts, and stay safe, every time!
I hope this helps!
-Corinne
I am wondering how long the back of tunic is and the length of the V neck when the tunic is finished. I am 5’10” and sometimes I have to adjust the pattern. I will be making the 40-43 size. Thanks!
Hi Jess –
Thanks for writing in!
When finished, the Front and Back of the Tunic measure 28 inches from shoulder to hem for the 40-43 size. The Front V is 12 1/2 inches long and the Back V is 5 1/2 inches long.
I hope this helps, and please let me know if you need any help making adjustments!
-Corinne
Love the simplicity of this! I finished last night and used the 32-35 bust size, tho I measured myself at 36. I still found it to be a bit too roomy up top and the v-neck too low for me. Any suggestions for how I can tailor it now or do I need to start over?
Beautiful top! Thank you for sharing it.
I am a beginner sewist, having made only simple projects such as your Easy lined tote bag (also loved that pattern), zippered pouches, etc. Would this pattern be appropriate for me to make?
Also, are there any other fabrics that you could recommend using other than linen? Linen is lovely but it very prone to wrinkling.
Hi Julie –
Thanks for writing in, and for your kind words about the pattern!
This top is super simple to put together, especially if you’ve already made the Easy Lined Tote Bag, and tackled zippers! I think it’s a great next project for you, and a great introduction to garments!
As for the fabric, any light weight fabric will work well! Have you seen our Wear Anywhere Tunic? It has a very similar construction to this top and we made samples in three beautiful fabrics for three different looks. Any of those fabrics would also be a great fit for this top. You can check out that post for some inspiration!
Happy sewing!
-Corinne
Love this and want to make it for my mom for her up coming birthday. I would love to increase the length and make it a dress that hits at the calf. Would you suggest simply increasing the yardage to make it longer or are there other adaptations I would need to make, for example more room in the hip area? Thanks so much! Hilary
Hi Hilary –
This could be lovely as a dress! There should be plenty of ease in the garment over all to extend past the hips, however you may want to consider adding some width to the Front pieces (either just to one, or both) to extend the overlap of the Front Flaps and add a bit more coverage.
I hope this helps!
-Corinne
I made this for my daughter to play Antigone, with a few small tweaks, especially lengthened to floor length dress. My top tip is to make bar tacks or decorative embroidered motif at the end of each seam, to prevent ripping the stitches or the fabric. Great results – thank you for the free pattern!
Hello Linda!
We’re so glad that this pattern came in handy for your daughter’s performance! Happy knitting! -Alyson
Can this be lengthened to create a knee length overdress tunic? If so, how do I go about doing it?
Hi Vernita –
This is a great question! Yes, this Tunic can easily be lengthened. Just simply add your desired length to the long side of each rectangle before you cut. You can follow all subsequent instructions as given.
Alternatively, have you seen our Wear Anywhere Tunic? The design is very similar to this garment, but already has the length you’re looking for.
I hope this helps! Let me know if you have any other questions!
-Corinne
Did the whole thing but made a mess of the shoulders:( Could you clarify the section about making the shoulder channel. It wasn’t clear to me(I am a terrible sewer.)
Thanks,
Marilynn
Hello Marilynn –
I’m sorry you’re having a hard time with the shoulders on this garment! I’m sure you haven’t made quite the “mess” of it you think you have!
The shoulder seam is sewn as a French seam, meaning that it is sewn twice in order to encase the raw edges for the seam allowance of the first seam inside the seam allowance of the second seam. The first two steps of sewing the shoulder seams are to create this French Seam. Next, you make the channel by folding the seam allowance towards the front of the garment and sewing it down with an edgestitch (that runs along the top fold of the seam allowance of the shoulder seam).
I hope I have helped clarify, rather than making it more confusing! Please let me know if you continue to have problems and I am happy to help!
-Corinne
-Corinne
Also a question regarding the shoulder… Following the pictures… I have the channel on the wrong side if the fabric. Once finished, I turned the tunic to the Right side. The last picture shows stitching on the right side as iuf the channel was sewn on the right side instead. Very confused :-\
Please advice
Hi Jill,
Thanks for writing in! The channel is sewn from the wrong side. What I think you are seeing is that we used a thread the is an accent color rather than a color that disappears. As such, the color of the stitching show prominently on the right side.
I hope that this helps!
Cassy
hi I love this pattern but i cant seem to open the link for free template.
TIA xTORI
Hi Victoria,
We are so glad that you love the pattern! This is not a traditional pattern with a template, rather there is a list of cuts with measurements. You will be cutting four rectangles out of the linen that are 11 x 27 (12 x 28, 13 x 29, 14 x 30, 15 x 31)-inches depending on the size that you select.
I hope that this helps and happy sewing!
Cassy
I’m also confused about the shoulders.
Is the first sewing pass done with the right sides facing out? Then turned for the 2nd pass? Your pictures seem to indicate that. Thanks.
Hi Jennifer,
Thanks for writing in! You are correct. The first sewing pass for the shoulders is with the right sides facing out and then turned so that the second pass is on the wrong side. This creates a neat seam with not exposed edges as well as creating the channel that you will use to create the gathered shoulder detail.
I hope that this helps and happy sewing!
Cassy
I was wondering how it would look with just cotton fabric, like calicos or muslin?
Hi Teresa! That sounds like a great idea! This easy pattern works well with many different types of fabric. We say, go for it!
Thanks!
Keith
Thank you for a lovely pattern and such clear instructions. If I made the tunic without gathering the shoulders, would the fabric drape over the tops of my arms like a short sleeved top? I prefer short sleeves to be elbow-length to hide my upper arms.
Hi Diane,
Thanks for the question! This is a hard one to say for sure. Linen can be quite structural and I am not sure if it would drape or point out to the sides. If the fabric you are using has a fair amount of drape to it, it will fall down you arms but ever so slightly, reaching maybe down to your armpit. If you are interested in a top with sleeves our Boxy Tee and Sewn Raglan Shirt may be good alternatives to this sleeveless tunic.
Happy sewing!
Cassy
I love your patterns, can this be made into a dress by extending the length
Hi Anjali,
Thanks for writing in! I love the idea! You can certainly lengthen this tunic into a dress. Given that there is no shaping to the body, you may want to belt the resulting dress in order to give it some shape. You may also want to check out our Wear Anywhere Tunic, which is already a dress length and could certainly be made with the Handkerchief Linen that we used for this Tunic.
If you try it out, please do let us know!
Cassy
I’m getting ready to make this tunic in Ecru handkerchief linen. In your mitered corner napkin tutorial you emphasis the need to ensure your fabric is square before cutting out the squares. Is this also important when cutting out rectangles for the tunic? I’m fairly new to sewing and a little stressed about cutting my beautiful fabric incorrectly. Also, should each rectangle be cut out separately or is it okay to fold the fabric such that you cut them all out at once?
Thank you,
Emily
Hi Emily,
Great question! You will want to be sure to true up the fabric to cut as close as possible to straight lines that match the wrap and weft of the fabric. This creates a better drape of the fabric and the final garment will hang better.
I hope that this helps!
Cassy
Okay, thank you!
This little V-neck blouse with gathered shoulders is just the cat’s meow! Too cute.
Hi, super cute pattern. I can’t seem to find the lacing at my store – any alternatives? Would thin elastic work? Thanks! Kris
Hi Kris,
The thin elastic would not lay properly,it might curl up on the edges of the shoulder, you need something a little heavier to hold the gathers.
I hope this helps,
Melissa
Hi there,
There doesn’t seem to be a link for the pattern here?
Cheers
Hi Hana,
For this pattern there is not a link, there are no actual pattern pieces. You will be cutting two rectangles from the fabric, the size depends on your measurements. If you scroll down it shows you in the pattern.
I hope this helps,
Melissa
You could make the tabs longer, pull the tabs on the shoulder tighter and let them show which is what a commercial designer did with a similar top I purchased. They also put the tape along the bottom and had those ties showing as well. It gives the top additional interest. Maybe in that neon color? And can be done in many lengths, which could be more flattering for different shapes. You could also create this gathered loosely along the sides for a different look. Very creative, simple design.
Hi,
I love the look of this tunic and will be making one for my mom.
Could I do the shoulders in a traditional gather? The way it’s done here appears to be too thick to wear with a handbag for example.
Thank you!
Hi Ivonne,
Thanks for reaching out! Yes, you could certainly substitute a traditional gather, or even pleats, in place of the cording we used if you prefer a flatter shoulder. If you give it a try, please let us know how it turns out!
Happy sewing!
Julianna
Very excited to try to make this! Shoulders are confusing me as well. Once you’ve done the tacking, is the channel just open at the edge once you’ve clipped the cord? Or you clip then sew it closed? Thank you!
Hi Sara,
Thanks for reaching out! You will be sewing the tacking stitches along the seam line which is about a half inch away from the outer edge of the shoulder and then trimming the cord close to those stitches. Since the outer edges of the shoulder have already been hemmed and finished, there is no need to sew the end of the channel shut – the trimmed edges of the cord will hide nicely inside of the end of the channel.
I hope that clears things up!
Julianna
I must say- the instructions for this pattern are a LOT better than the “wear anywhere tunic”. This pattern instructional is so well written and easy to comprehend with images that match up with the pattern making, I have confidence I will be able to complete this without making fatal errors or wasting valuable fabric! Wish me luck 🙂
Hey there,
I would love to do this beautiful pattern as my summer project. But I’m afraid it won’t fit my baby belly. So you have any recommendations to make it fit? Could I just add a little more length at the front piece so the fabric would cover the baby bump? Thank you!
Hi Charlotte,
Thanks for writing in! While you might be able to get away with just adding length to the front of the tunic, depending how far along you are, you may need to sew a larger size since this is designed for a woven non-stretchy fabric. For each size, to determine what the finished waist measurement will be, you will need to take the width of the rectangle you cut, subtract 1.25 inches for the seam allowances, and multiply by four. This should help you decide which size will fit you best!
Happy sewing!
Julianna
Very pretty, airy shirt. I added fish eye darts in the back to diminish the boxiness.
Just finished this garment. I lengthened the pattern to make a dress. I added a 3″ hem and gathered the shoulders a little less than it called for making it a bit of a cap sleeve. Thank you Purl Soho for extremely clear directions and a super cute summer dress. Can’t wait to make another one!
Newbie sewer here! I just spent the last few days making two of these tunics…..love the pattern and can’t wait to try out different fabrics. BUT, I’m stumped by the shoulder channels!!! I’ve read all the comments by others who were also struggling with this detail, and I’m still stumped by one thing: Is there supposed to be stitching along both sides of the channel visible on the right side of the garment?? In the pictures I think I can see a line of orange stitching along the channel, but when I follow the instructions all of my stitching is hidden inside the garment resulting in a kind of puffy shoulder. Please clarify, I’m driving myself crazy with this! Otherwise, thanks for the great pattern!
Hi Sarah,
Thanks for reaching out, and I’m so glad you are enjoying this pattern! You should see just one row of stitching along the shoulder from the right side, which is the orange stitching you can see in our images. After sewing the second step of the shoulder seam, which is sewing a half inch seam allowance with the right sides together, you will then press this half inch seam allowance flat towards the front of the garment, and edge stitch along the loose side of the seam allowance, tacking it down similar to a flat felled seam finish. This edge stitch will be visible from the right side, and is the stitching you are noticing in our pictures. Tacking down this seam allowance shuld result in a shoulder that looks more gathered and a little less puffy!
I hope that clears things up!
Julianna
Hi! I am a beginner sewist and would love to attempt this top for a little girl! If I want to make it a little bit more dramatic, like extra gather and flounce, do I just increase the width of the rectangles or should I got for a trapezium shape instead? Thank you so much!!
Hi Loretta,
Thanks for reaching out! What a cute idea! I think you could easily achieve this by simply increasing the size of the triangles!
I hope this helps an please let us know how this turns out!
Gianna
Hello! I really like the finish of this pattern. I agree with other folks who found the pattern easy to follow (I also made the Where Anywhere Tunic!) I used double gauze for my tunic. I found that the middle front and back at the hemline “rise” about 1.5″ higher than the sides at the bottom hem when on the body. At the back it sort of tents out in the center and rises and looks a bit awkward. I might pick my hem stitches and lower the bottom edge a bit in the center to compensate. Did I do something incorrectly on this pattern? I can see some evidence of this on the model photo on Instagram. I wonder if there is some shaping that I could have done to prevent this. Although I appreciate that folks are excited (and I do get swept up in the excitement as well), I can see how it can be helpful to see photos on real people prior to making clothing. I find it rare that folks post comments who have already made garments.
Hi Annemarie,
Thanks for writing in! I totally understand what you mean by wanting to see this on an actual person! Since this is one of our older patterns, it was prior to when we started using models (we now always show our garments on models!) If you would like, you can send the information above along with clear photos of your work to our customer service team at customerservice@purlsoho.com and they can help advise if everything looks correct!
I hope this helps!
Gianna
Hi! I made this as an afternoon project and it turned out super well. However, it was wayyyyy too big. I made this for myself as a 15 year old size 0, and it fit perfectly on my size 8-10 mom. There’s definitely something wacky going on with the measurements but otherwise liked the pattern and the clarity of instructions.
Hi Saachi,
Thanks for reaching out. The way we create sizes for our garments is based on chest measurements, and not traditional number sizes! For example, the smallest size is meant to fit someone with a chest measurement between 28 and 31 inches with 10.5 to 13.5 inches of ease. It’s certainly a loose-fitting garment, but I can confirm that the measurements are indeed correct as written! If you’d like to adjust the size to make a smaller tunic, you can decrease the width of each rectangle, based on how much ease you’d like the finished garment to have. Hope this helps!
All the best,
Lili
I like the easiness of this tunic, it is fun to make; the shoulders are too “thick” and bulky for my taste, and it gives a boxy look to the tunic; I will undo them and think of something else, maybe elastic or pleats. I did the size 32-35, and because I am not super tall (5’1″) , the front V was pretty low, so I closed up the V to make it open above my boobs, not under them. So this is a thing to consider if you are short like me.