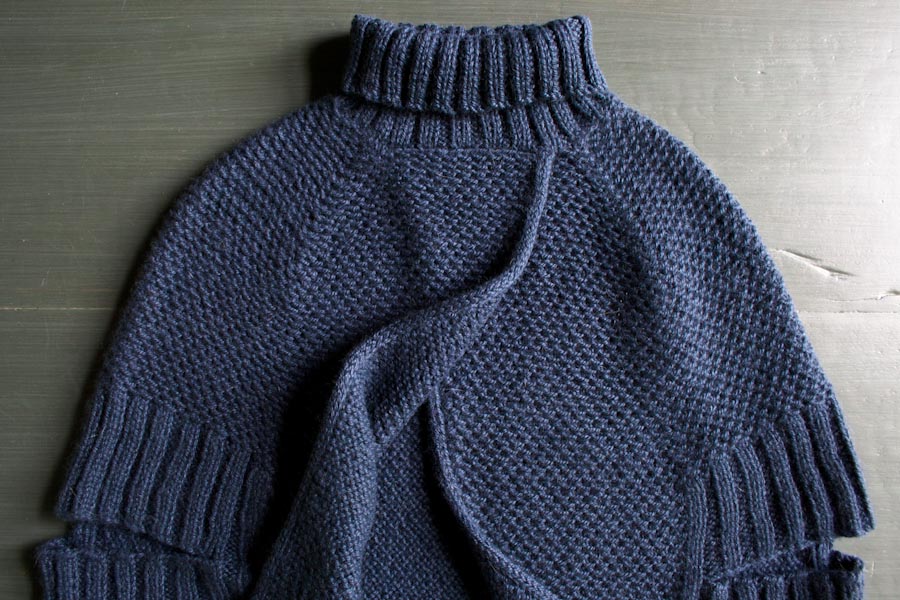
City Cape
The moment Honeycrisp apples make their seasonal debut at the Union Square Farmer’s Market, I start thinking about what I want to knit for my cold weather wardrobe. First on my list this year was a cape but not a fussy Little Red Riding Hood affair. Instead, I envisioned something more modern, something for layering over leggings on weekends and also for running errands in the city on weekdays.

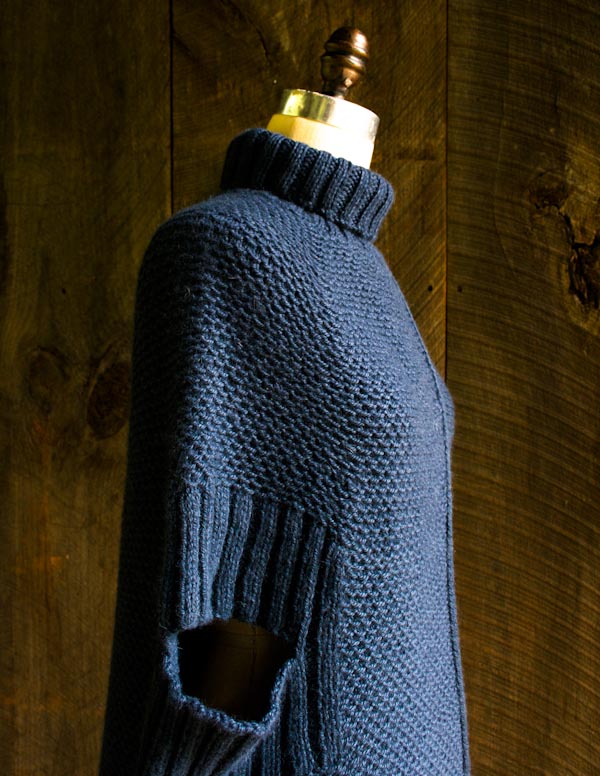
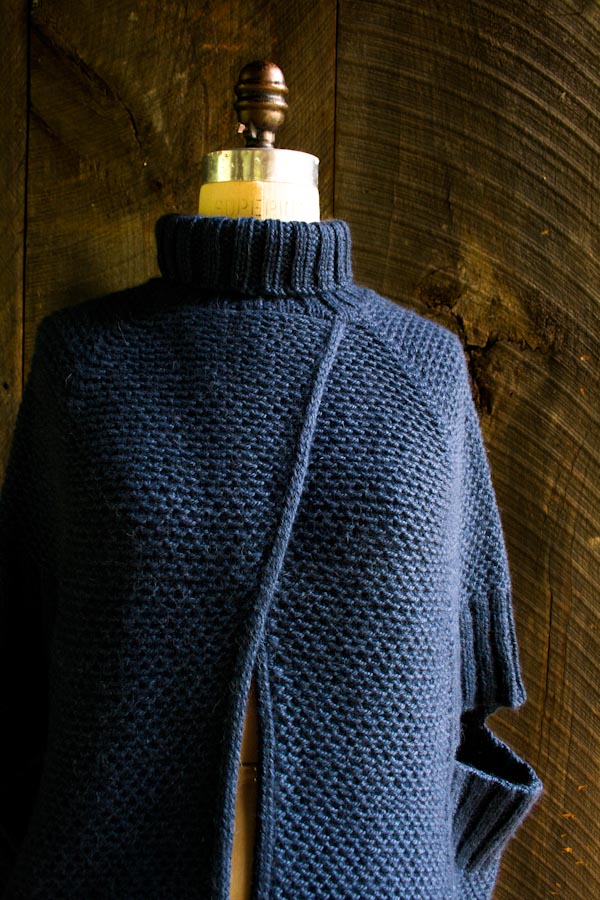
Our own Purl Soho Alpaca Pure ensures that my City Cape is seriously cozy and soft. It pops right over your head but has a pretty open front for a breath of fresh air. And precisely positioned armholes at elbow height leave my hands free at the market to pick all the Honeycrisp apples I want! -Gina
Designed by Purl Soho designer, Gina Rockenwagner.
Share your progress and connect with the community by tagging your pics with #PurlSoho, #PurlSohoBusyHands, and #PurlSohoCityCape. We can’t wait to see what you make!
Materials
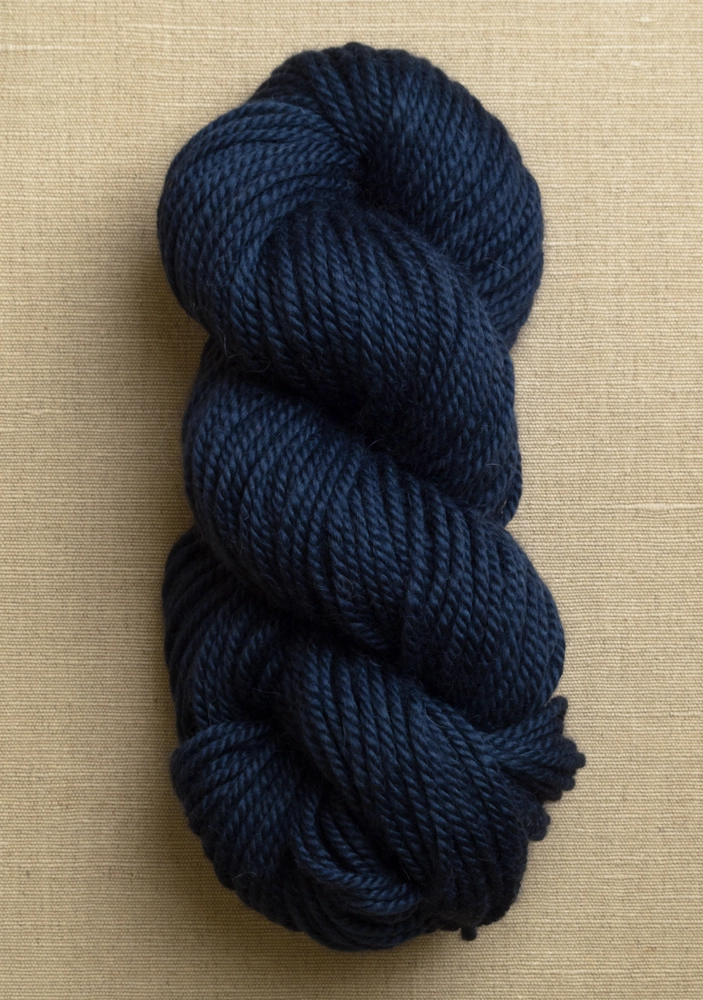
- 9 (11) skeins of Purl Soho’s Alpaca Pure, 100% alpaca; approximately 980 (1165) yards required. (NOTE: We no longer offer Alpaca Pure, but choose from one of our other worsted weight yarns.)
- US 9 (5.5 mm), 32-inch or longer circular needles
- US 8 (5 mm), 16- or 20-inch circular needles
- A set of US 6 (4 mm) double pointed needles
- 4 stitch markers
Gauge
16 stitches and 36 rows = 4 inches with larger circular needles in Woven Slip Stitch pattern (blocked)
20 stitches and 24 rows = 4 inches with smaller circular needles in 2×2 rib (relaxed)
Sizes
NOTE For help picking a size, please check out our Understanding Ease + Selecting Size Tutorial!
To fit chest circumference: 30–38 inches (38–46 inches)
- Finished circumference at bottom edge: 60 (66) inches
- Finished length from high point of shoulder to bottom edge: 22¼ (24) inches
- Finished neck circumference: 17 (19½) inches
Notes
Sl1 (slip 1): Slip the first stitch of every row by slipping purlwise with the yarn in front, then bring the yarn to the back in order to work the next stitch. This makes a nice edge and will make the Attached I-cord simpler.
Sl1 wyib (slip 1 with yarn in back): Slip 1 purlwise with yarn in back.
Woven Slip Stitch Pattern
Row 1 (wrong side): Sl1, *k1, sl1wyib, repeat from * to last stitch, k1.
Row 2 (right side): Sl1, knit to end of row.
Row 3: Sl1, *sl1wyib, k1, repeat from * to last stitch, k1.
Row 4: Repeat Row 2.
Repeat Rows 1–4.
(The Woven Slip Stitch is worked over an even number of stitches.)
Pattern
NOTE: This pattern is available as a printable PDF. Just click here.
Using larger circular needle, cast on 240 (264) stitches. We used a basic Long Tail Cast On. Do not join for working in the round.
Begin
Work Woven Slip Stitch pattern (see Notes, above) until piece measures 7 (8) inches from cast on edge, ending with a wrong side row.
Armholes
Row 1 (right side): Sl1, k31 (35), [k2, p2] 9 (10) times, k2, k100 (108), [k2, p2] 9 (10) times, k2, k32 (36).
Row 2 (wrong side): Sl1, work 31 (35) stitches in Woven Slip Stitch pattern, [p2, k2] 9 (10) times, p2, work 100 (108) stitches in Woven Slip Stitch pattern, [p2, k2] 9 (10) times, p2, work 32 (36) stitches in Woven Slip Stitch Pattern.
Repeat Rows 1 and 2 until piece measures 10 (11) inches from cast on edge, ending with a Row 2. (Because the ribbing portion of the Armhole has a different row gauge than the Woven Slip Stitch pattern, please measure the length over a section of only Woven Slip Stitch pattern).
Next Row (right side): Sl1, k31 (35), k2, p2, bind off 30 (34) stitches, p2 (first purl stitch is last stitch from bind off), k2, k100 (108), k2, p2, bind off 30 (34) stitches, p2, k2, k32 (36). [180 (196) stitches]
Next Row (wrong side): Sl1, work 31 (35) stitches in Woven Slip Stitch pattern, p2, k2, turn and Cable Cast On 29 (33) stitches, turn, pick up and knit 1 stitch from row below (where bound off stitches began), k2, p2, work 100 (108) stitches in Woven Slip Stitch pattern, p2, k2, turn and cable cast on 29 (33) stitches, turn, pick up and knit 1 stitch from row below (where bound off stitches began), k2, p2, work 32 (36) stitches in Woven Slip Stitch pattern. [240 (264) stitches]
Repeat Rows 1 and 2 until piece measures 13 (14) inches from cast-on edge, ending with a Row 2.
Decrease for Yoke + Increase for Front Overlap
Row 1 (right side): Sl1, k31 (35), place marker (pm), k58 (62), pm, k60 (68), pm, k58 (62), pm, k32 (36).
Row 2 (wrong side): Work in Woven Slip Stitch pattern to end, slipping the markers as you come to them.
Yoke Decrease Row (right side): Sl1, [knit to 2 stitches before marker, Knit Two Together (k2tog), slip marker (sm), ssk] 4 times, knit to end. [8 stitches decreased]
Work 3 rows even in Woven Slip Stitch pattern.
Repeat the last 4 rows two more times, then repeat the Yoke Decrease Row once more. [208 (232) stitches: 28 (32) stitches before first marker and after fourth marker, 50 (54) stitches between first and second markers and third and fourth markers, 52 (60) stitches between second and third markers]
Work 1 row even in pattern.
Front Increase Row (right side): Sl1, knit into front and back (kfb), knit to last 2 stitches, kfb, k1. [2 stitches increased]
Work 1 row even in pattern, working new stitches into pattern.
Repeat the last 2 rows three more times, then repeat the Front Increase Row once more. [218 (242) stitches]
Work 3 rows even in pattern.
Next Row (right side): Repeat the Front Increase Row. [2 stitches increased]
Repeat the last 4 rows two more times. [224 (248) stitches]
Work 1 row even in pattern.
Next Row (right side): Repeat the Front Increase Row. [226 (250) stitches]
Work 3 rows even in pattern.
Next Row (right side): Repeat the Front Increase Row. [228 (252) stitches: 38 (42) stitches before first marker and after fourth marker, 50 (54) stitches between first and second markers and third and fourth markers, 52 (60) stitches between second and third markers]
Work 1 row even in pattern.
Piece should now measure approximately 18 (19) inches from cast on edge.
Yoke Decrease Row (right side): Sl1, [knit to 2 stitches before marker, k2tog, sm, ssk] 4 times, knit to end. [8 stitches decreased]
Work 3 rows even in pattern.
Repeat the last 4 rows two (three) more times, then repeat the Yoke Decrease Row once more. [196 (212) stitches]
Work 1 row even in pattern.
Next Row (right side): Repeat the Yoke Decrease Row. [8 stitches decreased]
Work 1 row even in pattern.
Repeat the last 2 rows eight (nine) more times. [124 (132) stitches: 25 (27) stitches before first marker and after fourth marker, 24 stitches between first and second markers and third and fourth markers, 26 (30) stitches between second and third markers]
Shape Neckline
Row 1 (right side): Bind off 20 stitches, (1 stitch remains on right needle from bind off), k2 (4), k2tog, sm, Slip Slip Knit (ssk), k20, k2tog, sm, ssk, k22 (26), k2tog, sm, ssk, k20, k2tog, sm, ssk, knit 23 (25). [96 (104) stitches]
Row 2 (wrong side): Bind off 20 stitches, work in Woven Slip Stitch pattern to end. [76 (84) stitches]
Row 3: Sl1, k1 (3), k2tog, sm, ssk, k18, k2tog, sm, ssk, k20 (24), k2tog, sm, ssk, k18, k2tog, sm, ssk, k2 (4). [68 (76) stitches]
Row 4: Sl1, k2tog, work in Woven Slip Stitch pattern to last 3 stitches, k2tog, k1. [66 (74) stitches]
Row 5: Sl1, k1, [ssk] 0 (1) time, remove marker, k2tog, k16, k2tog, remove marker, ssk, k18 (22), k2tog, remove marker, ssk, k16, k2tog, remove marker, [ssk] 0 (1) time, k2. [60 (66) stitches]
Row 6: Sl1, k2tog, work in Woven Slip Stitch pattern to last 3 stitches, k2tog, k1. [58 (64) stitches]
Row 7: Bind off all stitches.
Finish Front Opening Edge
With right side facing and using the double pointed needles, work a 4-stitch Attached I-cord along both front opening edges, picking up one stitch for every slipped front edge stitch, beginning at the neck edge for the left front and at the bottom edge for the right front. Overlapping the right side over the left side, align the two 20-stitch bound off neck edges and pin them together.
Collar
Using the smaller circular needle and with the right side facing you, rejoin yarn at center back neck edge. Pick up and knit 32 (36) stitches from center back neck to front left neck, just before overlapped edges begin. Continue to pick up and knit 20 stitches across overlapped bound off edges, making sure to insert the needle through both bound off edges as you pick up each stitch, thus joining the two layers together. Pick up and knit another 32 (36) stitches along right neck edge, stopping when you reach the first stitch you picked up. [84 (92) stitches]
Place a marker and join to work in the round.
Round 1: *K2, p2, repeat from * to end of round.
Repeat Round 1 until Collar measures 6 inches from picked up edge.
Bind off loosely in pattern.
Weave in ends and block as desired. Enjoy your City Cape!


Please help! i’m ready to start this pattern so I was reading over the directions. The armhole instructions (Row 2) says to work xx(xx) stitches in Woven Slip Stitch pattern. But the way i read it, that stitch pattern consists of 4 rows. What row of the pattern am i supposed to work for these stitches? i’m sorry If this is a stupid question but I’m trying to figure it out Thanks in advance.
Hello BJ,
Thank you for your question! In this portion of the pattern you will be working the 4 rows of stitch pattern within the Armhole portion. This means that Row 1 will always be the same, but Row 2 will alternate between Rows 1 and 3 from the stitch pattern.
I hope this clears things up and let us know if you have any further questions!
Happy knitting!
-Marilla
Hi there, I was going to ask this same question, as I’m interested in attempting this beauty in the future. I’m still a little confused, though.
So, when you say that Row 2 of the armholes will alternate between Rows 1 & 3 of the stitch pattern, do you mean that it would go:
First time knitting Row 2 would be worked as Row 1 of stitch pattern,
Second time knitting Row 2 would be worked as Row 3 of stitch pattern,
And so on?
I was also wondering if, when I start the Woven Stitch in the armholes, do I slip the stitch as I would normally in Rows 1 & 3 of the stitch pattern, or do I begin from the star?
Thanks so much!
Hello Stephanie,
Thank you for reaching out- these are great questions! Yes, you will continue to slip your first stitch in this portion of the pattern. It sounds like you have a clear understanding of the stitch pattern. The only thing I would be careful of is that the stitch pattern row (row 1 & row3) That you begin with in the armhole section corresponds with the row you ended with when knitting the beginning section. For example if you ended with row 3 your armhole “row 2” would be a stitch pattern row 1.
I hope this makes sense and let us know if you have any further questions!
Happy knitting!
-Marilla
Hi,
I am planning to knit this gorgeous cape as a gift to a dear friend. However, she is vegan, so what yarn would you recommend to achieve gauge?
Thank you so much!
Hi Cristiane,
What a lovely, thoughtful present! The City Cape would be beautiful and vegan-friendly in Blue Sky Worsted Cotton.
Best of luck and happy knitting!
Julianna
How dense is the fabric supposed to be? I’m not sure if I am accurately counting the slip-stitch for my gauge. I like the denser fabric I get with US 9 but then I have too many stitches per inch. Also, how important is row gauge with this pattern? Thank you for your help.
Hello Stefani,
Thanks for reaching out! If you want to change the gauge of the pattern the finished project will come out smaller. If you are ok with this than go for it, but it will be tricky to know how much smaller. The row gauge will be a bit easier to figure out, because you can just knit extra rows, but you will need more yarn if your fabric is denser.
I hope this helps and happy knitting!
-Marilla
This is such a gorgeous cape! I have two questions- will this navy color ever come back? And if I wanted to make it longer, would I just knit a few extra inches before the armholes start?
Hello Michaela,
Thank you for reaching out! You are exactly right- you would just add length to the cape before the armholes. Unfortunately the Navy is discontinued, but Anzula’s For Better or Worsted comes in a lovely Navy that has a similar gauge.
I hope this helps and happy knitting!
-Marilla
I am at the point where I need to decrease for the neck. my decrease neck opening is not straight like pictured in the photo. What am I doing wrong?
Hello Julie,
Thank you for reaching out! Are you at the “DECREASE FOR YOKE + INCREASE FOR FRONT OVERLAP”portion of the pattern? Which row are you on? What exactly isn’t “straight” and what is it coming out as instead? I hope I can help!
-Marilla
am knitting the city cape pattern
I am now in the decrease for yoke and increase for front overlap portion and row three row right side yoke decrease and I see one k2tog and ssk 4 times (total of 5 stitches) and you say 8 sts decreased. Can you please explain my ignorance? I shall really appreciate your valuable guidance. Thanks kappu
Hello Kappu,
Thank you for reaching out! Because your k2tog and ssk are both within brackets you are repeating each one 4 times. “Sl1, [knit to 2 stitches before marker, k2tog, sm, ssk] 4 times, knit to end. [8 stitches decreased]”
I hope this makes sense and let us know if you have any further questions!
Happy knitting!
-Marilla
This looks like a lovely cape for cool weather, and i see the Alpaca Pure is on sale.
What is the difficulty level of this pattern? Is there a size measurement?
thank you
Hi Nancy,
Thank you for your kind words! We don’t rate the difficulty of our patterns because we want people to feel free to try things that are “too hard” for them; we want to encourage people to discover that learning new techniques enriches the process of making; and we don’t want to put people in a box that says, “You can make this but not this.” We do try to describe the skills involved with a pattern so that customers know what they’re getting into, but ultimately, we hope that you will take little leaps into the unknown and find that the satisfaction was worth the challenge! Remember, we’re always here to help!
For this pattern, you will be working in a textured stitch pattern, work an i-cord edging and pick up stitches. If you are comfortable witha ll of these techniques, you should be good to go!
Best,
Cassy
This looks like a lovely pattern, and I am planning to make it for a 14-year-old. Would I have to modify this pattern to fit her size? If so, how? Thank you in advance.
when you say (work 1 row even in pattern) you mean that knitting Row2 in woven slip stitch?
Hi and thanks for reaching out! This means to work one row in the established stitch pattern without working any increases or decreases. If Row 2 of the Woven Slip Stitch pattern is up next for your project, yes, you will work Row 2!
I hope that clears things up!
Julianna
City Cape: Hello – I’m wanting to make this for my neighbour. She is a short stout woman – 49″ across chest. Would you please recommend ways to make this pattern wider? My swatch’s gauge with 5.5 mm needles was as it should be (16 stitches = 4″ across), so am making a swatch using 6.0mm but even that might not make up the needed difference. Really like this pattern, but not the gape on larger women. Really appreciate your suggestions. Cheers.
Hi Ella,
Thanks for reaching out! Unfortunately we do not have a larger size written for this pattern; however, the current large size is meant to fit up to a 46″ bust, so you do not have to make it too much larger! Often moving up a needle size or two will be enough to add a few inches to a garment.
We really do appreciate that bodies come in all shapes and sizes and share your concern that patterns be as inclusive as possible. As a small company, we haven’t yet had the resources to offer the scope of sizes we would like to, but as our company grows, we have been steadily expanding that range and plan to continue to do so!
Best,
Julianna
What is the total yardage of yarn needed for the larger size to knit according to gauge on the size 9 needle? I can’t find any info on the discontinued yarn used for this pattern that would have this listed.
Thanks – Sioux
Hi Susan,
Thanks for reaching out! Alpaca Pure was an aran weight yarn that had 109 yards per skein, and we used 980 yards for the small size and 1,165 yards for the larger size.
Best,
Julianna
I see that the Alpaca Pure yarn is not available on your website. Do you sell a substitute yarn that will work well for this pattern? Thank you.
Hi Simone,
Thanks for reaching out! Unfortunately, Alpaca Pure has been discontinued – I’m so sorry about that! I would recommend using either Worsted Twist or Cashmere Tend for this pattern. Both knit up to the same gauge as Alpaca Pure and would create lovely, cozy capes!
Best,
Julianna
Hello! I am so close to being finished and am running into a problem with the I-cord: I watched a tutorial and read through the instructions in the provided link, but it seems once I start to repeat the pattern, I continue to knit the same last three stitches, with only the slip stitch and SSK stick moving up the edge. I am doing something incorrectly, but I’m not sure what. Can you please help!
Also, when I am finished with the two I-Cords, the instructions say to align the two 20-stitch bound off neck edges and pin them together. Can you please provide more detail here? What does that mean?
Maggie
Hi Maggie
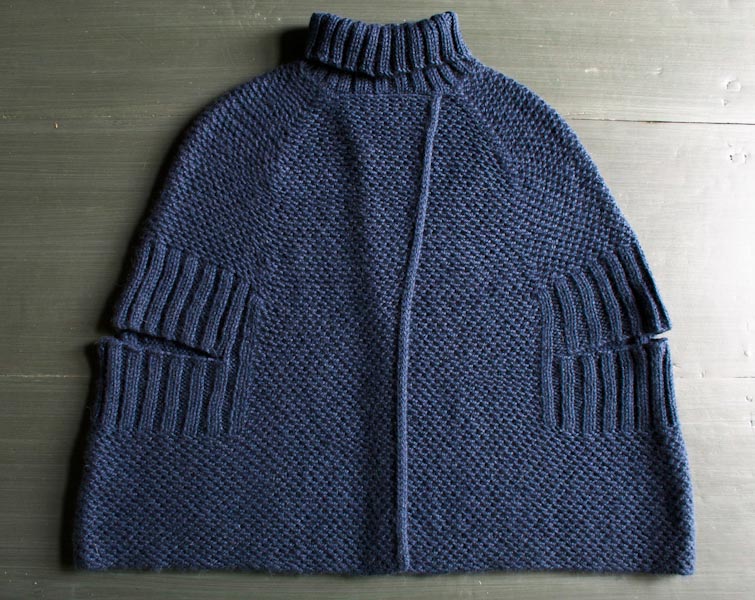
Thanks for writing in! It sounds like you are doing the i-cord correctly. You will continue to repeatedly knit the 3 edge stitches, slip the fourth, pick up a slipped stitch from the edge and decrease these together. It should look like a round cord connected and moving up the side of your work, until you have no slipped side stitches remaining. After this is complete, you will lay the 20 stitch bound off edge (where you shaped the neckline) directly on top of the other 20 stitch bound off edge, right sides facing you. This will create a flap closure, and you will go through both layers of your knitting while you pick up stitches for the collar to permanently join them. If you look at the last picture in the pattern you can see this a little more clearly. I really hope this helps!
Best
Jessica
On the armhole section, after you sl 1, work 31 stitches in Woven Slip Stitch pattern, p2, k2, and turn, there is one stitch left on the right needle. What do you do with this stitch when you cable cast on the 29 stitches? That part is confusing to me.
Hi Clara,
Thanks for reaching out! You should be right at the gap after working the P2, K2, so I think you may have gotten off by one stitch when casting off on the previous row. After binding off on the right side row, the next four stitches should be P2, K2; however, the stitch remaining on the right hand needle after casting off counts as the first purl stitch. I think you may have thought this stitch didn’t count and stopped casting off one stitch early! If you have done both armholes the same, you should be able to knit one more stitch and then turn and cable cast on 28 stitches so that the stitch pattern works out correctly on the next row. One stitch difference in the armhole shouldn’t be a problem!
I hope that helps!
Julianna
I’m trying to finish up the capelet for my sister for Christmas, but I’m having some issues. The concern is that the front yoke increase section really curves out a lot. Will the i-cord fix this? Also, the capelet doesn’t fall straight down but flares out from the neckline so far. Will washing this afterwards fix that?
Hi Emily,
Thanks for reaching out! The I-Cord will help fix the curve but most importantly blocking the Cape when you are finished knitting will make the biggest difference and will help get the best result! I recommend checking out our Blocking tutorial, it is an excellent resource to use!
Warmly,
Gianna
I love this cape but am not keen on a turtle neck. Is there a way to knit this and have a “split” neck and then instead of an over lap of the body, use a pin or button to close?
Hi Kathy,
Thanks for reaching out! I think you could certainly make the turtleneck with a split! When you get to the COLLAR section you can work a few rows in the round and then I would recommend stop working in the round (where you want the split to be) and work back and forth in rows instead of in the round until you reach your desired length, and then bind off loosely in pattern!
I hope this helps and please let us know how this turns out!
Warmly,
Gianna
Hi!
I’m at this part of the pattern and am not sure what “Work 3 rows even in the Woven Slip Stitch Pattern” means.
DECREASE FOR YOKE + INCREASE FOR FRONT OVERLAP
Row 1 (right side): Sl1, k31 (35), place marker (pm), k58 (62), pm, k60 (68), pm, k58 (62), pm, k32 (36).
Row 2 (wrong side): Work in Woven Slip Stitch pattern to end, slipping the markers as you come to them.
Yoke Decrease Row (right side): Sl1, [knit to 2 stitches before marker, k2tog, slip marker (sm), ssk] 4 times, knit to end. [8 stitches decreased]
Work 3 rows even in Woven Slip Stitch pattern.
Hi Erynn,
Thanks for reaching out! “Work 3 rows even in Woven Slip Stitch pattern” simply means you will work 3 rows in the Woven Slip Stitch, without any decreases.
I hope this clears things up!
Gianna
I love this pattern but I’m a novice when it comes to knitting. Would you recommend I attempt this pattern, or could you suggest another Cape style pattern that may be better suited to my knitting skills?
Hi Georgia,
Thanks for reaching! For a beginner knitter, this pattern may be a bit more on the complicated side but it would all depend on the skills you have already as a novice knitter! If you would like to tackle it I think it could certainly be possible and we are happy to help you along the way if needed, or if you would like to start off with a more simple design I would suggest our Mountain Caplete instead, it is a very easy a straight forward pattern!
I hope this helps and please let me know if you have any more questions!
Gianna
I am absolutely in LOVE with this pattern and want to give it a go (I’m an OK knitter, I think this is definitely going to be a learning for me). Could I use the Good Wool that is on sale as a yarn choice? I’m nervous to get a more expensive yarn and fail at the project. Will Good Wool be too scratchy?
Also, given what I was reading about yardage, would only 3 skeins be enough to knit a size small? (Each skein of Good Wool is 383 yards and I read that 980 yards is needed for a small.)
Hi Deb,
Thanks for your questions! We’re so happy to hear that you’re a fan of the City Cape pattern!
For this pattern in particular, I’m afraid Good Wool would be too thin of a yarn. Good Wool is a sport weight yarn and the yarn that was used for the City Cape, Alpaca Pure (now unfortunately out of production), is an aran or heavy worsted weight. As an alternative, Plenty, Campo, or Woolfolk’s Tov all would work well for this pattern! For the smaller size, you would need 8 skeins of Plenty, 9 skeins of Campo, or 6 skeins of Tov. With any yarn substitutions, it’s always a great idea to do a gauge swatch to make sure you’re consistent with the pattern. Here’s a guide on it in case you’d like more information: All About Gauge. Unfortunately, at the moment, we currently don’t offer a more budget-friendly aran weight yarn. We’re very sorry about that!
While the City Cape isn’t the most beginner friendly pattern, if you’ve already got some knitting experience under your belt, it could be an excellent pattern to expand your boundaries and add some more skills to your toolkit! We’re all for people being adventurous and trying new patterns and we’re always here to help every step of the way. If you begin the pattern and you find you need some more guidance, feel free to sign up for a 1-On-1 Project Help session with us where we can troubleshoot any problems you might be having over video chat!
I hope this was helpful! Have a great day!
All the best,
Cat
Hello I’ve just done the decrease for yoke section. All the decrease is on one side. There are different numbers of stitches between the markers. I have 28 stitches before the first marks it still 32 after the final marker. The count between the other markers is wrong too. The pattern has the decrease on the knit row and says to knit to 2 stitches before marker before k2tog etc. Which marker? What have I done wrong? Thank you
Hi Helen,
Thanks for reaching out. This section of the pattern is quite tricky, since there’s a lot going on at once! You’re decreasing on the repeats of the Yoke Decrease Row, while also increasing on the repeats of the Front Increase Row, so it can be tough to keep track of the decreases and increases you’ve worked. What likely happened in your project is that you either missed some decreases or increases, or worked extra decreases or increases. Unfortunately, I can’t say for sure exactly where this happened though! But I’d be happy to clarify the Yoke Decrease Row, since it sounds like you have questions about that in particular.
On the Yoke Decrease Row, you will make a total of 8 decrease stitches. You have 4 stitch markers at this point, and each stitch marker is surrounded by 2 decrease stitches: a k2tog directly before it, and an ssk directly after it. On the Decrease Row, you will knit up to 2 stitches before the very first marker, work the k2tog, slip the marker, and then immediately work an ssk. Then, you will repeat these steps for each of the other 3 markers! At the end of the row, you will have worked a total of 8 decreases, one on each side of the 4 markers.
I hope this helps clear things up!
All the best,
Lili
hi purl soho. sorry if this question is very basic but how do you count woven slip stitch? it appears there are longer stitches and shorter stitches. do I just count the longer ones? thanks
Hi Leilani,
Not a basic question at all! I’d actually recommend counting the stitches with the wrong side of the knit fabric facing up. The stitches are more regular on that side, so they should be easier to count accurately!
All the best,
Lili
Thanks Lili. Sorry to be a pest but it looks like my stitches count on the wrong side is correct but there are far too many stitches on the wrong side.
Hi Leilani,
Hmmmm, would you be able to send a photo of your work to customerservice@purlsoho.com? That way, we can better visualize what’s going on!
All the best,
Lili
hi again lili.
So I’ve sorted that gauge issue. I now have a question on this part of the pattern.
vRepeat Rows 1 and 2 until piece measures 10 (11) inches from cast on edge, ending with a Row 2. (Because the ribbing portion of the Armhole has a different row gauge than the Woven Slip Stitch pattern, please measure the length over a section of only Woven Slip Stitch pattern).
Next Row (right side): Sl1, k31 (35), k2, p2, bind off 30 (34) stitches, p2 (first purl stitch is last stitch from bind off), k2, k100 (108), k2, p2, bind off 30 (34) stitches, p2, k2, k32 (36). [180 (196) stitches]
it says end with a row two and the next row is the right side but in the woven stitch pattern the next row (3) is the wrong side. pls enlighten.
thanks a mil!
Hi Lei,
Thanks for writing in with your question! Once you begin the pattern, Row 1 is now the right side and Row 2 is the wrong side. Occasionally the STITCH PATTERN differs from the actual pattern instructions depending on which side of the fabric the designer intends to face out. So in this case, it sounds like you are right on track. I hope this helps!
Happy knitting,
Gavriella
Hello
I was looking for a similar cape as this one except l would like longer sleeves. Could l make this with a longer sleeve? How would l do this and is it possible?
Hi Ellie,
Thank you for your question! Although we love your idea, I’m afraid these kinds of modifications would be outside the scope of support we can offer at this time. One thing you could try is finding a circular yoke sweater (or cardigan) pattern that has a similar look and then knitting additional length on the yoke before separating for sleeves! Please let us know if you have any other questions!
Warmly,
Gavriella
Q: for the woven stitch pattern, since we are working with an even number of stitches, does it mean that the last 2 stitches would be knit 1 and knit 1? sorry for the question, I am new to knitting but I wanted to try this pattern out because it is so lovely 🙂
Hi Christine,
Thank you for reaching out! For the stitch pattern, you will end with ‘sl1wyib, k1’ on row 1 and k2 (2 knit stitches) on row 3! I hope this helps but feel free to write back should you have any other questions!
Happy knitting,
Gavriella