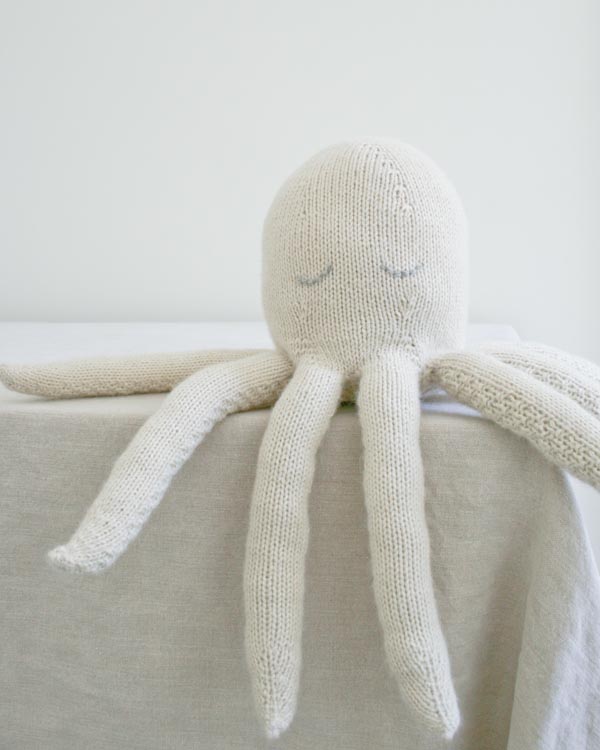
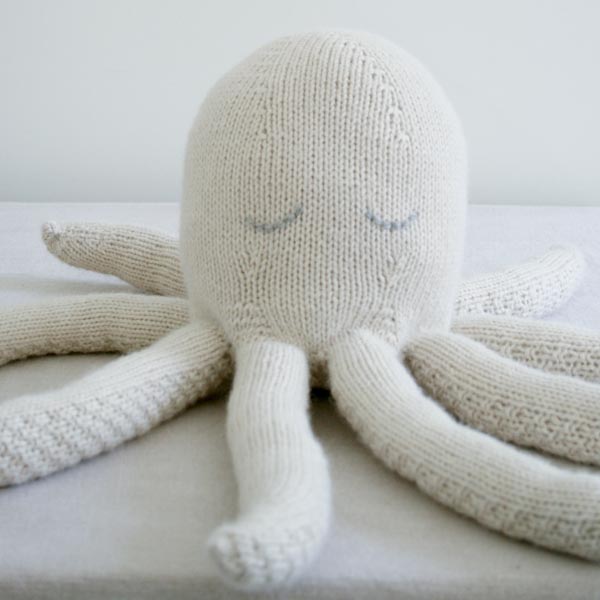

Knit Octopus
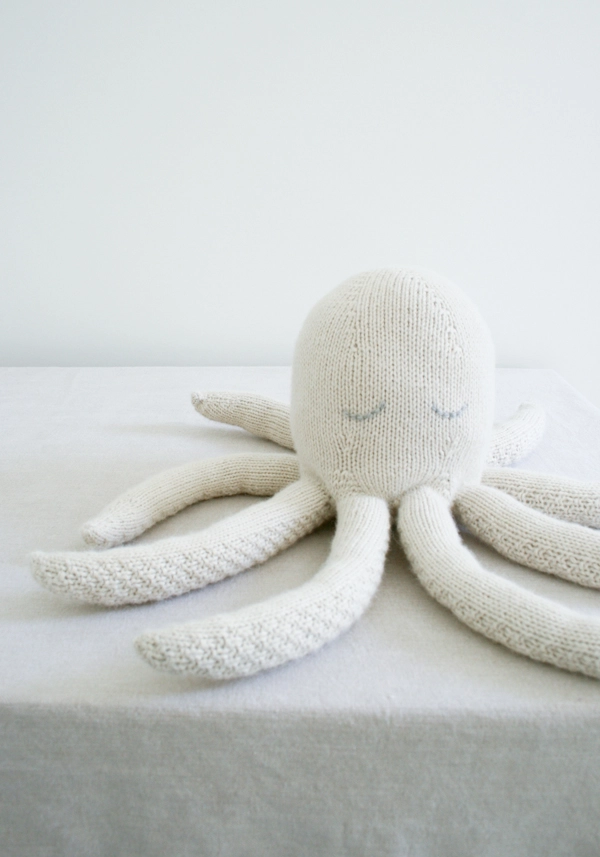
I can’t say that I’ve ever felt the desire to hug an actual octopus, but a stuffed one has a distinct appeal: eight embracing arms! With such magnanimity, a Knit Octopus makes a pretty sweet companion!
What I didn’t know about designing an octopus was that it would put me on a deep-sea exploration of knitting’s inherent intelligence. Knitting, like the ocean itself, answers to an inscrutable essence, part natural law and part mystery. Bound by the mathematics of eight, this Knit Octopus practically created itself, and so to me, the result feels magically inevitable.
And for mathematical magic there’s nothing better than the purity of warm white. Blue Sky’s Sport Weight Alpaca in Natural White brings a lovely serenity and simplicity to the Knit Octopus, while the wonderful softness of 100% baby alpaca (doubled!) brings us back to all that hugging I was talking about!
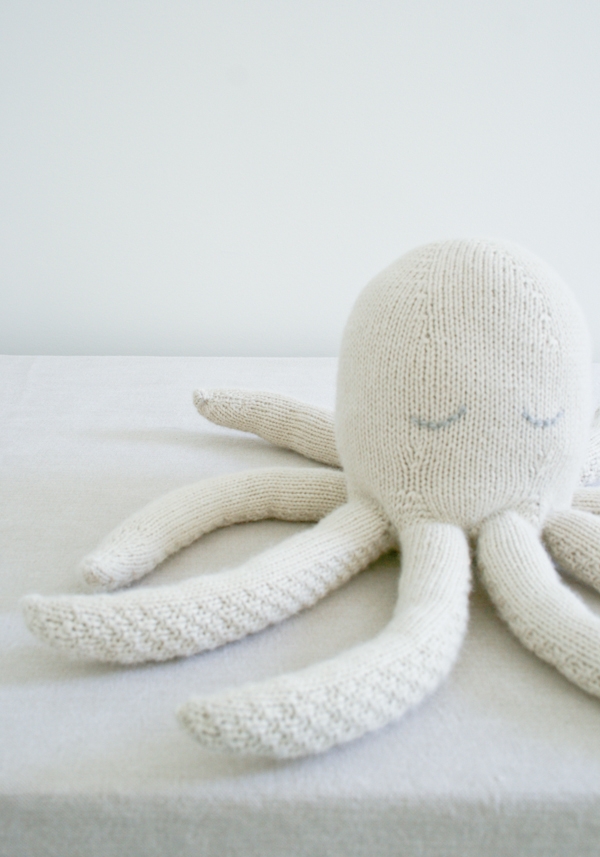
I hope, like me, that when you create your Knit Octopus you feel a little bit like the Jacques Cousteau of knitting, probing the fathomless world of knits and purls, learning a little something along the way! -Whitney
Update: Now in Season Alpaca!
August 8, 2018
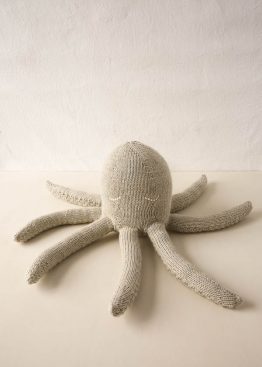

For an update to our eight-legged friend we used our super soft Season Alpaca, doubled for twice the nice, in cool and simple Dove Gray. But like color-fickle octopuses themselves, we think practically any color would yield equally tantalizing tentacles! Read all about it here!
Designed by Purl Soho designer, Whitney Van Nes.
Share your progress and connect with the community by tagging your pics with #PurlSoho, #PurlSohoBusyHands, and #PurlSohoKnitOctopus. We can’t wait to see what you make!
Materials
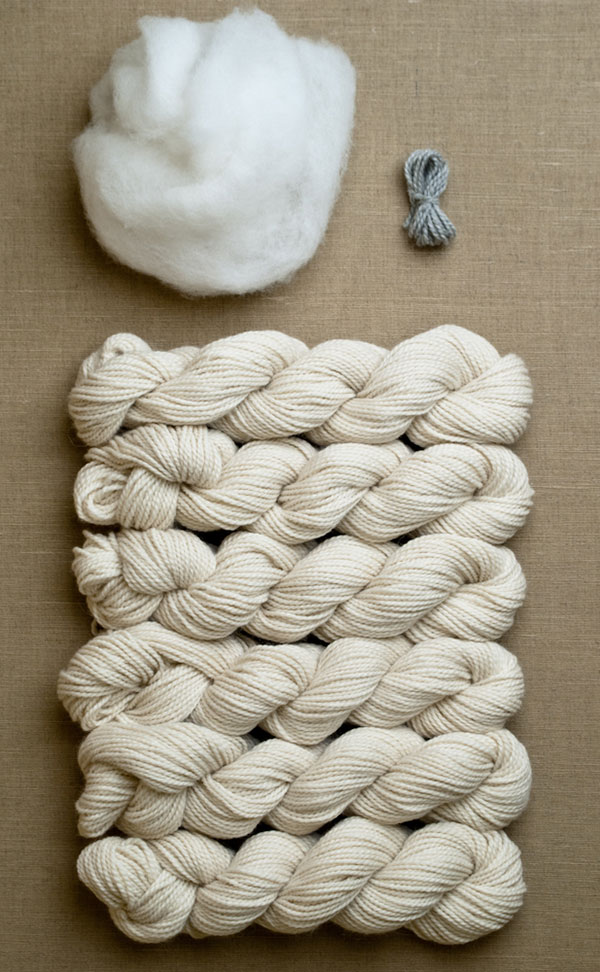
- 6 skeins of Blue Sky’s Sport Weight Alpaca – Solids, 100% baby alpaca, in the color Natural White, or 660 yards of a sport weight yarn required.
- A bag of Fairfield’s Poly-Fil stuffing
- About 2 yards of scrap yarn for the eyes. We used Blue Sky’s Sport Weight Alpaca in Natural Light Gray.
- US 6 (4 mm), 16-inch circular needles
- A set of US 6 double pointed needles
Gauge
18 stitches = 4 inches in stockinette stitch, with yarn doubled
Size
Circumference around widest part of Body: 20½ inches
Height of Body: 7½ inches
Length of each Arm: 10 inches
Note
You will use the Sport Weight Alpaca doubled throughout this pattern. The easiest way to do this is to pull from two balls at once.
Pattern
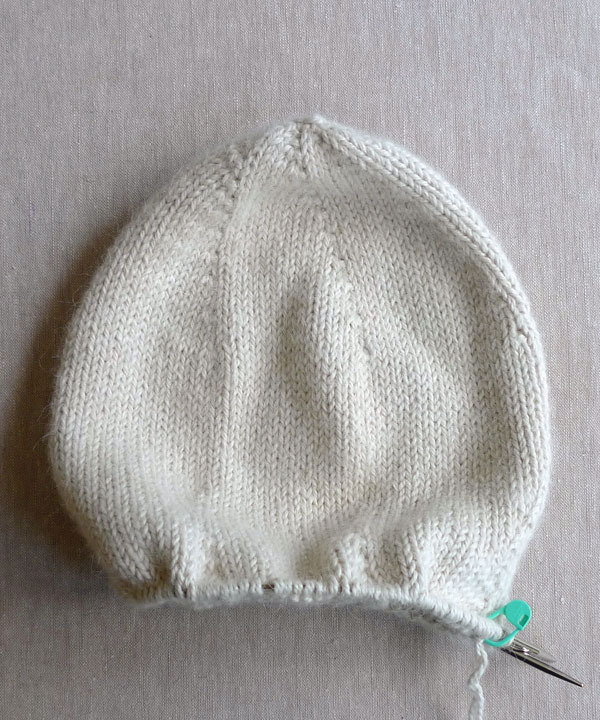
Body
Using two strands of the Sport Weight Alpaca, cast 6 stitches onto the double pointed needles. We used a basic Long Tail Cast On.
Join for working in the round, being careful to not twist the stitches.
Round 1: Knit into front and back (kfb) 6 times. (12 stitches)
Round 2: *K1, kfb, repeat from * to end of round. (18 stitches)
Round 3: *K2, kfb, repeat from * to end of round. (24 stitches)
Round 4: Knit.
Round 5: *K3, kfb, repeat from * to end of round. (30 stitches)
Round 6: Knit.
Round 7: *K4, kfb, repeat from * to end of round. (36 stitches)
Round 8: Knit.
Round 9: *K5, kfb, repeat from * to end of round. (42 stitches)
Round 10: Knit.
Round 11: *K6, kfb, repeat from * to end of round. (48 stitches)
Round 12: Knit.
Round 13: *K7, kfb, repeat from * to end of round. (54 stitches)
Rounds 14 and 15: Knit.
Round 16: *K8, kfb, repeat from * to end of round. (60 stitches)
Rounds 17 and 18: Knit.
Round 19: *K9, kfb, repeat from * to end of round. (66 stitches)
Rounds 20 and 21: Knit.
Changing to the 16-inch circular needle…
Round 22: *K10, kfb, repeat from * to end of round. (72 stitches)
Rounds 23-25: Knit.
Round 26: *K11, kfb, repeat from * to end of round. (78 stitches)
Rounds 27-29: Knit.
Round 30: *K12, kfb, repeat from * to end of round. (84 stitches)
Knit for 2 1/2 inches.
Next Round: *K12, k2tog, repeat from * to end of round. (78 stitches)
Knit 2 rounds.
Next Round: *K11, k2tog, repeat from * to end of round. (72 stitches)
Knit 4 rounds.
Next Round: *K11, kfb, repeat from * to end of round. (78 stitches)
Knit 1 round.
Next Round: *K12, kfb, repeat from * to end of round. (84 stitches)
Knit 1 round.
Next Round: *K13, kfb, repeat from * to end of round. (90 stitches)
Knit 1 round.
Next Round: *K14, kfb, repeat from * to end of round. (96 stitches)
Set the Body aside without cutting the yarn.
First Arm
With the yarn doubled, cast 6 stitches onto three double pointed needles.
Join for working in the round, being careful to not twist the stitches.
Round 1: Knit.
Round 2: K1, make 1 left (m1l), knit to end of round, make 1 right (m1r). (8 stitches)
Round 3: K4, p1, knit to end of round.
Round 4: K1, m1l, k3, p1, knit to end of round, m1r. (10 stitches)
Rounds 5 and 6: K4, p1, k1, p1, knit to end of round.
Round 7: K1, m1l, k4, p1, knit to end of round, m1r. (12 stitches)
Round 8: K6, p1, knit to end of round.
Round 9: K5, p1, k1, p1, knit to end of round.
Round 10: K1, m1l, k4, p1, k1, p1, knit to end of round, m1r. (14 stitches)
Rounds 11 and 12: K5, (p1, k1) 2 times, p1, knit to end of round.
Round 13: K6, p1, k1, p1, knit to end of round.
Round 14: K1, m1l, k5, p1, k1, p1, knit to end of round, m1r. (16 stitches)
Rounds 15 and 16: K6, (p1, k1) 2 times, p1, knit to end of round.
Round 17: K5, (p1, k1) 3 times, p1, knit to end of round.
Round 18: K1, m1l, k4, (p1, k1) 3 times, p1, knit to end of round, m1r. (18 stitches)
Rounds 19 and 20: K7, (p1, k1) 2 times, p1, knit to end of round.
Round 21 and 22: K6, (p1, k1) 3 times, p1, knit to end of round.
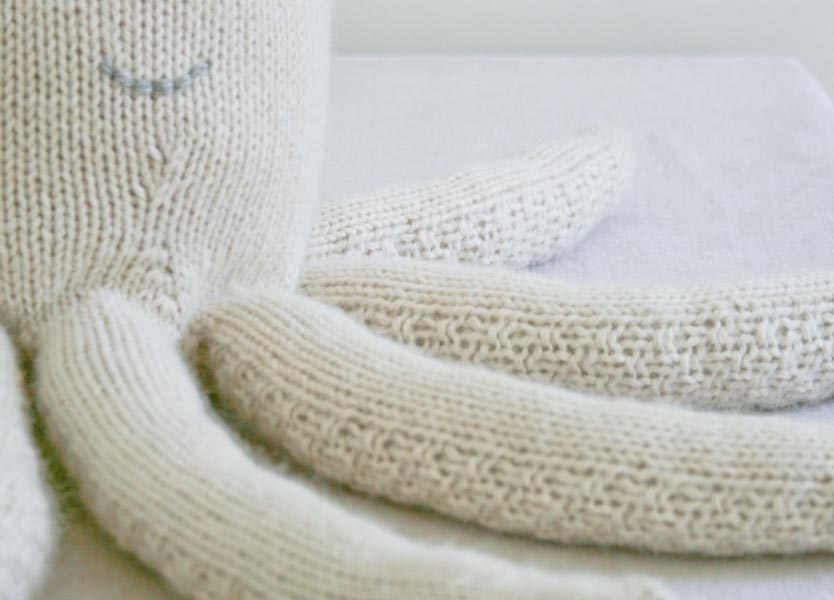
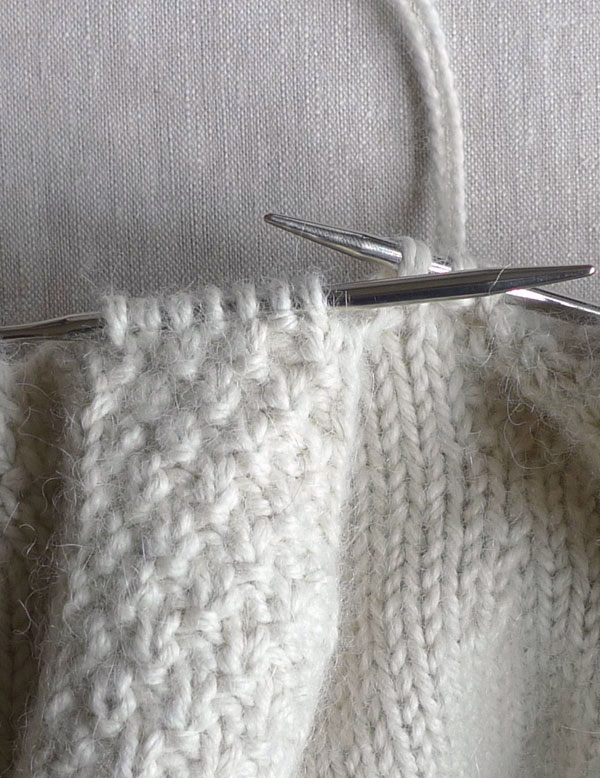
Repeat Rounds 19-22 until piece measures 10 inches from the tip, stuffing the Arm lightly as you go. End 5 stitches before the end of a Round 20. Cut a 12-inch tail.

Slip the next 11 stitches onto one double pointed needle and arrange the remaining 7 stitches onto another double pointed needle.
Now weave in the cast on tail to encourage the slight curl at the tip of the Arm. Weave the tail up the center stitch of the stockinette side.
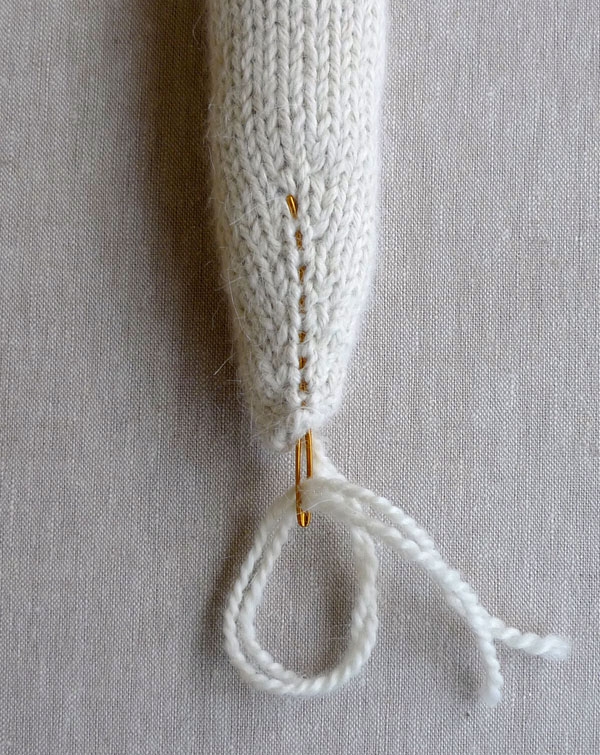
And weave it back down toward the tip to secure.
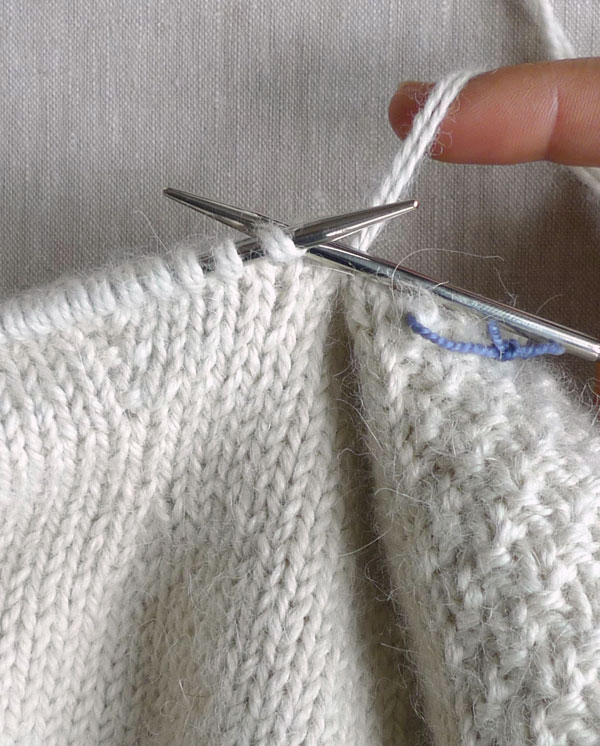
Attach Arm to Body
Returning to the Body, knit 12 stitches.
**Flip the Body over so the circular needle is on the bottom and the knitting is on the top.
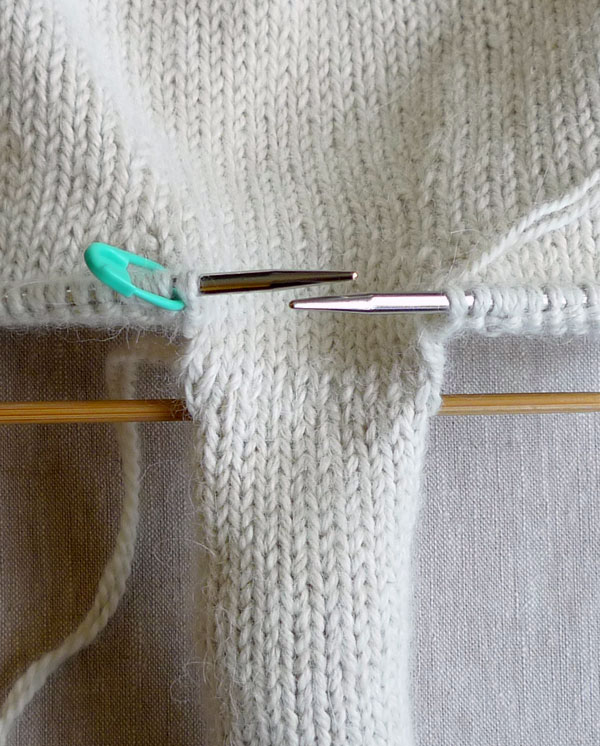
With wrong sides facing each other, hold the double pointed needle with 11 stitches parallel to the left-hand circular needle.
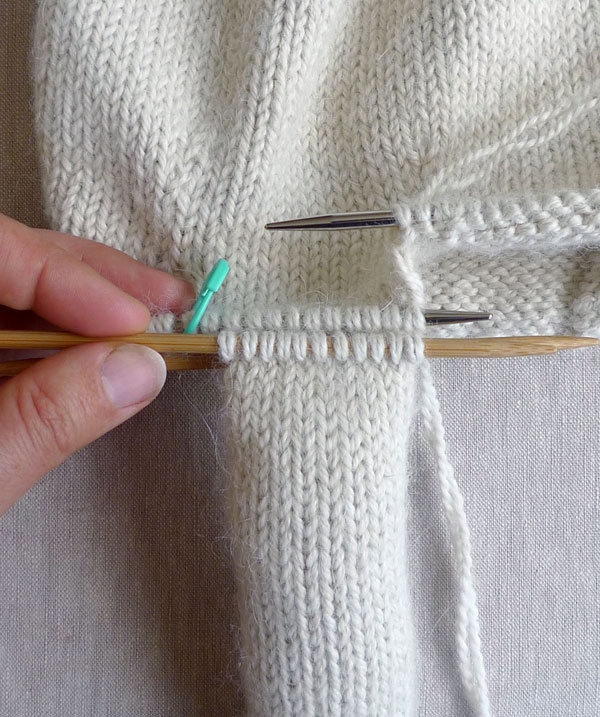
Using the 12-inch tail from the Arm, work Kitchener Stitch to graft the 11 stitches of the Arm to the next 11 stitches of the Body. (There will be one stitch from the Body remaining. Leave it on the circular needle.)
Put the Arm’s remaining 7 stitches on a piece of scrap yarn.
Flip the Body over again and with the right side facing you, knit the next 12 stitches.
Set the Body aside.
More Arms
*Knit another Arm identical to the first.
To attach it to the Body, repeat from ** of the Attach Arm to Body section.
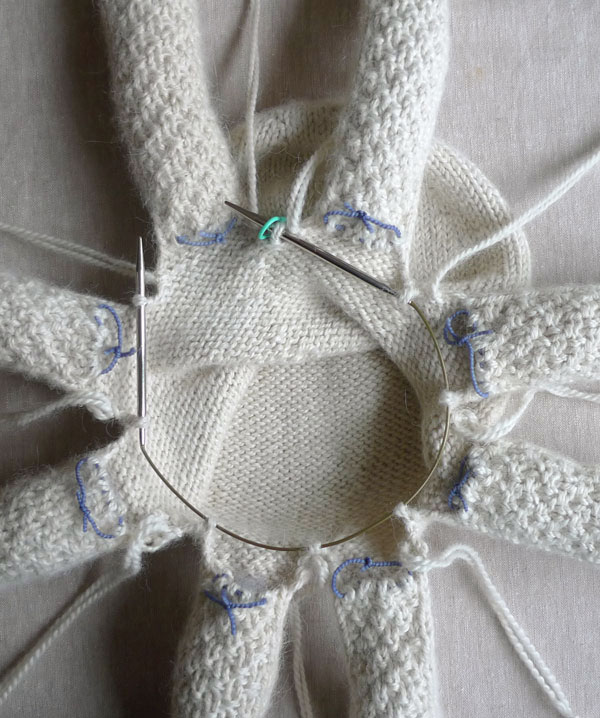
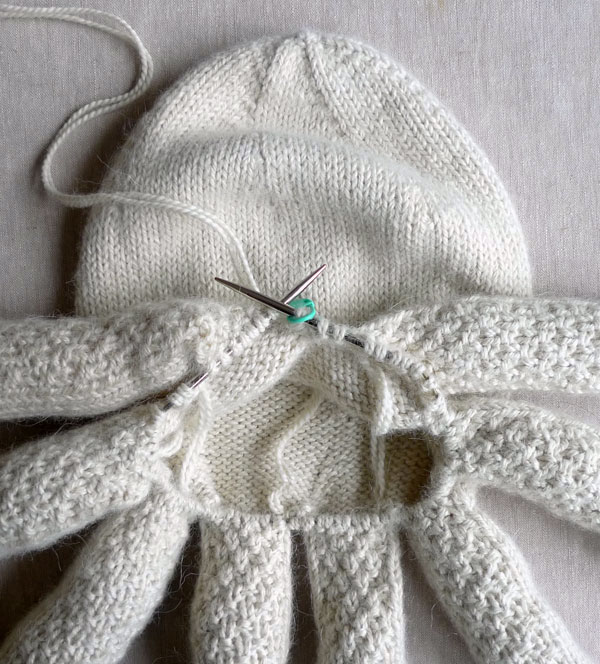
Repeat from * until you have made and attached a total of eight Arms (Do not knit 12 stitches after attaching the final Arm).
You should now have 8 stitches on the circular needle, one between each Arm. Make sure the end-of-the-round marker is still in place.
Bottom
Now working with the circular needle and the yarn that is still attached to the Body…
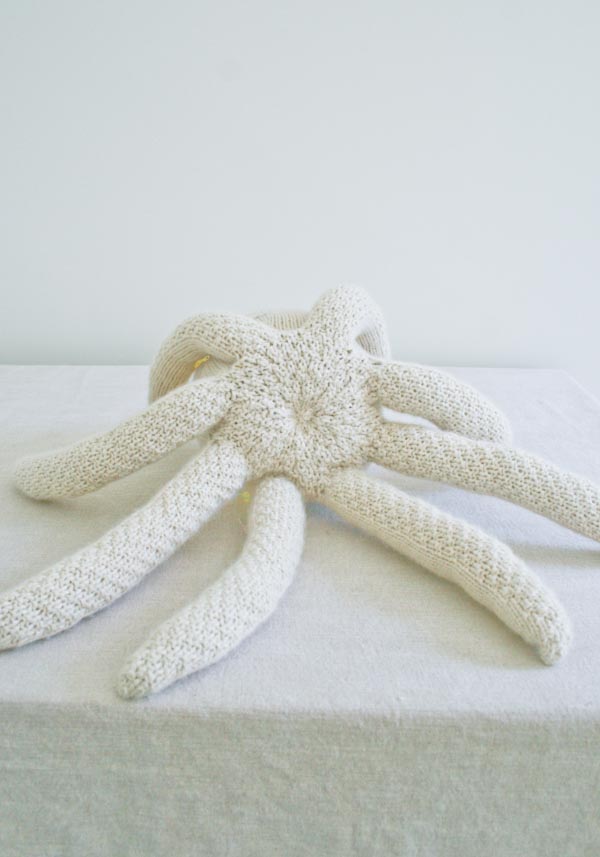
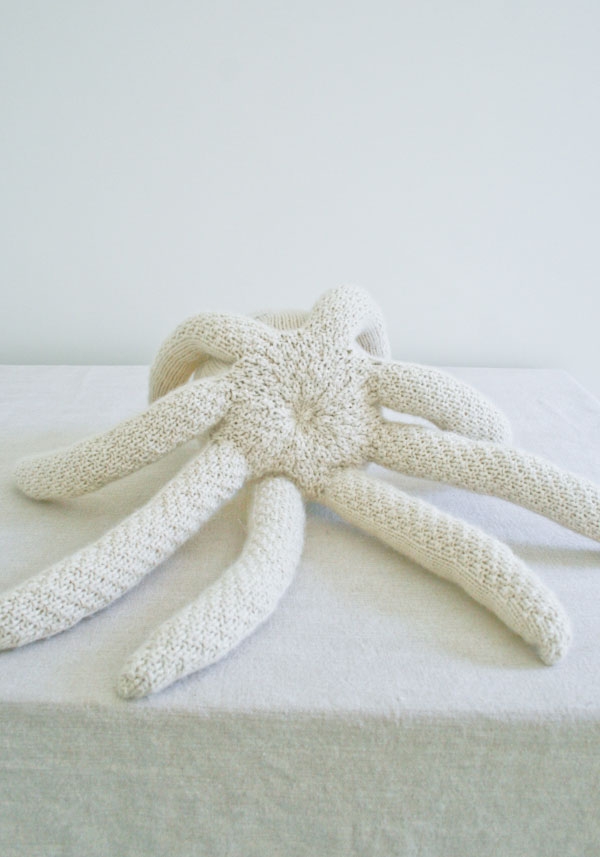
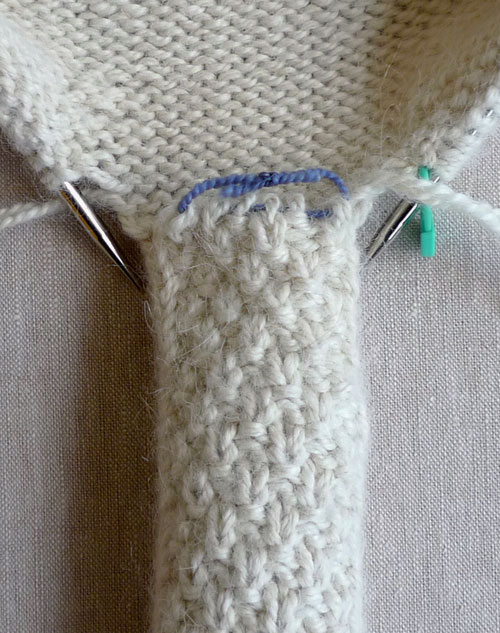
Round 1: Pick up 1 stitch from between the last Arm attached and the next stitch on the needle. The red dot in this photo shows you where.
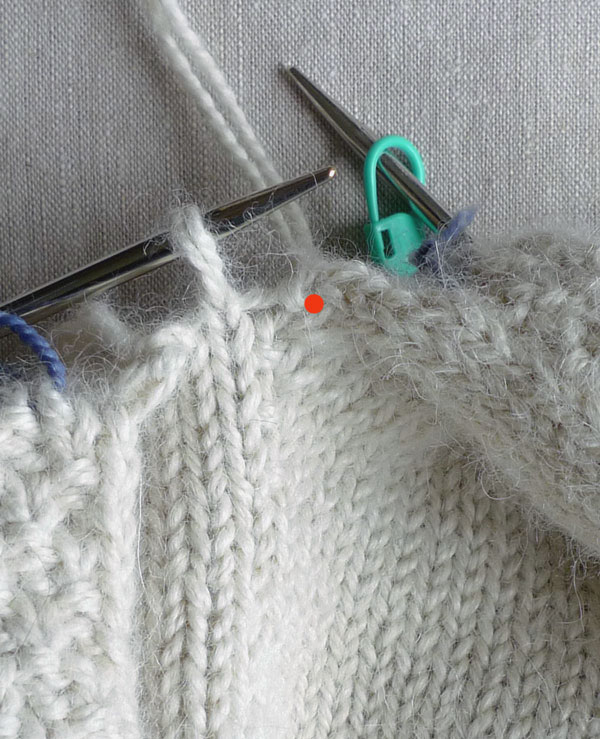
*Purl the next stitch, then pick up 1 stitch from between the stitch you just purled and the next Arm.
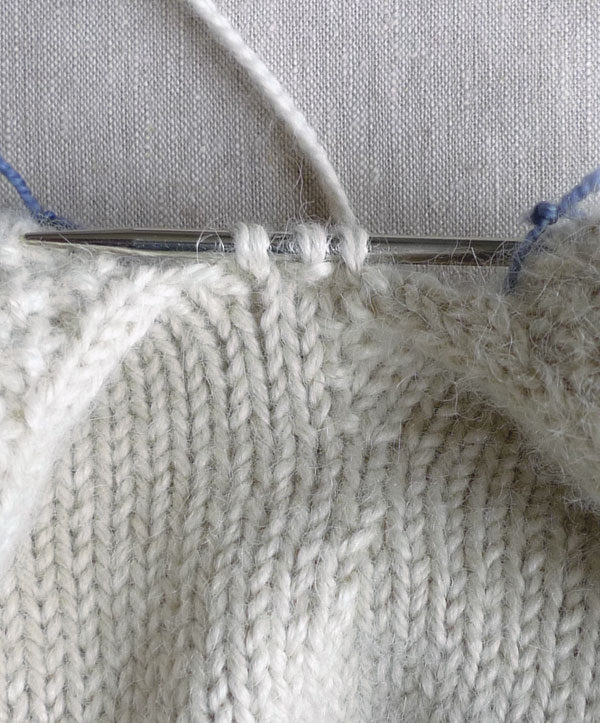
Slip the 7 stitches from the next Arm onto the left end of the circular needle. Remove the scrap yarn.
Working those 7 stitches, (p1, k1) 3 times, p1. Then pick up 1 stitch between the last stitch purled and the next stitch on the needle.
Repeat from * to the end of the round, finishing with the 7 stitches of the eighth Arm. (80 stitches)
Round 2: *K1, p1, repeat from * to end of round.
Now is a good time to even out any tension issues from grafting on the Arms and to weave in the remaining ends.
Round 3: *(P1, k1) 3 times, p2tog, k2tog, repeat from * to end of round. (64 stitches)
Changing to the double pointed needles…
Round 4: *P1, k1, repeat from * to end of round.
Rounds 5 and 6: Repeat Round 2.
Stuff the Body so it is nice and plump, and keep adding stuffing as you finish.
Round 7: (P1, k1) 2 times, p2tog, k2tog, repat from * to end of round. (48 stitches)
Rounds 8-10: Repeat Rounds 4-6.
Round 11: P1, k1, p2tog, k2tog, repeat from * to end of round. (32 stitches)
Rounds 12-14: Repeat Rounds 4-6.
Round 15: *P2tog, k2tog, repeat from * to end of round. (16 stitches)
Knit 2 rounds.
Next Round: K2tog 8 times. (8 stitches)
Cut a 12-inch tail and thread it through the remaining stitches. Then sew the tail through the center of the Bottom up to the top center of the Body, causing the center Bottom to pull in a little bit. Weave in the tail.

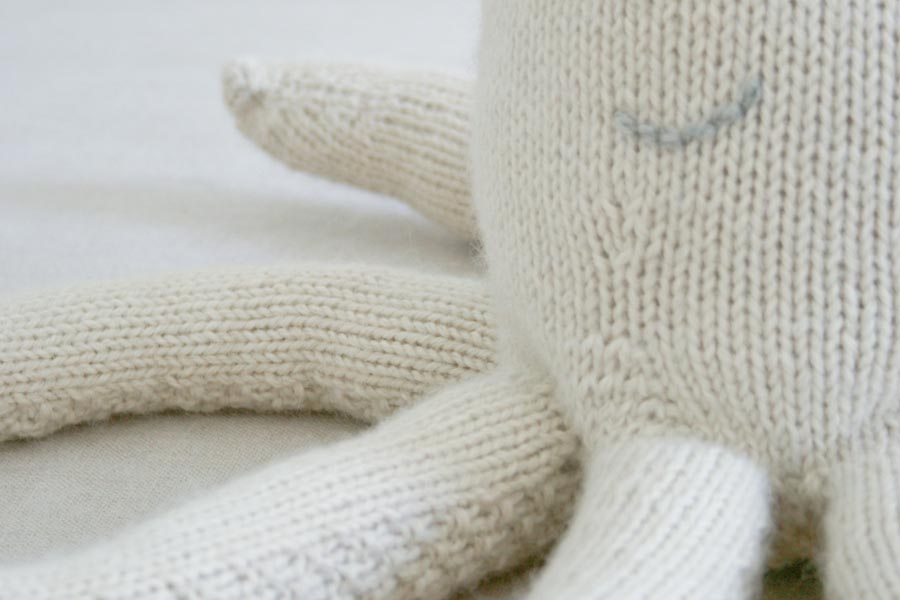
Eyes
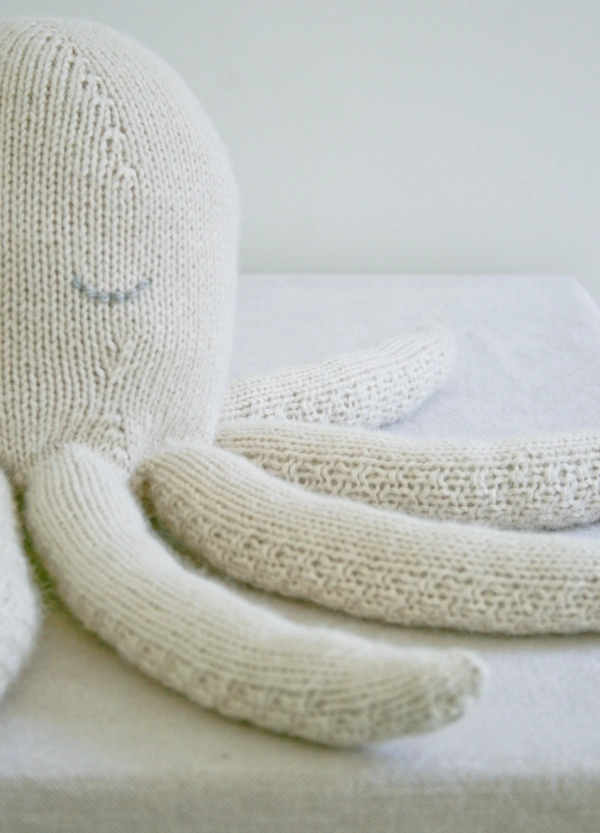
Using a tapestry needle and scrap yarn (I doubled a scrap of Blue Sky Sport Weight Alpaca’s Natural Light Gray), backstitch a sleeping eye onto the Body, a few rounds above the first round of decreases.
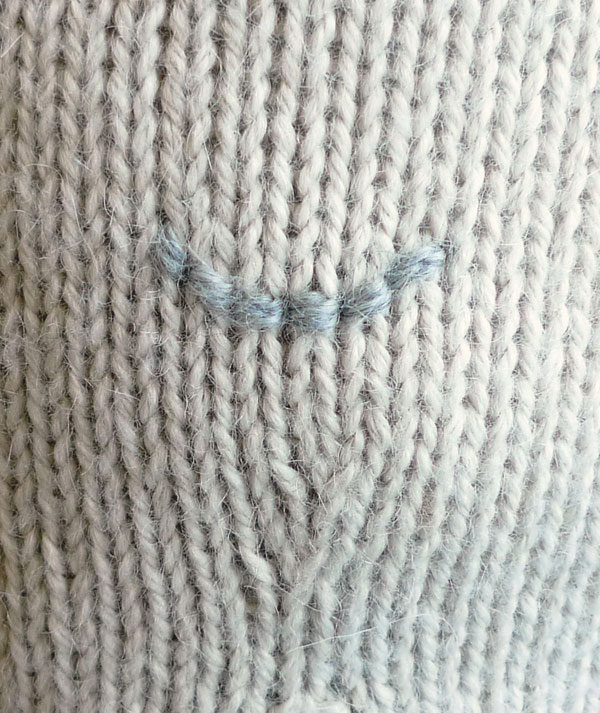
Make another eye to match the first.
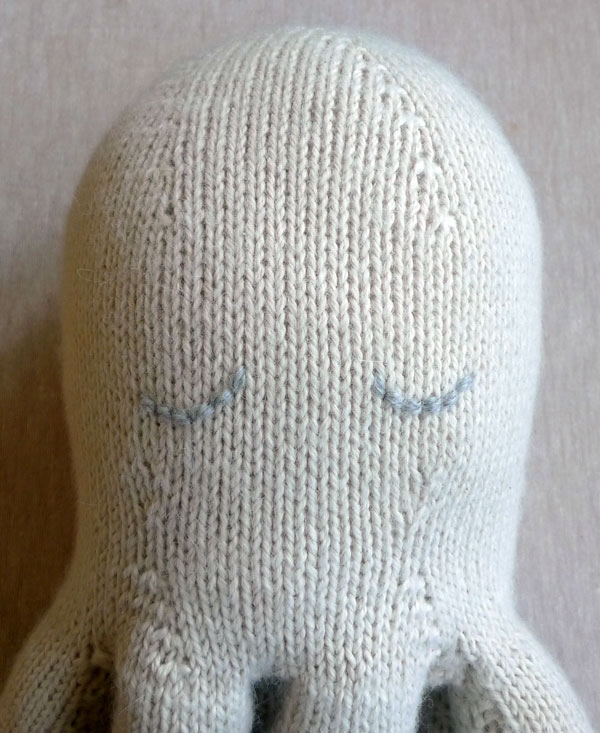
Give your octopus a squeeze and you’re all done!


I finally finished my octopus! I made it for my cousin’s baby who is turning one tomorrow. I must say eight legs is a lot:) But I’m so glad it turned out and thank you for an inspiring pattern! I love the PurlBee.
Is it possible to knit this on a circular needle? Are there any issues i might have?
Hello Kate!
Double Pointed Needles are a version of circular needles, but since they are disjointed they can accommodate projects in the round with very small circumferences, like the octopus’ tentacles! You could use connected circular needles to create this pattern, but you would need to use the magic loop method to create such small tubes of knitting.
Hope this helps and best of luck! -Alyson
Of course you can! You can do anything you like! There are no knitting police, and no one is going to stop you from using circulars. You can use the Magic Loop method, or use two circulars — or some other method. Who cares! It is YOUR knitting, so do whatever YOU need to do to get the job done! And enjoy yourself!!
Hi There, this is my first project using double pointed needles, and I may be in over my head! I finally finished the body, but I’m having the hardest time with the arms. The hardest part for me is m1L/R, I think because I have so few stitches and it’s difficult to see the “bridge”. Can I use another increase method or will the results be different? Thanks!!
Hello Magnolia!
Of course you can use a different increase! We chose m1R/L because we think they are the most elegant and invisible technique. Doing kfb would also totally work, and they would give the tentacles a little more texture.
Keep up the diligent work with the double pointed needles, once you master those you can make almost any shape with knitting! Enjoy! -Alyson
Hi,
I was wandering if I can use much thicker yarn tho make it really huge? I ‘ve got some polyester, fluffy and incredibly soft yarn that fits for 5 or even 6mm needles. Do you think that there’s the point to try this pattern with this kind of yarn?
Thanks in advance for your answer
Manuela
Hello, Manuela!
Thank you for writing in! You can totally use thicker yarn to make a larger octopus! Please keep us updated on your progress and let us know if you have any further questions!
Best,
Kumeko
Hi, I am knitting the octopus right now and am a little confused on the pattern. When attaching the final arm do you knit the 12 stitches you attach it to?
Hi Sandra,
Thanks for writing in! You will not knit 12 stitches after attaching the final arm of the octopus. Otherwise, you will follow the same directions for attaching the final arm as you did for the previous arms.
I hope that this clears things up!
Cassy
I have been looking for an octobus for a while its good for premiered babies to comfort them as umbilical cord. Thank you so much. X
Hi,
I would like to know how to design these kind of patterns; like the octopus. I like to believe I could so it to but maybe that is wishfull thinking. Is there a book to lwarn from or do you just need to be born wit these kind of designing skills? BR, Guillaumine (the Netherlands)
Hi Guillaumine,
Thanks you for the question! Designing your own patterns isn’t difficult if you are willing to put in the work and believe in your design enough to follow through and make it happen. The first thing you need is a lot of knitting experience because this helps you choose useful and creative techniques to knit what you need to. When I am designing I do tons of swatches and figure out my preferred gauge. From there you’ll do a lot of math based on your gauge. When knitting your sample it might not always turn our right and you’ll need a lot of patience and perseverance at this point! Best of luck and happy knitting!
-Adam
Hey Adam, thanks for your quick reply. I am glad to hear that there are no special skills or (multiple) study required. I have some experience with knitting but I do believe the experience I have might not be enough. I knitted the octopus and I am very happy with the end result. I am going to break my head about my own design then.. Thanks again! BR, Guillaumine.
Love this pattern! Finished the body and started working on the arms. I have a question about the ending though. How do not lose your needle when curling the center part of the bottom? Is there a special trick?
Hi Josie,
Thank you for writing in and for your kind words! There is no special trick here! You just want to be sure that you have left a long enough tail at your cast on (at least 6 inches), so that you have the room to weave the end in, secure the bit of curl and still have extra yarn to pull your needle out!
Best,
Cassy
Can you just buy it already made.?
Hi Jaimie,
Thanks for writing in! We do not sell the items premade. We do have all of the supplies available! We are also happy to answer any questions here on the project page!
Best,
Cassy
What is the purpose of knitting with two strands? Is it to give the fabric thickness so the stuffing doesn’t show through? Could I get a smaller size with one stand?
Hi Savannah,
Thanks for writing in! We hold the two strands together to get a good thick fabric that will not show the stuffing and to get the size of the octopus. You can certainly use a single strand of yarn to make this octopus. You will want to go down a needle size or two to get a goof tight fabric. Additionally, please do note that the smaller the yarn, the smaller the size of the octopus. You will certainly want to swatch and try out different needle sizes to get the fabric that will work for this lovely octopus!
Best,
Cassy
How much yarn was used for the tentacles? I have the crazy idea of hand dyeing some speckled on the yarn for the tentacles to give them a bit of dimension, and I want to have it all ready to go ahead of time.
Hi Lindsey,
Thanks for reaching out! Unfortunately, we did not note the amount of yarn used for each section of this project so I am not sure how much yarn each leg takes or how much yarn they take in toto. You could certainly knit one leg and note how much yarn you use and that will give you an idea of the amount all the legs together will take. I would wager that it is somewhere between 50 and 75% of of the total yardage but this is just a guess based on the size of each section.
I hope that this helps!
Cassy
Thanks Cassy! I purchased 8 50g skeins to have some extra, so my thought is to go ahead and dye 4 of them now, then I can do more later if needed. I’m looking forward to working on it!
Can you please explain what is meant by flipping the knitting over, when attaching the arms, so that the body is on top of the circular needles?
Hello Joan,
Thank you for writing us! This is just in reference to the orientation of the Octopus as you are working on it. When you begin to attach the arms to the bottom the the body you must flip the body so that the bottom of the body is ready to be worked on.
I hope this clears things up and happy knitting!
-Marilla
Thank you Marilla. I have been taken up by another project so I have only just seen your answer.
I did attach four arms before I had to put the octopus down and I sort of muddled my way through! I hope it all turns out OK when I finish it!
I did find it difficult though.
I am almost done and am confused by the very end. I weave in and close the bottom. I pull the rest of the tail where? To the top or to the side to get the nice tucked look? Thank you!
Hello Katrina,
Thank you for reaching out and congratulations on being almost done with this adorable project! Once you have threaded your tail through your remaining stitches with your tapestry needle you will sew the tail going bottom up and then weave in your tail.
I hope this helps and happy knitting!
-Marilla
I really appreciate that you answer all the questions posted. Thank you for your time! I did not understand this answer tho … after the tail is through the remaining stitches and you bring needle up thru the bottom … where does the needle go from the bottom? Just up and around the stuffing inside and then out against bottom or ?? Sorry for my confusion.
Hi Gabrielle,
No need to apologize, we’re happy to clarify anything! You will be pushing the needle up through the stuffing, straight through the center of the body, until it comes out at the top of the head, where you cast on to begin the body, and pulling the yarn tightly enough to indent the bottom of the body. You will then weave in your end at the top of the body to secure it.
I hope that clears things up!
Best,
Julianna
I am just reading through the pattern and I don’t understand the last instruction at the end of the finished first tentacle leg.
It reads “End 5 stitches before a Round 20”. What does this mean?
The way I read the pattern it seems that I will not have 20 stitches only 18 stitches on my finished leg Round and I am by this time knitting Round 21 and 22.
Tanya?
I think I have figured it out as the Rounds 19-22 repeat to give the leg length, then I knit to the last 5 stitches of that last round Which will be a repeat of Round 20 to finish.
Hi Tanya,
Thanks for writing in! Yes, it does sound like you’ve got it! Please let us know if you run into any more problems and we will be happy to help!
Best,
Julianna
This looks to be 25 pages to print out – don’t think I need all the pictures – is there a button to click on to just get the text? Thanks!
Hello Gretchen,
Thank you for reaching out! If you’re on a desktop version of the site, you will find a “print” icon in the right column just below the date and tags. If you’re on a mobile version of the site, you will find a “print” icon below the pattern and above the comments.
Follow the easy on-screen instructions to delete whichever parts of the pattern you don’t want to print or save. For example, you may decide to shorten the pattern by omitting certain images or the list of materials. To remove images, click the drop down next to the image icon and change from 100% to 0%.
I hope this helps and happy knitting!
-Marilla
Thanks for your help – sorry to be so long in getting back with the “thanks” – I was caught up in knitting my octopus! Much as I find knitting seed stitch to be annoyingly tedious, it is the perfect stitch for the arms and underside and really takes this pattern out of the run of the mill and into “extraordinary”
I would like to attempt this project; however, I cannot afford 100% baby alpaca yarn. It indicates “sport” yarn, but sport yarn comes in different weights and textures. What other similar alternatives could you recommend?
Hi Catherine,
We hear you! We totally understand that sometimes our yarn suggestions are more of an inspiration than a reality for many people. We are always happy to recommend less expensive (but still beautiful!) alternatives. Sport refers to a standard yarn weight that is thicker than fingering weight but thinner than DK – however, since we held it double, you could also substitute a single strand of a worsted weight yarn! I would suggest either using a double strand of Cotton Pure, which will require three skeins, or a single strand of Cascade 220, which will require only two skeins.
Thank you so much for asking. We’re sure that lots of other readers will thank you, too!
Julianna
Hi!
Do you put stuffing in the arms or only the body?
Thanks!
Hi Janelle,
Thanks for reaching out! The arms are stuffed as well! We recommend that you stuff them as you go when knitting them to make it as easy as possible!
Best,
Cassy
Hi, I’ve just started knitting the body and the pattern seems to read like garter stitch the whole way but the image is clearly stocking stitch. Did I miss something?
Thanks.
Hi Zitah,
Thanks for writing in! Although knitting every row does create garter stitch when worked flat, when working in the round (as we do for our Knit Octopus), it creates stockinette stitch!
I hope that clears things up!
Julianna
Very excited about this project! I’ve just finished the body and I’m a bit confused about how to begin the first leg. It says to set the body aside without cutting the yarn. How am I supposed to cast on the first leg without cutting the yarn from the body? I’m still fairly new to knitting and I’ve never made an animal before. Please help!
Hi Kathryn,
Great question! If you have another ball of yarn available, I would start the legs from that ball of yarn, or if you are working from a center pull ball of yarn, you could work from the opposite end of the same ball. If neither of those are an option, you can cut your yarn – the only downside is you will have an extra end or two to weave in when you are done.
I hope that helps!
Julianna
Hi there!
This knitting pattern is awesome but I do have a question!
when it says to cast 6 stitches onto three double pointed needles, does that mean cast 6 onto each individual needle? I’m Just a bit lost.
I also wanted to ask if I’m supposed to continue using the thread from the body to start the first arm, as it says do not cut the yarn from the body ?
Thanks!
Faith
Hello Faith,
Thank you for reaching out! You will cast on a total of 6 stitches, so this means that you are casting 2 stitches onto each of the 3 needles. When you are moving onto the arm you will just start knitting with a new skein!
I hope this helps and happy knitting!
-Marilla
Hi,
I have never knit a 3D, stuffed shape before. When I usually finish a project, I wash, block and dry the piece before completing it. Since this is stuffed, is that step removed from the process?
Thanks,
Meg
Hi Meg,
Great question! Usually stuffed animals are not blocked before stuffing, due to the inherent difficulty of wet blocking an empty three dimensional piece. Also, the stuffing and finishing process tends to pull everything into the correct shape without the need to block. If you find that it needs a light blocking after it is finished, I would recommend lightly spray blocking after stuffing.
I hope that helps!
Julianna
Hi!
Cute octo! Is there a printable pattern available? Can’t wait to make this for my friends new baby! Thanks!
Karla
Hi Karla,
Thanks for reaching out! If you’re on a desktop version of the site, you will find a “print” icon in the right column just below the date and tags. If you’re on a mobile version of the site, you will find a “print” icon below the pattern and above the comments.
Follow the easy on-screen instructions to delete whichever parts of the pattern you don’t want to print or save. For example, you may decide to shorten the pattern by omitting certain images or the list of materials. To remove images, click the drop down next to the image icon and change from 100% to 0%.
I hope that helps, and happy knitting!
Julianna
Thanks so much
I am loving this pattern so far! I have a question now that I have attached my first of eight arms. After I Kitchener stitch the arm to the body, I see the instructions say to knit the next 12 stitches of the body. Do i knit these next 12 stitches using the remainder of the tail from the arm, or do I use the tail from the body? Thank you! Happy Holidays!
Hello Adrienne,
Thank you for this question and congratulations on being almost done! You will se the yarn that is still attached to the Body. I hope this helps and happy knitting!
-Marilla
In the instructions for the body, immediately following Round 30, it says “Knit for 2 1/2 inches.” Is that a typo? Should it say “2 rounds” instead?
Hello Allison,
Thank you for reaching out! This is not a typo, it is the point in the process of knitting your spherical body that you have stopped increases and not yet begun to decrease. I hope this makes sense and happy knitting!
-Marilla
Hi,
I am working on attaching the second arm and I’m a little confused about where the working strand for the body should be. Having knit the next 12 sts after attaching the first arm the working strand is now on the first stitch of the lefthand needle when I turn the project over to kitchener the second arm — meaning the stitch with the working yarn will be worked into the kitchener stitches. However, in the images it looks like the working yarn (when doing the kitchener stitch) is on the righthand needle. Is this an optical illusion? Where should the working strand be when I am attaching the subsequent arms?
Thanks,
Josephine
Hi Josephine,
Thanks for reaching out! It sounds like you are on the right track and it is a bit of an optical illusion! You will be working kitchener beginning with the last stitch you knitted from each set of 12, leaving the working yarn attached so after the kitchener stitch is complete you can continue knitting on the next set of stitches.
I hope that clears things up!
Julianna
Thank you so much for this pattern! I can’t believe I knitted an octopus! When I first wanted to make toys I could only find crochet amigurumi patterns. Now that I can crochet I’m in awe of knitted amigurumi and toys! I’ve completed my octopus now and it’s gonna make for a super cute birthday gift 🙂
This is such a great project, but I’m a little confused at a few points. I somehow seem to have knit the arms inside out? I have to invert them before attaching to the body. Any idea what I’m doing wrong there? Also, while I figured out the Kitchener Stitch (yay!), I’m totally confused about the instructions to knit the next 12 stitches after attaching an arm. It looked wrong when I did that, so now I’m just attaching the arms and leaving one stitch between each one. I have four arms left to make and I hope this works out ok!
Hi Kristin,
Thanks for reaching out! If you are new to knitting in the round, it’s not uncommon to accidentally knit things inside out. Luckily you can easily turn the arm right side out by pushing it through the middle of the double pointed needles. Next time, you can avoid this by making sure when you first start working in the round that you are knitting on the side of the circle that is close to you, rather than the side that is far away from you, or turn it right side out as soon as you notice it is inside out.
Attaching the arms is a bit tricky! You will be working kitchener beginning with the last stitch you knitted from each set of 12, leaving the working yarn attached so after the kitchener stitch is complete you can continue knitting on the next set of stitches. As long as your octopus ends up looking like our image, with the top half of each arm attached to the body and the bottom half on scrap yarn and one stitch in between each arm, it should turn out just fine!
I hope that clears things up!
Julianna
Thank you so much, Julianna! Funny enough, I’ve done a lot of projects in the round, but none quite like the legs, so it must just be that it’s a newer thing for me. I’ll keep an eye out and invert them moving forward. Thanks for that tip.
I appreciate you taking the time to help! I’ve got four legs left and hope to finish this guy in time for it to be a Christmas gift for my two-year-old son 🙂
Kristin
Hi,
I really love this pattern but wanted to make a smaller version. How would you recommend doing that? Get smaller needle sizes or have the number of stitches? Thanks for the recommendation!
Hi Marcela,
Great question! I would recommend using thinner yarn and smaller needles if you would like a smaller octopus. Because this pattern has intricate shaping and lots of pieces that are all dependent on gauge, it would be quite a lot of work to adjust the pattern by reducing the number of stitches!
Happy knitting!
Julianna
Hi!
I just attached my first leg on to the body, flipped it over, and knit 12 stitches. I’m just confused as to if I did this correctly, because there is a stitch of yarn that crosses over the leg on the circular needle now… it does not lay flat and open like the pictures above. Any advice? I can send a picture if needed.
Hi Courtney,
Thanks for reaching out! It sounds like you might have attached the leg to the wrong set of stitches. After you knit the first 12 stitches of this round, you will flip the body of the octopus over and, using the tail attached to the arm, kitchener the first arm to 11 of the 12 stitches you just knitted. If your yarn is having to stretch across the arm to knit the next stitches, I think you probably attached the arm to the next 12 stitches that you haven’t knitted yet. If the arm is attached correctly, when you turn the body back over to knit, your yarn should be attached just below the right hand needle, ready to knit as usual!
I hope this clears things up!
Julianna
I made this in 2018 using cotton pure for my then two year old nephew. It has stood up amazingly well to his imagination, and has been tossed, squished, hugged, thrown, flung, stretched, and more, and it doesn’t look any worse for the wear. Such a great pattern and gift!
Hello! What a stunning pattern. As a beginner, I’m having a hard time understanding the pattern for the tentacles. When it says “Round 3: K4, p1, knit to end of round,” does the “to the end of round” mean all stitches in your round, or just the stitches on that double pointed needle? I am thrown off by following rounds which provide a number of stitches that just seems to be the number corresponding to what’s on one needle (Round 4: K1, m1l, k3, p1, knit to end of round, m1r. (10 stitches)), rather than the entire round. Hopefully my question makes sense! Thank you!
Hi Annika,
Thanks for writing in! At the beginning of the steps for the tentacles you cast on 6 stitches on 3 double pointed needles, as you work along the rows you are increasing stitches so the number in the parentheses is the amount of stitches you should end up with at the end of that round. For example, starting off with the 6 stitches you cast on, after row 2 of K1, make 1 left (m1l), knit to end of round, make 1 right (m1r) you should finish with 8 stitches! so in other words yes you are working across all of the stitches in the round and the number at the end is how many you should have at the end of ever increase row.
I hope this helps and feel free to reach out with any more questions you may have going forward!
All the best,
Gianna
I love this pattern and I’ve made it twice in the last year! I’m going to make a third one for a friend who is undergoing chemo (an emotional support octopus, if you will!) and I have a question. I get confused each time at the step after all the legs are attached and you begin picking up stitches. I ended up with huge holes between the legs that I stitched up at the end, but I’m wondering if you can clarify that part just a bit? Do you pick up the stitch on the end of the last leg where the Kitchener stitch finished? And then the next stitch on the needle is one of the eight left on while attaching the legs, right? I’m trying to figure out why I had such big gaps so I can fix it on the next one. Thanks for this great pattern!! It’s so good!
Hi Kristin,
Thanks for reaching out! That is such a sweet and thoughtful gift!
After you have connected all of the legs to the body you should have 8 stitches spaced out on your circular needles. You will then pick up 1 stitch from between the last Arm attached and the next stitch on the needle (the red dot in the photo will show you exactly where) after you pick up that stitch you will Purl the next stitch, then pick up 1 stitch from between the stitch you just purled and the next Arm. You will then slip the 7 stitches from the Arm onto the left end of the circular needle and remove the scrap yarn and then you will work those stitches and repeat the process! My best guess for why you are ending up with gaps is that you are over stretching the stitch when picking up and purling the stitch. I would be sure to pick up the stitch carefully and work the next stitch right away without pulling too hard, this should help keep the stitches tight!
I hope this helps, please feel free to reach out with any other questions!
Warmly,
Gianna
Hi, I’m currently knitting this and while I understand that Poly-fil stuffing is probably the easiest/best material to work with for the stuffing, it’s a synthetic fiber that is not environmentally friendly. Is there an eco-friendly alternative that you can recommend I use instead? Thanks for letting me know!
Hi Marcela,
Thanks for writing in! In place of Poly-fil you can use either cotton or wool stuffing! We don’t currently have a wool stuffing available but we have a great cotton option, QUILTERS DREAM Sweet Dreams Stuffing!
I hope this helps and please let me know if you have any more questions!
Warmly,
Gianna
Hi,
I’m so excited to make this – any thoughts on fillings that will give some weight to the toy?
Hi Grace,
Thanks for reaching out! Depending on how heavy you want to make the octopus, you could do a blend of fill like Poly-Fil or Cotton Stuffing for the fluffy factor, and then add in lentils or flax to add weight, and adjust the proportions to either be lighter or heavier by adding in more of the heavier substance!
I hope this helps, happy crafting!
Gianna
can this be done on straight needles?
Hi Lyn,
Thanks for writing in! While the octopus is not designed to be knit flat, on two needles, you can absolutely use DPNs for the entire thing, if you’d like. I hope this helps!
All the best,
Lili
I have just started working on the tentacles and want to make sure I understand where the m1L and m1R are supposed to go. I K1 and then m1 L then knit to the end of the round. My question is where do I m1R—Is it the ladder between the second to last stitch of the round and then K1 or is it the ladder between the last stitch of the round and the first stitch of the next round?
Thanks,
Pajes
Hi Pajes,
Thanks for reaching out. You’ll work the m1R into the ladder between the last stitch of the round and the first stitch of the next round! Hope this helps clarify things.
All the best,
Lili
Terrific. That’s what I thought but just wanted to make sure. Thanks for getting back. I love the pattern and the Alpaca yarn is the softest ever.
Pajes
I am having difficulty picking up the stitches once you have attached all of the arms. I see where I am supposed to pick up a stitch but I don’t totally understand how. Do I pick up and knit? Is there a tutorial or clear instructions for how to do this? Thanks!
Hi Kari,
Thanks for reaching out! You are correct that the arm stitches of the octopus will be picked up and knit! This is done by inserting your left needle into the stitch you are picking up, then knitting that stitch off of your left needle as you normally would with your right needle.
I hope this helps! Please let us know if you have any questions.
All the best,
Carly
Hi! I am a beginner/intermediate knitter, and so far I have only done a handful of different patterns, but I am really struggling with this one, mostly with the arms. I am wondering about the m1r , does that stitch stay on the ‘free’ needle (the one you use to knit with) or do I have to transfer it on the needle that I was knitting on before, or do I just continue knitting the next round with that m1r sitting on the knitting needle. I knitted several arms before unravelling it because it just seemed so off to me and not even close to the pictures shown in the pattern itself. My arm doesn’t have that nice even look to it (it is a bit curved and the seed stitch seems to be sitting stretched between two needles) and I wonder if that’s because, at the end of every round, I usually have two needles with two stitches on it and the rest on the third needle. Am I doing something wrong here? Thanks in advance!
Hi Anna,
Thanks for your question! After you pick up the loop for the M1R stitch with your left needle, you can knit in to it with your right needle and leave the new stitch on your right needle. We have a really helpful tutorial here on knitting in the round with DPNs!
If you’d like, you can email us some pictures of your project at customerservice@purlsoho.com so we can get a better look at what might be happening! We’d be happy to help you get your octopus back on track.
All the best,
Carly
Hi again and thanks for the quick reply. I tried the method of doing m1r and then transferring that stitch on the right needle, and I also tried to knit m1r directly on the right needle and that seemed to help a little bit so I went and knitted all the rounds written in the pattern. Now, my main concern (before I start knitting the length of the arm) is the fact that my seed stitches are distributed on all three needles whereas in the pictures they are all distributed on one. I believe I am going to keep on knitting and in case I get stuck again, I will send email you.
You’re very welcome, Anna! You can redistribute your stitches onto your needles in whatever way is most comfortable for you! If you would like the seed stitch section to be on the same needle, you can move them by slipping each stitch onto a new needle. I find that its easier to rearrange your stitches if you have a beginning of round marker so that you don’t lose your place when you are ready to start the next round.
We will keep an eye out for your email!
All the best,
Carly
Just confirming the decreases for the bottom are being done in the middle of the arms, not in the stitches between the arms; correct?
Hi Leila,
Thanks for reaching out. Yes, the decreases for the BOTTOM fall in the center of each arm!
All the best,
Lili
Hi — do you think this pattern could work with maxima?
Hi S,
Thanks for reaching out! You could absolutely use Maxima for this pattern. You would need to hold only one strand at once, rather than two though! And I’d also recommend knitting up a gauge swatch before beginning–you may need to size up or down your needles in order to achieve the correct gauge. Hope this helps, and have fun knitting!
All the best,
Lili
Hello! Do you think two arms could be knot at the same time? I’m trying to avoid 8th arm syndrome.
Hi S,
I think you could definitely knit these arms two (or maybe even three!) at a time. If you end up giving it a try, please let us know how it goes!
All the best,
Lili